Chapter 10
Anticipating and Preventing Potential Problems
IN THIS CHAPTER
 Preventing swarming and capturing a swarm
Replacing your queen
Thwarting robbing frenzies
Recognizing laying workers and getting rid of them
Protecting your bees from pesticides
Understanding the “killer bee” phenomenon
Despite the best intentions and the most careful planning, things occasionally go wrong. It happens. The bees swarm. The queen is nowhere to be found. The whole colony dies or flies away. What happened? Did you do something wrong? What could you have done differently?
I’ve made just about every mistake in the book at one time or another. But that’s nothing to be ashamed of. It’s part of the process. The key lesson I’ve learned has been to anticipate. Discipline yourself to plan ahead and look out for potential problems before they happen. I can assure you that you can head off 80 to 90 percent of potential problems if you anticipate trouble and take steps to avoid it.
In this chapter, I include a few of the more common non-health-related problems to anticipate and try to avoid. These problems include swarming and absconding; losing your queen; and losing your colony because of poor ventilation, robbers (robber bees, that is!), and pesticides. This chapter also tells you how to deal with potential community-mindset problems of having Africanized bees in your geographical area.
Running Away (to Join the Circus?)
Sometimes bees disappear. They simply get up and go. Poof! In one common scenario, called swarming, about 50 percent of the colony packs up with the queen and takes flight. In the other scenario, called absconding, 100 percent of the colony hits the road, leaving not a soul behind. Neither scenario is something you want to happen.
Swarming
A swarm of honey bees is a familiar sight in the spring and early summer. It’s one of the most fascinating phenomena in nature and an instinctive way that honey bees manage the colony’s growth and survival. To witness a swarm pouring out of a hive is simply thrilling — though the pleasure may be less so if the swarm of bees is yours!
Starting about a week before swarming, the bees that intend to leave the colony gorge themselves with honey (like packing a box lunch before a long trip). Then, all at once, like someone flipped a switch, tens of thousands of bees exit the hive and blacken the sky with their numbers. Half or more of the colony leaves the hive to look for a new home. But first, within a few minutes of departing from the hive, the bees settle down on a surface not too far from the hive they just left.
There’s no telling where a swarm might land. It could land on any convenient resting place: a bush, a tree branch (see Figure 10-1), a lamppost, or perhaps a piece of patio furniture (see Figure 10-2). In any case, the swarming bees won’t stay there long. As soon as scout bees find a more suitable and protected home, the swarm will be up, up, and away.
In its temporary resting place, the swarm is a bundle of bees clustered together for protection and warmth. Their queen is in the center of it all. Depending on the size of the hive that swarmed, the cluster may be as small as a grapefruit or as large as a watermelon. The bees will remain in this manner for a few hours or even a few days while scout bees look for a new home. When they return with news of a suitable spot, off they all go to take up residence in a hollow tree, within the walls of an old barn, or in some other cozy cavity.

Courtesy of John Clayton
FIGURE 10-1: A swarm resting in a tree.
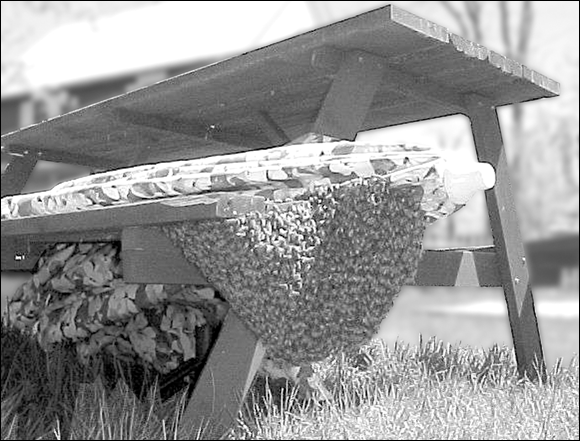
Courtesy of John Clayton
FIGURE 10-2: A swarm that has taken up temporary residence under a picnic table.
 Not sure if your hive has swarmed? A regular inspection during the spring may reveal the situation. Know the key indicators: no eggs, fewer bees, and all the cells have only older larvae and/or capped brood. And there are queen cells present along the lower third of the comb.
Understanding why you want to prevent swarming
Swarms are a dramatic sight and a completely natural occurrence for the bees, but swarms are not good news for you. A colony that swarms is far less likely to collect a surplus of honey. That means no honey harvest for you that year. A colony that loses 50 percent of its population and 50 percent of its honey will have a difficult time regaining its population and productivity. It also means the bees may have a tougher time making it through the cold winter months (assuming you have frosty weather).
It’s unhappy enough news when your bees swarm, but the later in the season they do it, the worse the news is for you. If the bees choose to swarm later, and you live in an area that experiences cold winter months, there simply isn’t enough time for the colony to recover during that season.
If you’re a first-year beekeeper, rest assured that a new colony is unlikely to swarm during its first season. But older and more crowded colonies are likely candidates for swarming. Remember, swarming is a natural and normal instinct for bees. At one point or another, your bees will want to swarm. It’s only natural. It’s nature’s way of reproduction. But discouraging them from doing so is a skill every beekeeper should have because a swarm means fewer bees to make honey for you.
Keeping the girls from leaving home
There are two primary reasons bees swarm: congestion of the brood area and poor ventilation. Occasionally, a poorly performing queen can contribute to the swarming impulse. But all these conditions can be anticipated and avoided. Here are some things you can do:
- Avoid congestion. Because overcrowding is a primary reason a colony will swarm, make sure to anticipate your bees’ needs and provide them with more room before they need it. If you wait until it’s obvious that the brood area is crowded, you’re too late! The colony is likely to swarm, and there is little you can do to prevent them from swarming once they’ve set their minds to it. However, you can do the following to prevent congestion from happening in the first place:
- Provide adequate ventilation. To ensure proper ventilation, you can do a number of things:
- If your inner cover has a notched ventilation hole in the front of the inner cover, make sure it’s open. Here’s how. Stand at the rear of the hive and push the outer cover forward. Doing so prevents the overhang of the outer cover from blocking the notched hole on the inner cover.
- Glue a short length of a wooden Popsicle stick to each of the four corners of the inner cover. By doing so, you create a thin gap between the inner cover and the hive and improve airflow into and out of the hive. (Alternatively, you can place a short screw with a fat, domed head in each corner. The fat head of the screw creates the gap you want.)
- Drill wine cork–sized holes in your upper deep (below the hand hold) and in all your honey supers, as shown in Figure 10-3. Doing so not only provides extra ventilation but also provides the bees with additional entrances. This ventilation can even be helpful in the cold winter months. You can control airflow and bee access by blocking and opening these holes as needed with corks or strips of duct tape. Be sure to close off these entrances for a new colony whose population is still too small to defend all these extra openings.
- Make the bees comfortable in hot weather by doing the following:
- Supply a nearby water source. The bees will use this water to regulate the hive’s temperature. See Chapter 3 for suggestions regarding water sources.
- Shield the hive from a full day of blazing sun, particularly if you live in a blazing hot area. Locating the hive in dappled sunlight is the best solution (see Chapter 3).
Remove queen swarm cells — all of them. The earliest evidence that your bees are thinking about swarming is when they start to make swarm cells (see Chapter 8). During the spring and early summer, inspect your hive every week or ten days to look for swarm cells. Most of them can be found along the bottom of the frames. If you see any, remove them by cutting them out with the sharp end of your hive tool. The colony won’t swarm if it doesn’t have a new queen in the making.
 This technique only works if you remove 100 percent of the swarm cells. If just one cell remains behind, the colony has the green light to swarm.
- Replace your queen every season. Colonies with young queens are far less likely to swarm.
Courtesy of Howland Blackiston
FIGURE 10-3: A useful way to provide a colony with ventilation is to drill wine cork–sized holes in the hive bodies and supers. Use a cork to open and close these holes as needed.
If the hive is simply boiling over with bees and you failed to take any of the above precautions, there is a last-resort emergency measure. You can remove all the frames of capped brood from the hive (with bees still on the frames) and replace them with frames of foundation. A colony will not swarm if it does not have adequate capped brood to leave behind.
Make sure the queen is not on any of these frames. You can use these frames of bees and brood to start a new hive! If there are eggs on those frames, the new hive will raise a new queen. Or you can play it safe and order a new queen from your bee supplier and install her in the new hive.
They swarmed anyway. Now what?
Okay, the bees swarmed anyway. You’re not alone; it happens. The good news is that you may be able to capture your swarm and start another colony. (See the following section titled “Capturing a swarm.”) You wanted a new hive of bees anyway, didn’t you?
In any event, what should you do with the half of the colony that remains? Follow these steps:
A week after your colony swarms, inspect the hive to determine whether it has a new queen.
You may spot a queen cell or two along the lower third of the frames (see Chapter 8 for tips on finding queen cells). Good! That’s an encouraging sign. It means a new queen is “in the oven.” But you must ultimately determine if the colony’s new queen is laying eggs. Two weeks after a swarm a queen may have emerged, but you’re unlikely to see any eggs — it’s too soon for the new queen to get to work. But do have a look and see if you can find her majesty. If you can, great! Close up the hive and wait another week. If you don’t see the queen, wait a couple more days and have another look.
After the swarm, it will take one to seven days for the queen cell to open and a new virgin queen to emerge. Then allow a week or more for her to be ready to mate with drones from other colonies. After mating, it will be another two days before she starts laying eggs. That’s when you should start looking for eggs.Consider marking your new queen once you’ve found her. It’s common for a beekeeper to place a daub of color on the queen’s thorax (back). Marking queens makes them easier to find during future inspections and verifies that the queen you see is the same one you saw during previous inspections. For information on how to do this, see Chapter 14.
Two weeks after the swarm, open the hive again and look for eggs.
Do you see eggs? If so, you have a queen, and your colony is off and running. Close things up and celebrate with a glass of mead. If there’s still no sign of a queen or her eggs, wait a few days and check again. Still no eggs? Then, order a new queen from your bee supplier. Hive the replacement queen as soon as she arrives (see “Introducing a new queen to the hive” later in this chapter).
If you don’t follow up after a swarm, the colony can easily become queenless without you ever being aware of it. No queen, no brood. No brood, no good.
Prepare a new hive.
Have at-the-ready a new hive body with nine frames and foundation, a bottom board, a hive-top feeder, and an outer cover (I’ll refer to this as the new hive).
Smoke the old hive and remove the frame with the queen.
Turn your attention to the suspect hive (I’ll refer to this as the old hive). Smoke and inspect, looking for the frame with the queen on it. When you find that regal frame, gently put it aside. Be careful! The queen is on that frame! Put the frame in an empty nuc box or another empty hive body to hold it out of harm’s way. In any event, find a way to keep the queen and frame safe and sound while you tend to other things.
Move the old hive at least 10 feet away from its original location.
(Here’s where a wheelbarrow or hive lifter comes in handy.)
- Now place the new hive setup where the old hive was previously located.
Place a bedsheet in front of the new hive, from the ground to the entrance board.
You are creating a ramp for the bees that you are about to unceremoniously dump in front of this hive.
Transfer the majority of the bees to the new hive.
Back to the old hive. One by one, take each frame out of the old hive, and shake 80 to 90 percent of the bees off the frames (use a bee brush if you prefer) and onto the bedsheet ramp in front of the new hive. They will march their way right into the new hive. Make sure you don’t shake all the bees off the frames. About 10 to 20 percent of the bees should remain on the old frames.
Put the old frames (with some bees still clinging to them) back into the old hive.
At this point, the old hive has nine of its original frames containing brood, larvae, eggs, and about 10 to 20 percent of the bees. Remember that these frames must contain at least one queen cell. Add a new frame and foundation to take up the empty (tenth) slot.
Take the frame with the old queen and gently brush her onto the entrance of the new hive.
Bee careful!
Take the frame that the queen was on and slip it into the tenth slot of the new hive.
Your new hive now contains this “old” frame, nine new frames with foundation, and about 80 to 90 percent of the bees. Plus the original queen.
- Feed syrup to both hives using hive-top feeders or some other suitable feeding device.
It’s a good practice to close up the new hive for a day or two by pushing screening along the entrance way. Confining the bees in this manner gets them working on building new comb and helps them get over the swarming instinct. Be certain to remove the screening after a day or two.
Capturing a swarm
If your bees do swarm and you can see where they landed (and you can reach it safely), you can capture them and start a new hive. You may even be lucky enough to get a call from a friend or neighbor who has spotted a wild swarm in his yard (beekeepers are often called to come capture swarms). Either way, capturing a swarm is a thrilling experience.
Despite their rather awesome appearance, swarms are not that dangerous. That’s because honey bees are defensive only in the vicinity of their nest. They need this defensive behavior to protect their brood and food supply. But a swarm of honey bees has neither young nor food to defend and is usually very gentle. That’s good news for you because it makes your job easy if you want to capture a swarm of bees.
If you live in an area known to have Africanized honey bees (discussed later in this chapter), you must be very cautious — a swarm might be this undesirable strain. There’s no way of telling just by looking at them. If you’re in doubt, don’t attempt to capture a swarm — unless you are certain this swarm originated from your hive or a hive where the bees are known to be gentle.
Be prepared for a crowd of awestruck onlookers. I always draw a crowd when I capture a swarm. Everyone in your audience will be stunned as you walk up to this mass of 20,000 stingers wearing only a veil for protection. “Look,” they’ll gasp, “that beekeeper is in short sleeves and isn’t wearing any gloves! Is he crazy?” Only you will know the secret: The bees are at their gentlest when they’re in a swarming cluster. You have nothing to fear. But your bystanders will think that your bravery is supreme. To them, you are a bee charmer — or the bravest (or nuttiest) person alive!
The easiest swarms to capture are those that are accommodating enough to collect on a bush or a low tree branch — one that you can reach without climbing a ladder. Obviously, if the branch is high up in a tree, you should not attempt your first capture! Gain experience by first capturing swarms that are easy reaches. Then you can graduate to the school of acrobatic swarm collection.
Say your swarm is located on an accessible branch. Lucky you! Follow these steps to capture it:
Place a suitable container on the ground below the swarm.
You can use a large cardboard box (my favorite), an empty beehive, or a nuc box (see Chapters 4 and 6). This container will be the swarm’s temporary accommodation while you transport the bees to their new, permanent home. The container you use should be large enough to accommodate the entire cluster of bees and a hunk of the branch they are currently calling home.
Get the bees off the branch.
One approach is to give the branch holding the bees a sudden, authoritative jolt. Doing so will dislodge the swarm, and the bees will (hopefully) fall into the container that you have placed directly under it. If this approach works, great. But it can be tricky. The swarm may miss its mark, and you may wind up with bees all over the place. In addition, this violent dislodging tests the gentle demeanor I promised!
I prefer a more precise approach that enables you to gently place (not drop) the bees into their “swarm box.” This approach works if the swarm is on a branch that you can easily trim and sever from the rest of the foliage. You’ll need a pair of pruning shears — a size appropriate for the job at hand — and permission from the branch owner to lop it off. Follow these steps:
Study the swarm.
Notice how the bees are clustered on the branches. Can you spot the main branch that’s holding the swarm? Are several branches holding it? Try to identify the branch (or branches) that, if severed, will allow you to gingerly walk the branch with swarm attached over to the box. In this manner, you can place the swarm in the box, not dump it.
Snip away at the lesser branches while firmly holding the branch containing the mother lode with your other hand.
Work with the precision of a surgeon: You don’t want to jolt the swarm off the branch prematurely. When you’re absolutely sure that you understand which branch is holding the bees, make the decisive cut. Anticipate that the swarm will be heavier than you imagined, and be sure you have a firm grip on the branch before you make the cut. Avoid sudden jolts or drops that would knock the bees off the branch.
- Carefully walk the swarm (branch and all) to the empty cardboard box and place the whole deal in the box. The bees will not leave the branch as you walk, but you should walk as gingerly as if you were walking on ice.
Close up the box, tape it shut, and you’re done. Whew!
Get it home right away because heat will build up quickly in the closed box.
I have modified a cardboard box for swarm captures. One side contains a large “window” cutout that I have fitted with mosquito screen. This window gives the captured swarm ample ventilation. Alternatively, punch some tiny holes in the box with an awl or an ice pick to provide some ventilation.
Hiving your swarm
You can introduce your swarm into a new hive in the following manner:
Decide where you want to locate your new colony.
Keep in mind all the factors you need to consider when making this decision (see Chapter 3).
Set up a new hive in this location.
You’ll need a bottom board, a deep-hive body, ten frames and foundation, an inner cover, an outer cover, and a hive-top feeder (or other means for feeding the bees syrup). Keep the entrance wide open (no entrance reducer).
Place a bedsheet in front of the new hive, from the ground to the hive entrance.
This ramp will help the bees find the entrance to their new home. In lieu of a bedsheet, you can use a wooden plank or any configuration that creates a gang plank for the bees.
Take the box containing the swarm and shake/pour the bees onto the bedsheet, as close to the entrance as possible.
Some of the bees will immediately begin fanning an orientation scent at the entrance, and the rest will scramble right into the hive. What a remarkable sight this is — thousands of bees marching into their new home. Congratulations! You have a new colony of bees!
The swarm of bees (now in their new home) will draw comb quickly because they arrive loaded with honey. Feed them syrup using the hive-top feeder to stimulate wax production. Feeding may not be necessary if the nectar flow is heavy.
In a week, check the hive and see how the bees are doing. See any eggs? If you do, you know the queen is already at work. How many frames of foundation have been drawn into comb? The more the merrier! Is it time to add a second deep (see the “The 70 percent rule” sidebar earlier in this chapter)?
Finding a swarm and starting a new colony are typically more desirable earlier in the season than later. That’s because late swarms don’t have much time to grow and prosper before the winter sets in. There’s an old poem of unknown origin that is well known to beekeepers:
- A swarm in May — is worth a load of hay.
- A swarm in June — is worth a silver spoon.
- A swarm in July — isn’t worth a fly.
Absconding
Absconding is a cruel blow when it happens. One day, you go to the hive and find no one home. Every last bee (or nearly every bee) has packed up and left town. What a horror! Here are some of the typical causes of absconding:
- Colony collapse disorder (CCD): This relatively new phenomenon has devastated honey bee colonies around the world. One day the bees are gone with no evidence as to why. The causes are not yet known for certain, but the problem is being vigorously studied. For more information on CCD, see Chapter 11.
- Lack of food: Make sure your hive has an ample supply of honey. Feed your bees sugar syrup when their honey stores are dangerously low (less than two frames of capped honey) and during a serious dearth of nectar.
- Loss of queen: This situation eventually results in a hive with no brood. Always look for evidence of a queen when you inspect your bees. Look for eggs!
- Uncomfortable living conditions: Make sure the hive is situated where it doesn’t get too hot or too wet. Overheated or overly wet hives make life unbearable for the colony. Provide ample ventilation and tip the hive forward for good drainage.
- Itty-bitty (or not so itty-bitty) pests: Some hives (particularly weak ones) can become overrun with other insects, such as ants or hive beetles. Even persistent raids from wildlife (skunks, raccoons, and bears, for example) can make life miserable for the bees. See Chapter 13 for tips on dealing with these troublemakers.
- Mites and disease: Colonies that are infested with mites or have succumbed to disease may give up and leave town. Take steps to prevent such problems. Keep your bees well nourished. Feed them when nectar flow and pollen is in short supply. Consider some of the nutritional supplements now on the market (see Chapter 12). If necessary, you may wish to medicate your bees if the situation demands (see Chapters 12 and 13).
Where Did the Queen Go?
It’s every beekeeper’s nightmare: The queen is dead, or gone, or lost. Whatever the reason, if the colony doesn’t have a queen, it’s doomed. That’s why you must confirm that the queen is alive and well at every inspection. If you come to the dismal conclusion that your colony is truly queenless, you can do two things: Let the colony raise its own queen or introduce a new queen into the colony.
If you are a new beekeeper, don’t panic if you can’t find your queen. I get more calls about “lost queens” than any other topic. But most of the time the queen is in the hive. It’s just that the new beekeeper has not yet become adept at spotting her. If you can’t find the queen (she’s easy to miss), look for eggs or very young larvae. That’s a sure indication she was there in the last three to five days. That’s often close enough — beekeeping isn’t as precise as rocket science.
Letting nature take its course
To let the colony create a new queen, it must have occupied queen cells or worker cells with eggs or young larvae. If eggs or young larvae are available, the worker bees will take some of them and start the remarkable process of raising a new queen. When the new virgin queen hatches, she will take her nuptial flight, mate with drones, and return to the hive to begin laying eggs. If no eggs or young larvae are available for the colony to raise a new queen, you must take matters into your own hands and order a new queen from your beekeeping supplier (see next section). Or you can find out how to raise your own queen (see Chapter 14).
 The colony must have eggs or young larvae (a size where the C-shaped larvae fill no more than half of the bottom of the cell) to create its own queen. Older larvae (those that have reached a size to fill the bottom of the cell) or capped brood are too late into the developmental stage to be transformed into new queens.
Replacing your queen naturally is certainly interesting, but consider the logistics. The entire process (from egg to laying queen) can take a month. That’s a precious amount of time during honey collection season, particularly if you live in a climate with a short summer season. In the interest of productivity, it may be better to take matters into your own hands and order a replacement queen.
Ordering a replacement queen
A faster solution than the au naturel method is to order a replacement queen from your bee supplier. Within a few days, a new, potentially vigorous queen will arrive at your doorstep. She’s already mated and ready to start producing brood.
The advantages of ordering a queen are clear:
- It provides a fast solution to the problem of having a queenless colony.
- The queen is certain to be fertile.
- It guarantees the pedigree of your stock. (Queens left to mate in the wild can produce bees with undesirable characteristics, such as a bad temper.)
Introducing a new queen to the hive
After your queen arrives, you must introduce her into the colony. Doing so can be a little tricky. You can’t just pop her in: She’s a stranger to the colony, and the bees are sure to kill her. You have to introduce her slowly. The colony needs time to accept her and become accustomed to her scent. Old-time beekeepers swear by all kinds of methods — and some are downright weird. (I don’t want you to try them so I’m not going to mention them here!) I suggest that you use one of the following tried-and-true approaches:
Remove one of the frames from the brood box.
Pick a frame with little or no brood on it because whatever brood is on the frame will be lost — you won’t use this frame again for a week.
- Shake any bees off this frame and put it aside for the next week.
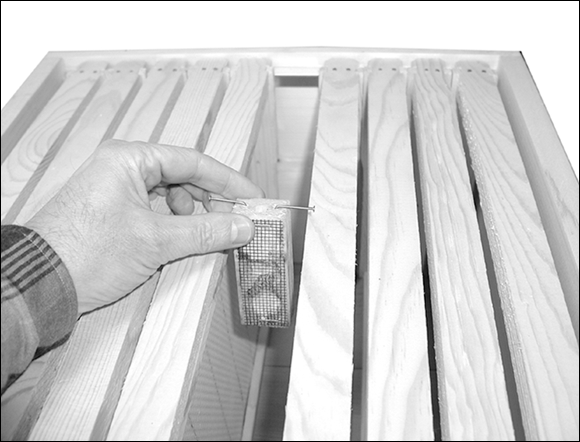
- With the one frame removed, create a space in the center of the brood box. Use this space to hang the queen cage in the same way you hung it when you first installed your package bees (see Chapter 6 and Figure 10-4).
Courtesy of Howland Blackiston
FIGURE 10-4: Hanging a queen cage.
Make sure to remove the cork from the queen cage to expose the candy plug. Also, when you hang the cage, make sure the candy end is facing up. That way, any attendant bees that die in the cage will not block the hole and prevent the queen from getting out. Leave the bees alone for one week, and then inspect the hive to determine that the queen has been released and that she is laying eggs. If the weather is mild (over 60 degrees Fahrenheit [16 degrees Celsius] at night), you can introduce the queen cage on the bottom board (see Figure 10-5). Remove the cork to expose the candy plug. Slide the cage screen side up along the bottom board and situate it toward the rear of the hive. Use your hive tool or a long stick to nudge it as far to the rear of the hive as possible. Leave the bees alone for one week and then inspect the hive to determine that the queen has been released and that she is laying.
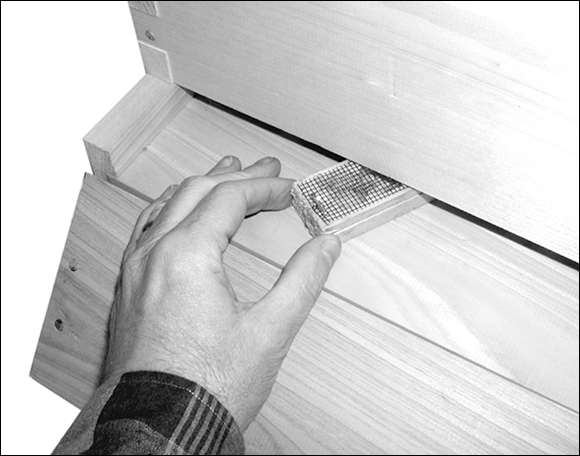
Courtesy of Howland Blackiston
FIGURE 10-5: Sliding a queen cage onto the bottom board.
Use a flashlight at the entrance to peer into the back of the hive to see if the hole in the cage is clear. If yes, the queen has likely been released.
Avoiding Chilled Brood
Honey bees keep their hive clean and sterile. If a bee dies, the others remove it immediately. If a larva or pupa dies, out it goes. During the early spring, the weather can be unstable in some regions of the country. A cold weather snap can chill and kill some of the developing brood. When this happens, the bees dutifully remove the little corpses and drag them out of the hive. Sometimes the landing board at the entrance is as far as they can carry them. You may spot several dead brood at the entrance or on the ground in front of the hive. Don’t be alarmed — the bees are doing their job. A few casualties during the early spring are normal.
Chilled brood looks similar to, but is different from, the disease chalkbrood. You can find information about chalkbrood in Chapter 12.
Sometimes beekeepers unwittingly contribute to the problem of chilled brood. Remember, chilled brood is killed brood. You can do a few things to avoid endangering your bees:
- When the temperature drops below 50 degrees (10 degrees Celsius), keep your inspections very, very brief. A lot of heat escapes every time you open the hive, and brood can quickly become chilled and die.
- Provide adequate ventilation to avoid condensation, especially at the top and sides of the hive. The resulting icy water dripping on the comb can chill the brood.
- Inspect your bees only on days when there is little or no wind (especially during cool weather). Harsh winds will chill (and kill) brood.
Dealing with the Dreaded Robbing Frenzies
Robbing is a situation in which a hive is attacked by invaders from other hives. The situation is serious for a number of reasons:
- A hive defending itself against robbing will fight to the death. This battle can result in the loss of many little lives and even destroy an entire colony. Tragedy!
- If the hive is unable to defend itself in a robbing situation, the invading army can strip the colony of all its food. Disaster!
- Being robbed changes the disposition of a hive. The bees can become nasty, aggressive, and difficult to deal with. Ouch!
Many new beekeepers mistake a robbing situation as being the opposite of a problem. Look at all that activity around the hive! Business must be booming! It’s a natural mistake. The hive’s entrance is furious with activity. Bees are everywhere. Thousands of them are darting in, out, and all around the hive. But look more closely.
Knowing the difference between normal and abnormal (robbing) behavior
A busy hive during the nectar flow may have a lot of activity at the entrance, but the normal behavior of foraging bees looks different than a robbing situation. Foraging bees go to and fro with a purpose. They shoot straight out of the hive and are quickly up and away. Returning foragers are weighted down with nectar and pollen and land solidly when returning to their hive. Some even undershoot the entrance and crash-land just short of the bottom board.
Normal activity at the hive’s entrance can look unusually busy. This is when young worker bees take their orientation flights. Facing the hive, they hover up, down, and back and forth. They’re orienting themselves to the location of their hive. You may see hundreds of these young bees floating around the front of the hive, but there’s nothing aggressive or frantic about their exploratory behavior.
You may also see a lot of activity during the afternoons when the drones are in flight, searching enthusiastically for virgin queens from other colonies. These drone flights are normal frenzies and should not be mistaken for robbing behavior.
In contrast to these normal busy situations, robbing takes on an aggressive and sinister look. Try to recognize the warning signs:
- Robbing bees approach the hive without being weighted down with nectar. They may not shoot right into the entrance. Instead, they fly from side to side, waiting for an opportune moment to sneak past the guard bees.
- If you look closely, you may see bees fighting at the entrance or on the ground in front of the hive. They are embraced in mortal combat. These are the guard bees defending their colony to the death. This behavior is a sure indication of robbing.
- Unlike foraging bees that leave the hive empty-handed, robbing bees leave the hive heavily laden with honey, which makes flying difficult. Robbing bees tend to climb up the front of the hive before taking off. Once they’re airborne, there’s a characteristic dip in their flight path.
Putting a stop to a robbing attack
If you think you have a robbing situation under way, don’t waste time. Use one or more of the following suggestions to halt robbing and prevent disaster:
- Reduce the size of the entrance to the width of a single bee. Use your entrance reducer or clumps of grass stuffed along the entrance. Minimizing the entrance will make it far easier for your bees to defend the colony. And if you have other ventilation holes in the hive bodies and supers, temporaily close these up. But be careful. If the temperature has turned hot, closing things up reduces and impairs ventilation.
- Soak a bedsheet in water and cover the hive that’s under attack. The sheet (heavy with water) drapes to the ground and prevents robbing bees from getting to the entrance. The bees in the hive seem to be able to find their way in and out. During hot, dry weather, rewet the sheet as needed. Be sure to remove the sheet after one or two days. By that time the robbing behavior should have stopped.
Preventing robbing in the first place
The best of all worlds is to prevent robbing from happening at all. Here’s what you can do:
- Never leave honey out in the open where the bees can find it — particularly near the hive and during a dearth in the nectar flow. Easy pickings can set off a robbing situation.
- When harvesting honey, keep your supers covered after you remove them from the colony.
- Be very careful when handling sugar syrup. Try not to spill a single drop when feeding your bees. The slightest amount anywhere but in the feeder can trigger disaster.
- Until your hive is strong enough to defend itself, use the entrance reducer to restrict the size of the opening the bees must protect. Also, be sure to close off the ventilation groove in the inner cover, if yours has one, and any other ventilations holes you may have added to your setup.
- Never feed your bees in the wide open (such as filling a dish with syrup or honey and putting it near the entrance of the hive).
- Avoid using a Boardman entrance feeder (see Figure 10-6). These were once very popular and are sometimes offered with startup kits. But being so close to the entrance, these feeders can sometimes incite robbing behavior. I no longer use them.

Courtesy of Howland Blackiston
FIGURE 10-6: I don’t advocate using a Boardman entrance feeder — the smell of the syrup can entice strange bees to rob your hive.
Don’t be tempted to make it easier for your bees to access the syrup you feed them. I know of a beekeeper who put shims between the hive-top feeder and hive to create a gap that makes it easier for the bees to access the syrup. The result was a furious robbing attack from other bees. Keep your feeding device where only your colony can reach it.
Ridding Your Hive of the Laying Worker Phenomenon
If your colony loses its queen and is unable to raise a new queen, a strange situation can arise. Without the “queen substance” wafting its way through the hive, there is no pheromone to inhibit the development of the worker bees’ reproductive organs. In time, young workers’ ovaries begin to produce eggs. But these eggs are not fertile (the workers are incapable of mating). So the eggs can only hatch into drones (male bees). You may notice eggs, larvae, and brood and never suspect a problem. But you have a huge problem! In time, the colony will die off without a steady production of new female worker bees to gather food and tend to the young. A colony of drones is a doomed one.
How to know if you have laying workers
Be on the lookout for a potential laying-workers situation and take action when it happens. The following are key indicators:
- You have no queen. Remember that every inspection starts with a check for a healthy, laying queen. If you have lost your queen, you must replace her. Quickly.
You see lots and lots of drones. A normal hive never has more than a few hundred drone bees. If you notice a big jump in the drone population, you may have a problem.
If you look really closely you might notice runty drones being reared in worker cells.
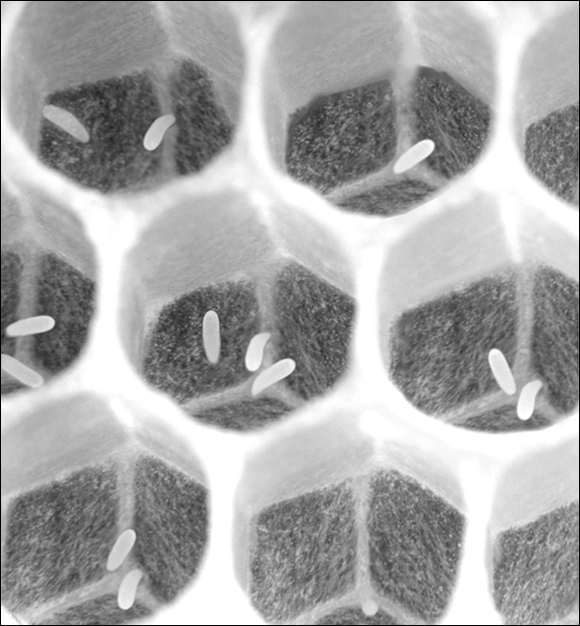
- You see cells with two or more eggs. This is the definitive sign. A queen bee will place only one egg in a cell — very seldom more than one. Laying workers are not so particular; they will nearly always place two or more eggs in a single cell. Some of these eggs may be placed haphazardly on the side of the cell or only partway into the cell. If you see many cells with more than one egg in them, and some are improperly positioned on the bottom (see Figure 10-7), you can be certain that you have laying worker bees. Time to take action!
Courtesy of Howland Blackiston
FIGURE 10-7: The best way to determine whether you have laying workers is to count eggs in the cells. If you spot multiple eggs in many cells, you have a problem to deal with.
Getting rid of laying workers
You may think that introducing a young and productive queen will set things right. But in a laying worker situation, it won’t. The laying workers will not accept a queen once they have started laying eggs. If you attempt to introduce a queen, she will be swiftly killed. Guaranteed.
Before you can introduce a new queen, you need to get rid of all the laying workers. But how? They look just like all the other workers! The solution is tedious and time-consuming but 100 percent effective when done properly. You need the following items:
- An empty deep-hive body (no frames). The empty hive body will be used to temporarily hold the frames you remove from the problem hive. You will need two empty hive bodies if your problem hive consists of two deep-hive bodies.
- An outer cover.
- A wheelbarrow or hand truck.
Follow these steps:
- Order a new marked queen from your bee supplier.
The day your queen arrives, put the entire “problem” hive (bees and all, minus the bottom board) in the wheelbarrow (or on the hand truck) and move it at least 100 yards away from its original location. You’ll want those spare empty hive bodies and outer covers nearby.
The bottom board stays in its original location.
One by one, shake every last bee off each frame and onto the grass.
Not a single bee can remain on the frame — that bee might be a laying worker. A bee brush (see Chapter 5) helps get the stubborn ones off the frames.
Put each empty frame (without bees) into the spare empty hive(s) you have standing by. These should be at least 15 to 20 feet away from the shaking point.
Make sure that no bees return to these empty frames while you are doing the procedure. Use the extra outer cover to ensure that they can’t sneak back to their denuded frames.
When you have removed every bee from every frame, use the wheelbarrow or hand truck to return the old (now bee-less) frames to the original hive bodies.
Again, make sure that no bees sneak back onto the frames.
Place the hive in its original location on the bottom board, and transfer all the beeless frames from their temporary housing. So now you have the original hive bodies back at their original location, and all the original frames (less any bees) placed back into the hive.
Some of the bees will be there waiting for you. These are the older foraging bees (not the younger laying workers). Be careful not to squash any bees as you slide the hive back onto the bottom board.
Most of these older foraging bees will find their way back to the hive. But the young nurse bees, the ones that have been laying eggs, have never ventured out of the hive before. They will be lost in the grass where you deposited them and will never find their way back to the hive. They are goners.
Now you can safely introduce your new queen using a queen cage. See the instructions earlier in this chapter on how to introduce a new queen.
There are rare occasions when a queen will lay nothing but drone eggs. This happens when a new queen does not successfully mate. Queens that don’t mate (or older queens that use up their stored sperm) can only produce unfertilized (drone) eggs. Such queens are termed drone layers. Such colonies are doomed because foraging workers are needed to survive and fertilized eggs are necessary to raise a replacement queen. In this rare situation, you need to order a new queen and destroy the problematic “drone laying” queen before you introduce the new queen (following the process outlined earlier in this chapter).
Preventing Pesticide Poisoning
With what we are finding out about colony collapse disorder and its relationship to pesticides, we can’t be too careful when it comes to pesticide use. I get upset when I see people spraying their lawns and trees with pesticides. These chemicals may make for showcase lawns and specimen foliage, but they are no good for the water table, birds, earthworms, and other critters. Some of these treatments are deadly to bees. (Note: I’m not talking about fertilizers, just pesticides.) If you ever see a huge pile of dead bees in front of your hive, you can be pretty sure that your girls were the victims of pesticide poisoning. Here are a few things you can do to avoid such a tragedy:
- Let your neighbors know that you are keeping bees. Make sure they know how beneficial pollinating bees are to the community and ecology. Explain to them the devastating effect that pesticide spraying can have on a colony. They may think twice about doing it at all. If they must spray, urge them to do so at dawn or dusk, when the bees are not foraging. Encourage your neighbors to call you the day before they plan to spray. With advance warning, you can protect your bees.
On the day your neighbors plan to spray, place a towel that has been saturated with water on top of the outer cover. This will be a water source for the colony. Then cover the entire hive with a bedsheet that you have saturated with water to give it some weight. Let it drape to the ground. The sheet will minimize the number of bees that fly that day. Remove the sheet and towel the following morning after the danger has passed.
Alternatively, you can screen the entrance the night before the spraying and keep the girls at home the entire day. Remove the screen and let them fly the next day.- Register your colony with your state’s department of agriculture. You may have to pay a minimal charge for registration. Some states publish a list of all registered beekeepers in the state. Reputable arborists check such lists before spraying in a community. If you are on the list, they will hopefully call you before they spray in your area.
The “Killer Bee” Phenomenon
Over the years, the media has had a ball with the so-called “killer bees.” These nasty-tempered bees have been fodder for fantastic headlines and even a few low-budget horror movies. At the same time, this kind of publicity has had a negative and unwelcome impact on backyard beekeeping. The resulting fear in the community can make it difficult for a beekeeper to gain the support and acceptance of his neighbors. Moreover, sensational headlines have resulted in sensational legislation against keeping bees in some communities. The public has been put on guard.
“Killer bees” present another problem for the beekeeper as well: If your area has them, you must manage your colony extra carefully to prevent your own bees from hybridizing and becoming more aggressive.
What are “killer bees”?
First of all, let’s get the name correct. The bees with the bad PR are actually Africanized honey bees (AHB) — or Apis mellifera scutellata if you want to get technical. The “killer bee” pseudonym was the doing of our friends in the media.
How did the AHB problem come about? It all started in 1957 in Brazil. A well-respected geneticist was experimenting with breeding a new hybrid that he hoped would result in superior honey production. He bred the notoriously defensive honey bee from Africa with the far more docile European honey bee. But a little accident happened. Some African queen bees escaped into the jungles of Brazil. The testy queens interbred with bees in the area, and voilà — the AHB become a force to deal with.
Outwardly, AHBs look just like our friendly European honey bees. In fact, you must take a peek under the microscope or do a DNA test to detect the difference. Their venom is no more powerful. And like our sweet bees, they too die after inflicting a sting. The main and most infamous difference is their temperament. It’s nasty! They are very defensive of their hives and are quick to become disturbed. Once alerted, individual bees may chase an intruder long distances, and stay hyper-defensive for days after an incident.
There have been reports of human deaths resulting from attacks by AHBs. But these reports are rare and frequently involve elderly victims who have other serious medical conditions, or have been unable to fend off the attackers or make a fast getaway. The media can put quite a sensational spin on such tragedies, and that has contributed to some bad PR for honey bees in general.
My friend Kate Solomon, shown in Figure 10-8, worked for several years in the Peace Corps teaching South American beekeepers how to work with the AHB. Kate’s efforts to create a “beard” of AHB resulted in not a single sting from these “killer bees.” (And yes, that’s cotton in her nose and ears to keep unwanted explorers from exploring those cavities!)

Courtesy of Kate Solomon
FIGURE 10-8: This young lady allows herself to be covered by so-called “killer bees.” Don’t try this at home!
Bee prepared!
In the half-century since “the accident” in Brazil, AHBs have been making their way northward to the United States. In 1990, the first colonies of AHBs were identified in southern Texas. There is speculation as to how far north these bees are capable of surviving (after all, they are a tropical species). In any event, they have arrived amid great publicity. Beekeepers and the public will have to learn how to deal with them.
Here are some helpful hints about safe beekeeping in areas known to be populated by AHBs:
- If you live in an area where AHBs have been seen, do not capture swarms or populate your hive with anything other than package bees from a reputable supplier. Otherwise, you may wind up with the hive from hell.
- If you are unlucky enough to disturb a colony of AHBs, don’t stick around to see how many will sting you. Run in a straight line far away from the bees. AHB are fast flyers, and you will have your work cut out for you when you attempt to outrun them. Don’t jump into water — they’ll be waiting for you when you surface. Instead, enter a building and stay inside until things cool off.
- In the areas where the AHB has been introduced, diligent beekeepers are the community’s best defense against the AHB’s spread. By systematically inspecting her hive to spot her marked queen, a beekeeper knows that her colony remains pure. Only when an unfamiliar queen (perhaps an AHB) is introduced is the colony’s genetic integrity at risk. More than ever, backyard beekeepers are needed to ensure that the AHB doesn’t become a problem in any community.
- If you join a local bee club (and I highly recommend that you do), encourage the club to publish information educating the public about the benefits of beekeeping. Teach the community the real story about the AHB. Take positive steps to quell the fear that may lurk in some people’s minds. Let them know how important it is to have beekeepers who can help control the spread of the AHB. A good education program is a beekeeper’s best defense against local legislation restricting beekeeping in the community. And please don’t call them “killer bees.”