Chapter 8
What to Expect When You’re Inspecting
IN THIS CHAPTER
 Inspecting Langstroth and Top Bar hives
Knowing what you’re looking for
Inspecting the hive during the first 8 weeks
Peering out through your veil with your cuffs strapped shut and your smoker lit, you’ve opened your hive and see that it’s bustling with bees. But what exactly are you looking at? What should you expect to see?
Understanding when to look and what to look for makes the difference between being a “beekeeper” and a “beehaver.” Anyone can have a hive of bees, but your goal as a beekeeper is to help these little creatures along. Understand their needs. Try to anticipate problems. Give them the room they need before they actually need it. See that they have comb in which to store honey before the nectar starts to flow. Feed them when food supplies are low. Ensure that they stay healthy by getting the right nutrition (see Chapter 12 on the critically important topic of bee nutrition). Nurse them back to health when illness strikes. Get them ready for winter before the weather turns cold. In return, your bees will reward you with many years of enjoyment and copious crops of sweet, golden honey.
You always follow certain procedures, and you always look for certain things when inspecting your hive. After a few visits, the mechanics become second nature, and you can concentrate on enjoying the miraculous discoveries that await you. In this chapter, I give you some pointers that make each inspection easy. And you will learn how the procedures differ slightly when inspecting Langstroth versus Top Bar hives.
Keeping a Journal
There are a couple of good reasons to keep a journal of your hive inspections, regardless of whether you’re inspecting a Langstroth hive, Top Bar hive, or any other kind of hive. First, the journal can serve as a helpful checklist to ensure you perform a complete inspection. Second, the journal provides you with a historical record of what you noted on the previous visits and thus serves as a useful way to compare the colony’s progress from one inspection to the next. You can also add reminders in the journal: “On next visit replace the broken entrance reducer,” or “This hive will need a honey super added in another week.”
 I’ve included an inspection checklist in Appendix B of this book.
Inspecting a Langstroth Hive
Once you have smoked and opened your hive (see Chapter 7), it’s time for a peek inside. So take a deep breath, relax, and follow these sequential steps. You’re in for a treat as you enter your bees’ secret world!
Removing the first frame of your Langstroth hive
Always begin your inspection of the Langstroth hive by removing the first frame or wall frame. That’s the frame closest to the outer wall. Which wall? It doesn’t matter. Pick a side of the hive to work from, and that determines your first frame. Here’s how to proceed:
- Insert the curved end of your hive tool between the first and second frames, near one end of the frame’s top bar (see Figure 8-1).
Twist the tool to separate the frames from each other.
Your hand moves toward the center of the hive — not the end.
Repeat this motion at the opposite end of the top bar.
The first frame should now be separated from the second frame.
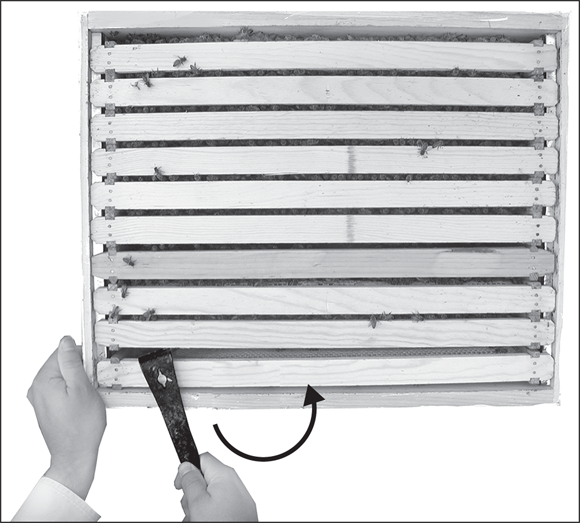
Courtesy of Howland Blackiston
FIGURE 8-1: Use your hive tool to pry the wall frame loose before removing it.
Using both hands, pick up the first frame by the end bars (see Figure 8-2).
Gently push any bees out of the way as you get a firm hold of the end bars. With the frame in both hands, slowly lift it straight up and out of the hive. Be careful not to roll or crush bees as you lift the frame. Easy does it!

Courtesy of Howland Blackiston
FIGURE 8-2: Carefully lift out the first frame and set it aside. Now you have room to manipulate the other frames.
 You should never put your fingers on a frame without first noting where the bees are, because you don’t want to crush any bees, and you don’t want to get stung. Bees can be easily and safely coaxed away with a little smoke or by gently and slowly nudging them aside with your fingers.
Now that you’ve removed the first frame, gently rest it on the ground, leaning it vertically up against the hive on the side of the hive opposite from where you are standing. It’s okay if bees are on it. They’ll be fine. Or, if you have a frame rest (a handy accessory available at some beekeeping supply stores), use it to temporarily store the frame.
This is a basic and important first step every time you inspect a colony. The removal of an initial frame gives you a wide-open empty space in the hive for better manipulation of the remaining frames without squashing any bees.
Working your way through the Langstroth hive
Using your hive tool, loosen frame two as you did the initial frame and move it into the open slot where frame one used to be. That gives you enough room to securely grasp and remove this second frame without the risk of injuring or crushing any bees. When you’re done looking at this frame, return it to the hive, close to (but not touching) the wall. Alternatively, you can add it to the frame rest, if you are using one.
Work your way through all ten frames in this manner — moving the next frame to be inspected into the open slot. When you’re done looking at a frame, always return it snugly against the frame previously inspected. Use your eyes to monitor progress as the frames are slowly and carefully nudged together.
As you gain experience, you’ll find that you need not examine every single frame. You will become increasingly knowledgeable regarding what to look for and will be able to evaluate your hive by examining fewer frames.
Be careful not to crush any bees when pushing the frames together. One of those bees may be the queen! Look between the frames to make sure the coast is clear before pushing the frames together. If bees are on the end bars and at risk of being crushed, use the flat end of your hive tool to coax them along. A single puff of smoke also urges them to move out of the way.
Holding up frames for inspection
Holding and inspecting an individual frame the proper way is crucial. Be sure to stand with your back to the sun, with the light shining over your shoulder and onto the frame (see Figure 8-3). The sun illuminates details deep in the cells and helps you to better see eggs and small larvae.

Courtesy of Howland Blackiston
FIGURE 8-3: Hold frames firmly with the light source coming over your shoulder and onto the frame.
Here’s an easy way to inspect both sides of the frame (Figure 8-4 illustrates the following steps):
Hold the frame firmly by the tabs at either end of the top bar.
Get a good grip. The last thing you want to do is drop a frame covered with bees. Their retaliation for your clumsiness will be swift and, no doubt, memorable.
- Slowly turn the frame vertically.
- Then turn the frame like a page of a book.
- Now smoothly return it to the horizontal position, and you’ll be viewing the opposite side of the frame.
When inspecting frames, all your movements must be slow and deliberate. Change hand positions sparingly. Sliding your fingers across the frames as you reposition your hands is better than lifting your fingers and setting them down again because you may land on a bee. As you turn the frame, avoid any sudden and unnecessary centrifugal force that can disturb the bees or damage the comb.
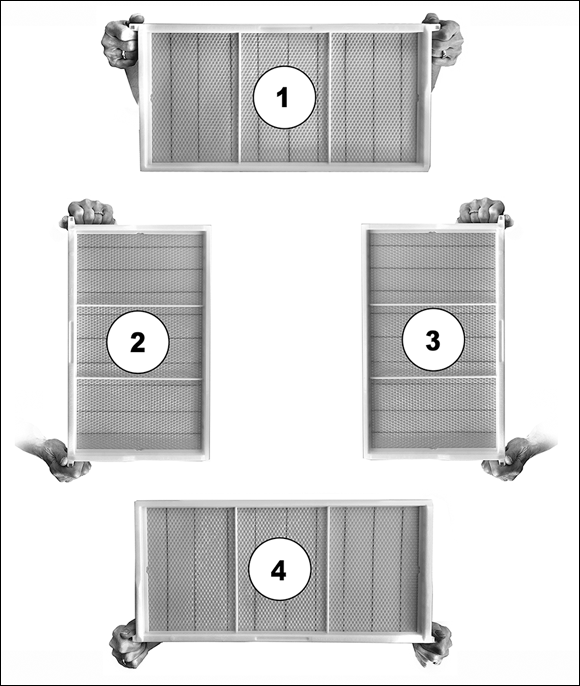
Courtesy of Howland Blackiston
FIGURE 8-4: The correct way to inspect both sides of a frame.
Knowing when it’s time for more smoke
Regardless of what kind of hive you are inspecting, a few minutes into your inspection, you may notice that the bees all have lined up between the top bars like racehorses at the starting gate. Their little heads are all in a row between the frames. Kind of cute, aren’t they? They’re watching you. That’s your signal to give the girls a few more puffs of smoke to disperse them again so you can continue with your inspection. See the “Understanding What to Always Look For” section later in the chapter to know what to inspect while the hive is open.
Replacing Langstroth frames
After you’ve inspected your last frame, all but one of the frames should be in the hive and one leaning against it or hanging on the frame rest (the first frame you removed). Putting the first frame back in the hive means taking these steps:
Slowly push the frames that are in the hive as a single unit toward the opposite wall of the hive.
That puts them back where they were when you started your inspection. Pushing them as a single unit keeps them snugly together and avoids crushing bees. Focus your eyes on the “point of contact” as you push the frames together. You’re now left with the open slot from which the first frame was removed.
- Smoke the bees one last time to drive them down into the hive.
Pick up the frame that’s outside the hive.
Are bees still on it? If so, with a sharp downward thrust, sharply knock one corner of the frame on the landing portion of the bottom board at the hive’s entrance. The bees that fall off the frame begin walking into the entrance to the hive. With few bees remaining on your first frame, you can easily return it to the hive without the risk of crushing them.
Ease the wall frame into the empty slot.
Slowly, please! Make certain that all the frames fit snugly together. Using your hive tool as a wedge, adjust the multi-frame unit so the space between the frames and the two outer walls is equal.
Closing the Langstroth hive
You’re almost finished. Follow these steps to close the hive:
If you’re using a hive-top feeder on a Langstroth hive, put it back in place immediately on top of the hive body.
Add more sugar syrup if the pantry is getting low. Now go to Step 4.
If you’re not using a hive-top feeder, replacing the inner cover comes next.
First remove any bees from the inner cover. Use a downward thrust and sharply knock one corner of the inner cover on the bottom board at the hive’s entrance. One good tap is enough.
Place the inner cover back on the hive by sliding it in position from the rear of the hive so you don’t crush any bees.
Very slowly slide it into place, and any bees along the top bars or on the edges of the hive will be pushed gently out of the way.
Note that the notched ventilation hole is positioned upward and toward the front of the hive. This notched opening allows air to circulate and gives bees a top-floor entrance to the hive. Some manufacturers of bee equipment do not have this ventilation opening — I suggest getting one that does have this nice feature.
Replace the outer cover (the final step).
Make sure the outer cover is free of any bees. Tap it sharply on the ground to free it of bees. From the rear of the hive, slide it along the inner cover, again, gently pushing any bees out of the way (use the bulldozer technique). Ease it into place, and adjust it so it sits firmly and level on the inner cover.
 Make sure the ventilation notch on the outer cover isn’t blocked. From the rear of the hive, shove the outer cover toward the front of the hive. Doing so opens the notched ventilation hole in the inner cover and gives the bees airflow and an alternate entrance.
Congratulations! The bees once again are snugly in their home.
Inspecting a Top Bar Hive
When inspecting your Top Bar hive, always remember that the comb is fragile and if handled without care can detach from the top bar. So be careful and your experience will be pleasant and rewarding.
Assuming you have just installed a package, your first inspections will be to ensure the following: The queen was released; the bees are drawing straight comb; and your feeder is full of syrup. New bees in a Top Bar hive will require continual feeding until your main nectar flow commences. Depending on where you live, you may be feeding your Top Bar colony for a while.
Working your way through the Top Bar hive
If you have just established the Top Bar hive, you’ll be feeding the colony for as long as it takes to get at least 10 to 15 bars drawn or until the colony stops taking syrup. So the first inspection task will be to remove the feeder and then fill it after you’re done.
After you’ve removed the feeder, you can see the top bars where the comb is being drawn.
To proceed, start at the most remote bar from the entrance, remove all the empty bars until you can see the feeder, and encounter the first bar with drawn wax. If you plan to remove the comb for a better look, follow the guidelines below and remove any bridge comb connected to the sidewall.
Top Bar comb (and especially new comb) is used for both brood and to store honey. It is almost always bridged near the top. Bridging is when bees attach a small amount of wax between the comb and the top of the sloped sidewall (see Figure 8-5). Before you attempt to lift a bar, this bridging wax will need to be unattached. It’s not difficult. Just use your hive tool or, better yet, a long, thin knife and slice through it. You can now lift the bar to inspect it or slide it back out of the way.

Courtesy of William Hesbach
FIGURE 8-5: Bridging. Notice the wax between the top of the comb and the sloped side.
After you’ve removed the bridge comb, insert your hive tool between that end of that bar and the next to make a little space. Do the same on the other side, and the bar should be free to slide away or to lift up. If the bar resists movement or you notice the comb stays stationary while the top bar moves, look for more bridge comb. After a bar is inspected, it can be slid into the empty space created by removing the blank bars so it’s safely out of the way while the next bar is inspected.
If you feel resistance as you begin to move the bar, stop and make certain that it’s not attached in some other way to the next bar. Top Bar comb is sometimes attached to the comb beside it at the very ends, so move slowly, and you may have to cut those connections before the bar can be moved.
Mark one end of all your top bars to ensure that they are always replaced in the same orientation.
As you slide your bars to the back of the colony, keep the top bars touching so you end up with all the bars together. This may require that you move bees out of the way, because they are likely to be on the top-bar edges checking things out. This can be done in one of two ways. One way is to start by touching the very end of the bars together on one side and then slowly narrow the angled gap. This will encourage bees to leave the gap as the closing bar pressures them. The other way is to lift the bar slightly above the bar already in place and lower it by first making contact on a slight angle, moving it slowly down while the bees scurry away. Whatever you try, remember not to crush bees, because crushed bees will release an alarm pheromone that will change their temperament quickly and for the worst.
This technique will work well until a colony builds out all the bars and there is no empty space. When your colony reaches that point, you must put aside the first few bars you inspect to make the space you need. You can turn them upside down and rest them on their top bars out of the way on any flat surface, or fabricate a frame rest that will hold them safely out of the way. Remember to consider the safety of any rest area you choose and make certain it’s not too hot, in direct sunlight for an extended period, or too cold.
If you need to move a lot of bees out of the way at once, use your smoker. To know when it’s appropriate to do so, check out the “Knowing when it’s time for more smoke” section earlier in the chapter.
Never tap or bang the edge of top bar comb against anything to make the bees fly away, because you’ll damage the comb. Use a bee brush to gently remove them instead.
If this is the first inspection after hiving the bees (when you are checking to see if your queen was released), move back the top bars until you arrive at the bar with the queen cage. Lift that bar and examine the cage. If the queen is released from the cage, remove it and replace the bar in the hive.
Top Bar comb management
At the early stage in comb building, you need to begin comb management and ensure that the bees are building straight along the top-bar guides. Two days after installing the bees in your Top Bar hive, inspect the colony. Begin by observing what they are doing by removing just the bars over the feeder. If they haven’t built enough comb for you to judge how straight they are building, close the colony and check it again in a couple more days.
The actual management manipulation comes into play if the bees are not building straight along the guide. In that case, you need to lift out the bar or bars and straighten the comb by gently repositioning the comb in alignment with the center guide.
If your bees are the type that will attach comb off the guide, it’s usually evident right away (see Figure 8-6). This misalignment is known as hooking. Caught early, hooking can be corrected and the bees will continue to build straight. If you allow the hooking of combs to continue, they will eventually cross the adjacent bar, which will make future inspections impossible without great difficulty. A little comb management at this point will make your Top Bar hive experience much more enjoyable.
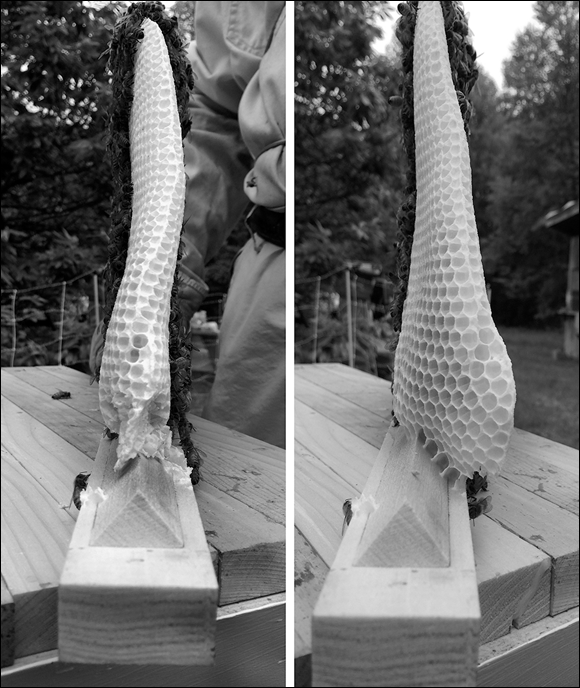
Courtesy of William Hesbach
FIGURE 8-6: Notice how this comb is hooked in the first figure and straightened in the next. It’s a little messy but has a big payoff.
Bars that use a strip of foundation as a guide seem to help keep the bees building straight.
Looking into Top Bar cells
The cells on a Top Bar hive comb are sometimes, but not always, built with a slight upward angle. When they are, you must look down into the cell bottoms to see eggs or larva while keeping in mind that you can’t tilt the frame so the comb becomes horizontal.
In most cases it’s easier to see down to the bottom of cells when the frame is flipped upside-down and held above your head. To master this technique, practice turning blank bars before any comb is drawn starting first by keeping the imaginary comb hanging down toward the ground. Next turn the bar 180 degrees so your arms are crossed while the comb is still hanging toward the ground. Next, in one smooth motion, uncross your arms keeping the comb vertical until it’s upside-down. Once the comb is flipped upside-down seeing into the cell bottoms is easy.
Replacing the top bars and closing the hive
With the inspection complete, it’s now time to start reassembling the hive. If you have been sliding bars into the empty space, you can now begin to slide them forward in groups, leaving the bars together as you go. Continue until all the inspected bars are back in their original space. Once all the bars are in place, you can fill the feeder, put in all the empty bars, and replace the cover. You’re done! Time for a tea and honey break.
Understanding What to Always Look For
Each time you visit your Langstroth or Top Bar hive, be aware of the things that you always must look for. Virtually all inspections are to determine the health and productivity of the colony. The specifics of what you’re looking for vary somewhat, depending on the time of year. But some universal rules of the road apply to every hive visit.
Checking for your queen
Every time you visit your hive, you’re looking for indications that the queen is alive and well and laying eggs. If you actually see her, that’s great and reassuring! But finding the queen becomes increasingly difficult as the colony becomes larger and more crowded. So how can you tell whether she’s there?
Rather than spending all that time trying to see the queen, look for eggs. Although they’re tiny, finding the eggs is much easier than locating a single queen in a hive containing tens of thousands of bees. Look for eggs on a bright, sunny day. Hold the comb at a slight angle and with the sun shining over your shoulder. This illuminates the deep recesses of the cells. The eggs are translucent white, resembling minuscule grains of rice.
If you see more than a single egg in a cell, you may have a problem — drone-laying worker bees. This conundrum and its solution are covered in Chapter 10.
Binocular magnifiers (used by hobbyists and watchmakers) are better than reading glasses. You can see an image of this gadget in Chapter 2. These magnifiers can be worn under your veil and tipped out of the way when you aren’t using them. They make egg spotting easier and give you a whole new perspective on the tiny wonders in the colony. Alternatively, you can make use of a conventional magnifying glass.
With any kind of magnifier, they can be tricky to use while wearing a veil. I take the frame I am inspecting 10 to 15 feet away from the hive, remove my veil, and have a unobstructed (and magnified) look.
Storing food; raising brood
Each deep Langstroth frame of comb contains about 9,000 cells (4,500 cells on each side). Each medium Langstroth frame contains about 6,200 cells (3,100 cells on each side). However, if you have a Top Bar hive, the number of cells will vary. That’s because Top Bar comb is trapezoidal and has fewer cells as the comb tapers down. The number of cells varies depending on the width and depth of the Top Bar box.
Honey bees use their hexagonal cells for storing food and raising brood. When you inspect your colony, noting what’s going on in those cells is important because it helps you judge the performance and health of your bees. Ask yourself: Is there ample pollen and nectar? Are there lots of eggs and brood? Does the condition of the wax cappings over the brood look normal — or are the cappings perforated and sunken in (see Chapters 10 and 12 for tips on recognizing unhealthy situations)?
Inspecting the brood pattern
Examining the brood pattern is an important part of your inspections. A tight, compact brood pattern with the majority of cells of the same age in an area is indicative of a good, healthy queen (see this book’s color insert). Conversely, a spotty brood pattern (many empty cells with scattered, mixed-age cells of eggs, larvae, or capped brood) is an indication that you have an old or sick queen and may need to replace her. How does the capped brood look? These are cells that the bees have capped with a tan wax. The tan cappings are porous and enable the developing larvae within to breathe. The cappings should be smooth and slightly convex (plump). Sunken-in capping (concave), greasy looking or perforated cappings indicate a problem. See Chapter 12 for more information about how to recognize the telltale signs of brood disease.
Capped brood refers to larvae cells that have been capped with a wax cover, enabling the larvae to spin cocoons within and turn into pupae. The color section of the book has an image of a beautiful frame of capped brood (and capped honey).
Recognizing foodstuffs
Learn to identify the different materials collected by your bees and stored in the cells. They’ll pack pollen in some of the cells. Pollen comes in many different colors: orange, yellow, brown, gray, blue, and so on. The color insert section of this book has a photo showing a wide array of pollen colors stored in the cells of a comb.
As you inspect the cells further, you’ll see non-capped cells with something “wet” in them. It may be nectar. Or it may be water. Bees use large amounts of water to cool the hive during hot weather.
Your New Colony’s First Eight Weeks
For the newly hived colony, some specific beekeeping tasks are unique to the first few weeks of your first season. When you do any inspection, the general method for smoking, opening, and removing the frames is the same as the methods given in the “Inspecting a Langstroth Hive” and “Inspecting a Top Bar Hive” sections earlier in this chapter.
Checking in: A week after hiving your bees
After putting your package of bees in the hive, you’ll be impatient to look inside to see what’s happening. Resist the temptation! You must wait one full week before opening the hive. The colony needs this first uninterrupted week for accepting its new queen. Any premature disturbance to the hive can result in the colony rejecting her. The colony may even kill her, perhaps thinking the disturbance is somehow her fault. Play it safe and leave the hive alone for one week. During that time, worker bees eat through the candy and release the queen from her cage. She becomes the accepted leader of the colony.
As mentioned in Chapter 7, conduct your first inspection on a mild, sunny day (55 degrees Fahrenheit [13 degrees Celsius] or more) with little or no wind. As always, visit your hive sometime between 10 a.m. and 5 p.m.
Smoke and open your hive, and remove the first frame. Other than a few occasional bees, not much will be happening on this frame. In all likelihood, the bees haven’t had time to draw the foundation into honeycomb. They will soon.
As you continue your inspection of each subsequent frame, you should begin to see more and more going on. Toward the center of the hive you should see that the girls have been busily drawing out the wax foundation into honeycomb.
Verifying that the queen was released
When you reach the two frames sandwiching the queen cage, look down in the hole where the candy plug was. If the candy is gone, that’s wonderful! It means worker bees have chewed through the candy plug and released the queen. Remove the cage and peek inside. Confirm that the queen has been released. Place the cage near the entrance so any worker bees exploring in the cage find their way back into the hive.
Removing any burr comb
You’re likely to find that industrious bees have built lots of burr comb (sometimes called natural comb, wild comb, or brace comb) in the gap created by the queen cage. You may find comb hanging from and around the queen cage itself. Although it’s a beautiful bit of engineering, you must remove this bright white comb of perfectly symmetrical cells. Failing to do so is sure to create all kinds of headaches for you later in the season.
Almost certainly, this wild comb near and on the cage will contain eggs (it’s the first place the queen lays eggs). Spotting those eggs will confirm you have a laying queen in the hive. And it provides you with your first opportunity to see what eggs look like!
Use your hive tool to sever the burr comb where it’s connected to the frames and slowly lift the comb straight up and out of the hive. You’ll probably find it covered with worker bees.
Examine the comb to ensure the queen isn’t on it. If she is, you must get her back into the hive. You can simply place the comb she is on next to a frame and hope she walks from the burr comb to a frame. Or you will need to gently remove her from the burr comb and place her back into the hive. Queens are quite easy to handle, and although they have a stinger, they’re not inclined to use it. Simply wet your thumb and index finger and gently grasp her by her wings. She moves quickly, so it may take a few tries. Don’t jab at her, but rather treat her as if she were made of eggshells. Easy does it!
Removing all the bees from this burr comb is a good idea for new beekeepers — one of those bees just might be the queen. If you are inspecting a Langstroth frame, one or two good shakes dislodge the bees from the burr comb. Shaking bees loose is a technique that will come in handy many times in the future. Shaking is a sharp downward motion with an abrupt halt just above the hive. See an illustration of this technique in Chapter 17. But this is not a technique I advise for a Top Bar hive. Top Bar comb is too delicate to handle the jolt. For Top Bar hives, use a bee brush to coax bees from the comb.
Save the natural burr comb to study at your leisure back at home. Look for eggs because the queen often starts laying on this comb. It becomes your first trophy to show to family/co-workers explaining “Look what my bees did!” And it makes a great show-and-tell for children! Be sure to save your burr comb, as you can use beeswax to make cool things, like candles, furniture polish, and cosmetics recipes. See Chapter 18 for wax crafting ideas.
Looking for eggs
Taking a close look at the frames that were near the queen cage, what do you see? Pollen? Nectar? Great! Do you see any eggs? They’re the primary things you’re looking for during your first inspection (see “Understanding What to Always Look For” earlier in this chapter). When eggs are present, you know the queen already is at work. That’s all you need to find out on this first inspection. Close things up and leave the bees alone for another week. Be satisfied that all is well. Because the weather likely is still cool, you don’t want to expose the new colony to the elements for too long.
If no queen or eggs can be found, you may have a problem. In this abnormal situation, wait another few days and check once again. Seeing eggs is evidence enough that you have a queen, but if you still find no evidence of the queen, you need to order a new one from your bee supplier. The colony will do okay while awaiting its new queen, which you’ll introduce exactly as you did the original: by hanging the cage between two frames (see Chapter 6) and leaving the bees alone for a full week.
New beekeepers often have a really hard time finding eggs. Before you give up hope as to whether there are any, look again. If you still don’t see them, look again. And use a magnifier. Seriously. Even if you have great eyesight. The magnification makes finding eggs so much easier. Chances are they’re there, and you just haven’t gained experience as to what you’re looking at. Remember, they are very, very small.
Replacing the missing frame of the Langstroth
The missing frame is the one that you removed when you originally hived your package. Removing it made room for the queen cage. Be sure to place it back into the hive. It now becomes your wall frame (the outermost frame). Don’t put it in the middle. You want to keep all of the frames the bees are currently working on bunched together.
Providing more syrup
When necessary, replenish your feeder with more sugar syrup. The recipe for sugar syrup can be found in Chapter 6.
The second and third weeks
On that first visit, you were looking for evidence that the queen had been released and was laying eggs. During the inspections that you conduct two and three weeks after hiving your package, you’re trying to determine how well the queen is performing. By now there are a lot of new things to see and admire.
Following standard procedure, smoke, open the hive, and remove frames (or top bars) one by one for inspection. Work your way toward the center of the hive. As always, look for eggs. They’re your ongoing assurance that the queen is in residence.
Note that the bees have drawn more honeycomb. In a Langstroth hive, they work from the center outward, so the outer five to six frames haven’t likely been drawn out yet. That’s normal.
Looking for larvae
By the second week you can easily see larvae in various stages of development (see Figure 8-7). They should be bright white, C-shaped, and glistening like snowy white shrimp! Looking closely, you may even witness a larva moving in its cell or spot a worker bee feeding one.
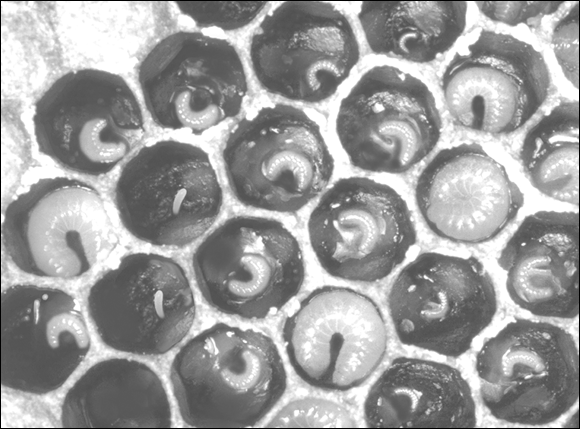
Courtesy of Howland Blackiston
FIGURE 8-7: Larvae go through various stages of development. Also, note two eggs in this photo, just left of center.
Evaluating your queen
Estimate how many eggs her majesty is laying. One good way to tell is if you have one or two frames with both sides ¾-filled with eggs and larvae. That means your queen is doing a super-fantastic job. Congratulations!
If you have one or two combs with only one side filled, she’s doing moderately well. If you find fewer than that, she’s doing poorly, and you need to consider replacing her as soon as possible. See Chapter 10 for instructions on how to replace your queen.
Hunting for capped brood
By the third week you’ll begin seeing capped brood — the final stage of the bees’ metamorphosis. Capped brood are light tan in color, but note that the brood cappings on older comb are a darker tan or even dark brown. The capping clearly shows the six-sided cell (in contrast to any capped cells of honey which are not so clearly delineated). The capped brood are located on comb that is closest to the center of the hive. Cells with eggs and larvae are on the adjacent comb.
An excellent queen lays eggs in nearly every cell, skipping only a few cells along the way, resulting in a pattern of eggs, larvae, and capped brood that is tightly packed together, stretching all the way across most of the comb.
You’ll also notice a crescent of pollen-filled cells above and to the sides of a brood area. Above it and to top corners of the frame cells will be cells filled with nectar and/or capped honey. This is a picture-perfect situation.
A spotty and loose brood pattern also can be evidence of a problem. You may have a poor queen, in which case she should be replaced as soon as possible. Sunken or perforated brood cappings may be evidence of brood disease, in which case you must diagnose the cause and take steps to resolve it. (See Chapter 12 for more about bee diseases and remedies.)
Looking for supersedure cells
The third week also is when you need to start looking for supersedure cells (also called queen cells). Supersedure is a natural occurrence when a colony replaces an old or ailing queen with a new queen. The bees create supersedure cells if they believe their queen is not performing up to par or she is injured for some reason. These peanut-shaped appendages are an indication that the colony may be planning to replace (or supersede) the queen. Queen cells, often only one or two in number and located on the upper two-thirds of the comb, are most likely supersedure cells (see Figure 8-8). On the other hand, queen cells located on the lower third of the comb, especially along the bottom and side edges of a brood area, are likely not supersedure cells, especially if numerous. These are swarm cells. Note: Swarming seldom is a problem with a new hive this early in the season.
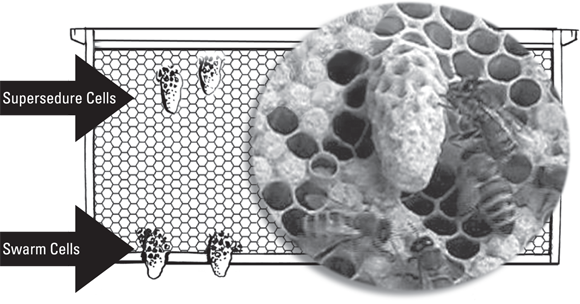
Photo courtesy of USDA-ARS, Stephen Ausmus; drawing courtesy of Howland Blackiston
FIGURE 8-8: Supersedure cells are located in the upper two-thirds of the comb; swarm cells are located along the bottom third.
The bees create swarm cells to raise a new queen in preparation for the act of swarming. This usually happens when conditions in the hive become too crowded. The colony decides to split in half — with half the population leaving the hive (swarming) with the old queen and the remaining half staying behind with the makings for a new queen (the ones that are developing in the queen cells, or swarm cells).
If you spot supersedure cells, especially early in the development of your new colony, you need to order a new queen, because giving the bees a new queen is usually better than letting them create one on their own. Why? Because you’ll lose less time and guarantee a desirable lineage.
Provide more syrup
Check every week to see whether your hive’s feeder has enough sugar syrup. Replenish as needed. The recipe for sugar syrup is in Chapter 6. Just pour it into the feeder.
Weeks four through eight
Things really are buzzing (or at least they should be) now that a month has passed since you hived your bees.
Perform your inspection as always, looking for evidence of the queen (eggs) and a good pattern of capped brood, pollen, and capped honey.
If you are using a Top Bar hive, the size of the hive remains constant as the colony grows. But if you are using a Langstroth hive, you will want to add additional space above the initial start-up area as the colony grows.
Adding a second deep-hive body to your Langstroth hive
If all’s well, by the end of the fourth week the progress of your bees will be really evident. The bees will have drawn the majority of the foundation into comb. They’ve added wax produced in their wax glands to the foundation, creating the hexagonal comb cells in which they store pollen, honey, and brood. When 70 percent of the frames are drawn into comb you should add your second deep-hive body (that’s 6 out of 8 frames if using an 8-frame hive, or 7 out of 10 frames if using a 10-frame hive). See Chapter 4 for more information about hive parts.
Anticipate the need for this addition because timing is important. If you wait too long, the colony may grow too fast (with up to 1,000 new bees emerging every day!), become overcrowded, and eventually swarm. Add the second deep-hive body too early and the colony below loses heat, and the brood may become chilled and die.
When adding the second deep-hive body becomes necessary, follow these steps:
- Smoke your hive as usual.
- Remove the outer cover and the hive-top feeder (or the inner cover, if one is being used).
- Place the second deep directly on top of the original hive body.
- Fill the new second story with frames and foundation (see Chapter 4).
Put the hive-top feeder directly on top of the new upper deep and below the outer cover.
Replenish sugar syrup if needed.
- Replace the outer cover.
The upper deep will be used during the early summer for raising brood. But during fall it serves as the food chamber for storing honey and pollen for the upcoming winter season.
Witnessing a miracle!
By the fifth week the combs are jam-packed with eggs, larvae, capped brood, pollen, and honey. Look carefully at the capped brood. You may see a miracle in the making. Watch for movement under the capping. A new bee is about to emerge! She’ll chew her way out of the cell and crawl out (see Figure 8-9). At first, she totters about, yet she quickly learns how to use her legs. She appears lighter in color than her sisters and is covered with soft, damp hairs. What a joy this is to witness. Savor the moment!

Courtesy of USDA-ARS, Stephen Ausmus
FIGURE 8-9: This young adult bee is just emerging from her cell.
Watching for swarm cells
During weeks six through eight, continue looking for queen cells, but also be on the lookout for numerous queen cells in the lower third of the frames. They are swarm cells (as mentioned previously in this chapter), which are an early indication that the hive may be preparing to swarm. During your first season, don’t be too concerned if you spot an occasional swarm cell. It isn’t likely that a new colony will swarm. However, when you find eight or more of these swarm cells, you can be fairly certain the colony intends to swarm.
You don’t want a swarm to happen. When a colony swarms, half the population leaves with the old queen looking for a new and more spacious home. Before that happens, the bees take steps — evidenced by the presence of swarm cells — to create a new queen. But with half of the girls gone, and several weeks lost while the new virgin queen gets up to speed, you’re left with far fewer bees gathering honey for you. Your harvest will be only a fraction of what it might otherwise have been. Prevent this unfortunate situation before it happens by anticipating the bees’ need for more space and adequate ventilation. (See Chapter 10 for more about swarming.)
Providing more ventilation
During weeks five or six, you need to improve hive ventilation by opening the hive entrance. Turn the entrance reducer so the larger of its two openings is in position. The larger opening is about 4 inches wide. (Eventually, the reducer is completely removed.) The colony is now robust enough to protect itself, and the weather is milder.
You can remove the entrance reducer completely in the eighth week following the installation of your bees.
Manipulating the frames of foundation
By the seventh or eighth week, manipulate the order of frames in a Langstroth hive to encourage the bees to draw out more foundation into comb cells. You can do this by placing any frames of foundation that haven’t been drawn between frames of newly drawn comb. However, don’t place these frames smack in the middle of the brood nest. That would be counterproductive because doing so splits (or breaks) the nest apart, making it difficult for bees to regulate the environment of the temperature-sensitive brood.
Making room for honey!
As the eighth week approaches, you may find that the bees, in addition to drawing seven or more frames in the lowest box, may have drawn out seven of the ten frames in the upper deep of your Langstroth hive. When that happens, remove the hive-top feeder (if you’re still using one) and add a queen excluder and a shallow honey super with frames and foundation (see Chapter 4 for more information on woodenware). The girls now are ready to start collecting honey for you!
The act of adding shallow (honey) supers to a colony is called supering.
Inspecting your multilevel Langstroth hive
Now that there are two hive bodies on your Langstroth hive (later there will also be honey supers), you have more than just one box to inspect. In your first season, to gain experience you should inspect the entire colony: both the lower deep and the upper deep. The process is the same as any inspection, except you will first need to systematically remove all the honey supers and the upper deep to get down to the lower deep. That’s where you will begin your frame-by-frame inspection. In subsequent years, after gaining experience, you need not inspect every frame. At that point, you can evaluate your colony by inspecting only a sampling of frames.
As always, you are checking for evidence of the queen, a good laying pattern, and healthy brood. Once all the frames in the lower deep are inspected, replace the upper deep and begin your frame-by-frame inspection of it.
As the season progresses, the upper deep will be used by the bees to store honey, so eventually you won’t find the queen, any eggs, or brood in the upper deep. The lower deep is where the action is as summer progresses. That will be the focus of your inspection.
Use the outer cover (placed bottom-side-up on the ground) as a surface on which to place supers and hive bodies as you disassemble the hive for inspection (see Figure 8-10). This approach minimizes the chance of squashing bees.
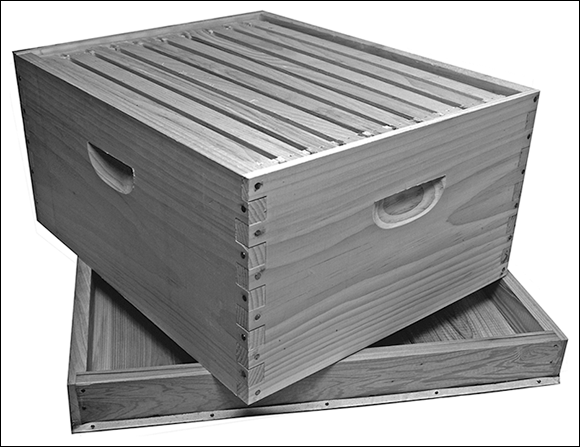
Courtesy of Howland Blackiston
FIGURE 8-10: Use the outer cover (placed on the ground bottom-side-up) as a surface on which to place supers and hive bodies as you disassemble the hive for inspection.