Chapter 17
Honey Harvest Day
IN THIS CHAPTER
 Determining when to harvest your honey
Separating the bees from their honey
Extracting honey from Langstroth hives
Harvesting honey from Top Bar hives
Harvesting wax cappings
The day you’ve anticipated all year is finally here, and it’s time to reap the rewards of all your efforts (actually the bees did most of the work, but go ahead and take the credit anyway). It’s time for the honey harvest!
And what better excuse could you ever have for having a party! Harvest day always is a big event at my house — a day when neighbors and friends gather to lend a hand and get a free sample from the magic candy machine. I schedule an open house on honey harvest day, inviting anyone interested to stop by, lend a hand, see how it’s done, and go home with a bottle of honey still warm from the hive. I have plenty of honey-related refreshments on hand: honey gingersnaps, and honey-sweetened iced tea and lemonade. (And speaking of such goodies, be sure to turn to Chapter 20 for yummy honey-inspired recipes.)
I assume that you’ve decided to harvest extracted honey. That’s what I recommend for new beekeepers of Langstroth type hives. Harvesting extracted honey is easier for you and the bees, and you’re far more likely to get a substantial crop than if you were trying to produce comb honey. Comb honey requires picture-perfect conditions to realize a successful harvest (large hive population, hard-working and productive bees, ideal weather conditions, and strong nectar flows).
If you have a Langstroth style of hive with removable wooden frames, you will use a spinning extractor to harvest your honey. If you have a Top Bar hive, you will likely use the crush-and-strain method or a honey press to extract.
Extracted honey refers to honey that is removed from wax comb by either centrifugal force (using an extractor) or by crushing the comb and filtering out the honey (using a honey press). The honey is bottled in a liquid form, as opposed to harvesting comb or chunk honey where the honey isn’t removed from the wax comb before it’s packaged.
Be sure to allow yourself enough time for harvesting. I set aside an entire weekend for my harvest activities, part of one afternoon to get the honey supers off the hive and a good hunk of the following day to actually extract and bottle the honey.
Knowing When to Harvest
Generally speaking, beekeepers harvest their honey at the conclusion of a substantial nectar flow and when the hive is filled with cured and capped honey (see Figure 17-1). Conditions and circumstances vary greatly across the country. Here in Connecticut, early one spring, I had an unusually large flow of nectar from a large honey locust tree. My bees filled their honey supers before June. I harvested this rare and delicate white honey in late May. I put the supers back on and got another harvest in the late summer. More typically, I wait until late summer to harvest my crop (usually mid-September). Where I live (in the northeastern United States), the last major nectar flow (from the asters) is over by September. First-year beekeepers are lucky if they get a small harvest of honey by late summer. That’s because a new colony needs a full season to build up a large enough population to gather a surplus of honey.
Surplus honey refers to the honey that’s beyond what the bees need for their own consumption. This extra amount of honey, stored in supers, is what you can harvest from the hive without creating any trouble for the colony. They made the surplus just for you!
 I suggest that you take a peek under the hive cover every couple of weeks during summer. Check in the honey supers that you placed on the hive earlier in the season. Note what kind of progress your bees are making and find out how many of the frames are filled with capped honey.
When a frame contains 80 percent or more of sealed, capped honey, you’re welcome to remove and harvest this frame. Or, you can practice patience — leave your frames on and wait until one of the following is true:
- The bees have filled all the frames with capped honey.
- The last major nectar flow of the season is complete.
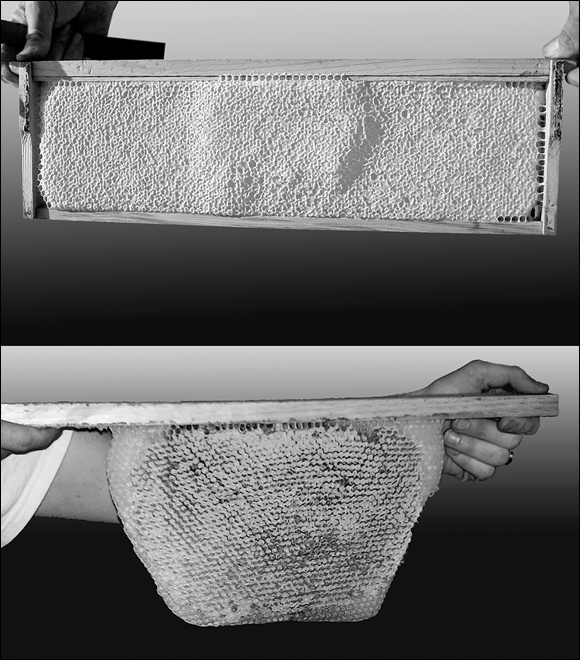
Courtesy of Howland Blackiston with Jasmine and Zack Cecelic, www.wildhoodfarm.com
FIGURE 17-1: On the top is a frame of comb from a Langstroth hive. On the bottom is honeycomb from a Top Bar hive. Note there is no wooden frame supporting the delicate top bar comb on the sides and bottom, as there is with the Langstroth frame.
Honey in open cells (not capped with wax) can be extracted if it is cured. To see if it’s cured, and assuming you are using frames with foundation (versus Top Bar combs), turn the frame with the cells facing the ground. Give the frame a gentle shake. If honey leaks from the cells, it isn’t cured and shouldn’t be extracted. This stuff isn’t even honey. It’s nectar that hasn’t been cured. The water content is too high for it to be considered honey. Attempting to bottle the nectar results in watery syrup that is likely to ferment and spoil. And just to be clear, if you have a Top Bar hive, this test is not possible. Top bar combs aren’t sturdy enough to tolerate a shake — the unsupported comb may break off the top bar.
Bad things come to those who wait!
You want to wait until the bees have gathered all the honey they can, so be patient. That’s a virtue. However, don’t leave the honey supers on the hive too long! I know, I know! Things tend to get busy around Labor Day. Besides spending a weekend harvesting your honey, you probably have plenty of other things to do. But don’t put off what must be done. If you wait too long, one of the following two undesirable situations can occur:
- After the last major nectar flow and when winter looms on the distant horizon, bees begin consuming the honey they’ve made. If you leave supers on the hive long enough, the bees will eat much of the honey you’d hoped to harvest. Or they will start moving it to open cells in the lower deep-hive bodies. Either way, you’ve lost the honey that should have been yours. Get those honey supers off the hive before that happens!
- If you wait too long to remove your supers, the weather turns too cold to harvest your honey. In cool weather, honey thickens or even granulates, which makes it impossible to extract from the comb. I discuss this later in this chapter in the “Two common honey-extraction questions” sidebar. Remember that honey is easiest to harvest when it still holds the warmth of summer and can flow easily.
A few pointers to keep in mind when harvesting liquid gold
Having enough honey jars and lids on hand is important. Standard honey jars are available in many different sizes and shapes. You can estimate that you’ll harvest about 20 to 30 pounds of honey from each shallow honey super, and around 40 to 50 pounds from each medium depth super (depending on how many frames in the super, and assuming all the frames are mostly full of honey).
Honey is hygroscopic — meaning that it absorbs moisture from the air. On the positive side, this is why baked goods made with honey stay moist and fresh. On the negative side, this means you must keep your honey containers tightly sealed; otherwise, your honey will absorb moisture from the air, become diluted, and eventually ferment.
Eventually all honey will crystallize. That does not change the purity of the product in any way. If you prefer liquid honey, you can heat the crystallized honey (assuming it’s in a glass jar) in a warm water bath (120 degrees Fahrenheit [49 degrees Celsius]) until it liquefies. Never heat honey excessively.
Getting the Bees out of the Honey Supers
Regardless what kind of hive you have (frames or top bars), you must remove the bees from the honeycomb before you can extract or remove the honey. You’ve heard the old adage, “Too many cooks spoil the broth!” Well, you certainly don’t need to bring several thousand bees into your kitchen!
 You must leave the bees 60 to 70 pounds of honey for their own use during winter months (less in those climates that don’t experience cold winters). But anything they collect more than what they need is yours for the taking. That’s the surplus honey I mention earlier.
To estimate how many pounds of honey are in your hive, figure that each deep frame of capped honey holds about 6 pounds of honey. If you have ten deep frames of capped honey, you have around 60 pounds! If you have a Top Bar hive (see Chapter 5 for an explanation of this and other hives), it’s a little harder to estimate, because the actual length of the top bars and the depth of the comb can vary so much. Table 17-1 gives you a rough calculation for determining how much honey is in your hive.
TABLE 17-1 Estimating Honey Yields
Type of Honeycomb |
Estimated Honey Capacity (per Comb) |
Langstroth deep frame |
6 pounds |
Langstroth medium frame |
4 pounds |
Langstroth shallow frame |
3 pounds |
Warré Top Bar |
3 to 4 pounds* |
Kenyan Top Bar |
4 to 6 pounds* |
* It’s hard to be precise when estimating honey yield in Top Bar hives. The top bars can vary in length, and the free-form construction of the honeycomb can vary considerably.
Removing bees from honeycomb can be accomplished in many different ways. This section discusses a few of the more popular methods that beekeepers employ. Before attempting any of these methods, be sure to smoke your bees the way you normally would when opening the hive for inspection. (See Chapter 7 for information on how to use your smoker properly.)
 If you are harvesting honey in the comb (producing comb honey), it’s best not to smoke your bees. Bees tend to open the capped honey cells when smoke is applied. This can make an oozy mess of your pristine comb honey.
The bees are protective of their honey during this season. Besides donning your veil, now’s the time to wear your gloves. If you have somebody helping you, be sure he or she is also adequately protected.
Shakin’ ’em out
This bee-removal method involves removing frames (one by one) from honey supers and then shaking the bees off in front of the hive’s entrance (see Figure 17-2). The cleared frames are put into an empty super. Be sure that you cover the super with a towel or board to prevent bees from robbing you of honey. You can use a bee brush (see Chapter 5) to gently coax any remaining bees off the frames.
© John Wiley & Sons, Inc.
FIGURE 17-2: Shaking bees off a Langstroth frame.
Don’t try to shake bees off Top Bar comb. There’s no wooden frame securing the wax comb (as there is when using a Langstroth frame). The unsupported comb on a top bar is very, very delicate. The shaking method will likely break the comb apart, so it’s best to use the bee brush method to remove bees from the comb (see the “Getting the bees off Top Bar comb” section later in this chapter).
Note that the cells on comb tend to slant downward slightly — to better hold liquid nectar. Therefore, when brushing bees, you should always brush bees gently upward (never downward). This little tip helps prevent you from injuring or killing bees that are partly in a cell when you’re brushing.
Shaking and brushing bees off frames aren’t the best options for the new beekeeper because they can be quite time-consuming, particularly when you have a lot of supers to clear. Besides, the action can get pretty intense around the hive during this procedure. The bees are desperate to get back into those honey frames, and, because of their frenzy, you can become engulfed in a fury of bees. Don’t worry — just continue to do your thing. The bees can’t really hurt you, provided you’re wearing protective gear.
Blowin’ ’em out
One fast way to remove bees from Langstroth supers (not recommended for Top Bar hives) is by blowing them out. Rest assured, they don’t like it much. Honey supers are removed from the hive (bees and all) and stood on end. By using a special bee blower (or a conventional leaf blower), the bees are blasted from the frames at 200 miles an hour. Although it works, to be sure, the bees wind up disoriented and very irritated. Oh goodie. Again, I wouldn’t recommend this method for the novice beekeeper.
A bee blower is basically the same as a conventional leaf blower, just packaged differently and usually more expensive.
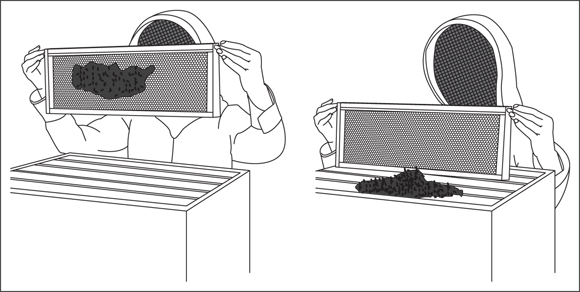
Using a bee escape board
Yet another bee-removal (and far less dramatic) method places method a bee escape board between the upper deep-hive body and the honey supers that you want to clear the bees from. Various models of escape boards are available, and all work on the same principle: The bees can travel down to the brood nest, but they can’t immediately figure out how to travel back up into the honey supers. It’s a one-way trip. (See Figure 17-3 for an example of a triangular bee escape with a maze that prevents the bees from finding their way back up into the honey supers.)

Courtesy of Howland Blackiston
FIGURE 17-3: This triangular bee escape enables bees to easily travel down into the top deep, but it takes the bees a while to figure out how to get back up into the honey supers.
Bee escapes work okay for Langstroth hives, but it takes a couple days for the bees to be cleared from the honey supers. You must install the escape boards 48 hours before you plan to remove the honey supers. It takes that long to clear the bees. And, the thing is, you can’t leave the escape board on for more than 48 hours, or the bees eventually solve the puzzle and find their way back into the supers. For me, a weekend beekeeper, the timing of all of this is quite impractical.
Fume board and bee repellent
Here’s my favorite method for a Langstroth hive — a fume board and bee repellent! It’s fast and highly effective. And it’s made even more desirable because of some wonderful products on the market (more about that later in this section).
A fume board looks like an outer cover with a flannel lining. A liquid bee repellent is applied to the flannel lining and the fume board is placed on top of the honey supers on a warm day (in place of the inner and outer covers). Within five minutes, the bees are repelled out of the honey supers and down into the brood chamber. Instant success! The honey supers can then be safely removed and taken to your harvesting area.
Although this approach can be used for Langstroth style hives, it will not work with a Top Bar hive.
In the past, chemicals used as repellents (either butyric propionic anhydride or benzaldehyde) have been hazardous in nature. They’re toxic, combustible, and may cause respiratory damage, central nervous system depression, dermatitis, and liver damage. Need I say more? It’s simply nasty stuff to have around the house.
In addition, the stench of each of these products is more than words can politely express. All of that has changed with products that effectively repel the bees but are nonhazardous and made entirely from natural ingredients (see Figure 17-4). Best of all, their scent smells good enough to be a dessert topping!
Here are step-by-step instructions for using a fume board with products such as Fischer’s Bee-Quick or Bee-Dun:
- Smoke your Langstroth hive as you would for a normal inspection.
- Remove the outer and inner covers and the queen excluder.
- Use your smoker on the top honey super to drive the bees downward.
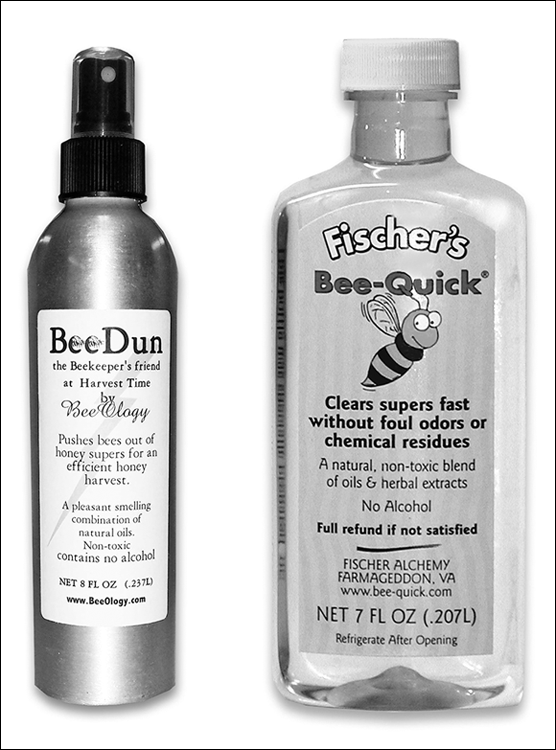
Courtesy of Howland Blackiston
FIGURE 17-4: A safe and fast way to get bees out of honey supers is to use a fume board with products such as Bee-Dun or Fischer’s Bee-Quick.
Spray the product on the fume board’s felt pad in a zigzag pattern (as if corresponding to spaces between the frames) across the full width of the fume board.
Don’t overdo it. About one ounce or less should do the trick (you will need to use more in cold, cloudy weather; less in warm, sunny weather). When in doubt, use less, and on a warm day.
- Place the fume board on the uppermost honey super and wait three to five minutes for the bees to be driven out (this method works most effectively when the warm sun is shining on the fume board’s metal cover).
- Remove the fume board and confirm that most or all of the bees have left the super. They have? Good.
- Now remove the top honey super. Put the super aside and cover it with a towel or extra hive cover to avoid robbing (discussed in the next section).
- Repeat the process for subsequent honey supers.
Keep in mind that a shallow super full of capped honey and frames can weigh 40 pounds. You’ll have a heavy load to move from the beeyard to wherever you’ll be extracting honey. So be sure to save your back and take a wheelbarrow or hand truck with you when removing honey supers from the hive. Figure 17-5 shows a hive carrier.
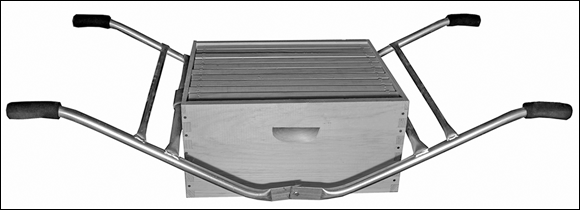
Courtesy of Howland Blackiston
FIGURE 17-5: If you have a friend to help, a hive carrier like this makes carrying heavy supers and hive bodies much easier.
Honey Extraction from a Langstroth Frame
After the bees are out of the honey supers, prepare to process your honey as soon as possible (within a few days). Doing so minimizes the chance of a wax moth infestation, discussed in Chapter 13. Besides, extracting honey is easier to do when the honey is still warm from the hive because it flows much more freely.
For a description of the various tools used in the honey-extraction process (uncapping knife, honey extractor or honey press, and so forth), see Chapter 16.
Harvesting honey using an extractor
Follow this procedure when extracting honey from your Langstroth-style frames:
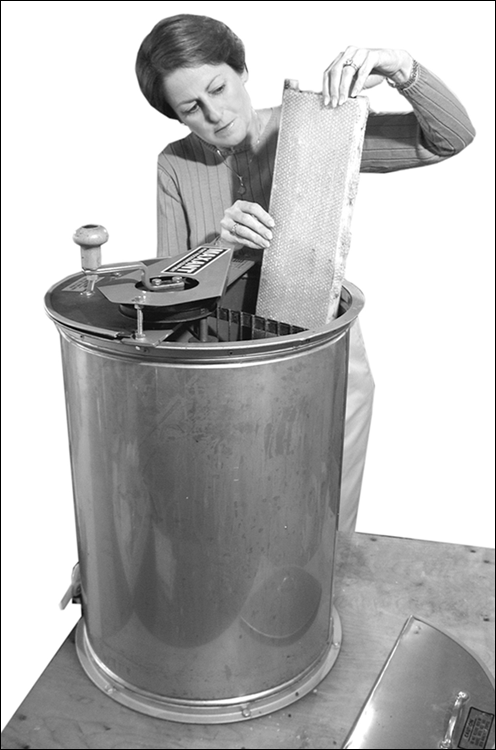
One by one, remove each frame of capped honey from the super.
Hold the frame vertically over the double uncapping tank and tip it slightly forward. This helps the cappings fall away from the comb as you slice them.
Use your electric uncapping knife to remove the wax cappings and expose the cells of honey.
A gentle side-to-side slicing motion works best, like slicing bread. Start a quarter of the way from the bottom of the comb, slicing upward (see Figure 17-6). Keep your fingers out of harm’s way in the event the knife slips. Complete the job with a downward thrust of the knife to uncap the cells on the lower 25 percent of the frame.

Courtesy of Howland Blackiston
FIGURE 17-6: Remove wax cappings using an electric uncapping knife. The uncapping tank below is a nifty accessory for collecting and draining the cappings.
Use an uncapping fork (also called a cappings scratcher) to get any cells missed by the knife.
Flip the frame over, and use the same technique to do the opposite side.
I discuss what you should do with the wax cappings, particularly if you want to use them for craft purposes, later in this chapter.When the frame is uncapped, place it vertically in your extractor (see Figure 17-7).
An extractor is a device that spins the honey from the cells and into a holding tank.
After you’ve uncapped enough frames to fill your extractor, put the lid on and start cranking. Start spinning slowly at first, building some speed as you progress. Build speed gradually, without initially spinning the frames as fast as you can because extreme centrifugal force may damage the delicate wax comb. After spinning for five to six minutes, turn all the frames to expose the opposite sides to the outer wall of the extractor. After another five to six minutes of spinning, the comb will be empty. The frames can be returned to the shallow super.
Courtesy of Howland Blackiston
FIGURE 17-7: Place the uncapped frame vertically in the extractor.
As the extractor fills with honey, it becomes increasingly difficult to turn the crank (the rising level of honey prevents the frames from spinning freely), so you need to drain off some of the harvest.
Open the valve at the bottom of the extractor and allow the honey to filter through a honey strainer and into your bottling bucket.
Wait about an hour before bottling.
This resting period allows any remaining wax pieces and air bubbles to rise to the top.
Use the valve in the bottling bucket to fill the jars you’ve designed for your honey.
Brand it with your label, and you’re done! Time to clean up.
Cleaning frames after extracting
Never store extracted frames while they’re wet with honey. You’ll wind up with moldy frames and comb that have to be destroyed and replaced next year. Instead, you need to clean up the sticky residue on the extracted frames. How? Let the bees do it!
At dusk, place the supers with the empty frames on top of your hive (sandwiched between the top deep and the inner and outer covers). Leave the supers on the hive for a few days and then remove them (you may have to coax any remaining bees from the supers by shaking them off the frames, or by using a bee escape or fume board). The bees will lick up every last drop of honey, making the frames bone dry and ready to store until next honey season.
Harvesting Honey from Your Top Bar Hive
Before you can harvest honey from your Top Bar hive, you must determine whether your colony made excess honey and where it is in the hive.
A Top Bar hive has honey stored in bands above the brood area on each comb. That honey is not part of the harvest and should be left for the bees’ winter stores.
The honey you can harvest comes from those combs completely filled with honey and capped. Remember that these same capped honey stores can also be critical for the survival of the colony in winter. You must approach the harvest in a conservative way, always leaving enough to see the bees through the winter months. So although it’s tempting to view all the full capped honey combs as surplus, it’s always a good idea to leave three or four full combs for winter stores. In time, your experience with the seasons in your area will help you judge what you can safely harvest.
Selecting the comb to harvest
The pure honeycombs are likely to be found farthest from the entrance. In the case of a front-entrance colony, that would be toward the back.
You may notice that some of the honeycombs are capped on top, but the bottom still has some open cells. Those cells will have a higher moisture content and are not suitable to be included in the harvest. If a significant amount of your comb is uncapped, your honey is not ready and should be left in the colony until it’s capped. The general rule is that the comb should be about 80 percent capped before you can safely harvest. But, like with all things bees, there are exceptions and one is with a late fall harvest. During a late fall harvest you may discover that less of the honey filled cells are capped. The reason is that bees make less wax as the weather cools and those cells may contain cured honey even when uncapped. To determine the moisture content of those cells you need a refractometer to test them; otherwise the best practice is to leave these combs for the bees.
If just a few rows at the bottom of a comb are not capped, you can harvest those combs and discard the uncapped cells or, better yet, eat them on the spot.
Since combs filled with honey are heavy, the bees will build extra bracing to the sidewall. This will be most apparent near the top just below the bar. This brace comb must be carefully detached before the comb is removed. A long, thin serrated bread knife is the best tool for separating brace comb from the sidewall. Start by sliding the knife up along the sidewall from the bottom until you encounter the brace comb, then continue “sawing” until the comb is free. This will need to be done on both sidewalls for each comb. If the top bar moves but the comb resists, look for more brace comb before continuing.
As soon as you begin removing the brace comb, some honey will be released and bees will begin to lap it up. This is where planning and expedience come into play. Move quickly through the process and have a plan to cover the harvested combs immediately. You don’t want to set off a robbing frenzy (see Chapter 10 for more on robbing frenzies).
Once you have identified what honeycombs you will take, the issue of handling the removed combs comes next. Top Bar combs filled with honey are very heavy and very fragile. The comb can break off the bar when mishandled. It is not recommended that you harvest on very hot days because the likelihood of breakage increases with higher temperatures. I also recommend that you build some kind of covered box or container that will allow you to transport the comb hanging vertically, and covered in some way to head off a robbing frenzy (see Figure 17-8).
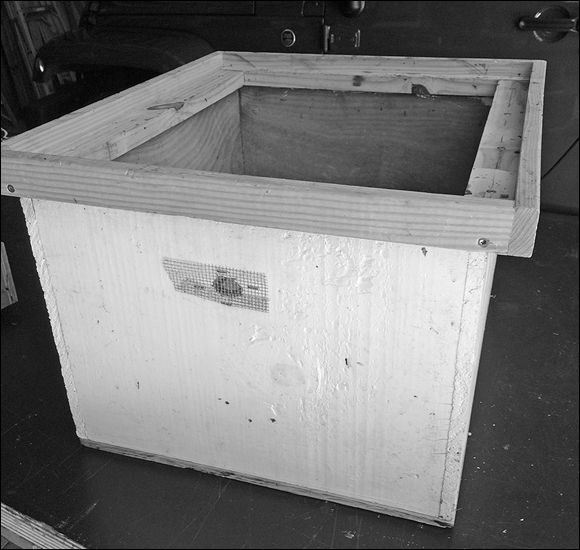
Courtesy of William Hesbach
FIGURE 17-8: This box makes it easy to protect and transport comb from a Top Bar hive.
Getting the bees off Top Bar comb
One way to remove bees from a Top Bar hive comb is to brush them off. Beekeepers use many objects for this purpose, including goose or turkey feathers, draftsmen’s brushes, and the commercial brushes sold by bee supply houses. The most useful brushes can be rinsed off with water when they get sticky with honey.
A bucket of clean water and clean wet rags are always a good idea to have around for immediate cleanup of tools and spills.
Do bees like being brushed off comb? In a word, no. So it helps both you and the bees to brush them off using small, quick strokes with just enough force to remove the bees without damage to the bees or the comb. You want to direct them back into the hive body. The action can be thought of as a series of flicks as you work your way across the comb. Don’t prolong the brush strokes.
Both sides of the comb will have bees that need removing; remove the bees on the side facing you first and then lower the comb so you can reach over the back and remove the bees on the back. This technique is much easier than trying to turn the heavy comb with one hand.
Some beekeepers are tempted to use a lot of smoke to move bees off the Top Bar comb. This is not a good idea since over-smoking bees can make them more defensive and complicate the harvest. Over-smoking can also impart a smoky flavor to the honey.
Harvesting using the crush-and-strain method
If you have just a few combs to harvest, your best option is to crush and strain them. Select a clean area and never harvest outside or any place that will allow the bees to find you. Line a strainer or colander with a paint strainer, and place it over a clean bucket or a deep bowl.
If you have a larger harvest, affordable bucket strainers and buckets with honey gates are available from the bee equipment suppliers that will make this process easier.
The process is simple but decidedly messy. Slice or break a small section of comb off the top bar and squeeze it to release the honey. Use a clean pair of kitchen gloves to keep your hands from getting sticky. Keep squeezing until all the honey is out. At this point the comb will harden into a ball. Break the ball apart and leave it in the strainer. Continue until all your combs are crushed. Leave them to strain until no honey is dripping through the strainer. Once all your honey is strained, it’s ready for you to jar or enjoy.
Regardless of whether you use the crush-and-strain method or a honey press (see the following section) to extract your honey, the comb is destroyed and the bees will have to build new comb before they can store more honey. That’s both a disadvantage and an advantage of Top Bar honey harvesting. The disadvantage is the time and resources that the bees have to expend to draw more comb. The advantage is that you will have fresh, new comb that ensures the purity of your honey products (pesticide buildup can occur on old comb used year after year).
Using this simple method, your honey will contain all the goodness the bees put into the honey, including small amounts of pollen and small bits of wax. These tiny particles are suspended in the strained honey but eventually will rise to the top of the container you use. It will look like the honey has a white, foamy coating. It is perfectly okay for you to enjoy — or it can be removed with a spoon.
Eventually all honey will crystallize. That does not change the purity of the product in any way. If you prefer liquid honey, you can heat the crystallized honey in a warm water bath (120 degrees [49 degrees Celsius]) until it liquefies. Never heat honey excessively.
Harvesting honey using a honey press
The crush-and-strain method (see the preceding section) of gathering honey from your Top Bar hive is a sticky, messy job. If you have multiple Top Bar–style hives like Warré or Kenyan hives and need to process lots of full honeycombs, the honey press procedure is quite simple:
One by one, slice the comb off each top bar using a serrated bread knife or an electric uncapping knife.
Allow the entire comb (wax and capped honey) to drop into the honey press’s container. Depending upon the size and style of your press, you are likely to get several entire combs into the hopper.
When the hopper is filled, put the lid and screw mechanism in place.
Following the manufacturer’s instructions (each brand is slightly different), apply pressure (using the screw mechanism; see Figure 17-9) to squeeze and crush the honey from the wax combs. The extracted honey will ooze through the metal or cloth filter, and you can capture it in a clean honey bucket.
Remove the crushed wax, clean the filter, and repeat the process until all the combs have been processed.
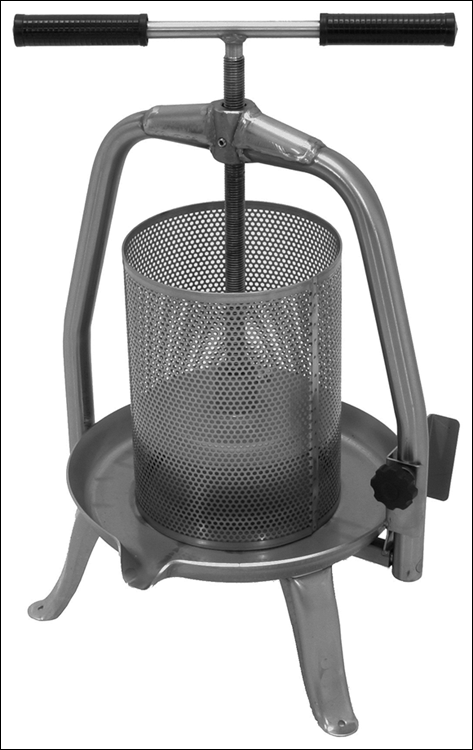
Courtesy of Swienty Beekeeping
FIGURE 17-9: This is one style of honey press that is used for extracting honey from Top Bar hives.
This method for harvesting honey also harvests a lot of beeswax, so be sure to save and process the crushed wax, as explained later in this chapter. See Chapter 18 to learn how to make gifts from your beautiful beeswax.
Return the now-empty top bars to their hive.
The bees will need to rebuild new comb on these bars before they use them again next season.
Honey presses are not that easy to find, and they can be expensive. You are more likely to find honey presses from suppliers in Europe, where they are more commonly used. But if you are clever at building things, the Internet will turn up an array of plans for making your own.
Swienty, one of the European vendors offering discount coupons at the end of this book, sells a very nice honey press.
Harvesting cut-comb honey
Cut-comb honey is usually selected from your best-looking comb and never from old or brood comb. With cut-comb you simply cut sections of comb and use them as is. Some folks spread the wax and honey right on the morning toast and others chew small sections like candy. You can store your cut-comb section in plastic containers. I recommend that you initially freeze the cut comb in containers for 72 hours to kill any wax moth eggs.
Harvesting Wax
When you extract honey, the cappings that you slice off represent your major wax harvest for the year. You’ll probably get 1 or 2 pounds of wax for every 100 pounds of honey that you harvest. If you have a Top Bar hive and are using a honey press, you will have an even greater bounty of beeswax. This wax can be cleaned and melted down for all kinds of uses (see the section on making stuff from beeswax in Chapter 18). Pound for pound, wax is worth more than honey, so it’s definitely worth a bit of effort to reclaim this prize. Here are some guidelines:
Allow gravity to drain as much honey from the wax as possible.
Let the wax drain for a few days. Using a double uncapping tank greatly simplifies this process. See Chapter 16 for an image of a double uncapping tank.
Place the drained wax in a 5-gallon plastic pail and top it off with warm (not hot) water.
Using a paddle — or your hands — slosh the wax around in the water to wash off any remaining honey. Drain the wax through a colander or a honey strainer and repeat this washing process until the water runs clear.
Place the washed wax in a double boiler for melting.
Always use a double boiler for melting beeswax (never melt beeswax directly on an open flame because it’s highly flammable). And never, ever leave the melting wax — even for a moment. If you need to go to the bathroom, turn off the stove!Strain the melted beeswax to remove any debris.
Remelt and re-strain as necessary to remove all impurities from the wax.
The rendered wax can be poured into a block mold for later use.
I use an old cardboard milk carton. Once the melted wax has solidified in the carton, it can easily be removed by tearing away the carton. You’re left with a hefty block of pure, light-golden beeswax.