Chapter 14
Raising Your Own Queens
IN THIS CHAPTER
 Understanding the benefits of raising your own queens
Finding out about honey bee genetics and mating
Looking at different queen-rearing methods
Selling your queens
Performing seasonal chores
Special thanks to my friend and EAS Master Beekeeper Leslie Huston for her help preparing this chapter.
In this chapter, I introduce you to different methods for raising your own queens. The process can be fairly involved, but after you’re familiar with some basic concepts, you’ll be on your way to success.
Several books have been written on this topic alone, and I recommend you do some further reading if you want to pursue this fascinating component of beekeeping. Here, I cover some of the fundamentals and a few easy methods to start you on your way.
Why Raising Queens Is the Bee’s Knees
Some colonies are particularly delightful to work with. Nice temperament, healthy bees, great honey producers, and resilient enough to survive winter. This is the kind of colony that’s a pleasure to be around. It’s the queen who possesses the genetics that provide the colony with these desirable traits. Her daughters will likely also embody these traits, and wouldn’t it be nice to have more colonies like that one you consider your favorite?
Raising healthy, well-developed queens with genetics that are tailored to your regional climate will produce healthy colonies and can help you avoid the multitude of worries and problems currently facing honey bees (including colony collapse disorder, or CCD — see Chapter 11). Healthy, robust colonies are resistant to pests, chemicals, and diseases and can better handle the weather in your area.
When you raise your own queens, you can avoid “imported” problems. Every time you bring bees into your apiary from other sources, you run the risk of bringing unwanted “hitchhikers” along — like the small hive beetle, American foulbrood, and Africanized honey bees, just to name a few. Once established, these troubles can be difficult to get rid of.
Raising superior queens is possible for the small-scale beekeeper. With a little attention to detail, and providing the bees with the things they need, you can raise strong, healthy queens — right from the bees you already have.
And here’s the best part. Raising queens is fun! You’ll experience a whole new dimension of these fascinating insects. And you’ll feel proud when you hold your homegrown queen in your hand.
Sure, you will encounter some challenges, but they will help you grow as a beekeeper. Queen rearing will improve your sensitivity to the overall health and well-being of all your bees. Even if you don’t make queen rearing a permanent part of your beekeeping repertoire, by trying it you’ll begin to appreciate what makes a good queen and what to look for when shopping for one.
 You can raise as few or as many queens as you like. I suggest that as a first step, you raise just enough queens for your own needs, rather than enough queens to sell to the public. Then, if you want, and after gaining some skill with the process, you can kick things up a notch and raise queens that you can sell to other beekeepers. Your carefully raised, local stock will be a big hit with other beekeepers in your neighborhood.
There is a subtle but important difference in the definition of the following similar terms
- Queen rearing is the process of raising queen bees. There are several methods for queen rearing. I cover the general principles here and describe in some detail a couple of the most popular methods.
- Queen breeding is the act of identifying and selecting queens with superior characteristics to use as the parents of subsequent generations. This selection process results in a greater tendency for descendent generations to exhibit the traits for which you select. Using gentleness as an example: Selecting queens from gentle colonies to raise new queens results in new colonies that are gentler than if you had not done that careful selection.
In this way, queen rearing and queen breeding are separate yet related processes.
Understanding Genetics
The study of genetics and inheritance is a big topic. Huge, really. What follows are some basic tenets relevant to queen rearing and queen breeding.
Just like people, chickens, and peas, genes determine the particulars of appearance and capabilities. In bees, there are genes that control body color, disease resistance, and temperament, and these traits are passed from one generation to the next. Which body color, what type and level of disease resistance, gentle or cranky: The possible outcomes for the offspring are limited to the genes carried by the parents. Honey bees are responsive to selection, and in just a few seasons you can influence the overall health of your colonies.
Dominant and recessive genes
All queens and workers develop from fertilized eggs. They are diploid, which means they possess two sets of genes — one from their father and one from their mother. Drones develop from unfertilized eggs and have half the full set of chromosomes (a mother, but no father). If an individual winds up with two different genes for color, the dominant color will be expressed.
So the female honey bees, being diploid, have two genes for every trait. They may match, or they may be different. If they receive a different gene from each parent, the dominant gene will be expressed, and the recessive one won’t be evident (see Figure 14-1).

© John Wiley & Sons, Inc.
FIGURE 14-1: This illustrates the dominant versus recessive gene expression.
When the queen’s ovaries produce eggs, the genes are divided in half. For example, if a queen’s body-color gene pair are the same, she will exhibit that color. If they are different, she will exhibit the dominant color. Half of her eggs receive the dominant color gene, and the other half of her eggs carry the gene for the recessive color. If that egg is fertilized — if it goes on to become a female, not a male — then the ensuing larva will have two genes for color. If the two genes match, then that is the color the bee will be. If they are different, then again, she will show the dominant color and carry the gene for the recessive color; it’s in her genes, but hidden.
So as you get into queen rearing, you use the very best queen or queens in your operation as queen mothers and encourage other colonies with desirable traits to produce drones. In this way, you’re maximizing the desirable genes in the gene pool, and those desirable traits should become more frequently seen in the queens raised and in their colonies.
As you raise successive generations of queens, you can select queens with an eye on continuing the improvement process. In just a few seasons, it is possible to have a substantial influence on the nature of your bees, whether it is color, temperament, productivity, or disease resistance.
If you wind up with more queens than you can use, get them to good homes. You can select the very best to keep for your own colonies, and from those you can select your future queen and drone mothers. But the other queens are fine queens, too, so no harm in selling (or giving) them to fellow beekeepers. Be sure to ask for feedback from those you sell or gift to — get their impression of the health and character of the queens you’ve raised, and make notes so you can continually improve the genetics.
Inbreeding versus outcrossing
Imagine if you had a truly isolated mating yard, and you selected certain traits over many generations. The gene pool of your breeding stock would become more and more focused, with less variation, and would yield more consistent bees with most or all having the traits for which you’ve selected. But beyond a certain point, that genetic focus can become a liability, and inbreeding can occur. Inbreeding in honey bees is evidenced by a scattered brood pattern. Rather than the nice, continuous expanse of capped worker brood, there are many skipped cells caused by the queen mating with too many drones that are too closely related to her. (Note: There may be other causes of spotty brood. Chapter 12 goes into detail about other diseases that can cause this situation.) The workers can tell this inbreeding, and they remove the inbred larva, leaving skips in the brood pattern. A skip here and there is normal, but in inbred bees, the skips become much more prevalent.
But for the small-scale queen rearer and bee breeder, this is not likely to happen. Truly isolated mating areas are rare, and it’s very likely that even though you stack the deck, there will be incursions from other bee stock. Bees from neighboring beekeepers or from feral colonies will mix with your stock enough to avoid inbreeding.
If you believe you have a fairly isolated mating area, you may want to deliberately introduce some unrelated bees to your operation from time to time. Bees from different sources, different races, and other regions bring some diversity to your stock. This counteracts any possible inbreeding with a dose of outcrossing and keeps the genetic diversity from becoming too limited.
Accentuate the positive
With bees, just like all plants and animals, traits — both good and bad — are passed from one generation to the next. With respect to livestock (and your bees can be considered livestock), it is common to select from your “herd” to retain the best traits and minimize or eliminate the worst. This is how the many different dog breeds came into existence, and it has also shaped the characteristics of our chickens, cows, corn, and so on.
To breed better bees, you need one or more mothers and a whole lot of fathers. So there are two types of colonies you will select to be your breeding stock:
- Queen mother colony: Your very best colony and the queen that rules the colony is the one to use to raise more queens. This queen is called the queen mother.
- Drone mother colony: Wherever you plan to allow your queens to do their mating, you want to have the most desirable drone (male bee) stock available. You don’t want drones from subpar colonies contributing their poor genetics to your fine queens. Unless you live in an area where you can guarantee isolation, you will be unable to control the drone gene pool completely. But you can stack the deck in your favor by doing your best to saturate the area with lots of healthy drones from colonies with desirable traits.
As you go about selecting queen mother and drone mother colonies, you’ll want to consider certain traits. Some traits are more hereditary than others. In the case of honey bees, here are some of the most desirable traits to look for when selecting colonies for your breeding project:
- Gentleness: Gentleness is an important (and hereditary) trait for bees to have — no beekeeper wants to be stung. You can test a colony for gentleness by vigorously waving a wand with a black leather patch at the end over an open hive. This will alarm the bees, and they may rush up to sting the leather patch. After a minute or so, count the stingers on the patch. The colonies with the fewest stingers in the patch are the most gentle.
- Resistance to disease and pests: Bee breeders and commercial queen producers are making progress with breeding bees that are resistant or more tolerant to disease (for more on bee diseases, see Chapter 12). You can do this as well by identifying those colonies that are the most robust and require the least treatment. Raise queens using stock from these superstar colonies.
- Hardiness: Winter hardiness is especially important to beekeepers in climates that have long, cold winters. If you live in a climate where winter’s deep freeze lasts 10 to 12 weeks or more, then you may regard winter as the enemy, at least as far as your bees’ survival goes. Winter can also be viewed as an objective selector. Colonies that survive a long cold spell must be healthy and strong. They must produce and store enough honey to fuel their winter hunker-down. And they should slow down their brood-rearing in the fall efficiently, and start up in the spring in time to have their numbers grow to take advantage of the spring nectar flow. It takes a healthy, productive, well-rounded colony to survive a northern winter. These are desirable traits for your colonies.
- Productivity: Some say you can’t really select for honey production when breeding queens because there are too many other factors, such as the weather (if it doesn’t rain, then there are fewer flowers, and honey production will be low). So whereas honey production may be more a function of environment than genetics, if one of your colonies consistently produces more honey than another, consider that colony’s queen for breeding.
No matter how you go about raising queens, provide your queen-rearing operation with every advantage. Go easy on, or better yet, avoid completely, any chemical treatments. And make sure your bees have plenty of honey and pollen. Ensuring good nutrition is important.
What Makes a Queen a Queen
All female bees start out the same way: from a fertilized egg. After two to three days, the fertilized egg of the bee destined to be a queen hatches into a young larva, just as with worker bees. All the newly hatched larvae are fed royal jelly. A day or two after the egg hatches into a young larva, it’s decision time. A larva that goes down the road to queendom continues to receive a plentiful supply of rich royal jelly, and only royal jelly. But larvae that will become workers are switched to brood food, which is a nourishing but coarser diet of honey and pollen. See Chapter 2 for more about the life cycle of bees.
A queen takes just 16 days to develop. (A worker takes 21, and a drone takes 24.)
Here’s how the queen’s development proceeds and a few notes for your queen-rearing efforts:
- Days 1–2: The egg stands on its end on the bottom of the cell.
- Day 3: The egg hatches and absorbs its chorion (outer shell), and the newly hatched larva lays down on the base of the cell and is fed royal jelly exclusively.
- Days 4–8: The cell containing the developing larva remains open, and the larva is fed royal jelly by nurse bees. The cell is extended downward and elongated into a vertical shape, sometimes described as looking like a peanut shell. (Larvae destined to become worker bees remain in cells parallel to the ground, and they are fed a different food that causes them to develop into a worker bee.) Note: Day 4 is the best time for a young larva to be selected to become a queen rather than a worker.
- Day 9: The queen cell is capped, and the developing queen (pupa) consumes royal jelly that the workers stored in the cell with the larva. She spins a cocoon inside the cell.
- Days 10–14: The developing queen transforms into its adult form. Her body is soft and very fragile. Note: Do not tip or jostle the queen cell during this time. Doing so may irreparably damage the queen’s development.
- Day 15: The developing queen is now less fragile. Note: At this point the queen cell can be carefully moved to a queenless nuc.
- Day 16: The queen emerges from her cell. Note: Cool temperatures can slow the queen's development, as can extreme heat. Under such conditions, a queen could take 17 or 18 days to emerge.
The empty queen cell will be left with a circular hole in the bottom for a time, then the bees will begin tearing it down.
A virgin queen running loose in a colony is hard to spot. A virgin queen is often on the small side, not much larger than a worker (she’ll plump-up after she mates). She walks quickly and without the stately pace of a mated queen. The other bees don’t pay her much attention — there’s no entourage of attendants circled around her. So if you don’t find her, don’t worry. A virgin emerging from a cell into a queenless colony is very likely to be accepted — hey, she’s the only game in town.
A virgin queen takes a few days to mature — her wings expand and dry, her glands mature, and so on. Then she needs a few days more to fly and mate, and a few days more to settle down to laying eggs. Allow two or three weeks from emergence to the time when she will begin laying eggs.
Talking about the Birds and Bees for Honey Bees
It’s important to understand how honey bees mate so you can do your best to provide optimal conditions and take into consideration how circumstances such as weather can impact your queen-rearing operation. The queen bee has some interesting mating habits:
- Queen bees mate in the air. The drones fly out of their colonies and gather at a place called a drone congregation area. The virgin queens also know where these places are and make a “bee-line” there to mate. In this drone congregation area, several drones mate with the virgin. The drones then drop dead afterward (see Chapter 2 for more).
- A virgin queen will take one or more mating flights over the course of a few days or a week. Then she’s done mating for her lifetime. The sperm (from the drones) is stored in a special tiny ball in the queen’s abdomen called the spermatheca. It is supplied with nutrients to keep the sperm alive for as long as the queen remains productive.
- Queens mate with a number of drones, which means that a honey-bee colony is a collection of “sub-families.” All the bees in the colony have the same mother (the queen); but some workers will be full sisters (having the same mother and father), and some will be half-sisters (having the same mother but different fathers). This genetic diversity is critical to having thriving, healthy colonies with a variety of traits that help the bees survive.
- If bad weather or some other circumstance prevents a virgin queen from mating, there will come a time when she will stop trying to mate and will begin laying eggs. However, none of these eggs will be fertilized, so they will all result in drones.
If virgin queens typically mated with drones from her own colony, it would result in a high incidence of undesirable inbreeding. The bees have developed a system to encourage genetic diversity and reduce the possibility of inbreeding. Instinctively, the queen flies much farther to drone congregation areas than do drones. So the queen goes farther from her hive to mate than the drones from her hive (her brothers) are willing to travel. This dramatically reduces the probability of her mating with a drone from her own hive.
Creating Demand: Making a Queenless Nuc
A nuc, or nucleus colony, is a small community of bees. Most common are nucs of four or five frames. Chapter 4 includes information on nuc hives. A queenless nuc is a small colony of bees without a queen. If a colony doesn’t have a queen, the bees will try to make a queen from any available larvae of the right age (four days after the egg was laid). A queenless nuc will also be receptive to a newly introduced virgin or mated queen.
Queenless nucs are used for starting queen cells and also for receiving queens — virgin or mated. Queenless nucs should be made up a day or two before they are needed so the bees will have time to realize that they no longer have a queen.
Here’s how to create a queenless nuc:
Place frames of capped brood, honey, and pollen into the nuc hive body. The frames should be covered with worker bees and come from a healthy hive.
 Make 100 percent certain there is no queen on these frames — just workers (an occasional drone is okay). There should be as little open (uncapped) brood as possible. Bees found on frames of open brood (not capped) are typically nurse bees. You can ensure that your queenless nuc has lots of nurse bees by shaking or brushing these nurse bees off of open brood frames into your queenless nuc. Just make sure you don’t shake off or brush a queen into the nuc! Return the brood frame to the colony it came from.
- Wait a day or two before introducing a frame of eggs, a frame of grafted larvae, or a queen (virgin or mated).
Queen-Rearing Method 1: Go with the Flow
One good way to raise queens is to simply go with the bees’ natural inclinations. Beekeepers may try to avoid swarming (Chapter 10 has information on swarming), and oftentimes the measures work. But swarming is something bees have done for eons. It’s been a successful survival strategy for them, and try as you might to avoid it, you will at some point find swarm cells in your colony. These cells will either be capped or open. Capped queen cells have been fed all they’re going to get, and the queen inside is pupating. If they’re still open at the bottom and contain an egg or a larva and a quantity or royal jelly, that’s a cell on its way to producing a queen.
So imagine you inspect your colony, and you find some queen cells. This is a nice, healthy colony, so you decide to turn this into a queen-rearing opportunity. Rather than destroy the cells in an attempt to prevent swarming, fetch a trusty nuc box (or two) and make a split (or two).
If the queen cells are capped
A swarm typically departs when the replacement queen cells are capped. So finding some or all of the queen cells capped means the swarm — and your old queen — has likely departed or soon will. Removing all the queen cells in this situation could render the colony unable to re-queen itself.
Instead of going on a mission to seek and destroy all those queen cells, you can capitalize on them instead. You need an extra hive setup for this, which can be a nuc box or a full-size hive.
Remove a frame that has queen cells on it. Add a frame or two of bees and brood, a frame or two of honey/pollen, and maybe a frame or two of foundation. If you’re putting this nuc into a full-size hive, upsize the ratios to fill the box.
If you have multiple frames with queen cells, and lots of bees — and enough equipment — you can split off more than one nuc. If the queen cells are capped, it’s probable that the original queen will soon go or is already gone, so be sure to leave a frame with queen cells in the original (parent) hive so it, too, can continue to re-queen itself.
If the queen cells are open
If you find queen cells that are all still open at the bottom, it’s possible that the original queen is still in the house. It’s best to find her so you’re certain she’s still around. You may want to move her to a nuc, along with some frames of bees, brood, nectar/pollen — and no queen cells. Let her serve as backup queen while you see how the other unit(s) play out. If there are queen cells on more than one frame, you can make another split into another nuc box with a frame containing queen cells, plus some other frames of bees, brood, food, and foundation. Just be sure to leave some queen cells in the original hive so those bees can raise a queen for themselves.
Mind the timeline
From the time the queen cells are first capped, it’s a week until the virgin(s) emerge. A virgin queen takes a few days — up to a week — inside the hive to mature. Her wings dry and harden. Then she takes her mating flights for one or more days. If it rains or is too cold to fly, she passes on the mating flight and waits for better weather, which could take a few days or up to a week. Finally, after she’s completed her mating flights, she settles down and begins to lay eggs. Her progress may be slow at first, but again, in a few days or a week’s time, she’ll have laid a big enough patch of eggs on one or more frames that you’ll be able to see them. So from the time the queen cells are capped, it can be three or maybe even four weeks until you see eggs. Be patient.
If, after four weeks, you don’t see any eggs, it’s probably time to intervene. You can introduce a queen obtained elsewhere, or you can combine the queenless unit with another, queen-right unit (a nuc or colony that has a laying queen).
 A good reason to start more than one of these nucs is that if one of the queens doesn’t work out, you can simply combine those bees back into another nuc unit. Use the newspaper method to do this, as explained in Chapter 18. If you made these splits during swarm season, you can now combine them into larger colonies without encouraging swarming. A month has passed and the urge to swarm has passed, too.
If, after four weeks, you have eggs in every split you made, you can celebrate with a glass of mead! You can grow each of these into full-size hives and increase your apiary. If there’s enough time left in the current season, you can add more nuc colonies that summer. If it’s midsummer or later, they can be wintered as smaller, single hive-body colonies and then given more space the following spring. If this has brought you to a place where you have more colonies than you want, you can offer one or more nuc colonies to another beekeeper. Or you can sell one or more of the queens and combine the remaining worker bees back into the full-size hives you keep (see information about combining colonies in Chapter 18).
Queen-Rearing Method 2: The Miller Method
The Miller Method is a queen-rearing process that requires no special equipment and is perfect for the backyard beekeeper who just wants to raise a few queens.
Here’s how it works:
First, take a deep frame with wax foundation and cut the bottom edge of the foundation into a sawtooth pattern (see Figure 14-2). If the wax has wires in it, you’ll need to snip a few of them or work around them.
The size of frame you use is not that critical. Most queen-rearing beekeepers use the same size frame used in their brood box. For most folks this would be a deep frame, although some beekeepers standardize on medium-depth frames for both brood and honey.
Courtesy of Howland Blackiston
FIGURE 14-2: Cutting a sawtooth pattern along the bottom edge of the wax foundation.
- Place the frame with the sawtooth foundation in the center of your queen mother colony (the strongest, hardiest, most productive, and gentlest). Let the bees draw it out into comb. Consider feeding the colony some sugar syrup to get them making wax. The syrup (like a nectar flow) stimulates wax production.
- After a week, have a peek every few days. At some point, the queen will start laying eggs in this new comb. When the cells along the sawtoothed margins have eggs, it’s time to set up a queenless nuc that will build and raise the queen cells. Make sure the cells along the sawtoothed margin are worker-sized not drone size cells.
- The day after setting up the queenless nuc, insert the sawtooth frame of eggs into the center. Overnight, the bees will have become aware that they have no queen. They will be ever-so-ready to receive a frame containing just what they need to raise some queens: eggs and very young larva. If all goes well, the bees will build several queen cells along the jagged edge.
In a week’s time, have a look and see what the bees have made. Hopefully, the bees will have built several queen cells in different spots along the sawtooth edge.
In a few more days, come back and see how the queen cells are developing. Later, you will separate the capped queen cells by cutting them away from the comb. But for now, just look and see what you have to work with. If some of the cells are too close to cut apart, then plan to leave them together and put that clump in a queenless nuc. If the bees are raising additional queen cells on other frames, you should destroy them. They’re not from your carefully chosen queen mother, and you want the bees’ attention focused on raising the daughters of that favored queen.
- Make up an additional queenless nuc for each queen cell (or clumps of cells) that will need placement from Step 5. Plan on leaving one or a few cells in the original colony so they can have a queen for themselves.
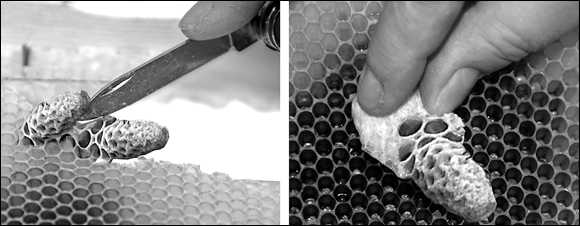
A few days before the queens are due to emerge, go back and remove the frame containing the queen cells.
Cut the cells apart carefully to put into the waiting queenless nucs (see Figure 14-3). When you cut the comb, take plenty of comb around each cell or clump of cells — give yourself a generous handle, even if it means cutting into other brood cells. Don’t dent or deform the queen cell in the least little bit — the developing queen inside is extremely fragile. Also, don’t tip the cells or jostle them for the same reason.
Be sure to move those queen cells to the queenless nucs before the queens emerge. If you don’t, the first queen to emerge will kill all the other queens and queen cells in the hive! A sad ending after so much effort.Distribute the queen cells to the queenless nucs.
Remove a central frame from each queenless nuc and carefully press the comb handle attached to the cells into the comb of this frame. The cells should be hanging vertically. Be very careful as you slide the frame back into the hive. Not damaginging the queen cell is of paramount importance.
A day or two after “emergence day” (16 days after the egg was laid), check to see that each queen did emerge from her cell.
You’ll see the queen cell with a round opening on the bottom. You may be able to find her walking around on one of the frames. Then again, you may not. Remember, a virgin queen is difficult to spot, so if you don’t find her at first, don’t worry.
Courtesy of Howland Blackiston
FIGURE 14-3: Carefully cut around the queen cell and transfer it onto a frame in a waiting queenless nuc (left). By gently pressing on the extra handle, it should stick securely in place (right).
Queen-Rearing Method 3: The Doolittle Method, also Known as Grafting
With the Miller Method you can raise a few queens at a time, but other methods allow you to ramp up production and turn out dozens of high-quality queens. Raising larger numbers of queens is more challenging, but you might find a market for your lovely queens among beekeepers in your area. Whatever the market is charging for queens, you can charge that also. Feel free to charge more if you think you have some hot property. Right now, queens sell for at least $30 each. I’ve seen truly superior queens selling for much more.
The most common method of producing large numbers of queens is by grafting larvae of the right age into special wax or plastic queen cell cups that are affixed to bars. The bars are positioned in frames, and the frames are inserted into a queenless nuc equipped with lots of nurse bees and lots of provisions such as honey (and/or syrup) and pollen (and/or pollen substitute).
Tools and equipment
Grafting requires some special equipment and supplies. All are available from most beekeeping suppliers. If you’re a gadget lover, grafting has a lot of allure.
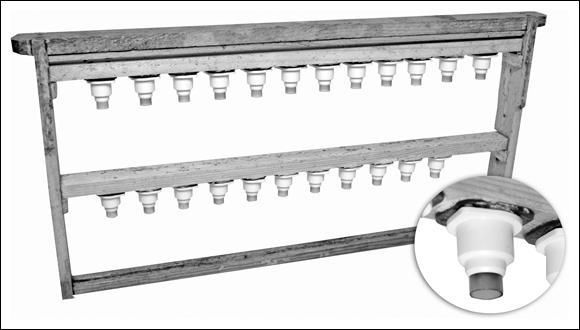
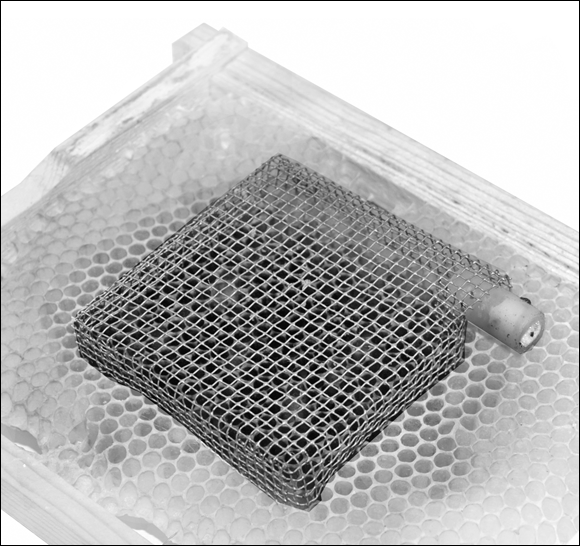
- Cell bar frames: These are frames that, instead of containing foundation, contain one or more bars that hold plastic or wax queen cups vertically into which larvae are grafted. The frame is then inserted into a queenless colony where queen cells will be raised. See Figure 14-4.
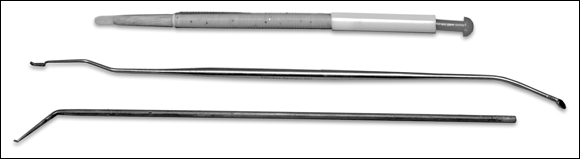
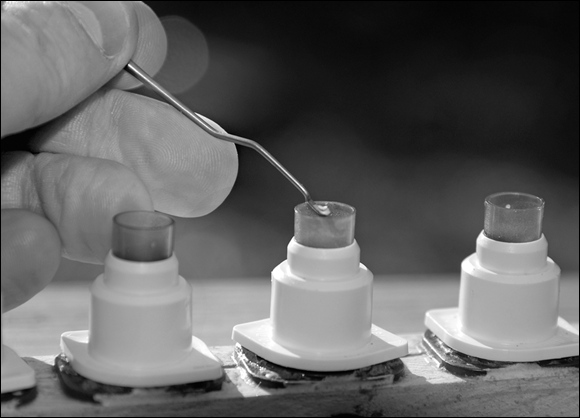
- Grafting tools: You use grafting tools (see Figure 14-5) to lift the delicate and oh-so-fragile larva out of its original worker cell and place it gently in the cup on the cell bar frame. There are many different kinds of grafting tools, and each beekeeper develops his or her own preference, often making personal modifications.
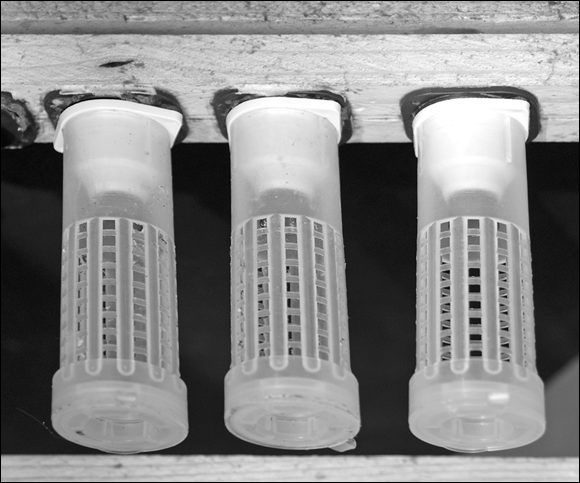
- Queen cell protectors: Cell protectors are cage-like cylinders that are placed around the developing queen cells once they are capped (see Figure 14-6). They look kind of like hair curlers. In fact some individuals use haircurlers they pick up at second-hand stores. The cell protectors keep the newly emerged virgin queens confined, preventing them from moving about the colony and killing the other queens. The perforations in the protector allow surrounding worker bees to feed and care for the new virgin queens.
- Queen cages: These are designed to confine the queen and provide, via screen or perforations, a way for the bees outside of the cage to feed the queen inside (see Figure 14-7). Queen cages also have a place that can be filled with a fondant or candy plug, which will be eaten by the bees and allow the queen to be released after sufficient time has passed to have her accepted by the colony.
Courtesy of Howland Blackiston
FIGURE 14-4: A cell bar frame (detail of individual queen cup).
Courtesy of Howland Blackiston
FIGURE 14-5: Three different kinds of grafting tools.
Courtesy of Howland Blackiston
FIGURE 14-6: Queen cell protectors snapped into place. They are used to protect queen cells before queen emergence and to hold new queens that emerge from their cells.
Courtesy of Howland Blackiston
FIGURE 14-7: Different kinds of cages designed to hold her majesty.
How it’s done
There are steps leading up to and following grafting day. As with the Miller Method, you select the colony headed by your best queen to be the source of larvae for grafting.
- Four days before grafting day: The eggs you’ll want to graft are laid four days before grafting day. To make it easier to locate the right-age larva, confine the queen on a frame of empty drawn comb four days ahead of grafting day. Use that comb when transferring larvae to cell cups. A push-in cage is the perfect tool for restricting a laying queen to a cluster of empty cells. See Figure 14-8.
- Three days before grafting day: Release the queen from confinement by removing the push-in cage. Having laid eggs in these cells, the queen’s job is done. She can be allowed to roam the colony and continue laying eggs at will. You will want to keep track of where you placed the queen cage because those larvae are the ones that will be the right age for grafting. Mark the frame’s top bar so you can retrieve that frame come grafting day. A paint pen or thumb tack will do the trick.
- Two days before grafting day: Create your queenless nuc to serve as a cell starter. You want to put your freshly grafted larvae into an environment where they’ll be well cared for. This means lots of bees (especially lots of nurse bees), frames of honey, pollen (and/or a feeder and a pollen patty), and little or no open brood. You want lots of nurse bees because they are the ones most attentive to feeding larvae.
Grafting day: Using the frame you confined the queen on four days ago, transfer (graft) larvae into cell cups and place the frame of newly grafted cells into the queenless cell starter that you made a couple of days ago. Graft 10, no more than 20, when starting until you get the hang of it. Grafting is a delicate maneuver, and the very young larvae are exceedingly fragile. You need to do this in a short time — 10 minutes is better than 20 minutes. See Figure 14-9.
The larva breathes through small openings on one side of its body — the side exposed to the air. If the larvae is flipped when transferred to the cell cup, it will not be able to breathe. When transferring larvae, be careful not to flip it over when setting it down in the cell cup. When you’re familiar with what larvae look like when they’re grafting age, you can skip the steps of confining the queen; just look through the queen mother’s hive and select a frame with larvae of the appropriate age.- One or two days after grafting day: Have a peek. The bees have decided which cells they’re going to feed and draw and develop into queens and which cells they are not. You will quickly notice the difference.
A week or so after grafting day: Check the cells. The cells should be capped by the bees four or five days after grafting, and the only care they need from that point until emergence is warmth and humidity. When they are capped, put cell protectors on. The cell protectors will keep the virgin queens separated from each other. If they are left to emerge into the colony, the first queen out will kill all the other queens. Or you can carefully move the cells to individual queenless nucs, one per nuc, and let the virgins emerge there.
During your inspection a week following grafting day, give the other frames a look and remove any rogue queen cells elsewhere that the bees may have built in the hive. If one of them emerges, she’ll kill all the other queens and she won’t be of your selected stock.
Courtesy of Howland Blackiston
FIGURE 14-8: A push-in queen cage helps you confine a queen to just a few cells. The eggs laid in these cells are the ones you want to use for grafting.
Courtesy of Howland Blackiston
FIGURE 14-9: The delicate process of grafting larvae into queen cell cups.
Virgin queens will emerge 15 to 17 days after the egg is laid (11 to 13 days after grafting). The average development time is 16 days, but development is faster in warmer weather and slower in cooler temperatures, so there is some variation in timing.
To achieve successful grafting, be prepared to try various grafting tools, different positions (for you and for the frame of larvae), different lighting, and perhaps some magnification. Try a few different tools, and give yourself time and a lot of practice to get it right. A larva that is bruised or handled too much is unlikely to survive and be accepted by the bees. You may have poor acceptance your first few rounds of grafting, but keep trying. Eventually you’ll get the knack.
Providing nuptial housing
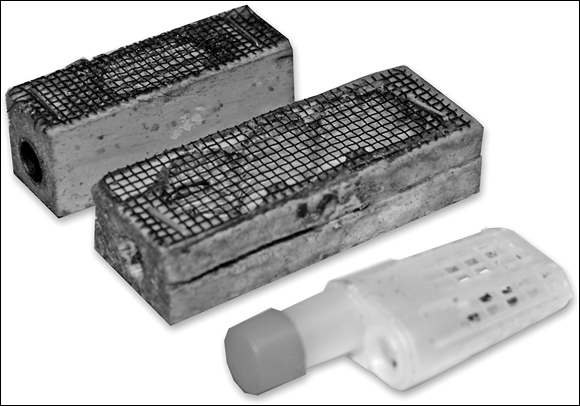
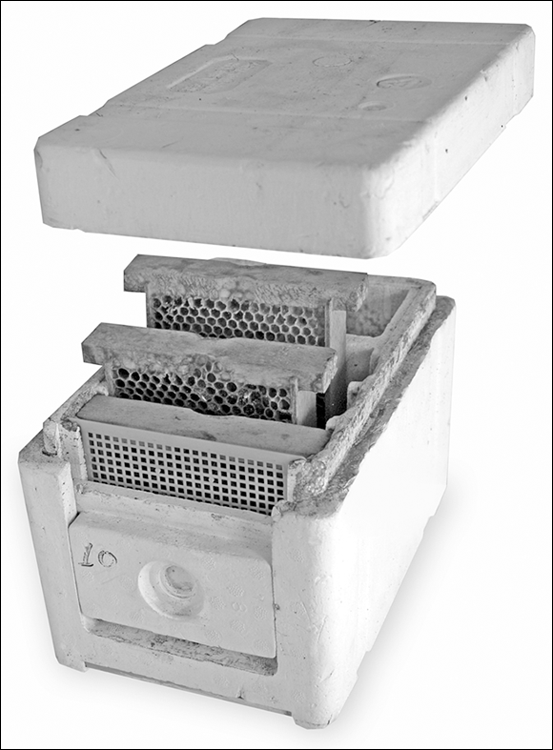
Virgin queens are often given temporary housing until they mate. Mating nucs for your virgins can be regular-sized hives or nucs, but if you’re raising a lot of queens, that can be quite demanding in terms of bees, equipment, and real estate. Small units, called mini-mating nucs or pee wees, hold just a couple of cups of bees, a few miniature frames, and a small food reservoir (see Figure 14-10). With mini-mating nucs, you can place a bunch of nucs in a comparatively small area. Checking these smaller units is quicker and easier, too. But be careful — in midsummer when nectar flow falls off, it can be hard to keep these tiny colonies from being robbed.
Courtesy of Howland Blackiston
FIGURE 14-10: A pee-wee mating nuc takes up less real estate than a conventional nuc or hive. With just a few mini frames and its own food supply, it’s the perfect size for temporarily housing a virgin queen while she matures and mates.
After the queens have emerged safely into their cell protectors, you can transfer them to queen cages (with candy plugs). Then introduce the caged queens into their own mating nuc (one queen per nuc), letting the bees slow-release the queens by chewing through the candy plug.
Be patient. Allow two to three weeks for a virgin queen to mate and begin laying eggs.
Finding Homes for Your Queens
Now that you have queens, what do you do with them? Where do they live? You have several options:
- Queen cages: Your queens can be kept for a few days in a cage with a few attendants. Over a week is too much stress on the queen, and she may die. Use a clean eyedropper to feed them a single drop of water once or twice a day.
- Battery box: This is a special ventilated container (usually used for shipping queens). It can also be used to house your new queens for a few days. The battery boxes typically hold 20 queen cages and have a space for a slab of sugar fondant (food) and a sponge (to hold water). Be certain to add a cupful or two of attendant bees (a hundred or more) who will care for the queens.
- Queen banks: A queen bank is a regular, queen-right colony with a queen excluder keeping the colony’s resident queen separate from the upper hive body. In the upper hive body, caged queens are held in a special rack that takes the place of one of the frames. Attendants from the colony care for the caged queens. Using this method, queens can be housed for several days or even a couple of weeks (versus a few days, as with the other two options).
When queens are in the bank, help ensure that they’re surrounded by nurse bees by periodically (weekly) moving frames of young, open brood from the lower portion up to the bank portion. Examine the frames carefully as you move them up — be careful not to move the queen from the lower portion up to the queen bank portion! If nectar is scarce, feed the queen bank with sugar syrup using whatever kind of feeder you prefer.
You can store mated queens for days or a few weeks in a queen bank. However, the sooner they get out and start laying eggs, the better off they’ll be. They’re meant to be roaming on comb, laying eggs, and surrounded by a population of worker bees. Confinement is hard on them, so get them into a colony as soon as possible.
Evaluating the Results
So you went to all the trouble to raise queens that you thought would be as good as or better than where you started. How did it turn out?
Whenever you work with bees, it’s good to make a habit of constantly evaluating the quality of the colony. For bees in your queen-rearing operation (large or small), formalize these observations by keeping some sort of record. Write it down! This record can take the form of a notebook, a set of index cards, or one of the new beekeeping phone apps — whatever works for you. Even writing on the outer cover can be helpful, though there is a limit to how much information will fit there. It’s a good idea to keep track of what queen was this queen’s mother. Over time, you may want to purposely switch from one queen mother to an unrelated (but still superb) queen to avoid inbreeding. Evaluate temperament, monitor varroa mite buildup, and make note of any other signs of disease or distress. Notice how they build up in the spring and handle a nectar dearth. Your notes can be simple — a series of check, check-plus, check-minus — or you can develop a more detailed analysis. There’s a lot of information to be managed, and having the information written down will help immeasurably. Don’t trust your memory!
You can review these notes to decide which queens to select for your next round of queen rearing and which to eliminate. You can compare various queens in terms of the traits you selected for. In this way, you can fine-tune your technique and be sure you move toward continuous improvement.
The Queen Rearer’s Calendar
Early Spring: Evaluate colonies for health and buildup. Finalize selection of queen and drone mother colonies. Prepare materials — tools and nuc boxes — for the coming season.
Spring: This is swarming season and an ideal time to raise queens. The bees are very willing to raise and accept new queens. Nectar and pollen are plentiful. Keep an eye on your drone mother colonies.
When drone cells appear and drones begin emerging, start actively rearing queens. The drones will be plentiful, mature, and ready for mating by the time your virgins are out on their mating flights.
Summer: Continue raising queens. Be aware that as nectar flow diminishes, the colonies will need feeding. In late summer especially, feeding is necessary not only to keep the smaller nucleus colonies afloat, but to aid in queen acceptance.
Fall: Queen rearing is done. Time to get nucs settled and ready for winter. Consider using a side-by-side nuc that can house two queens.
Winter: The off season is a good time to read your notes and make plans for the coming season.
You can set up some nucleus colonies for your new queens and overwinter them by setting them on top of other full-size colonies. This is especially helpful in cooler, northern climates. Heat rises, and the full-size colonies will help keep the nucs warm. The following spring, these overwintered nucs will have young queens that can be used to repopulate colonies that die over the winter. Or you can grow these nucs into full-sized colonies.
Overwintering nucs does require some special equipment: a split bottom board and a hive body divider of some kind (a division board and/or a division feeder).
Marking Your Queens
It’s a good idea to mark your mated queens. Beekeeping suppliers often sell queen-marking pens, or you can buy similar pens at an art supply store (just be careful to get water-based, permanent paint pens). An international queen-marking color code has been established to track the age of a given queen:
For years ending with |
Mark with this color |
0 or 5 |
Blue |
1 or 6 |
White |
2 or 7 |
Yellow |
3 or 8 |
Red |
4 or 9 |
Green |
Using this color code allows you to know a queen’s age at a glance, corroborates your written record, and can reveal “surprise” re-queening by the bees. Once in a while, the paint comes off, so if you expect a marked queen but find an unmarked one, first look closely to see if any paint residue can be found. If there is no evidence of paint, then perhaps the bees made a new queen all on their own.