Chapter 12. Adding Realism
Mods can not only add utilities to the game to make your life easier but can also entirely change the way the game plays. In this chapter, we’ll look at several mods that make Kerbal Space Program significantly more realistic; as a result of these changes, the game is also made much more challenging.
In an unmodified game of Kerbal Space Program, many things behave in an unrealistic way. Almost all engines can be throttled, shut down, and relit, and any spacecraft can be sent instructions that take effect immediately — effectively, commands to even your unmanned probes are sent faster than the speed of light!
Realism Overhaul and Real Solar System
Kerbal Space Program simplifies a lot of things in comparison to real space programs. All engines use the same fuel and the same oxidizer, they can all be throttled as much as you like, and they can be restarted on demand. Kerbals can last indefinitely without food or water, and many planetary bodies are politely lined up on the ecliptic. Kerbin itself is a tiny world, getting into orbit is surprisingly straightforward, and the Kerbol system is about one-tenth the size of our own. All of these changes mean that KSP is fun , and the game provides the player with much room for error.
But what if you wanted to imagine you’re running a space program on Earth? What if you wanted to re-create the Apollo missions of the 1960s and 1970s, or what if you wanted to see what could be done with current or future technology in our own solar system? Enter Realism Overhaul .
Realism Overhaul, or just RO as it’s commonly known, is a team effort from dozens of collaborators — including ones from actual space agencies — to make Kerbal Space Program more realistic. While many features are optional (such as limited throttling and restarts on engines), you can expect to be working with real technology, real propellants, and real aerodynamics, and you can expect it to be (compared to stock) really hard. Players can and do re-create both historical and planned missions in Realism Overhaul, and the fact that they’re able to do so is a testament to just how well the conversion has been made.
Tied to Realism Overhaul is the Real Solar System mod, which replaces the stock Kerbol system with our own. It is a beautiful piece of work, using actual planetary imagery, height maps, and atmospheric data to re-create the planets. The planets are also in their correct positions; day 1 of a new game in Real Solar System corresponds to January 1, 1951, at midnight GMT. If you were to skip time forward to the late 1970s, you could re-create the Grand Tour of the Voyager missions, with the planets all in their correct positions for their time.
Needless to say, while Realism Overhaul adds significant challenges to the game, the sense of achievement it brings you can be equally amazing.
Realism Overhaul has many dependencies and optional features. Installation via the CKAN is highly recommended, as a manual install can take a considerable amount of time. Indeed, one of the driving factors in the CKAN development was to simplify the installation and automated upgrade of Realism Overhaul and other equally complex mods.
We could write an entire book just on Realism Overhaul. This chapter is intended to give you a taste of what it’s like.
Note
Real Solar System can use up significantly more memory than a standard install. It’s recommended you run on a machine with at least 8 GB of memory, and ensure you’re running the 64-bit build of the game, which is KSP_x64.exe on Windows, and KSP.x86_64 on Linux. The Mac release runs in 64-bit automatically.
Sandbox and Career Mode (RP-0)
Realism Overhaul can be a very satisifying experience in Sandbox mode; being able to re-create past missions, or to simulate future or hypothetical missions, can be extremely rewarding without requiring external gameplay mechanics. However, Realism Overhaul can also be played in Career mode. At the time of writing, the most active and supported Career mode is Realistic Progression Zero (RP-0). Be aware that there is a steep learning curve when you’re switching from stock to Realism Overhaul, although many of the more challenging aspects (such as limited engine restarts) are optional.
ckan install RP-0
will give you the RP-0 career mode, along with all its dependencies, including Realism Overhaul. Note that while RP-0 supports many optional mods, it’s highly recommended to begin with the defaults presented by the CKAN client
.
Money in RP-0
In RP-0, money has been standardized such that 1 Kerbal Buck = $1,000 USD in 1965. While not every price is accurate, many of them are, and the rest are very good estimates from the information that’s available. As you’ll discover, launching things into space is expensive .
RP-0 is designed to work well with the “moderate” difficulty setting. If you disable entry purchases for parts research, then reducing monetary rewards from contracts to about 20 percent of their default value results in a similarly balanced game.
Avionics in RP-0
RP-0 starts with technology that was available at the very beginning of the Space Race, and this did not include fine-grained control of rockets. Instead, the initial launches were sounding rockets , which would fly on ballistic or suborbital paths, sometimes reaching altitudes far into space but without reaching orbit. Human space flight requires extensive research.
Your initial craft in RP-0 can’t be steered, so it’s essential you add small stabilizing fins to your craft to resist tipping during flight. As you move up the tech tree, you’ll unlock avionics packages that will allow for steering of craft up to a certain mass. Early avionics packs are heavy and expensive, and they consume large amounts of electricity. Later avionics packs are considerably better as your technology improves.
Avionics packages are additive: if you have two packs capable of controlling 100 tons, you can build a craft up to 200 tons and remain in control. Since avionics have a cost in weight and electricity, the larger avionics packs are often jettisoned with lower stages.
Note
Some advanced avionics packs can be placed into a “low power” mode, in which they use minimal electricity when not in use. These packs will automatically enter low-power mode during warp, or when the craft is no longer the “active” craft that’s being controlled.
Launching with Real Engines
When working with real engines, you must keep in mind that they have several differences from the stock engines that KSP provides.
Real engines don’t throttle
In stock KSP, practically every engine can be throttled. You can run at full power during liftoff and throttle back as you climb so you don’t end up accelerating too quickly, causing your craft to overheat or your crew to die from g-forces.
In reality, most engines don’t throttle, or don’t throttle by any appreciable amount. The really big engines that get you off the launch pad are almost always an all-or-nothing affair.
This means that, to launch, you need to pay a lot more attention to your thrust-weight ratios (TWR). A high TWR on launch is great for getting off the ground, but if that becomes too high during flight then there’s a risk of aerodynamic, thermodynamic, or passenger failure. Too low a TWR, and you won’t get off the launch pad, or you’ll spend most of your propellant fighting gravity rather than providing acceleration.
One of the reasons for staging in real rockets is that it allows more careful control of acceleration during flight. Short-lived, solid fuel boosters are popular because they can provide an initial “oomph” to get off the ground, allowing for a smaller liquid propellant engine that can be carried farther before things start to go “too fast.”
Real rockets can also make use of “clustered” engines, consisting of a number of smaller engines working together, with individual engines being shut off to avoid TWR spiking too high. For example, the Saturn V that launched the Apollo 8 missions would cut the center engine (of five) in both its first and second stages to control acceleration.
It’s strongly recommended that you use MechJeb (see “MechJeb” ) or another helper to be able to see TWRs for each of your stages when building, particularly those that will be operating in atmosphere. At launch, you rarely want a thrust-weight ratio that is too high , as the temperatures experienced during launch can be significant, and many real craft launch with a starting TWR of 1.2 to 1.4.
Real engines don’t restart
In the same way that big engines can’t be throttled, most large engines can’t be restarted either. Starting an engine is surprisingly complex, and restarting an engine reliably is even more difficult.
Most engines designed for takeoff are single-start. Shutting them off before they’re out of propellant is possible, but doing so is a permanent affair.
Real engines need ullage
On Earth, propellant flow is a relatively simple matter. Tanks contain a liquid propellant (which we want to burn or expel to provide thrust), and a gaseous pressurant (which ensures good flow of the propellant). You put your propellant lines at the bottom of your tanks, and gravity makes sure that your liquid propellant is there to flow through the lines when your pumps activate.
In space, it’s a different matter.
Craft in space are in free-fall. Propellant doesn’t stay at the “bottom” of the tank; instead, it coats the walls or just floats around in a big, sloshy mess. If you try drawing propellant from the tank, you might get a few sputters, but you won’t get a reliable supply, and will instead end up with pressurant in your lines. Propellant can’t flow “down,” as there’s no down in free-fall.
In order for propellant supplies to be reliable in space, craft need to perform ullage maneuvers. This is an acceleration toward the front of the craft that pushes the propellant backward via inertia. Once the main engine is lit, the continued acceleration ensures the propellant is pushed toward the base of the tank, guaranteeing a reliable supply.
But if we can’t start engines in our craft without accelerating first, and we can’t accelerate without the engines, how do we start any engine after it’s been in free-fall for a while? The answer is either by using small solid fuel engines (referred to as ullage motors ), or by separating the propellant and pressurant with a membrane, or enclosing the propellant in a mesh that provides surface tension, ensuring that only propellant can reach the engines. These tanks are more complicated and expensive to build, and while they are a staple of Reaction Control Systems and other smaller engines, they’re less commonly seen feeding larger engines.
Orbital and landing engines break these rules
Engines specifically designed for orbital and landing use often do have throttling and restart capabilities. However, they also provide limited thrust, and they tend to be very expensive for what they do. Some very small engines can fire without ullage; indeed, Reaction Control Systems are just a series of small engines allowing for controlled and directional thrust. Choosing appropriate engines is a significant part of any realistic mission.
Understanding real propellant mixtures
The stock game has liquid fuel engines that use “liquid fuel” and “oxidizer” as their propellant mixtures. These share many properties with Aerozine 50 and nitrogen tetroxide (NTO), but not their density. However, if you’re playing with Realism Overhaul, you can expect to be dealing with real propellant mixtures.
Kerosene and liquid oxygen (aka kerolox)
By far the most historically important rocket propellant, kerolox is made up of rocket-grade kerosene (RP-1 in the United States) and liquid oxygen. It is inexpensive, does not require excessive measures to prevent boil-off, offers excellent performance, and is extremely common in lower stages. The first stage of the Saturn V used kerolox, as does the Soyuz and the Atlas.
Liquid hydrogen and oxygen (aka hydrolox)
Hydrolox is a very efficient propellant mixture, featuring a much higher specific impulse than anything else (excepting exotic, dangerous mixtures). It also requires a lot more tank volume for a given mass, meaning that hydrolox-fueled rockets are a lot “bigger” than their storable counterparts.
Liquid hydrogen suffers badly from boil-off (its boiling point is –253°C), and requires additional layers of insulation to stay cool. Hydrolox is not commonly used for long missions for this reason.
Hydrolox engines are extremely expensive compared to their RP-1 counterparts. They make up for this by supplying a much higher specific impulse, meaning greater payloads can be launched into orbit for the same weight of propellant.
Storable Hypergolics
Hypergolic propellants are usually liquids that spontaneously combust when they come in contact with each other. They are often combinations of dinitrogen tetroxide (NTO) as oxidizer and a hydrazine or hydrazine derivative as fuel. Common fuels include hydrazine itself, unsymmetrical dimethylhydrazine (UDMH), and Aerozine 50/50, which is an equal mixture of both. Monomethylhydrazine (MMH) is often used for orbital applications. Storable hypergolics are often used in orbital and landing engines as they’re easier to restart and as they are liquids at common temperatures, they suffer little from boil-off.
Orbital taxi engines and RCS often run off storable hypogolics due to these advantages, however they are extremely toxic and require special handling. High performance RCS, the Apollo Service Propulsion System, and Lunar Module ascent and decent engines, and the Space Shuttle Orbital Maneuvering System all use storable hypergolics. Some launch vehicles also use storable hypergolics in their lower stages, including the Proton, Ariane 1 through 4, and Titan II through IV.
Monopropellants
While not used for heavy-thrust engines, monopropellants are a common choice for smaller thrusters and Reaction Control Systems. Nitrogen and helium are inexpensive, safe, and extremely reliable, requiring little more than venting gas. The most common monopropellant is hydrazine, which is toxic and unstable, and requires special handling. It’s also much more efficient, as it breaks down into hydrogen and nitrogen when run over a catalyst, expanding energetically as it does so, allowing one to obtain the strength of a fuel-oxidizer reaction without the oxidizer .
Note
The toxicity of hydrazine was used as an excuse for the United States to test an antisatellite missile system in February 2008, in Operation Burnt Frost. It was claimed that the disabled US satellite that was intercepted would have partially survived reentry, spreading a toxic cloud of hydrazine over an area of roughly the size of two football fields.
The Rocket Equation and You!
The rocket equation (see “The Rocket Equation” ) means that the more propellant you want to expend, the more additional propellant you need to bring to carry that propellant. This means that if you want to run your engine for a long time to get really fast, it’s not enough to just bring a really big propellant tank.
However, there’s a way around the rocket equation, and that’s by using engines that are much more efficient . Fuel efficiency in space is measured in specific impulse (Isp ), and Table 12-1 shows typical Isp values per technology.
| Propellant | Isp | Example engine |
|---|---|---|
|
Kerolox |
305s |
F-1 |
|
Hydrolox |
424s |
J-2 |
|
Nuclear thermal |
850s |
NERVA |
|
2.3 kW ion thruster |
3,000s |
NSTAR |
|
250 kW ion thruster |
19,300s |
DS4G |
Note
For a more detailed discussion on what specific impulse is, see “Specific Impulse” .
One of the reasons why hydrolox is such a big deal is that it provides roughly 30 percent more delta-v per unit mass of propellant, and due to the rocket equation this means a much, much greater than 30 percent savings in propellant mass for a given payload.
The downside of hydrolox is that it’s much more expensive to work with. The propellant is more expensive, the engines are much more expensive, and hydrogen boil-off is a real issue.
Nuclear thermal propulsion — which used the output of a high-temperature nuclear reactor to heat propellant — was a real technology that was actively researched during the Cold War era, including as part planning for crewed Mars exploration using the Nuclear Engine for Rocket Vehicle Application or “NERVA”. Despite numerous successful tests and the engine being deemed ready for integration into a spacecraft, the project was discontinued at the end of 1972.
Ion thrusters provide incredible propellant efficiency but require electricity to run and provide very little thrust. The Dawn craft, launched in 2007 to explore Vesta and Ceres dwarf planets, uses ion thrusters for propulsion.
SCANsat
One of the primary uses of satellites in Earth’s space programs has been the collection of mapping and resource information. While this began in the Cold War era as a form of surveillance — including the Corona satellites, which dropped film canisters that could survive reentry — the use of satellites to provide weather, resource, mapping, and environment data continues to be one of the mainstays of the space industry .
In regular games of Kerbal Space Program, there’s not much that you can do to map a planet.
To address this, the SCANsat (Scientific Committee on Advanced Navigation satellite) mod by DMagic provides a complete and very satisfying mapping experience for Kerbal Space Program. Installation is as easy as
ckan install SCANsat
.
Mapping Basics
SCANsat supports multiple map types, but we’ll start with altitude maps, which are one of the first SCANsat technologies to unlock and the easiest to establish. In order to perform an altimeter scan, you need to create a craft with the appropriate instrument and place it into an appropriate orbit for it to function.
Mapping favors highly inclined orbits, which means you should be heading north or south on launch, rather than due east. An equatorial orbit only ever passes over the equator and will not be able to capture much of the planetary surface. A nonresonant polar orbit will eventually be able to map the entire planetary body but will waste a lot of time over the poles, which will get mapped on the first pass. An ideal mapping orbit is inclined slightly from polar, and the larger the field of view, the farther you can be from polar and still achieve 100 percent coverage.
Be aware that all mapping instruments require electricity to run, so you may wish to pack some extra solar panels and batteries on your mapping probes so they can continue to run on the dark side of a body. While it’s not covered in this book, you can also use the Fusebox mod to display anticipated electricity usage, which includes SCANsat support.
Once a mapping instrument has been activated, there’s no need to keep the vessel active; it will continue to map in the background.
The first instrument you’ll unlock will be the RADAR altimeter, which provides low-resolution mapping data on the terrain below it. The default SCANsat install also includes a high-resolution SAR altimeter, a biome and anomaly scanner, and a ground-based anomaly scanner that’s useful for rovers. Other mods may also add their own scanners; this is particularly common for mods that add further resources to the game.
Note
A resonant orbit is one in which the body’s rotation is an integer multiple of your orbital time. The best known resonant orbit is a geostationary orbit, with a 1:1 resonance. Resonant orbits prevent effective mapping, as they mean a satellite always passes over the same areas. For example, a satellite with an orbital period of 12 hours around the Earth would always pass over the same two tracts of land each day. Luckily for mapping satellites, positioning into a true resonant orbit usually requires careful planning, and you’re unlikely to end up in one by accident.
Large and small maps
To view the data you’ve gathered, open up the map view, which is available in both small and large versions. The small map (see Figure 12-1 ) renders quickly and is particularly useful for seeing how mapping is progressing, as well as checking that your craft is positioned correctly. The larger map (see Figure 12-2 ) takes longer to render but provides much more information and functionality, including the ability to set landing sites and explore planetary resources!
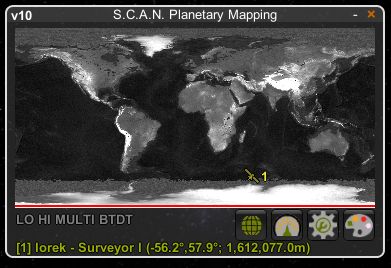
Figure 12-1. The small SCANsat map. All scanning craft are shown, with the currently active craft highlighted in yellow. In this image, we’re using Realism Overhaul to replace Kerbin with Earth.
If you’re not color-blind, the small map also provides visual information as to scanner altitude. A solid orange on the scanner panel means we’re too high (and not collecting any data), flashing orange and green indicates we’re too low (collecting data with a penalty), and solid green means we’re just right. If you are color-blind, or can’t remember what the colors mean, you can also right-click on the sensor to see the same information (“Too high,” “Sub-optimal,” and “Ideal”).
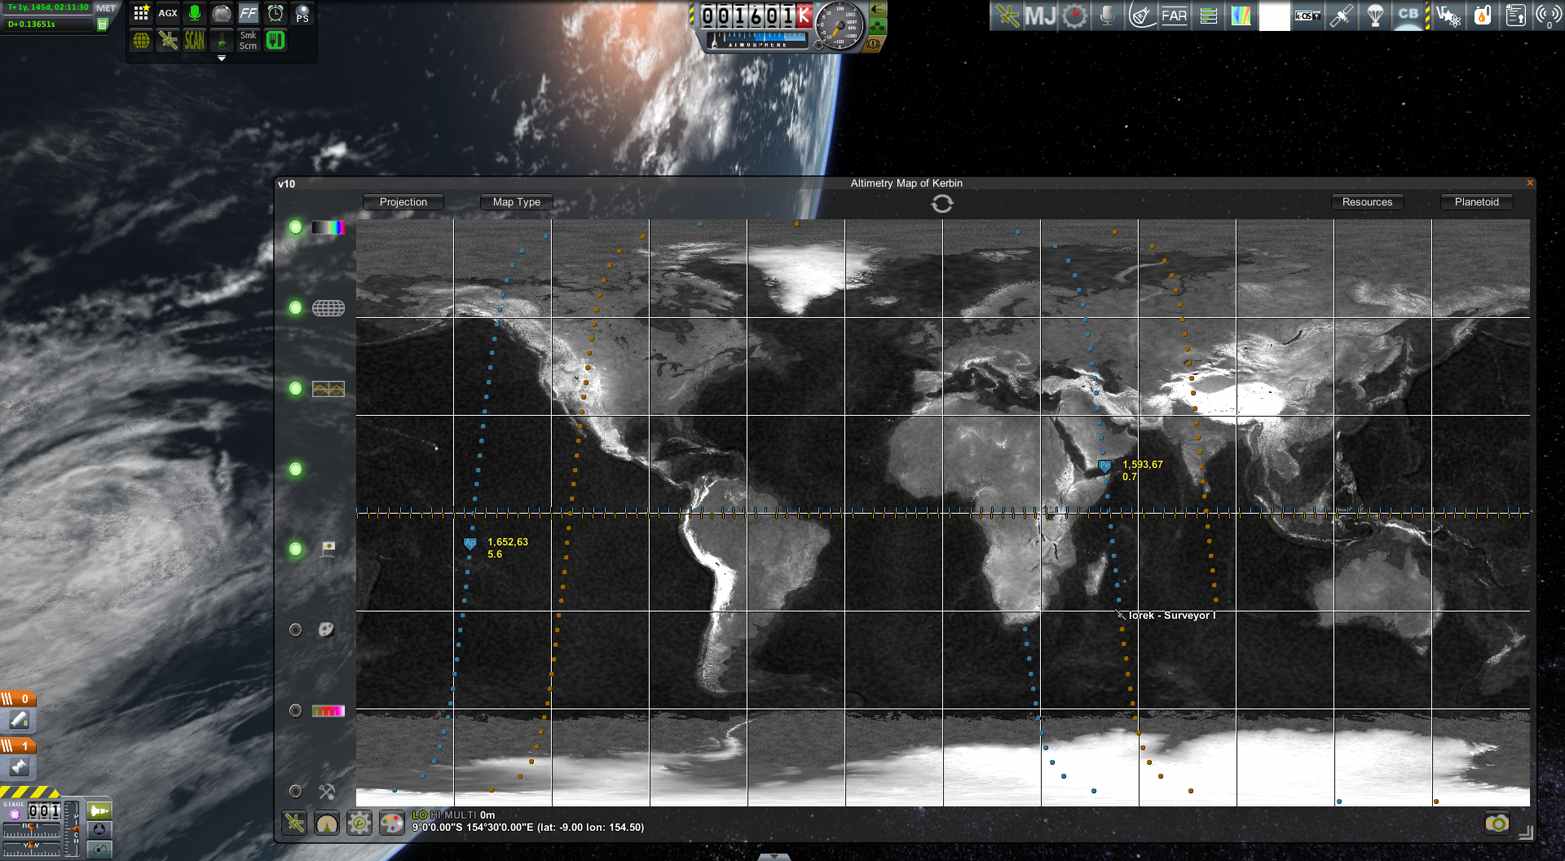
Figure 12-2. The large SCANsat map
While we don’t cover it in this book, SCANsat also supports the ability to zoom the map even further, allowing you to see detailed terrain and resource data. If you have MechJeb installed, you can even select a landing site directly from the zoomed map.
“Best” Altitudes and Fields of View
When examining the SCANsat instruments in the VAB or SPH, you’ll see they display minimum, maximum, and (for some instruments) “best” altitudes for each instrument. The minimum and maximum altitudes are easy to understand (outside of these ranges the instrument will simply fail to function), but the “best” altitude deserves further explanation.
Each satellite has a field of view in degrees. This is not the size of a cone drawn from the instrument toward the surface, but instead the width of the swath that can be mapped if the instrument is at the “best” height or above around Kerbin. Below the best height, instruments suffer a linear penalty; an instrument with a best height of 800 km but in a 400 km orbit will only have half the listed field of view and will have swaths of half the size of one at the best altitude.
Being above the best altitude provides no additional benefit, meaning the ideal instrument placement is above the best altitude but below its maximum altitude. The basic RADAR sensor has a best altitude of 5 km, meaning that not only is it effective on spacecraft up to its maximum height, but it can also be used by airplanes to perform mapping!
Tip
The SCANsat logo (see Figure 12-3 ), depicting an octopus c onsuming the world, is an actual mission logo from the real National Reconnaissance Office Launch 39 (NROL-39), which originally bore the motto “Nothing is beyond our reach.” The logo was extensively criticized, as the launch came soon after the 2013 disclosures by Edward Snowden on the state of global surveillance. Interestingly enough, the NROL-39 launched appeared to be that of a Topaz radar imaging satellite, using the very same scanning technologies that are added by the SCANsat mod.
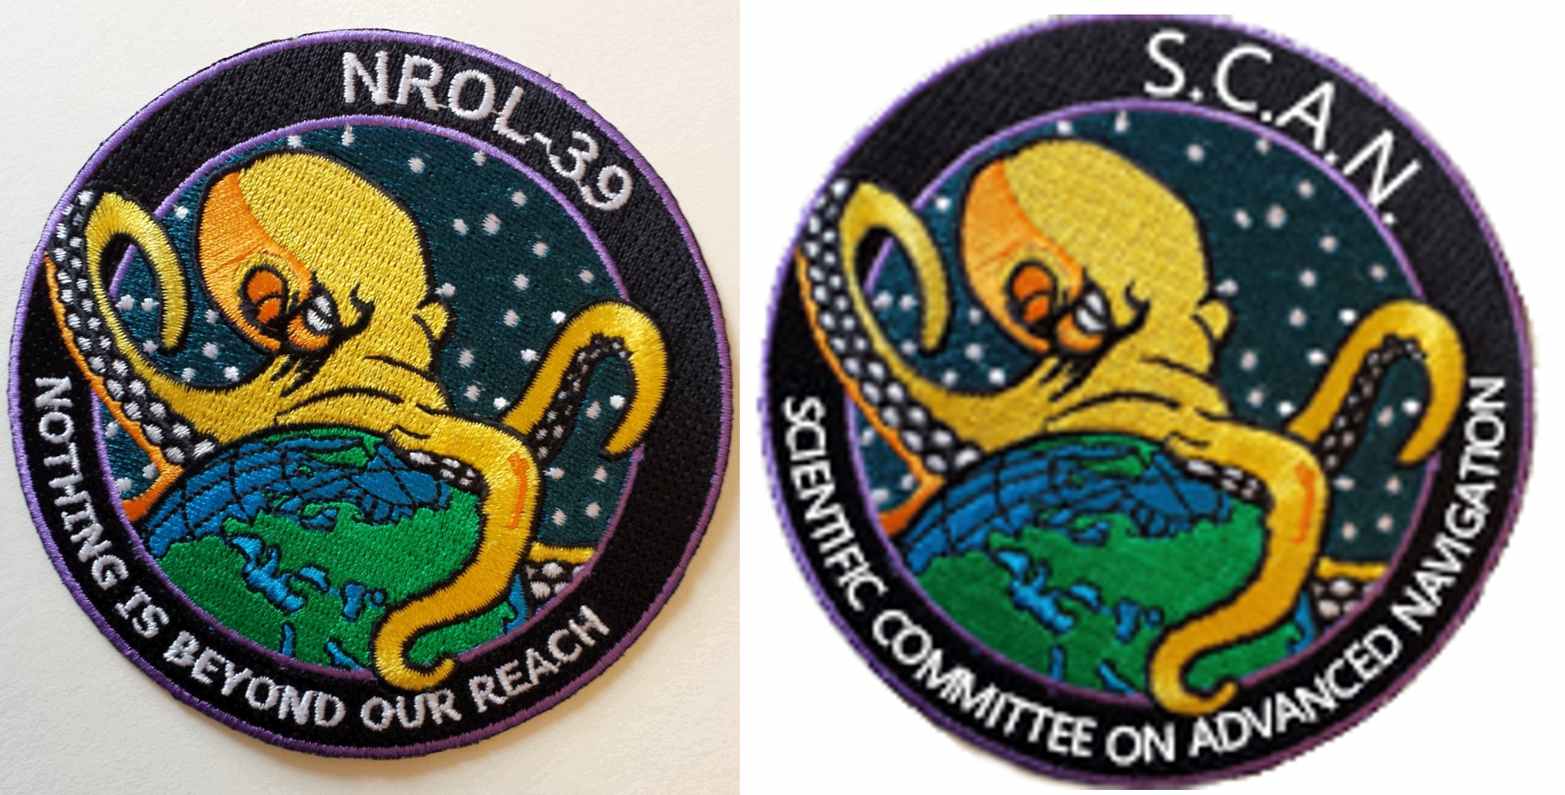
Figure 12-3. The NROL-39 and SCANsat badges, side by side
RemoteTech
One of the unique challenges to space exploration is the speed of light itself. When Curiosity landed on Mars, there was over a 13-minute delay between signals being sent from Earth and the probe receiving them. Likewise, there are times when a probe may be entirely out of contact, because it’s obscured by the body it’s orbiting.
The RemoteTech mod extends the concept of communication links, and adds signal delay to the game. Constructing communication satellites (see Figure 12-4 ), and planning appropriate communications arrays for craft, adds extra depth to the game, as well as looks really freakin’ cool.
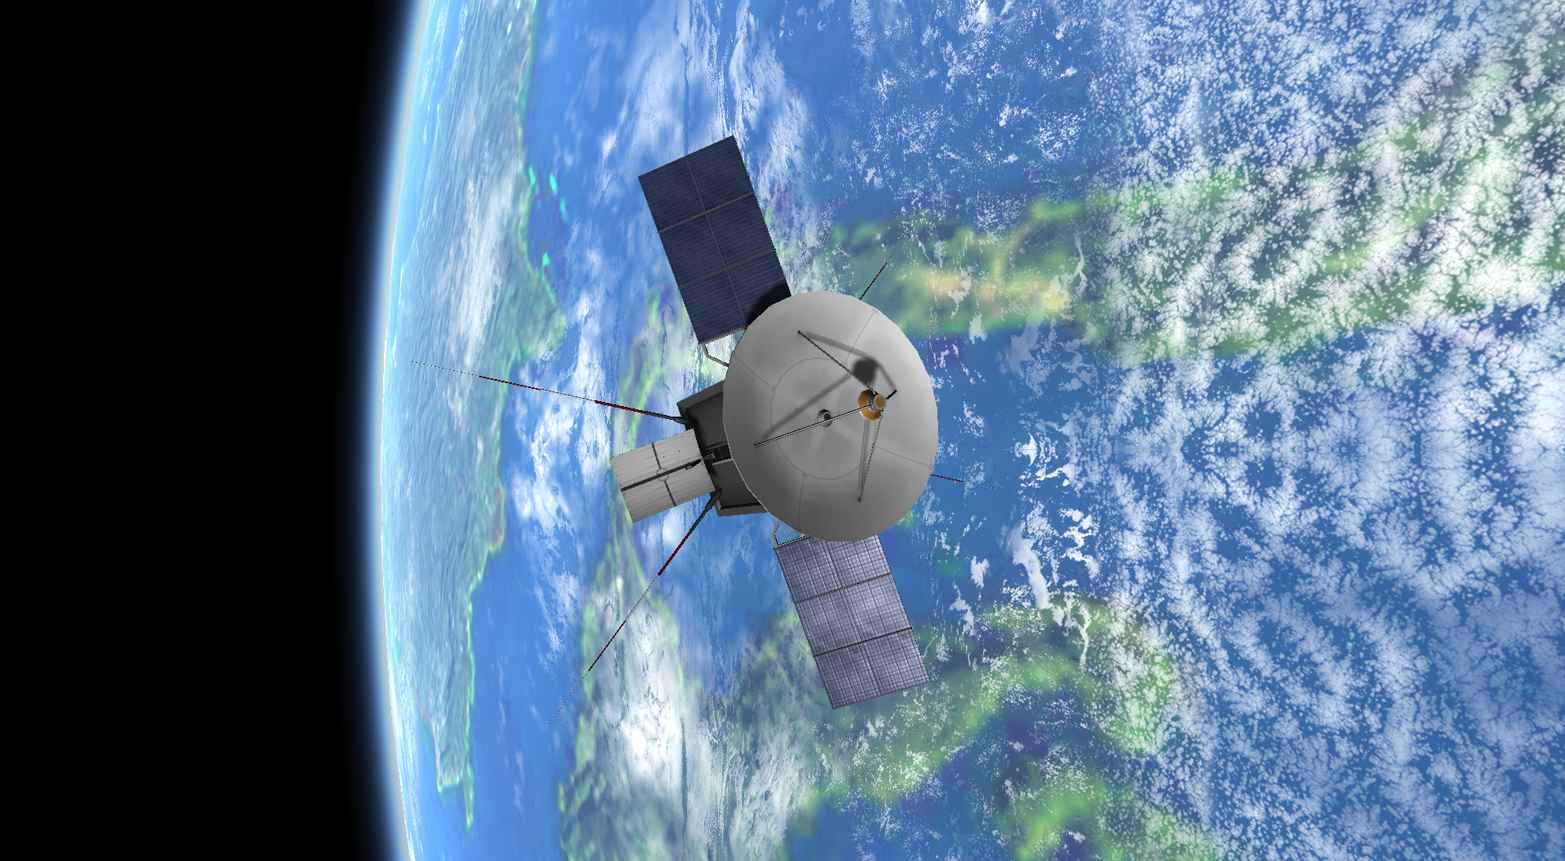
Figure 12-4. A dedicated communications satellite with a mix of antennae
Note
The RemoteTech mod is similar to the built-in antenna system present in the game, but adds several features to make it a lot more realistic.
Because craft can have a high signal delay, or be completely out of communications range, RemoteTech also adds a basic flight computer to the game. The flight computer can be instructed to hold particular attitudes (prograde, next maneuver, etc.), execute nodes, schedule burns, and even activate stages or individual parts. This not only allows for craft to be given instructions that can execute without direct human control, but also means you can queue up in advance all the steps to, say, land a probe on Duna using a rocket-powered crane. For more advanced levels of automation, the Kerbal OS (kOS) mod can go a long way toward the construction of semiautonomous probes.
Note
If you want to build communications networks, but don’t want all the complexity of RemoteTech, the AntennaRange mod (available via the CKAN) provides an easier but less realistic way to manage antennae in game.
A Simple Probe
Building a basic communication satellite is not only a great way to get into RemoteTech, but also will provide a valuable uplink in your communications network. We’ll walk through the various factors involved in designing a satellite that can facilitate both near and deep-space communication.
Note
In this part, we won’t be walking you through every step of the way, since this type of mission is most rewarding when you’re in charge. Instead, we’ll show you what’s needed and what the various options are for setting up your communications network using RemoteTech.
RemoteTech has two types of antennae: omnidirectionals , which have short range but will automatically link to any nearby antennae, and dishes , which have long ranges but can only communicate in a limited cone. Vessels can contain both types, with omni antennae establishing local communication, and dishes being used to form a deep space network.
Many antennae are fragile and will break off if deployed in atmosphere when moving at speed. In Figure 12-5 , eight retracted omnidirectional antennae can be seen at the top of the craft, and on the side we can see a panel where a foldable dish antenna has been stowed. Once in space, we’ll activate them to provide communications (see Figure 12-6 ).
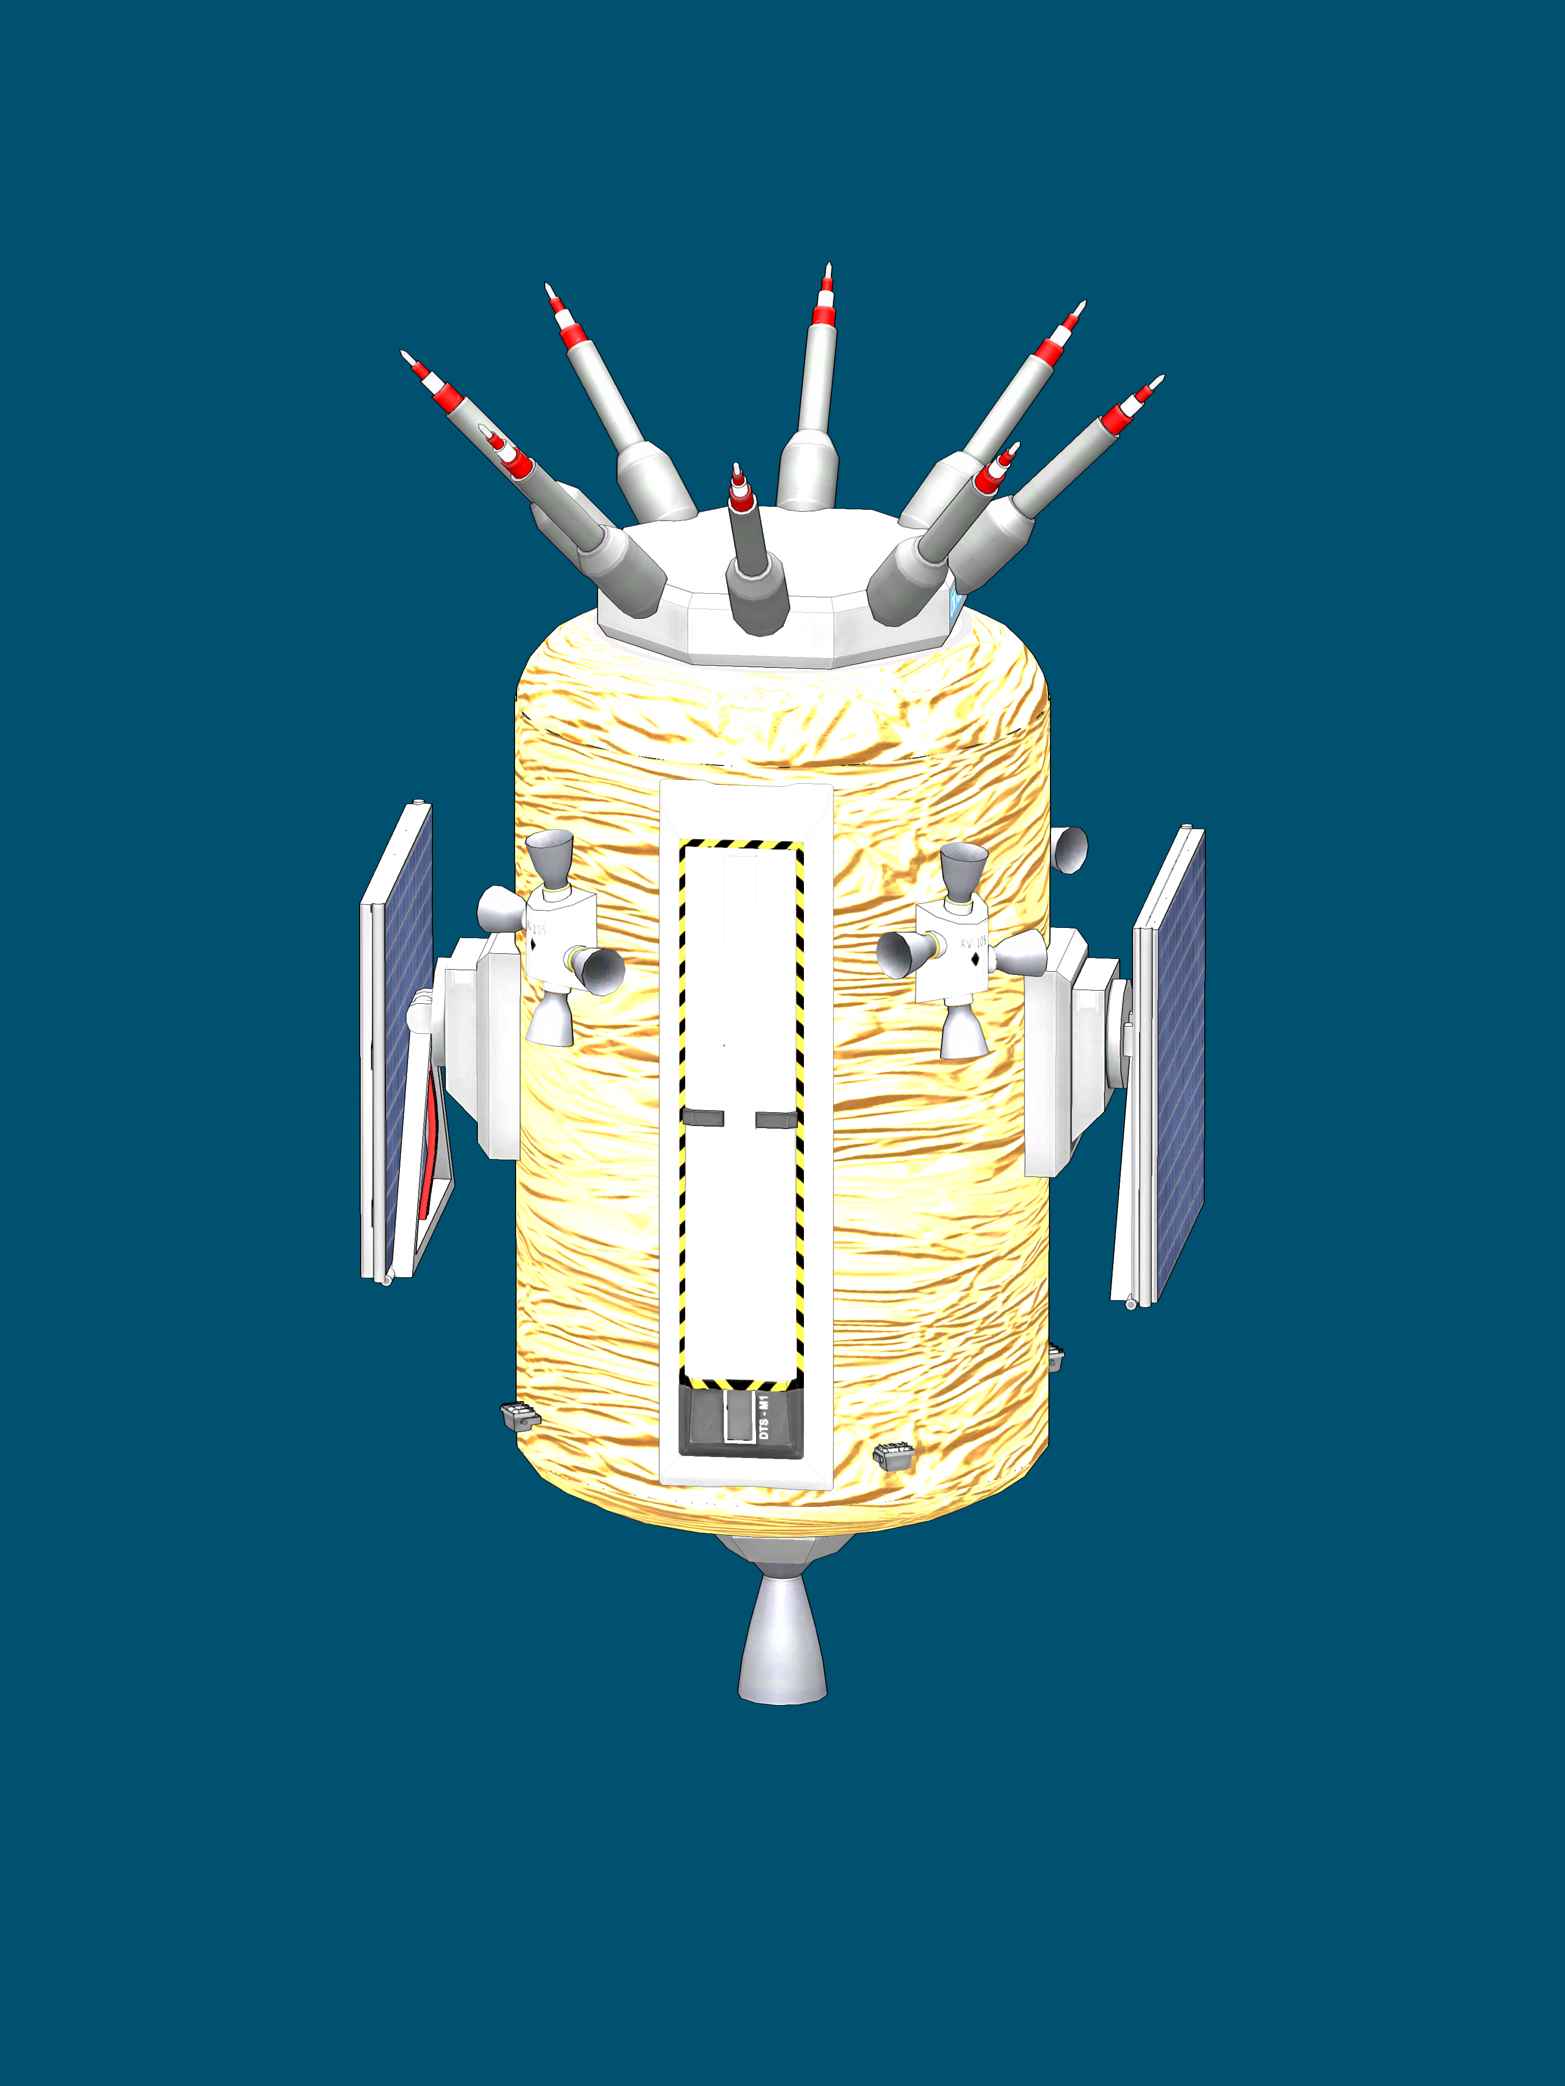
Figure 12-5. Our first communication satellite in launch configuration
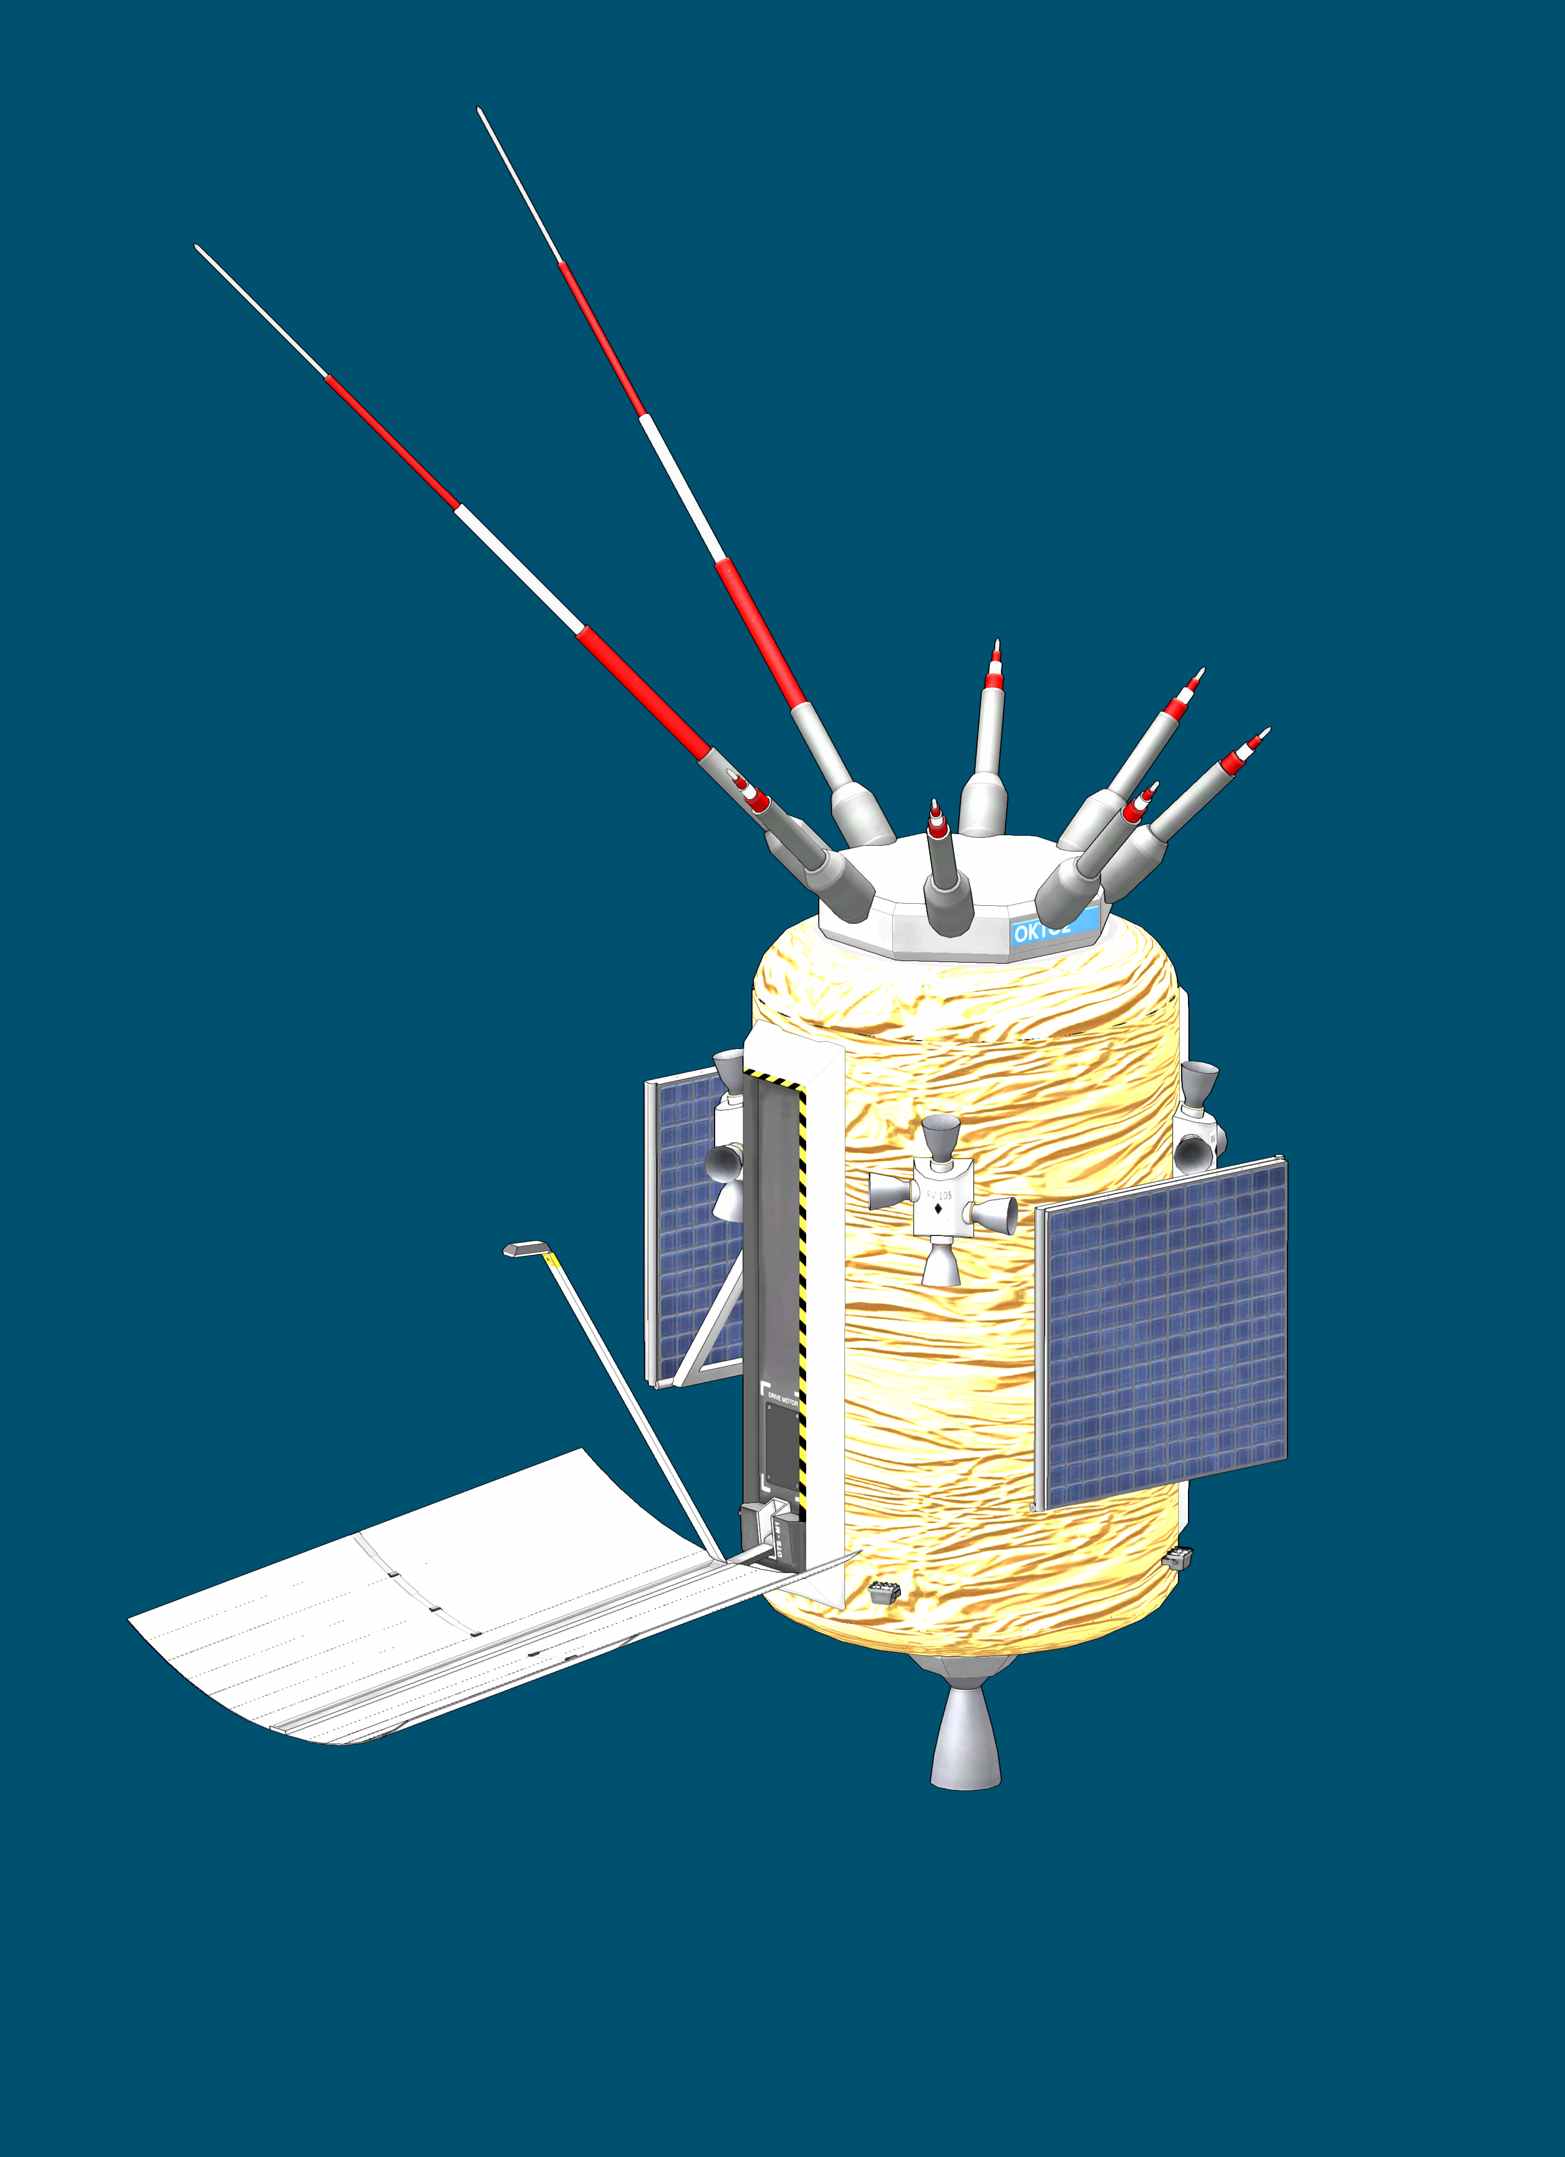
Figure 12-6. Two omnidirectional antennae and a folding dish antenna are shown in their active configuration
But if we can’t launch a craft with active antennae, how can we control our craft during ascent? There are two options: one is to use a probe that contains an integrated antenna, and the other is to use a much sturdier (but shorter-range) antenna intended for atmospheric use.
In our upper stage, we want a longer-range antenna, but we won’t be able to deploy this until we leave the atmosphere. In Figure 12-7 we have a cluster of antennae; not only does this mean our communication satellites look cooler than having a single antennae, but a clustered array also provides more range if we’re using the root range model (discussed later) and provides redundancy against any mishaps.
In the case of our satellite, we also have a foldable dish antenna, with a wide transmission cone, useful for reaching craft orbiting Mun. We can also see a radar altimeter (from SCANsat) and solar cells for power. Dedicated communication satellites can contain much larger dishes, allowing communication to the outer planets.
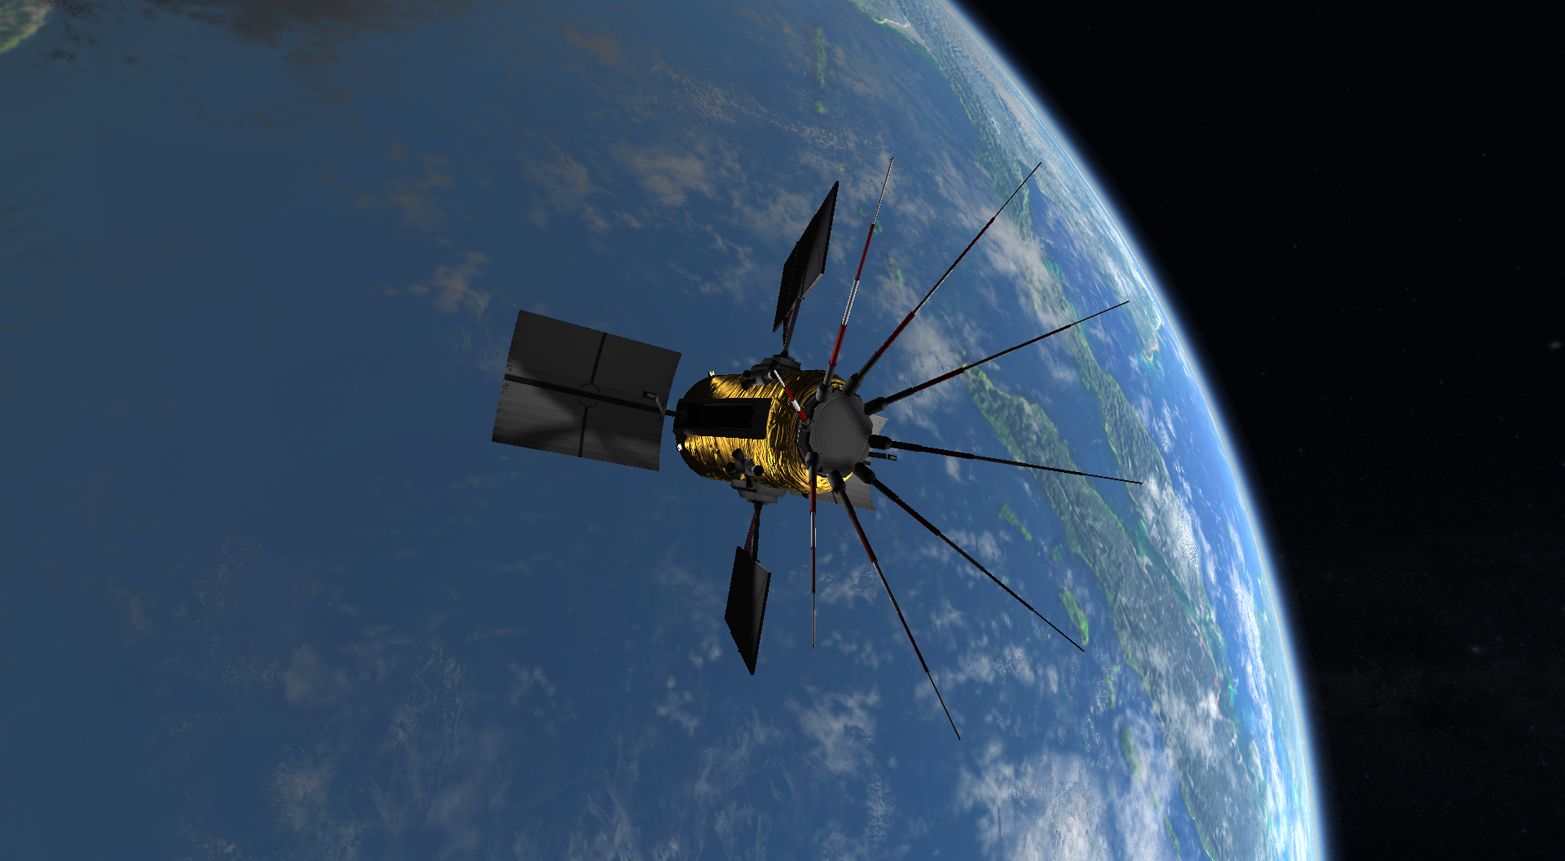
Figure 12-7. Our first communication satellite in orbit
Antenna Selection
As we mentioned earlier, RemoteTech divides antennae into two classes: omnidirectional antennae, which are good for local communication, and dish (directional) antennae, which have superior distance but need to be pointed in the correct direction to operate.
With a few exceptions, all antennae in RemoteTech need to be activated in order to be used. This causes them to deploy themselves and draw power, but it also puts them at much greater risk of damage from atmospheric forces. Fragile antennae that are deployed during launch run a real risk of snapping off, and any deployed antennae during reentry are unlikely to survive. When sending probes to distant bodies with atmospheres, you can use an orbiter with a large antenna to relay communications to a lander with much sturdier but shorter-range antennae.
Note
The hard dishes that come bundled with RemoteTech don’t have activation animations and do not change in their vulnerability to atmospheric stress.
Omnidirectional antennae
Omnidirectional antennae (or just “omnis”) are the easiest antennae to understand. They have a fixed range and will form ad hoc mesh networks with any other omni within that range. They don’t need to be targeted, and most of the time they can just be activated and forgotten.
Omni antennae are usually cheap, and have relatively short ranges. They’re recommended for all craft, as they allow communication between orbiters, landers, and mission control to all happen automatically. Because omnis automatically connect to any other omni within range, they can also be used to reestablish contact with a craft that’s lost communications, provided you can get another craft close enough for it to connect to.
Under the standard communication model, no antenna can reach farther than its listed range, so the maximum communication distance between two antennae is always equal to the weakest of the two. However, under the more realistic root range model a weaker omni can communicate at beyond its listed range if the other antenna is powerful enough.
Note
Some probes have integrated omnidirectional antennae. Check the part information when building your craft to see the details. In some career modes (including the stock career), a certain tech level is required to unlock integrated antennae.
Dish antennae
Dish (or directional) antennae in RemoteTech allow for communication across vast distances but are also more complex as a result. A dish needs to not only be activated but also targeted . Unlike omnidirectional antennae, dishes are only able to communicate with craft in their field of communication, as determined by their cone attribute. Longer-range antennae tend to focus their communications into a much tighter cone, which is perfect for long-distance communication but impractical for communicating with craft at short range. Craft designed to act as dedicated communication satellites often have multiple dishes of varying properties, so they can provide coverage to both near and distant targets.
Note
While you need to select a target for dish antennae, RemoteTech does not require the craft to be physically pointing the dish in the correct direction in game.
Dishes have three separate types of targets, and it’s worth noting the differences in each. From most to least versatile, the modes are targeting bodies , active vessel , and direct link .
Targeting bodies
When targeting a body like Mun or Kerbin, a dish can communicate with any craft that satisfies all of the following (shown also in Figure 12-8 ):
- Is within the dish’s range
- Is within the dish’s communication cone
- Is within the sphere of influence of the antennae’s target
- Is able to communicate back
The requirement that craft be in the same sphere of influence can be surprising; your craft won’t automatically connect to a relay around a body’s moon, even if that moon would otherwise be within the dish’s cone of communication.
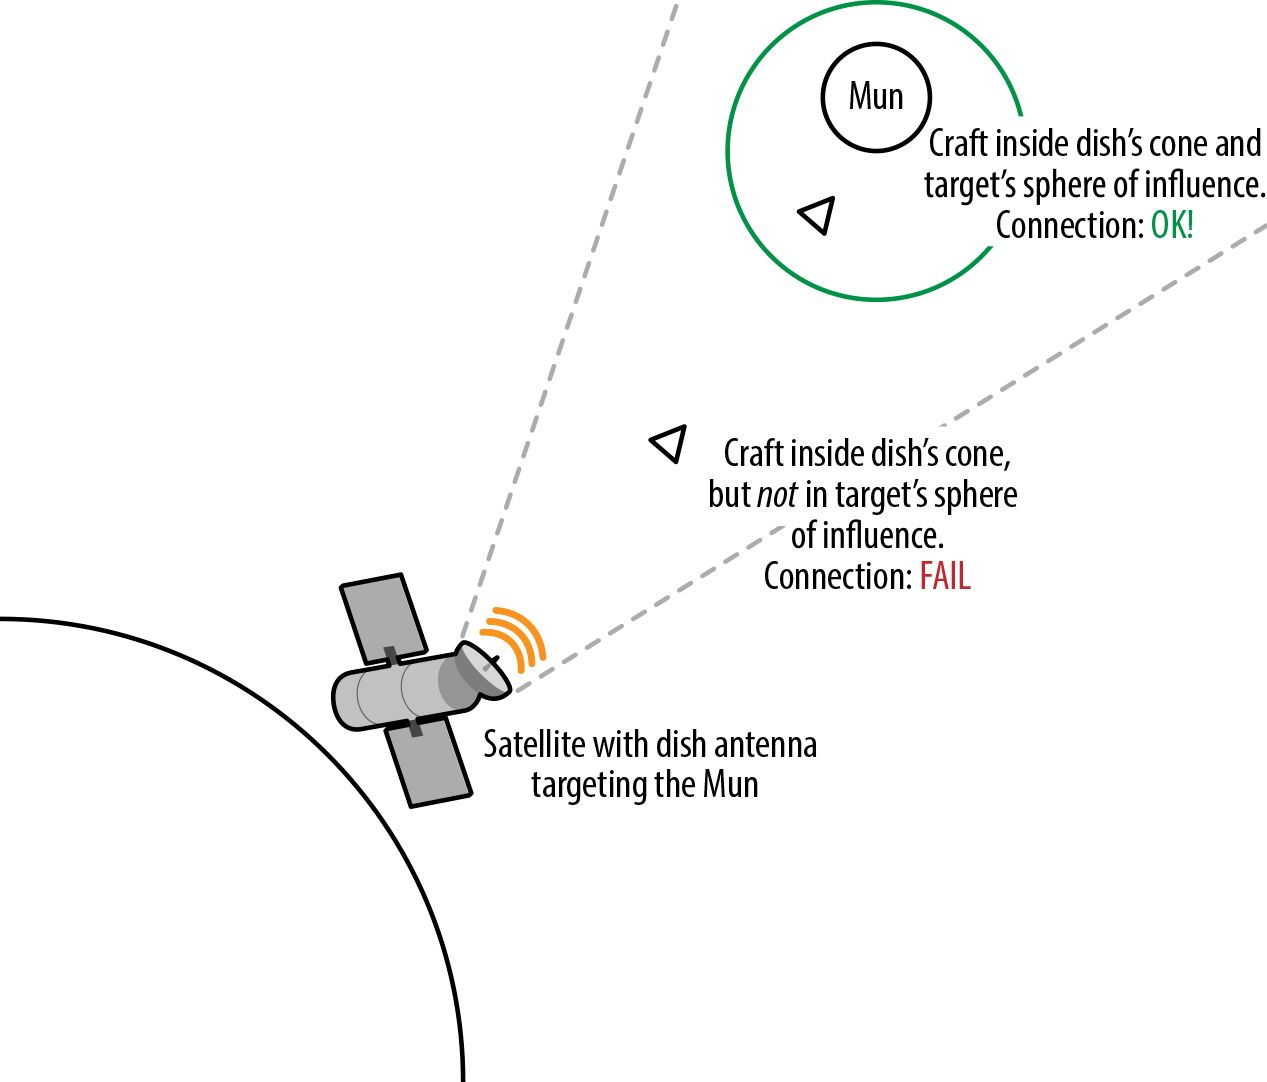
Figure 12-8. A craft needs to be inside both the dish’s cone and the target’s sphere of influence to be connected
Note
Targeting a body provides the most versatility in creating communication networks, as it permits communication with multiple craft at the same time.
Active vessel
An “active vessel” link targets the active craft and only the active craft, effectively ignoring the dish’s cone of communication and only establishing a point-to-point link. This is a versatile mode that reduces the need to manually change dish targets, as they’ll automatically target whichever craft you’re currently working with.
Active vessel targeting makes it easy to work with multiple interplanetary probes and other craft that wouldn’t normally fall within a single cone’s connection. It can sometimes cause confusion if the active vessel is acting as a relay , as changing the active vessel can cause it to lose its connection. If a link needs to be continuously maintained, a direct link (discussed next) should be used.
Direct link
A direct link targets a specific craft. The antenna will connect to that craft and only that craft, provided that range and line of sight allow it. When you’re using direct links, the dish’s cone of communication is effectively ignored.
Direct links are the least flexible link type but allow for communications to be maintained when other options aren’t suitable. For example, you might send a probe with a detachable lander to an asteroid. By maintaining a direct link to the probe, it can relay communications to the lander, which can then carry only a light omni. Using an active vessel link would not work, as the lander’s omni would have the reach required to talk back, and a body-targeted cone link is also unsuitable, as this can only be used with major celestial bodies (which do not include asteroids).
Range models
RemoteTech uses two range models. The “standard model” is easy to understand but not particularly realistic. The “root range model” is more complex to understand but is more realistic and provides more depth when it comes to creating your communication networks.
RemoteTech has in-game settings that are available form the space center screen, and will also present these to you when you open a new game.
The standard model of RemoteTech (RangeModelType = Standard
) is the default and says that for two craft to communicate, they need to be within the range of the lowest distance antenna
, or Min(r1,r2). For example, if one craft has a 2.5M m antenna, and the other a 5M m antenna, the maximum communication range is the lowest of the two, or 2.5M m.
Selecting antennae with the standard model is easy; figure out the farthest distance you’ll be traveling, and make sure you have an antenna with at least that range capability on your craft.
The root range model (RangeModelType = Root
) is more complex but provides much more realism and flexibility.
It determines maximum link distance by the equation Min(r1,r2) + sqrt(r1 r2)
. The first part of this equation is the same as the standard model, but the second term is worthy of additional discussion.
The root range model makes it possible for a low-powered antenna to communicate over great distances, provided a high enough powered antenna is on the other end. For example, a weak omnidirectional antenna on the surface of Mun doesn’t normally have the range to communicate back to Kerbin, but under the root range model it does if you point a big enough dish at it.
The root range model makes it possible to deploy heavy communication satellites with very large, high-powered antennae around Kerbin or the Earth, and use them to communicate with probes that have much smaller, lower-powered antennae deeper in space. Likewise, it is possible to reestablish contact with a distant probe if a large enough antenna can be found to communicate with it.
Note
The root range model enforces a maximum distance of 100 times the omni range, or 1,000 times the dish range (whichever is smallest) in all circumstances. If your proble only has an omnidirectional antenna, there will be a range at which it can no longer be communicated with, no matter how big a dish you point at it.
When two antennae communicating with each other have the same range, the root range model provides a maximum communications distance of twice
the standard model.
For this reason, setting a RangeModifier
of 0.5 is recommended to keep the standard range balance when you are using the stock Kerbol system.
Note
If you are playing with Realism Overhaul, the RemoteTech-Config-RSS
CKAN package will
automatically enable the root range model, additional ground stations, and other settings to provide additional realism.
Orbit Selection
One of the first goals of many players using RemoteTech is to establish continuous communications coverage. There are a number of ways to achieve this, including ad hoc networks with no special planning. However, well-designed and well-planned networks can be very satisfying to deploy and can ensure your distant multimillion-dollar probe doesn’t suddenly lose coverage when it needs it.
Ad hoc networks
The easiest way to form a communications network is simply to have an ad hoc network. Science experiments, contracts, and other missions will result in craft in orbit, and these will automatically network together if fitted with omnidirectional antennae. Because of this, you will develop a lot of localized coverage as the game continues, even without any special planning.
Because ad hoc networks are easy to put together, the secondary mission of any craft might be to act as a communication relay, and there are a number of considerations to keep in mind when you’re planning this.
The most important is that craft close to a planet have more of their field of view obscured by that planet. Conversely, craft in high orbits have less obstructed fields of view. Since higher orbits also have a longer orbital period (see “Basic Orbiting” ), these craft also tend to remain above the horizon a lot longer, which is particularly advantageous when you are launching new craft that may lose sight of the KSC during insertion.
Tip
When you build ad hoc networks, it’s recommended that you boost your satellites to higher orbits if communications is their only remaining mission.
Continuous coverage networks
It’s possible to ensure there’s always a communications satellite in view of the KSC, and also that this satellite can reach the other satellites in your network. The trick is to ensure that your satellites are evenly spaced, have the same orbital period, and are high enough that Kerbin does not obscure their view.
While it’s technically possible to have continuous coverage with only three satellites, this provides little room for error, and so a four-satellite arrangement is considerably easier to establish. Even so, we need to think a little bit about orbit placement. Too low, and our adjacent satellites risk being blocked by the planet; too high, and they might be too distant to communicate.
Note
The maximum height for a four-satellite network is (a . sqrt(2))/2 - r) , where a is the antenna range, and r is the radius of the planet (600 km for Kerbin, and 6,371 km for Earth). At this height all antennae will be at their maximum operating range from each other. It’s recommended you use an orbit lower than this, so satellites remain connected even if they’re not all exactly 90 degrees out of phase with each other.
While many players try to place their satellites in the exact same orbit, including identical apsides and inclination, this is not strictly required. What’s most important to prevent drift is to ensure the orbital period is the same for all craft. A tool such as MechJeb can greatly assist by showing your current orbital period.
Single-launch deployment
While it’s possible to insert four communication satellites with four different launches, it’s also possible to launch four satellites with a single launch . This is an advanced technique, but it provides an incredible sense of satisfaction when completed .
Our launch vehicle is going to have four satellites stacked together as its payload (see Figure 12-9 ). Each satellite will need its own engine with sufficient delta-v to insert itself into its final (circular) orbit from the (eccentric) deployment orbit we’ll employ.
Our strategy for deploying satellites is simple. Our deployment vehicle will enter an orbital period that is 75 percent of our desired orbital period. For example, if we wanted our satellites to orbit every 6 hours (a kerbosynchronous orbit each to one Kerbin day), our deployment vehicle will have an orbital period of 4.5 hours. The deployment orbit doesn’t need to be circular, although ideally the apoapsis of our delivery vehicle will match the apoapsis of our final satellites.
Each time our vehicle completes an orbit, we release a satellite and circularize it. In our example, with a 6-hour final period, our four satellites are going to be released 1.5 hours apart from each other, ensuring they have equal spacing.
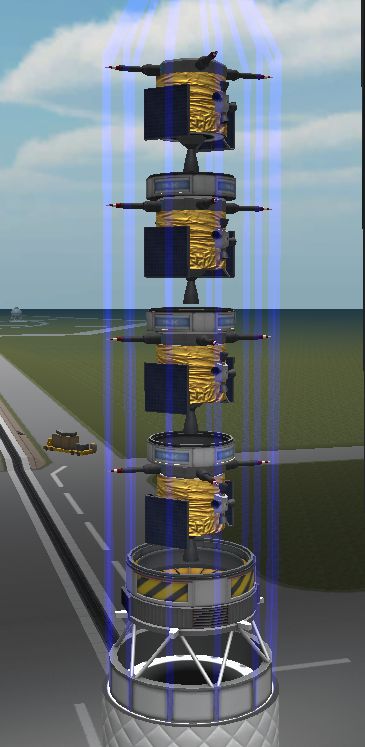
Figure 12-9. A stack of four communication satellites on a single launch vehicle
Note
For any given network of N satellites, our delivery orbital will require a fractional period of 1±1/N of our final desired orbital period. If we were deploying five satellites into Earth geostationary orbit (24 hours), we’d have a delivery vehicle with an orbital period of 19.2 hours, placing each satellite 4.8 hours apart.
In an ideal situation, we’d deploy our first satellite while our space center is still in view, meaning each additional satellite is able to see the one before it, resulting in an unbroken chain of communications back to the space center. However, this is not strictly necessary; we can insert our delivery vehicle into the desired orbit, and we can either wait until the space center is visible again (in our example, this happens after 18 hours, when our vehicle has completed 4 orbits and Kerbin has rotated 3 times), or we can use the flight computer to program maneuvers (see “Flight Computer” ).
Molniya orbits
While the default game has the space center on the equator, mods such as Real Solar System have more realistic launch locations. For space centers far from the equator, it can be useful to have craft in a Molniya (lightning) orbit, which has been employed by Russian communications satellites since the 1960s.
Molniya orbits are highly elliptical and take advantage of this to spend a long time above one hemisphere at apogee and a short time above the other at perigee. True Molniya orbits have a very specific inclination that prevents their orbits from being perturbed by the extra mass at the Earth’s equator, but this is not a concern in Kerbal Space Program.
To obtain a Molniya-style orbit, you launch into a relatively low orbit to begin with and then initiate a burn in the opposite hemisphere to raise apogee. To do this, you need a way to execute maneuvers without an active link, which brings us to the flight computer .
Flight Computer
Real space probes aren’t controlled in real time by mission control — they’re programmed in advance with commands. Whether you want to make sure a probe does the right thing during a communications outage, or your probe is simply so far away that the speed of light itself impedes your precise control, the flight computer (see Figure 12-10 ) can save your mission. To access it, simply select the computer icon in the RemoteTech status display under your warp controls (see Figure 12-11 ).

Figure 12-10. The flight computer active on one of our communications satellites

Figure 12-11. Warp controls with the RemoteTech plugin, showing almost 1/100 of a second of signal delay
The most basic flight computer commands are about attitude maintenance; for example, you may wish a craft to always point surface retrograde for reentry, or always point toward an approaching maneuver node in preparation for firing the engines. As you can see, the left of the computer is almost entirely dedicated to attitude control.
The flight computer allows for directions to be given in the following frames of reference :
Relative to the ship’s orbital notion, exactly the same as in the node editor.
Relative to the ship’s surface motion. A craft on the surface of the Earth at the equator has about 463 m/s in eastward “orbital” velocity but zero surface velocity.
Relative to the relative velocity vector formed by substracting our velocity from our target’s. This is most useful when docking, as thrusting retrograde in this reference frame will reduce relative velocity.
Relative to the selected target (prograde thrusts toward the target).
Commands entered into the computer are shown on the right. Commands aren’t executed until their signal delay timer is up; by default, this is how long it takes communications to reach your craft at the speed of light, but as we’ll see soon, you can set a longer manual delay if desired. You can cancel commands by clicking the x control to their right.
One of the most useful buttons is the EXEC button, which will instruct the computer to execute the next maneuver node when it is reached. This allows you to circularize on the other side of Kerbin, or precisely perform a burn in deep space. It’s strongly recommended that you use the NODE button well in advance, to ensure the craft is pointing in the right direction before the node is executed. All sorts of adventures can occur from craft executing nodes while not properly aligned.
To set a manual delay, enter a time into the delay box in the bottom right of the screen, and either press Enter or click the >
button on the flight computer. For example, to run a command in 8 hours and 12 minutes time, type
8h12m
.
Tip
The manual delay isn’t set until you press Enter or click the > button. Don’t forget to reset your manual delay back to 0 afterward.
Once a delay has been entered, any commands you enter — including RCS controls, activating or deactivating parts, staging, or performing science experiments — will be delayed by the time specified. You can use this functionality to reactivate antennae that have been stowed for aerobraking, collecting science on the “dark side” of Mun, performing ullage (see “Real engines need ullage” ) before a burn if you’re using the Engine Ingitor mod, or scheduling anything else that needs to run without supervision.
Tip
Set an action group to activate all your antennae. If you ever need an unmanned probe to aerobrake, you can execute this action group on a delay to redeploy them after the aerobraking has finished. Make sure you do this before you retract your last antenna!
Sometimes it’s useful to ensure that one action happens after another queued action. The v button next to any queued command will set the delay to run any commands just after it. This is particularly useful for scheduling commands to run after maneuver nodes.
RemoteTech and Contracts
The excellent mod author nightingale has developed a contract pack to work with RemoteTech. This sits on top of the fantastic Contract Configurator framework and contains many missions for setting up communication networks both around Kerbin and throughout the Kerbol system. Using the RemoteTech contract pack is a great way to not only learn about buidling a deep-space communications network, but also to provide more immersive gameplay. It’s compatible with Realism mods like Real Solar System in addition to more vanilla installs.
To get the remote contract pack, simply run
ckan install ContractConfigurator-RemoteTech
.
Summary
Adding realism mods to your game can make your entire experience of KSP more challenging and much more rewarding. There are literally hundreds of mods out in the wider universe; for more, we strongly suggest browsing the collection in the CKAN. But there’s only one thing better than playing with mods: making your own.
In an amazing coincidence, that’s what we’ll be talking about in the next chapter.