CHAPTER 6
For the House and Yard
The backyard-homestead life doesn’t stop at the back door; it marches around the backyard, through the garage, and into the kitchen. In this chapter, we’ll present projects for making life in these realms easier, more functional, and better organized.
A few of the projects, like the boot scraper and backdoor storage locker, will help prevent you from tracking your backyard homestead enthusiasm too far into the house — and across the kitchen floor. Others, like the leaf bag stand and firewood cradle, will save you hassle and back pain. Still others, like the concrete planter, the spice planter, and the seedling rack, will allow your green thumb to keep active even in the house or on the backdoor stoop.
This may be the final chapter in the book, but our hope is that it’s the beginning of a long chapter in a lifestyle of self-sufficiency and of do-it-yourself projects. Hammer on!
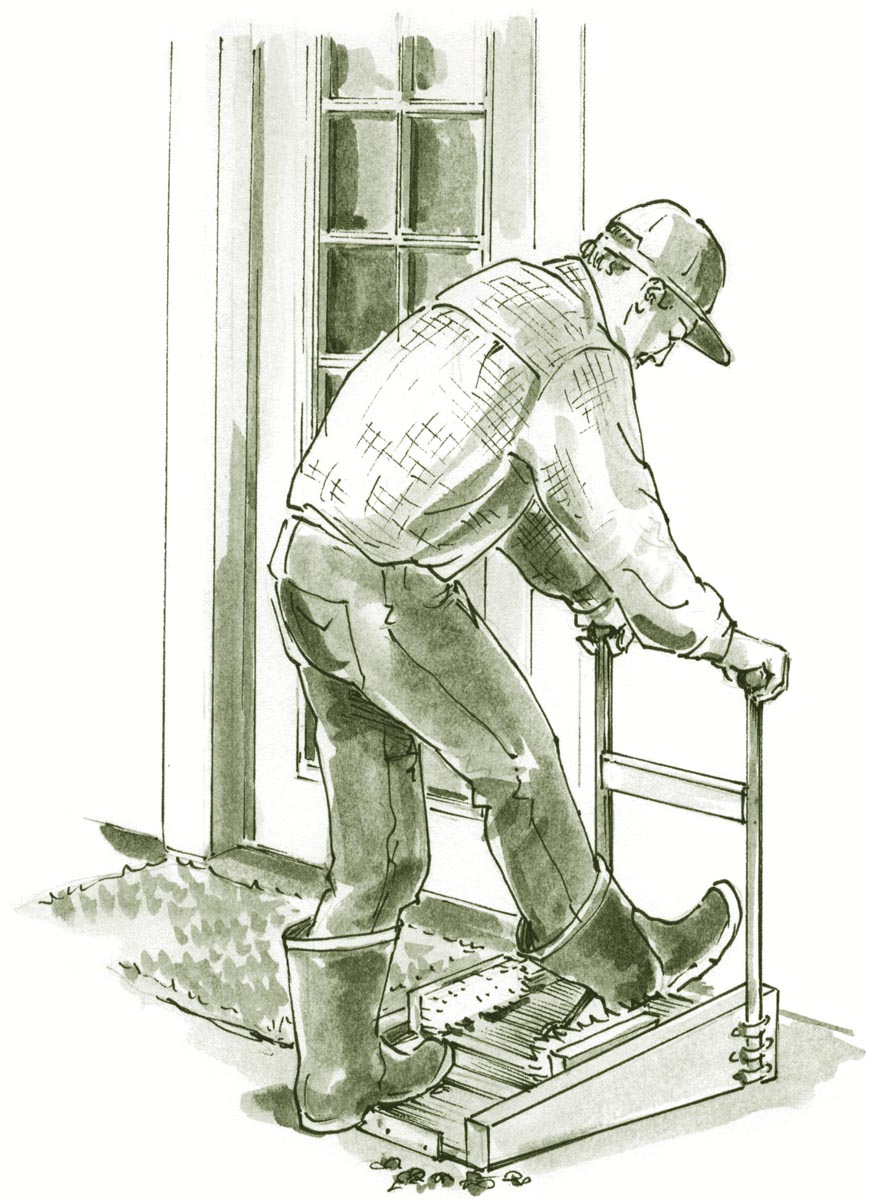
Boot Scraper and Jack
A place to scrape, brush, and stow mucky boots
It usually takes one muddy spring, one track of boot prints across the floor, and one good scolding to put the wheels in motion for this project. But once it’s built, you’ll have a place to stomp, scrape, and remove that mucky footwear. It’s a boot cleaner, bootjack, and boot-drying rack all in one: the posts provide grips to hold on to while you’re using it, and they double as racks to stow your boots upside down while they dry or air out.
We suggest using oak or some other hardwood for the platform and sides for durability. You can use pine or treated lumber, but neither will stand up to the wear and tear like oak or maple. Feel free to modify this basic design to accommodate the boots, and foot sizes, in your family.
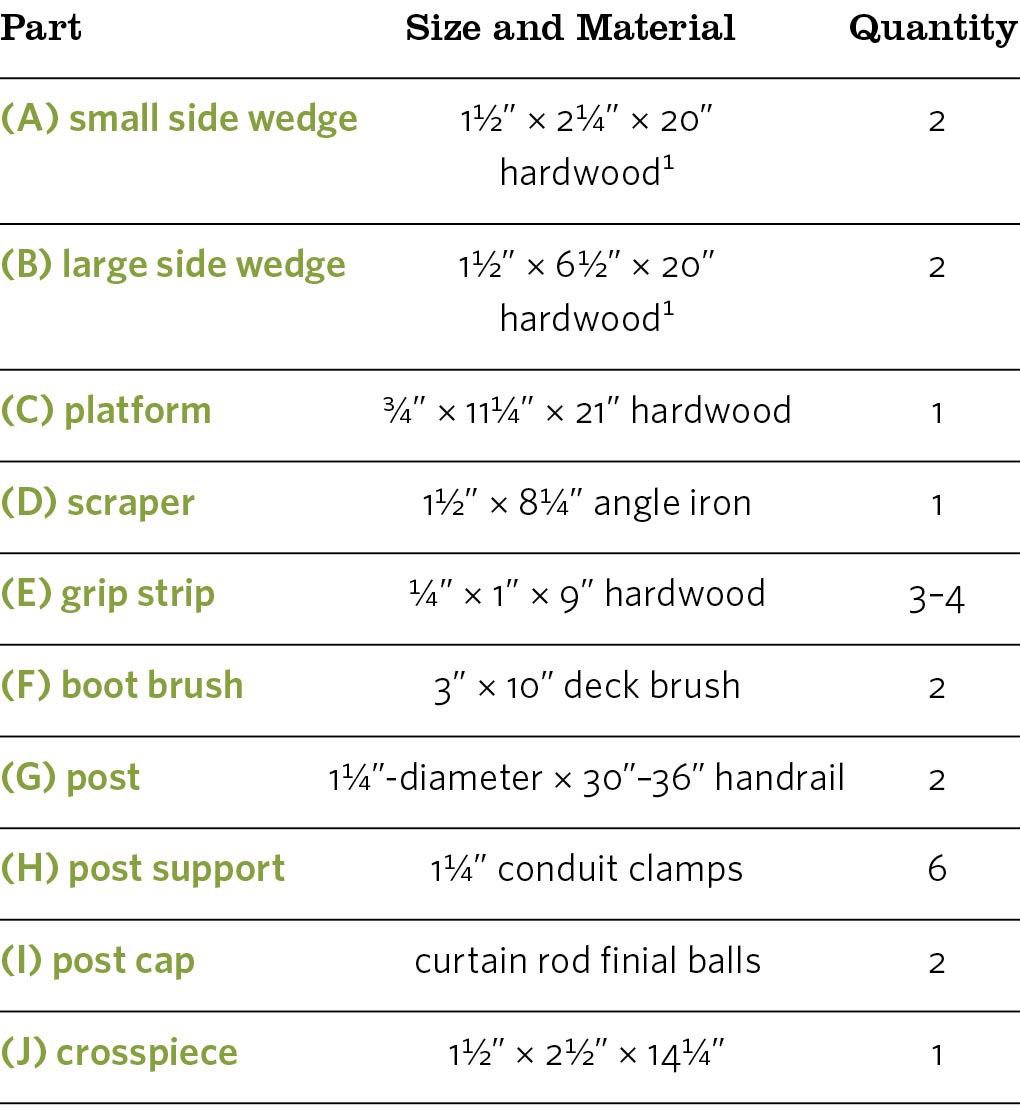
Materials
- One 40" piece hardwood 2×8
- One 21" piece hardwood 1×12
- One piece 11⁄2" × 8 1⁄4" angle iron
- Three or four 1⁄4" × 1" × 9" hardwood strips
- Two 3" × 10" stiff-bristle deck brushes
- One 11⁄4"-diameter wooden handrail (with one flat side), 60" to 72" long
- Six 11⁄4" conduit clamps
- Two curtain rod finial balls
- One hardwood 2×3, 141⁄4" minimum length
- Exterior wood glue
- 11⁄4" exterior screws
- 21⁄2" exterior screws
- 3⁄4" exterior screws
- 3⁄4" brads
- 4" exterior screws
- Exterior polyurethane
Hint: An old charcoal grill brush — one of those gizmos with a long handle, stiff bristles, and metal scraper — is a great makeshift boot scraper.
Instructions
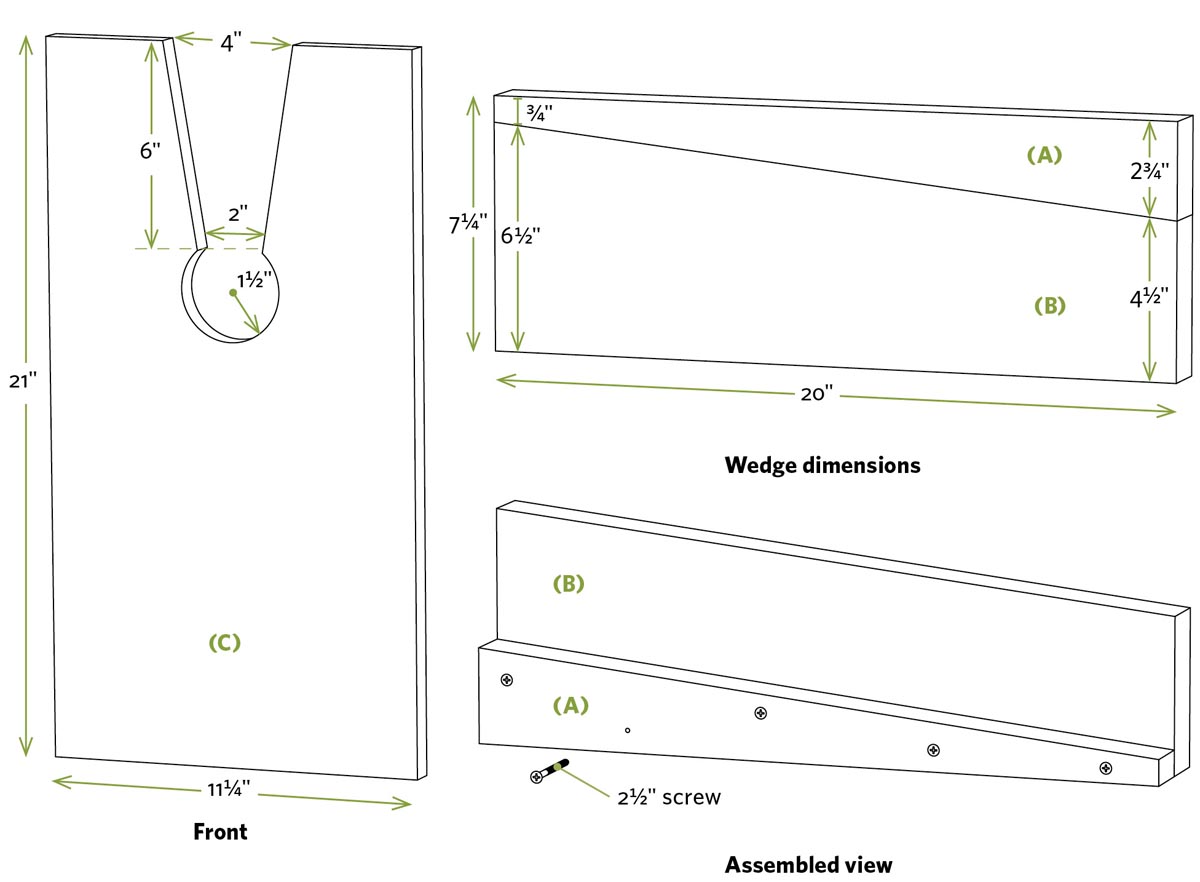
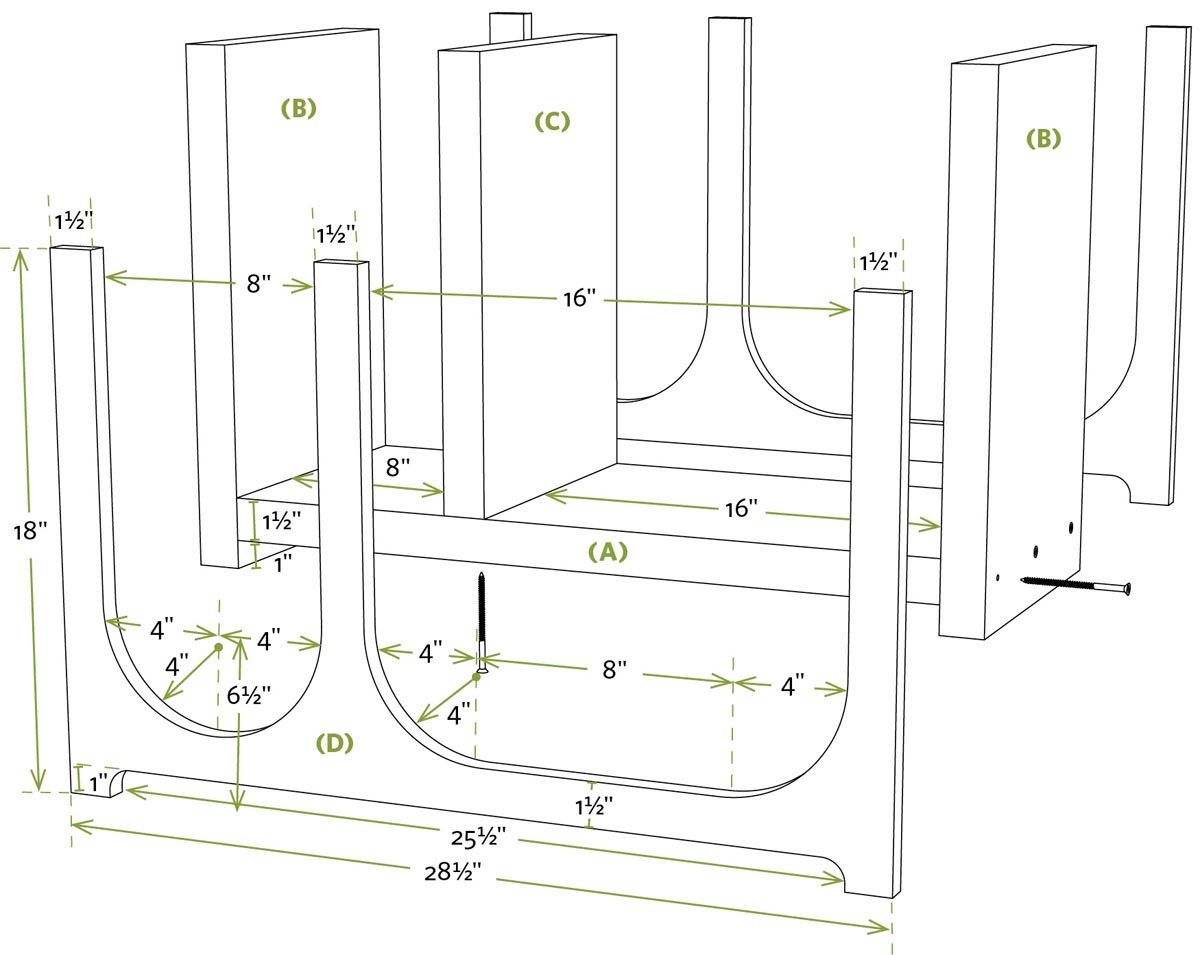
- 1. Mark the 2×8s for the sides as shown, and make the angled cuts with a circular saw to create the small (A) and large (B) side wedges. Lightly round over the upper edges of the larger wedges with sandpaper.
- 2. Use wood glue and 21⁄2" screws to secure the small wedges (A) to the large ones (B) to create each side, as shown in Cutting details (below). Predrill holes to prevent splitting. Note that the two sides are mirror images of each other.
- 3. Mark the keyhole shape on the platform (C). Use a drill and a 3" hole saw to create the circular part of the keyhole and a jigsaw to make the rest of the cutout (or you can use a jigsaw with a narrow blade for the whole thing). Test-fit the heel of a boot in the cutout; if it’s too small or the wrong angle, enlarge the opening as needed. Secure the platform to the two sides as shown, using glue and 11⁄4" and 21⁄2" screws. Use longer screws as the wedges get deeper.
Take Note: You may want to initially make the keyhole smaller than the one shown, then test-fit and enlarge the opening as needed. If there are little feet in the family, you may need to make a second bootjack!
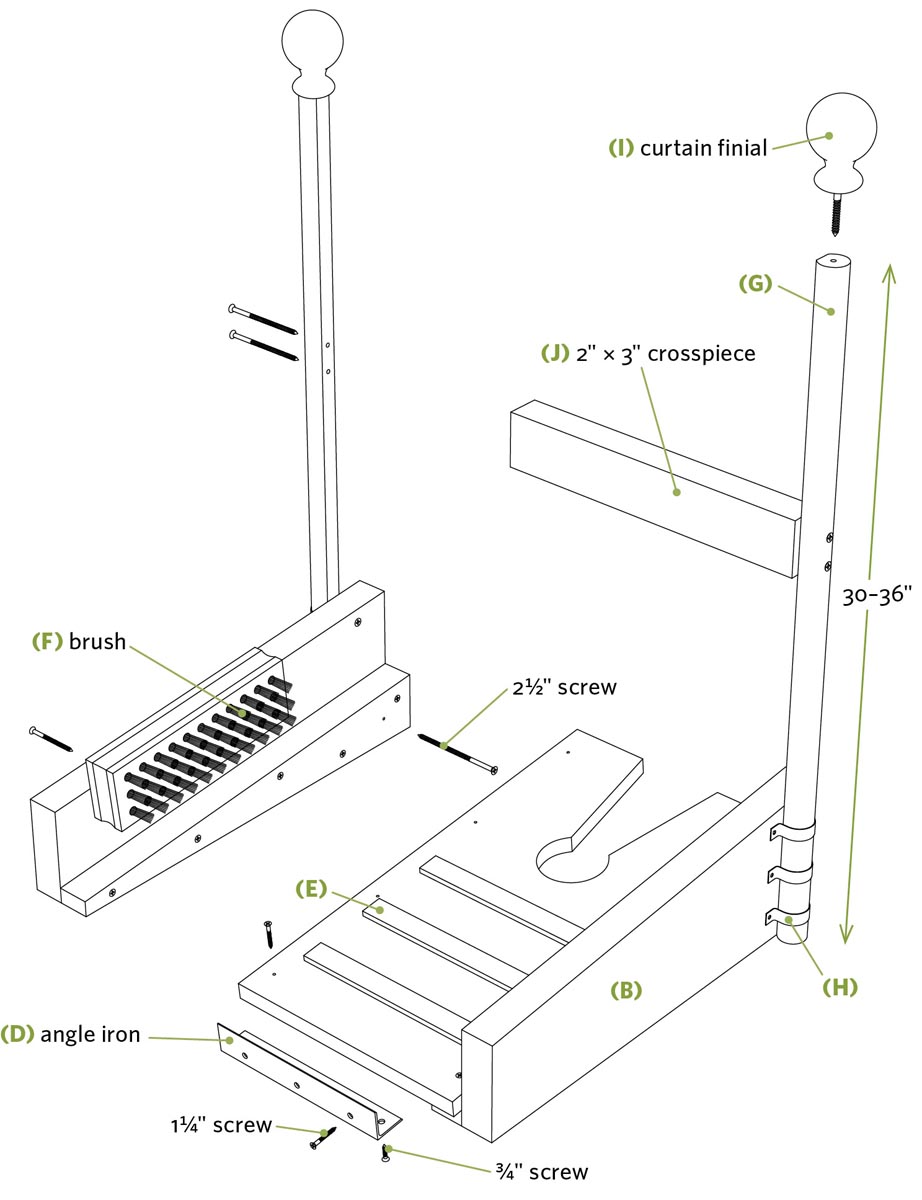
- 4. Cut the angle iron for the boot scraper (D) to length with a hacksaw, bore mounting holes, and use a file to round over sharp corners. With one leg of the angle iron hooked under the platform, secure it from below using 3⁄4" screws and from the front using 11⁄4" screws. Secure the brushes (F) to the sides with 21⁄2" screws; experiment to find the right height before installing them permanently.
- 5. Secure three or four grip strips (E) to the platform using glue and 3⁄4" brads, spacing the strips 1" to 2" apart.
- 6. Use glue, a couple of 11⁄4" screws, and conduit clamps (post supports; H) to secure the handrail posts (G) to the sides (B), positioning the flat section of the handrail against the sides. Drill a hole in the top of each post, and screw on the post caps (I).
- 7. Secure the crosspiece (J) about halfway up the posts, using 4" screws. (The flat area on the handrail gives you an ideal surface for securing the crosspiece.)
- 8. Apply two or three coats of exterior polyurethane to protect your project from the elements.
Take Note: The posts and crosspieces are for maintaining balance and hanging boots, not for tugging, pulling, or sitting. Spread the word.
Lessons from the Homestead
Of Boots and Boundaries
by Catherine Friend
When we moved onto our farm in southeastern Minnesota, my mother gave us an odd metal thing, with two long spikes at one end and a small arch at the other. “It’s a boot scraper,” she said. “You’ll need it.”
Huh. The rustic item didn’t go with our outside decor. It clashed with our inside decor. I stashed it in the closet.
Then the farming began. I didn’t realize how hard it is to stop the farm from following you into the house. Your clothes trap so much hay and straw that when you drop your overalls at the end of the day, there’s a ring of organic matter on the floor. Straw in underwear is very common. How does that even happen? Between the dogs and your Red Wing work boots, even more stuff appears in the house.
You quickly develop the need for a strong boundary between sheep manure and living space; sheep manure is to be kept outside. It’s a simple rule and perfectly easy to follow. Family and friends dutifully shuffle across your new doormat, leaving behind clumps of moist brown matter where it should be — until someone else steps into that moist brown matter and brings it into the house. If there’s anything that clashes with our interior decor, it’s mud and sheep manure.
I dug out Mom’s gift and picked a spot along the sidewalk. I pounded the spikes in deep, which left exposed an iron arch about seven inches high. I began training my family to scrape-scrape-scrape before approaching the door. Stuff was still tracked into the house, but it was reduced to those bits stuck in boot treads. We eventually left a stick near the boot scraper so we could sit on the step and clean out our treads, too.
My mother, of course, was right. When beginning a farm, people remember to buy tractors and feed bins and pitchforks. The one item they don’t consider is a boot scraper. Doesn’t need to be iron. Doesn’t need to match your decor — outside or inside. It just needs to be there, ready and willing to stop the farm from following you into the house.
Catherine Friend and her partner started a sustainable sheep farm 18 years ago. She’s written about their adventures in two memoirs: Hit by a Farm: How I Learned to Stop Worrying and Love the Barn, and Sheepish: Two Women, Fifty Sheep, and Enough Wool to Save the Planet. She also writes children’s books and fiction for adults. (See Resources for more information.)
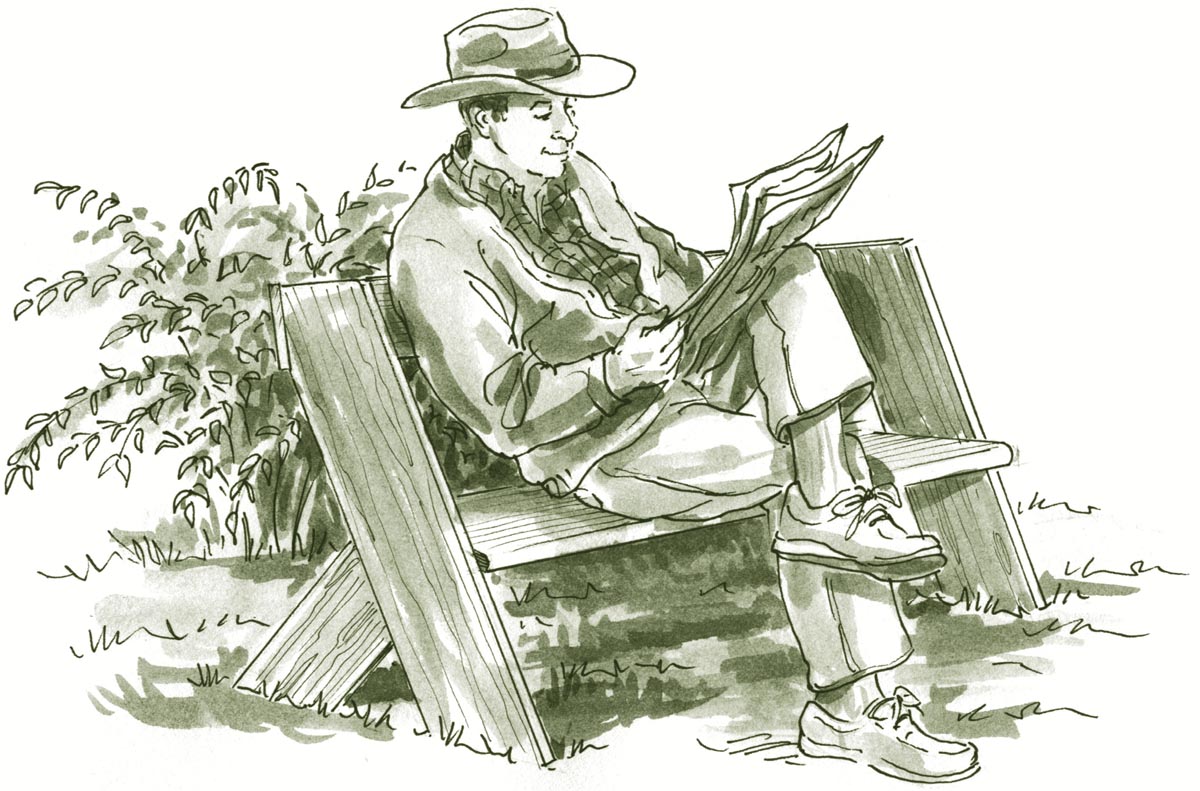
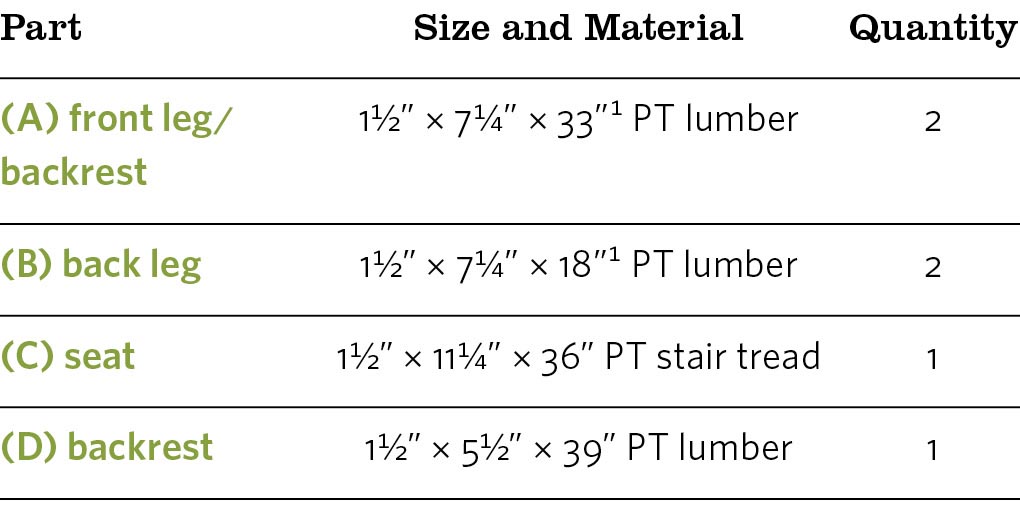
Leopold Bench
2 hours + 6 boards = 1 heck of a useful bench
If you’re looking for a project to kick off your backyard homestead building journey, you can’t beat this one. It’s cleverly designed, easy to build, fun to show off, and (best of all) comfortable. A deck stair tread, available at most home centers, for the seat and a uniform angle cut for the legs make this a project anyone can tackle with success.
The benches are the right size (and cost!) for setting in the garden, around the fire pit, in the woods, or on the back porch.
Legend has it, Aldo Leopold designed the bench so those seated on it had to sit upright and pay attention to the natural world around them. Others say the bench was inspired more by an old set of stairs salvaged from the dump.
Materials
- One 10-foot pressure-treated 2×8
- One 36" pressure-treated 2×12 stair tread
- One piece pressure-treated 2×6, 39" minimum
- One 2×4 scrap (for alignment)
- Construction adhesive
- 21⁄2" exterior screws
- 31⁄2" exterior screws
Instructions
- 1. Cut the front (A) and back (B) legs to the lengths shown. Since all the angles are the same, you’ll get a few “free” cuts as you work your way down the board. Use a Speed Square (page 10), angle finder, or protractor to establish the 30-degree angle. You can cut all four leg members from one 10-foot 2×8.
- 2. Position the short legs on top of the long legs as shown. Use a straight 2×4 or a 4-foot level to align the bottoms of the legs. Check to make certain left and right side assemblies are identical mirror images of one another. Secure the short legs to the long legs using construction adhesive and 21⁄2" screws.
- 3. Stand the leg assemblies upright with the short legs facing inward; an assistant comes in handy here. Set the seat (C) in place and adjust the parts so the back of the seat just kisses the back of the back legs. Drive four 31⁄2" screws through the seat on each end into the tops of the short legs. Drive a few long screws through the bench sides into the ends of the treads.
- 4. Lay the bench facedown and position the backrest (D) flush to the top of the front legs (A). Use a square to check that the seat and backrest are square to the leg assemblies, and secure the backrest to the legs with three 31⁄2" screws on each end.
Take Note: You can adjust the angle of the backrest by making slight angle cuts at the top of the legs as shown in Bench assembly.
Who the Heck Is Aldo Leopold?
Rand Aldo Leopold is considered by many to be the most influential American conservationist of the twentieth century. He was a forester, teacher, scientist, environmentalist, and nature writer. He worked for the U.S. Forest Service, taught at the University of Wisconsin, and helped found the Wilderness Society. His book A Sand County Almanac, written in 1949, has sold more than 2 million copies. The book was based on his experience purchasing 80 acres of depleted, overgrazed land in central Wisconsin and restoring it to health by practicing what he preached.
Leopold built his original bench while working on his farm in Wisconsin, where he and his family spent weekends in a restored chicken coop, affectionately nicknamed “The Shack.” Legend has it, he designed the bench so those seated on it had to sit upright and pay attention to the natural world around them. Others say the bench was inspired more by an old set of stairs salvaged from the dump. Either way, both Leopold and his bench have become enduring classics.
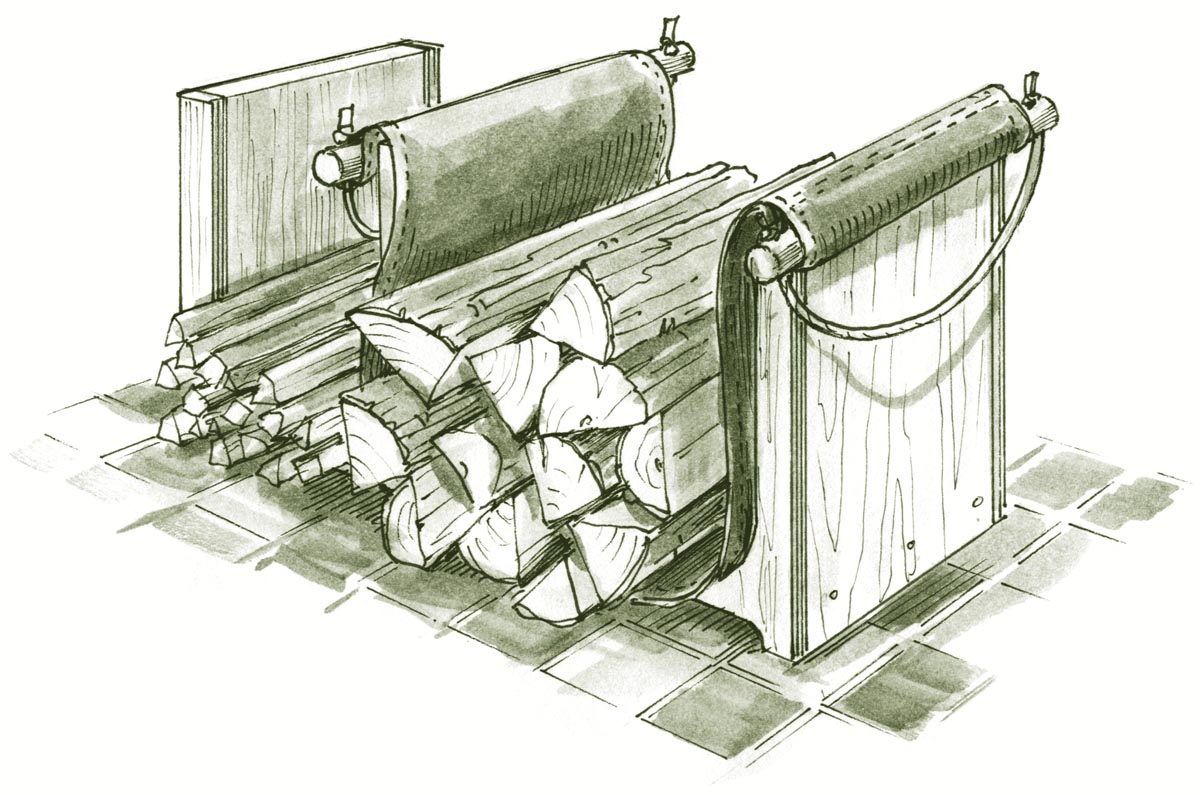
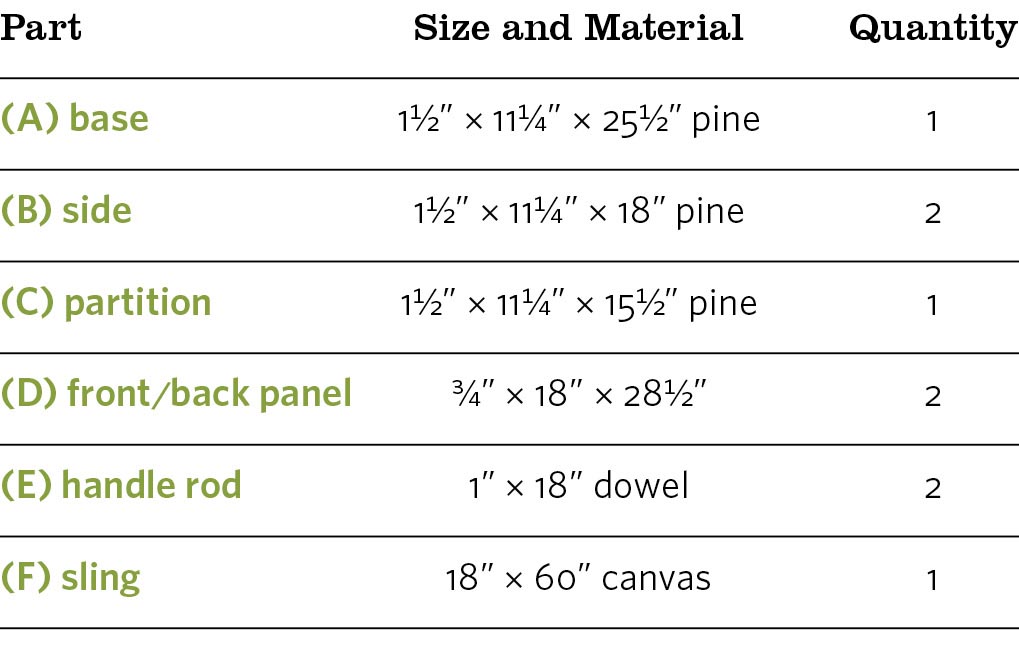
Firewood Cradle and Carrying Sling
A dynamic duo for less hassle, less mess
If your normal method of moving firewood involves stacking five or six logs in a bent arm, tracking bark and debris across the floor, and then dumping it on the floor, well, here’s a project for you. The cradle gives you a convenient place to store firewood and kindling, and the canvas sling gives you an easier way to haul it. Load up the sling at the woodpile, carry it into the house, and then place the sling and firewood in the cradle. Less fuss, less muss, less arm strain.
Materials
- One 8-foot pine 2×12
- One 4 × 4-foot sheet 3⁄4" plywood
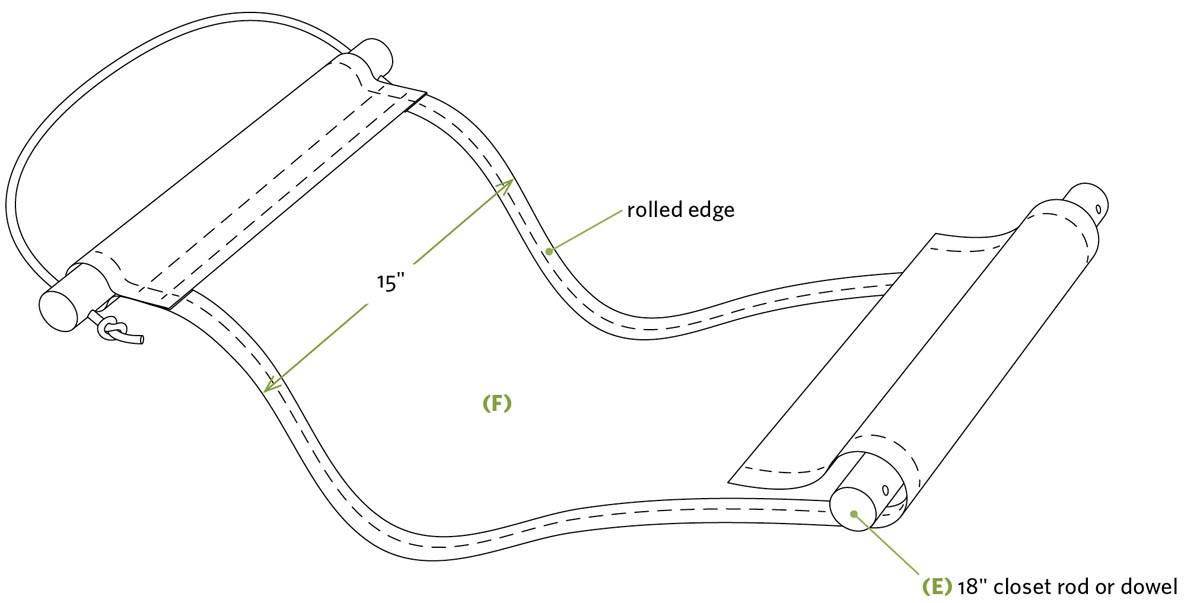
- One 1"-diameter × 36"-long wood dowel or closet rod
- One 18" × 60" piece heavy canvas (see step 4, below)
- 31⁄2" screws
- Wood glue
- 6d finish nails
- Heavy-duty upholstery thread
- Sturdy rope
Instructions
- 1. Cut the base (A), sides (B), and partition (C) to length, and secure them to one another with 31⁄2" screws as shown. Assemble the cradle frame so the sides extend 1" below the base to create the legs.
- 2. Mark and cut the front and back panels (D) as shown in Cradle construction (above). The goal is for the plywood uprights to align with the 2×12 frame uprights. Use a circular saw to cut the straight parts and a jigsaw to cut the curves. Smooth and slightly round the edges by hand sanding or by using a power sander.
- 3. With the cradle frame assembly (A, B, C) lying on its back, position the front panel (D) on top of it to make sure everything aligns and fits properly. Remove the panel, apply generous beads of wood glue to the front edges of the cradle frame pieces, and use 6d finish nails to secure the plywood to the frame. Flip the cradle over, and install the other back panel in the same way. Sand any rough edges, and apply a clear finish or paint, if desired.
- 4. Cut a piece of heavy-duty canvas for the sling (F) as shown. Fold over the long edges and stitch them to create a rolled edge. Position the handle rods (E) near the ends of the canvas, and loop the canvas over the rods. Double-stitch the seam. Drill holes in the ends of the handle rods and loop rope through them to create handles.
Take Note: Experiment with the ergonomics of your wood-carrying style before cutting the canvas to length. A finished sling length of 48" to 54" works well for most people. Lengthen or shorten the sling according to your preference, making sure to account for the extra material needed for folding and stitching the ends.
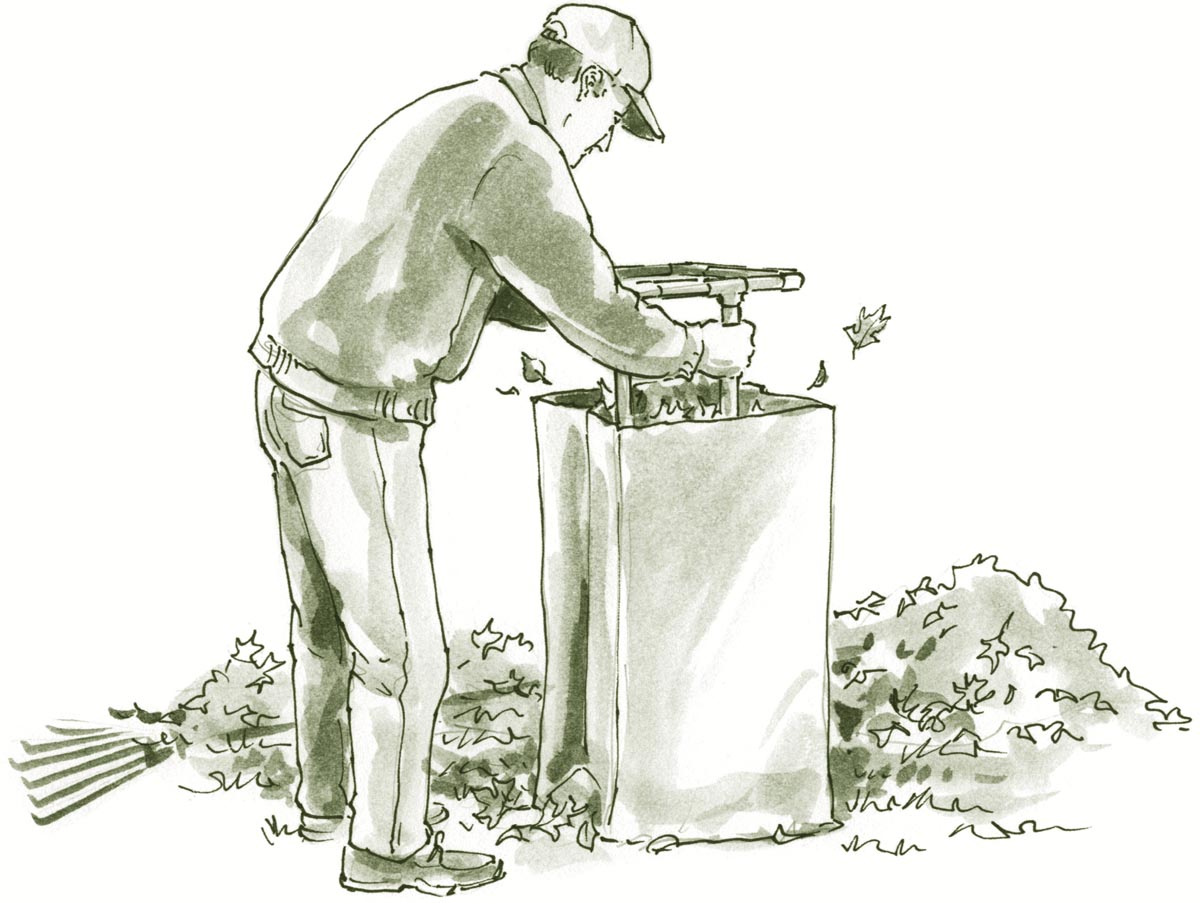
Lawn Bag Stand
Work faster with less frustration
Raking leaves and cleaning up the vegetable garden are enough work without having to hassle with keeping cleanup bags upright and open. You can build this simple PVC leaf bag stand in an hour or two.
To use it, open the mouth of the leaf bag and then turn the bag upside down as you slide it over the frame. Flip the stand and bag over, and go to work. If you like to lay bags on their sides and rake leaves and debris directly into them, it will work in that position as well. Remove the stand once the bag is partially full and able to stand on its own, before you start packing the leaves tightly, or you may have trouble removing it later.
When you’re done using it for the season, simply remove four screws, take off the legs, and store the pieces on a shelf until the next fall.
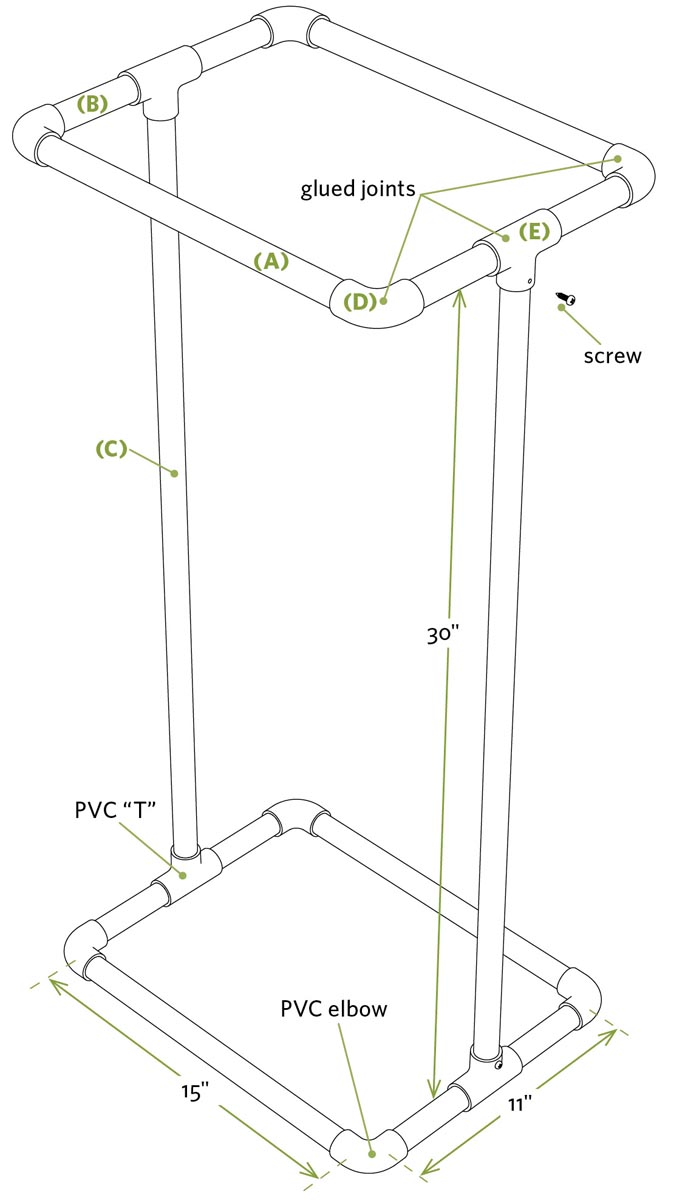
Materials
- Two 10-foot pieces 1⁄2" PVC pipe
- Eight 1⁄2" PVC 90-degree elbows
- Four 1⁄2" PVC T-fittings
- PVC primer and solvent glue
- 1" screws
Instructions
- 1. Cut the long (A) and short (B) frame pieces and legs (C) to length using a hacksaw, miter saw, or pipe cutter.
Take Note: The stand is designed to prop open a fairly standard 11" × 15" × 34", 30-gallon leaf bag. Before cutting the PVC pieces, measure your bags and adjust the lengths of your pipe pieces accordingly. PVC fittings also can vary slightly in size.
- 2. Glue the parts of the upper and lower frames together as shown, using PVC primer and solvent glue (sometimes called PVC cement), following the manufacturer’s directions. Make certain the elbows are all aligned with one another and that the legs of the Ts are positioned 90 degrees to the frames.
- 3. Slip the two legs into the T-fittings on the frames. Drill a small hole through the side of each T and into the end of the legs, and install a 1" screw to complete the stand assembly. These are the screws you can remove for disassembling the stand for flat storage.
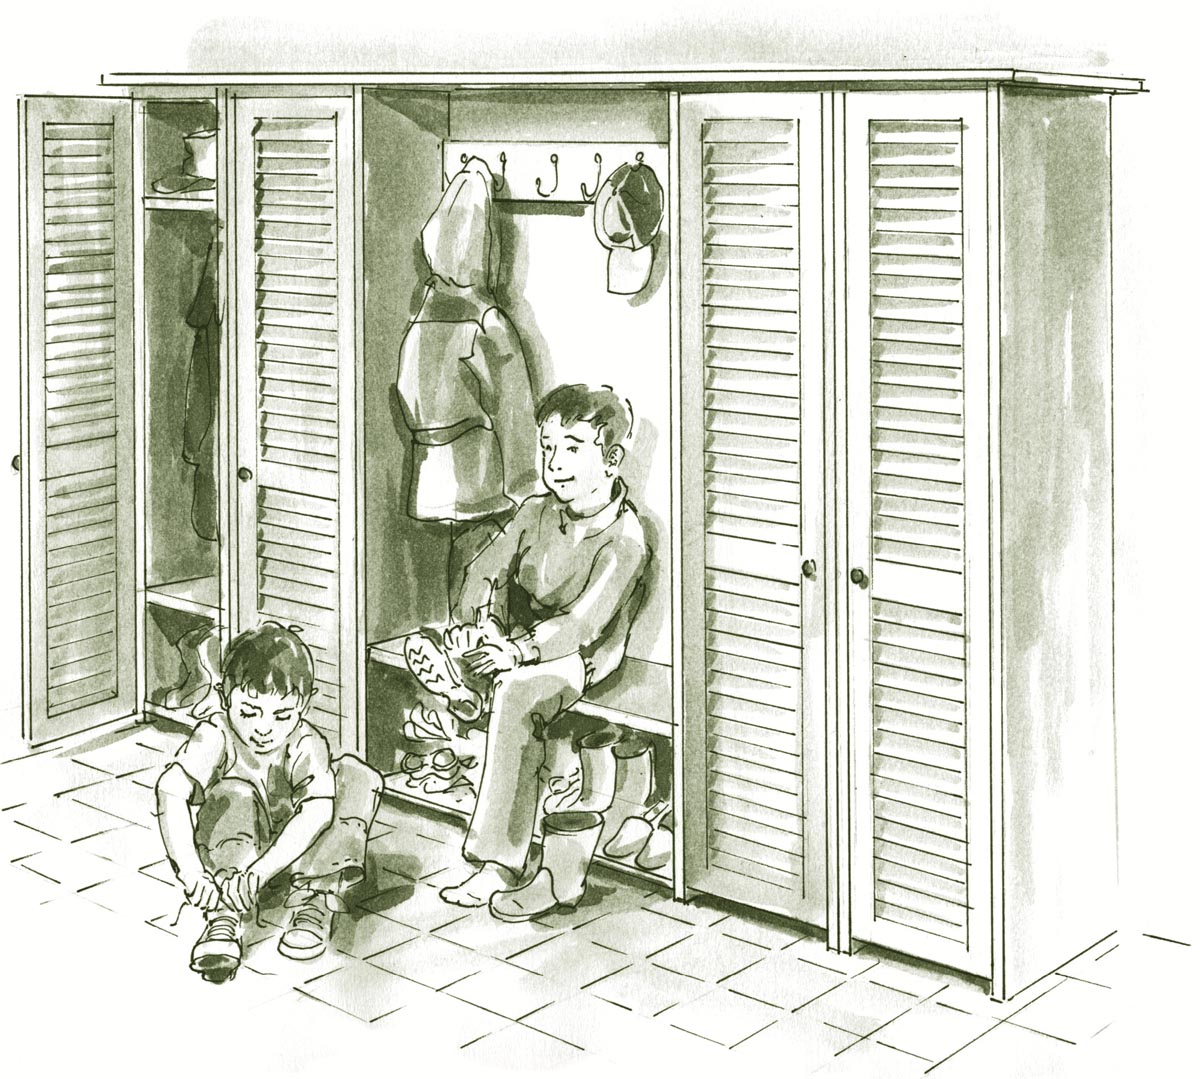
Backdoor Storage Locker
Organize mudroom clutter
This freestanding cabinet was inspired by the lockers found in almost every school hallway and locker room in North America. The top shelf provides plenty of storage for hats and gloves, and the bottom tray-shelf gives you a place for stashing muddy or soggy footwear. In between, there’s plenty of room for jackets, backpacks, and other items.
Build one for each member of your clan, then join the lockers side by side and/or build a bench between them as shown.
The general plan is to build a box with a front opening 1/4" larger in both directions than a single bifold door (G). Our door measured 1" × 143/4" × 80". Buy your door before starting the project — if the size differs, alter your parts dimensions accordingly. If your bifold door is 79" tall, subtract 1" from the length of the side pieces (A).
Locker Room Options
These lockers are so convenient, you may want to build one for each member of the family, including the dog. Here are a few options:
- Join multiple lockers side by side to create a bank of lockers. If you want a little more elbow room between units, insert 1×2s or 1×3s between them to serve as spacers.
- Separate lockers with a simple seat with cubbyholes beneath (see facing page). The seat provides a convenient place to sit while putting on shoes and boots, and the cubbies provide even more storage space.
- Add an extra slatted shelf about 12" to 24" below the upper slatted shelf so school-age kids have access to a place to stash gloves and mittens. As a kid gets taller, it’s easy to raise that shelf.
- There are a variety of bifold doors you can use. Some, like the ones shown, are fully louvered; others are completely solid; and still others are solid at the bottom and louvered at the top.
- Paint or stain your lockers, as desired, to match your decor. If you stain them or leave them natural, apply a couple of coats of polyurethane to help protect the wood.
- Build a locker for Fido. It’s a great place for stashing leashes, pickup bags, doggy-wear, food, and toys.
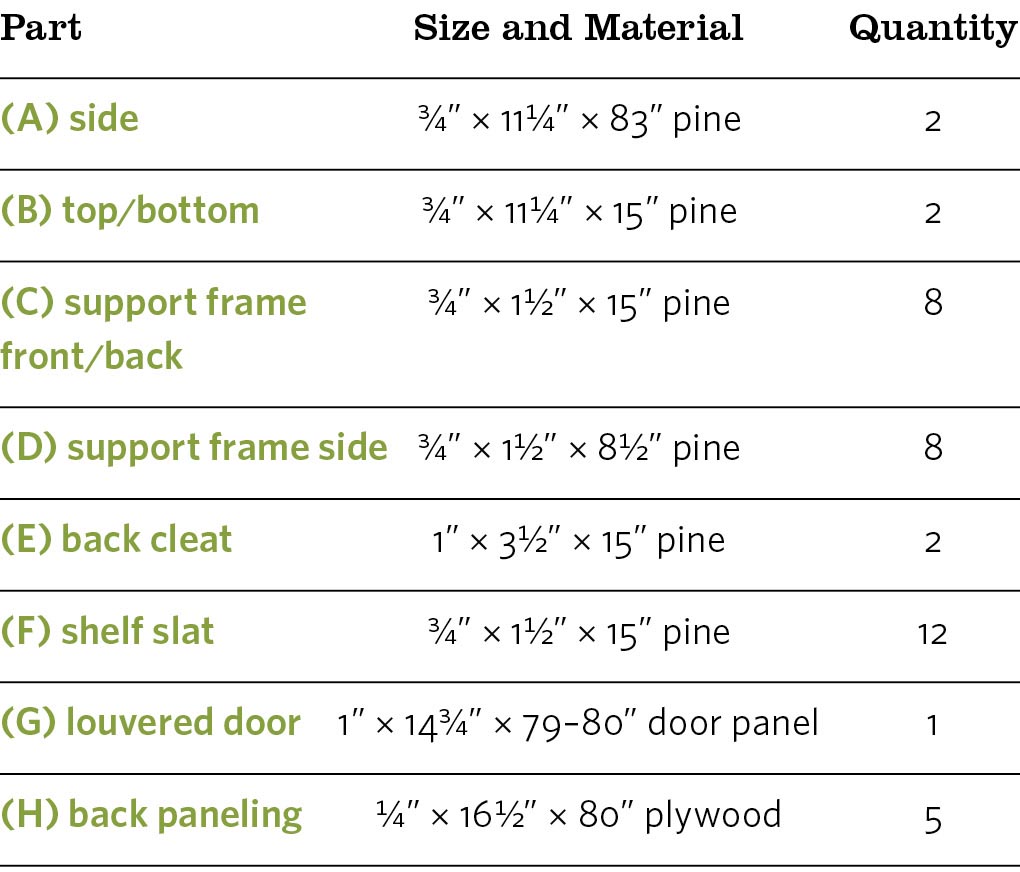
Materials (for One Locker)
- Two 10-foot pine 1×12s
- Five 8-foot pine 1×2s
- One 8-foot pine 1×4
- One 1" × 143⁄4" × 79–80" bifold door panel
- One 1⁄4" × 161⁄2" × 80" plywood
- Wood glue
- 8d finish nails
- 1" brads or finish nails
- 11⁄4" drywall screws
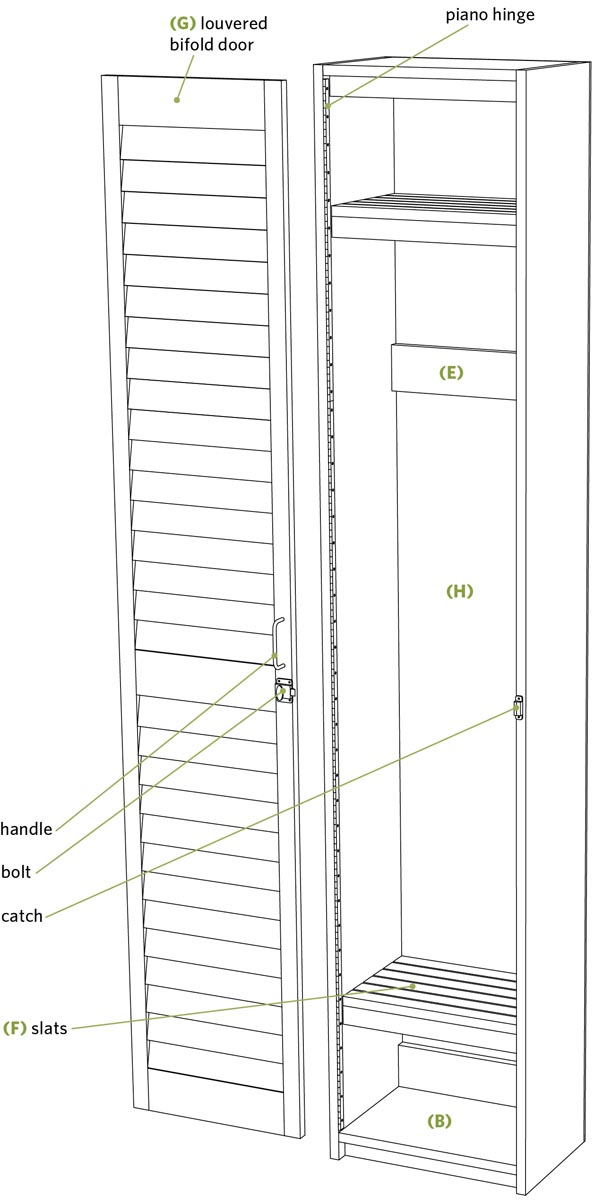
- One 6-foot-long piano hinge with screws
- One door handle with screws
- One door latch with screws
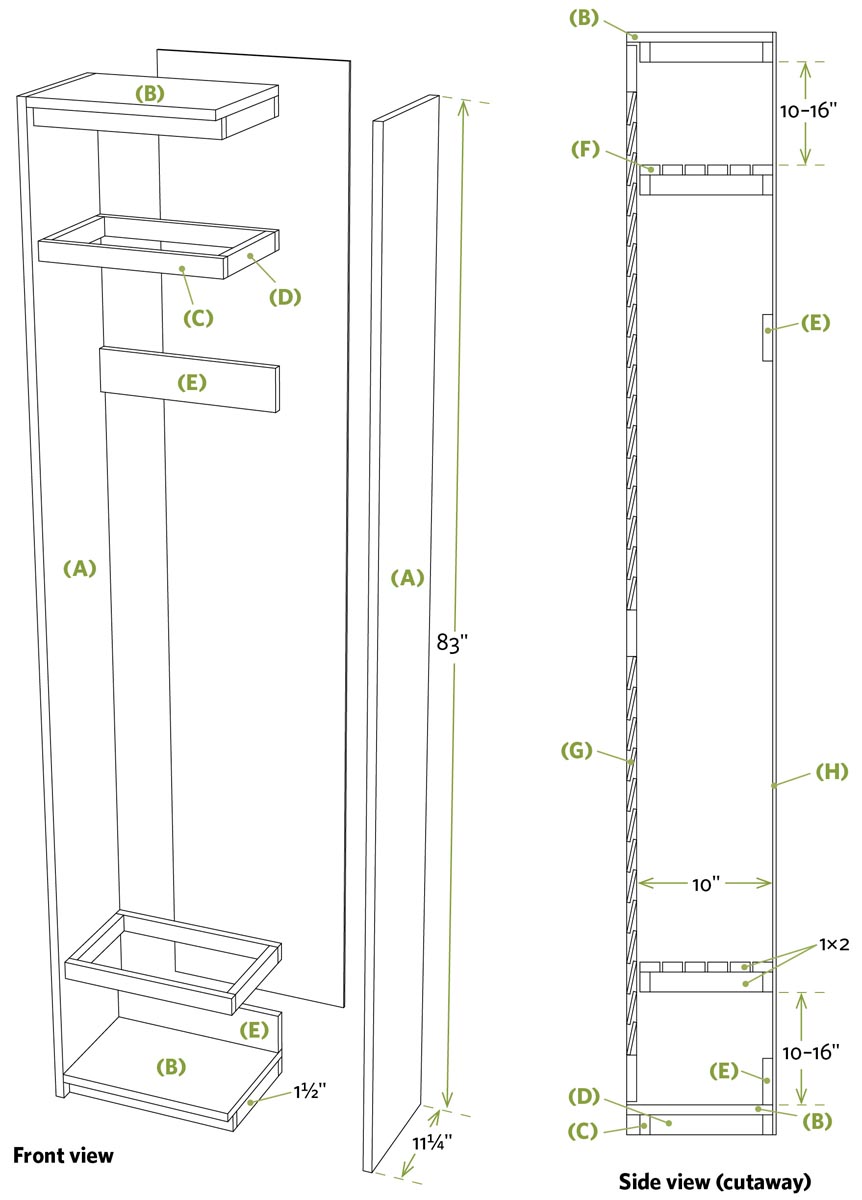
- 1. Cut the sides (A), top, and bottom (B) to length from 1×12 lumber. Position the side pieces side by side, mark the locations of the top and bottom shelves and support frames, and use a framing square to extend lines across the faces of both boards. Secure the top and bottom (B) to the sides with glue and 8d finish nails.
- 2. Cut the parts for the four support frames (C, D), and assemble them using 8d finish nails.
- 3. Use wood glue and 11⁄4" drywall screws to secure the frames to the layout lines on your cabinet sides. One frame adds support to the top (B), and another supports the bottom (B). The intermediate shelves can be arranged to suit your needs.
Take Note: Leave 1" to 11⁄4" of space between the front of each support frame and the front of the cabinet to accommodate the inset door.
- 4. Install the back cleats (E), flush with the back of the cabinet. Position the top cleat at “coat hanging” level.
- 5. Square the cabinet, and install the 1⁄4" back plywood (H). Nail the plywood to the backs of the frame, support frames, and the back cleats with 1" nails.
- 6. Cut the 1×2 shelf slats (F) to length, and nail them to the support frames as shown.
- 7. Mount the door in the opening using a piano hinge. Add a door handle and latch. If you need to trim the door lengthwise or widthwise to fit before installing it, use a straight-cutting jig (page 29).
Build one for each member of your clan, then join the lockers side by side or add a bench between them.
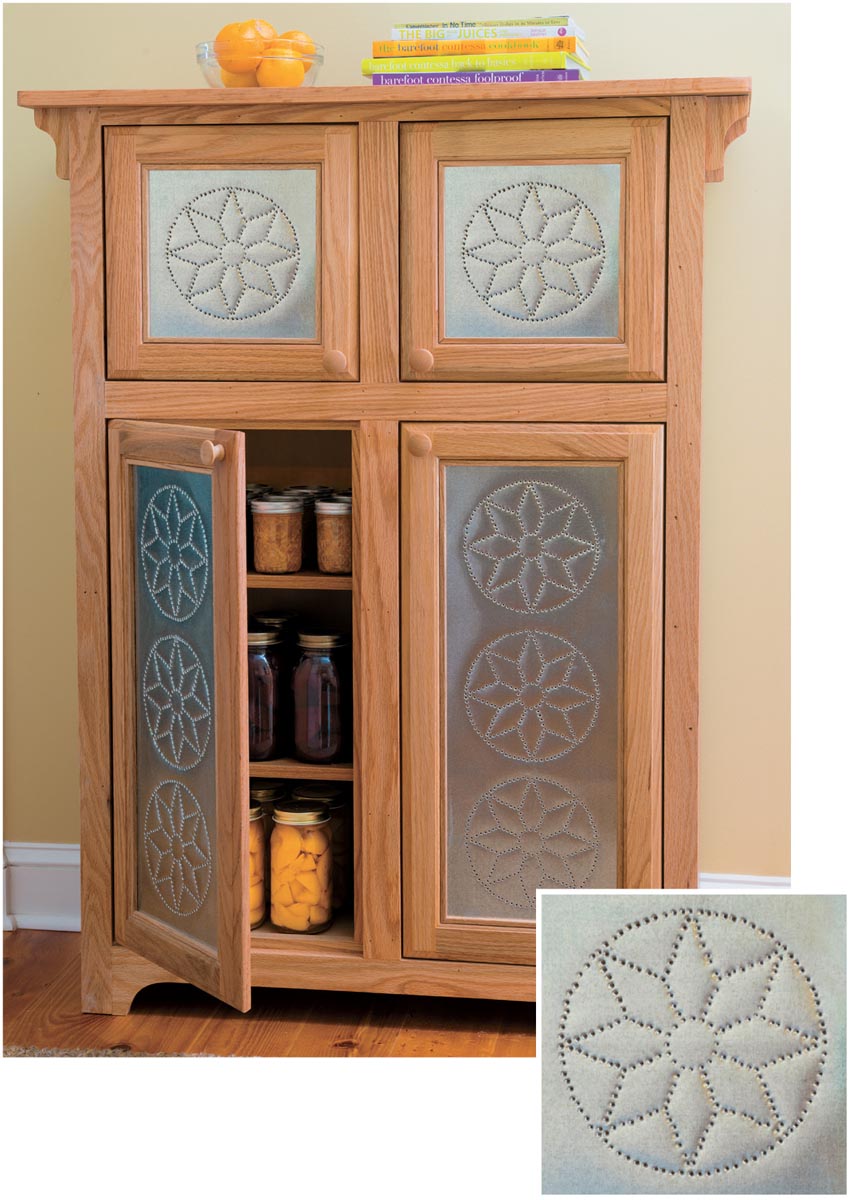
Punched Tin Jelly Cabinet
Home center cabinets + flashing = vintage storage
This project takes two vintage concepts, the jelly cabinet and the pierced tin pie cabinet, and rolls them into one. Jelly cabinets were popular because they provided a convenient place to store abundant amounts of canned goods. Pierced tin pie cabinets were popular because they provided a well-ventilated, fly-free area to cool and store baked goods prior to the invention of metal screening.
Though this cabinet is based on vintage ideas, it doesn’t make it any less useful today. It’s the perfect place for storing kitchen and pantry overflow. It’s easy to build, too. I used two wall cabinets from a home center as the core of the project, and then completed it using oak plywood and solid-oak trim boards. You don’t have to be an old-world craftsman to create the pierced tin front. The material is galvanized flashing, and the inexpensive patterns (along with other tools and materials) are available from the sources listed at the end of the project.
Materials
Materials quantities will depend on the size of your cabinets.
- Two stock cabinets
- 1⁄4" plywood
- 3⁄4" oak plywood
- 1×2 or 1×3 oak boards
- 3⁄4"-thick solid oak panel (for cabinet top)
- 1×4 oak board
- Metal flashing
- Oak screen molding
- Wood glue
- 2" screws
- 4d finish nails
- Construction adhesive
- 1⁄2" or 3⁄4" brads
- One punched tin pattern (more if desired)
- Door pulls (optional)
Choosing Cabinets
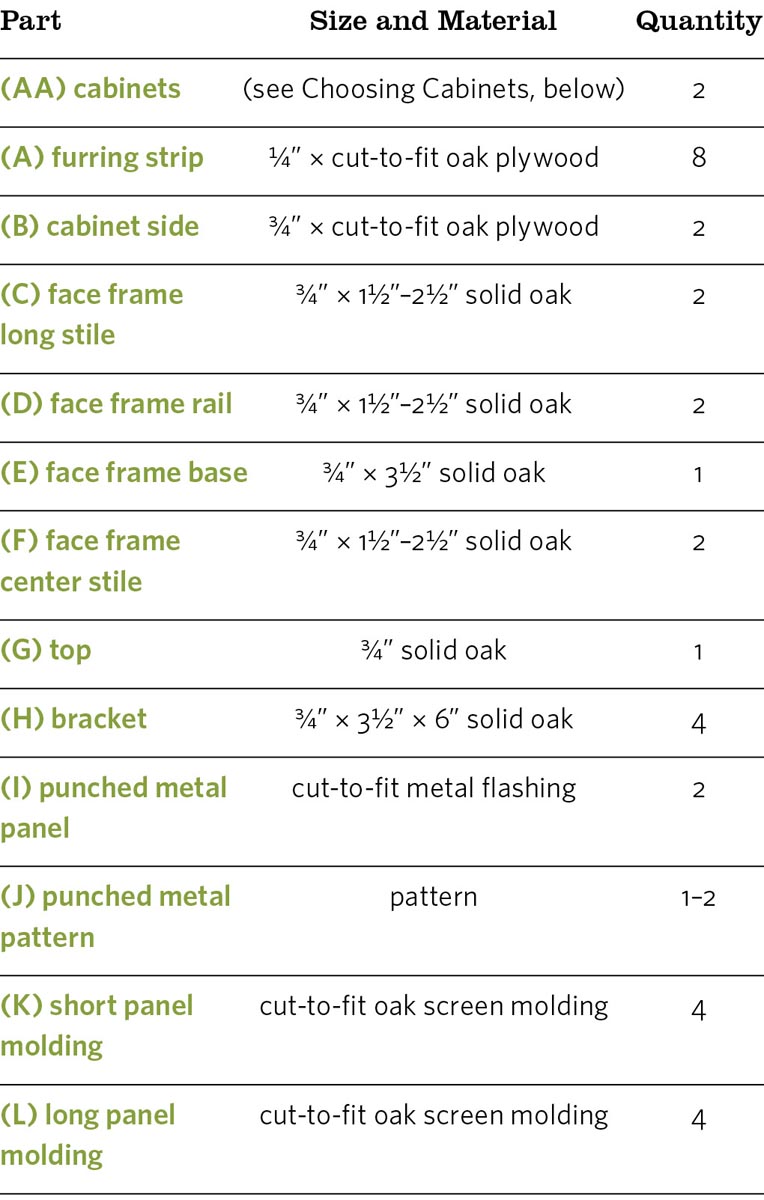
This project is an opportunity to let your inner designer cut loose. I stacked 12"- and 30"-tall wall cabinets, but you can make your cabinet taller, deeper, or wider. Selecting the right type of cabinet is important if you want to follow the design given here. The cabinets I chose, widely available at home centers, include:
- Face frames with “partial overlay” doors. This allowed me to add a face frame (C, D, E, F) to the cabinet front for a clean look.
- Concealed hinges. This allowed the doors to swing freely without hitting the face frame that was added.
- Frame-style doors with flat panels. This allowed me to inset the flashing used for the punched tin panels and cover the edges with molding (K, L).
You can use old cabinets or cabinets of a different style, but experiment beforehand to make certain the doors will operate and that the overall design will work.
The cutting list doesn’t include specific measurements since cabinets and projects will differ. But follow along, and you can create a cupboard to fit your space and needs. You’ll find it easier to paint or stain your cabinet before installing the punched tin panels.
Building the Jelly Cabinet
- 1. Position one cabinet (AA) on top of the other and secure them using glue and 2" wood screws. If the face frame of your cabinet has lips that extend 1⁄4" past the sides, add 1⁄4" furring strips (A) to the sides as shown in Cabinet construction diagram (page 250).
- 2. Cut plywood sides (B) long enough to cover the cabinet sides and extend 31⁄2" below the cabinet to create the legs. Use a jigsaw to create the leg “cutouts”. Use wood glue and 4d finish nails to secure the side panels to the edges of the front stiles and back edges of the cabinets, making sure the front edges are flush.
- 3. “Picture-frame” the front of the cabinet with wood boards, using glue and 4d finish nails. Leave a 1⁄4" space between the edges of the doors and the edges of the rails and stiles you install so the doors can swing freely. The two vertical side stiles (C) should extend from the top of the cabinet to the bottom of the plywood legs and be wide enough to cover the face frame of the cabinet and the exposed edges of the plywood side panels. The upper and lower face frame rails (D) and face frame base (E) should fit snugly between the long stiles (C). Cut the arch into the base before installing it. If your cabinets require stiles between the doors (F), add them.
Take Note: Before installing any of the picture frame pieces, lay the assembled cabinets on their backs and position the frame pieces just as you would if you were installing them. Check to make sure the doors operate okay and that everything aligns before fastening the parts.
- 4. Secure the solid-wood top (G) in place using finish nails driven in from above or screws driven in from below. You can either purchase wide solid wood panels at a home center or create your own by gluing narrower boards side by side. Let the top extend 3" beyond each side and 1" beyond the front, and then add arched brackets (H) for a Craftsman- or country-style look.
- 5. Remove the doors. Cut galvanized or copper flashing (I) to fit the sunken panel areas of the doors. Secure the flashing to the door fronts using contact adhesive. Protect the edges of the flashing, and hold it in place by installing thin moldings (K, L) around the perimeter of the sunken panels, secured in place with short brads.
- 6. Play around with the position of your punched tin pattern (J) until you arrive at a design you like. Tape the pattern in place as shown. Position the door over a piece of extruded foam insulation or plywood to support the back of the panel as you punch the holes. Use a nail set, special punch (see Punched Tin Panels: Patterns and Suppliers Galore, below), or 16d nail to punch the holes of the pattern. Most patterns can be used only two or three times; if you’re going to repeat the pattern more than that, purchase or print out extra patterns.
- 7. Remount and adjust the doors; then add the pulls of your choice. To add more shelf capacity to your cabinet, you can install narrow, slotted bookshelf standards to the sides of the cabinet to support additional shelves.
Punched Tin Panels: Patterns and Suppliers Galore
You can purchase patterns, punches, metal sheets, and even completed panels from a variety of specialty suppliers (see Resources). There are dozens of patterns available (some you can print out from sources on the Internet), including those with diamonds, wheat, weeping willows, and stars. Once you’ve selected a pattern you like (I used the “Bluebells” pattern), find out which punching tool or tools are recommended. With some patterns you can use 16d nails or a nail set; with others, using specialty punches will result in a more attractive, authentic-looking cabinet.
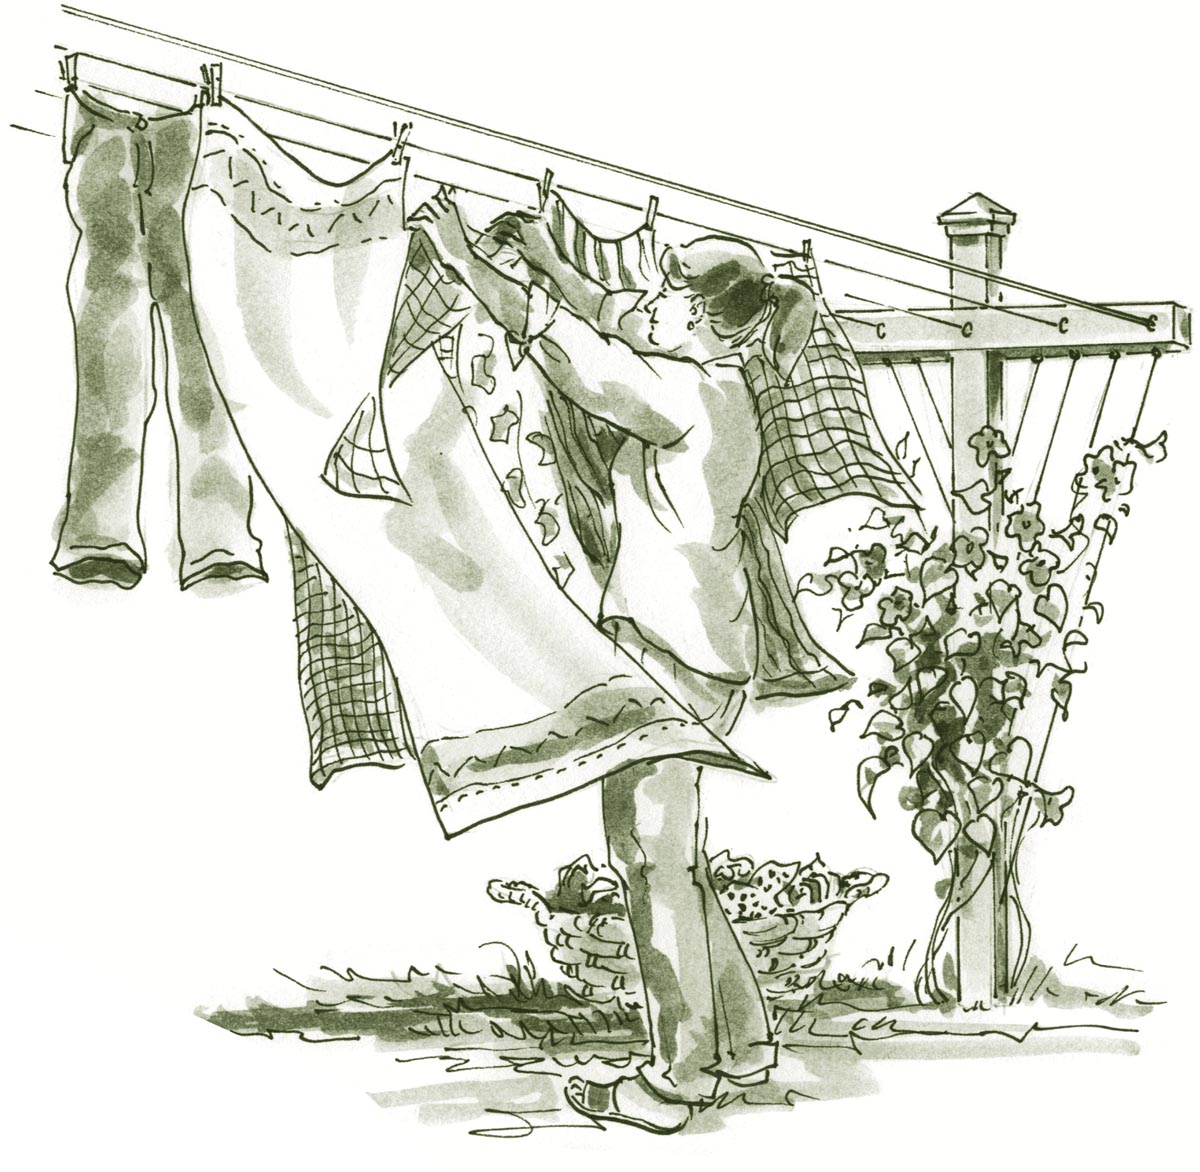
Clothes Pole Trellis
A natural way to dry clothes
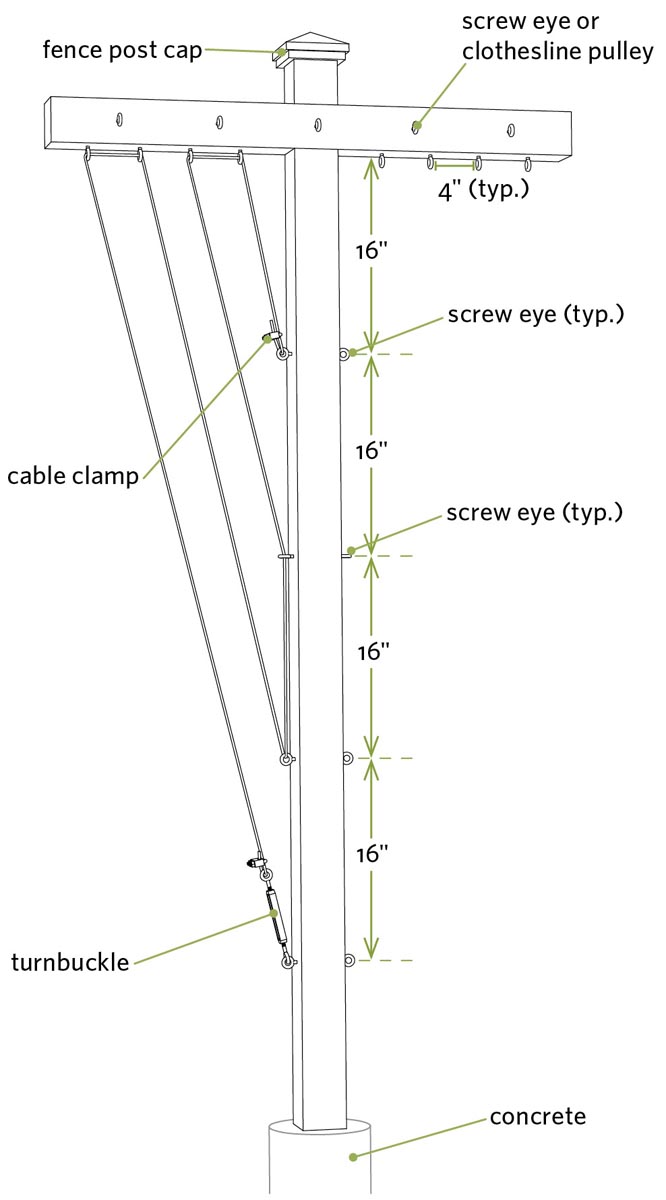
These poles support not just your clotheslines but your climbing vines as well. Build a single pole if you plan to have your clotheslines connected to the house; two if your lines will be freestanding. I built a set of poles from cedar, but you can use treated material to save money. You can use eye hooks for a stationary clothesline or pulleys that let you reel in your laundry. Adjust the height of the poles to fit your needs (setting your pole so the crossbar and lines are 4 to 6 inches above your head is a comfortable height for most people). The absolute maximum spacing between poles (or a pole and your house) should be around 18 feet.
Your vines can be strictly for looks or be of the more productive kind (see Plant the Right Vine!, page 254).
Materials (per pole)
All hardware and cable/wire must be rust-resistant.
- One 10-foot cedar 4×4
- One 4-foot cedar 4×4
- Gravel
- Wood preservative
- Scrap 2×4s (or other lumber; see step 4)
- Concrete mix
- Two 3" lag bolts
- Sixteen 1⁄4" × 2" screw eyes
- Braided 1⁄8" cable
- Four cable clamps
- Two turnbuckles
- Five 3⁄8" × 2" screw eye bolts or clothesline pulleys
- Clothesline
- One decorative fence post cap per post
Take Note: Before doing anything, call 811, the “Call Before You Dig” hotline, to have all utility lines marked on your property (see page 26).
Instructions
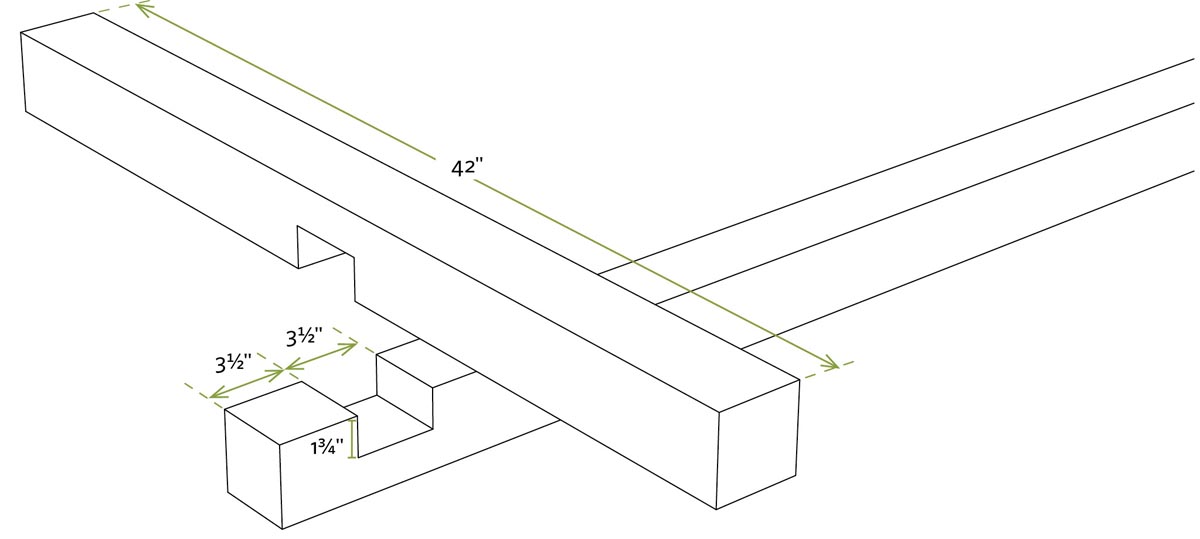
- 1. Cut each 4×4 upright and crossbar to length. Mark 31⁄2"-wide notches in each, as shown. Set a circular saw to cut 13⁄4" deep, and make a series of cuts between your marks. To create the notches, use a hammer and chisel to remove the fingers of wood.
Take Note: The tighter the notches fit together, the more solid and wobble-free the crossbar will be. Err on the side of making the notches too narrow, test-fit the pieces, and then gradually widen the notches as needed.
- 2. Fit the notch of the crossbar into the notch of the upright to create a T, and use two 3" lag bolts to secure the crossbar and upright to each other.
- 3. Dig a 36"-deep × 8"-diameter hole for each pole. Add a few inches of gravel to the bottom of the hole to promote drainage. Position the pole in the hole, determine the best height for your clothesline, and remove the pole and cut the bottom to length as needed. Soak the cut end in wood preservative, to extend the life of your pole.
- 4. Place the pole in the hole, and brace it plumb with 2×4 cross bracing. Fill the hole with concrete, checking the post with a level to make sure it remains plumb in both directions. Overfill the hole slightly, and shape the concrete into a mound that slopes down and away from the post to help shed water. Let the concrete harden overnight before moving on to the next step.
- 5. Add screw eyes to the crossbar and upright as shown. Use small cable clamps to secure one end of the braided cable to the uppermost eye on the upright. Thread the cable through the eyes as shown, keeping tension on the cable. Secure the other end of the cable to a turnbuckle hooked onto the lowest eye. Use the turnbuckle to tighten the cable. Tighten the turnbuckles evenly on both sides so you don’t rack the crossbar out of whack. Install a wood or copper fence post cap to the top of the upright to protect the end grain and add a decorative touch.
- 6. Install the screw eyes or clothesline pulleys to the crossbar, and then install the clothesline.
Plant the Right Vine!
There are dozens of vines that would love to call your clothesline trellis home, but some make better occupants than others. You may want to avoid vines that attract swarms of bees, produce messy berries, or have thorns that could scratch you or your clothes.
All vines have their pros and cons. Here are some factors to consider:
- Climbing rose vines, calamus, and bougainvillea are gorgeous but have hooks or thorns to help them climb — and scratch you.
- Beans and peas will provide beauty and food but require some maintenance and training throughout the growing season.
- Flowering vines such as clematis, morning glory, and honeysuckle are beautiful but can attract bees.
- Boston and English ivy can grow in shady places, but they grow so vigorously that in some parts of the country they’re considered invasive species.
- Grape and other fruit vines grow vigorously, but the fruits can stain your newly washed clothes.
Whatever you plant, be patient. There’s truth to the adage that vines sleep the first year, creep the second, and leap the third.
Spice Planter
A mini herb garden you can hang anywhere
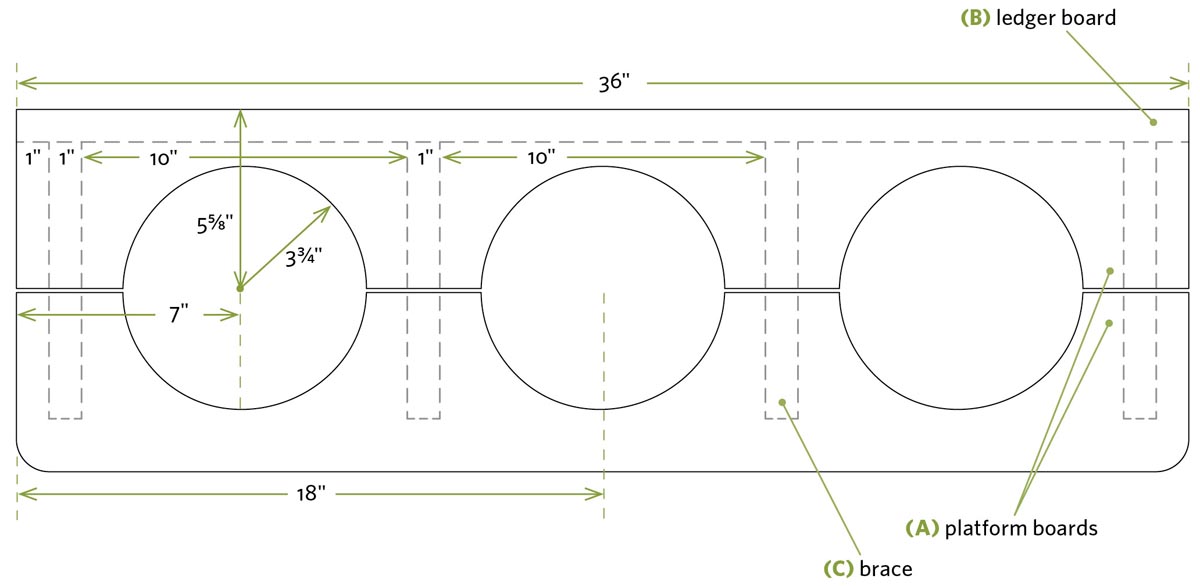
Here’s a garden you can create even if you live in an apartment on the fourth floor. This planter holds three standard-size pots for growing your most-loved herbs and spices. It’s designed to mount to a wall, deck rail, or fence so you can easily step outside and snip a few sprigs for cooking.
You can expand your garden by lengthening the platform boards and ledger strip, then adding more braces and cutting additional holes.
Materials
- Three 6-foot 5⁄4 × 6 cedar deck boards
- 21⁄2" exterior screws
- 31⁄2" exterior screws
- Three label holders (optional; see Resources)
Instructions
- 1. Temporarily clamp the two platform boards (A) side by side. Lightly draw in the positions of the ledger board and braces on the platform boards for reference. Use a compass to draw the three circles as shown. If the size of your pots differs from the ones indicated here, adjust the radius of the circles so the lips of your pots rest on the circumference of the cutouts.
- 2. Separate the boards, and use a jigsaw to cut out the semicircles. Save the scraps; you might find a unique use for them later.
- 3. Cut the braces (C) to length; then mark and cut the arched bottom as shown. Feel free to improvise on the shape.
- 4. Secure the braces to the ledger board (B) by driving 31⁄2" screws through the backside of the ledger, as shown in Planter construction (below). Position the platform boards and fasten them to the tops of the braces with 21⁄2" screws, checking to make sure the braces are square to the ledger as you go.
- 5. Mount the planter to your deck railing, fence, or house by driving 31⁄2" screws through the ledger strip. If you’re securing it to an exterior wall, make certain to drive the screws into underlying wall studs. Add metal label holders (available at office supply stores and specialty woodworking stores) to the front of your planter if you want to label your spices or herbs.
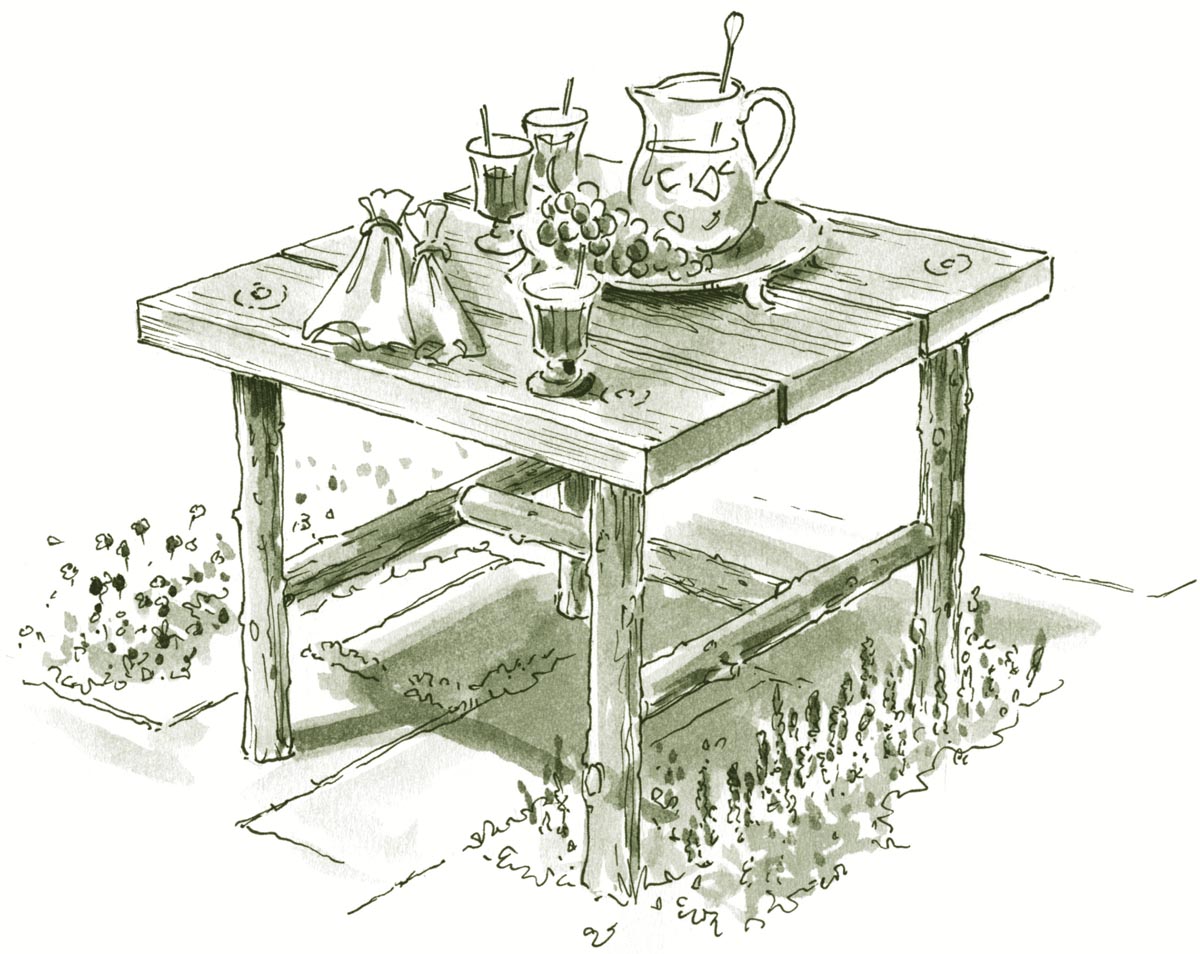
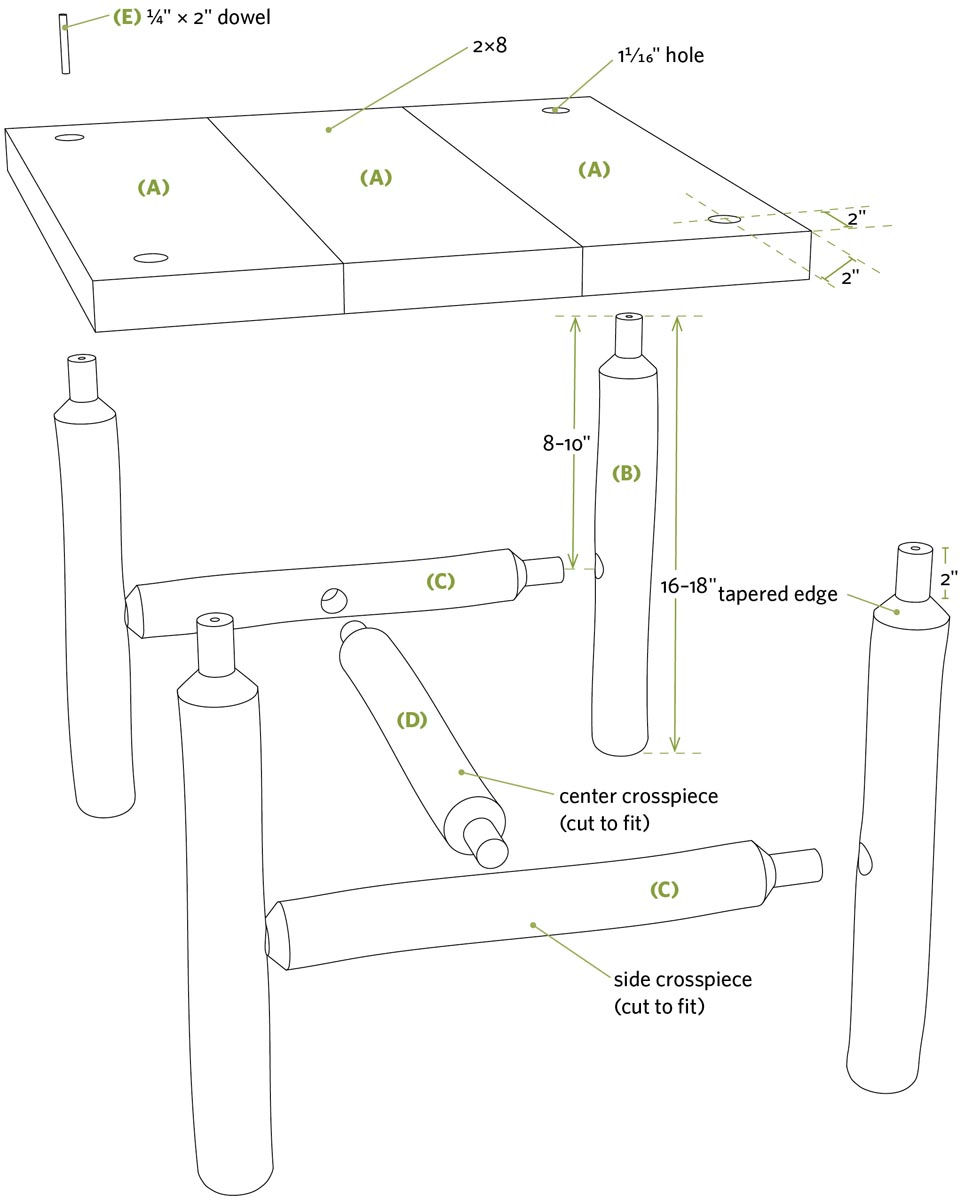
Rustic Garden Table
A table from branches, with a clever way to make joints
Somewhere (on a neighbor’s porch, at a craft show, in a magazine) you’ve admired a piece of rustic furniture and said to yourself, “I wish I could build that!” Well, you can. Using only basic tools, basic drill bits, and the techniques shown here, you can craft not only this table but also benches, chairs, and other furniture or structures as well.
Since every tree branch is different, use the dimensions shown here as approximate guidelines rather than gospel truth. You’ll need to measure and tweak your dimensions as you go to make everything fit properly.
Materials
For the tree branches, dry hardwoods like oak, hickory, and maple are best. Wet woods or softwoods like pine will gum up your hole saw bit, making the work much harder.
- One 8-foot pine (or other) 2×8
- 2"- to 21⁄2"-diameter tree branches
- One 12" length of 1⁄4" dowel
- Exterior wood glue
Instructions
- 1. Glue the three tabletop boards (A) side by side, and clamp them together (be sure to use exterior glue). After the glue has set, remove the clamps and trim the ends so the tabletop is about 213⁄4" square.
- 2. Measure 2" in from each edge at each corner of the tabletop and draw crosshairs as a center for your drill bit. Use a 11⁄16" spade bit to drill holes through the four corners. If you have a drill press, use it.
- 3. Cut four branches 16" to 18" long to create the legs (B) of your table. Firmly clamp one leg to your work surface, and use a 11⁄4" hole saw to drill a 2"-deep hole in the center of one end of each leg.
Take Note: Your branches must be dry, and you must use a sharp, high-quality hole saw or you’ll be doomed to frustration. Hole saws come in deep and shallow styles; you’ll need the deep style.
Measure 2" from the drilled end, and use a handsaw or jigsaw to carefully cut through the branch until it hits the outer perimeter of the circle cut by the hole saw. Your goal is to remove the outer cylinder of wood to create the round tenon. You can remove it in pieces or try to remove it in a single piece (in which case you’ll get a free rustic napkin ring out of the deal). Repeat for the remaining three legs. Use a sharp chisel or handsaw to taper the edges around the bases of the tenons as shown in Preparing the legs (above).
- 4. Use your 11⁄16" spade bit to bore a 11⁄2"-deep hole in the side of each leg, 8" to 10" down from the end of the tenon (the top of the leg). Follow the tip in Get Plumb with a Little Help from Your Friend (below) to create vertical holes here. These holes are for inserting your side crosspieces (C).
- 5. Partially insert the round tenons of the legs into the holes in the tabletop. Take measurements for the two side crosspieces (C) that will hold the pairs of legs together, taking into account the length of the tenons that will go into the leg holes. Create the tenons on each end of each crosspiece, just as with the leg tenons. Use your 11⁄16" spade bit to drill a 11⁄2" deep hole in the center of each crosspiece; these holes are for inserting the center crosspiece (D).
- 6. Insert the side crosspieces (C) into the holes in the legs, and then once again partially insert the leg tenons into the tabletop holes. Fine-tune the lengths of the end crosspieces as needed. Measure and cut the tenons on each end of the center crosspiece (D); then test-fit all of the pieces as shown. If your tenons fit too loosely, you can use epoxy or polyurethane glue to help fill the gaps (step 7). If the fit is too tight, use a utility knife or file to shave the tenon a little smaller.
- 7. Apply glue to all the tenons and assemble the table. Use a hand mallet to persuade the pieces together if necessary. Once the table is assembled, apply glue and pound the 1⁄4" dowels for the leg hole plugs (E) into the holes created by the hole saw pilot bit on the ends of the leg tenons (the ones protruding through the tabletop). Saw or sand any part of the leg tenon protruding through the tabletop so it’s flush with the surface.
- 8. Once the glue is dry, set your table on a flat surface. If it wobbles or sits at a slight slant, cut one or more of the legs shorter until the table sits flat and level.
Using only basic tools, basic drill bits, and the techniques shown here, you can craft not only this table but benches, chairs, and other furniture or structures as well.
Get Plumb with a Little Help from Your Friend
You can drill very vertical holes by hand with the help of a partner. Grasp the drill, position the tip of the bit on the mark, and then position the drill so the shaft of the bit is vertical. Have a friend position himself or herself at a 90-degree angle to your sight line and also grasp the drill handle. Have your friend move the handle until the shaft is vertical from his or her point of view. Pull the trigger, and drill away. As you bore the hole, each person is responsible for keeping the bit vertical from his or her own perspective. The result is a vertical hole, even in a crooked branch.
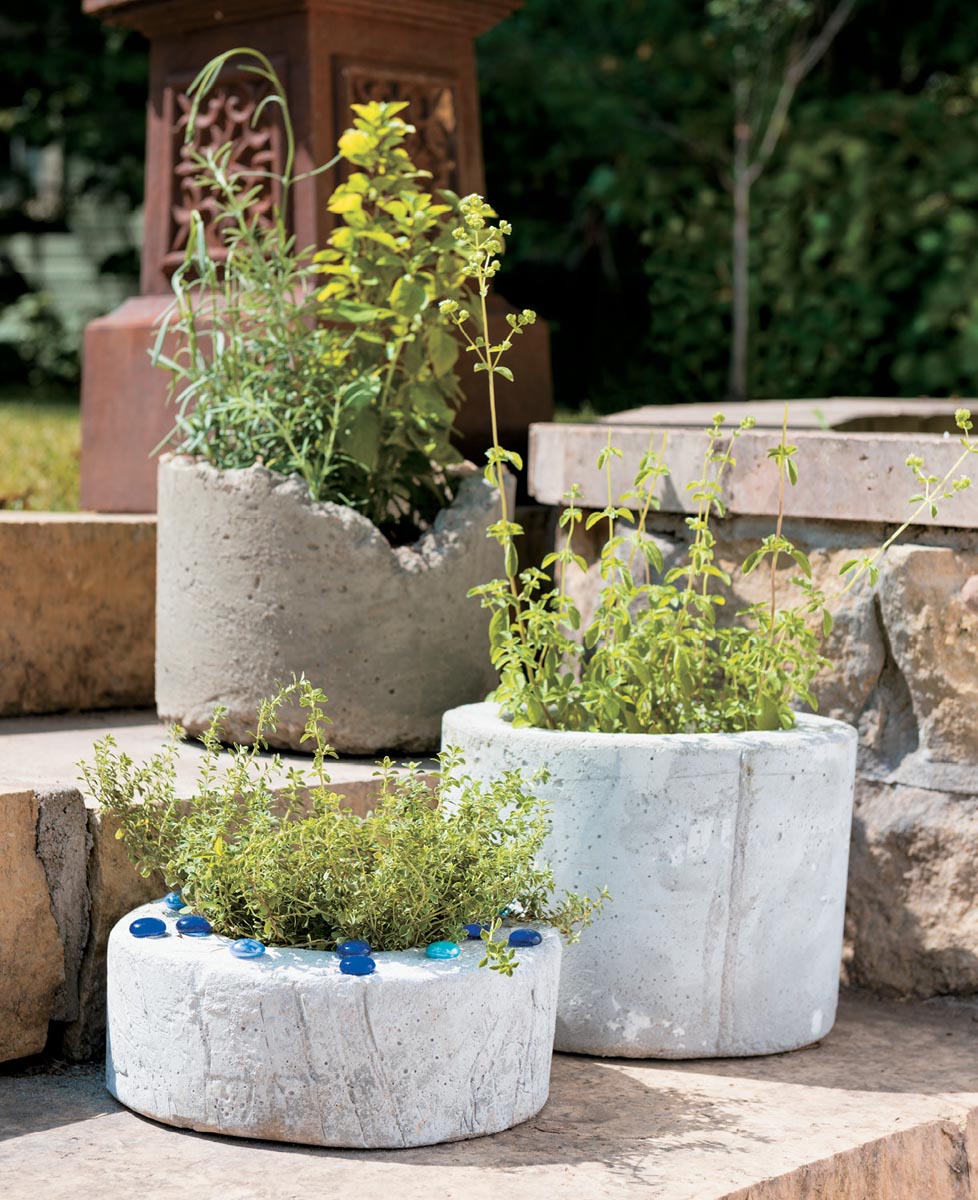
Concrete Planter
A heavy-duty planter at a lightweight price
Concrete is the most widely used manmade material in the world: for every person on the face of the earth, nearly 30 cubic feet of concrete is used each year. Here’s a simple project for using up a couple of your cubic feet.
Concrete may not be lightweight, but it certainly is versatile and cheap. We show you how to build a simple round planter, but its size, shape, and look are limited only by your imagination (see Customize Your Planters, page 264).
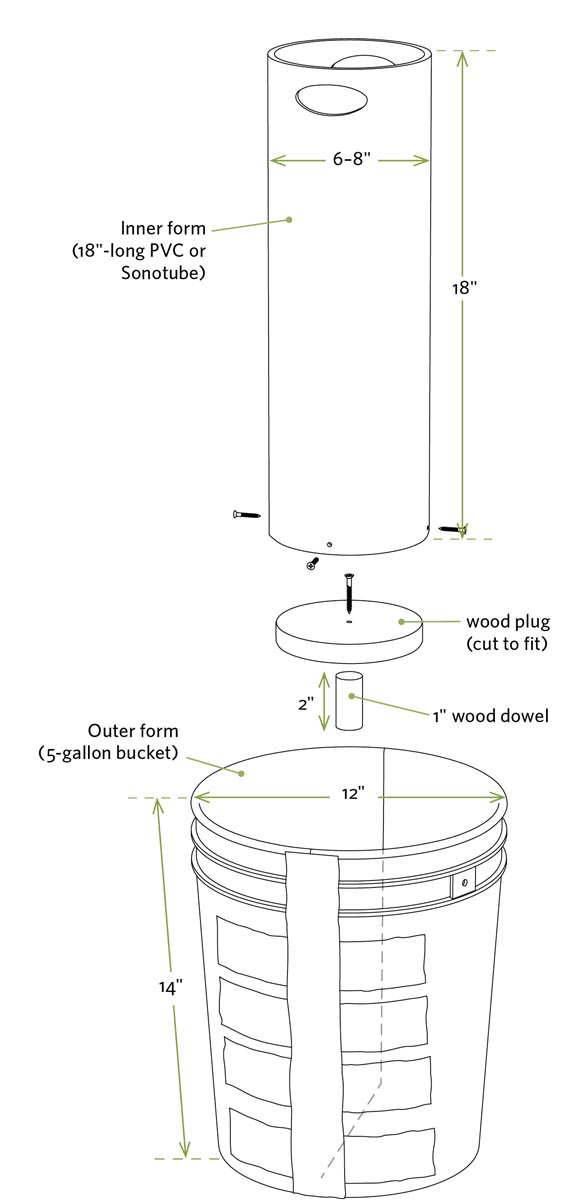
Materials
- One 5-gallon plastic bucket
- Duct tape
- One 6"- to 8"-diameter concrete tube form or PVC pipe, 18" minimum length
- One plywood scrap, at least 7" square
- One wood dowel, 1" diameter × 2" long
- Drywall screws
- Concrete form release oil or vegetable oil
- One 60- or 80-pound bag concrete or mortar mix (see step 4)
Instructions
- 1. Use a jigsaw or circular saw to cut a 5-gallon bucket in half lengthwise, as shown. Use duct tape to secure the halves back together again; apply 8" horizontal pieces of tape every few inches to secure the halves together, followed by long continuous pieces to seal the seam. If you want a shorter planter, cut the top few inches off the bucket. If you want to add some special details to your planter, install panels or other objects to the inside(s) of the bucket halves before assembling them (see Customize Your Planters, page 264).
Take Note: Don’t skimp on the duct tape; the concrete exerts more pressure than you might think.
- 2. Build the inner form as shown in Inner and outer form details, right. Begin by cutting the round concrete form (made of cardboard, commonly available at home centers and lumberyards) or PVC pipe to length and rough-cutting a couple of handholds near the top. (You’ll use these for twisting and removing the form later on.) Cut a plywood disc to match the diameter of the inside of the form. Cut a 2"-long section of 1"-diameter dowel, and secure it to the center of the disc with a drywall screw (this will create the drainage hole.) Push the plywood disc into the bottom of the form (with the dowel pointing away from the tube), and secure it with three or four drywall screws.
Take Note: You can also use a sturdy pail or bucket for the inner form. You still need a dowel to create a drainage hole.
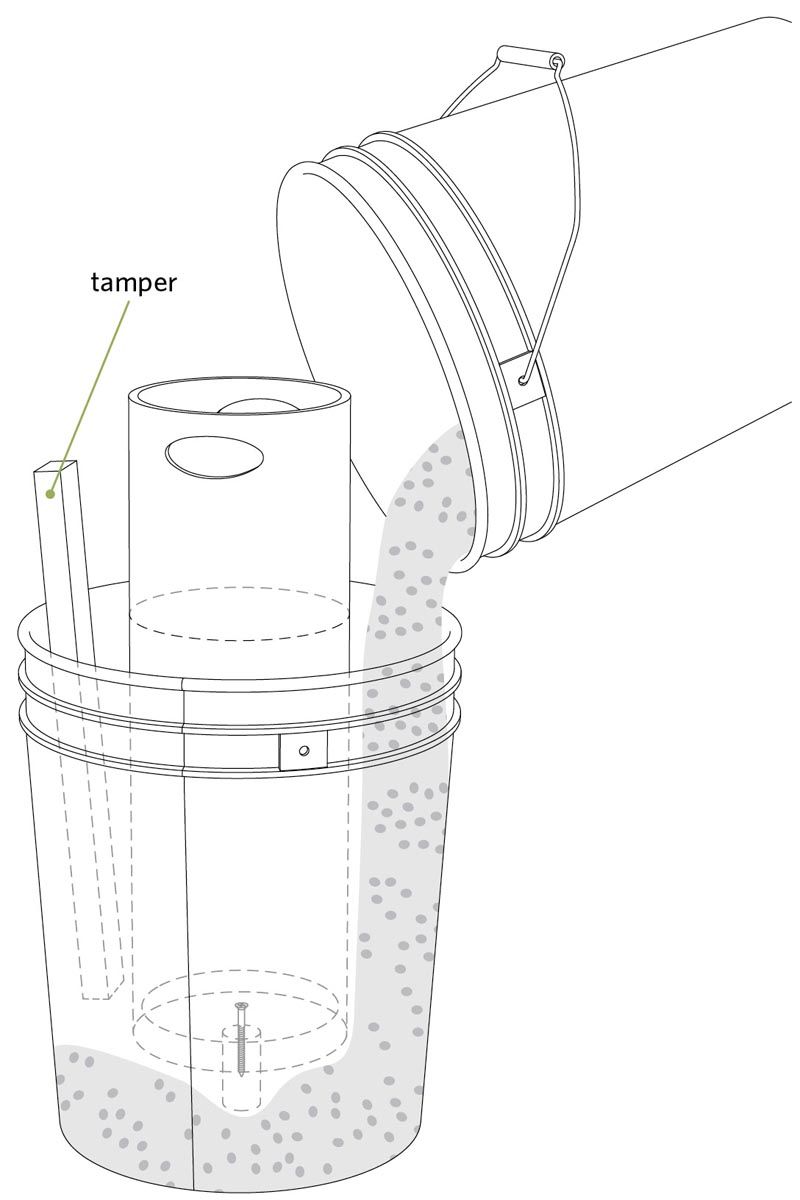
- 3. Coat the inside of the bucket and the outside of the inner form with concrete form release oil or vegetable oil so the forms won’t stick to the concrete. Use lots of it if you use the cardboard tube form, because the cardboard is absorptive.
- 4. Dump 1⁄2 bag of mortar or concrete mix into a mixing tray or bucket, add water gradually, and mix until the contents are thoroughly blended and the mix has the consistency of peanut butter. Pour 2" of mix into the bottom of the bucket, as shown. Position the inner form in the middle of the bucket; then push and twist it until the drainage hole dowel hits bottom. Continue packing concrete around the tube until the bucket is no more than half full. If the form tends to float upward, fill it with rocks or concrete mix. To help settle the concrete as you work, tap the sides of the bucket with a hammer or lift the bucket 1" off the ground, and let it drop.
Take Note: Mortar mix will create a smooth pot; concrete mix will create a pot with a more rustic look.
- 5. Let the concrete set for 60 minutes; then grab the inner form by the handholds and twist it a half turn. Do this every 30 minutes for a while to prevent the concrete from adhering to the cardboard.
- 6. Let the concrete harden; this will take 10 to 20 hours depending on the conditions. Remove the duct tape holding the two sides of the bucket together and gently pry the halves apart to remove the outer mold. You may need a helper for this part. Twist and remove the inner mold, plywood disc and drainage hole dowel. If they don’t come out easily, try again after the concrete has cured. You may need to remove the cardboard form in pieces, and remove the plywood disc and “drainage dowel” by hand. Use a coarse, damp sponge to smooth the outside of the planter.
- 7. Place the planter on a piece of plastic in an out-of-the-way place, cover it with more plastic, and let it cure and harden for four or five days. Then plant away.
Take Note: Concrete planters can easily crack if water or moist dirt left in them expands during the winter. Before the first freeze, bring them inside or remove the soil, turn them upside down, and cover them with a plastic bag.
Customize Your Planters
You can make your planters as plain or as decorative as you want. Here are a few ideas:
- Create recessed patterns by securing bevel-edged 1×4s or plywood panels to the inner bucket wall before adding the concrete. Drive drywall screws from the outside of the bucket to hold them in place. Think ahead so the panels won’t make it difficult to remove the outer form later on. Make sure to coat them with concrete form release oil, vegetable oil, or another suitable release agent. You can also use rope and other objects to make custom designs.
- Color your concrete by using liquid coloring agents (see Resources), adjusting the intensity by the amount you add.
- Antique your planter using a mixture of dry, crumbled moss and buttermilk. Paint the mixture onto your pot; then place your pot in a sealed plastic bag and set it in a cool shady spot for about a week. Remove it from the bag, and in a few weeks your pot will sport a mossy coating.
- Use epoxy adhesive to secure pieces of broken tile, beads, dishes, mirrors, or other objects to the outside of the pot (see page 262).
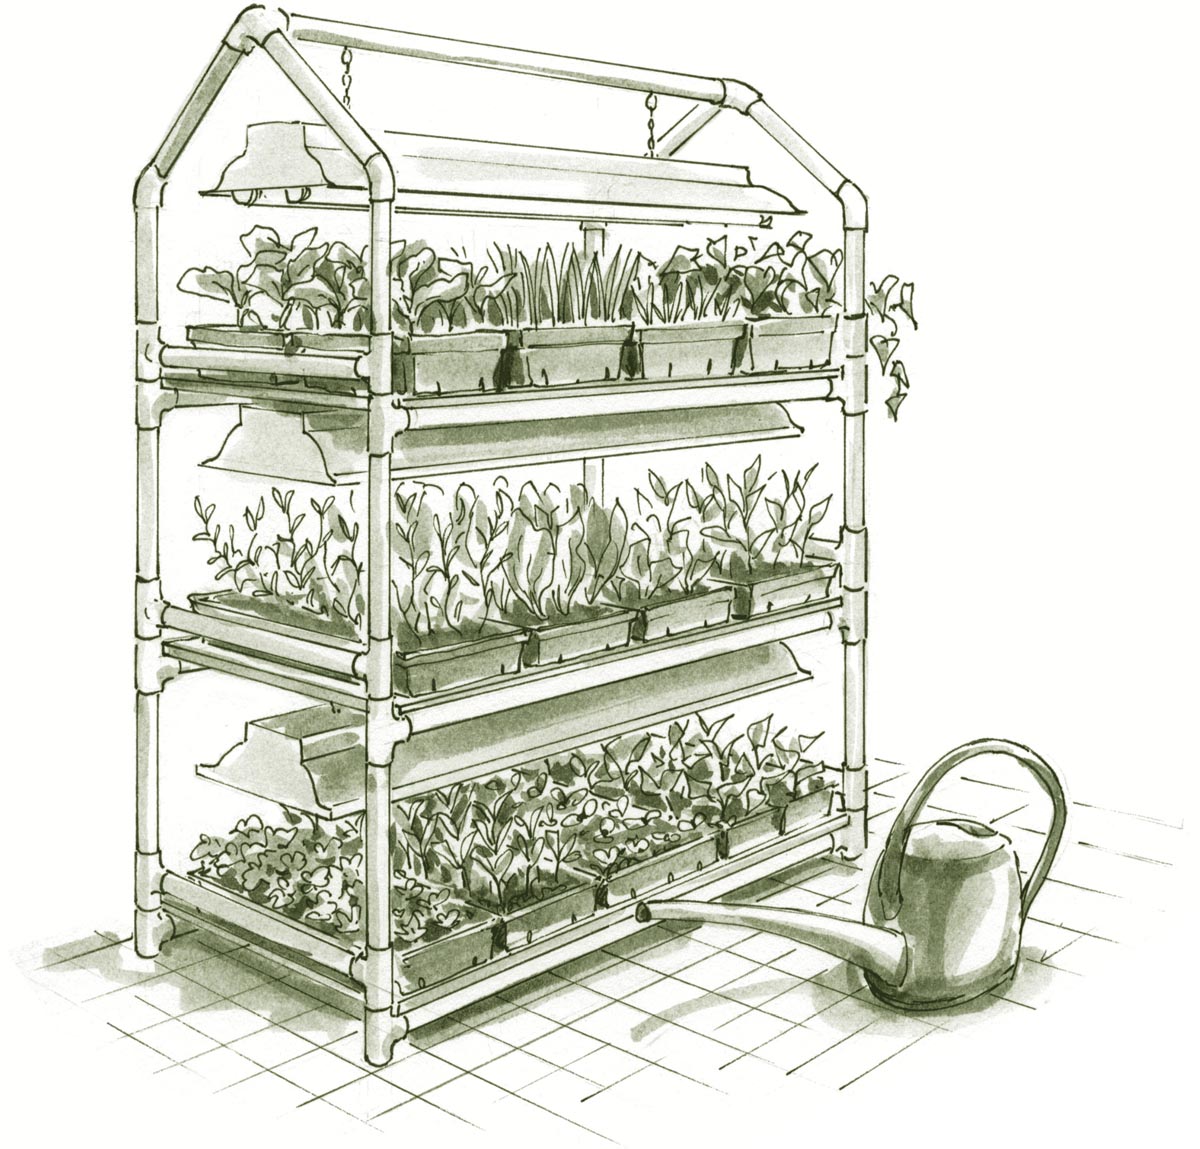
Seedling Rack
Get a jump on the growing season
A seedling rack provides a space-saving vertical garden to give your plants an indoor head start. This rack, made primarily from inexpensive PVC pipe and fittings, can accommodate grow lights to give your seedlings an even better jump start. Since seedling racks can be space wasters for the 10 months of the year you don’t need them, this PVC rack is designed to be easily disassembled and stowed.
You can adjust the height and spacing of the platforms by adjusting the length of the legs (D, E).
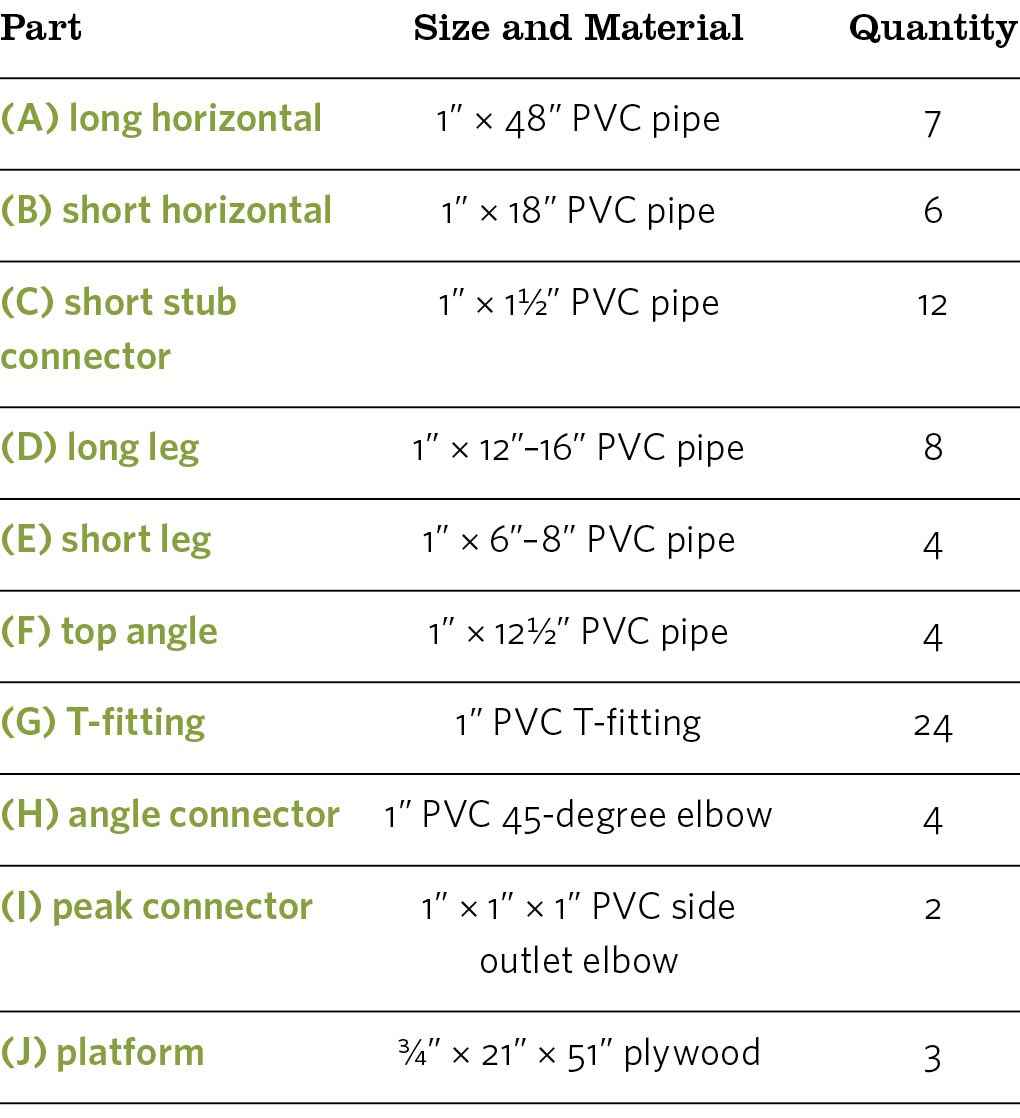
Materials
Buy T-fittings in packs of 10 to save money. Instead of two Ts at each corner, you can use a single 4-way side outlet T. These simplify the project but cost three to four times as much as a pair of standard Ts. (PVCFittingsDirect.com, 877-777-8421 carries 4-way side outlet Ts and side elbow Ts, both of which might not be sold at your local building supply store.)
- Six 10-foot pieces 1" PVC pipe
- Twenty-four 1" PVC T-fittings
- Four 45-degree 1" PVC elbows
- Two 1" × 1" × 1" PVC side outlet elbows
- One and a half 4 × 8-foot sheets 3⁄4" plywood
- White silicone caulk
Grow It Safe
If you have climbing kids or curious cats, or just want to play it safe, prevent your rack from tipping by securing it to the wall using pipe straps or L brackets. Also, make certain the cord or cords running from the lights to the outlet don’t create a tripping hazard.
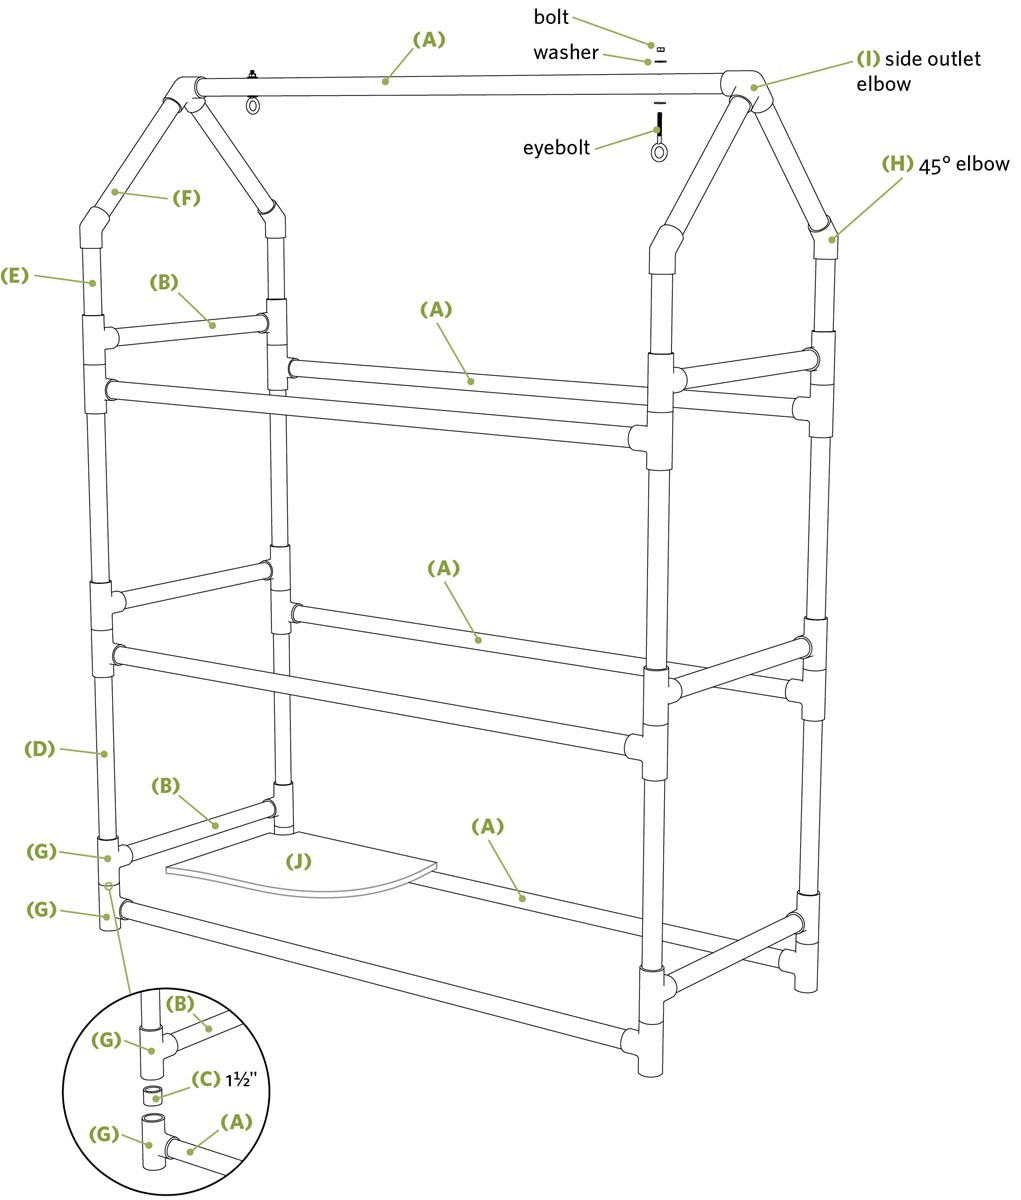
Instructions
- 1. Cut the PVC pipe sections (A, B, C, D, E, F) to length, using a hand miter box, power miter saw, or fine-tooth handsaw. To make the best use of pipe materials (which normally come in 10-foot lengths), cut the 48" and 18" horizontals first, then the legs, and finally the short stub connectors. Watch your fingers when you’re working with short pieces! Use sandpaper to smooth the cut edges. If you want to remove the factory markings on the pipe, rub the area with a cloth dampened in acetone. Wear gloves, and do this outside.
Take Note: Adjust the length of the long (D) and short (E) legs according to the heights of the seedlings you intend to grow.
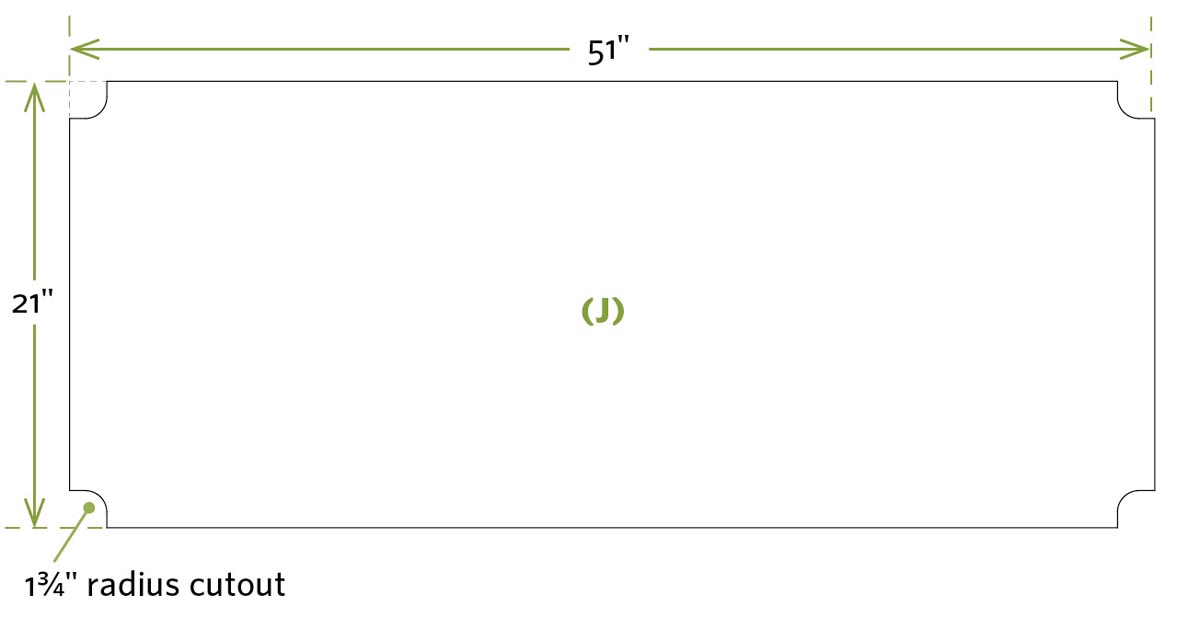
- 2. Cut the three plywood platforms (J) to size as shown. Use a jigsaw to cut the curved notches in the corners.
- 3. Secure Ts (G) to both ends of the long (A) and short (B) horizontals. Use white silicone caulk, rather than pipe cement, since your joints don’t need to be watertight, and caulk will give you more time to fiddle with the orientation of the pieces. When you’re done, you’ll have a dozen pieces of pipe with Ts on both ends; six of these frame assemblies will be long, and six will be short.
Hint: For optimum results, adjust the lights so they’re 2 to 3 inches above the tops of the plants.
- 4. Slide the 11⁄2" stubs (C) into the tops of the Ts at the ends of the long frame assemblies (A, G). Note: Do not glue or caulk these or any remaining joints if you want to be able to disassemble the rack for storage. Slip one short frame assembly (B, G) over the stubs of two long frame assemblies (A, G) to create a U shape. Lay a platform (J) in place, and then add the second short frame assembly (B, G) to complete the rectangular frame of piping. You must assemble the rack in this order so that you get the platforms in place.
Take Note: Even when they’re not cemented together, PVC pipe and fittings can be a bear to take apart. To make the legs easier to remove for storage, apply furniture wax to the ends and then buff with a rag before assembling the parts.
- 5. Insert the legs (D) into the top sockets of the Ts; then work upward, assembling the frames and inserting the plywood platforms as you go. Create the peak by assembling the parts as shown in Piping assembly diagram.
- 6. Hang the lower two grow lights from eye bolts secured near the ends of the platforms. Hang the upper grow light from eye bolts secured to the upper long horizontal (A). Adjust the heights of the lights by moving the S-hooks to different links in the chain. Use tape to secure the lights’ cords to the legs to keep them organized.
To minimize the number of cords running across the floor, mount a multi-outlet strip to the rack for plugging in the lights, and then run a single extension cord to the wall outlet. You can add a timer to automate the on-off cycles.
It’s a Greenhouse, Too
As the weather warms, you can move your seedling rack outdoors, cover the framework with plastic film, and use it for a greenhouse. The peaked roof comes in handy for shedding rain. Secure it to something sturdy so it doesn’t topple.
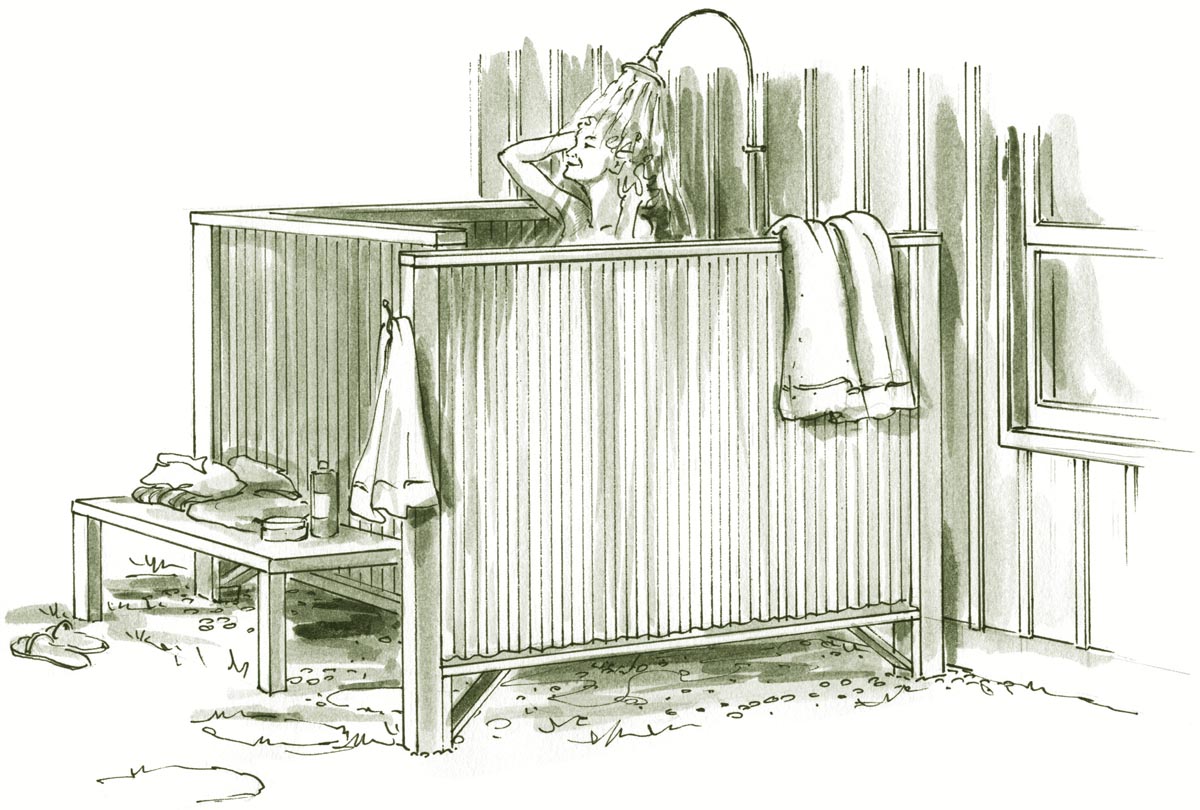
Outdoor Shower
A place to wash your mud, and worries, away
Ah, an outdoor shower: a place to rinse off after a muddy day, to wash the dog, to cool off, to give your outdoor plants their annual shower. It’s an attractive idea, and here’s a simple design.
Unlike most projects in this book, this one leaves a few critical details to you — like how to get warm water to the shower and how to usher it away. This is no small feat, nor should it be an afterthought (Plumbing Your Outdoor Shower, page 272). Since each climatic area, house, plumbing setup, and community differs, we leave the details of the plumbing to you. For the shower shown, we tied into existing hot and cold water lines, and the existing sewer or septic lines. But, as the saying goes, it’s complicated. If you’re pursuing the idea of an outside shower, talk to a local plumber and your local building official before you start.
The site for your shower and your needs will dictate the size of your enclosure; therefore, the construction details presented here are intended to be more inspirational than exact.
Note: Don’t start this project unless you’ve figured out the plumbing details. Better yet, don’t build the surround until the plumbing is installed and operating.
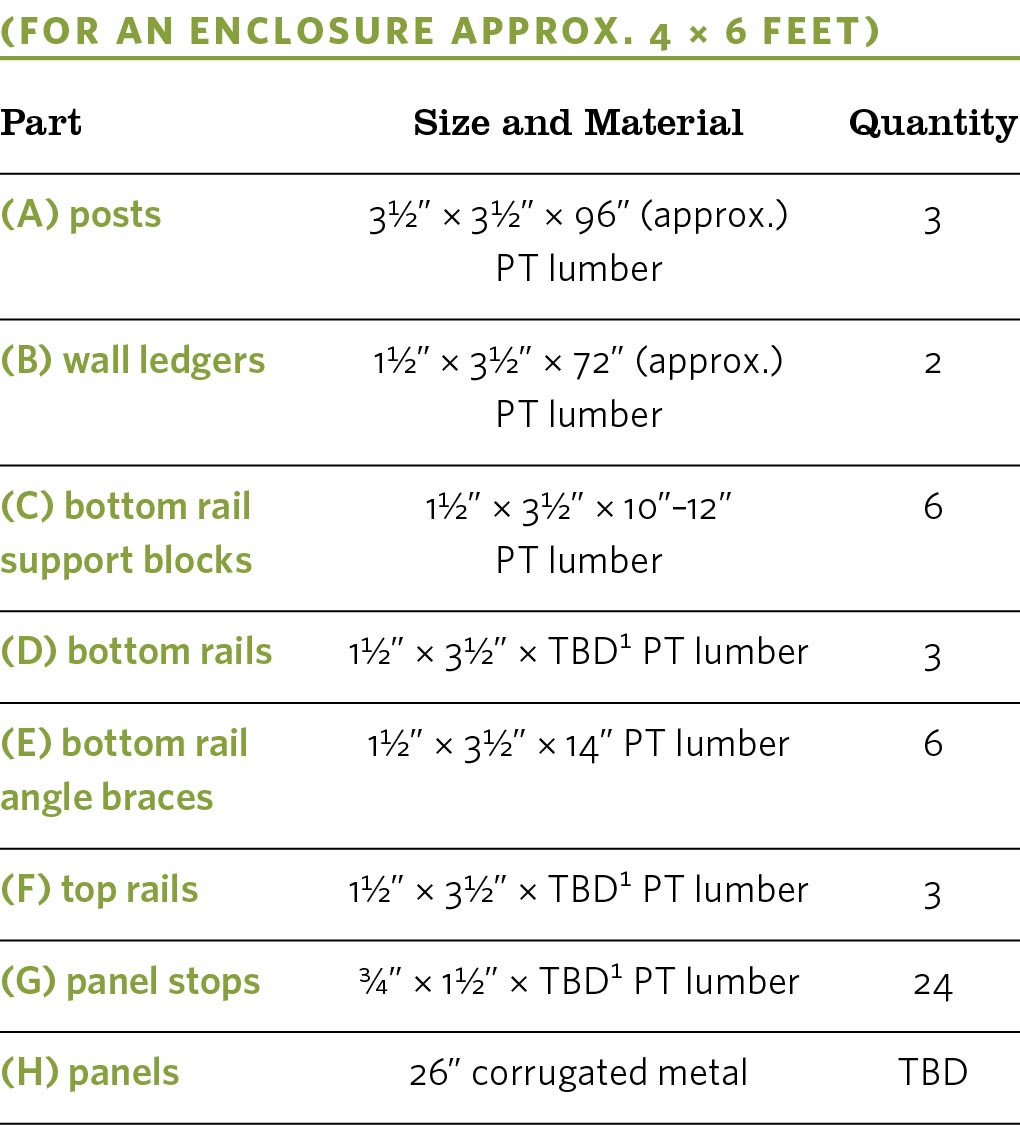
Materials
All lumber is pressure-treated, cedar, or other rot-resistant wood.
- Three 8-foot 4×4s
- Scrap 2×4 lumber (for post bracing)
- Eight 8-foot 2×4s
- Nine 8-foot 1×2s
- 26"-wide corrugated metal panels
- Gravel
- Concrete mix
- 16d galvanized nails
- 6d galvanized nails
Instructions
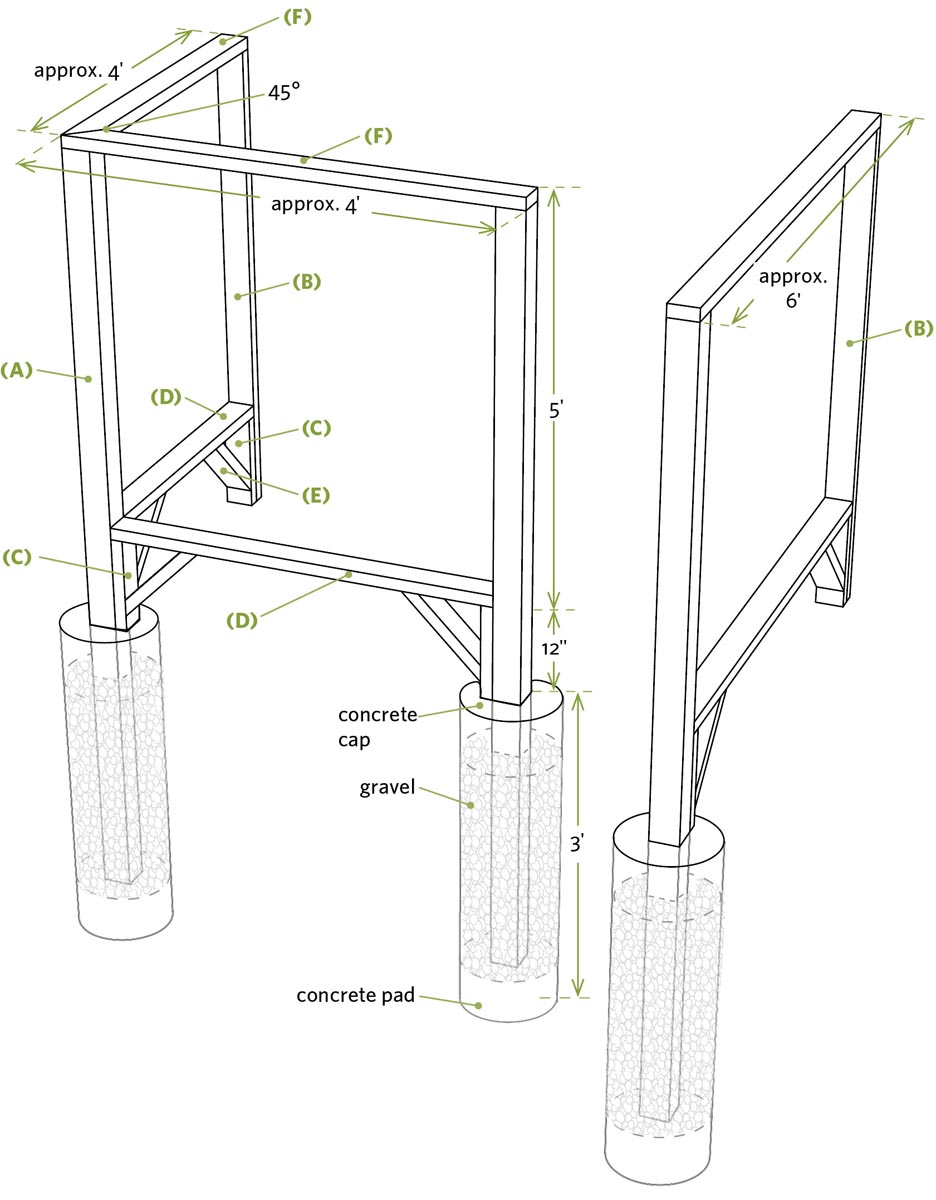
- 1. Use string or 2×4s to determine the position of the walls and support posts. Adjust the size of the shower surround according to your needs and building site.
- 2. Dig a 36"-deep hole for each 4×4 post (A). Add 6" of concrete to the bottom of each hole, and let it harden. Set the posts, make sure they’re plumb, and brace them in both directions. Backfill the holes with gravel to within 8" of the top; then add more concrete, slightly mounding the top so water runs away from the posts. Let the concrete dry for 24 hours or so.
- 3. Determine the height of the shower walls, and mark this height onto one of the posts. Use a level and straight 2×4 to transfer this height to the other posts and also to the wall of the house where the wall ledgers and panels will be secured. Use a circular saw to cut the tops of the 4×4s to the correct height.
Take Note: Keeping the walls at shoulder height provides both privacy and good ventilation, as well as good sightlines so you can see who’s coming!
- 4. Secure two vertical wall ledgers (B) to the house so they’re level with the tops of the 4×4 posts. Use 16d nails to secure the short 2×4 support blocks (C) to the bottoms of the posts and wall ledgers, making sure the tops of the blocks are level. Position the horizontal bottom rails (D) on the blocks and nail them in place. Add the short 45-degree angle braces (E) to help support the bottom rail, and brace the overall structure. Finally, install the horizontal top rails (F), nailing them to the tops of the 4×4s and 2×4 ledgers.
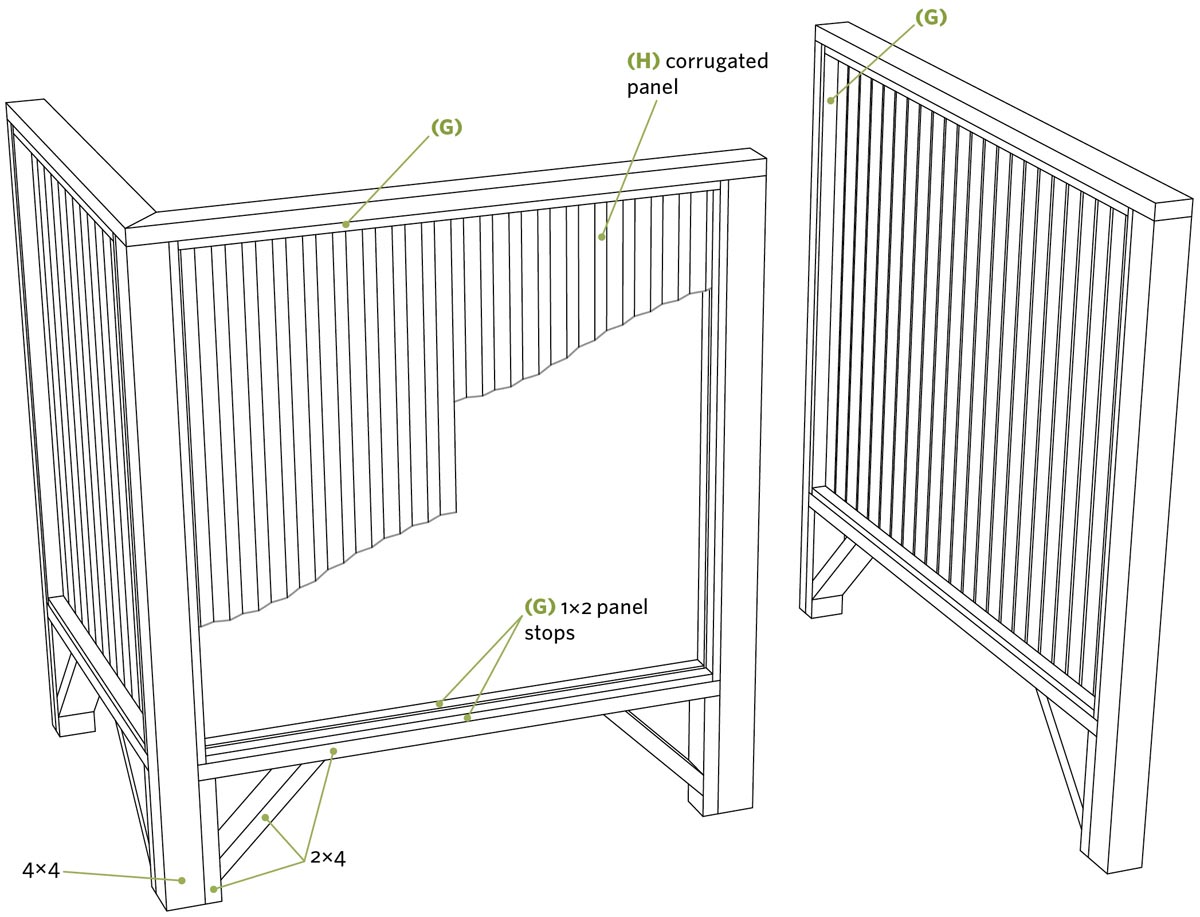
- 5. Nail the inner set of panel stops (G) to the 2×4 rails, wall ledgers, and 4×4 posts using 6d nails to create one side of the frame for the metal corrugated wall panels, as shown. Cut and set the panels (H) in the openings, holding them in place with the outer set of stops (G.)
Take Note: Some metal panel suppliers will cut panels to length for you. If you use 26"-wide panels and overlap them strategically, you may not have to cut them width-wise.
- 6. Build the shower base in accordance with your planned drainage system. If you’re channeling your runoff into the house’s main drain-waste-vent system, you’ll need a concrete floor with floor drain. If you’re draining your runoff into a gravel-filled trench or catch basin, the floor may consist of a gravel base with a wood-slat floor perched on top.
Customize Your Shower
Now that you’ve built your shower surround, customize it according to your needs. Here are a few ideas:
- Install a shower control valve that allows you to include a shower handset with a sliding bar. This setup allows you to adjust the height of the showerhead for kids and adults, and to use the showerhead in handheld mode for washing pets, rinsing boots, and doing other chores.
- Install benches, inside and/or out. Use the shower support posts (A) for the back legs of the bench, and add two more legs for the front.
- Install hooks for towels, clothes, and scrub brushes. Add trays for soaps, shampoos, and other outdoor showering supplies.
- Add a door, using gate hinges mounted to one of the support posts. Build the door using cedar slats or galvanized paneling like the rest of the surround.
Plumbing Your Outdoor Shower
Water directly from the outside faucet is usually too cold, and water from a simple makeshift passive solar device can be too variable. Tying into existing hot and cold water lines is your surest bet, but it gets complicated in regions where water lines can freeze. If you’re going to tap into existing lines, your task will be much easier if your shower backs up to a kitchen, bathroom, or laundry room with plumbing in place.
Then there’s the question of where and how to get rid of the wastewater. In some cases it can be directed into the main sewer or septic system; in other cases it can drain to a gravel pit under or near the shower. Gray water can even be directed to the lawn or flower garden, but some communities are very picky about this last option.
For more complete information on options, check out the book The Outdoor Shower, by Ethan Fierro; for practical information on plumbing, check out: The Complete Guide to Plumbing (see Recommended Reading).
Lessons from the Homestead
Your Own Private Slice of Aquatic Heaven
By Ethan Fierro
If you derive pleasure from relaxing in the natural world of flowing water, dappled sunlight and sumptuous verdant surroundings, then look no further than your own personal outdoor shower. Creating a structure that brings immense satisfaction from daily use, as well as the design and construction process, is actually quite simple for the backyard homestead crowd. By employing a basic set of plumbing and carpentry skills, you can create your own backyard sanctuary for bathing and delighting in nature.
I grew up showering in a semicircular wooden enclosure draped with thick English ivy. In the summer, migratory songbirds roosted while raising their young, chatting and flying about. By night I watched fireflies glowing in the steam against a backdrop of Northern constellations, and heard the last delicate notes stroked out by a cricket.
These memories are deeply poignant as I look back, recalling the poetic beauty emanating from a simple daily routine. And the focal point of this touching-in-to-nature centers on a structure of three easily combined elements: plumbing, a structure to attach the plumbing, and drainage. All three elements include a host of variables you can fine-tune for your own personal tastes.
To enclose or not enclose, this is the question. To what extent do you desire privacy in your surroundings? Are there sightlines that may leave an exposed bather ducking for cover from second-floor vantages? Or are you the free-spirited type who could not care less? Either way — open shower or enclosed — comes with benefits, and regardless of how enclosed an outdoor shower is, viewing portals will enable the most prudent bather to enjoy the scenery without feeling “on center stage.”
With the continuing depletion of our freshwater, I recommend making the most of the used gray water, by collecting it and irrigating nearby vegetation. Local regulations will dictate what parameters you must abide by, but it is the conscientious bather who goes the extra mile in creating a simple filtration system to reuse a limited resource.
If you are confident in your own construction skills, then put your imagination to work and build yourself a dream shower that will serve you for years. But even if you require professional assistance with the design and construction, by all means supplement your talent where you want. Join the ranks of thousands of delighted outdoor bathers and give yourself the gift of your own private slice of aquatic heaven.
Ethan Fierro is the author of The Outdoor Shower (see Recommended Reading). He grew up on the island of Martha’s Vineyard, following in the footsteps of his artistic parents. He now resides with his wife of 23 years, Phyllis, on Maui, enjoying the plentitude of showering opportunities.
Creating a structure that brings immense satisfaction from daily use, as well as the design and construction process, is actually quite simple for the backyard homestead crowd.
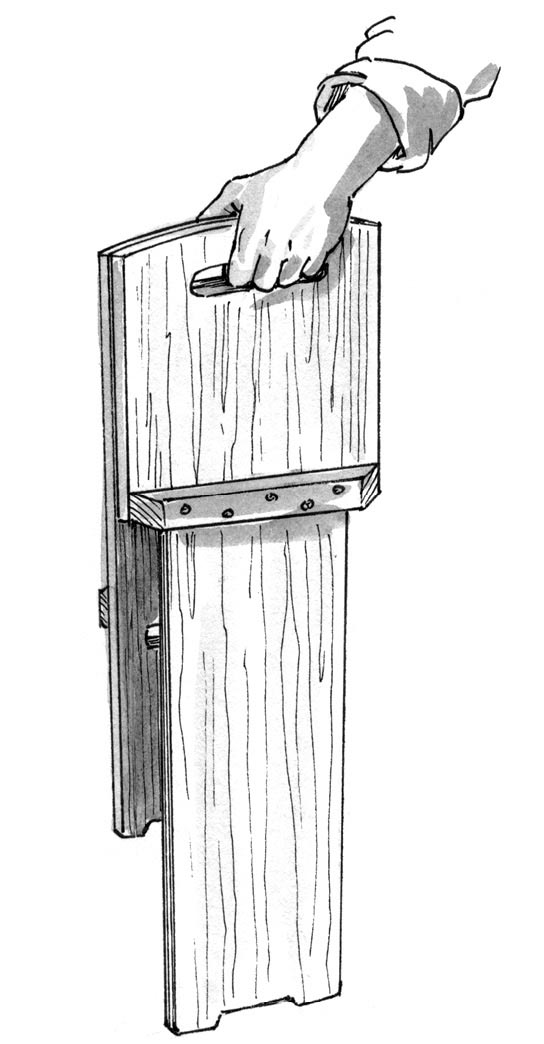
Pickin’ and Grinnin’ Chair
Easy to build, easy to tote
Whether you’re pickin’ peas from a pod or tunes from a guitar, you’ll be grinnin’ while you sit in this chair. You’ll be smiling while you build it, too, since it only takes a few boards, a few tools, and a few hours of time. When you’re done you’ll have a seat you can use when camping, husking corn, or sitting out under the stars. The pieces slide apart and nest flat so you can carry them easily and stash them just about anywhere.
Seats similar to this have gone by dozens of names in the past: backpacking chair, plank seat, stargazer chair, campfire roost. And they’ve been made from all sorts of woods in all sorts of shapes and sizes. I made this Pickin’ and Grinnin’ Chair from oak; you can use pine, but your chair won’t be as sturdy or last as long.
Materials
- One 6-foot oak or hardwood 1×12
- 11⁄4" wood screws
- Wood glue
- Clear exterior wood finish
Instructions
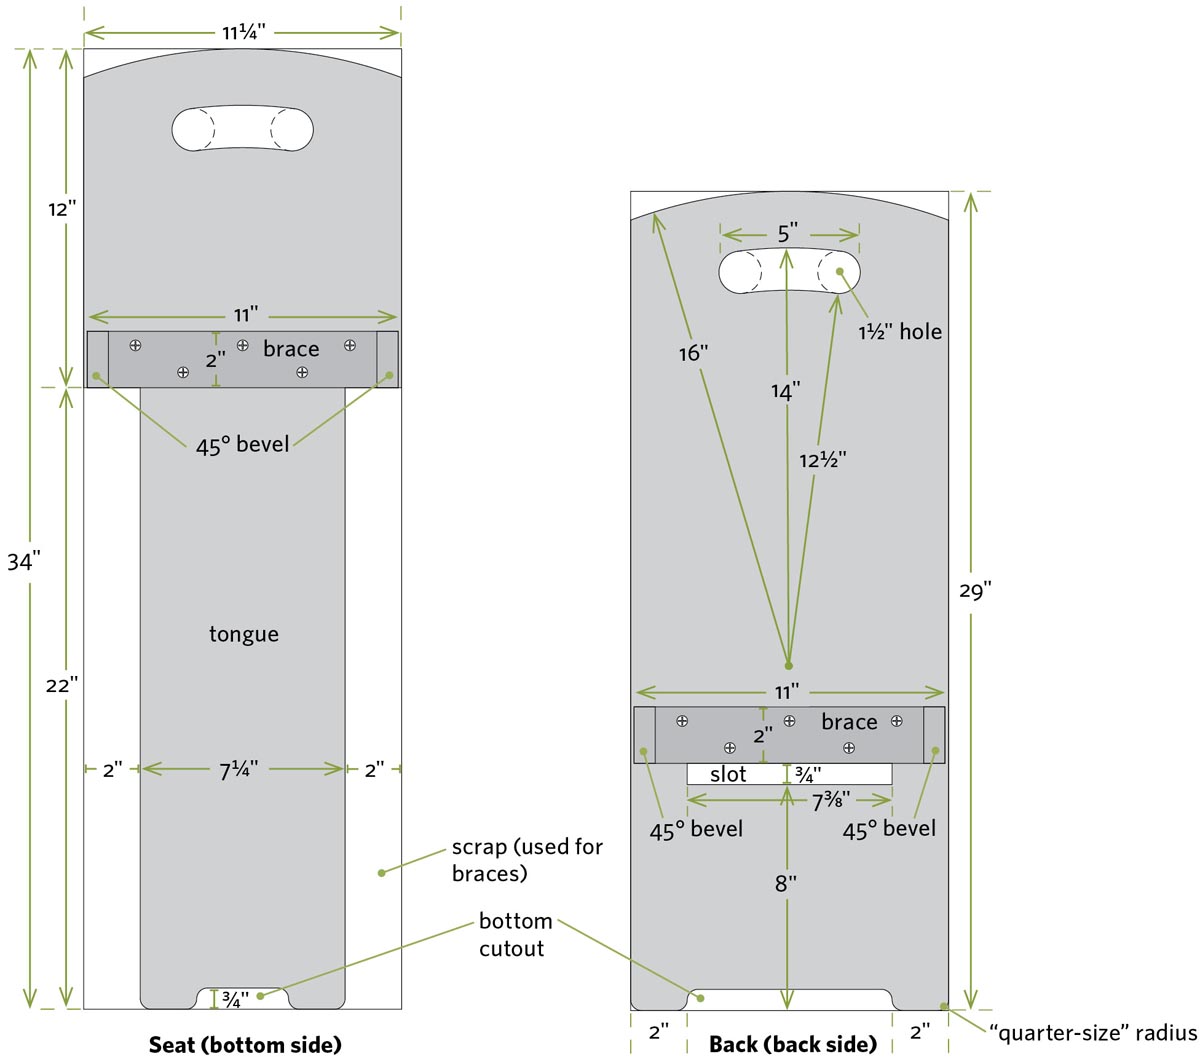
- 1. Cut the 1×12 seat plank and back plank to length as shown. Drive a screw 16" away from one end of each plank (as shown in the Back detail below), centered across the width of the board; then use your tape measure and pencil to swing arcs to mark the 16" radius for the ends. Swing smaller arcs with 121⁄2" and 14" radii for the handholds. Drill 11⁄2"-diameter holes at the ends of each handhold, and then use a jigsaw to cut out the curved openings.
- 2. Mark the bottom cutouts on the opposite ends of the boards, as shown in Cutting diagrams (below). Use a quarter to draw the rounded corners, and then cut them to shape with a jigsaw. Smooth the edges by hand- or power-sanding them. If you have a router, round over the edges of the seat to create a more butt-friendly surface.
- 3. Mark the 2"-wide side cutouts to create the tongue in the seat board, as shown. Make the cuts with a circular saw and jigsaw.
- 4. Cut two 11"-long braces from the tongue cutoff pieces, and bevel the ends at 45 degrees. Use glue and 11⁄4" screws to secure one of these braces to the back of the seat board, as shown.
- 5. Mark the position of the slot in the back plank as shown. Drill a 3⁄4" hole on each end, and then cut the 3⁄4"-wide slot with a jigsaw, squaring off the corners. Test-fit the pieces; if the fit is too tight, use sandpaper or a jigsaw to slightly enlarge the slot. Use glue and screws to secure the other 11" brace just above the slot, as shown.
- 6. Apply a clear exterior finish to the seat and back for protection.
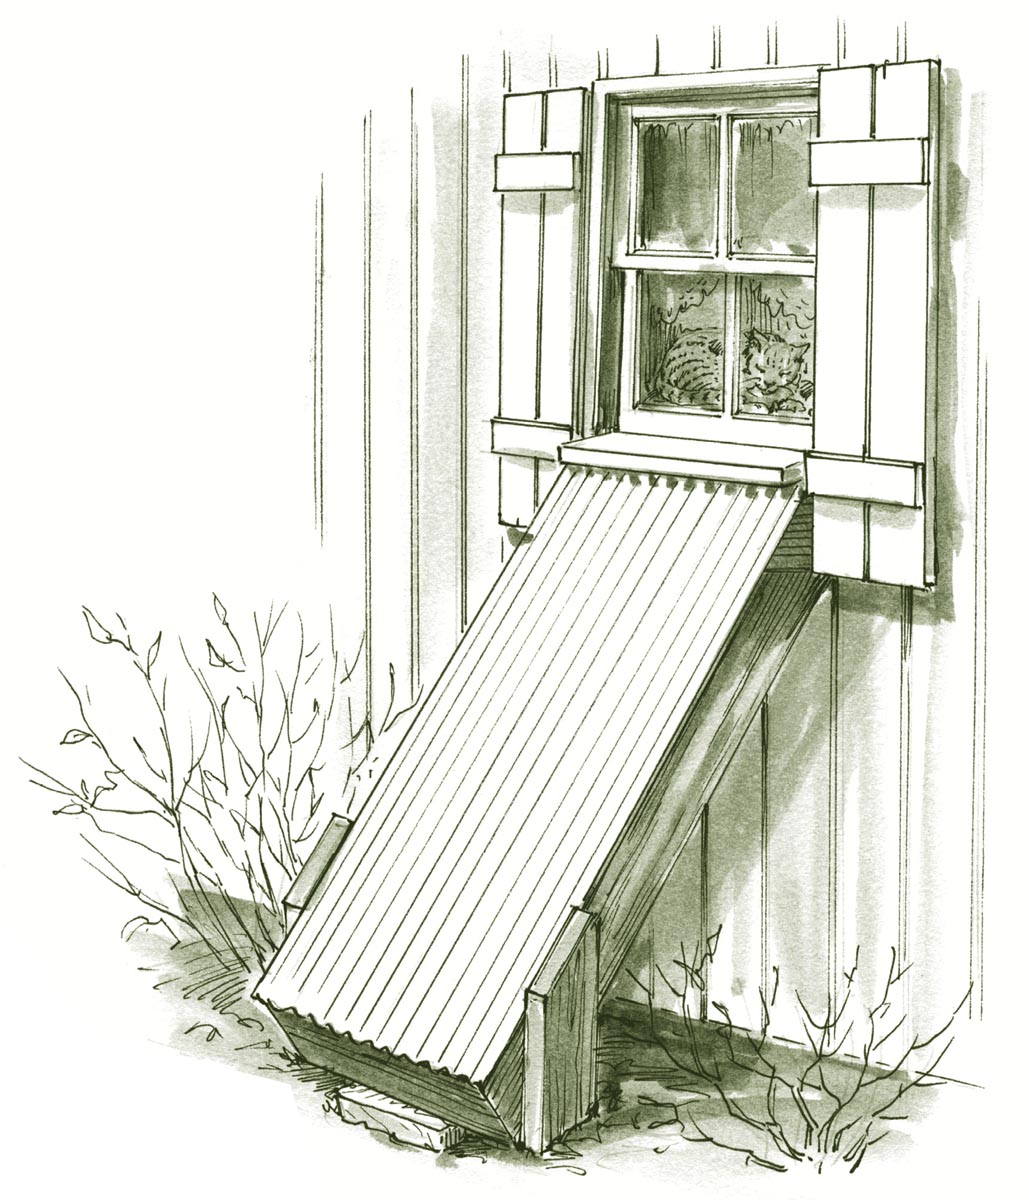
Solar Window Heater
Cheap heat for your home, barn, or workshop
To build and install some types of solar heating systems, you need to be a rocket scientist; to build this one, all you need to be is handy with a hammer and saw. This project is made from readily available material, purchased or scrounged. It’s a simple solar collector that operates by drawing cool room air down through the bottom chamber, warming it as it passes through the upper chamber, and releasing it back into the room. If you plan properly and build your heater the right width, length, and angle, installing it is as easy as opening and shutting a south-facing window. (Your window must be a single-hung or double-hung version for this to work.)
Before starting, study the illustrations and read the instructions to gain an overall understanding of how everything goes together and works. We don’t provide exact measurements since the collector’s size is based on the window dimensions, installation angle, and other factors. If in doubt, construct your collector without adhesives to make sure everything fits right, make any necessary adjustments, and then assemble it for real using adhesives and caulk.
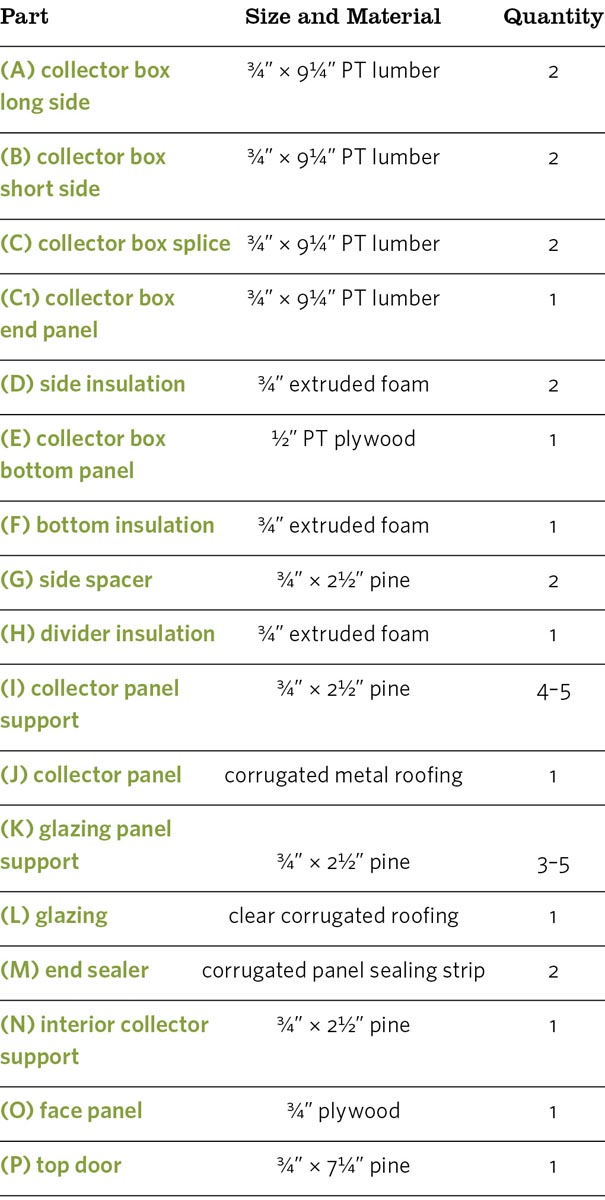
Materials
- Pressure-treated 1×10s
- 1⁄2" pressure-treated plywood
- Pine 1×3s
- 3⁄4" plywood
- Pine 1×8
- 3⁄4" extruded foam insulation board
- Corrugated metal roofing panel
- Metal primer
- Flat black paint
- 11⁄2" metal roofing screws
- Corrugated panel sealing strip
- Construction adhesive
- 11⁄4" exterior screws
- 2" exterior screws
- Foam adhesive
- Silicone caulk
Building the Collector
Read The Right Size, the Right Angle (page 281) to determine the optimum angle for your solar collector. You can build it so it lies flat against the house if space is tight, or build it at a 45-degree slant for simplicity, but using the formula in the sidebar will produce the best bang for your buck and the best heat for your efforts.
Instructions
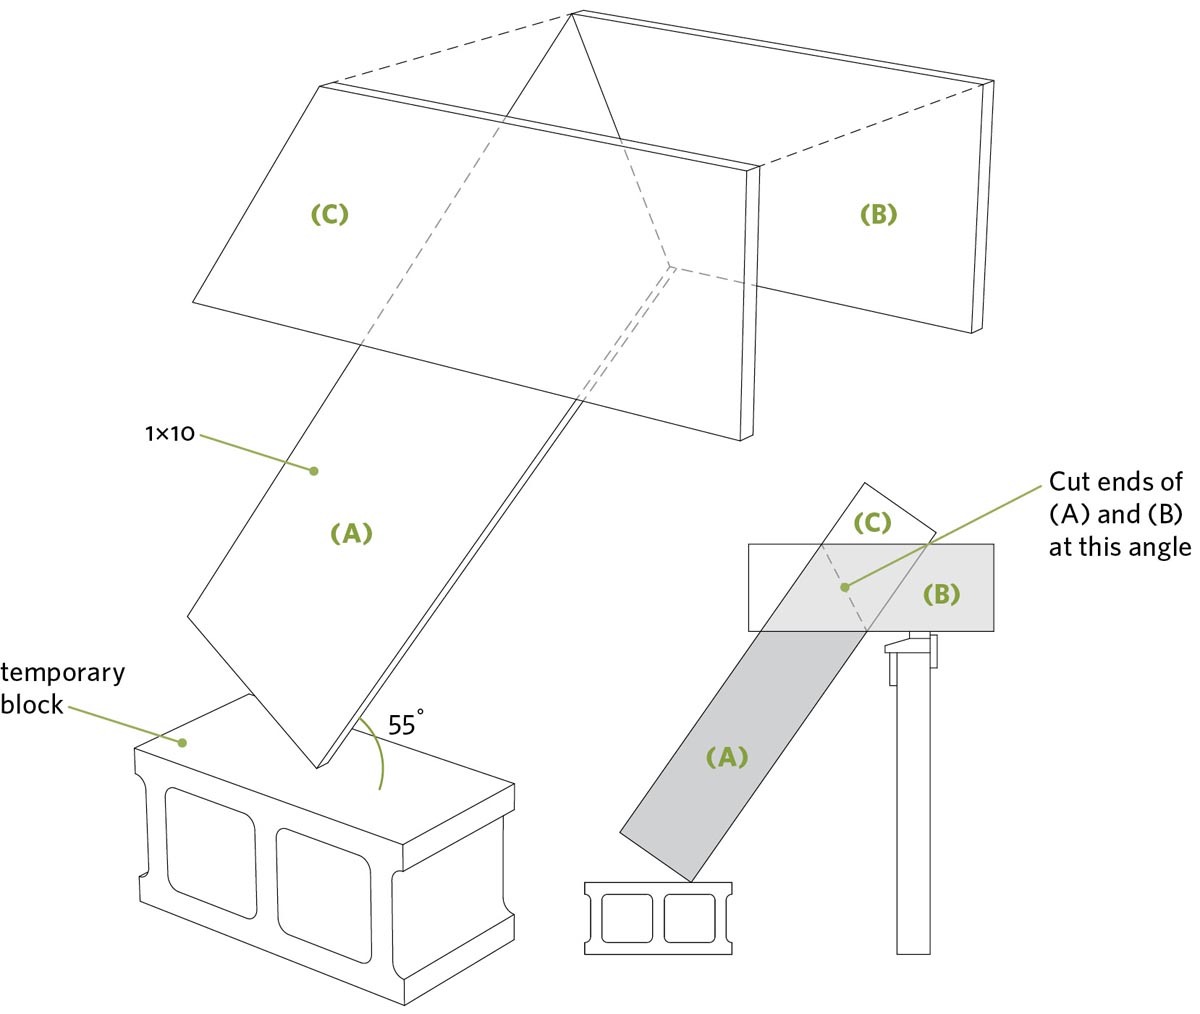
- 1. Determine how far off the ground you want the base of your collector to rest; in snowy climates, we suggest a minimum of 8". Open the window, rest the base of a long 1×10 board for the collector box long side (A) on your temporary block, and lean the board against the windowsill, as shown in Determining collector angle, below. Adjust the block and angle of the board until the board is at the correct angle (55 degrees in our example). Use a large protractor or digital level to establish the correct angle.
- 2. Rest a short length of 1×10 (for part B) horizontally through the window opening and let it extend at least 6" into the room. Mark the intersection where the two 1x10s cross, and cut the boards to that angle (in our example, 271⁄2 degrees). Cut a splice (C) and use construction adhesive and 11⁄4" screws to join parts A and B together to create a dogleg. Build the other box side assembly so it’s the mirror image of this.
- 3. Test-fit the two box sides in the window opening to confirm the overall length and box angle. The splices (C) should face outward. Measure the distance between the outside faces of the dogleg sides (C), and subtract 1⁄2"; this is the maximum width your collector can be and still fit through your window opening.
- 4. Lay the dogleg sides on a flat surface, and use foam adhesive to secure extruded foam insulation (D) to the inside faces of each piece, as shown in End view, page 279. Make sure to use foam adhesive; construction adhesive and other glues can dissolve the foam rather than secure it!
- 5. Install the 1×10 end (C1) between the two side pieces (A), securing it with construction adhesive and 2" screws.
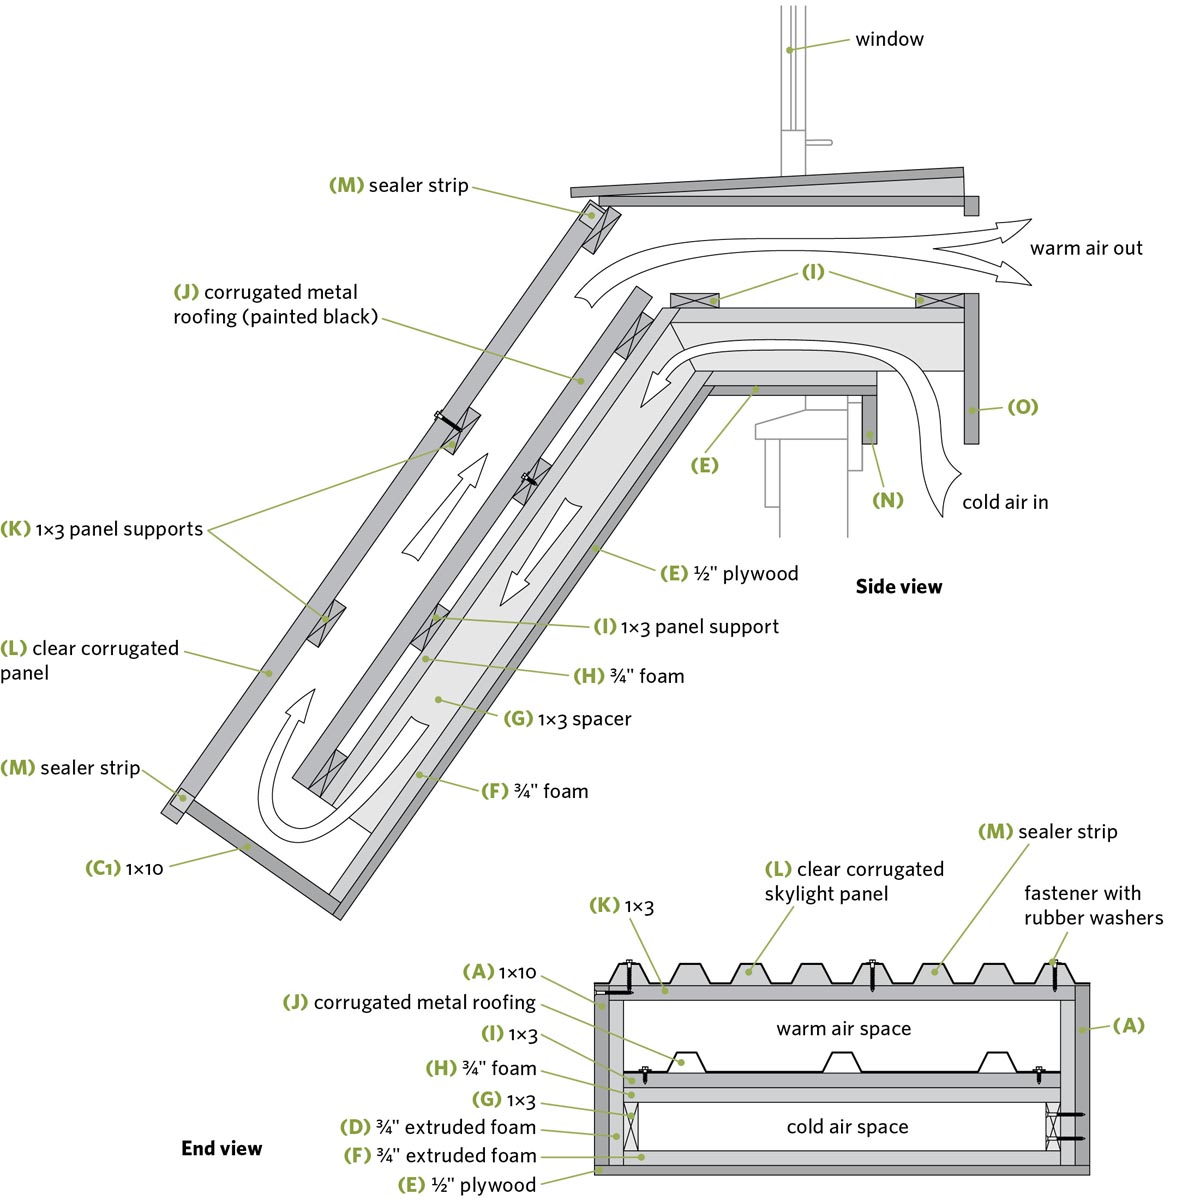
- 6. Lay the collector frame upside down and install the 1⁄2" plywood panel (E) to join the bottoms of parts A and B. Use construction adhesive and 11⁄4" screws.
Take Note: As you work, continue to add the same components (D, E, F, G, H, and I) to the part of the short horizontal leg of the collector created by part B as you do for the main collector.
- 7. Flip the collector box over. Install foam insulation (F) in the bottom of the collector using foam adhesive.
- 8. Install the side spacer strips (G) that create the lower cold-air chamber. They should end 4" from the bottom of the collector. Use foam adhesive and 2" screws that can penetrate through the foam and into the box sides (A, B).
- 9. Install the divider foam panel (H) to create the top of the cold air chamber. This should also end 4" from the bottom of the chamber.
- 10. Apply foam adhesive to the undersides of the panel supports (I); secure them with 2" screws driven through the supports and the foam divider (H) and into the spacer strips (G). The adhesive on the 1×3s will help support the foam divider (H) below.
- 11. Cut the metal roofing (J) to the correct width and length. (Again, this should end 4" from the bottom of the collector to allow for airflow.) Apply metal primer and flat black paint to the upper side of the metal roofing. Install the roofing panel using metal roofing screws that penetrate into the 1×3 panel supports (I).
- 12. Use silicone caulk to seal all cracks and openings. Paint the sides, bottom, and other exposed parts of the collector (inside and out) that will be exposed to the sun black.
Take Note: Some spray paints will dissolve or degrade foam insulation. Use a spray-on or brush-on paint that’s compatible with foam.
- 13. Install the 1×3 glazing panel supports (K) that help support the clear glazing (L), as shown in Collector — side and end cutaway views (page 279). Notch the side foam (D) so the ends of the panel supports (K) make solid contact with the side pieces (A, B). Fasten the supports with screws driven through the side pieces.
- 14. Install sealer strips (M) to close in the ends of the clear corrugated panel (L); then install the panel using self-tapping screws with gaskets.
Take Note: Before cutting and installing the glazing panel, read Building the Upper Window Chamber (facing page). You’ll want to create a tight seal at the top that will shed water. The details will vary based on your window construction.
- 15. Install legs made from leftover lumber on the bottom of the collector to raise it off the ground the same height as the temporary block used in step 1. Open your window and install the unit.
Lessons from the Homestead
Me and My Heat Wall
By George Vondriska
I’ve got a 1,000-square-foot shop that’s heated by a natural gas furnace. I’ve also got 10-below-zero winds swirling around outside in the winter. Ever on the lookout for a way to save some dough, it occurred to me that I might be able to take advantage of the south-facing wall of the shop. A friend of mine told me about Trombe walls, and this became the core of my idea.
At some point in my scavenging career, I’d picked up a 4 × 7-foot sliding glass door panel; this became the glazing for my solar heater. I used cementboard panels, commonly used under floor tiles, as the collector for absorbing and radiating the heat. The panels would also serve as the thermal mass for storing heat so the wall could still “coast” and put out heat when the sun wasn’t shining. I built the collector box out of plywood and installed it at a 10-degree angle directly against the south-facing wall of the shop. It’s just one big chamber. A hole near the bottom pulls cool air from the shop into the collector, and a hole near the top channels the warm air back in. I insulated it to the max and painted everything, except the glass door, black. With a little more scrounging I found a thermostatically controlled duct-booster fan that turns on when the temperature reaches a certain level. It wasn’t built very scientifically, but it was built!
I installed the heater a number of years ago, and it’s been my best friend ever since. My natural gas bill for my shop is about 30 percent lower, and even on the coldest days of winter my heat box is kicking out 90 to 100°F warm air. It doesn’t “coast” as well as I had hoped, so I could have used more thermal mass. And I wish I’d run a few copper pipes through it so I could have experimented with preheating water with it. But I’ve recouped the 8 hours in labor and $250 spent on materials many times over.
George Vondriska runs a shop in western Wisconsin. In addition to experimenting with solar heat, he offers woodworking classes, hosts guitar-building events, and manages the Woodworkers Guild of America magazine and website (see Resources).
Building the Upper Window Chamber
There are a variety of ways to finish the short horizontal leg of the collector that extends through the window. The configuration of your windowsill and other factors will impact the detailing. The main objectives are to maintain two separate air chambers (one for the cold air entering the collector at the bottom, and one for the warm air exiting at the top) and to provide openings into the room for each. A few key points:
- For the solar window heater I made, I cut an opening through the foam and plywood (E) at the bottom of the collector box to allow cold air to enter the bottom chamber. I added a 1x3 support (N) on the interior side of the window opening to help support the collector and prevent drafts. You can add foam weatherstripping to create a tighter seal.
- I also installed a 3⁄4" plywood face panel (O) across the main opening. Before installing it, I cut an opening near the top for the warm air from the collector to enter the room.
- Install a hinged flap (P) to block the “exhaust” opening in the evening or at times your solar collector isn’t putting out heat. If cold air is drifting through the “intake” opening when the collector isn’t in use, create a hinged flap for that opening, too.
Once your unit is installed, create a sloped surface on the top horizontal part of the collector (B) so it will shed water. I installed a horizontal sheet of 1⁄2" plywood, some wedges, then another layer of 1⁄2" plywood that extended beyond the clear corrugated glazing (L).
The Right Size, the Right Angle
The optimum angle of the collector is based on where you’re located. The formula for the ideal angle is as follows: latitude + 10 degrees, measured from horizontal. (In other words, the farther you are from the equator, the more upright your collector will sit.) To find your latitude, simply search online using the name of the nearest city and the keyword coordinates or latitude. I angled mine at 55 degrees, making it suitable for northern regions of the United States.