
Slowly drying tomatoes in a low oven
This is a selection of techniques and recipes that I find are essential in today’s kitchen. Though the béchamel sauce may sound rather old fashioned, it is still vital. Others, like the salsa verde, seem more contemporary. Roasting and grinding spices, though a new experience for some, has been an essential technique in the kitchen for millennia.
Crushing garlic
The reasons for crushing garlic are twofold. Garlic when raw and crushed to a paste is at its strongest and fieriest, and as a smooth paste it will generally disappear into the dish it is being added to. I take the old-fashioned approach of a knife and timber chopping board or a more contemporary approach, with a Microplane. What I don’t use is a garlic press. I find them awkward, inefficient and wasteful.
Place the unpeeled cloves of garlic on a heavy chopping board. With a chopping knife, press heavily on each clove. I use the part of the knife closest to the tip of the blade. The knife will crush the garlic. Peel off the skin, and if there is a hard bit at the bottom remove that as well. Sprinkle a tiny pinch of salt on to the garlic – this helps the knife to grip. Again using the tip end of the knife, press heavily on the garlic in rhythmic movements to render it a smooth paste.
If using a Microplane to crush the garlic, there is no need to peel the individual cloves. Grip the clove of garlic by the end closest to the root and rub it up and down the blade of the Microplane. The papery skin will remain on the sharp side of the implement where it helps to protect your fingers from the bladed surface, while the crushed garlic is pushed through to the blunt rear. Discard the skin and scrape the paste off the Microplane.
Peeling tomatoes
Peeling tomatoes will either be easy and enjoyable, or a penance that you may swear never to repeat. The crucial requirements here are really ripe tomatoes and boiling water. Underripe tomatoes are not worth eating and are torturous to peel, hence not worth considering. Water that has once boiled is no good to you. It must be still boiling when poured over the tomatoes. When the tomatoes are ripe and the water is boiling, this task is actually quite pleasurable.
Remove the stalks from the tomatoes and with a small knife make a shallow cross-shaped cut where the stalk was. This cut encourages the skin to lift off. Bring enough water to cover the tomatoes to the boil and pour the still boiling water over, to submerge the tomatoes completely. Count out ten seconds and immediately pour off all the water. Refresh the tomatoes in cold water for a few seconds. Pour off the cold water, then simply peel off the skins. I discard the skins, adding them to the hens’ bucket. You can save the strained water for the washing up.
Drying your own tomatoes
At the end of the summer, when there is a glut of really ripe and inexpensive tomatoes, I cut them in half, put them on a wire rack, season them with a little salt and pepper, pop them into a very low oven and forget about them for about 12 hours. They dry out and become wizened and intense. Then, when cooled, I put them into jars with basil or marjoram leaves, cover them completely with olive oil, label and date them, and put them in a cold place, to be used right the way through the months when good tomatoes are scarce. The basil or marjoram, while flavouring the tomatoes, is beautifully preserved in the oil, and is also fished out for use when otherwise getting those herbs would involve an aeroplane.
Slowly drying tomatoes in a low oven
Roast peppers
I find this simple technique for roasting peppers very successful. The secret is to allow the peppers to get blistered, almost burnt and collapsing before removing them from the oven. The peeled peppers can be stored in the fridge for weeks. I usually cover them with olive oil and add a few basil leaves if I have them. Annual marjoram is also an excellent herb here.
Serves 4–6 6 best-quality (preferably organic) peppers
A drizzle of olive oil for roasting, and more olive oil to cover the roasted and peeled peppers
Maldon sea salt and freshly ground black pepper
Preheat the oven to 190°C/375°F/gas 5.
Place the peppers in a bowl and drizzle lightly with olive oil. There is no need for pools of oil, it will just go to waste. Season with salt and pepper. Transfer to a roasting tray and roast for about 40 minutes, or until the skin is dark and blistered, the flesh is soft and the peppers are starting to collapse.
When ready, remove from the oven and tip the contents of the roasting tray into a bowl. Cover the bowl tightly with cling film and allow to cool completely.
Gently pull the cooled peppers apart and remove the skin and seeds. Put the peppers into a jar. If you like, at this stage you can add leaves or sprigs of the herb of your choice. They will keep for longer, several months in fact, if you cover them completely with olive oil. The leftover oil can be used for cooking when the peppers are finished.
Cover and chill until needed. Always allow the peppers to come back to room temperature before serving.
Roasting and grinding spices
If you like to use spices in your cooking, grinding your own as you need them will give you the very best results. It is an easy and essential kitchen technique. Most of the pre-ground spices you buy are a pale imitation of the freshly ground results you can achieve with ease in your own kitchen. Whole spices are sometimes lightly dry-roasted before being used or ground. The roasting lifts the flavour and aroma of the spices, giving them a nutty tone. I generally roast the different spices for a recipe in separate batches, as because of the variation in size and shape, they colour unevenly when they are roasted together. For example, if you roast cumin and coriander together, the cumin will have reached the required toasted colour before the coriander; hence if you allow the coriander to toast properly, the cumin will burn and become unpleasantly bitter. If you burn spices when dry-roasting, it is better to cut your losses and start again. Do not be put off by the last sentence, though, as this is so easy and rewarding. The roasted spices can be ground in a spice grinder or in the more manual pestle and mortar, which is my preferred spice-grinding apparatus. An electric coffee grinder makes a perfect spice grinder, though if your first cup of coffee of the day is as important to you as it is to me, I suggest that perhaps you have a separate grinder, clearly marked for the purpose of grinding spices only.
Spices are best bought in small quantities and stored in tightly sealed containers. If you grind too much spice for a recipe, store any left over, again in tightly sealed containers, and use it up as soon as possible. I use jars with tightly fitting screw-on lids.
To dry roast spices, heat a heavy cast-iron or heavy-based non-stick frying pan over a medium heat and add the spice. Stir gently or shake the pan to keep the spices moving.
Watch as the colour changes. If you are not sure of the colour change, refer to the colour of the unroasted spice to indicate what is happening in the pan. The roasting spice should be lightly browned. Do not leave the pan at any stage, as a small quantity of spice can roast in as short a time as 1 minute.

Spices, roasted to a golden-brown colour, and ready to grind
As soon as the spice is lightly browned, remove it from the pan immediately and place in the grinder or mortar. Grind the spice right away, generally to a fine powder, unless a recipe specifies a coarser finish.
Do not forget to catch the aroma of the spices as the little plume of warm and fragrant smoke arises from the grinder or mortar. Only the cook/grinder gets to enjoy this brief moment, and every time I inhale that exotic offering I give silent thanks to the spice god. It is at that point you will know it is worth the small effort of grinding your own. Magic.
Checking if the bird is cooked
Fowl must be fully cooked. There is no grey area here and no question of personal preference. There should be no sign of blood or pink flesh. It is crucial to be able to recognise this stage, and there are a couple of ways to determine this. The first thing to do is to look at the bird and see if it looks cooked. That’s the starting point. If it appears to be cooked, take preferably a thin metal skewer, otherwise a small thin-bladed knife, and insert it into the flesh between the leg and the breast, that is, at the bone, right down where the leg is attached to the carcass. Leave it there for exactly 10 seconds and remove. Now immediately test the temperature of the tip of the skewer or knife on your hand. It should be red hot and make you pull away the skewer with a start. If that is the case, you know the heat has properly penetrated into the place where it takes longest to cook. If the knife tip is not red hot, replace the bird in the casserole or oven, cook for a further 10 minutes and test again. I find this is the best way to check if the bird is cooked. The other way is to pierce the leg of the bird at the base or get a spoon into the spot where the skewer went in and try to release some of the cooking juices on to it. These juices should be clear, with no trace of pink or blood. This method also works, but is in my opinion somewhat more cumbersome than the first.
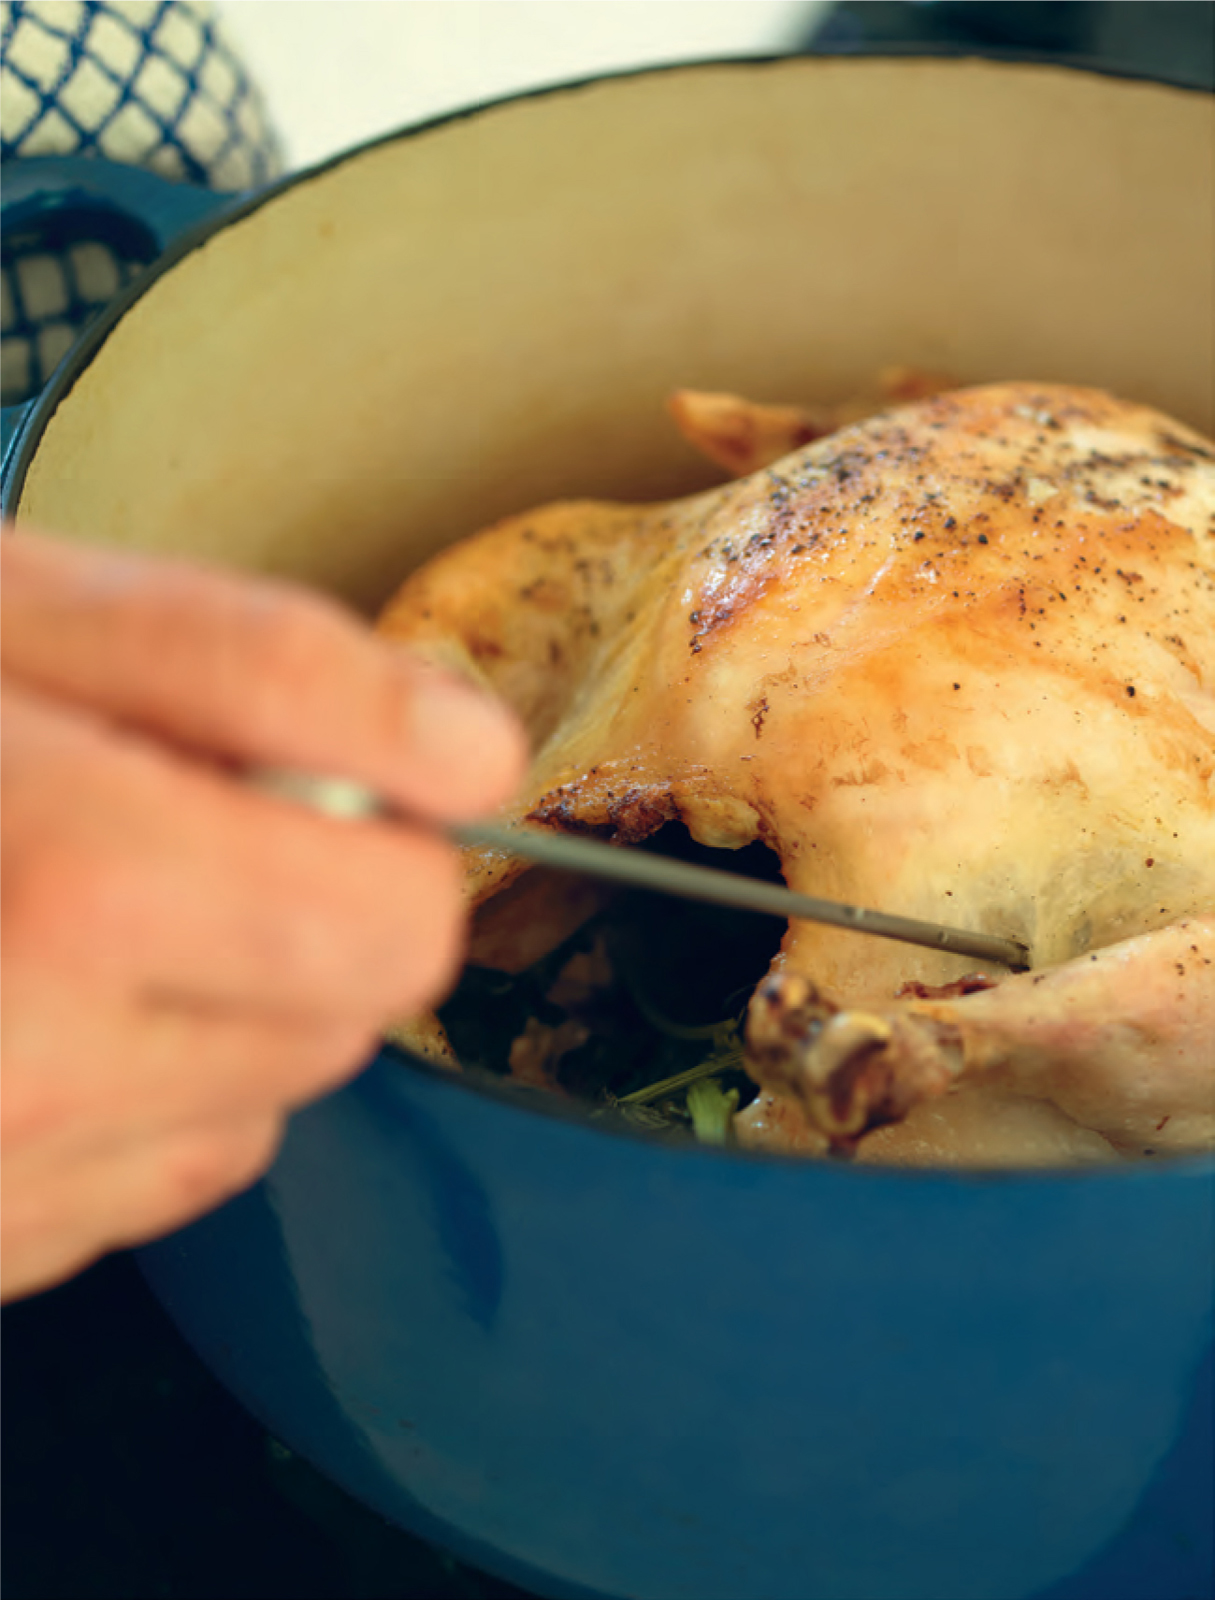
Find the spot between the leg and the breast, count to ten and then test the heat of the skewer
Carving
To carve the cooked bird, place it on a timber carving board. A carving board will have a little well cut into it to collect any juices that flow out of the poultry or meat being carved. Failing one of these boards, place a board inside a shallow tray; that way any juices will flow into the tray and not all over your counter. If you struggle with carving a bird, there are several reasons why that might be. Remember that when carving, your knife will generally be travelling south.
A sharp knife helps greatly, and I prefer to use a flexible filleting knife rather than the usually recommended long carving knife. I find you can be defter with the medium-sized knife.
The next crucial bit of information is to know what a ‘ball and socket joint’ is and also to know where these are, because they are at the joints where the wings and legs are attached to the carcass and also where the thigh is attached to the drumstick. These joints are most important in this particular adventure, and they feature strongly in the next piece of text, so please bear with me. The ball and socket joint occurs where one bone with a ball end fits snugly into another bone with a socket end. To separate these bones, you need to cut precisely between the ball and socket. They are held together by a small piece of membrane, and when you cut through that, they are miraculously separated. When you are doing this, you need to be a little bit patient, at least to start off with. Put your knife in the appropriate spot and cut. If you hit a bone, stop. Abandon the brute force and ignorance approach. All that will do is blunt your knife and have you in a sweat. Just move the tip of the knife a little to the right or left and cut again. When you are in the right place, as in exactly between the ball and socket, your knife will slip through as if it is soft butter. This is an important moment because when you can find this spot confidently, you have removed at least three-quarters of the difficulty from carving any bird.
So to start, turn the bird so that the cavity end is facing you. Begin by removing one of the legs, that is, the whole leg consisting of the drumstick and thigh, in one piece. Do this by cutting through the skin between the breast and leg. Push the leg out a little with the side of the knife blade. This makes it easier to see where you are going, and, as you can imagine, being able to see what is going on is a considerable advantage here. You are looking for the ball and socket joint at the base of the carcass. Cut through the middle of this joint and, as I explained above, don’t rush it, just concentrate on finding the spot where the knife will slide through easily. Place the removed leg, skin side down, on the board, and separate the drumstick from the thigh by cutting again through the ball and socket joint where they are attached at the top of the drumstick. Place separately on a hot serving plate.
To remove the flesh from the breast, turn the bird around with the cavity now facing away from you and the wishbone towards you. The first piece to be removed here is the wing, and in the case of chicken, duck and guinea fowl, with about 3cm of the breast attached to the wing bone. Carve into the breast and push your knife down towards the wing bone, where it is attached to the carcass. The search for the ball and socket goes on here again, and when found and cut through, the wing and piece of breast meat will come away easily in one piece. Continue carving the breast in neat slices. I like to carve these slices about 7.5mm thick. Serve some of the white breast meat with some of the brown leg meat, arranging the neatest slices of white meat on top of the brown.
When carving a very small bird like quail, the legs and breasts are generally served whole. In the case of a larger bird like turkey, the legs once removed from the carcass will be carved off the bone and sliced, the wings for those who like them can be served whole and the breast meat carved into neat 7.5mm slices.
Serve the carved and neatly arranged fowl on hot serving plates.
Parsley pesto
This is brilliant stuff. Given that fresh basil is only available for a couple of months during the summer, parsley is an obvious year-round and delicious substitute. I strongly believe that most people’s experience of the classic basil pesto is an unpleasant one, as basil deteriorates so quickly if not carefully handled. As a result it is generally bitter and rancid.
This parsley pesto made to the classic recipe has a special flavour all of its own. It is very good in soups and broths, on bruschetta, with grilled or roast fish, poultry and meats, and on pasta. It keeps well in the fridge for up to 2 weeks.
Serves 6–8 25g flat-leaf parsley, weighed after removing tough stalks
25g pine nuts
1 fat clove of garlic, peeled and crushed to a paste
75–150ml extra virgin olive oil
40g finely grated Parmesan
Pinch of Maldon sea salt
Place the parsley, pine nuts and garlic in a food processor and pulse-chop to a fine crumb. Add the olive oil in a stream to achieve a soft consistency. Fold in the grated Parmesan.
Taste and correct the seasoning with a pinch of sea salt.
Spring wild garlic pesto
Replace the parsley in the master recipe with wild garlic leaves. Finely chop the wild garlic before processing, as otherwise it may end up being a little stringy. Proceed as in the above recipe.
Rocket leaf pesto
Remove the tough stalks from the rocket leaves before weighing and continue as in the master recipe.
Basil pesto
You can make this sauce at any time of the year if you are happy to use imported basil, though the notion of eating basil pesto in January leaves me feeling rather cold. I only make it during the summer months, when fresh local basil is available, and then I use a pestle and mortar, which imparts a particular consistency that I enjoy. However, you can achieve a good result using a food processor.
Remove the tough stalks from the basil leaves before weighing and continue as in the master recipe, adding the oil immediately so as to protect the torn leaves from the air. As basil oxidises and becomes bitter after the leaves are chopped or broken, it is essential to get the oil in straight away, so cover the pesto with a layer of olive oil and chill it as soon as possible.
Béchamel sauce
Every cook needs to know how to make a béchamel or white sauce. Even though it seems a bit old-fashioned, and won’t be featuring at your local molecular gastronomy restaurant, it is still an essential part of the cook’s repertoire. Properly made, this sauce is well flavoured, smooth and shiny, and has a silky consistency. The plain or master version becomes a vehicle for other flavourings such as herbs, mustard, anchovies, capers, spices, vegetables, cheese and so on. You can’t really consider a cauliflower or macaroni cheese or a fish pie without it. It can be delicious to serve with a poached chicken, in which case a little of the chicken poaching liquid can be added to the sauce to achieve a thinner consistency than you normally expect from this sauce.
So if your memory of white sauce is a miserable one, of a lumpy, thick, stodgy, floury and bland non-event, perhaps this recipe, carefully followed, will change your mind and remind you why this classic remains important.
Serves 6–8 300ml full-fat milk
1 small carrot, peeled and thickly sliced
¼ of an onion, peeled
1 bay leaf
4 parsley stalks
1 thyme branch
25g butter
25g plain flour
Maldon sea salt and freshly ground black pepper
Place the cold milk, carrot, onion and herbs in a small saucepan and bring to a simmer. Do not allow the milk to boil over, as you will lose some of the milk and the proportions of the sauce will be wrong, yielding a sauce that is too thick – exactly what we are trying to avoid. Turn off the heat and allow to sit for 10 minutes. The vegetables and herbs will add a subtle flavour to the milk.
While the milk is infusing, melt the butter in another small saucepan and add the flour. Stir with a wooden spoon to combine, and cook on a low heat for 3 minutes, all the time stirring regularly and making sure the mixture does not overheat and burn. It is crucial that you allow it to cook for the 3 minutes as suggested, to remove any raw trace of flour from the sauce. This slightly odd-looking mixture of cooked flour and butter is called a roux, and it will both thicken and enrich the sauce. (You can make exactly the same mixture to whisk into a gravy to thicken it.)

The sauce should be thick enough to heavily coat the back of a spoon
Strain the milk and whisk it into the roux. Place on a low heat and, whisking all the time, bring the sauce to a simmer. The sauce will not start to thicken until the liquid reaches a simmer. At this point, maintain the sauce at a gentle simmer for 2 minutes, still whisking to ensure that there are no lumps of roux left floating in the sauce. You will notice the sauce becoming smooth and shiny.
Remove from the heat and season to taste with salt and pepper. The consistency should be thick enough to heavily coat the back of a spoon. The sauce is now ready to serve. You can prepare a béchamel in advance and reheat when needed.
Parsley sauce
Just before serving, add 3 tablespoons of chopped parsley to the finished sauce and bring back to a simmer. Serve immediately for the freshest taste.
Cheese sauce
Add 2 tablespoons each of grated Parmesan and Gruyère and 1 teaspoon of French mustard to the finished sauce. Whisk in well and simmer for 1 minute before serving.
Pancakes, sweet or savoury
It’s a funny name really, pancakes, as they are as far removed from a cake as you could imagine. Mind you, they can be great, and when thin and light and sweetened with a citrusy butter or a warm fruit compote, or stuffed with a carefully chosen vegetable wrapped in a light yet rich sauce, they will bring a smile to most faces.
I use the same recipe whether making the sweet or the savoury version, just adding a small pinch of sugar to the dessert option. The addition of melted butter is a tremendous asset to the texture and flavour.
Keys to success
Whisk all the ingredients thoroughly to ensure there are no lumps of flour in the batter.
The addition of the cooled melted butter is vital for the flavour and texture of the pancakes and makes them less likely to stick when being cooked.
Cook the pancakes on quite a high heat using the correct quantity of batter to ensure you achieve a pancake that is neither too thick nor too thin.
Makes 12 170g plain white flour
Pinch of salt
2 teaspoons caster sugar (omit for savoury pancakes)
2 eggs and 1 yolk
425ml full-fat milk
2 tablespoons cooled melted butter
Sieve the flour, salt and sugar (if you are making sweet pancakes) into a bowl. Make a well in the centre and drop in the eggs and extra yolk. Start whisking the eggs and adding the milk in a steady stream, gradually drawing in the flour from the edges of the bowl. When all the milk has been whisked in, the batter should look smooth and will have a layer of fine bubbles on the surface. I usually pass it through a fine sieve to be absolutely sure all the flour has been properly incorporated.
Stir in the melted butter, which may become a little lumpy-looking. That is fine and to be expected, as when the melted butter hits the cold liquid it tends to solidify into little lumps. These buttery lumps disappear completely in the cooking. Chill the batter if possible for 1 hour before cooking.
To cook the pancakes, I use a 20.5cm heavy-based non-stick or cast-iron pan. Place the pan over a medium heat and allow it to become quite hot. Grease the pan sparingly yet thoroughly with a little butter, making sure to go up 1cm along the sides of the pan. I do this with a bit of baking parchment or greaseproof paper, or a butter wrapper lightly greased with soft butter. Dribble ½ teaspoon of the batter on to the pan to check that it is hot enough. The batter should start to colour and cook immediately. If it doesn’t, let the pan get hotter.
Add about 2 tablespoons of the batter per pancake and quickly lift, tilt and swirl the pan to coat the bottom evenly with a fine layer. If you miss a spot and there is a hole in the pancake, just dribble in a tiny bit more batter to fill the hole. Allow to cook until the edges of the pancake start to curl and loosen. Turn the pancake carefully and continue to cook for another minute, until it is a golden colour. Lift out of the pan and place on a plate while you cook the rest. The cooked pancakes can be stacked one on top of the other and, blissfully, they will not stick together.
The cooked pancakes can be eaten there and then in the old-fashioned way with a little butter, lemon juice and caster sugar, or may be reheated later according to your taste.
Sweet pancakes
Serve with: chocolate sauce, roasted hazelnuts and a blob of softly whipped cream; caramel sauce and thickly sliced bananas and a blob of softly whipped cream or crème fraîche; a warm compote of raspberries and geranium and softly whipped cream; a collapsing roast peach and its cooking juices, a sprinkling of almond praline and thick pouring cream.
Savoury pancakes
Stuff savoury pancakes, using the method below, with: broccoli with lemon and Parmesan and a drizzle of hollandaise sauce; chard and Gruyère, as in the gratin recipe; leeks with olive oil, Parmesan, toasted pine nuts and pangrattata.
First preheat the oven to 180°C/350°F/gas 4.
Lay a pancake one at a time on your work surface. Spoon 1½ tablespoons of the chosen filling on to the centre of the pancake and fold in the edges to make a neatly sealed parcel. Place them, folded side down, on a baking tray lined with baking parchment. Sprinkle a very few drops of water with your fingertips over the pancakes to create a gently steamy atmosphere in the oven. Cover with a sheet of baking parchment and reheat in the oven for about 15 minutes, or until bubbling hot.
Serve as soon as possible, with a leaf salad.
Tomato sauce
This is a general-purpose sauce which is versatile and can be served in a variety of ways, ranging from a simple pasta dish or with grilled meat or fish. It’s good with meatballs, and I sometimes use it as a cooking medium for mussels and mackerel, finishing off the dish with a blob of garlicky mayonnaise.
As with any tomato dish, the quality and ripeness of the tomatoes is crucial. If you try making this sauce with watery winter tomatoes, the result will be dull and disappointing. Summer is without doubt the best time of the year for making it, when deep red vine-ripened tomatoes are at their best. You could make a large batch at that time of year, when the tomatoes are also good value, and freeze it in small containers to defrost on cold wintry days and remind you of summer’s sweet flavours. Failing that, a very good result can be achieved in winter using best-quality tinned or bottled tomatoes.
The ingredients
Tomatoes for this dish need to be brilliantly ripe, almost to the point of bursting. In fact if they are slightly softening due to their readiness, that is fine, as they will melt into the sauce.
Basil is an obvious choice for this sauce, but other herbs such as marjoram and tarragon are also excellent.
Serves 6–8 2 tablespoons extra virgin olive oil
225g red onions, peeled and finely chopped
2 cloves of garlic, peeled and finely chopped
2 sticks of celery, cut into 5mm dice
1 medium carrot, peeled and cut into 5mm dice
Maldon sea salt and freshly ground black pepper
1.8kg tomatoes, peeled and coarsely chopped (or the
equivalent quantity in canned or bottled tomatoes)
2 tablespoons basil leaves
Pinch of sugar
Heat the olive oil in a medium-sized heavy-based saucepan. Add the onions, garlic, celery and carrot, and coat them in the oil. Season with salt and pepper and cook uncovered on a moderate heat. Stir the vegetables regularly with a wooden spoon and control the heat to prevent them from both stewing and scorching. After 10 minutes the vegetables will be beginning to soften but in no way collapsing.
Add the prepared tomatoes, season with salt and pepper and stir. Cover the saucepan with a tight-fitting lid, reduce the temperature and allow the tomatoes to cook at a gentle simmer and melt into a sauce. This will take about 20 minutes. Stir the tomatoes a couple of times as they cook. If the sauce seems a bit thin and watery, remove the lid and cook uncovered to thicken the sauce slightly. On the other hand, the sauce should not be too thick and strong. You are looking for a consistency that will just hold its shape on the plate, but still be full of flavour.
Add the basil leaves, torn into smaller pieces if large, and stir in. Taste and correct the seasoning. If the sauce seems a little dull, add a small pinch of sugar to lift it.
With cinnamon to serve with grilled lamb
Add a broken cinnamon stick to the vegetables and do not retrieve it until the sauce is cooked.
With dried chilli to add some heat
Break a small deseeded dried chilli into coarse pieces or use a pinch of dried chilli flakes and add to the vegetables at the beginning of cooking. Use rosemary as the herb in this case.
With rosemary in winter
For a robust and warming winter sauce, add 2 large sprigs of rosemary to the vegetables at the beginning of cooking. The herb stalks can be removed at the end of cooking. Some of the leaves will have fallen off the sprigs – that’s fine.
Salsa verde
Salsa verde – or call it Green Sauce if you like, though it doesn’t sound quite so good like that – is a delicious and most useful sauce. Full of herbs and piquant from the addition of the anchovies and capers, it packs a punch and will stand up to and sit happily alongside robustly flavoured meats such as beef and lamb or grilled oily fish like bass, mullet and salmon. Though it will keep for a day or two, it is without doubt best eaten within a few hours of being made. This way the flavour of the herbs is fresh and green. When allowed to sit for longer than that, the herbs become muddy in flavour, as the piquant ingredients seem to ‘cook’ the charm out of the greens.
If using salted anchovies and capers, they will need to be well rinsed under cold water to remove excess salt.
Serve with grilled meats and fish.
Serves 6–8 1 large handful of rocket leaves, about 100g
1 bunch of flat-leaf parsley leaves, about 100g
8 large sprigs of mint, leaves only
6 large sprigs of tarragon, leaves only
1 tablespoon capers, coarsely chopped
2 cloves of garlic, peeled and crushed to a smooth paste
6–8 anchovies, very finely chopped
1 tablespoon Dijon mustard
225ml extra virgin olive oil
Zest of 1 lemon
Maldon sea salt and freshly ground black pepper
Chop the rocket and herbs quite finely, but not to a dust, and mix with the other ingredients. Taste and correct the seasoning, if necessary adding a few drops of lemon juice to freshen the taste. Store in a covered container in the fridge.
Mayonnaise
Mayonnaise is an immensely important sauce and if I had to choose a single savoury ‘Desert Island’ sauce, this would be it.
It pairs perfectly with many different ingredients. Poached salmon or trout are sublime with it. A blob of mayonnaise on top of a halved hard-boiled egg, still a little warm from the pot, is one of my favourite foods. I love it with a simple hamburger when it melts into the beefy juices. With a slice of warm roast chicken, it makes the best sandwich. Lobster, prawns, shrimps, mussels, cockles and clams lap it up. It accepts lots of different flavours happily. Herbs such as tarragon, chives, dill, parsley, watercress and wild garlic, and stronger flavours like gherkin, anchovy, spices, chillies, garlic crushed raw or roasted, tomatoes and roast peppers all work well when stirred into it. More exotic flavours such as tamarind and quince are also good, and sometimes I add the juices from a foil-or parchment-baked fish, to thin, warm and flavour all at the same time. The roast garlic version can be thinned with a little gravy from the roasting pan of lamb, beef or chicken, to make a delicious sauce, again served warm. As you can see, it is versatile.
Some books will terrify you with words of warning before you start making mayonnaise. Others are perhaps a little casual in their approach, but all I will say is be a bit careful, take your time, and just remember the important rules, as stated below. Once you have made it once or twice, it won’t cause you a second thought and by then you will realise that there is simply no substitute for the real thing.
The sauce can be made by hand, in a food processor or in a food mixer. The handmade sauce will be softer, the machine-made one firmer.
The ingredients
Use free-range or if possible organic egg yolks for mayonnaise. The egg whites, which are not used in the making of the sauce, can be stored covered in the fridge for 2 weeks, or alternatively they freeze perfectly. Some very organised cooks like to freeze the individual egg whites in ice-cube trays. This makes life easier when using them later. Otherwise you can weigh the whites, which take about 2 hours to defrost at room temperature, allowing 25g for each white. Defrosted egg whites make perfect meringues and whip up perfectly for mousses and soufflés.
Try to find good-quality French mustard and white wine vinegar. A lot of vinegar is poisonously sharp, and if that is the case with yours, use, as I often do, lemon juice to sharpen the sauce.
Good-quality oil is crucial for a good mayonnaise. The combination of oils is also important. If you use all olive oil, you might find the taste too strong, so many people find that a combination of a ‘bland’ oil such as sunflower or peanut oil, mixed with a smaller proportion of the stronger-tasting olive oil, gives them a balance that they enjoy. However, mayonnaise made solely with grassy green new season’s olive oil is truly fabulous, and something I look forward to and am willing to splash out on at least once a year.
Mayonnaise is a cold emulsion sauce. The ‘emulsion’ refers to the joining together of two liquids. The liquids in this case are egg yolk and oil. There is only a certain speed at which the emulsion can be formed, so if you add the oil too quickly to the egg yolks, the yolks cannot absorb the oil and the two liquids will separate and curdle. This is the most important thing to remember when making mayonnaise, so take your time.
Serves 6–10 2 free-range egg yolks
¼ teaspoon French mustard
1 dessertspoon white wine vinegar or lemon juice
Pinch of fine sea salt and freshly ground black or white pepper
250ml oil (e.g. 50ml olive oil and 200ml sunflower or peanut oil)
Place the egg yolks, mustard, vinegar or lemon juice and a pinch of salt and pepper in a medium-sized Pyrex or glazed ceramic bowl.

Adding the oil, in a thin, steady stream
Place the oil in a jug. I use a Pyrex measuring jug so that I can control the flow of the oil to a slow dribble.
Drop the oil very slowly on to the egg mix while continuously whisking. Adding the oil slowly is the key to success, and other than using good ingredients it is the only rule you need to remember. If your arm gets tired from the whisking, it is fine to stop and leave it for a minute or two before starting again.
After about 3 minutes of whisking in the oil, the mixture will start to thicken slightly. You can start to add the oil a little bit more quickly now, but do not get carried away by your success – continue to add it quite cautiously. Keep adding the oil until it is all incorporated into the sauce, which by now will have the consistency of softly whipped cream.
Taste and correct the seasoning, perhaps adding another drop of vinegar or lemon juice.
Occasionally the mayonnaise may be a little too thick for your liking. This might be caused by an extra large egg yolk. If this is the case, whisk in a teaspoon or two of water to bring it to the required consistency. The small amount of water will have virtually no effect on the flavour of the sauce.
Store the mayonnaise in a covered jar in the fridge, where it will keep happily for a week or more.
*If the mayonnaise curdles, due to the oil being added too quickly, it will start to look grainy and when left to rest for a few minutes will become quite thin and oily on top. If this happens, it is not a disaster. Put another egg yolk into a clean bowl and slowly whisk in the curdled mayonnaise, a teaspoon at a time, until it emulsifies again. Continue and finish the sauce as above.
Puff pastry book
There are certain dishes and techniques that can elevate your food and cooking to a higher level. Puff pastry is one of these techniques. This light, flaky and buttery pastry, with its 729 feathery layers, is peerless and opens up a lot of different avenues that have previously been closed in the sweet or savoury kitchen. Once the technique is mastered, you will find that even though the pastry will need two hours to complete, the actual handling time is quite short. I reckon 10–15 minutes. The rest of the time the pastry sits in the fridge, chilling and relaxing between the all-important rolls and folds.
With this pastry to hand a whole new range of dishes is possible: vol-au-vents and bouches, millefeuilles, palmiers, sacristains, tartes fines, all sorts of delights en croûte and so on.
Puff pastry freezes really well. Get it into the freezer as soon as possible, to trap the flavour of the butter. So bite the bullet and get rolling and folding and you will be richly rewarded with a fine pastry that bears no resemblance to the commercial equivalent.
I’ve included the recipe for savoury shortcrust pastry in the relevant chapters.
Keys to success
The initial dough made with flour and water is called the détrempe. It should be neither too wet as in soft and sticky, nor too dry as in firm and cracking.
The butter should be chilled and is then beaten and formed into the appropriate shape.
Use flour on the worktop and on the pastry when rolling, but brush off excess flour before folding and chilling.
Line up edges carefully and always fold the pastry exactly in three as if it was an important business letter.
Wrap the pastry and chill for at least 30 minutes between each double roll.
Each time you start to roll the pastry it should be placed on your worktop like a book ready to be opened.
If butter squirts out of the pastry when you are rolling, add a sprinkle of flour and keep going. It is better if it doesn’t happen, but it sometimes does, and even though you might not end up with the desired 729 layers of pastry, it will still be excellent.
The ingredients
Strong white flour or baker’s white flour, a white flour high in protein, is essential for puff pastry.
The butter used is generally unsalted, though I often use salted butter and find the result delicious.
Makes 1kg 450g baker’s or strong flour
Pinch of salt
250ml ice-cold water
450g butter, cold from the fridge
Sieve the flour and salt into a large bowl. Add almost all the water, and with your hand, mix to form a dough, adding the remaining drops of water if it refuses to come together. The dough will not look particularly attractive or smooth at this stage. A soft dough will make a flabby pastry that will not rise with straight sides when being cooked later. If your détrempe is too dry the pastry is more likely to crack when you are rolling and folding it.
Cover the détrempe by wrapping it in greaseproof or parchment paper or plastic film, or slip it into a large plastic bag, and chill for 30 minutes.
When the détrempe is chilled, dust the worktop with flour and roll the dough out about 30cm square.
Place the cold butter, wrapper removed, in a strong plastic bag and bash it with your rolling pin to achieve a rectangular slab that is pliable but still chilled. The slab should be about 13cm wide and 17cm long. You will probably have to shape the butter a bit with your hands – that’s fine, but do not allow the butter to warm up or start to melt. Place the butter in the middle of the square of dough and fold in the edges of the dough as if making a neat parcel. The butter should be completely enveloped – no butter should be visible.
Now roll the dough and butter ‘parcel’ into a rectangle about 22cm wide and 45cm long. Don’t get too worked up about these measurements. They are approximate, so something close to this size will be fine. What is really important, though, is that the sides and ends of the pastry are straight, so that when you fold the pastry, all of the edges meet in flush lines. If your pastry looks misshapen, apply pressure with your rolling pin wherever necessary to achieve a regular shape.
Brush the excess flour off the surface of the pastry with a pastry brush, and neatly and precisely fold the dough into three – as if folding a business letter! This is crucial, and lining up the edges of the dough neatly is also crucial. With folds and edges carefully aligned, the pastry will rise up straight later. If not carefully aligned, the rising pastry has a tendency to tumble off to one side or the other. You now have three layers in your pastry.
Give the dough a 90° clockwise turn. It should now look like a book ready to be opened on your worktop. Roll out into a rectangle as before, fold in three again, and seal at the edges by pressing gently with your rolling pin. Brush off the excess flour. Place in a plastic bag and chill for at least 30 minutes. Your pastry now has nine layers.
Now the pastry has had two single rolls or one double roll. It needs two more of these double rolls, allowing a 30-minute rest and chill between each. Chill the pastry after the final roll for at least 30 minutes.
The pastry is now ready to be rolled again for cutting, shaping and cooking.
Harissa
I keep a jar of this hot and spiced North African-inspired paste in the fridge most of the time. I find it a really useful condiment for seasoning and marinating and on some occasions for adding a little heat to certain dishes. I use it with grilled lamb, pork and chicken, with oily fish such as salmon and mackerel, on hard-boiled eggs and in an omelette, stirred through mayonnaise as a sauce or through olive oil to make a slightly hot vinaigrette for crisp and cool salad leaves.
I use medium hot chillies such as cayenne, jalapeño or serrano, for a level of heat that is obvious but not too scorching.
Serves 6–8 6 medium hot red chillies
1½ tablespoons tomato paste or thick purée
8 cloves of garlic, peeled and crushed to a paste
3 teaspoons cumin seeds, roasted and ground
3 teaspoons coriander seeds, roasted and ground
6 tablespoons extra virgin olive oil
1 teaspoon red wine vinegar or lemon juice
3 tablespoons chopped coriander leaves
Maldon sea salt, freshly ground black pepper and a pinch of sugar
Preheat the oven to 200°C/400°F/gas 6. Place the chillies on a small roasting tray and roast for about 20 minutes. The skins will be blackening and blistering and coming away from the flesh. Place the roasted chillies in a bowl, seal tightly with cling film and allow to cool. When cool, peel off the skins and slit the chillies to remove the seeds. You just want the roasted flesh of the chilli for the harissa.
Place the chillies in a food processor. Add the tomato paste, garlic and ground spices and process to a smoothish purée. Gradually add the oil and vinegar or lemon juice. Add the chopped coriander leaves and season to taste, adding a tiny pinch of sugar if you feel the flavour needs a lift. The taste should be strong, hot and pungent. Store in a covered container such as a jam jar in the fridge. The harissa will keep perfectly like this for several months.
Curry powder
If you would like to make your own spice mix, here is a combination I like to use for a general-purpose mix. Buy the spices whole, and roast and grind them yourself, and the flavour will be fresh and exciting. In this blend, it is the particular flavour and aroma of the fenugreek mixed with the other spices that gives the blend its distinctive ‘curry powder’ feel.
Makes 35g 1 teaspoon fenugreek seeds
1 teaspoon ground turmeric
2 tablespoons coriander seeds, roasted
1 tablespoon cumin seeds, roasted
2 teaspoons black peppercorns, roasted
1 teaspoon black mustard seeds, roasted
4 cloves, roasted
1 dessertspoon chilli flakes (add more if you want a hotter mix)
Place a heavy-based frying pan over a medium heat and roast the fenugreek and turmeric for 10 seconds. Remove from the heat and add the remaining ingredients before grinding everything to a fine powder in a clean coffee or spice grinder or a pestle and mortar.
Store the spices in a clean sealed container such as a jam jar and keep in a cool dark place. Use within a couple of weeks.
Vegetable stock
Vegetable stock can be a well flavoured, delicious and subtle broth or it can be as dull as dishwater. The key to a good vegetable stock is vegetables. A few bits of randomly chosen vegetables floating around in a saucepan of simmering water will not give you the result you wish for. Neither is this process a vehicle for using up stale vegetables that would find a more productive role on the compost heap or a way to absolve your guilt at the sight of those unused ingredients.
The cooking time of the stock is short. As soon as the vegetables are cooked, so is the stock. You know how horrible overcooked vegetables taste, the same applies here as the overcooked taste will be obvious in the strained liquid.
You may not have all of the vegetables as suggested here, but there is a bit of leeway as long as you do not overpower the stock by using too much of one particular ingredient.
Makes 1.5 litres 4 carrots
2 onions
1 leek
4 sticks of celery (outside greener stalks are fine)
6 button mushrooms
1 small fennel bulb
1 small potato
2 cloves of garlic, unpeeled
4 parsley stalks
½ bay leaf
1 sprig of thyme and tarragon
4 black peppercorns
Peel and coarsely chop the vegetables into 2cm pieces. Leave the garlic cloves unpeeled. Place all of the ingredients into a saucepan they fit into quite snugly and just cover with cold water. Bring to a simmer and cook for 30 minutes. Allow to sit for 10 minutes before straining through a fine sieve. The stock will keep for 2 days in the fridge or may be frozen.