
Small, spherical, and a lovely shade of pale green, TOMATILLOS removed from their husks resemble miniature green tomatoes. In fact, they are called tomates verdes in Mexico, where they originated; alternate names are Mexican husk tomatoes and Mexican ground cherries.
Part of the nightshade family, tomatillos were first cultivated thousands of years ago by the Aztecs. They continue to be a staple of Mexican cuisine today and are beloved both raw and cooked in a wide variety of dishes. In this chapter, we offer our Roasted Tomatillo Salsa, which is as delicious with tortilla chips as it is when used as a topping for steak or chicken. We also include a grilled version of tomatillo salsa to serve with grilled pork tenderloin. Along with green chiles, tomatillos are a hallmark ingredient in Enchiladas Verdes, and our bright, fresh, tangy version of this authentic Mexican classic is memorably delicious.
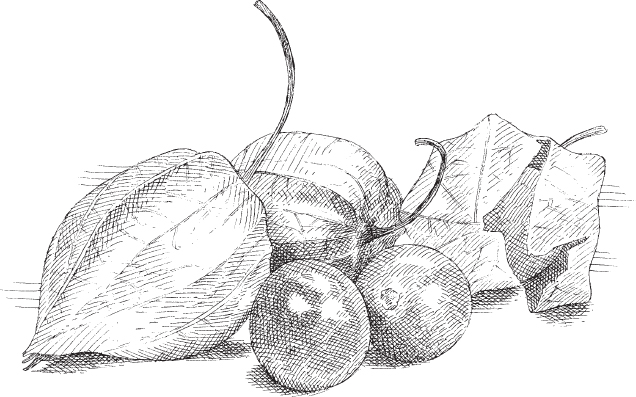
Another dark-horse member of the nightshade family is the CAPE GOOSEBERRY, which was first cultivated in the Andes and also goes by the names husk cherry, Peruvian ground cherry, golden berry, and Inca berry. These small golden fruits are encased in delicate, paper lantern–shaped husks. They have a unique flavor, with hints of pineapple, tomato, and green grapes. Famed naturalist and wild-foods proponent Euell Gibbons once said that the flavor of the Cape gooseberry is “so good it doesn’t have to resemble something else.”
Cape gooseberries are delicious raw or cooked, in both savory and sweet dishes. They make a great addition to a summer salad, as in our Cape Gooseberry Salad with Ginger-Lime Dressing, and they’re ethereally wonderful in our Cape Gooseberry–Rose Preserves.
shopping and storage
Tomatillos are in season in the summer and fall. When shopping for tomatillos, choose those of a similar size so they will cook evenly. Look for firm specimens that boast bright green skin—a yellow color indicates that the flesh is overripe and will taste sweet, not tangy. A light green, flexible, unblemished husk is also desirable; a brown hue and a dry, papery texture indicate overripeness. Finally, the tomatillo should completely fill out its husk (the husk should not balloon away from the fruit). Don’t remove the husks or rinse off the sticky coating (which protects the fruit from bugs) until you are ready to cook the tomatillos. Store tomatillos in an open plastic produce bag in the refrigerator for a couple of weeks. Canned tomatillos are a reasonable substitute for fresh in a pinch, though they won’t contribute the same depth of flavor.
Cape gooseberries are not widely cultivated commercially, making them a wonderful height-of-summer find at your local farmers’ market or specialty supermarket. As they ripen, they turn from green to golden or pale orange, and from tart to sweet. Try them at all stages of ripeness to see how you like their flavor. Cape gooseberries are more perishable than tomatillos; store them in an open plastic produce bag in the refrigerator for up to one week.
tomatillos versus tomatoes
Tomatillos may look like small green tomatoes, but they are emphatically not the same thing. Both are technically fruits that we treat in the kitchen like vegetables. They are two different species in the same family of nightshades, which also includes potatoes, eggplant, bell peppers, and Cape gooseberries.
So if a tomatillo is not like a tomato, then what is it like? Tomatillos are much firmer than tomatoes. They have a tangier, more citrusy flavor than green tomatoes, without even a hint of sweetness. Typically they are too acidic and coarse-textured to eat “straight up” in slices, as we do with tomatoes. They can be used raw to delicious effect, as in our Shrimp Ceviche with Tomatillos, Jícama, and Avocado, but most often they are roasted or grilled.
about cape gooseberries
Cape gooseberries are closely related to tomatillos and are entirely different from American gooseberries (which are fruits in the currant family). There is no consensus on how Cape gooseberries got their name. Some stories claim it’s because they were grown on the Cape of Good Hope, in South Africa, at the turn of the 19th century. Other stories say they are called that because of the cape-like husk that covers the berries. Although they are still little known in the United States, these diminutive berries are world travelers. They are most widely cultivated today in South America, South Africa, Australia, and New Zealand.
vegetable prep
Preparing Tomatillos for Cooking
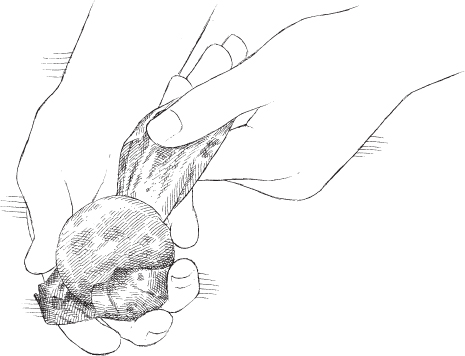
1. Remove stems and peel away inedible husks.

2. Rinse well to remove slightly sticky coating and drain in colander.
Preparing Cape Gooseberries for Cooking
Remove outer lantern-shaped husks and stems, and rinse well.

ROASTED TOMATILLO SALSA
Makes about 2 cups
Total time: 1 hour
WHY THIS RECIPE WORKS Salsa verde (“green sauce”) is even more common than tomato-based salsa on the Mexican table. We wanted a tangy salsa that highlighted the green, citrusy notes of tomatillos. While some recipes use raw tomatillos, most call for cooking them by either boiling or roasting. Cooking softens the fruit, which can be quite firm, and mellows its acidity. We found that charring half of the tomatillos under the broiler and leaving the other half raw produced a salsa with clean, fresh flavor and subtle, smoky nuances. We combined the tomatillos with traditional salsa seasonings (jalapeño, onion, garlic, cilantro, lime juice, and salt) in the bowl of a food processor, and pulsed the salsa to a chunky consistency. Serve with tortilla chips or dolloped on steaks, chicken, or fish.
1 pound tomatillos, husks and stems removed, rinsed well and dried
1 teaspoon vegetable oil
1 small white onion, chopped
1 jalapeño chile, stemmed, halved, and seeded
½ cup fresh cilantro leaves
2 tablespoons lime juice
1 garlic clove, minced
Salt
2 teaspoons extra-virgin olive oil
Sugar
1. Adjust oven rack 6 inches from broiler element and heat broiler. Line rimmed baking sheet with aluminum foil. Toss half of tomatillos with vegetable oil and transfer to prepared sheet. Broil until tomatillos are spotty brown and skins begin to burst, 7 to 10 minutes. Transfer tomatillos to food processor and let cool completely.
2. Halve remaining tomatillos and add to food processor with broiled tomatillos. Add onion, jalapeño, cilantro, lime juice, garlic, and ¼ teaspoon salt. Pulse until slightly chunky, 16 to 18 pulses. Transfer salsa to serving bowl, cover, and let sit at room temperature for at least 30 minutes. Stir in olive oil and season with salt and sugar to taste before serving. (Salsa can be refrigerated for up to 2 days.)
TOMATILLO AND PINTO BEAN NACHOS
Serves 4 to 6
Total time: 45 minutes
WHY THIS RECIPE WORKS These vegetarian nachos are not just a pile of chips, cheese, and beans. They deliver big flavor thanks to mouth-puckering fresh tomatillos and bold seasonings including garlic, oregano, and coriander. We chopped the tomatillos and sautéed them with corn (frozen kernels were ideal for year-round nacho convenience). To avoid soggy chips, we cooked the tomatillo mixture until all the moisture had evaporated, and we also sprinkled the cheese on the chips first, so it would act as a protective layer. We especially liked the flavor of spicy pepper Jack here. We wanted to add a bean component to these nachos, but refried beans added too much moisture. We opted for whole canned pinto beans instead, sprinkling them between each layer of filling. Fresh jalapeños added another layer of flavor and texture to our nachos. Once everything was layered, it took just 10 minutes in the oven to melt the cheese—any longer and the chips became soggy. Once the nachos came out of the oven, we added sliced radishes for fresh, cooling crunch. Our homemade tomato salsa and guacamole are key for making this recipe stand out, but if you are short on time you can use your favorite store-bought varieties.
1 tablespoon vegetable oil
1 onion, chopped fine
3 garlic cloves, minced
2 teaspoons minced fresh oregano or ½ teaspoon dried
1 teaspoon ground coriander
1 teaspoon salt
12 ounces tomatillos, husks and stems removed, rinsed well and dried, cut into ½-inch pieces
1 cup frozen corn, thawed
8 ounces tortilla chips
12 ounces pepper Jack cheese, shredded (3 cups)
1 (15-ounce) can pinto beans, rinsed
2 jalapeño chiles, stemmed and sliced thin
3 radishes, trimmed and sliced thin
1½ cups Super Guacamole
1 cup Fresh Tomato Salsa
½ cup sour cream
Lime wedges
1. Adjust oven rack to middle position and heat oven to 400 degrees. Heat oil in 12-inch nonstick skillet over medium heat until shimmering. Add onion and cook until softened, about 5 minutes. Stir in garlic, oregano, coriander, and salt and cook until fragrant, about 30 seconds. Add tomatillos and corn, reduce heat to medium-low, and cook until tomatillos have released all their moisture and mixture is nearly dry, about 10 minutes. Let cool slightly.
2. Spread half of tortilla chips evenly into 13 by 9-inch baking dish. Sprinkle 1½ cups pepper Jack evenly over chips, then top evenly with half of tomatillo mixture, followed by half of beans and, finally, half of jalapeños. Repeat layering with remaining chips, pepper Jack, tomatillo mixture, beans, and jalapeños. Bake until cheese is melted and just beginning to brown, 7 to 10 minutes.
3. Let nachos cool for 2 minutes, then sprinkle with radishes. Drop scoops of guacamole, salsa, and sour cream around edges of nachos. Serve immediately, passing lime wedges separately.
SHRIMP CEVICHE WITH TOMATILLOS, JÍCAMA, AND AVOCADO
Serves 4 to 6 as a main dish or 6 to 8 as an appetizer
Total time: 1 hour
WHY THIS RECIPE WORKS Tomatillos do double-duty in this ceviche: Pureed, they help to marinate the shrimp; and diced, they provide citrusy-tart flavor and crunchy texture to the finished dish. Because shrimp “cook” much more slowly in acid as compared with fish and scallops, we first poached our shrimp in seasoned water and then cut them into bite-size pieces. To create a flavorful yet balanced marinade for our ceviche, we made what’s known as a leche de tigre by blending lime juice, tomatillos, jalapeño, garlic, and extra-virgin olive oil along with a small amount of shrimp. Once strained, the liquid was an intensely flavorful and silky-textured emulsion. We marinated the poached shrimp in the leche for just 30 minutes to allow the flavors to penetrate and the shrimp to firm slightly. To complete the dish, we added diced tomatillos, crunchy jícama, Vidalia onion, creamy avocado, and chopped cilantro. We served the ceviche with corn nuts and popcorn, which provided salty crunch. Shrimp of other sizes may be used in this recipe; just be sure to adjust the cooking time accordingly. If Vidalia onions are unavailable, substitute another sweet onion or ¼ cup chopped red onion. Serving the corn nuts and popcorn separately allows diners to customize their ceviche to suit their taste.
5 sprigs fresh cilantro, plus ¼ cup coarsely chopped
4 garlic cloves, lightly crushed and peeled
Salt and pepper
1 pound large shrimp (26–30 per pound), peeled, deveined, and tails removed
12 ounces tomatillos, husks and stems removed, rinsed well and dried
½ cup lime juice (4 limes)
1 jalapeño chile, stemmed and seeded
3 tablespoons extra-virgin olive oil
8 ounces jícama, peeled and cut into ¼-inch pieces (1 cup)
½ cup chopped Vidalia or Walla Walla onion
1 avocado, halved, pitted, and cut into ½-inch pieces
1 cup corn nuts
1 cup lightly salted popcorn
1. Bring 2 cups water, cilantro sprigs, 2 garlic cloves, and ½ teaspoon salt to boil in large saucepan over high heat. Add shrimp, cover, and let sit off heat, stirring occasionally, until shrimp are just opaque, 1 to 2 minutes. Meanwhile, fill large bowl halfway with ice and water. Drain shrimp well, transfer to ice water, and let sit until just cool, about 2 minutes. Transfer shrimp to triple layer of paper towels and dry well. Cut shrimp in half lengthwise and then cut each half into ½-inch pieces. Transfer ⅓ cup shrimp pieces to blender jar. Refrigerate remaining shrimp.
2. Cut 8 ounces tomatillos into ¼-inch pieces and set aside. Cut remaining tomatillos into quarters and add to blender jar with shrimp. Add lime juice, jalapeño, 2 tablespoons oil, remaining 2 garlic cloves, and 1 teaspoon salt and process until mixture is smooth, 30 to 60 seconds, scraping down sides of blender jar as needed. Strain liquid through fine-mesh strainer set over large bowl, pressing on solids to extract as much liquid as possible; discard solids. (Sauce can be made up to 24 hours in advance and refrigerated. It will separate slightly; whisk to recombine before proceeding with recipe.)
3. Add chopped shrimp, reserved diced tomatillo, and jícama to bowl with sauce and toss to combine. Refrigerate for 30 minutes.
4. Add onion and chopped cilantro to bowl with ceviche and toss to combine. Portion ceviche into individual bowls, garnish with avocado, and drizzle with remaining 1 tablespoon oil. Serve, passing corn nuts and popcorn separately.
CAPE GOOSEBERRY SALAD WITH GINGER-LIME DRESSING
Serves 4
Total time: 20 minutes
WHY THIS RECIPE WORKS Lightly sweet Cape gooseberries are balanced by a bold dressing and creamy, tangy goat cheese in this light summertime salad. The simple vinaigrette, made with lime juice, fresh ginger, Dijon mustard, and cayenne pepper, added exciting bright freshness without overpowering the mild flavor of the gooseberries. Simply whisking the dressing together in the salad bowl before tossing in the remaining ingredients made the salad easy to prepare. Bibb lettuce added bulk and a delicate buttery bite to accompany the gooseberries. Mint offered a refreshing twist to the vinaigrette and complemented the lime juice and ginger. The addition of goat cheese made for a nice creamy counterpoint to the zesty dressing and sweet gooseberries, and a final sprinkle of pistachios added a crunchy bite. Adjust the amount of lime juice depending on the sweetness level of your Cape gooseberries.
2–3 teaspoons lime juice
1 teaspoon grated fresh ginger
½ teaspoon Dijon mustard
Pinch cayenne pepper
Salt and pepper
¼ cup extra-virgin olive oil
1 head Bibb lettuce (8 ounces), leaves separated and torn into 2-inch pieces
8 ounces Cape gooseberries, husks and stems removed, rinsed well and dried, halved
¼ cup chopped fresh mint
1½ ounces goat cheese, crumbled (⅓ cup)
2 tablespoons chopped toasted pistachios
Whisk lime juice, ginger, mustard, cayenne, and ¼ teaspoon salt together in large bowl. Whisking constantly, slowly drizzle in oil until well combined. Add lettuce, gooseberries, and mint and gently toss to coat. Season with salt and pepper to taste. Transfer to serving platter and sprinkle with goat cheese and pistachios. Serve.
SALAD WITH PICKLED TOMATILLOS, SUN-DRIED TOMATOES, AND GOAT CHEESE
Serves 4 to 6
Total time: 45 minutes
WHY THIS RECIPE WORKS While tomatillos are Mexican in origin and are often used in Mexican dishes, we wanted to create a tomatillo salad with a different and unexpected flavor profile. So we started by pickling our tomatillos. They’re a great fit for pickling, since their crunchy skin holds up well to the pickling process and their tart flavor is enhanced by a balanced sweet and vinegary brine. We boiled the tomatillo wedges in a simple brine of cider vinegar, sugar, water, and salt for just 1 minute to infuse flavor before transferring the mixture to a bowl to cool to room temperature. While the tomatillo pickles were cooling, we built our salad. Oil-packed sun-dried tomatoes were an unexpected flavor complement, their assertively bright flavor pairing perfectly with the pickled tomatillos. Refreshing leaf lettuce made a sturdy base for our salad. For a zippy, punchy dressing, we used the sun-dried tomato packing oil and the tomatillo pickle brine. To finish the salad, creamy goat cheese balanced the acidity of the tomatillos and dressing, and toasted walnuts added a crunchy final touch.
½ cup cider vinegar
¼ cup sugar
Salt and pepper
12 ounces tomatillos, husks and stems removed, rinsed well and dried, and cut into eighths
⅓ cup oil-packed sun-dried tomatoes, patted dry and sliced thin, plus 2 tablespoons packing oil
¼ cup chopped fresh basil
1 garlic clove, minced
¼ teaspoon red pepper flakes
1 head red or green leaf lettuce (8 ounces), torn into bite-size pieces
2 ounces goat cheese, crumbled (½ cup)
¼ cup walnuts, toasted and chopped
1. Bring vinegar, sugar, 2 tablespoons water, and 2 teaspoons salt to boil in medium saucepan over medium-high heat. Add tomatillos and boil for 1 minute. Transfer mixture to bowl and let cool to room temperature, about 30 minutes. Drain tomatillos, reserving 2 tablespoons brine.
2. Whisk reserved brine, sun-dried tomato oil, basil, garlic, pepper flakes, and ¼ teaspoon salt together in large serving bowl. Add pickled tomatillos, red leaf lettuce, and sun-dried tomatoes and toss to combine. Season with salt and pepper to taste. Sprinkle with goat cheese and walnuts. Serve.
VEGETABLES REIMAGINED
SALAD WITH PICKLED TOMATILLOS, SUN-DRIED TOMATOES, AND GOAT CHEESE
Tomatillos are most typically used in Mexican and southwestern-style dishes, but here we created a refreshing salad using more of a Mediterranean flavor profile. Crunchy, sweet-tart pickled tomatillos and unctuous oil-packed sun-dried tomatoes are the green and red jewels nestling into the leaf lettuce, complemented by tangy goat cheese and rich toasted walnuts for a stunner of a salad.

1. Remove the husks and stems from the tomatillos, rinse them well, dry them, and cut them into eighths.

2. Bring the vinegar, sugar, water, and salt to a boil in a medium saucepan and boil the tomatillos in the pickling liquid for 1 minute.
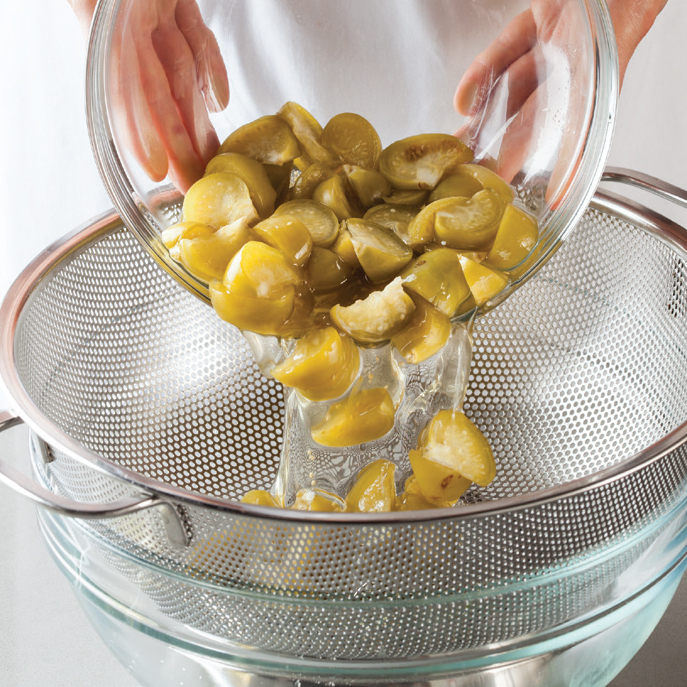
3. Transfer the tomatillos and pickling liquid to a bowl and let cool for 30 minutes. Drain the tomatillos over a bowl and reserve 2 tablespoons of the liquid.

4. Whisk the reserved pickling liquid, sun-dried tomato oil, basil, garlic, pepper flakes, and salt together in a large serving bowl.

5. Add the pickled tomatillos, lettuce, and sun-dried tomatoes and toss to combine.

6. Sprinkle the salad with the goat cheese and toasted walnuts.
CHICKEN POSOLE VERDE
Serves 6 to 8
Total time: 2 hours
WHY THIS RECIPE WORKS Posole is the Mexican name for both hominy (dried field corn kernels treated with lime and boiled until tender but still chewy) and the full-flavored stew made with it. We decided to create a green chicken posole—a style with a trademark tanginess that comes from tomatillos, jalapeños, and cilantro. Using whole bone-in chicken thighs resulted in easy-to-shred meat, giving our stew a pleasant, rustic texture. We quickly browned the chicken and then sautéed our aromatics after we removed the chicken from the pot, allowing us to incorporate the flavorful browned bits into our broth. When we returned the partially cooked chicken to the pot, we moved the cooking from the stove to the more even, gentle heat of the oven. Adding the tomatillo puree late in the cooking process allowed the flavors to meld without dulling the puree’s bright freshness. Finally, we returned the shredded chicken to the pot to warm briefly before serving the posole. Serve with lime wedges, diced avocado, and/or sliced radishes.
4 pounds bone-in chicken thighs, trimmed
Salt and pepper
2 tablespoons vegetable oil
1 onion, chopped fine
3 garlic cloves, minced
1 tablespoon chopped fresh oregano or 1 teaspoon dried
4½ cups chicken broth
12 ounces tomatillos, husks and stems removed, rinsed well and dried, quartered
2½ cups fresh cilantro leaves and stems, trimmed (2 bunches)
2 jalapeño chiles, stemmed, halved, and seeded
2 (15-ounce) cans white or yellow hominy, rinsed
1. Adjust oven rack to lower-middle position and heat oven to 300 degrees. Pat chicken dry with paper towels and season with salt and pepper. Heat 1 tablespoon oil in Dutch oven over medium-high heat until just smoking. Brown half of chicken, about 5 minutes per side; transfer to plate. Repeat with remaining 1 tablespoon oil and remaining chicken; transfer to plate. Let chicken cool slightly, then discard skin.
2. Pour off all but 1 tablespoon fat from pot. Add onion and ¼ teaspoon salt and cook over medium heat until softened, about 5 minutes. Stir in garlic and oregano and cook until fragrant, about 30 seconds. Stir in 4 cups broth, scraping up any browned bits, and bring to simmer. Nestle chicken into pot along with any accumulated juices. Cover, transfer pot to oven, and cook until chicken is tender, about 1 hour.
3. Remove pot from oven. Transfer chicken to cutting board, let cool slightly, then shred into bite-size pieces using 2 forks; discard bones.
4. Meanwhile, process tomatillos, cilantro, jalapeños, and remaining ½ cup broth in blender until smooth, about 30 seconds. Stir tomatillo mixture and hominy into stew, bring to simmer over medium heat, and cook until flavors meld, 10 to 15 minutes. Stir in chicken and cook until heated through, about 2 minutes. Season with salt and pepper to taste. Serve.
ENCHILADAS VERDES
Serves 4 to 6
Total time: 1 hour 30 minutes
WHY THIS RECIPE WORKS The green tomatillo-based sauce used in enchiladas verdes cooks much more quickly than the red enchilada sauce variety, making these a great choice for a weeknight meal. We love the combination of rustic-textured, vibrant green sauce, tender chicken, soft corn tortillas, and gooey cheese topping. To keep this recipe easy while still mimicking traditional recipes, which call for dry-roasting whole tomatillos and poblanos on the stovetop until charred, we broiled the vegetables. The pepper Jack cheese has a mildly spicy kick that complements the poblanos. To increase spiciness, reserve some of the chiles’ ribs and seeds and add them to the food processor in step 4. To avoid soggy enchiladas, be sure to cool the chicken filling before filling the tortillas.
3 tablespoons vegetable oil
1 onion, chopped
½ teaspoon ground cumin
3 garlic cloves, minced
1½ cups chicken broth
1 pound boneless, skinless chicken breasts, trimmed
1½ pounds tomatillos, husks and stems removed, rinsed well and dried
3 poblano chiles, stemmed, halved, and seeded
1–2½ teaspoons sugar
Salt and pepper
8 ounces pepper Jack or Monterey Jack cheese, shredded (2 cups)
½ cup chopped fresh cilantro
12 (6-inch) corn tortillas
2 scallions, sliced thin
Thinly sliced radishes
Sour cream
1. Adjust 1 oven rack to middle position and second rack 6 inches from broiler element; heat broiler. Heat 2 teaspoons oil in medium saucepan over medium heat until shimmering. Add onion and cook until softened and lightly browned, 5 to 7 minutes. Stir in cumin and two-thirds of garlic and cook until fragrant, about 30 seconds. Stir in broth and bring to simmer.
2. Add chicken and reduce heat to medium-low. Cover and simmer until chicken registers 160 degrees, 15 to 20 minutes, flipping chicken halfway through cooking. Transfer chicken to cutting board and let cool slightly.
3. While chicken cools, measure out ½ cup liquid and set aside; discard remaining liquid. Toss tomatillos and poblanos with 1 teaspoon oil. Arrange tomatillos cut side down and poblanos skin side up on aluminum foil–lined rimmed baking sheet. Broil on upper rack until vegetables blacken and start to soften, 5 to 10 minutes, rotating sheet halfway through broiling. Let tomatillos and poblanos cool slightly, then remove skins from poblanos (leave tomatillo skins intact). Heat oven to 450 degrees.
4. Transfer vegetables, along with any accumulated juices, to food processor. Add 1 teaspoon sugar, 1 teaspoon salt, remaining garlic, and reserved cooking liquid to food processor and pulse until sauce is somewhat chunky, about 8 pulses. Season with salt and pepper to taste, and adjust tartness by stirring in remaining sugar, ½ teaspoon at a time; set aside.
5. When chicken is cool, use 2 forks to shred into bite-size pieces. Combine chicken with 1½ cups pepper Jack and cilantro; season with salt to taste.
6. Grease 13 by 9-inch baking dish. Brush both sides of tortillas with remaining 2 tablespoons oil. Stack tortillas, wrap in damp dish towel, and place on plate. Microwave until warm and pliable, about 1 minute. Working with 1 warm tortilla at a time, spread ⅓ cup chicken filling across center. Roll tortilla tightly around filling and place seam side down in dish, arranging enchiladas in 2 columns across width of dish. Cover completely with remaining sauce. Sprinkle with remaining ½ cup pepper Jack.
7. Cover dish tightly with greased aluminum foil and bake until enchiladas are heated through, 15 to 20 minutes. Let enchiladas cool for 10 minutes. Sprinkle with scallions, and serve, passing radishes and sour cream separately.
GRILLED PORK TENDERLOINS WITH GRILLED TOMATILLO SALSA
Serves 4 to 6
Total time: 1 hour
WHY THIS RECIPE WORKS A grilled green salsa adds loads of bright flavor to pork. We grilled tomatillos, scallions, and garlic right alongside the tenderloins and then, while the meat rested, combined them in a food processor with cilantro, serrano chiles, lime juice, and spices to make the piquant salsa. For a rich crust and a tender, juicy interior on our pork, we seared it on the hotter side of the grill to develop flavorful browning. Then we moved the meat to the cooler side of the grill to finish cooking. Seasoning it with a mixture of salt, cumin, and chipotle chile powder added smoky, savory flavor, and a touch of sugar encouraged browning. We prefer unenhanced pork in this recipe, but enhanced pork (injected with a salt solution) can be used.
PORK
1½ teaspoons kosher salt
1½ teaspoons sugar
½ teaspoon ground cumin
½ teaspoon chipotle chile powder
2 (12- to 16-ounce) pork tenderloins, trimmed
SALSA
1 pound tomatillos, husks and stems removed, rinsed well and dried
9 scallions
6 garlic cloves, peeled and threaded onto wooden skewer
2 tablespoons plus 1 teaspoon extra-virgin olive oil
¾ cup minced fresh cilantro
2 serrano chiles, stemmed, seeded, and minced
3 tablespoons lime juice, plus extra for seasoning (2 limes)
Salt
1. For the pork Combine salt, sugar, cumin, and chile powder in small bowl. Reserve ½ teaspoon spice mixture. Rub remaining spice mixture evenly over surface of both tenderloins. Transfer to large plate and refrigerate while preparing grill.
2a. For a charcoal grill Open bottom vent completely. Light large chimney starter filled with charcoal briquettes (6 quarts). When top coals are partially covered with ash, pour evenly over half of grill. Set cooking grate in place, cover, and open lid vent completely. Heat grill until hot, about 5 minutes.
2b. For a gas grill Turn all burners to high, cover, and heat grill until hot, about 15 minutes. Leave primary burner on high and turn off other burner(s).
3. Clean and oil cooking grate. Place tenderloins on hotter side of grill. Cover and cook, turning tenderloins every 2 minutes, until well browned on all sides, about 8 minutes.
4. For the salsa Brush tomatillos, scallions, and garlic with 1 teaspoon oil. Move tenderloins to cooler side of grill (6 to 8 inches from heat source) and place tomatillos, scallions, and garlic on hotter side of grill. Cover and cook until tomatillos, scallions, and garlic are charred on both sides and softened, 8 to 10 minutes, and until pork registers 140 degrees, 12 to 17 minutes, turning tenderloins every 5 minutes. As vegetables and tenderloins reach desired level of doneness, transfer vegetables to plate and transfer tenderloins to carving board. Tent tenderloins with aluminum foil and let rest for 10 minutes.
5. While tenderloins rest, chop scallions coarse. Pulse scallions, tomatillos, garlic, cilantro, serranos, lime juice, reserved spice mixture, and remaining 2 tablespoons oil in food processor until mixture is coarsely chopped, 4 to 6 pulses. Transfer to bowl and season with salt and extra lime juice to taste. Slice tenderloins crosswise ½ inch thick. Serve with salsa.
PAN-ROASTED COD WITH AMARILLO SAUCE
Serves 4
Total time: 45 minutes
WHY THIS RECIPE WORKS A light rust orange in color, classic amarillo sauce is a mole-style sauce from Oaxaca that includes chiles, tomatillos, and masa harina as a thickener. We wanted to create a lively, tangy, slightly spicy version of this sauce to dress up mild white fish. Through typically aji amarillo chiles are used, most modern recipes use guajillos, which we found gave the mole a pleasant, mild heat. We complemented that chile flavor with some warm spices. Our aromatic base benefited from the addition of clam broth, which provided a subtle seafood backbone. We cooked the tomatillos only briefly, to preserve their bright, tart flavor, before pureeing the sauce in the blender. We cooked the cod fillets simply, sprinkling them with just a bit of sugar to accelerate browning. This shortened the cooking time and ensured that the fish didn’t dry out. Halibut, sea bass, and red snapper are good substitutes for the cod. Because most fish fillets differ in thickness, some pieces may finish cooking before others—be sure to immediately remove any fillet that reaches 140 degrees. You will need a 12-inch ovensafe nonstick skillet for this recipe.
3 guajillo chiles, stemmed, seeded, and torn into ½-inch pieces (6 tablespoons)
2 tablespoons vegetable oil
1 onion, chopped
4 garlic cloves, peeled
½ teaspoon dried oregano
¼ teaspoon whole cumin seeds
⅛ teaspoon ground cloves
⅛ teaspoon ground allspice
3 tablespoons masa harina
1 (8-ounce) bottle clam juice
8 ounces tomatillos, husks and stems removed, rinsed well and dried, cut into ½-inch pieces
6 sprigs cilantro
Salt and pepper
4 (6- to 8-ounce) skinless cod fillets, 1 to 1½ inches thick
½ teaspoon sugar
1. Toast guajillos in medium saucepan over medium heat, stirring frequently, until fragrant, 2 to 6 minutes; transfer to bowl. Heat 1 tablespoon oil in now-empty saucepan over medium heat until shimmering. Add onion and cook until softened, about 5 minutes. Stir in garlic, oregano, cumin seeds, cloves, and allspice and cook until fragrant, about 30 seconds. Stir in masa harina and cook for 1 minute. Slowly whisk in clam juice, scraping up any browned bits and smoothing out any lumps.
2. Stir in tomatillos, cilantro sprigs, guajillos, ½ teaspoon salt, and ¼ teaspoon pepper. Bring to simmer and cook until tomatillos begin to soften, about 3 minutes. Carefully transfer mixture to blender and process until smooth, 1 to 2 minutes. Return to clean pot and cover to keep warm.
3. Adjust oven rack to middle position and heat oven to 425 degrees. Pat cod dry with paper towels, season with salt and pepper, and sprinkle sugar lightly over 1 side of each fillet.
4. Heat remaining 1 tablespoon oil in 12-inch ovensafe nonstick skillet over high heat until just smoking. Lay fillets, sugared side down, in skillet and press lightly to ensure even contact with skillet. Cook until browned, 1 to 1½ minutes.
5. Turn fillets over using 2 spatulas and transfer skillet to oven. Roast cod until fish flakes apart when gently prodded with paring knife and registers 140 degrees, 7 to 10 minutes. Serve with sauce.

CAPE GOOSEBERRY–ROSE PRESERVES
Makes two 1-cup jars
Total time: 45 minutes (plus 12 hours refrigeration time)
WHY THIS RECIPE WORKS When cooked into preserves, the flavors of Cape gooseberries intensify, and their natural juices give the preserves a dense, velvety texture without having to add any pectin. To balance the sweetness of our preserves, we added lemon juice, and to highlight the gentle floral tones of the fruit, we stirred in a small amount of rose water just before portioning our preserves into jars. Cape gooseberries turn from green to golden, and tart to sweet, as they ripen. Look for fruits that are mostly golden (some underripe fruit will add a bit of tartness, if you like), with dry, clean husks. You will need two 1-cup mason jars with tight-fitting lids for this recipe. You must chill the preserves for at least 12 hours before using.
1¼ pounds Cape gooseberries, husks and stems removed, rinsed well and dried
1½ cups sugar
3 tablespoons lemon juice
2 teaspoons rose water
1. Place 2 small plates in freezer to chill. In large saucepan, bring gooseberries, sugar, and lemon juice to boil, stirring often, over medium-high heat. Once sugar has completely dissolved, remove pot from heat and use potato masher to crush fruit coarse, leaving some berries intact.
2. Return mixture to boil over medium-high heat and cook, stirring and adjusting heat as needed, until mixture registers 217 to 220 degrees, 12 to 15 minutes. Remove pot from heat.
3. To test consistency, place 1 teaspoon preserves on chilled plate and freeze for 2 minutes. Drag your finger through preserves on plate. Preserves have correct consistency when your finger leaves distinct trail. If runny, return pot to heat and simmer for 1 to 3 minutes before retesting. Skim any foam from surface of preserves using spoon and stir in rose water.
4. Meanwhile, place two 1-cup jars in bowl and place under hot running water until heated through, 1 to 2 minutes, then shake dry.
5. Using funnel and ladle, portion hot preserves into hot jars. Let cool to room temperature, cover, and refrigerate until preserves are set, 12 to 24 hours. (Preserves can be refrigerated for up to 2 months.)