
Figure 705: The Google Books app widget, showing a StackView
API Level 11 introduced a few new capabilities for app widgets, to make them more interactive and more powerful than before. The documentation lags a bit, though, so determining how to use these features takes a bit of exploring. Fortunately for you, the author did some of that exploring on your behalf, to save you some trouble.
Understanding this chapter requires that you have read the preceding chapter and all of its prerequisites.
In addition to the classic widgets available for use in app widgets
and RemoteViews, five more were added for API Level 11:
GridViewListViewStackViewViewFlipperAdapterViewFlipperThree of these (GridView, ListView, ViewFlipper) are widgets
that existed in Android since the outset. StackView was added in API Level 11
to provide a “stack of cards” UI:
Figure 705: The Google Books app widget, showing a StackView
AdapterViewFlipper works like a ViewFlipper, allowing you to
toggle between various children with only one visible at a time.
However, whereas with ViewFlipper all children are
fully-instantiated View objects held by the ViewFlipper parent,
AdapterViewFlipper uses the Adapter model, so only a small number
of actual View objects are held in memory, no matter how many
potential children there are.
With the exception of ViewFlipper, the other four all require the
use of an Adapter. This might seem odd, as there is no way to
provide an Adapter to a RemoteViews. That is true, but API Level 11
added new ways for Adapter-like communication between the app
widget host (e.g., home screen) and your application. We will take an
in-depth look at that in an upcoming section.
In an activity, if you put a ListView or GridView into your
layout, you will also need to hand it an Adapter, providing the
actual row or cell View objects that make up the contents of those
selection widgets.
In an app widget, this becomes a bit more complicated. The host of
the app widget does not have any Adapter class of yours. Hence,
just as we have to send the contents of the app widget’s UI via a
RemoteViews, we will need to provide the rows or cells via
RemoteViews as well. Android, starting with API Level 11, has a
RemoteViewsService and RemoteViewsFactory that you can use for
this purpose. Let’s take a look, in the form of the
AppWidget/LoremWidget
sample project, which will put a ListView
of 25 Latin words into an app widget.
At its core, our AppWidgetProvider (named WidgetProvider, in a
stunning display of creativity) still needs to create and configure a
RemoteViews object with the app widget UI, then use
updateAppWidget() to push that RemoteViews to the host via the
AppWidgetManager. However, for an app widget that involves an
AdapterView, like ListView, there are two more key steps:
RemoteViews the identity of a
RemoteViewsService that will help fill the role that the Adapter
would in an activityRemoteViews with a “template”
PendingIntent to be used when the user taps on a row or cell in the
AdapterView, to replace the onListItemClick() or similar method
you might have used in an activityFor example, here is WidgetProvider for our Latin-word app
widget:
package com.commonsware.android.appwidget.lorem;

import android.app.PendingIntent;
import android.appwidget.AppWidgetManager;
import android.appwidget.AppWidgetProvider;
import android.content.Context;
import android.content.Intent;
import android.net.Uri;
import android.widget.RemoteViews;

public class WidgetProvider extends AppWidgetProvider {
  public static String EXTRA_WORD=
    "com.commonsware.android.appwidget.lorem.WORD";

  @Override
  public void onUpdate(Context ctxt, AppWidgetManager appWidgetManager,
                        int[] appWidgetIds) {
    for (int i=0; i<appWidgetIds.length; i++) {
      Intent svcIntent=new Intent(ctxt, WidgetService.class);

      svcIntent.putExtra(AppWidgetManager.EXTRA_APPWIDGET_ID, appWidgetIds[i]);
      svcIntent.setData(Uri.parse(svcIntent.toUri(Intent.URI_INTENT_SCHEME)));

      RemoteViews widget=new RemoteViews(ctxt.getPackageName(),
                                          R.layout.widget);

      widget.setRemoteAdapter(R.id.words, svcIntent);

      Intent clickIntent=new Intent(ctxt, LoremActivity.class);
      PendingIntent clickPI=PendingIntent
                              .getActivity(ctxt, 0,
                                            clickIntent,
                                            PendingIntent.FLAG_UPDATE_CURRENT);

      widget.setPendingIntentTemplate(R.id.words, clickPI);

      appWidgetManager.updateAppWidget(appWidgetIds[i], widget);
    }

    super.onUpdate(ctxt, appWidgetManager, appWidgetIds);
  }
}The call to setRemoteAdapter() is where we point the RemoteViews
to our RemoteViewsService for our AdapterView widget. The main
rules for the Intent used to identify the RemoteViewsService are:
Uri), so even if you
create the Intent via the Context-and-Class constructor, you
will need to convert that into a Uri via
toUri(Intent.URI_INTENT_SCHEME) and set that as the Uri for the
Intent. Why? While your application has access to your
RemoteViewsService Class object, the app widget host will not, and
so we need something that will work across process boundaries. You
could elect to add your own <intent-filter> to the
RemoteViewsService and use an Intent based on that, but that
would make your service more publicly visible than you might want.Intent — such as the
app widget ID in this case — will be on the Intent that is
delivered to the RemoteViewsService when it is invoked by the app
widget host.Note that there are two flavors of setRemoteAdapter(). An older
deprecated one takes the app widget ID as the first parameter. The
current one does not. The current one, though, is only available
on API Level 14 and higher.
The call to setPendingIntentTemplate() is where we provide a
PendingIntent that will be used as the template for all row or cell
clicks. As we will see in a bit, the underlying Intent in the
PendingIntent will have more data added to it by our
RemoteViewsFactory.
In all other respects, our WidgetProvider is unremarkable compared
to other app widgets. It will need to be registered in the manifest
as a <receiver>, as with any other app widget.
Android supplies a RemoteViewsService class that you will need to
extend, and this class is the one you must register with the
RemoteViews for an AdapterView widget. For example, here is
WidgetService (once again, a highly creative name) from the
LoremWidget project:
package com.commonsware.android.appwidget.lorem;

import android.content.Intent;
import android.widget.RemoteViewsService;

public class WidgetService extends RemoteViewsService {
  @Override
  public RemoteViewsFactory onGetViewFactory(Intent intent) {
    return(new LoremViewsFactory(this.getApplicationContext(),
                                 intent));
  }
}As you can see, this service is practically trivial. You have to
override one method, onGetViewFactory(), which will return the
RemoteViewsFactory to use for supplying rows or cells for the
AdapterView. You are passed in an Intent, the one used in the
setRemoteAdapter() call. Hence, if you have more than one
AdapterView widget in your app widget, you could elect to have two
RemoteViewsService implementations, or one that discriminates
between the two widgets via something in the Intent (e.g., custom
action string). In our case, we only have one AdapterView, so we
create an instance of a LoremViewFactory and return it. Google
has suggested using getApplicationContext() here to supply the
Context object to RemoteViewsFactory, instead of using the
Service as a Context, though it is unclear why this is.
Another thing different about the RemoteViewsService is how it is
registered in the manifest:
<?xml version="1.0" encoding="utf-8"?>
<manifest xmlns:android="http://schemas.android.com/apk/res/android"
  package="com.commonsware.android.appwidget.lorem"
  android:versionCode="1"
  android:versionName="1.0">

  <uses-feature
    android:name="android.software.app_widgets"
    android:required="true"/>

  <application
    android:allowBackup="false"
    android:icon="@drawable/ic_launcher"
    android:label="@string/app_name">
    <activity
      android:name="LoremActivity"
      android:label="@string/app_name"
      android:theme="@android:style/Theme.Translucent.NoTitleBar">
      <intent-filter>
        <action android:name="android.intent.action.MAIN"/>

        <category android:name="android.intent.category.LAUNCHER"/>
      </intent-filter>
    </activity>

    <receiver
      android:name="WidgetProvider"
      android:icon="@drawable/ic_launcher"
      android:label="@string/app_name">
      <intent-filter>
        <action android:name="android.appwidget.action.APPWIDGET_UPDATE"/>
      </intent-filter>

      <meta-data
        android:name="android.appwidget.provider"
        android:resource="@xml/widget_provider"/>
    </receiver>

    <service
      android:name="WidgetService"
      android:permission="android.permission.BIND_REMOTEVIEWS"/>
  </application>

</manifest>Note the use of android:permission, specifying that whoever sends
an Intent to WidgetService must hold the BIND_REMOTEVIEWS
permission. This can only be held by the operating system. This is a
security measure, so arbitrary applications cannot find out about
your service and attempt to spoof being the OS and cause you to
supply them with RemoteViews for the rows, as this might leak
private data.
A RemoteViewsFactory interface implementation looks and feels a lot
like an Adapter. In fact, one could imagine that the Android
developer community might create CursorRemoteViewsFactory and
ArrayRemoteViewsFactory and such to further simplify writing these
classes.
For example, here is LoremViewsFactory, the one used by the
LoremWidget project:
package com.commonsware.android.appwidget.lorem;

import android.appwidget.AppWidgetManager;
import android.content.Context;
import android.content.Intent;
import android.os.Bundle;
import android.widget.RemoteViews;
import android.widget.RemoteViewsService;

public class LoremViewsFactory implements
    RemoteViewsService.RemoteViewsFactory {
  private static final String[] items= { "lorem", "ipsum", "dolor",
      "sit", "amet", "consectetuer", "adipiscing", "elit", "morbi",
      "vel", "ligula", "vitae", "arcu", "aliquet", "mollis", "etiam",
      "vel", "erat", "placerat", "ante", "porttitor", "sodales",
      "pellentesque", "augue", "purus" };
  private Context ctxt=null;
  private int appWidgetId;

  public LoremViewsFactory(Context ctxt, Intent intent) {
    this.ctxt=ctxt;
    appWidgetId=
        intent.getIntExtra(AppWidgetManager.EXTRA_APPWIDGET_ID,
                           AppWidgetManager.INVALID_APPWIDGET_ID);
  }

  @Override
  public void onCreate() {
    // no-op
  }

  @Override
  public void onDestroy() {
    // no-op
  }

  @Override
  public int getCount() {
    return(items.length);
  }

  @Override
  public RemoteViews getViewAt(int position) {
    RemoteViews row=
        new RemoteViews(ctxt.getPackageName(), R.layout.row);

    row.setTextViewText(android.R.id.text1, items[position]);

    Intent i=new Intent();
    Bundle extras=new Bundle();

    extras.putString(WidgetProvider.EXTRA_WORD, items[position]);
    extras.putInt(AppWidgetManager.EXTRA_APPWIDGET_ID, appWidgetId);
    i.putExtras(extras);
    row.setOnClickFillInIntent(android.R.id.text1, i);

    return(row);
  }

  @Override
  public RemoteViews getLoadingView() {
    return(null);
  }

  @Override
  public int getViewTypeCount() {
    return(1);
  }

  @Override
  public long getItemId(int position) {
    return(position);
  }

  @Override
  public boolean hasStableIds() {
    return(true);
  }

  @Override
  public void onDataSetChanged() {
    // no-op
  }
}You need to implement a handful of methods that have the same roles
in a RemoteViewsFactory as they do in an Adapter, including:
getCount()getViewTypeCount()getItemId()hasStableIds()In addition, you have onCreate() and onDestroy() methods that you
must implement, even if they do nothing, to satisfy the interface.
You will need to implement getLoadingView(), which will return a
RemoteViews to use as a placeholder while the app widget host is
getting the real contents for the app widget. If you return null,
Android will use a default placeholder.
The bulk of your work will go in getViewAt(). This serves the same
role as getView() does for an Adapter, in that it returns the row
or cell View for a given position in your data set. However:
RemoteViews, instead of a View, just as
you have to use RemoteViews for the main content of the app widget
in your AppWidgetProvider
View (or
RemoteViews) back to somehow repopulate, meaning you will create a
new RemoteViews every timeThe impact of the latter is that you do not want to put large data
sets into an app widget, as scrolling may get sluggish, just as you
do not want to implement an Adapter without recycling unused View
objects.
In LoremViewsFactory, the getViewAt() implementation creates a
RemoteViews for a custom row layout, cribbed from one in the
Android SDK:
<?xml version="1.0" encoding="utf-8"?>
<!-- Copyright (C) 2006 The Android Open Source Project

     Licensed under the Apache License, Version 2.0 (the "License");
     you may not use this file except in compliance with the License.
     You may obtain a copy of the License at

          http://www.apache.org/licenses/LICENSE-2.0

     Unless required by applicable law or agreed to in writing, software
     distributed under the License is distributed on an "AS IS" BASIS,
     WITHOUT WARRANTIES OR CONDITIONS OF ANY KIND, either express or implied.
     See the License for the specific language governing permissions and
     limitations under the License.
-->

<TextView xmlns:android="http://schemas.android.com/apk/res/android"
    android:id="@android:id/text1"
    android:layout_width="match_parent"
    android:layout_height="wrap_content"
    android:textAppearance="?android:attr/textAppearanceLarge"
    android:gravity="center_vertical"
    android:paddingLeft="8dp"
    android:paddingStart="8dp"
    android:textColor="@android:color/white"
    android:minHeight="?android:attr/listPreferredItemHeight"
/>Then, getViewAt() pours in a word from the static String array of
Latin words into that RemoteViews for the TextView inside it.
It also creates an Intent and puts the Latin word in as an
EXTRA_WORD extra, then provides that Intent to
setOnClickFillInIntent(). In addition, it adds the app widget instance ID
as an extra, reusing the framework’s own AppWidgetManager.EXTRA_APPWIDGET_ID
as the key. The contents of the “fill-in” Intent
are merged into the “template” PendingIntent from
setPendingIntentTemplate(), and the resulting PendingIntent is
what is invoked when the user taps on an item in the AdapterView.
The fully-configured RemoteViews is then returned.
The app widget metadata needs no changes related to Adapter-based
app widget contents. However, LoremWidget does add the
android:previewImage attribute:
<appwidget-provider xmlns:android="http://schemas.android.com/apk/res/android"
  android:minWidth="146dip"
  android:minHeight="146dip"
  android:updatePeriodMillis="0"
  android:initialLayout="@layout/widget"
  android:autoAdvanceViewId="@+id/words"
  android:previewImage="@drawable/preview"
  android:resizeMode="vertical"
/>This points to the res/drawable-nodpi/preview.png file that
represents a “widgetshot” of the app widget in isolation, obtained
from the Widget Preview application:
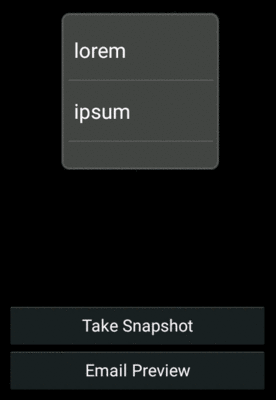
Figure 706: The preview of LoremWidget
Also, the metadata specifies android:resizeMode="vertical". This
attribute is new to Android 3.1, and allows the app widget to be
resized by the user (in this case, only in the vertical direction, to
show more rows). Older versions of Android will ignore this
attribute, and the app widget will remain in your requested size. You
can use vertical, horizontal, or both (via the pipe operator) as
values for android:resizeMode.
When the user taps on an item in the list, our PendingIntent is set
to bring up LoremActivity. This activity has
android:theme="@android:style/Theme.Translucent.NoTitleBar" set in the manifest,
meaning that it will not have its own user interface. Rather, it will
extract our EXTRA_WORD — and the app widget ID — out of the Intent
used to launch the
activity and displays it in a Toast before finishing:
package com.commonsware.android.appwidget.lorem;

import android.app.Activity;
import android.appwidget.AppWidgetManager;
import android.os.Bundle;
import android.widget.Toast;

public class LoremActivity extends Activity {
  @Override
  public void onCreate(Bundle state) {
    super.onCreate(state);

    String word=getIntent().getStringExtra(WidgetProvider.EXTRA_WORD);

    if (word == null) {
      word="We did not get a word!";
    }

    Toast.makeText(this,
                   String.format("#%d: %s",
                                 getIntent().getIntExtra(AppWidgetManager.EXTRA_APPWIDGET_ID,
                                                         AppWidgetManager.INVALID_APPWIDGET_ID),
                                 word), Toast.LENGTH_LONG).show();

    finish();
  }
}When you compile and install the application, nothing new shows up in
the home screen launcher, because we have no activity defined to
respond to ACTION_MAIN and CATEGORY_HOME. This would be unusual
for an application distributed through the Play Store, as users
often get confused if they install something and then do not know how
to start it. However, for the purposes of this example, we should be
fine, as readers of programming books never get confused about such
things.
However, if you bring up the app widget gallery (e.g., long-tap on
the home screen of an Android 6.0 device or emulator), you will see LoremWidget
there, complete with preview image. You can drag it into one of the
home screen panes and position it. When done, the app widget appears
as expected:

Figure 707: LoremWidget on Android Home Screen
The ListView is live and can be scrolled. Tapping an entry brings
up the corresponding Toast.
If the user long-taps on the app widget, they will be able to
reposition it. On Android 3.1 and beyond, when they lift their finger
after the long-tap, the app widget will show resize handles on the
sides designated by your android:resizeMode attribute:
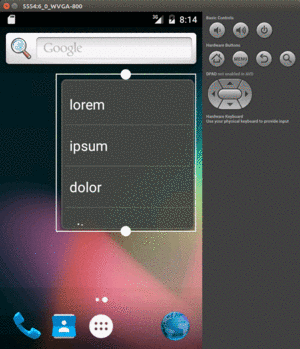
Figure 708: LoremWidget on Android Home Screen, with Resize Handles
The user can then drag those handles to expand or shrink the app widget in the specified dimensions:
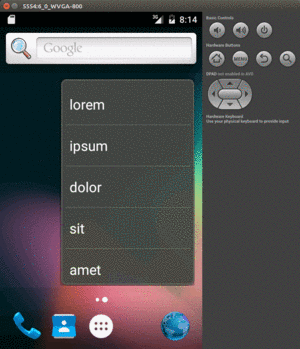
Figure 709: Resized LoremWidget on Android Home Screen