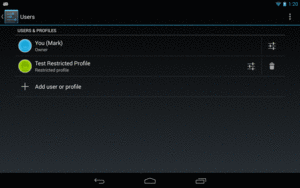
Figure 727: Users Screen in Settings
Android 4.2 introduced the concept of having multiple distinct users of a tablet. Each user would get their own portion of internal and external storage, as if they each had their own tablet.
Android 4.3 extends this a bit further, with the notion of setting up restricted profiles. As the name suggests, a restricted profile is restricted, in terms of what it can do on the device. Some restrictions will be device-wide (e.g., can the user install apps?), and some restrictions will be per-app. You can elect to allow your app to be restricted, where you define the possible ways in which your app can be restricted, and the one setting up the restricted profile can then configure the desired options for some specific profile.
This chapter will explain how users set up these restricted profiles, what you can learn about the device-wide restrictions, and how you can offer your own restrictions for your own app.
Understanding this chapter requires that you have read the core chapters of this book, particularly the chapter on files and its section on multiple user accounts.
The theory is that tablets are likely to be shared, whether among family members, among team members in a business, or similar sorts of group settings. There are three levels of “user” in an Android 4.3+ tablet that we will need to consider.
The primary user is whoever first set up the tablet after initial purchase. In a family, this is probably a parent; in a corporate setting, this might be an IT administrator.
Prior to Android 4.2, there was only one user per device, and that user could (generally) do anything. In Android 4.2+, the primary user holds this role.
One thing that the primary user can do is set up other users, via the Users option in the Settings app:
Figure 727: Users Screen in Settings
Tapping the “Add user or profile” entry allows the primary user to set up another user or restricted profile:
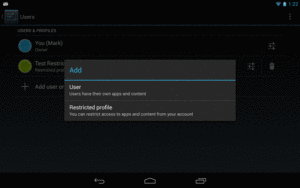
Figure 728: Add Dialog in Users Screen in Settings
Choosing “User” from the Add dialog will define a secondary user of the device. This user has much of the same control as the primary user, in terms of being able to install and run whatever apps are desired.
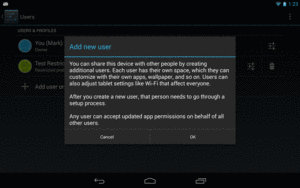
Figure 729: Add New User Warning Dialog in Users Screen in Settings
A restricted profile is akin to a secondary user, in that it gets its own separate portion of internal and external storage. Beyond that, though, the primary user can further configure what the restricted profile can access:
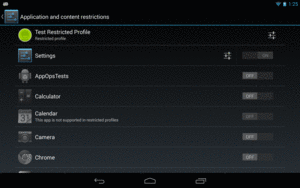
Figure 730: Restricted Profile Configuration Screen in Settings
The bulk of the restricted profile configuration screen is a list of apps,
with Switch widgets to allow the primary user to allow or deny access
to each app.
Some apps will have the “settings” icon to the left of the Switch. Tapping
that will either bring up a dedicated activity for restricting operations
within that app, or it will add new rows to the list with individual
restriction options for that app. For example, tapping the settings icon for
the Settings app adds a row where the primary user can block location
sharing:
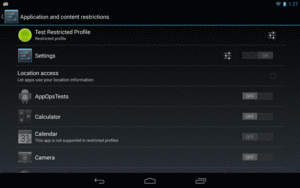
Figure 731: Location Sharing Restrictions
The “settings” icon in the first row, for the profile itself, will allow the primary user to control things for the entire profile, notably its name.
Switching to the restricted profile (e.g., via the lockscreen) will show the constrained set of available apps:
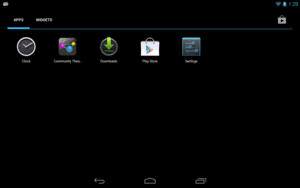
Figure 732: Apps in a Restricted Profile
Your app can find out what device-level restrictions were placed on the
current user by means of the UserManager system service. Specifically,
as you can see in MainActivity of the
RestrictedProfiles/Device
sample project, all you need to do is:
UserManager by calling getSystemService() on
a Context, passing in USER_SERVICE as the service’s namegetUserRestrictions() on the UserManager:package com.commonsware.android.profile.device;
import android.support.v4.app.FragmentActivity;
import android.os.Bundle;
import android.os.UserManager;
import android.widget.Toast;
public class MainActivity extends FragmentActivity {
@Override
protected void onCreate(Bundle savedInstanceState) {
super.onCreate(savedInstanceState);
UserManager mgr=(UserManager)getSystemService(USER_SERVICE);
Bundle restrictions=mgr.getUserRestrictions();
if (restrictions.keySet().size() > 0) {
setContentView(R.layout.activity_main);
RestrictionsFragment f=
(RestrictionsFragment)getSupportFragmentManager().findFragmentById(R.id.contents);
f.showRestrictions(restrictions);
}
else {
Toast.makeText(this, R.string.no_restrictions, Toast.LENGTH_LONG)
.show();
finish();
}
}
}
getUserRestrictions() returns a Bundle, whose keys are documented
on UserManager for various device-level restrictions that theoretically
can be placed on the user. Here, “theoretically” means that while UserManager
documents several DISALLOW_* constants, only two seem to be directly accessible
to the primary user for configuration via Settings:
DISALLOW_MODIFY_ACCOUNTS, to prevent a restricted profile from, among other
things, modifying restricted profilesDISALLOW_SHARE_LOCATION, to prevent the apps run in this restricted profile
from gathering location dataMainActivity examines the Bundle and, if it is empty, just displays a Toast
and exits via finish(). This is the behavior you will see if you run this sample
app on a non-restricted profile, such as the primary user. If, however, the
Bundle has one or more keys, we inflate an activity_main layout that
contains a RestrictionsFragment in a <fragment> element:
<fragment xmlns:android="http://schemas.android.com/apk/res/android"
  android:id="@+id/contents"
  android:layout_width="match_parent"
  android:layout_height="match_parent"
  class="com.commonsware.android.profile.device.RestrictionsFragment"/>
We then retrieve the RestrictionsFragment from the FragmentManager and call
showRestrictions() on it, passing in the Bundle.
RestrictionsFragment is a ListFragment employing a custom RestrictionsAdapter.
The RestrictionsAdapter wraps around the Bundle and an ArrayList of its
keys. The RestrictionsAdapter constructor creates the ArrayList by sorting
the keySet() of the Bundle. getView() on RestrictionsAdapter lets
the superclass handle inflating the row (android.R.layout.simple_list_item_1),
then puts an icon on the right side by using
setCompoundDrawablesWithIntrinsicBounds(), which can tuck a drawable resource
onto any of the four sides of a TextView.
The resulting list will show green icons for keys where the Bundle has stored
a true Boolean value, and a red icon for false:
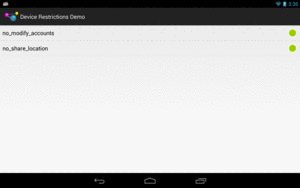
Figure 733: Default Device Restrictions, on a Nexus 7 (2013)
Since the keys are negative in tone (e.g., DISALLOW_MODIFY_ACCOUNTS), true
means that the restriction is enforced and the underlying operation (e.g., modifying
accounts) cannot be done.
Your app’s functionality may be limited by these device-level restrictions. This section outlines some of the results you should expect from a restricted profile.
If a restricted profile is prevented from sharing the device’s location with
apps, those apps simply will not receive location updates. There is no good
way to detect this via the location API (e.g., isProviderEnabled() returns
true), so you will have to detect this via getUserRestrictions() on
UserManager as noted above.
Even without specific configuration, the restricted profile can only uninstall apps that they are available to that profile. However, since apps are really shared between profiles, this only removes that app from the restricted profile; it does not actually uninstall the app from the device as a whole.
As noted earlier, the list of apps that is shown on the restricted profile configuration screen in Settings can have “settings” icons. The Settings app itself will have a settings icon, to allow the primary user to configure device-level restrictions.
But, what if you want your app to have such a settings icon? Maybe it makes sense for your app to allow the primary user to restrain restricted profiles from doing certain things within your app:
The means by which the Settings app restricts profiles is also available to you. You can declare to Android what aspects of your app can be restricted. Android will then collect that restriction data for you. Your app, at runtime, can then determine what restrictions are in place (if any) and take appropriate steps.
All of this will be illustrated using the
RestrictedProfiles/App
sample project.
The biggest thing that you need to do to restrict your app is teach Android how to collect restrictions. In other words, you need to tell Android what to do when the user taps that settings icon in the restricted profile entry for your app.
You have two major options:
Intent that can be used to start up an activity of your own
design where you collect those restrictionsEither approach will require you to set up a manifest-registered
BroadcastReceiver, set to respond to the
android.intent.action.GET_RESTRICTION_ENTRIES action:
    <receiver android:name="RestrictionEntriesReceiver">
      <intent-filter>
        <action android:name="android.intent.action.GET_RESTRICTION_ENTRIES"/>
      </intent-filter>
    </receiver>
That BroadcastReceiver will be called with sendOrderedBroadcast(),
not so much to affect ordering, but to allow the BroadcastReceiver
to send back a result via its setResultExtras() method. This provides a
Bundle that the broadcaster can eventually retrieve, in this case providing
details of what restrictions we wish to collect from the primary user to restrict
the profile.
To collect restrictions the way the Settings app does — with restriction
rows appearing below your app in the restricted profile screen in Settings –
your BroadcastReceiver will need to put an entry into the return
Bundle, under the key of EXTRA_RESTRICTIONS_LIST (a constant defined
on the Intent class). The value needs to be an ArrayList of
RestrictionEntry objects, with each RestrictionEntry describing one
restriction to collect.
Another thing that the RestrictionEntry objects contain is their
current value. Android itself retains these values and supplies them to
your BroadcastReceiver via an EXTRA_RESTRICTIONS_BUNDLE extra on
the incoming Intent. Your app needs to use those current values when
constructing its list of RestrictionEntry objects to return.
So, let’s take a look at RestrictionEntriesReceiver, the receiver
we have set up to handle the android.intent.action.GET_RESTRICTION_ENTRIES
action for this sample app.
The entry point for RestrictionEntriesReceiver is onReceive(), as it is
for any basic BroadcastReceiver:
  @Override
  public void onReceive(Context ctxt, Intent intent) {
    Bundle current=
        (Bundle)intent.getParcelableExtra(Intent.EXTRA_RESTRICTIONS_BUNDLE);
    ArrayList<RestrictionEntry> restrictions=
        new ArrayList<RestrictionEntry>();

    restrictions.add(buildBooleanRestriction(ctxt, current));
    restrictions.add(buildChoiceRestriction(ctxt, current));
    restrictions.add(buildMultiSelectRestriction(ctxt, current));

    Bundle result=new Bundle();

    result.putParcelableArrayList(Intent.EXTRA_RESTRICTIONS_LIST,
                                  restrictions);

    setResultExtras(result);
  }
In onReceive(), RestrictionEntriesReceiver pulls out the Bundle
of current restrictions, by retrieving the EXTRA_RESTRICTIONS_BUNDLE extra
from the Intent passed into onReceive(). Note that this Bundle could
very well be empty, if this is the first time we are being asked for restrictions.
RestrictionEntriesReceiver creates an empty ArrayList of
RestrictionEntry objects, then calls a series of builder methods to create
a total of three such RestrictionEntry objects, adding each to the list.
onReceive() goes on to create a Bundle representing the results to be
returned, packages the ArrayList in that Bundle under the
EXTRA_RESTRICTIONS_LIST key, and returns that Bundle to the caller by
means of setResultExtras().
The three builder methods are each responsible for defining a single
RestrictionEntry, including populating it with the current value from the
current Bundle.
There are three types of RestrictionEntry, for boolean, single-selection lists
(“choice”), and multi-selection lists. The RestrictionEntry constructor
takes two parameters:
String key under which we will later retrieve this restriction value The current value is:
boolean for boolean restrictionsString for choice restrictionsString array for multi-select restrictionsOur first builder, buildBooleanRestriction(), populates and returns a
RestrictionEntry designed to collect a boolean value from the primary user, via a
CheckBox:
  private RestrictionEntry buildBooleanRestriction(Context ctxt,
                                                   Bundle current) {
    RestrictionEntry entry=
        new RestrictionEntry(RESTRICTION_BOOLEAN,
                             current.getBoolean(RESTRICTION_BOOLEAN,
                                                false));

    entry.setTitle(ctxt.getString(R.string.boolean_restriction_title));
    entry.setDescription(ctxt.getString(R.string.boolean_restriction_desc));

    return(entry);
  }
buildBooleanRestriction() retrieves the current value from current Bundle
to use with the RestrictionEntry constructor. In this case, if there is no such
entry in the Bundle, the overall default value is false.
Each RestrictionEntry can have a title (setTitle()), supplying a string
which will be displayed to describe what this restriction is. A boolean
restriction can also have a description (setDescription()), containing another
string with a bit more text. Note that, at the present time, the other
two types of restrictions will ignore any description that you include.
Also note that the values supplied to setTitle() and setDescription()
need to be strings, and so if you wish to use a string resource, you will need
to get the actual string value yourself via getString().
The remaining two builder methods have a similar structure:
  private RestrictionEntry buildChoiceRestriction(Context ctxt,
                                                  Bundle current) {
    RestrictionEntry entry=
        new RestrictionEntry(RESTRICTION_CHOICE,
                             current.getString(RESTRICTION_CHOICE));

    entry.setTitle(ctxt.getString(R.string.choice_restriction_title));
    entry.setChoiceEntries(ctxt, R.array.display_values);
    entry.setChoiceValues(ctxt, R.array.restriction_values);

    return(entry);
  }

  private RestrictionEntry buildMultiSelectRestriction(Context ctxt,
                                                       Bundle current) {
    RestrictionEntry entry=
        new RestrictionEntry(RESTRICTION_MULTI,
                             current.getStringArray(RESTRICTION_MULTI));

    entry.setTitle("A Multi-Select Restriction");
    entry.setChoiceEntries(ctxt, R.array.display_values);
    entry.setChoiceValues(ctxt, R.array.restriction_values);

    return(entry);
  }
As with a ListPreference, you provide two string arrays to the
RestrictionEntry, representing the values the primary user sees
(setChoiceEntries()) and the corresponding values to be supplied to your
app based upon the choice(s) (setChoiceValues()). You can supply these either
as Java string arrays or as <string-array> resources –
RestrictionEntriesReceiver goes with the latter approach.
It may be that what you want to collect, in terms of restrictions, cannot
readily be represented in the form of Switch widgets and list dialogs.
For example, to restrict use of your app based on time, it would be nice
to use a TimePickerDialog or the equivalent.
The alternative to returning an EXTRA_RESTRICTIONS_LIST roster of
RestrictionEntry objects from your BroadcastReceiver is to have the
result Bundle contain EXTRA_RESTRICTIONS_INTENT. This key should point
to an Intent that identifies the activity that you want to start up
when the user taps the settings icon. Android will call
startActivityForResult() on that Intent when the user taps on the
settings icon.
Your job is to collect the restrictions from the user, using the
EXTRA_RESTRICTIONS_BUNDLE from the incoming Intent to pre-populate
your activity, if desired. When the user is done, you should call
setResult(), passing in an Intent that contains another
EXTRA_RESTRICTIONS_BUNDLE with the revised data, or optionally a
EXTRA_RESTRICTIONS_LIST (with the RestrictionEntry objects containing
the values to be used).
Given the RestrictionEntriesReceiver described above, when the primary user
goes to configure a restricted profile, your app will appear with a
settings icon next to it:
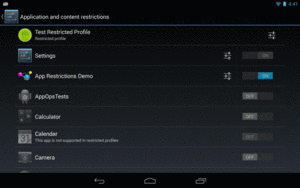
Figure 734: Restricted Profile, Showing App Settings Icon
Tapping that settings icon will “unfold” and display the restrictions
that you configured via the RestrictionEntry objects:
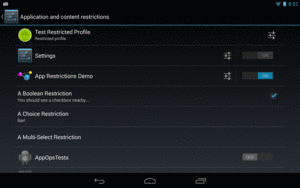
Figure 735: Restricted Profile, Showing App Restrictions
The primary user can then interact with your restrictions, toggling checkboxes and popping up the list dialogs:
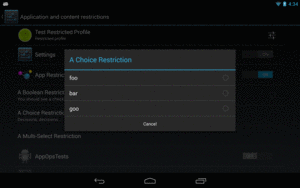
Figure 736: Restricted Profile, Showing Choice Restriction
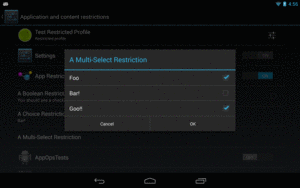
Figure 737: Restricted Profile, Showing Multi-Select Restriction
Now, the rest of your app needs to find out what restrictions are placed
upon it, so behavior can be tailored accordingly. To do this, call
getApplicationRestrictions() on UserManager, passing in your package name,
as seen here in MainActivity:
package com.commonsware.android.profile.app;

import android.support.v4.app.FragmentActivity;
import android.os.Bundle;
import android.os.UserManager;
import android.widget.Toast;

public class MainActivity extends FragmentActivity {
  @Override
  protected void onCreate(Bundle savedInstanceState) {
    super.onCreate(savedInstanceState);

    UserManager mgr=(UserManager)getSystemService(USER_SERVICE);
    Bundle restrictions=
        mgr.getApplicationRestrictions(getPackageName());

    if (restrictions.keySet().size() > 0) {
      setContentView(R.layout.activity_main);

      RestrictionsFragment f=
          (RestrictionsFragment)getSupportFragmentManager().findFragmentById(R.id.contents);

      f.showRestrictions(restrictions);
    }
    else {
      Toast.makeText(this, R.string.no_restrictions, Toast.LENGTH_LONG)
           .show();
      finish();
    }
  }
}
This Bundle could be empty, or it could have values specified by the
primary user to restrict the profile that is running your app.
In the case of this sample, we once again set up a RestrictionsAdapter
to show the results, if the Bundle is not empty. However, our adapter is a bit
more complicated, as there are more than boolean restrictions now. getView()
has been updated to handle all three possible restrictions, showing
the icon for the boolean restriction, and showing the value(s) from the lists
in the other restrictions:
package com.commonsware.android.profile.app;

import android.support.v4.app.ListFragment;
import android.os.Bundle;
import android.text.TextUtils;
import android.view.View;
import android.view.ViewGroup;
import android.widget.ArrayAdapter;
import android.widget.TextView;
import java.util.ArrayList;
import java.util.Collections;

public class RestrictionsFragment extends ListFragment {
  public void showRestrictions(Bundle restrictions) {
    setListAdapter(new RestrictionsAdapter(restrictions));
  }

  class RestrictionsAdapter extends ArrayAdapter<String> {
    Bundle restrictions;

    RestrictionsAdapter(Bundle restrictions) {
      super(getActivity(), android.R.layout.simple_list_item_1,
            new ArrayList<String>());

      ArrayList<String> keys=
          new ArrayList<String>(restrictions.keySet());

      Collections.sort(keys);
      addAll(keys);

      this.restrictions=restrictions;
    }

    @Override
    public View getView(int position, View convertView, ViewGroup parent) {
      TextView row=
          (TextView)super.getView(position, convertView, parent);
      String key=getItem(position);

      if (RestrictionEntriesReceiver.RESTRICTION_BOOLEAN.equals(key)) {
        int icon=
            restrictions.getBoolean(key) ? R.drawable.ic_true
                : R.drawable.ic_false;

        row.setCompoundDrawablesWithIntrinsicBounds(0, 0, icon, 0);
      }
      else if (RestrictionEntriesReceiver.RESTRICTION_CHOICE.equals(key)) {
        row.setText(String.format("%s (%s)", key,
                                  restrictions.getString(key)));
      }
      else {
        String value=
            TextUtils.join(" | ", restrictions.getStringArray(key));

        row.setText(String.format("%s (%s)", key, value));
      }

      return(row);
    }
  }
}
The result, when run on a restricted profile with restrictions placed upon our app, is to show those restrictions:
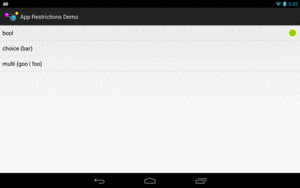
Figure 738: App Restrictions Demo, on a Restricted Profile
The primary user of a tablet, when setting up a restricted profile, can control what apps are available to that profile. In many cases, if the user is setting up a restricted profile in the first place, the list of apps available to that profile will be fairly limited, such as only allowing a young child to access a few games and educational apps.
startActivity() always has the chance of throwing an ActivityNotFoundException.
However, for certain Intent actions, we often ignore this possibility,
because we are certain that there will be an app that can handle our request:
Now, with restricted profiles, you will need to deal with the
ActivityNotFoundException case all of the time. You have three basic
approaches for this:
startActivity() and startActivityForResult() calls in
a try/catch block that catches ActivityNotFoundException and
intelligently handle the problemPackageManager and resolveActivity() before trying to start
the activity, where if resolveActivity() returns null, you know that
there is no activity available to handle your desired operationstartActivity() and startActivityForResult() calls
for implementations in your app (e.g., embed Maps V2 rather than
try to launch a potentially-nonexistent activity)You might consider implementing a safeStartActivity() utility method
that wraps up your particular plan, so you can debug it once.