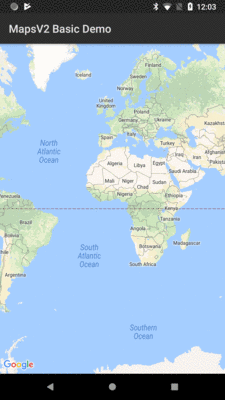
Figure 560: Maps V2 Map, as Initially Viewed
One of Google’s most popular services — after search, of course – is Google Maps, where you can find everything from the nearest pizza parlor to directions from New York City to San Francisco (only 2,905 miles!) to street views and satellite imagery.
Android has had mapping capability from the beginning, with an API available to us as developers to bake maps into our apps. However, as we will see shortly, that original API was getting a bit stale.
In December 2012, Google released a long-awaited update to the mapping capabilities available to Android app developers. The original mapping solution, now known as the Maps V1, worked but had serious limitations. The new mapping solution, known as Maps V2, offers greater power and greater ease of handling common situations, though it too has its rough edges.
Understanding this chapter requires that you have read the core chapters, along with the chapter on drawables. Also, one of the samples involves location tracking, and another of the samples involves the use of the animator framework.
One section involves the use of Picasso, covered in the chapter on Internet access.
This chapter also makes the occasional reference back to Maps V1 for comparisons, mostly for the benefit of developers already familiar with Maps V1 and looking to migrate to Maps V2. However, prior experience with Maps V1 is not necessary to understand this chapter.
Back in the dawn of Android, we were given the Maps SDK add-on. This would allow
us to load a firmware-hosted mapping library into our applications, then embed
maps into our activities, by means of a MapView widget.
And it worked.
More importantly, from the standpoint of users, the results from our apps were visually indistinguishable from the built-in Maps application available on devices that had the Maps SDK add-on.
This was the case through most of 2009. Eventually, though, the Google Maps team wanted to update the Maps application… but, for whatever reason, the decision was made to not update the Maps SDK add-on as well. At this point, the Google Maps team effectively forked the Maps SDK add-on, causing the Maps application to diverge from what other Android app developers could deliver. Over time, this feature gap became quite pronounced.
The release of Android 3.0 in early 2011 compounded the problems. Now, we needed to consider using fragments to help manage our code and deliver solutions to all screen sizes. Alas, while we could add maps to our fragments, we could only do so on API Level 11 or higher — the fragments backport from the Android Support package did not work with the Maps SDK add-on.
The release of Maps V2 helped all of this significantly. Now we have proper map support for native and backported versions of the fragment framework. We also have a look and feel that is closer to what the Maps application itself supports. While we still cannot reach feature parity with the Maps application, our SDK apps can at least look like they belong on the same device as the Maps application.
More importantly, as of the time of this writing, Maps V1 is no longer an option for new developers. Those who already have Maps V1 API keys can use Maps V1, but no new Maps V1 API keys are being offered. That leaves you with either using Maps V2 or some alternative mapping solution.
Many devices will be able to use Maps V2… but not all. Notably:
Later in this chapter, we will look at other mapping libraries that you could use instead of either of Google’s mapping solutions.
As with the original Maps SDK add-on, to use Maps V2, you must agree to a terms of service agreement to be authorized to embed Google Maps within your application. If you intend to use Maps V2, you should review these terms closely, as they place many restrictions on developers. The most notorious of these is that you cannot use Maps V2 to create an application that offers “real time navigation or route guidance, including but not limited to turn-by-turn route guidance that is synchronized to the position of a user’s sensor-enabled device.”
If you find these terms to be an issue for your application, you may need to consider alternative mapping solutions.
If you wish to use Maps V2 in one or more of your Android applications, this section will outline what you need to get started.
As with the legacy Maps SDK add-on, you will need fingerprints of your app signing keys, to tie your apps to your Google account and the API keys you will be generating. However, unlike the legacy Maps SDK add-on, the fingerprints you will be using will be created using the SHA-1 hash algorithm, rather than MD5.
First, you will need to know where the keystore is for your signing key. For a production keystore that you created yourself for your production apps, you should know where it is located already. For the debug keystore, used by default during development, the location is dependent upon operating system:
~/.android/debug.keystore
C:\Documents and Settings\$USER\.android\debug.keystore
C:\Users\$USER\.android\debug.keystore
(where $USER is your Windows user name)
You will then need to run the keytool command, to dump information related
to this keystore. The keytool command is in your Java SDK, not the Android
SDK. You will need to run this from a command line (e.g., Command Prompt in
Windows). The specific command to run is:
keytool -list -v -keystore ... -alias androiddebugkey -storepass android -keypass android
where the ... is replaced by the path to your debug keystore, enclosed in quotation
marks if the path contains spaces. For your production keystore, you would supply
your own alias and passwords.
This should emit output akin to:
Alias name: androiddebugkey
Creation date: Aug 7, 2011
Entry type: PrivateKeyEntry
Certificate chain length: 1
Certificate<1>:
Owner: CN=Android Debug, O=Android, C=US
Issuer: CN=Android Debug, O=Android, C=US
Serial number: 4e3f2684
Valid from: Sun Aug 07 19:57:56 EDT 2011 until: Tue Jul 30 19:57:56 EDT 2041
Certificate fingerprints:
   MD5:  98:84:0E:36:F0:B3:48:9C:CD:13:EB:C6:D8:7F:F3:B1
   SHA1: E6:C5:81:EB:8A:F4:35:B0:04:84:3E:6E:C3:88:BD:B2:66:52:E7:09
   Signature algorithm name: SHA1withRSA
   Version: 3
You will need to make note of the SHA1 entry (see third line from the bottom
of the above sample).
To sign up for an API key, you need a Google account. Ideally, this account would be the same one you intend to use for submitting apps to the Play Store (if, indeed, you intend to do so).
Given that you are logged into the aforementioned Google account, you can visit the Google Cloud Console to request access to the Maps V2 API. They have a tendency to keep changing this set of pages, but these instructions were good as of late February 2014:
This will give you an “API key” that you will need for your application.
If you wish to have more than one app use Maps V2, you can click “Edit allowed Android applications” for a key, to return to the dialog where you can paste in another SHA1 fingerprint and package name, separated by a semicolon. Or, if you prefer, you can create new keys for each application.
For apps that are in (or going to) production, you will need to supply both the debug and production SHA1 fingerprints with your package name. By doing this on the same key, you will use the same API key string for both debug and production builds, which simplifies things a fair bit over the separate API keys you would have used with the legacy Maps SDK add-on.
Also note that a single API key seems to only support a few fingerprint/package pairs. If you try adding a new pair, and the form ignores you, you will need to set up a separate API key for additional pairs.
You also need to set up the Google Play Services library for use with your app.
While this used to be published via a separate “Google Repository” that you had
to download to your development machine, nowadays, it is part of Google’s overall
public Maven repository, the one that google() points to in your build.gradle
files. Most likely, your project is already set up to use this repository.
If so, all you need to do is add
a dependency on com.google.android.gms:play-services-maps for some likely version
(e.g., com.google.android.gms:play-services-maps:15.0.1) to your dependencies
closure.
Note, though, that starting with version 10.x, the minSdkVersion imposed
by the Play Services libraries is 14. If your desired minSdkVersion
is lower than that, you will need to remain on older versions of the Play
Services libraries.
If you wish to try to run the book samples outlined in this chapter, you will need to replace the Maps V2 API key in the manifest with your own.
With that preparation work completed, now you can start working on projects that
use the Maps V2 API. In this section, we will review the
MapsV2/Basic
sample project, which simply brings up a Maps V2 map of the world.
Android Studio
users need an entry in their top-level dependencies closure
to pull in the Play Services SDK artifact:
dependencies {
    implementation 'com.android.support:support-v4:27.1.1'
    implementation 'com.google.android.gms:play-services-maps:15.0.1'
}
This project uses Maps V2, and so it has a reference to that library project.
Our manifest file is fairly traditional, though there are a number of elements in it that are required by Maps V2:
<?xml version="1.0" encoding="utf-8"?>
<manifest package="com.commonsware.android.mapsv2.basic"
  xmlns:android="http://schemas.android.com/apk/res/android"
  android:versionCode="1"
  android:versionName="1.0">

  <uses-permission
    android:name="android.permission.WRITE_EXTERNAL_STORAGE"
    android:maxSdkVersion="22" />

  <uses-feature
    android:glEsVersion="0x00020000"
    android:required="false" />

  <application
    android:allowBackup="false"
    android:icon="@drawable/ic_launcher"
    android:label="@string/app_name">
    <activity
      android:name="MainActivity"
      android:label="@string/app_name">
      <intent-filter>
        <action android:name="android.intent.action.MAIN" />

        <category android:name="android.intent.category.LAUNCHER" />
      </intent-filter>
    </activity>

    <meta-data
      android:name="com.google.android.maps.v2.API_KEY"
      android:value="AIzaSyC4iyT46cB00IdKGcy5EmAxK5uCOQX2Oy8" />

    <meta-data
      android:name="com.google.android.gms.version"
      android:value="@integer/google_play_services_version" />

  </application>

</manifest>
Specifically:
WRITE_EXTERNAL_STORAGE
permissions, but only on Android 5.1 and below, so we can
use android:maxSdkVersion="22" to only request that permission on older devices<meta-data> element, with a name of com.google.android.maps.v2.API_KEY,
whose value is the API key we got from the Google APIs Console for use with
this particular package name.<meta-data> element, with a name of com.google.android.gms.version,
with a value of the @integer/google_play_services_version (an integer resource
supplied by the Play Services SDK library project). Starting with version
8.1.0 of the Maps V2 library, this element is not essential, as it will
be added automatically to our manifest via
the manifest merger process. However, code written
for older versions of Maps V2 than 8.1.0 will need the element, and there
is no particular harm in having it.We also should include a <uses-feature> element for OpenGL ES 2.0. If your app
absolutely must be able to run Maps V2, have android:required="true" (or
drop the android:required attribute entirely, as true is the default), which
will force devices to have OpenGL ES 2.0 to run your app. If your app will
gracefully degrade for devices incapable of running Maps V2, use
android:required="false", as is shown in the sample.
Beyond those items, everything else in this project is based on what the app
needs, more so than what Maps V2 needs. Note, though, that the Play Services
SDK library project will add additional items to our manifest, notably requests
for a few other permissions, like INTERNET.
Also note that we used to need to define and use a custom permission, based upon our app’s
package name and ending in MAPS_RECEIVE. This is not required as of
Play Services 3.1.59 and the “rev 8” release of the Play Services SDK.
In the fullness of time, all devices that are capable of using Maps V2 will already have the on-device portion of this logic, known as the “Google Play services” app.
However, it is entirely possible, in the short term, that you will encounter devices that are capable of using Maps V2 (e.g., they have OpenGL ES 2.0 or higher), but do not have the “Google Play services” app from the Play Store, and therefore you cannot actually use Maps V2 in your app.
This is a departure from the Maps V1 approach, where either the device shipped with maps capability, or it did not, and nothing (legally) could be done to change that state.
To determine whether or not the Maps V2 API is available to you, the best option
is to call the isGooglePlayServicesAvailable() static method on the
GooglePlayServicesUtil utility class supplied by the Play Services library.
This will return an int, with a value of ConnectionResult.SUCCESS if
Maps V2 can be used right away.
Actually assisting the user to get Maps V2 set up all the way is conceivable
but is also bug-riddled and annoying. The MapsV2/Basic sample app has an
AbstractMapActivity base class that is designed to hide most of this annoyance
from you. If you wish to know the details of how this works, we will cover
it later in this chapter.
Our main activity — MainActivity — extends from the aforementioned
AbstractMapActivity and simply overrides onCreate(), as most activities do:
package com.commonsware.android.mapsv2.basic;

import android.os.Bundle;

public class MainActivity extends AbstractMapActivity {
  @Override
  protected void onCreate(Bundle savedInstanceState) {
    super.onCreate(savedInstanceState);

    if (readyToGo()) {
      setContentView(R.layout.activity_main);
    }
  }
}
We call setContentView() to load up the activity_main layout resource:
<fragment xmlns:android="http://schemas.android.com/apk/res/android"
  android:id="@+id/map"
  android:layout_width="match_parent"
  android:layout_height="match_parent"
  class="com.google.android.gms.maps.SupportMapFragment"/>
That resource, in turn, has a <fragment> element pointing to a
com.google.android.gms.maps.SupportMapFragment class supplied by the Play Services
library. This is a fragment that knows how to display a Maps V2 map. There is a corresponding
com.google.android.gms.maps.MapFragment class based on the native Fragment
class.
You will notice, though, that we only call setContentView() if a readyToGo()
method returns true. The readyToGo() method is supplied by the
AbstractMapActivity class and returns true if we are safe to go ahead
and use Maps V2, false otherwise. In the false case, AbstractMapActivity
will be taking care of trying to get Maps V2 going, and we need do nothing
further.
When you run the app, assuming that Maps V2 is ready for use, you will get a basic map showing a good-sized chunk of the planet:
Figure 560: Maps V2 Map, as Initially Viewed
If your Maps V2 API key is incorrect, or you do not have this app’s package name
set up for that key in the Google APIs Console, you will get an “Authorization
failure” error message in Logcat, and you will get a blank map, akin to the
behavior seen in Maps V1 when you had an invalid android:apiKey attribute on
the MapView.
Showing a map of a good-sized chunk of the planet is nice, and it is entirely possible
that is precisely what you wanted to show the user. If, on the other hand, you
wanted to show the user something else — another location, a closer look,
etc. — you will need to further configure your map, via a GoogleMap object.
To see how this is done, take a look at the
MapsV2/NooYawk
sample application. This is a clone of MapsV2/Basic that adds in logic to
center and zoom the map over a portion of New York City.
The onCreate() method of the revised MapActivity is now a bit more
involved:
  @Override
  protected void onCreate(Bundle savedInstanceState) {
    super.onCreate(savedInstanceState);

    if (readyToGo()) {
      setContentView(R.layout.activity_main);

      SupportMapFragment mapFrag=
          (SupportMapFragment)getSupportFragmentManager().findFragmentById(R.id.map);

      if (savedInstanceState == null) {
        mapFrag.getMapAsync(this);
      }
    }
  }
After calling setContentView(), we can retrieve our SupportMapFragment
via findFragmentById(), no different than any other static fragment.
Then, if savedInstanceState is null — meaning that the activity is
not being recreated, but instead is being created from scratch — we
call getMapAsync() on the SupportMapFragment. This triggers some asynchronous
work to set up a GoogleMap object. getMapAsync() takes an implementation
of OnMapReadyCallback as a parameter. In this case, OnMapReadyCallback
is implemented on the activity itself.
That GoogleMap object will then be delivered to us in onMapReady().
Most of our work in configuring the map will be accomplished by calling methods
on this GoogleMap object:
  @Override
  public void onMapReady(GoogleMap map) {
    CameraUpdate center=
        CameraUpdateFactory.newLatLng(new LatLng(40.76793169992044,
            -73.98180484771729));
    CameraUpdate zoom=CameraUpdateFactory.zoomTo(15);

    map.moveCamera(center);
    map.animateCamera(zoom);
  }
To change where the map is centered, we can create a CameraUpdate object from
the CameraUpdateFactory (“camera” in this case referring to the position of
the user’s virtual eyes with respect to the surface of the Earth). The
newLatLng() factory method on CameraUpdateFactory will give us a CameraUpdate
object that can re-center the map over a supplied latitude and longitude.
Those coordinates are encapsulated in a LatLng object and are maintained as
decimal degrees as Java float or double values (as opposed to the Maps V1
GeoPoint, which used integer microdegrees).
To change the zoom level of the map, we need another CameraUpdate object, this
time from the zoomTo() factory method on CameraUpdateFactory. As with Maps V1,
the zoom levels start at 1 and zoom in by powers of two. As you will see, a
value of 15 gives you a nice block-level view of a city like New York City.
To actually apply these changes to the map, we have two methods on GoogleMap:
moveCamera() will perform a “smash cut” and immediately change the map based
upon the supplied CameraUpdate
animateCamera() will smoothly animate the map from its original state to the
new state supplied by the CameraUpdate
In our case, we immediately shift to the proper position, but then zoom in from the default zoom level to 15, giving us a map centered over Columbus Circle, in the southwest corner of Central Park in Manhattan:
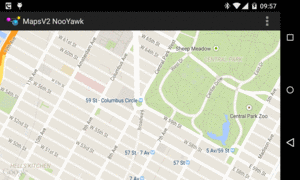
Figure 561: Maps V2 Centered Over Columbus Circle, New York City
Note that you might want to do both actions simultaneously, rather than have one
be animated and one not as in this sample. In that case, you can manually
create a CameraPosition object that describes the desired center, zoom, etc., then
use the newCameraPosition() method on CameraUpdateFactory to get a
CameraUpdate instance that will apply all of those changes.
The map, by default, shows the normal tile set. setMapType() on the
GoogleMap allows you to switch to satellite, hybrid (satellite view plus place
labels), or terrain tile sets.
For markers — push-pins and the like — you simply
hand markers to the GoogleMap for display, as is illustrated in the
MapsV2/Markers
sample application. This is a clone of MapsV2/NooYawk, with four markers for
four landmarks within Manhattan.
Our onCreate() method on MainActivity now always invokes getMapAsync(), not
just when the activity is first created. However, we still check savedInstanceState
and set a new needsInit boolean data member to true if savedInstanceState is
null:
  @Override
  protected void onCreate(Bundle savedInstanceState) {
    super.onCreate(savedInstanceState);

    if (readyToGo()) {
      setContentView(R.layout.activity_main);

      SupportMapFragment mapFrag=
          (SupportMapFragment)getSupportFragmentManager().findFragmentById(R.id.map);

      if (savedInstanceState == null) {
        needsInit=true;
      }

      mapFrag.getMapAsync(this);
    }
  }
Our onMapReady() method performs the camera adjustments if needsInit is true.
It also has four additional statements –
calls to a private addMarker() method to define the four landmarks:
  @Override
  public void onMapReady(GoogleMap map) {
    if (needsInit) {
      CameraUpdate center=
          CameraUpdateFactory.newLatLng(new LatLng(40.76793169992044,
                                                   -73.98180484771729));
      CameraUpdate zoom=CameraUpdateFactory.zoomTo(15);

      map.moveCamera(center);
      map.animateCamera(zoom);
    }

    addMarker(map, 40.748963847316034, -73.96807193756104,
              R.string.un, R.string.united_nations);
    addMarker(map, 40.76866299974387, -73.98268461227417,
        R.string.lincoln_center,
        R.string.lincoln_center_snippet);
    addMarker(map, 40.765136435316755, -73.97989511489868,
        R.string.carnegie_hall, R.string.practice_x3);
    addMarker(map, 40.70686417491799, -74.01572942733765,
        R.string.downtown_club, R.string.heisman_trophy);
  }
The addMarker() method on our MainActivity adds markers by creating a
MarkerOptions object and passing it to the addMarker() on GoogleMap.
MarkerOptions offers a so-called “fluent” interface, with a series of methods
to affect one aspect of the MarkerOptions, each of which returns the
MarkerOptions object itself. That way, configuring a MarkerOptions is a
chained series of method calls:
  private void addMarker(GoogleMap map, double lat, double lon,
                         int title, int snippet) {
    map.addMarker(new MarkerOptions().position(new LatLng(lat, lon))
                                     .title(getString(title))
                                     .snippet(getString(snippet)));
  }
Here, we:
position() of the marker, in the form of another LatLng objecttitle() and snippet() of the marker to be a pair of strings
loaded from string resourcesWe will see other methods available on MarkerOptions in upcoming sections
of this chapter.
addMarker() on GoogleMap returns an actual Marker object, which we could
hold onto to change certain aspects of it later on (e.g., its title). In the
case of this sample, we ignore this.
Now, you may be wondering why we set up the markers on every onMapReady()
invocation, not just in the needsInit block.
That is because while a SupportMapFragment retains its camera information (center,
zoom, etc.) on a configuration change, it does not retain its markers.
Hence, we need to re-establish the markers in all calls to onCreate(),
not just the very first one.
With no other changes, we get a version of the map that shows markers at our designated locations:
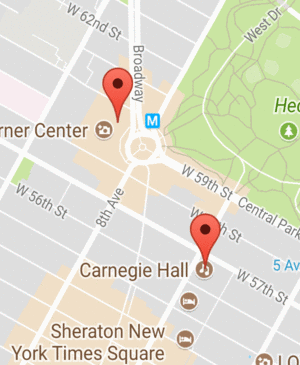
Figure 562: Maps V2 with Two Markers
Initially, we only see two markers, as the other two are outside the current center position and zoom level of the map. If the user changes the center or zoom, markers will come and go as needed:
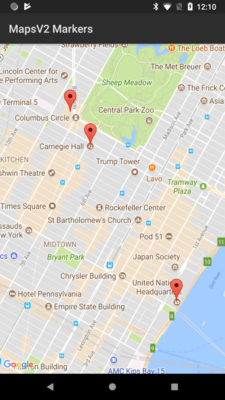
Figure 563: Maps V2 with All Four Markers
We do not need to worry about managing the markers ourselves, so long as
the GoogleMap performance is adequate. It is likely that dumping 10,000
markers into a GoogleMap will still result in sluggish responses, though,
so you may need to add and remove markers yourself based upon what portion
of the world the user happens to be examining in the map at the moment.
When you add markers to a map, there is no guarantee that the markers will be visible given the map’s current center position and zoom level. In fact, it is entirely possible that you add a bunch of markers and none are visible, so the user may not realize that the markers were added.
There is a way that you can center and zoom the map to show some set of markers, based on their positions. You get to choose the markers: all of them, the four nearest markers, etc.
We can see how this works in the
MapsV2/Bounds
sample application. This is a clone of MapsV2/Markers from the previous section,
with reworked code to show all four markers when the map is first displayed.
The key to making this work is a LatLngBounds object. This represents a bounding
box that contains all LatLng locations handed to the LatLngBounds. To build up
a LatLngBounds, you can use the LatLngBounds.Builder class. So, our revised
MainActivity has a LatLngBounds.Builder private data member:
private LatLngBounds.Builder builder=new LatLngBounds.Builder();
Our revised addMarker() method adds the LatLng values from our markers as they are
added to the map:
  private void addMarker(GoogleMap map, double lat, double lon,
                         int title, int snippet) {
    Marker marker=
        map.addMarker(new MarkerOptions().position(new LatLng(lat, lon))
                                         .title(getString(title))
                                         .snippet(getString(snippet)));

    builder.include(marker.getPosition());
  }
Finally, the revised onMapReady() moves the CameraUpdateFactory work until after all
four of the addMarker() calls and changes it a bit:
  @Override
  public void onMapReady(final GoogleMap map) {
    addMarker(map, 40.748963847316034, -73.96807193756104,
              R.string.un, R.string.united_nations);
    addMarker(map, 40.76866299974387, -73.98268461227417,
              R.string.lincoln_center,
              R.string.lincoln_center_snippet);
    addMarker(map, 40.765136435316755, -73.97989511489868,
              R.string.carnegie_hall, R.string.practice_x3);
    addMarker(map, 40.70686417491799, -74.01572942733765,
              R.string.downtown_club, R.string.heisman_trophy);

    if (needsInit) {
      findViewById(android.R.id.content).post(new Runnable() {
        @Override
        public void run() {
          CameraUpdate allTheThings=
              CameraUpdateFactory.newLatLngBounds(builder.build(), 32);

          map.moveCamera(allTheThings);
        }
      });
    }
  }
Specifically, we:
LatLngBounds.Builder to build() the LatLngBounds
newLatLngBounds() method on CameraUpdateFactory, along with an inset
value in pixels (all LatLng locations will be that many pixels in from the edges, or more)moveCamera() to center and zoom the map based upon the resulting CameraUpdate
All of this is done in a Runnable which we post() to a View (here, the FrameLayout
of our activity supplied by Android as android.R.id.content). GoogleMap cannot ensure
that all of our markers are visible until it knows how big the map is, and that is not known
until the map is rendered to the screen. post() will add our work to the end of the
main application thread’s work queue. The Runnable will not be run until after the
map is on the screen, at which time the CameraUpdate can work.
Markers, by default, appear to be “push pins” pressed into the surface of the map. This is not necessarily obvious with the default top-down perspective of the map camera. But, if you use a two-finger vertical swiping gesture, you can change the camera tilt, and that will illustrate the “push pin” effect a bit better:
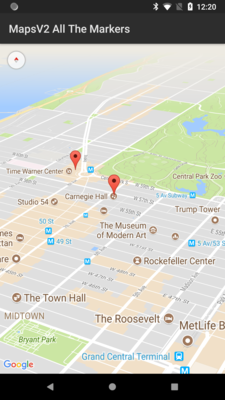
Figure 564: Maps V2 with Markers, Viewed on a Tilt
However, you have options for flat markers and rotated markers.
A flat marker is one that is flat on the map. In other words, rather than theoretically rising out of the Z axis of the map, the marker is kept on the X-Y plane:
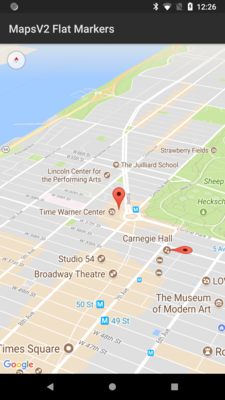
Figure 565: Maps V2 with Markers, One Normal, One Flat
It is also possible to rotate a marker. The flat marker in the previous screenshot is rotated 90 degrees from its normal “bulb on the north side” orientation. The following screenshot shows another flat marker, rotated 270 degrees from normal:

Figure 566: Maps V2 with Markers, Flat and Rotated
These features can be handy for providing pointers in a particular direction, such as indicating not only the location to make a turn, but what direction to turn at that location.
These capabilities are courtesy of flat() and rotation() methods
on MarkerOptions, plus corresponding getters and setters on Marker
itself. To see how this works, let’s examine the
MapsV2/FlatMarkers
sample application. This is a clone of MapsV2/Markers, with markers applied using
different values for flat() and rotation().
Specifically, our own addMarker() helper method now takes and applies a boolean
parameter for flat (true means it is flat, false means normal behavior), as well
as a float parameter for rotation (a value between 0 and 360 for the rotation
off the default in degrees):
  private void addMarker(GoogleMap map, double lat, double lon,
                         int title, int snippet, boolean flat,
                         float rotation) {
    map.addMarker(new MarkerOptions().position(new LatLng(lat, lon))
                                     .title(getString(title))
                                     .snippet(getString(snippet))
                                     .flat(flat).rotation(rotation));
  }
When we call addMarker(), we supply corresponding values:
    addMarker(map, 40.748963847316034, -73.96807193756104,
              R.string.un, R.string.united_nations, false, 180);
    addMarker(map, 40.76866299974387, -73.98268461227417,
              R.string.lincoln_center,
              R.string.lincoln_center_snippet, false, 0);
    addMarker(map, 40.765136435316755, -73.97989511489868,
              R.string.carnegie_hall, R.string.practice_x3, true, 90);
    addMarker(map, 40.70686417491799, -74.01572942733765,
              R.string.downtown_club, R.string.heisman_trophy, true,
              270);
If the user taps on one of the markers from the preceding sample, Android will automatically display a popup, known as an “info window”:
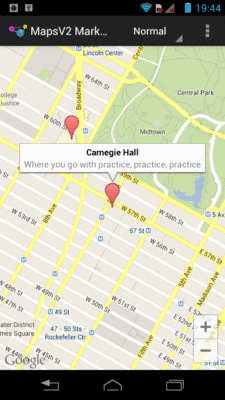
Figure 567: Maps V2 with Default Info Window
You can tailor that “info window” if desired, either replacing just the interior
portion (leaving the bounding border with its caret intact) or replacing the
entire window. However, in the interests of memory conservation, you do not
hand new View widgets to the MarkerOptions object. Instead, you can provide
an adapter that will be called when info windows (or their contents) are required.
To see how this works, we can examine the
MapsV2/Popups
sample application. This is a clone of MapsV2/Markers, where we are using our
own layout file for the contents of the info windows, from the popup.xml
layout resource:
<?xml version="1.0" encoding="utf-8"?>
<LinearLayout xmlns:android="http://schemas.android.com/apk/res/android"
  android:layout_width="match_parent"
  android:layout_height="wrap_content"
  android:orientation="horizontal">

  <ImageView
    android:id="@+id/icon"
    android:layout_width="wrap_content"
    android:layout_height="wrap_content"
    android:layout_gravity="center_vertical"
    android:padding="2dip"
    android:src="@drawable/ic_launcher"
    android:contentDescription="@string/icon"/>

  <LinearLayout
    android:layout_width="match_parent"
    android:layout_height="wrap_content"
    android:orientation="vertical">

    <TextView
      android:id="@+id/title"
      android:layout_width="wrap_content"
      android:layout_height="wrap_content"
      android:textSize="25sp"
      android:textStyle="bold"/>

    <TextView
      android:id="@+id/snippet"
      android:layout_width="wrap_content"
      android:layout_height="wrap_content"
      android:textSize="15sp"/>
  </LinearLayout>

</LinearLayout>
Here, we will show the title and snippet in our own chosen font size and weight, plus show the launcher icon on the left.
To use this layout, we must create an InfoWindowAdapter implementation — in the
case of this sample project, that is found in the PopupAdapter class:
package com.commonsware.android.mapsv2.popups;

import android.annotation.SuppressLint;
import android.view.LayoutInflater;
import android.view.View;
import android.widget.TextView;
import com.google.android.gms.maps.GoogleMap.InfoWindowAdapter;
import com.google.android.gms.maps.model.Marker;

class PopupAdapter implements InfoWindowAdapter {
  private View popup=null;
  private LayoutInflater inflater=null;

  PopupAdapter(LayoutInflater inflater) {
    this.inflater=inflater;
  }

  @Override
  public View getInfoWindow(Marker marker) {
    return(null);
  }

  @SuppressLint("InflateParams")
  @Override
  public View getInfoContents(Marker marker) {
    if (popup == null) {
      popup=inflater.inflate(R.layout.popup, null);
    }

    TextView tv=(TextView)popup.findViewById(R.id.title);

    tv.setText(marker.getTitle());
    tv=(TextView)popup.findViewById(R.id.snippet);
    tv.setText(marker.getSnippet());

    return(popup);
  }
}When an info window is to be displayed, Android will first call getInfoWindow()
on our InfoWindowAdapter, passing in the Marker whose info window is needed.
If we return a View here, that will be used for the entire info window. If,
instead, we return null, Android will call getInfoContents(), passing in the
same Marker object. If we return a View here, Android will use that as the
“body” of the info window, with Android supplying the border. If we return
null, the default info window is displayed. This way, we can conditionally
do any of the three possibilities (replace the window, replace the contents,
or accept the default).
In our case, getInfoContents() will inflate the popup.xml layout and
populate the two TextView widgets with the title and snippet from the Marker.
However, we cache the inflated layout and reuse it on the second and subsequent
calls to getInfoContents(). Despite
the “adapter” name conjuring up visions of ListAdapter and having multiple
outstanding views, InfoWindowAdapter will only ever use one View at a time.
Hence, rather than inflate our layout each time we need to show the info
window, we can safely reuse the previously-used View.
Then, we just need to tell the GoogleMap to use our InfoWindowAdapter,
via a call to setInfoWindowAdapter(), such as this statement from onMapReady()
of our new edition of MainActivity:
map.setInfoWindowAdapter(new PopupAdapter(getLayoutInflater()));
Now, when the user taps on a marker, they will get our customized info window:
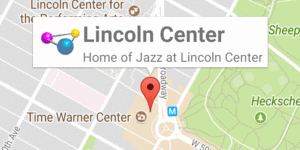
Figure 568: Maps V2 with Customized Info Window
We can also call setOnInfoWindowClickListener() on our GoogleMap, passing in
an implementation of the OnInfoWindowClickListener interface, to find out when
the user taps on the info window. In the case of MainActivity, we set up the
activity itself to implement that interface and be the listener:
map.setOnInfoWindowClickListener(this);
This requires us to implement an onInfoWindowClick() method, where we are
passed the Marker representing the tapped-upon info window:
  @Override
  public void onInfoWindowClick(Marker marker) {
    Toast.makeText(this, marker.getTitle(), Toast.LENGTH_LONG).show();
  }
Here, we just display a Toast with the title of the Marker when the user
taps an info window:
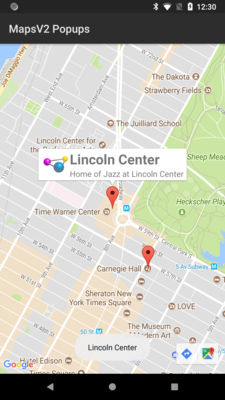
Figure 569: Maps V2 with Toast Triggered by Tap on Info Window
Note that, according to the documentation, you can only find out about taps on
the entire info window. Indeed, if you try setting up click listeners on the
widgets in your custom layout, you will find that they are not called. This is
because the View you return for the info window is converted into a Bitmap,
which is then displayed. Presumably,
this is to steer developers in the direction of making larger tap targets,
rather than expecting users to tap tiny elements within an info window. On the
other hand, if your design calls for a large info window containing several
navigation options, you will need to either re-think your design or avoid
the info window system. We will see how to find out about taps on markers
more directly later in this chapter.
The Bitmap approach that Maps V2 uses for the info window introduces an additional
challenge: updating the info window itself. Normally, we would just update the
individual widgets in the info window, the way we might update widgets in an already-visible
row in a ListView. However, that is not an option here, as our widgets are discarded
almost immediately.
One particular occurrence of this problem comes when you want to show an image
in the info window. If the image is a resource, or is already in memory, showing
it is not a big problem, as you can just populate your ImageView in your info window
with it. However, if the image is a file (or, worse, needs to be downloaded), you want
to load the image asynchronously. However, if you kick off some background thread, like
an AsyncTask, to retrieve the image, you will return from your InfoWindowAdapter
method long before the task is complete. Your info window will show whatever placeholder
image you used; the image you loaded will never be seen, even if you update your
original ImageView.
There are two solutions to this problem.
The best solution, by far, is to have the images before you need them, wherever possible. For example, if you are showing a map with 25 markers, for which you need 25 thumbnail images, start downloading those images while you are showing the map. With luck, at the point in time when the user taps on a marker to show the info window, you will have your image already.
However, this approach will not work well if:
The workaround is to make note of the Marker the user tapped upon to open its info
window, then call showInfoWindow() on that Marker to cause the info window to be
redisplayed once you have your image, triggering calls to your InfoWindowAdapter.
There, you can see that your image cache includes the image that you need, and you can
apply it to the info window.
The problem here is that it is possible that the user tapped on another marker, after
the first one, while you were busily fetching and loading the image. Hence, rather
than blindly calling showInfoWindow() on the Marker, you should call isInfoWindowShown()
first, and only call showInfoWindow() to force the refresh if isInfoWindowShown()
returns true. Otherwise, some other marker’s info window is shown. The user is
not expecting this earlier info window to somehow magically reappear.
All of this is a pain. It can be made a bit less of a pain by use of an image
fetching-and-caching library like Picasso. We can see how this
can be applied by looking at the
MapsV2/ImagePopups
sample application. This is a clone of MapsV2/Popups, with some additions to handle
lazy-populating an info window based upon a downloaded image.
First, since we are going to be generating some thumbnails based on downloaded imagery, it
helps to establish a fixed-size ImageView for our icon. So, this project has a pair of
dimension resources, for the image height and width:
<?xml version="1.0" encoding="utf-8"?>
<resources>
    <dimen name="icon_width">96dp</dimen>
    <dimen name="icon_height">64dp</dimen>

</resources>
Those are then used in a revised version of the popup layout resource:
<?xml version="1.0" encoding="utf-8"?>
<LinearLayout xmlns:android="http://schemas.android.com/apk/res/android"
  android:layout_width="match_parent"
  android:layout_height="wrap_content"
  android:orientation="horizontal">

  <ImageView
    android:id="@+id/icon"
    android:layout_width="@dimen/icon_width"
    android:layout_height="@dimen/icon_height"
    android:padding="2dip"
    android:src="@drawable/ic_launcher"
    android:contentDescription="@string/icon"/>

  <LinearLayout
    android:layout_width="match_parent"
    android:layout_height="wrap_content"
    android:layout_gravity="center_vertical"
    android:orientation="vertical">

    <TextView
      android:id="@+id/title"
      android:layout_width="wrap_content"
      android:layout_height="wrap_content"
      android:textSize="25sp"
      android:textStyle="bold"/>

    <TextView
      android:id="@+id/snippet"
      android:layout_width="wrap_content"
      android:layout_height="wrap_content"
      android:textSize="15sp"/>
  </LinearLayout>

</LinearLayout>
We need some way of keeping track of what images should be used for each marker. This is
somewhat annoying to implement, as we cannot subclass Marker, since it is marked as final
and cannot be extended. However, we can use getId() on a Marker to obtain a unique ID,
and we can use that as the key to additional model data. We will examine variations on this
technique later in this chapter. For now, this sample gets away with
a simple HashMap, mapping the string ID of a Marker to a Uri representing an image
to be shown for that Marker’s info window:
private HashMap<String, Uri> images=new HashMap<String, Uri>();
Our private addMarker() method now takes a String name of an image, and it
adds a Uri pointing to that image to the HashMap, keyed by the ID of the generated
Marker:
  private void addMarker(GoogleMap map, double lat, double lon,
                         int title, int snippet, String image) {
    Marker marker=
        map.addMarker(new MarkerOptions().position(new LatLng(lat, lon))
                                         .title(getString(title))
                                         .snippet(getString(snippet)));

    if (image != null) {
      images.put(marker.getId(),
                 Uri.parse("http://misc.commonsware.com/mapsv2/"
                     + image));
    }
  }
For three of our markers, we pass in actual filenames; for a fourth, null is used,
indicating that there is no suitable image for use:
    addMarker(map, 40.748963847316034, -73.96807193756104,
              R.string.un, R.string.united_nations, "UN_HQ.jpg");
    addMarker(map, 40.76866299974387, -73.98268461227417,
              R.string.lincoln_center,
              R.string.lincoln_center_snippet,
              "Avery_Fisher_Hall.jpg");
    addMarker(map, 40.765136435316755, -73.97989511489868,
              R.string.carnegie_hall, R.string.practice_x3,
              "Carnegie_Hall.jpg");
    addMarker(map, 40.70686417491799, -74.01572942733765,
              R.string.downtown_club, R.string.heisman_trophy, null);
Note that the three images being used in this chapter come from Wikipedia. One is public domain, the others are licensed under the Creative Commons Attribution 1.0 license. Those two are a picture of Avery Fisher Hall, part of the Lincoln Center for the Performing Arts (courtesy of Geographer) and the other is a picture of the United Nations building (courtesy of WorldIslandInfo).
The PopupAdapter needs access to these images. It will also need access to a Context,
for use with Picasso. So, PopupAdapter now has data members for these, which are passed
into a revised version of its constructor by MainActivity. That constructor not only
holds onto the new objects, but it retrieves the values of the dimension resources for our
images, converted by Android into pixels for the screen density of the device that we
are running on:
  PopupAdapter(Context ctxt, LayoutInflater inflater,
               HashMap<String, Uri> images) {
    this.ctxt=ctxt;
    this.inflater=inflater;
    this.images=images;

    iconWidth=
        ctxt.getResources().getDimensionPixelSize(R.dimen.icon_width);
    iconHeight=
        ctxt.getResources().getDimensionPixelSize(R.dimen.icon_height);
  }
The revised getInfoContents() method is significantly more complicated than was its
predecessor:
  @SuppressLint("InflateParams")
  @Override
  public View getInfoContents(Marker marker) {
    if (popup == null) {
      popup=inflater.inflate(R.layout.popup, null);
    }

    if (lastMarker == null
        || !lastMarker.getId().equals(marker.getId())) {
      lastMarker=marker;

      TextView tv=(TextView)popup.findViewById(R.id.title);

      tv.setText(marker.getTitle());
      tv=(TextView)popup.findViewById(R.id.snippet);
      tv.setText(marker.getSnippet());

      Uri image=images.get(marker.getId());
      ImageView icon=(ImageView)popup.findViewById(R.id.icon);

      if (image == null) {
        icon.setVisibility(View.GONE);
      }
      else {
        icon.setVisibility(View.VISIBLE);
        Picasso.with(ctxt).load(image).resize(iconWidth, iconHeight)
               .centerCrop().noFade()
               .placeholder(R.drawable.placeholder)
               .into(icon, new MarkerCallback(marker));
      }
    }

    return(popup);
  }
We track the last Marker that we have processed in a lastMarker data member. Initially,
of course, that will be null. If it is, or if the Marker passed into getInfoContents()
is a different one (based on the getId() value), then we populate the popup View. This
includes fetching the Uri
from the HashMap of Uri values (given the Marker ID). If there is no Uri, getInfoContents() marks
the ImageView as GONE, so it will not take up space in the popup. If, however, there is an image Uri, getInfoContents() asks Picasso to “do its thing”:
Uri
ImageView, center-cropping to
keep the right aspect ratioImageView (as the Maps V2 Bitmap is generated before the animation completes, resulting
in a washed-out image)placeholder drawable resource while the image is loadingImageView with the results, specifying a MarkerCallback to be notified
of the resultsMarkerCallback, as an implementation of Picasso’s Callback interface, needs onError()
and onSuccess() methods. onError() just dumps a message to Logcat, while onSuccess()
refreshes the info window, via a call to showInfoWindow() on the Marker, if that
info window is still showing:
  static class MarkerCallback implements Callback {
    Marker marker=null;

    MarkerCallback(Marker marker) {
      this.marker=marker;
    }

    @Override
    public void onError() {
      Log.e(getClass().getSimpleName(), "Error loading thumbnail!");
    }

    @Override
    public void onSuccess() {
      if (marker != null && marker.isInfoWindowShown()) {
        marker.showInfoWindow();
      }
    }
  }
If you run this sample app, you will see the popup with a placeholder image at first, quickly being replaced by the thumbnail supplied by Picasso:
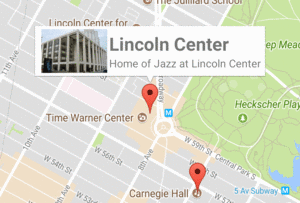
Figure 570: Maps V2 with Popup and Thumbnail
Maps V2 includes a stock marker icon that looks a lot like the standard Google Maps marker. You have three major choices for what to use for your own markers:
Bitmap
To indicate that you want a different icon than the stock one, use the icon()
method on the MarkerOptions fluent interface. This takes a BitmapDescriptor,
which you get from one of a series of static methods on the
BitmapDescriptorFactory class.
For example, you might have a revised version of the addMarker() method
of MainActivity that took a hue — a value from 0 to 360 representing
different colors along a color wheel. 0 represents red, 120 represents green,
and 240 represents blue, with different shades in between. There is a series
of HUE_ constants defined on BitmapDescriptorFactory, plus a defaultMarker()
method that takes a hue as a parameter and returns a BitmapDescriptor that
will use the stock icon, colored to the specified hue:
  private void addMarker(GoogleMap map, double lat, double lon,
                         int title, int snippet, int hue) {
    map.addMarker(new MarkerOptions().position(new LatLng(lat, lon))
                                     .title(getString(title))
                                     .snippet(getString(snippet))
                                     .icon(BitmapDescriptorFactory.defaultMarker(hue)));
  }
This could then be used to give you different colors per marker, or by category of marker, etc.:
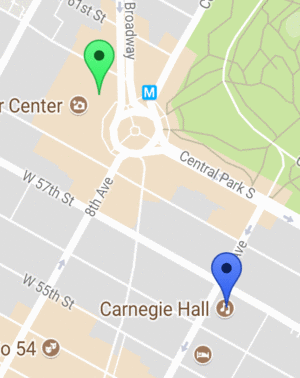
Figure 571: Maps V2 with Alternate Marker Hues
Note that you can modify the icon at runtime via the setIcon() method on
the Marker returned by addMarker() method on GoogleMap.
However, you cannot draw the marker directly yourself, the way you might have with
Maps V1. What you can do is draw to a Bitmap-backed Canvas object, then
use the resulting Bitmap with BitmapFactoryDescriptor and its fromBitmap()
factory method.
Perhaps we would like to find out when a user taps on one of our markers, instead of displaying an info window. Maybe we want to have some other UI response to that tap in our app.
To do that, simply create an implementation of the OnMarkerClickListener
interface and attach it to the GoogleMap via setOnMarkerClickListener().
You will then be called with onMarkerClick() when the user taps on a marker,
and you are passed the Marker object in question. If you return true, you
are indicating that you are handling the event; returning false means that
default handling (the info window) should be done.
You can see this, plus the multi-colored markers, in the
MapsV2/Taps
sample application. This takes MapsV2/Popups and adds a Toast when the
user taps a marker, in addition to displaying the info window:
  @Override
  public boolean onMarkerClick(Marker marker) {
    Toast.makeText(this, marker.getTitle(), Toast.LENGTH_LONG).show();

    return(false);
  }
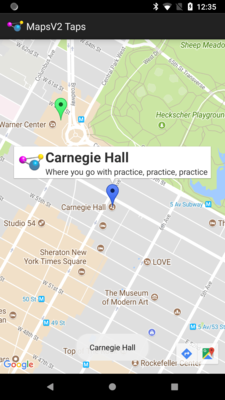
Figure 572: Maps V2 with Toast and Info Window
Our call to setOnMarkerClickListener() is up in the onMapReady() method of
MainActivity:
map.setOnMarkerClickListener(this);
By default, markers are not draggable. But, if you call draggable(true) on
your MarkerOptions when creating the marker — or call setDraggable(true)
on the Marker later on — Android will automatically support drag-and-drop.
The user can tap-and-hold on the marker to enable drag mode, then slide
the marker around the map.
Note that at the present time, this functionality is a little odd. When you tap-and-hold the marker, with drag mode enabled, the marker initially jumps away from its original position. The user can reposition the marker to any desired location, and the marker will seem to “drop” where the user requests. Why the marker makes the sudden shift at the outset, using the default marker settings, is unclear.
Of course, your code may need to know about drag-and-drop events, such as to
update your own data model to reflect the newly-chosen location. You can register
an OnMarkerDragListener that will be notified of the start of the drag,
where the marker slides during the drag, and where the marker is dropped at the
end of the drag.
You can see all of this in the
MapsV2/Drag
sample application, which is a clone of MapsV2/Popup with drag-and-drop
enabled.
To enable drag-and-drop, we just chain draggable(true) onto the series of
calls on our MarkerOptions when creating the markers:
  private void addMarker(GoogleMap map, double lat, double lon,
                         int title, int snippet) {
    map.addMarker(new MarkerOptions().position(new LatLng(lat, lon))
                                     .title(getString(title))
                                     .snippet(getString(snippet))
                                     .draggable(true));
  }
We also register MainActivity as being the drag listener, up in onMapReady():
map.setOnMarkerDragListener(this);
That requires MainActivity to implement OnMarkerDragListener, which in turn
requires three methods to be defined: onMarkerDragStart(), onMarkerDrag(),
and onMarkerDragEnd():
  @Override
  public void onMarkerDragStart(Marker marker) {
    LatLng position=marker.getPosition();

    Log.d(getClass().getSimpleName(), String.format("Drag from %f:%f",
                                                    position.latitude,
                                                    position.longitude));
  }

  @Override
  public void onMarkerDrag(Marker marker) {
    LatLng position=marker.getPosition();

    Log.d(getClass().getSimpleName(),
          String.format("Dragging to %f:%f", position.latitude,
                        position.longitude));
  }

  @Override
  public void onMarkerDragEnd(Marker marker) {
    LatLng position=marker.getPosition();

    Log.d(getClass().getSimpleName(), String.format("Dragged to %f:%f",
        position.latitude,
        position.longitude));
  }
Here, we just dump the information about the new marker position in Logcat.
So, if you run this app and drag-and-drop a marker, you will see output in Logcat akin to:
12-19 13:10:36.442: D/MainActivity(22510): Drag from 40.770876:-73.982499
12-19 13:10:36.892: D/MainActivity(22510): Dragging to 40.770876:-73.981593
12-19 13:10:36.912: D/MainActivity(22510): Dragging to 40.770795:-73.981352
12-19 13:10:36.932: D/MainActivity(22510): Dragging to 40.770754:-73.981141
.
.
.
12-19 13:10:38.292: D/MainActivity(22510): Dragging to 40.769596:-73.983615
12-19 13:10:38.372: D/MainActivity(22510): Dragged to 40.769596:-73.983615
The actual list of events was much longer, as onMarkerDrag() is called a lot,
so the ... in the Logcat entries above reflect another 50 or so lines for a
drag-and-drop that took a couple of seconds.
Also, up in onCreate(), we retain our SupportMapFragment across configuration
changes via setRetainInstance(true):
mapFrag.setRetainInstance(true);
Retaining the fragment instance causes the fragment to keep our markers in their moved positions, rather than resetting them to their original positions.
In Maps V2, not only do you not create Marker objects directly yourself, but
Marker is marked as final and cannot be extended. Hence, you cannot
use a Marker directly to hold model data.
However, Marker does have getId(), an immutable identifier for the
Marker. We can use that as a key for a HashMap that allows us to get at
additional model data associated with the Marker.
You can see this approach in the
MapsV2/Models
sample application, which is a clone of MapsV2/Popup where we use the ID
in just this fashion.
Our simplified model is merely the data we poured into our Marker objects
in the original MapsV2/Popup project:
package com.commonsware.android.mapsv2.model;

import android.content.Context;

public class Model {
  String title;
  String snippet;
  double lat;
  double lon;

  Model(Context ctxt, double lat, double lon, int title,
        int snippet) {
    this.title=ctxt.getString(title);
    this.snippet=ctxt.getString(snippet);
    this.lat=lat;
    this.lon=lon;
  }

  String getTitle() {
    return(title);
  }

  String getSnippet() {
    return(snippet);
  }

  double getLatitude() {
    return(lat);
  }

  double getLongitude() {
    return(lon);
  }
}
Our activity holds onto a HashMap of these Model objects, with the
map keyed by the Marker ID (a String):
private HashMap<String, Model> models=new HashMap<String, Model>();
Of course, a real application would have a much more elaborate setup than this.
We then arrange to populate our map with Marker objects created from our
Model objects, moving the add-the-markers-to-the-map logic to an addMarkers() method:
  private void addMarkers(GoogleMap map) {
    Model model=
        new Model(this, 40.748963847316034, -73.96807193756104,
                  R.string.un, R.string.united_nations);

    models.put(addMarkerForModel(map, model).getId(), model);

    model=
        new Model(this, 40.76866299974387, -73.98268461227417,
                  R.string.lincoln_center,
                  R.string.lincoln_center_snippet);
    models.put(addMarkerForModel(map, model).getId(), model);

    model=
        new Model(this, 40.765136435316755, -73.97989511489868,
                  R.string.carnegie_hall, R.string.practice_x3);
    models.put(addMarkerForModel(map, model).getId(), model);

    model=
        new Model(this, 40.70686417491799, -74.01572942733765,
                  R.string.downtown_club, R.string.heisman_trophy);
    models.put(addMarkerForModel(map, model).getId(), model);
  }

  private Marker addMarkerForModel(GoogleMap map, Model model) {
    LatLng position=
        new LatLng(model.getLatitude(), model.getLongitude());

    return(map.addMarker(new MarkerOptions().position(position)
                                            .title(model.getTitle())
                                            .snippet(model.getSnippet())));

  }
Notice that addMarkerForModel() returns the Marker, and we use getId() on that
Marker as the key when adding a Model to the HashMap.
Our PopupAdapter gets the data for the info window
from the Model (though, in truth, in this case, it could have gotten
the data from the Marker itself, since we did not add more information
to the info window):
package com.commonsware.android.mapsv2.model;

import android.view.LayoutInflater;
import android.view.View;
import android.widget.TextView;
import java.util.HashMap;
import com.google.android.gms.maps.GoogleMap.InfoWindowAdapter;
import com.google.android.gms.maps.model.Marker;

class PopupAdapter implements InfoWindowAdapter {
  LayoutInflater inflater=null;
  HashMap<String, Model> models=null;

  PopupAdapter(LayoutInflater inflater, HashMap<String, Model> models) {
    this.inflater=inflater;
    this.models=models;
  }

  @Override
  public View getInfoWindow(Marker marker) {
    return(null);
  }

  @Override
  public View getInfoContents(Marker marker) {
    View popup=inflater.inflate(R.layout.popup, null);

    TextView tv=(TextView)popup.findViewById(R.id.title);

    tv.setText(models.get(marker.getId()).getTitle());
    tv=(TextView)popup.findViewById(R.id.snippet);
    tv.setText(models.get(marker.getId()).getSnippet());

    return(popup);
  }
}Visually, this is indistinguishable from the original MapsV2/Popups project.
Of course, a real app would have more complex models, perhaps containing more
discrete information for a more complex info window.
IPC is not only a problem in terms of disappearing Marker objects.
If you run a Maps V2 app under Traceview, to see what methods
get called and how much time everything takes, you will see that many, many
operations with GoogleMap do little in your process, but instead make
synchronous calls to a Play Services process to do the real work. You
need to avoid manipulating your GoogleMap in time-sensitive
portions of your code.
It is often useful to help point out to the user their current
location. That is a matter of adding a suitable location permission (e.g.,
ACCESS_FINE_LOCATION) and calling setMyLocationEnabled(true) on your
GoogleMap. This activates a layer that will highlight their location, with
the user having an option of having the “camera” (i.e., their perspective
on the map) reposition itself to their location and move as they move.
This latter capability is activated by a small icon in the upper right of
the map.
There does not appear to be a way to force camera tracking of the user’s position — you are reliant upon the user tapping that icon. You also have no control over the nature of the location provider that is used.
However, there is a workaround for this, proposed in
a Stack Overflow answer –
provide your own location data and update the camera yourself, by means
of setLocationSource(). setLocationSource() lets you push locations
to the GoogleMap, making other adjustments (e.g., camera position) along
the way.
You can see this in operation in the
MapsV2/Location
sample application, which is based on MapsV2/Popup but with a variety of
changes to deal with location tracking. A lot of that has to do with
the runtime permissions system on Android 6.0+, as we need
permission from the user to be able to work with the device location.
onCreate() of MainActivity now looks radically different:
  @Override
  protected void onCreate(Bundle state) {
    super.onCreate(state);

    if (state==null) {
      needsInit=true;
    }
    else {
      isInPermission=state.getBoolean(STATE_IN_PERMISSION, false);
      autoFollow=state.getBoolean(STATE_AUTO_FOLLOW, true);
    }

    onCreateForRealz(canGetLocation());
  }
Most of the original business logic from onCreate() has been moved
into onCreateForRealz(). That method takes a boolean parameter,
indicating whether or not we have permission to access the user’s location.
Here, we get that from a canGetLocation() method that, in turn,
uses ContextCompat.checkSelfPermission() to see if we hold
ACCESS_FINE_LOCATION:
  private boolean canGetLocation() {
    return(ContextCompat.checkSelfPermission(this,
      Manifest.permission.ACCESS_FINE_LOCATION)==
      PackageManager.PERMISSION_GRANTED);
  }
If we can work with locations, onCreateForRealz() will do what
onCreate() used to do: call readyToGo() and, if we are ready to go,
bring up the map:
  private void onCreateForRealz(boolean canGetLocation) {
    if (canGetLocation) {
      if (readyToGo()) {
        setContentView(R.layout.activity_main);

        SupportMapFragment mapFrag=
          (SupportMapFragment)getSupportFragmentManager().findFragmentById(R.id.map);

        mapFrag.getMapAsync(this);
      }
    }
    else if (!isInPermission) {
      isInPermission=true;

      ActivityCompat.requestPermissions(this,
        new String[] {Manifest.permission.ACCESS_FINE_LOCATION},
        REQUEST_PERMS);
    }
  }
If we do not have access to the user’s location, this particular sample
app is not that interesting, so we will ask the user for permission,
via a call to ActivityCompat.requestPermissions(). This will eventually
trigger a call to onRequestPermissionsResult():
  @Override
  public void onRequestPermissionsResult(int requestCode,
                                         String[] permissions,
                                         int[] grantResults) {
    isInPermission=false;

    if (requestCode==REQUEST_PERMS) {
      if (canGetLocation()) {
        onCreateForRealz(true);
      }
      else {
        finish(); // denied permission, so we're done
      }
    }
  }
Here, if we can now get the location, we go ahead and run through
onCreateForRealz() again, to initialize the map. If, however, the
user denied us the right to access the location, we finish() and
exit the activity outright.
Throughout this code, you have seen references to an isInPermission
field. This tracks whether or not we are in the middle of requesting
a permission:
false in the activitytrue just before calling requestPermissions()
false in onRequestPermissionsResult()
onSaveInstanceState()
and is retrieved from that state in onCreate(): @Override
protected void onSaveInstanceState(Bundle outState) {
super.onSaveInstanceState(outState);
outState.putBoolean(STATE_IN_PERMISSION, isInPermission);
outState.putBoolean(STATE_AUTO_FOLLOW, autoFollow );
}
(where STATE_IN_PERMISSION is a static final String to use as a
key for the Bundle value)
This allows us to check whether or not we are in the middle of
requesting permissions already in onCreateForRealz() and avoid popping
up the permission-request dialog twice if the user rotates the screen
while the first dialog is up, then denies the permission.
The UI has a checkable overflow item in the action bar, named follow.
When checked, we will use LocationManager to move the map camera ourselves
to the user’s location. When unchecked, we will show the my-location layer,
and the user can manually jump to their current location via the button
supplied by that layer.
So, we need to keep track of whether we should be automatically following the user or not.
To that end, we have an autoFollow field, initially set to true, as the
action item checkbox initially is checked. We toggle that field as the user
checks and unchecks the item:
  @Override
  public boolean onCreateOptionsMenu(Menu menu) {
    getMenuInflater().inflate(R.menu.actions, menu);
    menu.findItem(R.id.follow).setChecked(autoFollow);

    return super.onCreateOptionsMenu(menu);
  }

  @Override
  public boolean onOptionsItemSelected(MenuItem item) {
    if (item.getItemId()==R.id.follow) {
      item.setChecked(!item.isChecked());
      autoFollow=item.isChecked();
      follow();

      return true;
    }

    return super.onOptionsItemSelected(item);
  }
We also call a follow() method to update the UI based on the user’s choice — we
will see that method shortly.
We also hold onto that autoFollow value in the saved instance state Bundle
and restore it when the activity is recreated.
Part of what we do in onMapReady() is call setMyLocationEnabled(true) on the
map, which puts a blue dot at the user’s location:
  @Override
  public void onMapReady(final GoogleMap map) {
    this.map=map;

    if (needsInit) {
      CameraUpdate center=
          CameraUpdateFactory.newLatLng(new LatLng(40.76793169992044,
                                                   -73.98180484771729));
      CameraUpdate zoom=CameraUpdateFactory.zoomTo(15);

      map.moveCamera(center);
      map.animateCamera(zoom);
    }

    addMarker(map, 40.748963847316034, -73.96807193756104,
              R.string.un, R.string.united_nations);
    addMarker(map, 40.76866299974387, -73.98268461227417,
              R.string.lincoln_center,
              R.string.lincoln_center_snippet);
    addMarker(map, 40.765136435316755, -73.97989511489868,
              R.string.carnegie_hall, R.string.practice_x3);
    addMarker(map, 40.70686417491799, -74.01572942733765,
              R.string.downtown_club, R.string.heisman_trophy);

    map.setInfoWindowAdapter(new PopupAdapter(getLayoutInflater()));
    map.setOnInfoWindowClickListener(this);

    map.setMyLocationEnabled(true);
    locMgr=(LocationManager)getSystemService(LOCATION_SERVICE);
    crit.setAccuracy(Criteria.ACCURACY_FINE);
    follow();
  }
Part of what follow() does is call setMyLocationButtonEnabled(), with a suitable
boolean value, to toggle whether the “jump to my location” button is shown:
  private void follow() {
    if (map!=null && locMgr!=null) {
      if (autoFollow) {
        locMgr.requestLocationUpdates(0L, 0.0f, crit, this, null);
        map.setLocationSource(this);
        map.getUiSettings().setMyLocationButtonEnabled(false);
      }
      else {
        map.getUiSettings().setMyLocationButtonEnabled(true);
        map.setLocationSource(null);
        locMgr.removeUpdates(this);
      }
    }
  }
The rest of follow() either starts up or stops our request for location
data using LocationManager, plus setting up our activity as being the
source of location data, using setLocationSource().
setLocationSource() takes a LocationSource implementation, and we implement
that interface on the activity itself. It therefore needs activate()
and deactivate() methods, where we can track a supplied OnLocationChangedListener
for us to use:
  @Override
  public void activate(OnLocationChangedListener listener) {
    this.mapLocationListener=listener;
  }

  @Override
  public void deactivate() {
    this.mapLocationListener=null;
  }
LocationManager will supply our location data to onLocationChanged().
There, we do two things:
OnLocationChangedListener supplied to
our LocationSource, and @Override
public void onLocationChanged(Location location) {
if (mapLocationListener != null) {
mapLocationListener.onLocationChanged(location);
LatLng latlng=
new LatLng(location.getLatitude(), location.getLongitude());
CameraUpdate cu=CameraUpdateFactory.newLatLng(latlng);
map.animateCamera(cu);
}
}
The result is that while autoFollow is true, we will find the user’s location
and use that to update the map. When autoFollow is false, we let the map
itself handle that role, including showing that “jump to my location” button.
If you wanted to draw on a map in the Maps V1 framework, you created an Overlay
and drew upon it. This forced you to handle low-level drawing work yourself, as
you were handed a Canvas object and had to handle all the lines, fills, and
so forth yourself.
Maps V2 offers a different approach. Free-form drawing is still conceivable,
though it appears to have to be handled in the form of tile overlays instead
of map overlays. However, for the simpler cases of drawing lines and areas,
Maps V2 has built-in polyline, polygon, and circle support. You tell the GoogleMap
what needs to be drawn, and it handles drawing it, both initially and as the
map is zoomed or panned. A polyline is a line connecting a series of points;
a polygon is a region defined by a series of corners. A circle, from the
standpoint of Maps V2, is defined by a center coordinate and a radius.
We can see polylines and polygons on a GoogleMap in the
MapsV2/Poly
sample application, which is a clone of MapsV2/Popup with two additions:
To draw those, we simply add a few lines to onMapReady() of MainActivity:
    PolylineOptions line=
        new PolylineOptions().add(new LatLng(40.70686417491799,
                                             -74.01572942733765),
                                  new LatLng(40.76866299974387,
                                             -73.98268461227417),
                                  new LatLng(40.765136435316755,
                                             -73.97989511489868),
                                  new LatLng(40.748963847316034,
                                             -73.96807193756104))
                             .width(5).color(Color.RED);

    map.addPolyline(line);

    PolygonOptions area=
        new PolygonOptions().add(new LatLng(40.748429, -73.984573),
                                 new LatLng(40.753393, -73.996311),
                                 new LatLng(40.758393, -73.992705),
                                 new LatLng(40.753484, -73.980882))
                            .strokeColor(Color.BLUE);

    map.addPolygon(area);
The API for adding polylines and polygons is reminiscent of the API for adding
markers: define an ...Options object with the characteristics of the item
to be drawn, then call an add...() method on GoogleMap to add the item.
So, to add a polyline, we create a PolylineOptions object. Using its fluent
interface, we add() a series of LatLng objects, representing the points
to be connected by the line. We also specify the line width in pixels via
width() and the color of the line via color(). If we had several lines that
might overlap, we could specify the zIndex(), where higher indexes indicate
lines to be drawn over the top of lines with lower indexes. We add the polyline to
the map by passing our PolylineOptions to addPolyline() on GoogleMap.
This gives us a line connecting the four markers, with GoogleMap handling
the details of where the line should be drawn on the screen given the current
map center and zoom levels:

Figure 573: Maps V2 with Polyline
Note that the polyline is drawn using a flat Mercator projection by default.
For most maps, that is perfectly fine. If your map will be showing countries
and continents, rather than city blocks, you might want to call geodesic(true)
on the PolylineOptions, to have the line drawn on a geodesic curve, reflecting
the spherical nature of the Earth (dissenting opinions on that notwithstanding).
Similarly, we create a PolygonOptions object, configure it, and pass it
to addPolygon for our Garment District box. The add() method on
PolygonOptions will take the corners of our polygon, automatically enclosing
that region. We also specify the strokeColor(). We could have specified
a fillColor() (default is transparent), strokeWidth() (default is 10 pixels),
zIndex(), and geodesic().
If we run the app and pan the map down to the south a bit, we see our polygon:
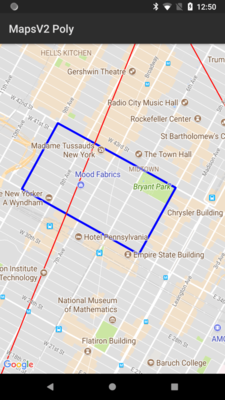
Figure 574: Maps V2 with Polyline and Polygon
As with the polyline, Android automatically handles drawing what is needed based on map center and zoom levels.
Note that, as with markers, we need to re-add the polylines and polygons after
a configuration change, as the GoogleMap does not retain that information.
By default, standard gestures and controls are enabled on your map:
You can obtain a UiSettings object from your GoogleMap via getUiSettings()
to disable these features, if desired:
setRotateGesturesEnabled()setScrollGesturesEnabled() (for panning the map)setTiltGesturesEnabled()setZoomControlsEnabled() (for the + and - buttons)setZoomGesturesEnabled() (for pinch-to-zoom)There is also setAllGesturesEnabled() to toggle on or off all gesture-based
map control. This is roughly analogous to the android:clickable attribute
on the Maps V1 edition of MapView.
There is also setCompassEnabled(), to indicate if a compass should be shown
if the user changes the map orientation via a rotate gesture.
If you have gestures enabled, the user can change the perspective of the map, referred to as changing the camera position. You may need to know about these changes, to perform various operations in your app based upon what is presently visible on the screen.
Originally, to
find out when the camera position changes, you could call setOnCameraChangeListener()
on the GoogleMap, supplying an implementation of OnCameraChangeListener, which would
be called with onCameraChange() as the user pans, zooms, or tilts the map. This
approach was deprecated and replaced with a series of listeners:
OnCameraMoveStartedListener, invoked when the user starts moving the mapOnCameraMoveListener, invoked when the user continues moving the map after
having originally started moving it, all in one gestureOnCameraIdleListener, invoked when the user stops moving the map
(e.g., lifts up their finger or stylus)OnCameraMoveCanceledListener, invoked if you do something programmatically
to interrupt the camera movementTo see how this works, we can take a quick peek at the
MapsV2/Camera
sample application, which is a clone of MapsV2/Popup with camera position tracking
enabled.
Late in onMapReady() of MainActivity, we call a series of setter methods
on the GoogleMap to associate MainActivity itself as the listener for these events:
    map.setOnCameraMoveStartedListener(this);
    map.setOnCameraMoveListener(this);
    map.setOnCameraMoveCanceledListener(this);
    map.setOnCameraIdleListener(this);
This requires MainActivity to implement all four of those listener interfaces:
public class MainActivity extends AbstractMapActivity implements
    OnMapReadyCallback, OnInfoWindowClickListener,
  OnCameraMoveStartedListener,
  OnCameraMoveListener,
  OnCameraMoveCanceledListener,
  OnCameraIdleListener {
And, this requires MainActivity to implement the callback method for
each of those listeners:
| Listener Interface | Event Method |
|---|---|
OnCameraMoveStartedListener |
onCameraMoveStarted(int i) |
OnCameraMoveListener |
onCameraMove() |
OnCameraIdleListener |
onCameraIdle() |
OnCameraMoveCanceledListener |
onCameraMoveCanceled() |
  @Override
  public void onCameraIdle() {
    CameraPosition position=map.getCameraPosition();

    Log.d("onCameraIdle",
      String.format("lat: %f, lon: %f, zoom: %f, tilt: %f",
        position.target.latitude,
        position.target.longitude, position.zoom,
        position.tilt));
  }

  @Override
  public void onCameraMoveCanceled() {
    CameraPosition position=map.getCameraPosition();

    Log.d("onCameraMoveCanceled",
      String.format("lat: %f, lon: %f, zoom: %f, tilt: %f",
        position.target.latitude,
        position.target.longitude, position.zoom,
        position.tilt));
  }

  @Override
  public void onCameraMove() {
    CameraPosition position=map.getCameraPosition();

    Log.d("onCameraMove",
      String.format("lat: %f, lon: %f, zoom: %f, tilt: %f",
        position.target.latitude,
        position.target.longitude, position.zoom,
        position.tilt));
  }

  @Override
  public void onCameraMoveStarted(int i) {
    CameraPosition position=map.getCameraPosition();

    Log.d("onCameraMoveStarted",
      String.format("lat: %f, lon: %f, zoom: %f, tilt: %f",
        position.target.latitude,
        position.target.longitude, position.zoom,
        position.tilt));
  }
Here, we just log a message to Logcat on each camera position change, logging:
target LatLng data member
of the CameraPosition object supplied to onCameraChange(),zoom data member of CameraPosition, andtilt data member of CameraPosition
As a result, if you run this app and play around with the various gestures, you get a series of Logcat messages with the results:
10-08 12:13:54.449 28718-28718/com.commonsware.android.mapsv2.camera D/onCameraMoveStarted: lat: 40.771664, lon: -73.986067, zoom: 15.000000, tilt: 0.000000
10-08 12:13:54.453 28718-28718/com.commonsware.android.mapsv2.camera D/onCameraMove: lat: 40.771773, lon: -73.985717, zoom: 15.000000, tilt: 0.000000
10-08 12:13:54.483 28718-28718/com.commonsware.android.mapsv2.camera D/onCameraMove: lat: 40.771805, lon: -73.985701, zoom: 15.000000, tilt: 0.000000
10-08 12:13:54.500 28718-28718/com.commonsware.android.mapsv2.camera D/onCameraMove: lat: 40.771843, lon: -73.985669, zoom: 15.000000, tilt: 0.000000
.
.
.
10-08 12:13:57.001 28718-28718/com.commonsware.android.mapsv2.camera D/onCameraIdle: lat: 40.774540, lon: -73.985632, zoom: 15.000000, tilt: 0.000000
Note that onCameraMoveStarted() will be invoked for three reasons:
The parameter passed into onCameraMoveStarted() will contain
a reason code (e.g., REASON_GESTURE) to help you distinguish these
cases, if that level of detail is needed by your app.
One key limitation of Maps V1 was that you could only have one MapView instance per
process. Presumably, the proprietary code at the heart of the Maps SDK add-on used
static data members for some state management, ones that would get messed up if there
were two or more MapView widgets in active use.
Fortunately, Maps V2 gets rid of this restriction. You are welcome to have multiple
SupportMapFragment objects if that makes sense. Maps are relatively memory-intensive, so you
should not be planning on having dozens or hundreds of them in use at a time, but you
can have more than one.
To showcase this, the
MapsV2/Pager
sample application hosts 10 SupportMapFragment instances as pages in a ViewPager.
The bulk of the application is a clone of one of the ViewPager samples from
the chapter on ViewPager.
Having maps in a ViewPager presents a bit of a problem, in terms of interpreting
horizontal swipe events. Normally, ViewPager handles those itself. However, that
would mean that the user cannot pan the map horizontally, which makes using the
map somewhat challenging. In this sample, we will augment the ViewPager with
logic to allow horizontal swiping on the maps and on the tab strip.
Our activity inflates a layout that contains our ViewPager along with a PagerTabStrip:
<?xml version="1.0" encoding="utf-8"?>
<com.commonsware.android.mapsv2.pager.MapAwarePager xmlns:android="http://schemas.android.com/apk/res/android"
  android:id="@+id/pager"
  android:layout_width="match_parent"
  android:layout_height="match_parent">

  <android.support.v4.view.PagerTabStrip
    android:layout_width="match_parent"
    android:layout_height="wrap_content"
    android:layout_gravity="top"/>

</com.commonsware.android.mapsv2.pager.MapAwarePager>
However, you will note that this is not ViewPager, but rather MapAwarePager,
a custom subclass of ViewPager that we will examine shortly.
MainActivity then populates the MapAwarePager with an instance of a MapPageAdapter:
package com.commonsware.android.mapsv2.pager;

import android.os.Bundle;
import android.support.v4.view.PagerAdapter;
import android.support.v4.view.ViewPager;

public class MainActivity extends AbstractMapActivity {
  @Override
  protected void onCreate(Bundle savedInstanceState) {
    super.onCreate(savedInstanceState);

    if (readyToGo()) {
      setContentView(R.layout.activity_main);

      ViewPager pager=findViewById(R.id.pager);

      pager.setAdapter(buildAdapter());
    }
  }

  private PagerAdapter buildAdapter() {
    return(new MapPageAdapter(this, getSupportFragmentManager()));
  }
}
MapPageAdapter is a FragmentStatePagerAdapter, not a FragmentPagerAdapter. This
means that as the user swipes through our ViewPager, the adapter has the right to
discard old fragments when it creates new ones. This helps reduce the overall memory footprint
of our activity.
package com.commonsware.android.mapsv2.pager;

import android.content.Context;
import android.support.v4.app.Fragment;
import android.support.v4.app.FragmentManager;
import android.support.v4.app.FragmentStatePagerAdapter;

public class MapPageAdapter extends FragmentStatePagerAdapter {
  Context ctxt=null;

  public MapPageAdapter(Context ctxt, FragmentManager mgr) {
    super(mgr);
    this.ctxt=ctxt;
  }

  @Override
  public int getCount() {
    return(10);
  }

  @Override
  public Fragment getItem(int position) {
    return(new PageMapFragment());
  }

  @Override
  public String getPageTitle(int position) {
    return(ctxt.getString(R.string.map_page_title) + String.valueOf(position + 1));
  }
}MapPageAdapter declares that there should be ten pages (in getCount()) and returns an
instance of PageMapFragment for each page. PageMapFragment is a subclass of
SupportMapFragment, and so is responsible for displaying our map:
package com.commonsware.android.mapsv2.pager;

import android.os.Bundle;
import android.view.View;
import com.google.android.gms.maps.CameraUpdate;
import com.google.android.gms.maps.CameraUpdateFactory;
import com.google.android.gms.maps.GoogleMap;
import com.google.android.gms.maps.OnMapReadyCallback;
import com.google.android.gms.maps.SupportMapFragment;
import com.google.android.gms.maps.model.LatLng;
import com.google.android.gms.maps.model.MarkerOptions;

public class PageMapFragment extends SupportMapFragment implements OnMapReadyCallback {
  private boolean needsInit=false;

  @Override
  public void onViewCreated(View view, Bundle savedInstanceState) {
    super.onViewCreated(view, savedInstanceState);

    if (savedInstanceState == null) {
      needsInit=true;
    }

    getMapAsync(this);
  }

  @Override
  public void onMapReady(final GoogleMap map) {
    if (needsInit) {
      CameraUpdate center=
          CameraUpdateFactory.newLatLng(new LatLng(40.76793169992044,
                                                   -73.98180484771729));
      CameraUpdate zoom=CameraUpdateFactory.zoomTo(15);

      map.moveCamera(center);
      map.animateCamera(zoom);
    }

    addMarker(map, 40.748963847316034, -73.96807193756104, R.string.un,
              R.string.united_nations);
    addMarker(map, 40.76866299974387, -73.98268461227417,
              R.string.lincoln_center, R.string.lincoln_center_snippet);
    addMarker(map, 40.765136435316755, -73.97989511489868,
              R.string.carnegie_hall, R.string.practice_x3);
    addMarker(map, 40.70686417491799, -74.01572942733765,
              R.string.downtown_club, R.string.heisman_trophy);
  }

  private void addMarker(GoogleMap map, double lat, double lon,
                         int title, int snippet) {
    map.addMarker(new MarkerOptions().position(new LatLng(lat, lon))
                                     .title(getString(title))
                                     .snippet(getString(snippet)));
  }
}If we simply wanted to display an unconfigured map, we could just have MapPageAdapter
create and return instances of SupportMapFragment directly. If we want to configure
our map, though, we need to get control when the GoogleMap object is ready for use.
One way to do that is to extend SupportMapFragment and override onViewCreated() and
call getMapAsync() there to begin the whole get-the-GoogleMap-loaded process.
In onMapReady(), we can then go ahead and
configure the map much as we have done in previous examples, just from within the fragment
itself rather than from the hosting activity.
MapAwarePager overrides one key method of ViewPager: canScroll():
package com.commonsware.android.mapsv2.pager;

import android.content.Context;
import android.support.v4.view.PagerTabStrip;
import android.support.v4.view.ViewPager;
import android.util.AttributeSet;
import android.view.SurfaceView;
import android.view.View;

public class MapAwarePager extends ViewPager {
  public MapAwarePager(Context context, AttributeSet attrs) {
    super(context, attrs);
  }

  @Override
  protected boolean canScroll(View v, boolean checkV, int dx, int x,
                              int y) {
    if (v instanceof SurfaceView || v instanceof PagerTabStrip) {
      return(true);
    }

    return(super.canScroll(v, checkV, dx, x, y));
  }
}
canScroll() should return true if the View (and specifically the supplied
X and Y coordinates within that View) can be scrolled horizontally, false
otherwise. In our case, we want to say that the map and the tab strip are each
scrollable horizontally. As it turns out, the passed-in View for our
SupportMapFragment will be the map if it is a subclass of SurfaceView
(determined by trial and error on the author’s part, with hopes for a more
authoritative solution in a future edition of the Maps V2 API). So, if the
passed-in View is either a SurfaceView or a PagerTabStrip, we return true,
otherwise we default to normal logic.
The result is a series of independent maps, one per page:
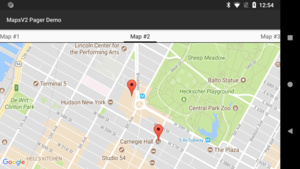
Figure 575: Multiple Maps V2 Maps in a ViewPager
Each map is independent: if the user pans or zooms one map, that has no impact on any of the other pages. Panning the maps horizontally works; to move between pages, use the tab strip.
Markers, by default, are static, unless you make them be draggable, and then only the user can drag them.
However, you are welcome to update the position of a Marker at any point, by
calling setPosition() and supplying a new LatLng. The Marker then will jump to that
position.
But what if you want to animate the movement of a Marker from its current
position to a new one? Maps V2 does not offer anything “out of the box” for implementing
this, but Google demonstrated approaches for this in
a “DevBytes” video and related
bit of code in a GitHub Gist. This
section will cover the technique appropriate for API Level 14+, including a full
working sample (the Gist shows code but not its usage).
The position of a Marker is a LatLng, as we have seen previously. LatLng is
not a simple number, and so the animator framework needs our assistance to
animate them. Specifically, we need a TypeEvaluator for LatLng, with our
evaluate() method taking the initial and end positions and computing another
LatLng representing the fraction position between those other positions.
This concept was introduced back in
the chapter on the animator framework.
A simple approach to computing the fractional LatLng would be to apply
the fraction to the latitude and the longitude as Java double values:
LatLng interpolate(float fraction, LatLng initial, LatLng end) {
  double lat = (end.latitude - initial.latitude) * fraction + initial.latitude;
  double lng = (end.longitude - initial.longitude) * fraction + initial.longitude;

  return(new LatLng(lat, lng));
}
That would work reasonably well for fairly close points, such as animating a marker within a city. However, animating markers across longer distances means that we have to take into account some geographic realities that a simple calculation will miss.
One bit of reality is that the Earth is round. The above calculation assumes that the Earth is flat. Calculating “great circle” positions requires a fair bit of spherical trigonometry, known to cause loss of hair in software developers.
Hence, ideally, we will use somebody’s existing debugged algorithm for that.
The other problem is that longitudes wrap around, as 180 degrees longitude is equivalent to –180 degrees longitude, and longitudinal values are considered to be between 180 and –180. In cases where we would not cross 180 degrees longitude, this is not an issue. However, a simple calculation might miss this and wind up having our animation “take the long way” (e.g., animating from –175 degrees longitude to 175 degrees longitude by going 350 degrees around the Earth, rather than just 10 degrees and crossing the International Date Line).
Google themselves have released a
utility library for Maps V2.
It offers polyline and polygon decoding, primarily for interoperability with
other location-related Google services like the Google Directions API. The
SphericalUtil class handles all of the nasty math for computing distances
along the surface of the Earth and related calculations. It also offers
BubbleIconFactory, which makes it easy to create marker icons that look a
bit like info windows (complete with border and caret) wrapping around a bit
of text or an icon.
In our case, we can use SphericalUtil to handle Problem #2 and Problem #3,
interpolating
the location between two LatLng values, taking the curvature of the Earth
and longitude idiosyncrasies into account.
The
MapsV2/Animator
sample project is a modified version of the MapsV2/Markers project, adding in the
notion of animating a marker from its original position (Lincoln Center) to a new
position (Penn Station) within Manhattan.
Since we want to use the Google map utility library, we need to add it as a dependency.
Android Studio users can simply add implementation 'com.google.maps.android:android-maps-utils:0.3.4'
(or a higher version) to the dependencies closure.
We need to know where our starting and ending position for the animation will
be, in terms of LatLng objects. Since those have no dependencies upon a Context
or anything, we can simply declare them as static final values:
  private static final LatLng PENN_STATION=new LatLng(40.749972,
                                                      -73.992319);
  private static final LatLng LINCOLN_CENTER=
      new LatLng(40.76866299974387, -73.98268461227417);
We will also need the actual Marker object created when we add our starting
position (LINCOLN_CENTER) to the map. So far, we have ignored the Marker
returned by addMarker() on GoogleMap, but now we need that. So, our own
addMarker() method now returns this value:
  private Marker addMarker(GoogleMap map, double lat, double lon,
                           int title, int snippet) {
    return(map.addMarker(new MarkerOptions().position(new LatLng(lat,
                                                                 lon))
                                            .title(getString(title))
                                            .snippet(getString(snippet))));
  }
We also now have a markerToAnimate data member of the activity, for our Marker,
which we populate from our modified addMarker() method:
    addMarker(map, 40.748963847316034, -73.96807193756104,
              R.string.un, R.string.united_nations);
    markerToAnimate=
        addMarker(map, LINCOLN_CENTER.latitude,
                  LINCOLN_CENTER.longitude, R.string.lincoln_center,
                  R.string.lincoln_center_snippet);
    addMarker(map, 40.765136435316755, -73.97989511489868,
              R.string.carnegie_hall, R.string.practice_x3);
    addMarker(map, 40.70686417491799, -74.01572942733765,
              R.string.downtown_club, R.string.heisman_trophy);
To make the sample work repeatedly, it would be nice to support bi-directional
animation, starting with animating from Lincoln Center to Penn Station, then reversing
the animation to go back to Lincoln Center. That means that we need to know, for any
particular animation, where the end position should be. So, we track a LatLng for
the next end position, surprisingly named nextAnimationEnd, initializing it to be
PENN_STATION (since we are starting at the outset at LINCOLN_CENTER):
private LatLng nextAnimationEnd=PENN_STATION;
Next, we need to give the user a means of actually requesting the animation to run.
To do that, we define a new menu XML resource for an animate menu item (using the
directions icon for lack of a better handy icon):
<menu xmlns:android="http://schemas.android.com/apk/res/android">

  <item
    android:id="@+id/animate"
    android:icon="@android:drawable/ic_menu_directions"
    android:showAsAction="ifRoom"
    android:title="@string/animate"/>

</menu>We then load that menu resource in an overridden onCreateOptionsMenu() and direct
the click event to an animateMarker() method in onOptionsItemSelected():
  @Override
  public boolean onCreateOptionsMenu(Menu menu) {
    getMenuInflater().inflate(R.menu.animate, menu);

    return(super.onCreateOptionsMenu(menu));
  }

  @Override
  public boolean onOptionsItemSelected(MenuItem item) {
    if (item.getItemId() == R.id.animate) {
      animateMarker();

      return(true);
    }

    return(super.onOptionsItemSelected(item));
  }
In animateMarker(), we need to do two things:
To handle the camera position, we need to use moveCamera() with a CameraUpdate
from CameraUpdateFactory, as we used to set the initial camera position and zoom level.
To handle the case where we want one or more points to be visible, we can use the
newLatLngBounds() method on CameraUpdateFactory. This takes a LatLngBounds describing
the area that needs to be visible, plus a padding amount in pixels for where that area
should be inset within the map.
Of course, this implies that we have a LatLngBounds.
Since LatLngBounds also does not depend upon a Context or much of anything,
we can define one of those as a static final data member, using a LatLngBounds.Builder
instance:
  private static final LatLngBounds bounds=
      new LatLngBounds.Builder().include(LINCOLN_CENTER)
                                .include(PENN_STATION).build();
A LatLngBounds.Builder takes one or more LatLng objects — passed in via include() –
then constructs a LatLngBounds that encompasses all of those points via build().
Our animateMarker() method then starts off by using moveCamera() to reset the
camera to show that defined region:
  private void animateMarker() {
    map.moveCamera(CameraUpdateFactory.newLatLngBounds(bounds, 48));

    Property<Marker, LatLng> property=
        Property.of(Marker.class, LatLng.class, "position");
    ObjectAnimator animator=
        ObjectAnimator.ofObject(markerToAnimate, property,
                                new LatLngEvaluator(), nextAnimationEnd);
    animator.setDuration(2000);
    animator.start();

    if (nextAnimationEnd == LINCOLN_CENTER) {
      nextAnimationEnd=PENN_STATION;
    }
    else {
      nextAnimationEnd=LINCOLN_CENTER;
    }
  }
Then, we need to set up the animation. To do this, we will use the object animator
framework, specifically an ObjectAnimator. We know the Marker that we want to animate
(markerToAnimate) and we know where we want to animate it to (nextAnimationEnd).
What we need is to indicate the property to animate on this object, plus provide
help to actually animate a LatLng.
To specify the property, we could just pass in the name of the property ("position").
However, in animateMarker(), we set up a Property object via the static of()
factory method. This makes our use of ofObject() more type-safe, as Property
will help enforce that
we are animating a Marker using LatLng values.
To animate LatLng values, we need a TypeEvaluator for LatLng, here defined as
a static inner class named LatLngEvaluator:
  private static class LatLngEvaluator implements TypeEvaluator<LatLng> {
    @Override
    public LatLng evaluate(float fraction, LatLng startValue,
                           LatLng endValue) {
      return(SphericalUtil.interpolate(startValue, endValue, fraction));
    }
  }
Our evaluate() method turns around and calls the static interpolate() method
on SphericalUtil, supplied by Google’s map utility library. interpolate() handles
all the nasty spherical trigonometry and stuff, so we do not have to.
We then set the duration of the animation to be two seconds, and start the animation.
Finally, to reverse the animation for the next request, animateMarker() resets
the value of nextAnimationEnd to be PENN_STATION or LINCOLN_CENTER, wherever
we will animate to next.
You will notice that our animation ignores other aspects of reality, such as buildings that might be in the way. Sometimes, that is appropriate, such as animating the movement of:
Sometimes, though, we need to take into account those obstacles, such as animating the movement of:
However, to do this implies that we know where the obstacles are. Or, more accurately, we would need to animate the marker along known good waypoints, such as streets.
The animation would not be especially difficult, as ofObject() can take a series of
waypoints. However, we would need to find those waypoints, and there is nothing
in Maps V2 itself that supplies this data.
The good news is that Maps V2 supports Google’s indoor maps, for those venues for which Google has indoor map data.
The bad news is that for some reason, only one map at a time supports indoor maps. The default will be that the first map you create will support indoor maps, and others will not.
To see if a given map offers indoor map capability, you can call isIndoorEnabled()
on GoogleMap. To toggle this capability, call setIndoorEnabled().
Once a map is drawn, you can take a snapshot of it, converting the viewed map
into a Bitmap object. This is designed to take an image of the map and use it
in places where a SupportMapFragment, or even a MapView, cannot go, such as:
RemoteViews, such as a custom Notification
The GoogleMap object has two flavors of a snapshot() method. Both take a
SnapshotReadyCallback object. You will need to supply an instance of something
implementing the SnapshotReadyCallback interface, overriding onSnapshotReady(),
where you will receive your Bitmap.
One flavor of snapshot() takes just the
SnapshotReadyCallback; the other also takes a Bitmap of the proper dimensions,
such as a previous snapshot Bitmap that you want to recycle. Using the latter
snapshot() is recommended where possible, so you do not need to allocate new Bitmap
objects on each snapshot() call.
Note that snapshot() will only work once the map is actually rendered. So, for example,
calling snapshot() from onCreate() of your activity will fail, because the map
has not been rendered yet. snapshot() is designed to be called based upon user input,
either to manually capture a snapshot or based on navigation (e.g., tapping on a
ListView item triggers saving a snapshot of the current map as a thumbnail before
changing the map contents).
Also, the documentation for snapshot() contains the following:
Note: Images of the map must not be transmitted to your servers, or otherwise used outside of the application. If you need to send a map to another application or user, send data that allows them to reconstruct the map for the new user instead of a snapshot.
As this statement may be tied to the terms and conditions of your use of Maps V2, you should talk with qualified legal counsel before:
ACTION_SEND
or similar operations.
So far, all the examples shown in this chapter use SupportMapFragment.
In most cases, this is the right thing to use.
However, there may be places where you really want to use a View, rather than a
Fragment, for your maps.
The good news is that Maps V2 does have a MapView. SupportMapFragment usually handles creating
and managing the MapView for you, but you can, if you wish, avoid SupportMapFragment and
manage the MapView yourself.
The biggest limitation is that you need to forward the lifecycle methods from your activity
or fragment on to the MapView, calling onCreate(), onResume(), onPause(), onDestroy(),
and onSaveInstanceState() on the MapView. Normally, SupportMapFragment would do that for you,
saving you the trouble.
Also note that while MapView is a ViewGroup, you are not allowed to add child widgets
to it.
Early on, we hand-waved our way past the AbstractMapActivity that all of our MainActivity
classes inherit from, and we skirted past the readyToGo() method that we were calling.
Also, you may have noticed that our app has an action bar overflow item, that we do not seem
to be creating in MainActivity.
Now, it is time to dive into what is going on in our AbstractMapActivity implementations.
The readyToGo() method in AbstractMapActivity is designed to help us determine if Maps V2
is “ready to go” and, if not, to help the user perhaps fix their device such that Maps V2
will work in the future:
  protected boolean readyToGo() {
    GoogleApiAvailability checker=
      GoogleApiAvailability.getInstance();

    int status=checker.isGooglePlayServicesAvailable(this);

    if (status == ConnectionResult.SUCCESS) {
      if (getVersionFromPackageManager(this)>=2) {
        return(true);
      }
      else {
        Toast.makeText(this, R.string.no_maps, Toast.LENGTH_LONG).show();
        finish();
      }
    }
    else if (checker.isUserResolvableError(status)) {
      ErrorDialogFragment.newInstance(status)
                         .show(getFragmentManager(),
                               TAG_ERROR_DIALOG_FRAGMENT);
    }
    else {
      Toast.makeText(this, R.string.no_maps, Toast.LENGTH_LONG).show();
      finish();
    }

    return(false);
  }
Determining the availability of Maps V2 — or anything in the Play Services
SDK — is handled through an instance of GoogleApiAvailability. You
get a singleton instance of this class via its static getInstance()
method.
First, we call isGooglePlayServicesAvailable() method on the GoogleApiAvailability
singleton.
This will return an integer indicating whether Maps V2 is available for our use or not.
If the return value is ConnectionResult.SUCCESS — meaning Maps V2 is indeed available to us –
we check to see if OpenGL ES is version 2.0 or higher, as we did not require that in the manifest.
There are a few ways in Android to check the OpenGL ES version. This sample uses some code from
the Compatibility Test Suite (CTS), examining PackageManager to determine the major level:
  // following from
  // https://android.googlesource.com/platform/cts/+/master/tests/tests/graphics/src/android/opengl/cts/OpenGlEsVersionTest.java

  /*
   * Copyright (C) 2010 The Android Open Source Project
   *
   * Licensed under the Apache License, Version 2.0 (the
   * "License"); you may not use this file except in
   * compliance with the License. You may obtain a copy of
   * the License at
   *
   * http://www.apache.org/licenses/LICENSE-2.0
   *
   * Unless required by applicable law or agreed to in
   * writing, software distributed under the License is
   * distributed on an "AS IS" BASIS, WITHOUT WARRANTIES OR
   * CONDITIONS OF ANY KIND, either express or implied. See
   * the License for the specific language governing
   * permissions and limitations under the License.
   */

  private static int getVersionFromPackageManager(Context context) {
    PackageManager packageManager=context.getPackageManager();
    FeatureInfo[] featureInfos=
        packageManager.getSystemAvailableFeatures();
    if (featureInfos != null && featureInfos.length > 0) {
      for (FeatureInfo featureInfo : featureInfos) {
        // Null feature name means this feature is the open
        // gl es version feature.
        if (featureInfo.name == null) {
          if (featureInfo.reqGlEsVersion != FeatureInfo.GL_ES_VERSION_UNDEFINED) {
            return getMajorVersion(featureInfo.reqGlEsVersion);
          }
          else {
            return 1; // Lack of property means OpenGL ES
                      // version 1
          }
        }
      }
    }
    return 1;
  }

  /** @see FeatureInfo#getGlEsVersion() */
  private static int getMajorVersion(int glEsVersion) {
    return((glEsVersion & 0xffff0000) >> 16);
  }
If the major version is 2 or higher,
we return true from readyToGo(), so MainActivity knows to continue on setting up the map.
If the major version is 1, we display a Toast — a production-grade app would do something
else to let the user know of the problem, most likely.
But, what if isGooglePlayServicesAvailable() returns something else?
There are two major possibilities here:
We can distinguish these two cases by calling isUserResolvableError() on
the GoogleApiAvailability singleton,
passing in the value we received from isGooglePlayServicesAvailable().
This will return true if the user might be able to fix the problem, false otherwise.
In the false case, the user is just out of luck, so we display a Toast to alert them of
this fact, then finish() the activity and return false, so MainActivity skips over
the rest of its work.
In the true case, we can display something to the user to prompt them to fix the problem.
One way to do that is to use a dialog obtained from Google code, by calling
the static getErrorDialog() method on a GoogleApiAvailability singleton. In our case,
we wrap that in a DialogFragment named ErrorDialogFragment, implemented as a static
inner class of AbstractMapActivity:
  public static class ErrorDialogFragment extends DialogFragment {
    static final String ARG_ERROR_CODE="errorCode";

    static ErrorDialogFragment newInstance(int errorCode) {
      Bundle args=new Bundle();
      ErrorDialogFragment result=new ErrorDialogFragment();

      args.putInt(ARG_ERROR_CODE, errorCode);
      result.setArguments(args);

      return(result);
    }

    @Override
    public Dialog onCreateDialog(Bundle savedInstanceState) {
      Bundle args=getArguments();
      GoogleApiAvailability checker=
        GoogleApiAvailability.getInstance();

      return(checker.getErrorDialog(getActivity(),
        args.getInt(ARG_ERROR_CODE), 0));
    }

    @Override
    public void onDismiss(DialogInterface dlg) {
      if (getActivity()!=null) {
        getActivity().finish();
      }
    }
  }
While the code and comments around getErrorDialog() suggest that there is some way for
us to find out if the user performed actions that fix the problem, this code does not seem
to work well in practice. After all, downloading Google Play Services is asynchronous, so even
if the user returns to our app, it is entirely likely that Maps V2 is still unavailable.
As a result, when the user is done with the dialog, we finish() the activity, forcing the
user to start it again if and when they are done downloading Google Play Services.
Testing this code requires an older device, one in which the “Google Play services” app can be uninstalled… if it can be installed at all.
As it turns out, not all Android devices support the Play Store, or the Google Play Services
by extension. Notably, if the device lacks the Play Store,
isUserRecoverableError() returns true, even
though the user cannot recover from this situation (except perhaps via a firmware update).
(An earlier problem where getErrorDialog() could return null
even for cases where the error is supposedly user-recoverable has been fixed)
Many developers have been busy writing libraries that help in the development of Maps V2 applications, beyond Google’s own utility library mentioned in the section on animating markers.
Perhaps the most expansive of these is the Android Maps Extensions library. The big thing that this library offers is marker clustering, where as the user zooms out, individual markers are replaced by a marker representing a cluster, so you avoid flooding a small area with too many individual markers:
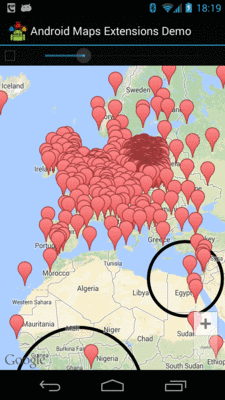
Figure 576: Map with Many Markers (from Android Maps Extensions demo app)

Figure 577: Same Map with Cluster Markers (from Android Maps Extensions demo app)

Figure 578: Same Map with Zoomed In Cluster Markers (from Android Maps Extensions demo app)
This library wraps the Maps V2 classes, allowing the library to offer extensions to the standard Maps V2 API, including:
Marker, Polygon, Polyline, and other
classes, to tie them back to your modelsAnother library offering marker clustering is clusterkraf, from Two Toasters.
The clusterkraf library can optionally integrate with
Cyril Mottier’s Polaris2 library.
His original Polaris library aimed to provide more features to Maps V1; Polaris2
fills a similar role for Maps V2. At this time, Polaris2 is a smaller library,
simply because Maps V2 handles much of what Polaris provided. Polaris2, like
Android Maps Extensions, wraps the Maps V2 API with its own classes, in lieu
of subclassing (since most Maps V2 classes are marked final). Of note, Polaris2
offers reset() methods on many of the ...Options classes (e.g., MarkerOptions),
and offers constants for the minimum and maximum valid latitude and longitude.
Portions of the logic that powers your Maps V2 SupportMapFragment are supplied by the Google Play
Services app. As a result, many operations with Maps V2, such as manipulating markers, require
IPC calls between your app and Google Play Services. If those IPC calls are synchronous,
they will add a bit of overhead to your app — enough that you will want to avoid them in
time-critical pieces of code, tight loops, and the like.
Of course, the key question is: should you be using Maps V2 at all?
Google thinks so, as they have turned off access to new API keys for Maps V1. That makes ongoing development of Maps V1 solutions a bit risky, as you cannot create new API keys for new signing keys, such as if you need to replace your debug keystore.
However, Maps V2 has some deployment limitations at this time. While 99.8+% of Android
devices that have the Play Store have the requisite OpenGL ES 2.0+,
some devices that have a suitable OpenGL ES version may not have the Play
Store or otherwise be unable to get Google Play Services, required for using
Maps V2. The isGooglePlayServicesAvailable() approach advocated by Google can
help determine this at runtime, though this approach used to have some bugs,
and it still cannot always help you recover from this problem.
And, as the next section illustrates, not every Android device supports Maps V2, because not every device supports Google Play Services.
If your app tries to bring up Maps V2 on a device that cannot possibly have the Play Services Framework — such as a Kindle Fire — the user will see an error dialog:
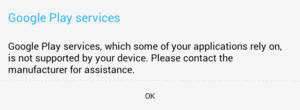
Figure 579: Maps V2 Error on Kindle Fire
For those devices, you will need to consider some alternative source of maps.
Beyond using Maps V2 or Maps V1, you may need to consider other mapping alternatives. The Google mapping APIs are only available on Android devices that have the Maps SDK add-on (Maps V1) or Google Play Services (Maps V2). Not all devices have those. And, the limitations of Maps V2 deployment and the deprecation of Maps V1 may convince you that relying upon Google for maps is not safe at the present time.
The most common native replacement for Google’s mapping is OpenStreetMap, which to some extent is “the Wikipedia of maps”. OSMDroid is a library that provides a Maps V1-ish API for embedding OpenStreetMap-based maps into your application.
Another solution is to integrate Web-based Google maps into your app, the same way that
you might embed them into your Web site. An activity hosting a WebView can display a
Web-based Google Map, for example.
Certain devices may have access to other native mapping solutions. For example, Amazon has published their own maps API for use with the Kindle Fire.