Figure 835: Token Sample App, Showing a Token
Oh, what a tangled web we weave
When first we practice to work with SMS on Android, Eve
(with apologies to Sir Walter Scott)
Android devices have had SMS capability since Android 1.0. However, from a programming standpoint, for years, SMS and Android were intensely frustrating. When the Android SDK was developed, some aspects of working with SMS were put into the SDK, while others were held back. This, of course, did not stop many an intrepid developer from working with the undocumented, unsupported SMS APIs, with varying degrees of success.
After much wailing and gnashing of teeth by developers, Google finally formalized a more complete SMS API in Android 4.4. However, this too has its issues, where some apps that worked fine with the undocumented API will now fail outright, in irreparable fashion, on Android 4.4+.
This chapter starts with the one thing you can do reasonably reliably
across Android device versions –
send an SMS, either directly or by invoking the user’s choice
of SMS client. The chapter then examines how to monitor or receive
SMS messages (both pre-4.4 and 4.4+) and the SMS-related ContentProvider
(both pre-4.4 and 4.4+).
Understanding this chapter requires that you have read the core chapters,
particularly the chapters on broadcast Intents.
One of the samples uses the ContactsContract provider,
so reading that chapter will help you understand that particular sample.
While much of Android’s SMS capabilities are not in the SDK, sending an SMS is. You have two major choices for doing this:
Which of these is best for you depends on what your desired user experience is. If you are composing the message totally within your application, you may want to just send it. However, as we will see, that comes at a price: an extra permission.
Sending an SMS via the user’s choice of SMS client is very similar to
the use of ACTION_SEND described
elsewhere in this book. You craft an appropriate Intent,
then call
startActivity() on that Intent to bring up an SMS client (or
allow the user to choose between clients).
The Intent differs a bit from the ACTION_SEND example:
ACTION_SENDTO, rather than ACTION_SEND
Uri needs to begin with smsto:, followed by the mobile
number you want to send the message tosms_body extra on the Intent
For example, here is a snippet of code from the
SMS/Sender
sample project:
      Intent sms=new Intent(Intent.ACTION_SENDTO,
                            Uri.parse("smsto:"+c.getString(2)));

      sms.putExtra("sms_body", msg.getText().toString());

      startActivity(sms);
Here, our phone number is coming out of the third column of a
Cursor, and the text message is coming from an EditText —
more on how this works later in this section, when we review the
Sender sample more closely.
If you wish to bypass the UI and send an SMS directly, you can do so
through the SmsManager class, in the android.telephony package.
Unlike most Android classes ending in Manager, you obtain an
SmsManager via a static getDefault() method on the SmsManager
class. You can then call sendTextMessage(), supplying:
null unless you
know what you are doingPendingIntent objects to be executed when the SMS has
been sent and delivered, respectivelyIf you are concerned that your message may be too long, use
divideMessage() on SmsManager to take your message and split it
into individual pieces. Then, you can use
sendMultipartTextMessage() to send the entire ArrayList of
message pieces.
For this to work, your application needs to hold the SEND_SMS
permission, via a child element of your <manifest> element in your
AndroidManifest.xml file.
For example, here is code from Sender that uses SmsManager to
send the same message that the previous section sent via the user’s
choice of SMS client:
      SmsManager
        .getDefault()
        .sendTextMessage(c.getString(2), null,
                         msg.getText().toString(),
                         null, null);
The Sender example application is fairly straightforward, given the
aforementioned techniques.
The manifest has both the SEND_SMS and READ_CONTACTS permissions,
because we want to allow the user to pick a mobile phone number from
their list of contacts, rather than type one in by hand:
<?xml version="1.0" encoding="utf-8"?>
<manifest xmlns:android="http://schemas.android.com/apk/res/android"
  package="com.commonsware.android.sms.sender"
  android:installLocation="preferExternal"
  android:versionCode="1"
  android:versionName="1.0">

  <uses-permission android:name="android.permission.READ_CONTACTS"/>
  <uses-permission android:name="android.permission.SEND_SMS"/>

  <uses-sdk
    android:minSdkVersion="7"
    android:targetSdkVersion="11"/>

  <supports-screens
    android:largeScreens="true"
    android:normalScreens="true"
    android:smallScreens="false"/>

  <application
    android:icon="@drawable/ic_launcher"
    android:label="@string/app_name">
    <activity
      android:name="Sender"
      android:label="@string/app_name">
      <intent-filter>
        <action android:name="android.intent.action.MAIN"/>

        <category android:name="android.intent.category.LAUNCHER"/>
      </intent-filter>
    </activity>
  </application>

</manifest>If you noticed the android:installLocation attribute in the root
element, that is to allow this application to be installed onto
external storage, such as an SD card.
The layout has a Spinner (for a drop-down of available mobile phone
numbers), a pair of RadioButton widgets (to indicate which way to
send the message), an EditText (for the text message), and a “Send”
Button:
<?xml version="1.0" encoding="utf-8"?>
<LinearLayout xmlns:android="http://schemas.android.com/apk/res/android"
    android:orientation="vertical"
    android:layout_width="match_parent"
    android:layout_height="match_parent"
>
  <Spinner android:id="@+id/spinner"
    android:layout_width="match_parent"
    android:layout_height="wrap_content"
    android:drawSelectorOnTop="true"
  />
  <RadioGroup android:id="@+id/means"
    android:orientation="horizontal"
    android:layout_width="match_parent"
    android:layout_height="wrap_content"
    >
      <RadioButton android:id="@+id/client"
        android:layout_width="wrap_content"
        android:layout_height="wrap_content"
        android:checked="true"
        android:text="Via Client" />
      <RadioButton android:id="@+id/direct"
        android:layout_width="wrap_content"
        android:layout_height="wrap_content"
        android:text="Direct" />
  </RadioGroup>
  <EditText
    android:id="@+id/msg"
    android:layout_width="match_parent"
    android:layout_height="0px"
    android:layout_weight="1"
    android:singleLine="false"
    android:gravity="top|left"
  />
  <Button
    android:id="@+id/send"
    android:text="Send!"
    android:layout_width="match_parent"
    android:layout_height="wrap_content"
    android:onClick="sendTheMessage"
  />
</LinearLayout>Sender uses the same technique for obtaining mobile phone numbers
from our contacts as is seen in the
chapter on contacts. To support Android 1.x and Android 2.x
devices, we implement an abstract class and two concrete
implementations, one for the old API and one for the new. The
abstract class then has a static method to get at an instance
suitable for the device the code is running on:
package com.commonsware.android.sms.sender;

import android.app.Activity;
import android.os.Build;
import android.widget.SpinnerAdapter;

abstract class ContactsAdapterBridge {
  abstract SpinnerAdapter buildPhonesAdapter(Activity a);

  public static final ContactsAdapterBridge INSTANCE=buildBridge();

  private static ContactsAdapterBridge buildBridge() {
    int sdk=new Integer(Build.VERSION.SDK).intValue();

    if (sdk<5) {
      return(new OldContactsAdapterBridge());
    }

    return(new NewContactsAdapterBridge());
  }
}The Android 2.x edition uses ContactsContract to find just the
mobile numbers:
package com.commonsware.android.sms.sender;

import android.app.Activity;
import android.database.Cursor;
import android.provider.ContactsContract.Contacts;
import android.provider.ContactsContract.CommonDataKinds.Phone;
import android.widget.SpinnerAdapter;
import android.widget.SimpleCursorAdapter;

class NewContactsAdapterBridge extends ContactsAdapterBridge {
  SpinnerAdapter buildPhonesAdapter(Activity a) {
    String[] PROJECTION=new String[] { Contacts._ID,
                                              Contacts.DISPLAY_NAME,
                                              Phone.NUMBER
                                            };
    String[] ARGS={String.valueOf(Phone.TYPE_MOBILE)};
    Cursor c=a.managedQuery(Phone.CONTENT_URI,
                            PROJECTION, Phone.TYPE+"=?",
                            ARGS, Contacts.DISPLAY_NAME);

    SimpleCursorAdapter adapter=new SimpleCursorAdapter(a,
                                    android.R.layout.simple_spinner_item,
                                    c,
                                    new String[] {
                                      Contacts.DISPLAY_NAME
                                    },
                                    new int[] {
                                      android.R.id.text1
                                    });

    adapter.setDropDownViewResource(
            android.R.layout.simple_spinner_dropdown_item);

    return(adapter);
  }
}… while the Android 1.x edition uses the older Contacts provider
to find the mobile numbers:
package com.commonsware.android.sms.sender;

import android.app.Activity;
import android.database.Cursor;
import android.provider.Contacts;
import android.widget.SimpleCursorAdapter;
import android.widget.SpinnerAdapter;

@SuppressWarnings("deprecation")
class OldContactsAdapterBridge extends ContactsAdapterBridge {
  SpinnerAdapter buildPhonesAdapter(Activity a) {
    String[] PROJECTION=new String[] {  Contacts.Phones._ID,
                                        Contacts.Phones.NAME,
                                        Contacts.Phones.NUMBER
                                      };
    String[] ARGS={String.valueOf(Contacts.Phones.TYPE_MOBILE)};
    Cursor c=a.managedQuery(Contacts.Phones.CONTENT_URI,
                            PROJECTION,
                            Contacts.Phones.TYPE+"=?", ARGS,
                            Contacts.Phones.NAME);

    SimpleCursorAdapter adapter=new SimpleCursorAdapter(a,
                                    android.R.layout.simple_spinner_item,
                                    c,
                                    new String[] {
                                      Contacts.Phones.NAME
                                    },
                                    new int[] {
                                      android.R.id.text1
                                    });

    adapter.setDropDownViewResource(
            android.R.layout.simple_spinner_dropdown_item);

    return(adapter);
  }
}For more details on how those providers work, please see the chapter on contacts.
The activity then loads up the Spinner with the appropriate list of
contacts. When the user taps the Send button, the sendTheMessage()
method is invoked (courtesy of the android:onClick attribute in the
layout). That method looks at the radio buttons, sees which one is
selected, and routes the text message accordingly:
package com.commonsware.android.sms.sender;

import android.app.Activity;
import android.content.Intent;
import android.database.Cursor;
import android.net.Uri;
import android.os.Bundle;
import android.telephony.SmsManager;
import android.view.View;
import android.widget.EditText;
import android.widget.RadioGroup;
import android.widget.Spinner;

public class Sender extends Activity {
  Spinner contacts=null;
  RadioGroup means=null;
  EditText msg=null;

  @Override
  public void onCreate(Bundle savedInstanceState) {
    super.onCreate(savedInstanceState);
    setContentView(R.layout.main);

    contacts=(Spinner)findViewById(R.id.spinner);

    contacts.setAdapter(ContactsAdapterBridge
                        .INSTANCE
                        .buildPhonesAdapter(this));

    means=(RadioGroup)findViewById(R.id.means);
    msg=(EditText)findViewById(R.id.msg);
  }

  public void sendTheMessage(View v) {
    Cursor c=(Cursor)contacts.getSelectedItem();

    if (means.getCheckedRadioButtonId()==R.id.client) {
      Intent sms=new Intent(Intent.ACTION_SENDTO,
                            Uri.parse("smsto:"+c.getString(2)));

      sms.putExtra("sms_body", msg.getText().toString());

      startActivity(sms);
    }
    else {
      SmsManager
        .getDefault()
        .sendTextMessage(c.getString(2), null,
                         msg.getText().toString(),
                         null, null);
    }
  }
}Apps running on Android 1.x and 2.x devices are limited to sending 100 SMS messages an hour, before the user starts getting prompted with each SMS message request to confirm that they do indeed wish to send it.
Apps running on Android 4.x devices, the limits are now 30 SMS messages in 30 minutes, according to some source code analysis by Al Sutton.
For the purposes of this section, “monitoring” refers to the ability to inspect incoming SMS messages, including reading their contents. In contrast, “receiving” SMS messages is actually consuming the message and storing it somewhere for the user to use.
As it turns out, “monitoring” and “receiving” are much the same thing prior to Android 4.4, but are significantly different in the new API made available in Android 4.4
It is possible for an application to monitor or receive an incoming SMS
message… if you are willing to listen on the undocumented
android.provider.Telephony.SMS_RECEIVED broadcast Intent. That is
sent by Android whenever an SMS arrives, and it is up to an
application to implement a BroadcastReceiver to respond to that
Intent and do something with the message. The Android open source
project has such an application — Messaging — and device
manufacturers can replace it with something else.
Note that to listen for this broadcast, your app must hold the RECEIVE_SMS
permission.
The BroadcastReceiver can then turn around and use the SmsMessage
class, in the android.telephony package, to get at the message
itself, through the following undocumented recipe:
Intent (intent), call
intent.getExtras().get("pdus") to get an Object array representing
the raw portions of the messageSmsMessage.createFromPdu() to convert the Object into an
SmsMessage — though to make this work, you need to cast the
Object to a byte array as part of passing it to the createFromPdu()
static methodThe resulting SmsMessage object gets you access to the text of the
message, the sending phone number, etc.
The SMS_RECEIVED broadcast Intent is broadcast a bit differently
than most others in Android. It is an “ordered broadcast”, meaning
the Intent will be delivered to one BroadcastReceiver at a time.
This has two impacts of note:
<intent-filter> element, you can have an
android:priority attribute. Higher priority values get access to
the broadcast Intent earlier than will lower priority values. The
standard Messaging application has the default priority
(undocumented, appears to be 0 or 1), so you can arrange to get
access to the SMS before the application does.BroadcastReceiver can call abortBroadcast() on itself to
prevent the Intent from being broadcast to other receivers of lower
priority. In effect, this causes your receiver to consume the
SMS — the Messaging application will not receive it. So, aborting
the broadcast means that your app chose to “receive” the SMS; not
aborting the broadcast means that your app is merely “monitoring” the
SMS messages that come in.However, just because the Messaging application has the default priority does not mean all SMS clients will, and so you cannot reliably intercept SMS messages this way. That, plus the undocumented nature of all of this, means that applications you write to receive SMS messages are likely to be fragile in production, breaking on various devices due to device manufacturer-installed apps, third-party apps, or changes to Android itself… such as the changes that came about in Android 4.4.
The code described above still works on Android 4.4, though the
formerly-hidden android.provider.Telephony class is now part of
the SDK.
The biggest difference, though, is that even if you call abortBroadcast(),
the user’s chosen SMS messaging client will still receive the message.
It is not possible for an app listening for SMS_RECEIVED broadcasts
to prevent the user’s chosen SMS messaging client from receiving those
same messages. This is a substantial change, one that will break or
make obsolete many Android applications.
Regardless, if monitoring SMS fits your needs, SMS_RECEIVED can do it.
So, for example, the
SMS/Monitor
sample project implements a BroadcastReceiver for SMS_RECEIVED, one
with slightly elevated priority:
<?xml version="1.0" encoding="utf-8"?>
<manifest xmlns:android="http://schemas.android.com/apk/res/android" package="com.commonsware.android.sms.monitor" android:versionCode="1" android:versionName="1.0">

  <supports-screens android:largeScreens="true" android:normalScreens="true" android:smallScreens="false"/>

  <uses-permission android:name="android.permission.RECEIVE_SMS"/>

  <uses-sdk android:minSdkVersion="4" android:targetSdkVersion="19"/>

  <application android:icon="@drawable/ic_launcher" android:label="@string/app_name">
    <receiver android:name="Monitor" android:permission="android.permission.BROADCAST_SMS">
      <intent-filter android:priority="2">
        <action android:name="android.provider.Telephony.SMS_RECEIVED"/>
      </intent-filter>
    </receiver>

    <activity android:name="BootstrapActivity" android:theme="@android:style/Theme.Translucent.NoTitleBar">
      <intent-filter>
        <action android:name="android.intent.action.MAIN"/>

        <category android:name="android.intent.category.LAUNCHER"/>
      </intent-filter>
    </activity>
  </application>

</manifest>
You will notice that the BroadcastReceiver not only has the slightly-elevated
priority (android:priority="2"), but also a required permission
(android:permission="android.permission.BROADCAST_SMS"). Only apps that
hold this permission can send this broadcast in a way that will be picked
up by the receiver. Since this permission can only be held by the device
firmware, you are protected from “spoof” SMS messages from rogue apps on
the device, sending the SMS_RECEIVED themselves.
The app also has a do-nothing activity, solely there to activate
the manifest-registered BroadcastReceiver, which will not work until
some component of the app is manually started.
The bulk of the business logic — what little there is of it — lies in the
Monitor class that is the BroadcastReceiver:
package com.commonsware.android.sms.monitor;

import android.content.BroadcastReceiver;
import android.content.Context;
import android.content.Intent;
import android.telephony.SmsMessage;
import android.util.Log;

public class Monitor extends BroadcastReceiver {
  @Override
  public void onReceive(Context context, Intent intent) {
    Object[] rawMsgs=(Object[])intent.getExtras().get("pdus");

    for (Object raw : rawMsgs) {
      SmsMessage msg=SmsMessage.createFromPdu((byte[])raw);

      if (msg.getMessageBody().toUpperCase().contains("SEKRIT")) {
        Log.w("SMS:"+msg.getOriginatingAddress(),
              msg.getMessageBody());

        abortBroadcast();
      }
    }
  }
}Here, we retrieve the raw messages from the Intent extra, iterate over
them, and convert each to an SmsMessage. Those that have the magic word
in their message body will result in the message being dumped to Logcat, plus
the broadcast is aborted. On Android 4.3 and below, this will prevent
lower-priority receivers from receiving the SMS. On Android 4.4, the abort
request is ignored.
Receiving SMS messages, on Android 4.4+, means that you are implementing
an SMS client application, one the user might be willing to set as
their default SMS client application in Settings. There are other sorts
of apps that may temporarily want to be the default SMS client,
such as a backup/restore utility, as only the default SMS client
will be able to work with the SMS ContentProvider suite, such as the
inbox.
The default SMS client should be able to handle both SMS and MMS. This
is a problem, as while supporting SMS is poorly documented, supporting
MMS has almost no documentation whatsoever. However, unless the default
SMS client handles MMS, nobody else can (at least, while saving MMS
details to the ContentProvider suite.
Hence, Google is expecting you to have two BroadcastReceivers
registered in the manifest: one for SMS and one for MMS. Unfortunately,
these cannot readily be combined into a single receiver, because each
has its own permission requirement:
BROADCAST_SMS
BROADCAST_WAP_PUSH
In practice, probably both are held by the OS component that is sending
these broadcasts in response to incoming messages of either type.
In principle, though, they could be separate, and an individual
<receiver> can only specify one such permission.
The Android documentation
illustrates the <receiver> elements that
Google expects your SMS client application to have:
<!-- BroadcastReceiver that listens for incoming SMS messages -->
<receiver android:name=".SmsReceiver"
        android:permission="android.permission.BROADCAST_SMS">
    <intent-filter>
        <action android:name="android.provider.Telephony.SMS_DELIVER" />
    </intent-filter>
</receiver>

<!-- BroadcastReceiver that listens for incoming MMS messages -->
<receiver android:name=".MmsReceiver"
    android:permission="android.permission.BROADCAST_WAP_PUSH">
    <intent-filter>
        <action android:name="android.provider.Telephony.WAP_PUSH_DELIVER" />
        <data android:mimeType="application/vnd.wap.mms-message" />
    </intent-filter>
</receiver>
Notice that the MMS receiver has both an <action> and a <data> element
in its <intent-filter>, which is rather unusual.
On the SMS side, the Intent you receive should be the same as the
Intent you would receive for the SMS_RECEIVED broadcast, where you can
decode the message(s) and deal with them as you see fit. On the MMS side…
there is little documentation.
Google expects the default SMS client to be able to handle ACTION_SEND
and ACTION_SENDTO for relevant schemes:
<!-- Activity that allows the user to send new SMS/MMS messages -->
<activity android:name=".ComposeSmsActivity" >
    <intent-filter>
        <action android:name="android.intent.action.SEND" />
        <action android:name="android.intent.action.SENDTO" />
        <category android:name="android.intent.category.DEFAULT" />
        <category android:name="android.intent.category.BROWSABLE" />
        <data android:scheme="sms" />
        <data android:scheme="smsto" />
        <data android:scheme="mms" />
        <data android:scheme="mmsto" />
    </intent-filter>
</activity>
That may not be terribly surprising. What is surprising is that Google
also expects you to have an exported service for handling
“quick response” requests. These requests come when the user receives a
phone call and taps on an icon to reply with a text message, rather than
accept the call. In those cases, Android will invoke a service in the
default SMS client, with an action of
android.intent.action.RESPOND_VIA_MESSAGE. The Intent that you receive
in onStartCommand() (or onHandleIntent(), if you elect to use an
IntentService) will have an EXTRA_TEXT and optionally an EXTRA_SUBJECT
as extras, representing the message to be sent. The Uri in the Intent
will indicate the intended recipient of the message. Your job is to
use SmsManager to actually send the message.
The Android documentation cites this as the relevant <service> element:
<!-- Service that delivers messages from the phone "quick response" -->
<service android:name=".HeadlessSmsSendService"
         android:permission="android.permission.SEND_RESPOND_VIA_MESSAGE"
         android:exported="true" >
    <intent-filter>
        <action android:name="android.intent.action.RESPOND_VIA_MESSAGE" />
        <category android:name="android.intent.category.DEFAULT" />
        <data android:scheme="sms" />
        <data android:scheme="smsto" />
        <data android:scheme="mms" />
        <data android:scheme="mmsto" />
    </intent-filter>
</service>
Note:
<service> requires that the sender have the SEND_RESPOND_VIA_MESSAGE
permission, to reduce spoofingandroid:exported="true" shown in the sample should be superfluous,
as since the <service> has an <intent-filter], it should be exported
by default<category>, and possibly the <data>, elements may be erroneous…
and since the author cannot find anything in the OS that uses
RESPOND_VIA_MESSAGE, the author cannot validate that these elements should
be here or represent copy-and-paste errors in the documentationIf you want to support receiving SMS using both the legacy approach and
the Android 4.4+ approach, you can have two BroadcastReceiver implementations,
one for android.provider.Telephony.SMS_RECEIVED and one for
android.provider.Telephony.SMS_DELIVER. However, you will only need the
latter one on Android 4.4, and by default you would receive both broadcasts.
To handle that, you can define a boolean resource in the res/values-v19/
directory (e.g., isPreKitKat) to be false, with a default definition in
res/values/ of true for the same resource. Then, in your manifest, you
can have android:enabled="@bool/isPreKitKat" on your SMS_RECEIVED
<receiver> element. This will only enable this component on API Level 18
and below, disabling it on API Level 19+.
You can also define a counterpart resource for the positive case
(e.g., @bool/isKitKat), and use that to selectively enable the SMS and MMS
receivers, if desired.
Many users keep their text messages around, at least for a while. These
are stored in an “inbox”, represented by a ContentProvider. How you
work with this ContentProvider — or if you can work with it at all,
varies upon whether you are running on Android 4.4+ or not.
When perusing the Internet, you will find various blog posts and such
referring to the SMS inbox ContentProvider, represented by the
content://sms/inbox Uri.
This ContentProvider is undocumented and is not part of the Android
SDK, because it is not part of the Android OS.
Rather, this ContentProvider is used by the aforementioned
Messaging application, for storing saved SMS messages. And, as noted,
this application may or may not exist on any given Android device. If
a device manufacturer replaces Messaging with their own application,
there may be nothing on that device that responds to that Uri, or
the schemas may be totally different. Plus, Android may well change
or even remove this ContentProvider in future editions of Android.
For all those reasons, developers should not be relying upon this
ContentProvider.
Android 4.4 has exposed a series of ContentProviders, in the
android.provider.Telephony namespace, for storing SMS and MMS messages.
These include:
Inbox for received messagesOutbox for a log of sent messagesDraft for messages that were written but have not yet been sentSome are duplicated, such as separate providers for the SMS inbox versus
the MMS inbox. Some are distinct, such as Sms.Conversations and
Mms.Rate.
All are largely undocumented.
The user’s chosen default SMS client can write to these providers.
Apps with READ_SMS
permission should be able to read from them.
There are many areas in Android where the user must do two things to use an app:
You see this with app widgets, input method editors, device administrators, and many others.
On Android 4.4+, you also see this with SMS/MMS clients. Devices usually
ship with one. If the user wants a replacement, the user must indicate in
Settings that this new SMS/MMS client should be the default, so it can
write to the SMS/MMS ContentProvider suite.
Your app can determine what the default client is by calling
getDefaultSmsPackage() on the Telephony.Sms class. This will return
the package name of the current default client.
If this is not your package, and you would like the user to make you the default, you can start an activity to request this change:
Intent i = new Intent(Sms.Intents.ACTION_CHANGE_DEFAULT);
i.putExtra(Sms.Intents.EXTRA_PACKAGE_NAME, getPackageName());
startActivity(i);
The EXTRA_PACKAGE_NAME will trigger the UI to ask the user if the user
wishes to change the current default to your package (versus anything else
on the device that might also be a possible SMS/MMS client).
Hence, the recommended flow for a backup/restore app is to:
getDefaultSmsPackage()
ACTION_CHANGE_DEFAULT
getDefaultSmsPackage()
ACTION_CHANGE_DEFAULT
The “Emulator Control” view in DDMS allows you to send fake SMS messages to a running emulator. This is very useful for light testing.
You can also send fake SMS messages to an emulator via the emulator
console. This can be accessed via telnet, where the console is available
on localhost on your development machine, via the port number that appears
in the title bar of your emulator window (e.g., 5554). In the telnet
session, you can enter sms send [sendingNumber> <txt>, replacing
<sendingNumber> with the phone number of the pretend sender of the SMS,
and replacing <txt> with the text message itself.
The changes that Android made in 4.4 to limit who can delete SMS messages all but eliminated one common bit of app functionality: sending an SMS from the server to a user’s device to validate that the user’s phone number is what was expected. This is still possible, but the app can no longer delete that SMS message, meaning that it will clutter up the user’s SMS inbox.
Android 8.0+ provides “app-specific SMS tokens”, via a createAppSpecificSmsToken()
method on SmsManager. You supply a PendingIntent, and you get a unique
string back. If an SMS is received by the device containing that string, the
PendingIntent is invoked, instead of the message being delivered to the user’s
SMS client.
Hence, phone number validation flow is once again possible:
createAppSpecificSmsToken() on the SmsManager
Your PendingIntent that you gave to createAppSpecificSmsToken() will get
triggered as a result, invoking whatever component that you identified in the
underlying Intent.
The
SMS/Token
sample project demonstrates this flow. It consists of two activities:
one to show you a generated token, and one that will be displayed when that
token is received in an SMS message.
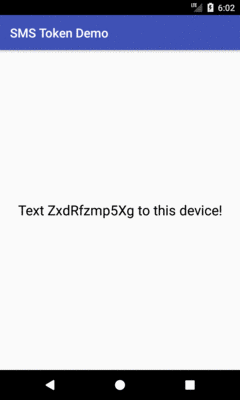
MainActivity is responsible for showing you the token:
package com.commonsware.android.sms.token;

import android.app.Activity;
import android.app.PendingIntent;
import android.content.Intent;
import android.os.Bundle;
import android.telephony.SmsManager;
import android.widget.TextView;

public class MainActivity extends Activity {
  @Override
  public void onCreate(Bundle savedInstanceState) {
    super.onCreate(savedInstanceState);
    setContentView(R.layout.activity_main);

    SmsManager mgr=SmsManager.getDefault();
    String token=mgr.createAppSpecificSmsToken(buildPendingIntent());
    TextView tv=(TextView)findViewById(R.id.text);

    tv.setText(getString(R.string.msg, token));
  }

  private PendingIntent buildPendingIntent() {
    return(PendingIntent.getActivity(this, 1337,
      new Intent(this, ResultActivity.class), 0));
  }
}Here, we:
SmsManager by calling the getDefault() static methodPendingIntent identifying ResultActivity
PendingIntent
The token itself is not really designed for manual user entry:
Figure 835: Token Sample App, Showing a Token
If another device sends an SMS message containing that token (along with perhaps
other information), ResultActivity will be displayed:
package com.commonsware.android.sms.token;

import android.app.Activity;
import android.app.PendingIntent;
import android.os.Bundle;
import android.provider.Telephony;
import android.telephony.SmsManager;
import android.telephony.SmsMessage;
import android.widget.TextView;

public class ResultActivity extends Activity {
  @Override
  public void onCreate(Bundle savedInstanceState) {
    super.onCreate(savedInstanceState);
    setContentView(R.layout.activity_main);

    TextView tv=(TextView)findViewById(R.id.text);

    for (SmsMessage pdu :
      Telephony.Sms.Intents.getMessagesFromIntent(getIntent())) {
      tv.append(pdu.getDisplayMessageBody());
    }
  }
}The actual SMS message is included in the Intent extras, filled into a copy
of the Intent that you supplied in the PendingIntent. The
getMessagesFromIntent() method on Telephony.Sms.Intents offers a convenient
way to get the actual SmsMessage objects. Here, we assume that they represent
a text message, and we concatenate their messages together to display in a
TextView:
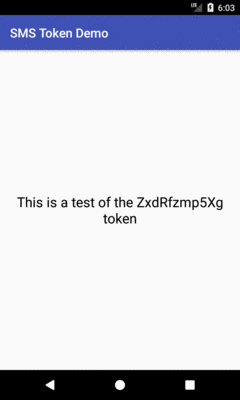
Figure 836: Token Sample App, Showing a Received Message with the Token
Usually, rather than show the token to the user, you will send it programmatically where it needs to go (e.g., a Web service call). Since the SMS message containing the token does not wind up in the user’s SMS client, the message containing the token does not need to be human-readable. It does need to contain the token verbatim, without any compression, encryption, or other conversions placed upon it.
Also:
createAppSpecificSmsToken() twice in succession, the first token will be invalidated
and ignored.PendingIntent.