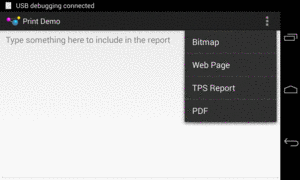
Figure 844: Print Demo App, Showing Overflow
Mobile devices are continuing to close the gap on capabilities that had formerly been the sole province of desktop systems or servers. After all, if the vision is that people should be able to use phones and tablets instead of desktops and notebooks, phones and tablets need to do whatever it is that those people need to have done.
One such capability is the ability to print to networked printers. While various third-party printing options had been available for some time, it is only starting with the Android 4.4 release that the OS and framework itself has support for printing. Hence, at this time, a significant majority of Android devices will be natively capable of printing, and so users will be more likely to expect that your app supports such printing.
As it turns out, the print engine in Android is centered upon the PDF document format, and Android supports converting HTML into PDF, albeit on a somewhat limited basis.
The API seems simple and clean. It actually is simple and clean… so long as you are printing very simple contents (bitmaps or HTML). Once you get into anything more complicated than that, the threading alone starts to make things rather messy.
This chapter describes how to use the Android 4.4 print system, including how to print HTML and PDF files. It will also cover how to generate HTML and PDF files, whether for printing or for other purposes (e.g., reports to be emailed or uploaded somewhere).
Understanding this chapter requires that you have read the core chapters
of this book. Also, you should read
the chapter on advanced uses of WebView.
Writing programs that print on desktop operating systems historically has been tedious. The fine-grained control that is needed for high-quality output makes the APIs complicated, and these tend to be only partially masked by high-level wrappers to simplify common scenarios.
Android’s print system is no different.
Starting with Android 4.4, you can request access to a PrintManager system
service (via getSystemService(), called on any Context). It offers a
print() method that lets you describe what should be printed, in the form of
a PrintAttributes (e.g., what size paper are you looking for?) and a
PrintDocumentAdapter. The latter is responsible for working with Android
to actually create the content to be printed.
print() returns a PrintJob, which you can use to examine the status of
the print request. PrintManager also offers a getPrintJobs() method that
returns all of your outstanding print requests. Note that you cannot access
print jobs from other applications.
Hence, the real complexity of printing lies in the PrintDocumentAdapter
implementation. This class is responsible for generating a PDF that represents
the content to be printed. This leads to four basic ways of working with
a PrintDocumentAdapter:
WebView for printing HTML contentCanvas-based PDF generation class, called
PrintedPdfDocument
printBitmap() on
PrintHelper
The
Printing/PrintManager
sample project demonstrates all but the Canvas option.
The UI is just a large EditText, designed for you to type in a message.
The action bar overflow contains four options:
EditText
Figure 844: Print Demo App, Showing Overflow
Google helpfully supplies a PrintHelper class in the Android Support
package that makes it trivially easy to print a bitmap. Just call printBitmap()
on the PrintHelper, after some minor configuration, and it takes over from
there.
In onOptionsItemSelected() of the sample app’s MainActivity, when
the user chooses the “Bitmap” item, we call
startActivityForResult() on an ACTION_GET_CONTENT Intent, to allow
the user to pick an image from the device or emulator:
      case R.id.bitmap:
        Intent i=
            new Intent(Intent.ACTION_GET_CONTENT)
              .addCategory(Intent.CATEGORY_OPENABLE)
              .setType("image/*");

        startActivityForResult(i, IMAGE_REQUEST_ID);
This, in turn, will trigger a call to onActivityResult(), once the user has
(presumably) chosen an image:
  @Override
  protected void onActivityResult(int requestCode, int resultCode,
                                  Intent data) {
    if (requestCode == IMAGE_REQUEST_ID
        && resultCode == Activity.RESULT_OK) {
      try {
        PrintHelper help=new PrintHelper(this);

        help.setScaleMode(PrintHelper.SCALE_MODE_FIT);
        help.printBitmap("Photo!", data.getData());
      }
      catch (FileNotFoundException e) {
        Log.e(getClass().getSimpleName(), "Exception printing bitmap",
              e);
      }
    }
  }
If the user did indeed choose an image, we create an instance of PrintHelper,
call setScaleMode() to tell it fit the image to the page, and then call
printBitmap() to print the image.
setScaleMode() takes one of two values:
SCALE_MODE_FIT will show the entire image, blown up as big as possibleSCALE_MODE_FILL will fill the entire page, at the cost of cropping the
image along one axis, if the image’s aspect ratio does not match the paper’s
aspect ratioprintBitmap() takes the name of the print job (so the user, when reviewing the
outstanding print jobs, knows what it is) and either a Uri or a Bitmap for
the image itself. In the case of a Uri, the Uri could be malformed, in which
case the FileNotFoundException may be thrown, which is why we catch it.
What the user sees, after choosing an image to print (and a printer, if the user has more than one available), is a print configuration dialog appear, much like those you might see in a desktop OS:
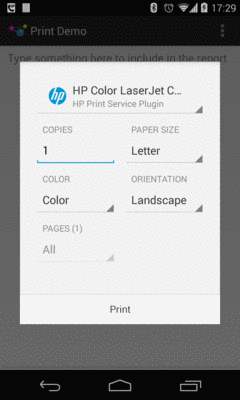
Figure 845: HP Print Configuration Dialog
The dialog itself is provided by Android; the contents of the dialog is provided
by a PrintService that is responsible for taking our print job and actually
dispatching it to the printer.
Here, the user can make typical changes, like portrait/landscape printing and the number of copies, before pressing the “Print” button. At that point, the user’s chosen image will be printed.
Note that, in Android 4.4, the print dialog does not work especially well in landscape on smaller screen sizes, forcing the user to scroll to get to all of the widgets, including the “Print” button.
Printing a bitmap is nice. It is not especially useful, as it implies that we have a bitmap worth printing by itself. That is certainly possible, but it is unlikely. Even in the case where we want to print a photo, there is a very good chance that we will need to print some additional information along with the photo (caption, date when photo was taken, etc.).
Being able to print something over which we have greater control of the rendering would be more useful. The easiest way to do that is to print some HTML. Later in this chapter we will cover how to generate some dynamic HTML representing what you want to print. For the moment, though, let’s focus on the printing itself.
Starting in API Level 19, WebView is capable of participating in the
print process. You can load up a WebView with your desired content, then
print that content.
Some apps will already be using a WebView as part of the UI, and that WebView
will contain what needs to be printed. For example, a Web browser can easily
add a “Print” action bar overflow item that would print the contents of the
active WebView in the browser.
For cases where you want to print something, but you are not using the WebView
for anything but printing, you do not need to add the WebView to the UI.
You can create a WebView instance via its constructor, passing in your Activity
as the Context required by that constructor. You can then populate that WebView
with what needs to be printed, then print it. That is the technique that the
sample application demonstrates, in part because it is likely to be the more
common scenario — only so many apps use a WebView in the UI, and more are likely
to need to print.
The sample app’s “Web Page” action bar overflow item is tied to an R.id.web
MenuItem. When that is tapped by the user, onOptionsItemSelected() calls
printWebPage() to print a Web page loaded from a URL:
  private void printWebPage() {
    WebView print=prepPrintWebView(getString(R.string.web_page));

    print.loadUrl("https://commonsware.com/Android");
  }
Here, getString(R.string.web_page) is returning a string resource that will
be used for the name of a print job. prepPrintWebView() returns the WebView
that will be used for printing. loadUrl() is the standard WebView method
for populating the WebView from a URL. Note that this causes the sample app
to need the INTERNET permission, since we are downloading a Web page and its
related assets (CSS, images) from the Internet.
You will notice that we are not actually printing anything directly in
printWebPage(), which may seem a bit odd given the name of the method. That
is because we cannot print anything until the page is loaded — after all, it is
only then that we have what we want to print.
The job of prepPrintWebView() is to arrange to get control when the page
is loaded and actually print the desired page:
  private WebView prepPrintWebView(final String name) {
    WebView result=getWebView();

    result.setWebViewClient(new WebViewClient() {
      @Override
      public void onPageFinished(WebView view, String url) {
        print(name, view.createPrintDocumentAdapter(),
              new PrintAttributes.Builder().build());
      }
    });

    return(result);
  }
getWebView() is just a lazy-initialization method, populating a wv data
member of the activity with a WebView. This way, we avoid creating the WebView
up front, as if the user does not elect to print any HTML, we do not need the
WebView, and a WebView is expensive to initialize:
  private WebView getWebView() {
    if (wv == null) {
      wv=new WebView(this);
    }

    return(wv);
  }
We are holding onto the WebView in a data member to ensure that it will
not be garbage-collected. A WebView that is part of our UI is being strongly
held by its parent in the View hierarchy, so we do not normally need to worry
about this. However, in this case, we are creating a WebView dynamically and
are not adding it to the UI, so we are responsible for holding onto it, at least
as long as is needed. In this sample, we just hold onto it for the rest of the life
of the activity.
Back in prepPrintWebView(), we call setWebViewClient(), to attach an anonymous
inner class extending WebViewClient to the WebView. Back in
the chapter introducing WebView, we saw WebViewClient in the
context of shouldOverrideUrlLoading(). Another popular method to override on a
WebViewClient is onPageFinished(). This is called when the HTML and related
assets (CSS, images, etc.) have been loaded and rendered within the WebView. At
this point, for the particular URL we are loading, it is safe to print the
page.
In onPageFinished(), we call a print() method on MainActivity itself:
  private PrintJob print(String name, PrintDocumentAdapter adapter,
                         PrintAttributes attrs) {
    startService(new Intent(this, PrintJobMonitorService.class));

    return(mgr.print(name, adapter, attrs));
  }
The first line of print() calls startService() to start a PrintJobMonitorService.
We will see more about why we are doing that later in this chapter.
For the moment, take it on faith that this service will help ensure that our process
stays around long enough for our print job to finish.
The second line of print() calls a print() method on
a mgr data member. Here,
mgr is a PrintManager, initialized up in onCreate() of the activity,
by calling getSystemService(), asking for the PRINT_SERVICE, and casting the
result to be a PrintManager.
  @Override
  protected void onCreate(Bundle savedInstanceState) {
    super.onCreate(savedInstanceState);
    setContentView(R.layout.main);
    prose=findViewById(R.id.prose);
    mgr=(PrintManager)getSystemService(PRINT_SERVICE);
  }
The print() method tells the PrintManager to go print something. print()
takes three parameters:
name parameter
to prepPrintWebView(). That parameter is marked final, so the call to
setWebViewClient() will include the value of that parameter in the
anonymous inner class’ implementation of onPageFinished().PrintDocumentAdapter. For the case of printing HTML, we get one of those
by calling createPrintDocumentAdapter() on our populated WebView.PrintAttributes object, describing any particular requirements that you
have for the printed output (e.g., media size, margins, color/monochrome). If you
will let the user control all of that via the print dialog, an empty PrintAttributes
is fine to use with print(). You typically create a PrintAttributes by
creating a PrintAttributes.Builder, calling setters on the Builder to configure
the PrintAttributes, and getting the resulting PrintAttributes via a call
to build().And that’s it. Android — in particular, WebView and its PrintDocumentAdapter –
takes over from here and prints the Web page.
Alas, we do not have infinite flexibility with printing HTML from a WebView.
Here are some limitations and potential problem areas that you will encounter:
onPageFinished()
does not take those operations into account. You will need to use
addJavascriptInterface() to inject a Java object into the JavaScript realm,
then have your asynchronous work arrange to call some method on that Java
object, to signal to you that the document is ready for printing.WebView can only do one print job at a time. Printing occurs asynchronously,
and so you have to be careful that you do not accidentally start off a second
print job while an earlier one is in process. The print() method returns a
PrintJob that you can use to monitor the print job status, and this object
will be covered in a bit more detail later in this chapter.
You may wish to set up a WebView pool, where you reuse an existing WebView
only if its associated PrintJob is completed, creating a new WebView
instance if there is no available WebView at the moment. Or, you might disable
printing options in the UI until the PrintJob is done, so you can reuse the
WebView. The sample app does none of this, to keep things simpler.<div> IDs) or by page numbers.
Hence, you need to load into the WebView exactly what you want to print, no
more, no less.Also, any direct use of PrintManager will only work on API Level 19. You will
need to ensure that you only try using it on API Level 19+ devices, using Java
version guard blocks. You will also need to set your build target
(i.e., compileSdkVersion in Android Studio) to at least
API Level 19 to be able to reference the PrintManager and related classes.
Finally, while loading and printing HTML are both intrinsically asynchronous, generating HTML locally is not. We will discuss this issue a bit more later in this chapter.
As will be seen in the next section, even if we “hand-roll”
our printed output using a Canvas, the result seems to be a PDF file. Hence,
you would think that the printing framework would provide convenience code to
print a PDF file that we obtained by other means.
Alas, that is not the case.
The sample app contains some code demonstrating how this is possible,
inspired by this Stack Overflow answer,
though
it may cut a few corners that Google would prefer not be cut. However, it also
illustrates how to create your own PrintDocumentHandler, which you will need
for any print job not involving a bitmap or HTML.
We supply a PrintDocumentAdapter to the print() method on PrintManager. In
the HTML case, we got a PrintDocumentAdapter from the WebView, and so it
is Google’s job to implement that adapter. Similarly, PrintHelper has its
own internal implementation of a PrintDocumentAdapter that it uses for printing
the bitmap.
For anything else, you need to create your own PrintDocumentAdapter, or
find a third-party implementation that you can perhaps reuse.
PrintDocumentAdapter’s job is to supply the PrintManager with the content
to be printed, in the form of a PDF file. To do that, there are four callback
methods that PrintManager (and related classes) will call on the
PrintDocumentAdapter:
onStart() is called first. If you are planning on using the same
PrintDocumentAdapter instance for multiple print jobs, this would be a spot
to initialize the work for a new job. Otherwise, if you were only planning
on using a PrintDocumentAdapter instance once, you may as well just put your
initialization logic in the constructor.onLayout() is called next. Here is where you do enough work to determine
what the resulting output will be later on as printing continues. In particular,
if you want to provide an accurate page count, this is where you will need
to perform the necessary calculations to determine that.onWrite() is called next, asking you to write one or more PDF pages out to
a supplied ParcelFileDescriptor (on which you can create an OutputStream).onFinish() is called last, when the printing request is completed, so you
can free up any necessary resources.All four of those callback methods are called on the main application thread.
Your onStart() and onFinish() methods need to be fast enough to complete
their work on that thread, and that may not be a problem. The work that
onLayout() and onWrite() do may take a while, though, and so the protocol
is designed to allow you to do that work on a background thread. Both methods
are passed a callback object that you use to pass along the results of your work,
and both are passed a CancellationSignal to indicate if the user cancels the
print job while you are doing the work.
What PrintDocumentAdapter does not do is actually give you a thread to use.
So, the sample app contains a ThreadedPrintDocumentAdapter that moves
the onLayout() and onFinish() work to a background thread:
package com.commonsware.android.print;

import android.content.Context;
import android.os.Bundle;
import android.os.CancellationSignal;
import android.os.ParcelFileDescriptor;
import android.print.PageRange;
import android.print.PrintAttributes;
import android.print.PrintDocumentAdapter;
import java.util.concurrent.ExecutorService;
import java.util.concurrent.Executors;

abstract class ThreadedPrintDocumentAdapter extends
    PrintDocumentAdapter {
  abstract LayoutJob buildLayoutJob(PrintAttributes oldAttributes,
                                    PrintAttributes newAttributes,
                                    CancellationSignal cancellationSignal,
                                    LayoutResultCallback callback,
                                    Bundle extras);

  abstract WriteJob buildWriteJob(PageRange[] pages,
                                  ParcelFileDescriptor destination,
                                  CancellationSignal cancellationSignal,
                                  WriteResultCallback callback,
                                  Context ctxt);

  private Context ctxt=null;
  private ExecutorService threadPool=Executors.newFixedThreadPool(1);

  ThreadedPrintDocumentAdapter(Context ctxt) {
    this.ctxt=ctxt;
  }

  @Override
  public void onLayout(PrintAttributes oldAttributes,
                       PrintAttributes newAttributes,
                       CancellationSignal cancellationSignal,
                       LayoutResultCallback callback, Bundle extras) {
    threadPool.submit(buildLayoutJob(oldAttributes, newAttributes,
                                     cancellationSignal, callback,
                                     extras));
  }

  @Override
  public void onWrite(PageRange[] pages,
                      ParcelFileDescriptor destination,
                      CancellationSignal cancellationSignal,
                      WriteResultCallback callback) {
    threadPool.submit(buildWriteJob(pages, destination,
                                    cancellationSignal, callback, ctxt));
  }

  @Override
  public void onFinish() {
    threadPool.shutdown();

    super.onFinish();
  }

  protected abstract static class LayoutJob implements Runnable {
    PrintAttributes oldAttributes;
    PrintAttributes newAttributes;
    CancellationSignal cancellationSignal;
    LayoutResultCallback callback;
    Bundle extras;

    LayoutJob(PrintAttributes oldAttributes,
              PrintAttributes newAttributes,
              CancellationSignal cancellationSignal,
              LayoutResultCallback callback, Bundle extras) {
      this.oldAttributes=oldAttributes;
      this.newAttributes=newAttributes;
      this.cancellationSignal=cancellationSignal;
      this.callback=callback;
      this.extras=extras;
    }
  }

  protected abstract static class WriteJob implements Runnable {
    PageRange[] pages;
    ParcelFileDescriptor destination;
    CancellationSignal cancellationSignal;
    WriteResultCallback callback;
    Context ctxt;

    WriteJob(PageRange[] pages, ParcelFileDescriptor destination,
             CancellationSignal cancellationSignal,
             WriteResultCallback callback, Context ctxt) {
      this.pages=pages;
      this.destination=destination;
      this.cancellationSignal=cancellationSignal;
      this.callback=callback;
      this.ctxt=ctxt;
    }
  }
}
This class uses a single-thread thread pool, managed by an ExecutorService.
In principle, a well-written PrintDocumentAdapter could handle multiple
print jobs in parallel — if you attempt this and are using
ThreadedPrintDocumentAdapter for inspiration, simply increase the size
of the thread pool.
The onLayout() and onWrite() methods package up their parameters
(described in the next section) into job objects.
Those objects implement Runnable, and they are then handed to the ExecutorService
to be run on the next-available thread. onFinish() shuts down the ExecutorService,
though if you wanted to use the ThreadedPrintDocumentAdapter for multiple
print jobs, you would come up with some other logic to clean up the
ExecutorService when you were done with all of the jobs.
Subclasses of ThreadedPrintDocumentAdapter need to:
LayoutJob and WriteJob static inner classes,
implementing their respective
run() methods, to do the work required of onLayout() and onWrite()
buildLayoutJob() and buildWriteJob() methods that return
instances of those custom subclasses(fans of dependency injection no doubt can find better solutions for wiring
up a ThreadedPrintDocumentAdapter)
However, we still need to actually be able to print a PDF, which
ThreadedPrintDocumentAdapter does not do on its own. The sample app
also has a PdfDocumentAdapter, which extends ThreadedPrintDocumentAdapter
and demonstrates a crude way of printing a PDF through the PrintDocumentAdapter
protocol.
PdfDocumentAdapter does not use onStart() or onFinish(). And, since
the onLayout() and onWrite() methods are handled by
ThreadedPrintDocumentAdapter, PdfDocumentAdapter does not have those either.
It does, however, have the buildLayoutJob() and buildWriteJob() methods
required by ThreadedPrintDocumentAdapter. These return instances of a
PdfLayoutJob and PdfWriteJob, respectively:
  @Override
  LayoutJob buildLayoutJob(PrintAttributes oldAttributes,
                           PrintAttributes newAttributes,
                           CancellationSignal cancellationSignal,
                           LayoutResultCallback callback, Bundle extras) {
    return(new PdfLayoutJob(oldAttributes, newAttributes,
                            cancellationSignal, callback, extras));
  }

  @Override
  WriteJob buildWriteJob(PageRange[] pages,
                         ParcelFileDescriptor destination,
                         CancellationSignal cancellationSignal,
                         WriteResultCallback callback, Context ctxt) {
    return(new PdfWriteJob(pages, destination, cancellationSignal,
                           callback, ctxt));
  }
PdfLayoutJob needs to fulfill the bulk of the onLayout() contract:
CancellationSignal and call onLayoutCancelled() on
the supplied LayoutResultCallback if the job has been canceledPrintDocumentInfo object to provide metadata about the document
to be printed, and pass that to onLayoutFinished() on the
LayoutResultCallback
  private static class PdfLayoutJob extends LayoutJob {
    PdfLayoutJob(PrintAttributes oldAttributes,
                 PrintAttributes newAttributes,
                 CancellationSignal cancellationSignal,
                 LayoutResultCallback callback, Bundle extras) {
      super(oldAttributes, newAttributes, cancellationSignal, callback,
            extras);
    }

    @Override
    public void run() {
      if (cancellationSignal.isCanceled()) {
        callback.onLayoutCancelled();
      }
      else {
        PrintDocumentInfo.Builder builder=
            new PrintDocumentInfo.Builder("CHANGE ME PLEASE");

        builder.setContentType(PrintDocumentInfo.CONTENT_TYPE_DOCUMENT)
               .setPageCount(PrintDocumentInfo.PAGE_COUNT_UNKNOWN)
               .build();

        callback.onLayoutFinished(builder.build(),
                                  !newAttributes.equals(oldAttributes));
      }
    }
  }
PdfLayoutJob also has access to two PrintAttributes objects, the “old”
attributes and the “new” attributes. In principle, onLayout() could be called
a couple of times, perhaps based upon changes the user makes in the print dialog.
These PrintAttributes objects describe the nature of the output, including
things like page size and margins. PdfLayoutJob totally ignores these, because
the PDF is a packaged asset in this case and cannot be changed. If you are
dynamically generating a PDF file, you may wish to pay attention to the
new PrintAttributes and take them into account.
PdfLayoutJob also has access to a Bundle of “extras”, not unlike the “extras”
associated with an Intent. At the present time, there is only one semi-documented
“extra”, EXTRA_PRINT_PREVIEW, which will be true if onLayout() is being
called to generate a print preview of the printed output, false otherwise.
What PdfLayoutJob does do is create a PrintDocumentInfo.Builder to set up
a PrintDocumentInfo object indicating that:
CONTENT_TYPE_DOCUMENT) versus a “photo”
(CONTENT_TYPE_PHOTO) or “unknown” (CONTENT_TYPE_UNKNOWN). This information
is passed to the PrintService that functions as a bridge between PrintManager
and the printer, and the PrintService might optimize output based upon this
setting (e.g., lower quality print output for a “document” instead of
a “photo”).PAGE_COUNT_UNKNOWN). In principle,
the page count is known, insofar as the PDF that will be printed is an asset
baked into the app, and so we could hard-code the page count in addition to
hard-coding other details (like the asset’s filename).The boolean second parameter to onLayoutFinished() is supposed to be true
if the layout changed, false otherwise. In practice, the value does not seem
to matter on the first onLayout() call. The implementation here compares
the two PrintAttributes objects using equals().
The last piece is the PdfWriteJob, which performs the work required of the
onWrite() callback:
  private static class PdfWriteJob extends WriteJob {
    PdfWriteJob(PageRange[] pages, ParcelFileDescriptor destination,
                CancellationSignal cancellationSignal,
                WriteResultCallback callback, Context ctxt) {
      super(pages, destination, cancellationSignal, callback, ctxt);
    }

    @Override
    public void run() {
      InputStream in=null;
      OutputStream out=null;

      try {
        in=ctxt.getAssets().open("cover.pdf");
        out=new FileOutputStream(destination.getFileDescriptor());

        byte[] buf=new byte[16384];
        int size;

        while ((size=in.read(buf)) >= 0
            && !cancellationSignal.isCanceled()) {
          out.write(buf, 0, size);
        }

        if (cancellationSignal.isCanceled()) {
          callback.onWriteCancelled();
        }
        else {
          callback.onWriteFinished(new PageRange[] { PageRange.ALL_PAGES });
        }
      }
      catch (Exception e) {
        callback.onWriteFailed(e.getMessage());
        Log.e(getClass().getSimpleName(), "Exception printing PDF", e);
      }
      finally {
        try {
          in.close();
          out.close();
        }
        catch (IOException e) {
          Log.e(getClass().getSimpleName(),
                "Exception cleaning up from printing PDF", e);
        }
      }
    }
  }
At its core, PdfWriteJob simply writes our PDF (culled from a cover.pdf asset)
to an OutputStream. The OutputStream is built from the ParcelFileDescriptor,
indicating where the PDF content should be written to.
The InputStream-to-OutputStream “bucket brigade” is augmented with checks on
the CancellationSignal, to abandon the loop if the print job was canceled by
the user. At the end, we call one of three methods on the WriteResultCallback:
onWriteCancelled() if the CancellationSignal indicates that the job
was canceledonWriteFinished() if everything succeededonWriteFailed() (with an error message) if there was some problem, such as
failed I/OPdfWriteJob has access to a PageRange array, representing the particular pages
out of a larger document to be printed. The parameter to onWriteFinished()
is another PageRange array that should indicate what pages were printed. Once
again, since the PDF is fixed, PdfWriteJob ignores the input PageRange array,
and it indicates that we wrote all pages (PageRange.ALL_PAGES) in the output.
In principle, if you have more control over your environment, you should only
print the requested pages, in which case the output parameter to onWriteFinished()
might be the same array as was passed into onWrite().
Back in MainActivity, the “PDF” action bar overflow item triggers a call to
print() on the PrintManager, supplying our PdfDocumentAdapter and another
empty PrintAttributes:
      case R.id.pdf:
        print("Test PDF",
              new PdfDocumentAdapter(getApplicationContext()),
              new PrintAttributes.Builder().build());
The PdfDocumentAdapter needs a Context, in order to access the cover.pdf
asset. If your PDF file is being generated, or is saved as a file on external
storage, you would not need this. Since it is theoretically possible that our
activity could be destroyed while the printing is going on in background threads,
rather that briefly leak an Activity, we provide the Application Context
to PdfDocumentAdapter, as that is a singleton and cannot be leaked.
The result of all of this is that when the user chooses the “PDF” action bar overflow item, the book cover copy is printed.
What Google really wants you to do — if bitmaps and HTML are insufficient –
is to create PDF documents using PrintedPdfDocument and a Canvas.
The concept is simple:
PrintedPdfDocument instance, given a PrintAttributes that describes
the page size, margins, etc.startPage() to add a page to the document, which returns a
PdfDocument.Page
getCanvas() on the Page and use the standard Android 2D drawing APIs
to draw lines, text, shaded areas, and so forthfinishPage() on the PdfPrintedDocument when you are done rendering
that pagewriteTo() on the PrintedPdfDocument to write the PDF to an OutputStream,
such as the one you get from the ParcelFileDescriptor in the onWrite()
callback of your PrintDocumentAdapter
close() on the PrintedPdfDocument when you are doneFor example, let’s look at the onWrite() implementation used by PrintHelper
to print a bitmap:
@Override
public void onWrite(PageRange[] pageRanges, ParcelFileDescriptor fileDescriptor,
                    CancellationSignal cancellationSignal,
                    WriteResultCallback writeResultCallback) {
    PrintedPdfDocument pdfDocument = new PrintedPdfDocument(mContext,
            mAttributes);
    try {

        Page page = pdfDocument.startPage(1);
        RectF content = new RectF(page.getInfo().getContentRect());

        // Compute and apply scale to fill the page.
        Matrix matrix = getMatrix(mBitmap.getWidth(), mBitmap.getHeight(),
                content, fittingMode);

        // Draw the bitmap.
        page.getCanvas().drawBitmap(mBitmap, matrix, null);

        // Finish the page.
        pdfDocument.finishPage(page);

        try {
            // Write the document.
            pdfDocument.writeTo(new FileOutputStream(
                    fileDescriptor.getFileDescriptor()));
            // Done.
            writeResultCallback.onWriteFinished(
                    new PageRange[]{PageRange.ALL_PAGES});
        } catch (IOException ioe) {
            // Failed.
            Log.e(LOG_TAG, "Error writing printed content", ioe);
            writeResultCallback.onWriteFailed(null);
        }
    } finally {
        if (pdfDocument != null) {
            pdfDocument.close();
        }
        if (fileDescriptor != null) {
            try {
                fileDescriptor.close();
            } catch (IOException ioe) {
                /* ignore */
            }
        }
    }
}
(note: the preceding code snippet is Copyright (C) 2013 The Android Open Source Project)
Here, they:
PrintedPdfDocument
startPage()
Matrix based upon the image size, the page size,
and the scale type (FIT or FILL)Canvas using that Matrix
OutputStream for the supplied ParcelFileDescriptor
Curiously, they do not do this work in a background thread, though the
onLayout() implementation does use a background thread (since the image
Uri may require an Internet download).
If you are comfortable with the Canvas API, writing PDF pages is much
the same as drawing to your custom View. On the other hand, Android’s
Canvas API is not the same as any other drawing system’s API, so
there will be distinct differences from any other 2D drawing API that
you might have used previously.
The print() method that we have been calling on PrintManager returns
a PrintJob, representing the print job. This object has a number of
status inquiry methods, including (in rough order of when the events occur):
isStarted()isQueued() (i.e., waiting for the print system to process it)isBlocked() (i.e., permanently stuck, but needs to be canceled)isCompleted()isFailed()isCancelled()It also has a cancel() method that you can call to cancel the print job (e.g.,
based on user request). PrintJob also offers a restart() method that
you can use to re-try a failed (but not canceled) print job.
What PrintJob does not have is a listener interface to be proactively notified
when the job changes state.
PrintManager also has getPrintJobs(), which will return a list of the
PrintJob objects representing the jobs you have requested in this process,
rather than having to keep track of all of those yourself.
If you are going to create a report in HTML,
you will want to consider doing that work in an AsyncTask’s doInBackground()
method, so the I/O involved in creating the report happens in the background.
However, PrintManager requires that print() be called on the main application
thread, so you would call print() from onPostExecute() of the AsyncTask.
Similarly, if you are creating your own PrintDocumentAdapter, you will want
to consider moving the onLayout() and onWrite() work into background
threads, such as is illustrated in the sample app via ThreadedPrintDocumentAdapter.
The problem with bare threads or an AsyncTask is that they do not indicate
to Android that your process is still doing some work. It is possible that the
user could request that you print something, then switch to another app (e.g., HOME,
recent-tasks list). Android might consider your process to be relatively
low priority and could terminate it before your print job completes.
The obvious solution is to involve a service, perhaps even a foreground service, to indicate to Android that your process is doing work that the user will notice if it does not complete. You could start the service when you do the print job, and then stop the service when the print job is completed, to return your process to normal priority.
However, actually having a service do the printing is a serious pain:
WebView’s PrintDocumentAdapter really wants the Context that created
the WebView to be an Activity
onLayout() and onWrite() are not Parcelable and
so cannot be passed in Intent extras via startService() to the serviceOne possibility would be to create a PrintJobMonitorService, which is what
the sample app does. PrintJobMonitorService takes advantage of that
listPrintJobs() method on PrintManager to keep tabs on all of our
requested print jobs. So long as there is one or more print jobs in an active
state, the service keeps running. Otherwise, the service stops. Hence, while
the service is not actually doing the printing, it is running while the printing
is going on, flagging to the OS to leave our process alone during this critical
juncture.
package com.commonsware.android.print;

import android.app.Service;
import android.content.Intent;
import android.os.IBinder;
import android.os.SystemClock;
import android.print.PrintJob;
import android.print.PrintJobInfo;
import android.print.PrintManager;
import java.util.concurrent.Executors;
import java.util.concurrent.ScheduledExecutorService;
import java.util.concurrent.TimeUnit;

public class PrintJobMonitorService extends Service implements Runnable {
  private static final int POLL_PERIOD=3;
  private PrintManager mgr=null;
  private ScheduledExecutorService executor=
      Executors.newSingleThreadScheduledExecutor();
  private long lastPrintJobTime=SystemClock.elapsedRealtime();

  @Override
  public void onCreate() {
    super.onCreate();

    mgr=(PrintManager)getSystemService(PRINT_SERVICE);
    executor.scheduleAtFixedRate(this, POLL_PERIOD, POLL_PERIOD,
                                 TimeUnit.SECONDS);
  }

  @Override
  public int onStartCommand(Intent intent, int flags, int startId) {
    return(super.onStartCommand(intent, flags, startId));
  }

  @Override
  public void onDestroy() {
    executor.shutdown();

    super.onDestroy();
  }

  @Override
  public void run() {
    for (PrintJob job : mgr.getPrintJobs()) {
      if (job.getInfo().getState() == PrintJobInfo.STATE_CREATED
          || job.isQueued() || job.isStarted()) {
        lastPrintJobTime=SystemClock.elapsedRealtime();
      }
    }

    long delta=SystemClock.elapsedRealtime() - lastPrintJobTime;

    if (delta > POLL_PERIOD * 2) {
      stopSelf();
    }
  }

  @Override
  public IBinder onBind(Intent intent) {
    return(null);
  }
}
PrintJobMonitorService uses a single-thread ScheduledExecutorService, to get
control every three seconds in its run() method. The run() method iterates
over the PrintJob objects associated with our app and looks for any that are
in one of three states:
The first two states have simple test methods on PrintJob (isStarted() and
isQueued()). The “created” state does not, for some reason, so we have to get
the underlying PrintJobInfo object and manually check its state (getState())
to see if it is started (PrintJobInfo.STATE_STARTED).
PrintJobMonitorService tracks the last time we saw an in-progress print job.
If we have gone through two three-second polling periods without any in-progress
print jobs, the service assumes that it is no longer needed and calls stopSelf().
Before Android 4.4, printing in Android was limited and clunky.
The primary approach was to use Google Cloud Print. In effect, Google Cloud
Print is a Web-managed print server. You would teach Google how to talk to
your printers, and then any authorized device could print to those
printers. By sharing your content (particularly PDFs) via ACTION_SEND,
the user could choose Google Cloud Print as an option if they had
Google Cloud Print set up for their device and printer. Note that
the Android 4.4 printing framework includes a PrintService that works
with Google Cloud Print, so users who have set up Google Cloud Print can
still use it even with the new printing framework.
Various printer manufacturers or third parties also created their own apps that would fill a similar role, albeit perhaps working with printers on the local network. Or, you could write your own low-level code to talk to a network printer via relevant printing protocols like IPP, though this would be unpleasant at best.
Earlier in this chapter, we saw how to print HTML. However,
the HTML we printed was loaded from a URL. That is fine, but, as with printing
bitmaps, it may not be a very popular scenario. What will be more likely is that
you want to print some sort of report, generated on the device. And, since
printing using the Canvas is a bit complicated, creating the report via HTML
may be an easier route to take.
The typical approach for this involves creating an HTML template that sets up the basic page (e.g., references to CSS), then uses some sort of “macros” in the template to indicate portions that should be replaced dynamically with something from outside of the template.
This approach has been used since the early days of the original “dot-com revolution” of the 1990’s, pioneered by tools like Cold Fusion. In Java, there are any number of available template engines.
However, for HTML, it is reasonably likely that a Web designer is going to want to get involved, to style the report. Ideally, you choose a template engine that is either something the designer is already using, or is one that is something the designer might wish to use elsewhere in the future. Forcing the designer to learn some new template syntax, just for the purposes of creating these reports, may not be the best use of the designer’s time (or your time, for answering all of the designer’s questions).
One of the more popular template structures used today use braces (a.k.a., curly
brackets) as the macro delimiters (e.g., {{ something }}). In particular,
the macro syntax popularized by mustache is used
by many template engine implementations. There is a very good chance that your
Web designer already has used mustache-style templates, or at least has heard
about them.
And, conveniently enough, there is a Java implementation – jmustache — that is Android-friendly. The sample app in this chapter implements a “TPS Report” that is generated from a mustache template using jmustache.
The “Get It” section of the jmustache documentation contains up-to-date instructions for adding it to a project.
Developers using the Android Gradle Plugin — including Android Studio users –
should reference the Maven Central artifact (com.samskivert:jmustache) from
build.gradle.
A report template for jmustache can be a String or a Reader, with the latter
allowing you to pull in files, assets, or raw resources (the latter two via an
InputStreamReader).
In the case of the sample app, the template is small, and is packaged as a string
resource. However, since the template involves HTML tags, we have to use CDATA
notation to allow those tags to be left alone within the XML of the string
resource:
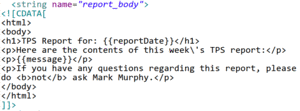
Figure 846: TPS Report Mustache Template
The template contains {{reportDate}} and {{message}} variables to be replaced
at runtime with dynamic data from our app. Also note that, despite the CDATA,
we still need to escape the apostrophe with a leading backslash (\').
What will fill in the {{reportDate}} and {{message}} variables will be values
from a “context”. Here, “context” is not referring to Context, but rather an
object that we pass to jmustache to serve as the source of data to blend into
the report.
jmustache has fairly flexible rules for how it can resolve template variables,
including calling Java getter methods based on the variable names. Hence,
we can create a “context” that has getReportDate() and getMessage()
methods, such as the TpsReportContext class in the sample app:
  private static class TpsReportContext {
    private static final SimpleDateFormat fmt=
        new SimpleDateFormat("yyyy-MM-dd", Locale.US);
    String msg;

    TpsReportContext(String msg) {
      this.msg=msg;
    }

    @SuppressWarnings("unused")
    String getReportDate() {
      return(fmt.format(new Date()));
    }

    @SuppressWarnings("unused")
    String getMessage() {
      return(msg);
    }
  }
The “TPS Report” action bar overflow item eventually routes to a
printReport() method on MainActivity:
  private void printReport() {
    Template tmpl=
        Mustache.compiler().compile(getString(R.string.report_body));
    WebView print=prepPrintWebView(getString(R.string.tps_report));

    print.loadData(tmpl.execute(new TpsReportContext(prose.getText()
                                                          .toString())),
                   "text/html; charset=UTF-8", null);
  }
The first statement creates a jmustache Template object representing the
report template. This is created by getting the singleton compiler() from
Mustache, and calling compile() on it to interpret the string resource.
Note that since this Template only depends upon the string resource, we could
cache the Template, rebuilding it only on configuration changes, if desired.
Note that we load the template on the main application thread, as printReport()
is called from onOptionsItemSelected(). For a small string resource, that is OK.
If you are loading a more complex report template, you will want to do that in
a background thread.
The second statement mirrors one from printing the Web page from before, where
we call prepPrintWebView() to lazy-create our WebView and set it up to print
when the page is loaded. Here, we use a different print job name than before, one
reflecting the fact that this is a TPS report.
Finally, we use execute() on the Template to generate our HTML for printing,
then pass that HTML to the loadData() method on WebView. execute() takes
our “context” Object, which in this case is an instance of our TpsReportContext
class, with the value typed into the EditText widget in our UI as the “message”
to go into the report.
Note that we execute() the Template on the main application thread as well as
having loaded it on that thread in the first place. Once again, the more complex
the report, the more likely it is that you will want to move this logic into a
background thread. However, remember that print() needs to be called on the main
application thread.
The result is that the user gets a printed TPS report, containing today’s date and
whatever message they typed into the EditText.
Perhaps you feel that generating HTML does not give you enough control,
yet using the Canvas options directly was too much control. Perhaps you
then think that generating a PDF to print, using something other than PdfDocument,
is the right answer. Or perhaps you are generating a PDF for other reasons, such
as to use with ACTION_SEND as output from your app.
You have two basic options for getting this PDF: generate it on the device, or offload the generation to a server.
There are various open source and commercial libraries
for generating PDF on Android. The best-known open source Java PDF library –
iText — has as dedicated Android version
(iTextG), though the AGPL license
may make it unsuitable for your use case. The commercial libraries range
from fixed-price to per-device licenses. How much advantage these have over
using PrintedPdfDocument from the Android SDK depends upon your needs.
If the bulk of the data needed for generating the PDF resides on a server, rather than downloading that data and using an underpowered Android device to create the PDF, you could upload the device-specific data to the server, have it create the PDF, and download the result from the server. There are plenty of server-side PDF generation tools, ranging from open source (e.g., wkhtmltopdf, unoconv, prawn) to commercial (e.g., Prince, used to generate the PDF edition of this book). You also get to work in your preferred programming language, in case that is not Java, and perhaps leverage the PDF generation logic for other uses (e.g., generate reports from your Web app).