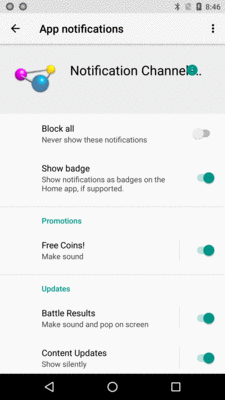
Figure 375: Notification Settings, Showing Three Channels in Two Groups
Notifications are those icons that appear in the status bar (or system bar on tablets), typically to alert the user of something that is going on in the background or has completed in the background. Many apps use them, to let the user know of new email messages, calendar reminders, and so on. Foreground services, such as music players, also use notifications, to tell the OS that they are part of the foreground user experience and to let the user rapidly return to the apps to turn the music off.
There are other tricks available with the Notification object
beyond those originally discussed
in an earlier chapter.
Understanding this chapter requires that you have read
the chapter on basic notifications and
the section on RemoteViews in
the chapter on basic app widgets.
Users have a love/hate relationship with apps that use notifications:
AlarmManager, JobScheduler, or other means of doing work
periodically)And so on.
Users’ discomfort with how apps handle notifications is why Android allows users to disable notifications.
Some of the items in this chapter, particularly those surrounding Wear OS, can help you improve user satisfaction with your notification strategy and tactics. Yet, at the same time, misuse of notifications is magnified by Wear, as Wear takes extra steps to get the user to pay attention to the notifications, with possibly disastrous results for your Play Store reviews.
In short, your objective with notifications is to be a good citizen:
Android 8.0 moved a lot of notification configuration out of NotificationCompat.Builder
and into a new NotificationChannel class, and moving their effects from being
per-notification to per-channel. When you configure a channel, all notifications
in that channel will exhibit the behavior defined for the channel.
Many configuration options formerly set on a Notification are now set on a
NotificationChannel:
You Used to Call This on Notification
|
You Now Call This on NotificationChannel
|
|---|---|
setDefaults() |
no real analogue |
setLights() |
enableLights() and setLightColor()
|
setPriority() |
setImportance() |
setSound() |
setSound() |
setVibration() |
enableVibration() and setVibrationPattern()
|
setVisibility() |
setLockscreenVisibility() |
The “enable” methods (enableLights(), enableVibration()) opt you into whatever
the device default behaviors are for those features.
As a result of these things moving to NotificationChannel, the user can control
the behavior. You might request to enable vibration, but the user will be able
to override your choice, for example.
In addition to these options, a NotificationChannel also configures:
setBypassDnd())setShowBadge())Channels can also be associated into channel groups. This is purely for organizational purposes; groups show up on the screen that the user sees to help cluster related channels together. Beyond that, channels in groups behave identically to channels not in groups.
A NotificationChannelGroup is the Java class embodiment of a channel group.
A NotificationChannelGroup consists purely of a String unique identifier
and a CharSequence (e.g., String) display name to show the user. In most cases,
you will want the display name to come from a string resource, for translation
purposes.
You need to register your channel groups with Android. To do this, you will need
to call one of the following methods on NotificationManager:
createNotificationChannelGroup(), to create a single channel groupcreateNotificationChannelGroups(), to create a List of channel groupsThe
Notifications/Channels
sample project demonstrates the use of notification channels and channel
groups. The MainActivity has an initGroups() method that defines two channel groups:
  private void initGroups() {
    ArrayList<NotificationChannelGroup> groups=new ArrayList<>();

    groups.add(new NotificationChannelGroup(GROUP_UPDATES,
      getString(R.string.group_name_updates)));
    groups.add(new NotificationChannelGroup(GROUP_PROMO,
      getString(R.string.group_name_promo)));

    mgr.createNotificationChannelGroups(groups);
  }
Here, the display names come from string resources, and the channel group IDs are
string constants defined on MainActivity itself.
Creating channels, in turn, involves configuring NotificationChannel objects and
calling createNotificationChannel() on NotificationManager for each channel.
MainActivity has three methods for defining three separate channels, in those
two channel groups:
  private void initContentChannel() {
    NotificationChannel channel=
      new NotificationChannel(CHANNEL_CONTENT,
        getString(R.string.channel_name_content),
        NotificationManager.IMPORTANCE_LOW);

    channel.setGroup(GROUP_UPDATES);
    mgr.createNotificationChannel(channel);
  }

  private void initBattleChannel() {
    NotificationChannel channel=
      new NotificationChannel(CHANNEL_BATTLE,
        getString(R.string.channel_name_battle),
        NotificationManager.IMPORTANCE_HIGH);

    channel.setGroup(GROUP_UPDATES);
    channel.setShowBadge(true);
    mgr.createNotificationChannel(channel);
  }

  private void initCoinsChannel() {
    NotificationChannel channel=
      new NotificationChannel(CHANNEL_COINS,
        getString(R.string.channel_name_coins),
        NotificationManager.IMPORTANCE_DEFAULT);

    channel.setGroup(GROUP_PROMO);
    mgr.createNotificationChannel(channel);
  }
The constructor takes a unique String identifier for the channel, a user-facing
display name for the channel, and the importance of the notifications in that channel.
Again, typically you will want to use a string resource for the display name, as
the sample code demonstrates.
Between creating the NotificationChannel and registering it with
createNotificationChannel() on NotificationManager, you can call various
setter methods to configure the way that this channel behaves, beyond
the importance. For example,
if you are using channel groups, you will need to call setGroup()
on the NotificationChannel, passing in the channel group ID.
All of these methods are invoked from onCreate() of MainActivity:
  @Override
  protected void onCreate(Bundle savedInstanceState) {
    super.onCreate(savedInstanceState);

    mgr=getSystemService(NotificationManager.class);

    if (mgr.getNotificationChannel(CHANNEL_CONTENT)==null) {
      initGroups();
      initContentChannel();
      initBattleChannel();
      initCoinsChannel();
    }

    setContentView(R.layout.activity_main);
  }
In particular, we only call those methods if we do not already have
the CHANNEL_CONTENT channel defined, as determined via a call to
getNotificationChannel() on NotificationManager. This if check serves
two purposes:
When the user visits the notification settings for this app, all three channels appear, clustered into the two groups:
Figure 375: Notification Settings, Showing Three Channels in Two Groups
The groups appear to be sorted alphabetically, not in the order that they are defined.
Tapping on the channel itself brings up a screen for configuring the details of that channel:
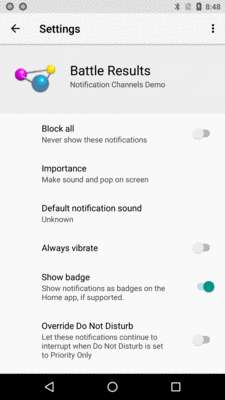
Figure 376: Notification Settings, Showing Channel Configuration
Of note, if the importance calls for a sound, and you did not supply a Uri
to some ringtone via setSound() on the NotificationChannel, the user
will see that the “Default notification sound” is “Unknown”, though this really
means that the default notification sound will be used.
You can bring up the activity for configuring channel settings yourself, via
an ACTION_CHANNEL_NOTIFICATION_SETTINGS Intent and a call to startActivity():
  @Override
  public boolean onOptionsItemSelected(MenuItem item) {
    if (item.getItemId()==R.id.settings) {
      Intent i=new Intent(Settings.ACTION_CHANNEL_NOTIFICATION_SETTINGS);

      i.putExtra(Settings.EXTRA_CHANNEL_ID, CHANNEL_BATTLE);
      i.putExtra(Settings.EXTRA_APP_PACKAGE, getPackageName());
      startActivity(i);
    }

    return super.onOptionsItemSelected(item);
  }
This requires two extras:
EXTRA_APP_PACKAGE is your application ID, returned via getPackageName()
or BuildConfig.APPLICATION_ID
EXTRA_CHANNEL_ID is the channel ID of the channel whose settings you wish
to displayOnce you create a notification channel, control over the channel settings resides with the user. You cannot modify the settings of that channel. Consider your settings to be defaults; the user is welcome to modify the channel from those defaults as the user sees fit.
To help prevent developers from deleting and re-creating channels, while you can
call deleteNotificationChannel() on NotificationManager, that channel will
still be visible to the user (“Deleted channels remain visible in notification settings, as a spam prevention mechanism.”)
There is no backport of notification channels.
NotificationCompat.Builder takes a channel ID, but you will need to use the
native NotificationChannel class to define the channel. And since that class
only exists on Android 8.0+, unless your minSdkVersion is 26 or higher,
you will need to make sure that you use NotificationChannel only on
suitable devices, using the recipe that we saw in the original chapter on notifications:
if (Build.VERSION.SDK_INT>=Build.VERSION_CODES.O &&
  mgr.getNotificationChannel(CHANNEL_WHATEVER)==null) {
  mgr.createNotificationChannel(new NotificationChannel(CHANNEL_WHATEVER,
    "Whatever", NotificationManager.IMPORTANCE_DEFAULT));
}
The humble Notification has been steadily advancing over the past
few years, with “big” styles and the like adding new capabilities
for newer devices.
Wear OS takes notifications to a new level, by having the notification not only appear on the user’s device, but also on wearables connected to that device.
The good news is that this works “out of the box”. There is nothing you absolutely need to do in your app to get your notifications to appear on a Wear device.
The bad news is that the “out of the box” experience may be poor,
as a Notification approach that is fine for devices that reside
in pockets and backpacks might be inappropriate for wrists and eyes.
With that in mind, let’s see what some notification samples from earlier in the book behave like when they are run on a phone connected to a Wear device.
NOTE: For this section, and the rest of this chapter, “primary device” will refer to the user’s phone or tablet that the “Wear device” will be connected to.
The
Notifications/DownloadNotify
sample project allows the user to download a PDF file, raising a Notification
when that download is complete.
With a Wear device paired with the phone, the Notification also appears on the
device, first as a “mini card”:
Figure 377: Simple Notification on Wear, As Originally Displayed, On Samsung Galaxy Gear
Swiping up on that will bring up the full card:

Figure 378: Simple Notification on Wear, Full, On Samsung Galaxy Gear
Swiping to the right will bring up the action associated with setContentIntent()
on the NotificationCompat.Builder:

Figure 379: Simple Notification on Wear, Default Action, On Samsung Galaxy Gear
Tapping on that dismisses the Notification on the Wear device and the primary device,
plus it invokes the PendingIntent on the phone itself (in this case, opening up
the PDF file).
This is a fine example of a Notification that perhaps should not appear on
the Wear device. The fact that the download completed is interesting but not all
that important. Furthermore, the user cannot do anything about this download
other than to pull out the primary device to see the PDF. Low-priority
primary-device-centric
notifications generally should be shown on the primary device alone,
not on the Wear device. We will see how to do that
later in this chapter.
The
Notifications/BigNotify
sample application wrapped a regular Notification in a NotificationCompat.InboxStyle
“big” Notification, one with both a regular action and a separate “Play” action button.
As before, with a Wear device paired with the phone,
the Notification also appears on the
device, first as a “mini card”:
Figure 380: Big Notification on Wear, As Originally Displayed, On Samsung Galaxy Gear
However, this time, when the user swipes up to show the full card, it is the
InboxStyle version that appears, albeit without the summary text:
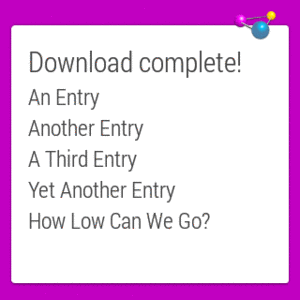
Figure 381: Big Notification on Wear, Full, On Samsung Galaxy Gear
Swiping to the right shows our actions, starting with the custom “Play” action:
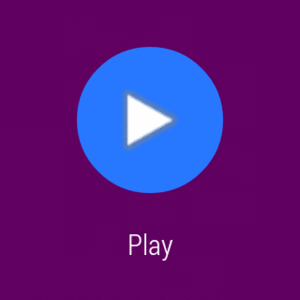
Figure 382: Big Notification on Wear, Play Action, On Samsung Galaxy Gear
…followed by the default action:

Figure 383: Big Notification on Wear, Default Action, On Samsung Galaxy Gear
Tapping on either action will cause the primary device to invoke its
PendingIntent, but only the default action dismisses the Notification from
both devices. The custom “Play” action does not.
The
Notifications/Foreground
sample project is another version of the download-the-file sample, but this time
uses a Notification and startForeground() to mark the service as a foreground
service while it is downloading things.
This particular sample does not spend much time in the foreground state, so for
testing purposes, you may want to add a SystemClock.sleep() call to the
service, between the startForeground() and stopForeground() calls, to better
examine the behavior while the foreground service Notification is around.
However, in truth, that modification is probably not necessary… as the foreground
service Notification is not displayed on the Wear device, only on the primary device.
This is by design. The expectation is that you would use a Wear app to control
your service from the Wear device, not some un-dismissable card.
If you are writing an email client, and you want to use a Notification to
let the user know about new email messages, you do not want to raise a
separate Notification for each email. Users will come to your home with
pitchforks and torches… and not to help you with farming.
Instead, the vision is that you update an existing Notification with
new content. For example, you might start with a regular Notification for
the first received email. Then, when the second one comes in, you replace
that Notification with one that has a simple summary (“2 messages are in
your inbox!”), plus perhaps an InboxStyle “big” Notification variant
that could show the subject lines for both of those messages.
Wear OS devices, however, add an interesting wrinkle: you want the
Notification to be informative about the event itself. You want the user
to be able to make an informed decision about whether they should pull out
their primary device to read the new messages, and that decision is only
partly based on how many messages there are. Users will want to know more
about the outstanding messages (sender and/or subject line) to help them
make that decision… at least to a point. If there are 57 unread messages,
users may get frustrated dealing with all of those as individual items
on the wearable itself.
The pattern here, then, takes advantage of some “group” capabilities added
to NotificationCompat:
Notification, that will only be shown on the primary device,
with the same sort of “2 messages are in your inbox!” information that you
would have used without considering WearThis can be seen in action in the
Notifications/Stacked
sample project.
The setup is reminiscent of the “big” style one from
the original chapter on Notification. However, this time,
there are a total of three Notification objects created: two for individual
events for the Wear device, and one summary one for the primary device.
However, to make this work, we need a new version of the support-v13 library
from the Android Support package: 20.0.0 (or higher), as it is where the
extra compatibility smarts were added to support this whole group-and-summary construct.
Hence, in build.gradle, we have implementation 'com.android.support:support-v13:20.0.0'.
Similarly, while we will still use NotificationCompat for creating the
Notification objects, we will not use NotificationManager for displaying
them. Instead, we need to use NotificationManagerCompat from the Android
Support package. While the NotificationManager API has not changed to support
the group-and-summary pattern, the implementation has, and NotificationManagerCompat
gives us a version of that implementation that can work on compatible devices
and gracefully degrade on older ones. However, since the API did not change, it
is easy to miss this requirement, use NotificationManager, and not quite get
the desired results. Notably, the primary device will wind up showing all three
notifications, not just the summary as we want.
Hence, our MainActivity will hold onto a NotificationManagerCompat as a data
member, initialized in onCreate():
  private NotificationManagerCompat mgrCompat=null;

  @Override
  public void onCreate(Bundle savedInstanceState) {
    super.onCreate(savedInstanceState);

    NotificationManager mgr=
      (NotificationManager)getSystemService(NOTIFICATION_SERVICE);

    if (Build.VERSION.SDK_INT>=Build.VERSION_CODES.O &&
      mgr.getNotificationChannel(CHANNEL_WHATEVER)==null) {
      mgr.createNotificationChannel(new NotificationChannel(CHANNEL_WHATEVER,
        "Whatever", NotificationManager.IMPORTANCE_DEFAULT));
    }

    mgrCompat=NotificationManagerCompat.from(this);

    showWearOne();
    showWearTwo();
    showSummary();

    finish();
  }
The three show...() methods are each responsible for raising one Notification:
showWearOne() and showWearTwo() are ones that will wind up on the Wear device,
and showSummary() will show the summary Notification for use on the primary
device.
Beyond using NotificationManagerCompat instead of NotificationManager, the only
substantial difference is the use of setGroup() and setGroupSummary()
methods on the NotificationCompat.Builder.
setGroup() associates the Notification with a group, identified by a String
key. On a Wear device, notifications that are part of a group will be shown stacked
as part of a single card by default. So, the two showWear...() methods call
setGroup() as part of building the Notification:
  private void showWearOne() {
    NotificationCompat.Builder b=
      new NotificationCompat.Builder(this, CHANNEL_WHATEVER);

    b.setAutoCancel(true)
        .setDefaults(Notification.DEFAULT_ALL)
        .setContentTitle(getString(R.string.entry))
        .setContentIntent(buildPendingIntent(Settings.ACTION_SECURITY_SETTINGS))
        .setSmallIcon(android.R.drawable.stat_sys_download_done)
        .setGroup(GROUP_SAMPLE);

    mgrCompat.notify(NOTIFY_ID2, b.build());
  }

  private void showWearTwo() {
    NotificationCompat.Builder b=
      new NotificationCompat.Builder(this, CHANNEL_WHATEVER);

    b.setAutoCancel(true)
        .setDefaults(Notification.DEFAULT_ALL)
        .setContentTitle(getString(R.string.another_entry))
        .setContentIntent(buildPendingIntent(Settings.ACTION_SECURITY_SETTINGS))
        .setSmallIcon(android.R.drawable.stat_sys_download_done)
        .setGroup(GROUP_SAMPLE);

    mgrCompat.notify(NOTIFY_ID3, b.build());
  }
setGroupSummary() indicates a particular Notification that should serve as
the summary for its group. This Notification will not be passed to the Wear
device, and it replaces all other notifications for this group on the primary device.
Hence, showSummary() (or, more accurately, the buildNormal() method that creates
the base Notification for the summary) uses setGroupSummary():
  private void showSummary() {
    NotificationCompat.Builder normal=buildNormal();
    NotificationCompat.InboxStyle big=
        new NotificationCompat.InboxStyle();

    big.setSummaryText(getString(R.string.summary))
        .addLine(getString(R.string.entry))
        .addLine(getString(R.string.another_entry));

    mgrCompat.notify(NOTIFY_ID, normal.setStyle(big).build());
  }

  private NotificationCompat.Builder buildNormal() {
    NotificationCompat.Builder b=
      new NotificationCompat.Builder(this, CHANNEL_WHATEVER);

    b.setAutoCancel(true)
        .setDefaults(Notification.DEFAULT_ALL)
        .setContentTitle(getString(R.string.download_complete))
        .setContentText(getString(R.string.fun))
        .setContentIntent(buildPendingIntent(Settings.ACTION_SECURITY_SETTINGS))
        .setSmallIcon(android.R.drawable.stat_sys_download_done)
        .setGroup(GROUP_SAMPLE)
        .setGroupSummary(true);

    return(b);
  }
Note that you need to use setGroupSummary() on a NotificationCompat.Builder
on which you have also called setGroup(), to identify the group for which this
Notification is a summary.
When you run this, the primary device shows the summary Notification:
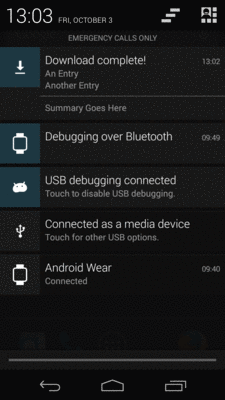
Figure 384: Stacked Notifications, Summary on Primary Device
On the Wear device, you will see the two original notifications as part of a single card at the outset:
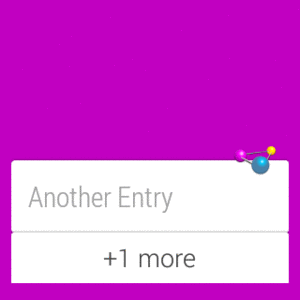
Figure 385: Stacked Notifications, Stacked on Wear Device
Tapping on the stack brings up separate mini cards for each individual Notification:
Figure 386: Stacked Notifications, Expanded Stack on Wear Device
Of course, this sample is artificially simple, like most of the samples in this book.
In the sample, we are raising all three notifications all at once. That is certainly conceivable, but it is not especially likely. A more likely scenario is that the mix of notifications needs to change over time, based upon continuing events, such as a trickle of new unread email messages for an email client.
This adds a few complexities to what you need to implement all of this properly.
The big thing is that your persistent data model (e.g., database) needs to have enough information for you to know how to notify the user about the next event, when that event occurs. Using the email client as an example:
Notification
on both the Wear device and the primary device, with the sender and subject line
of the unread message.Notification (requiring a separate notification ID) for the Wear device,
but also show a summary Notification for the primary device. For all that to work,
we need to know this is a second unread message, and that the user has not read
the first message in between the two incoming messages. And, we need to know enough
details about the unread messages to format the summary properly.This gets even more complex when events “stack themselves” (e.g., one poll of the mail server results in two unread messages), in addition to having to deal with user input (e.g., user clears the notification stack from either device, yet does not read the messages).
Among other things, you cannot rely upon static data members as being the sole
source of your Notification-related data, as your process may be terminated
in between events. You are welcome to use it as a cache, in case your process
does happen to survive long enough to process more than one event, but you will
need to also save this data to a persistent store, so that you can properly
handle new events requiring Notification changes with your process having been
terminated since the last Notification-related event.
Sometimes, you will want to raise a Notification that does not make
sense to show on a Wear device, only on the primary device. In the
case of the group summary for the stacked notifications, this primary-only
behavior happens automatically. In other cases, though, you will
need to call setLocalOnly() on the NotificationCompat.Builder to
tell the framework that this Notification should only be displayed
on the current device.
The
Notifications/BigLocal
sample project demonstrates this, through a clone of the Notifications/BigNotify
sample that calls setLocalOnly(true) as part of configuring the Notification:
  private NotificationCompat.Builder buildNormal() {
    NotificationCompat.Builder b=
      new NotificationCompat.Builder(this, CHANNEL_WHATEVER);

    b.setAutoCancel(true)
     .setDefaults(Notification.DEFAULT_ALL)
     .setContentTitle(getString(R.string.download_complete))
     .setContentText(getString(R.string.fun))
     .setContentIntent(buildPendingIntent(Settings.ACTION_SECURITY_SETTINGS))
     .setSmallIcon(android.R.drawable.stat_sys_download_done)
     .setTicker(getString(R.string.download_complete))
     .setPriority(NotificationCompat.PRIORITY_DEFAULT)
     .setLocalOnly(true)
     .addAction(android.R.drawable.ic_media_play,
         getString(R.string.play),
         buildPendingIntent(Settings.ACTION_SETTINGS));

    return(b);
  }
Note that we do not need to use NotificationManagerCompat for local-only
behavior — simply calling setLocalOnly(true) on an up-to-date
NotificationCompat.Builder will suffice.
Running this sample provides the same behavior as Notifications/BigNotify,
except that the Notification only appears on the primary device, not
the Wear device.
Configuring stacked notifications, and opting into local-only behavior when needed, should give you Wear behavior that is acceptable. Right now, Android Wear is fairly nascent, and therefore it may not behoove you to do much more than this, as you decide how to prioritize your engineering time.
However, there are other things that you can do to further tailor your notifications on Wear that can improve user satisfaction, if you wish for Wear to be a key part of your marketing message.
On the primary device, the amount of information you can provide in a
Notification is intentionally capped. This prevents a Notification
from drowning out its peers. The cap is not a big problem, simply because
the whole UI for the app raising the Notification is usually just a
tap away.
With a Wear device, though, the whole UI for the app raising the Notification
involves pulling out the primary device.
Hence, it might be nice to provide some additional information to the
Wear user, so that perhaps they can make a more informed decision as to
whether it is worthwhile to open up their primary device. In Wear terms,
this involves adding more “pages” to a Notification.
To do this, you must:
Notification objects, probably via a NotificationCompat.Builder
NotificationCompat.WearableExtender to teach the primary
Notification about the additional pagesNotification using a NotificationManagerCompat
variant of the system serviceWe can see this in action in the
Notifications/Pages
sample project. This is a clone of Notifications/BigNotify, where we make
the “big” content be on a second page.
  @Override
  public void onCreate(Bundle savedInstanceState) {
    super.onCreate(savedInstanceState);

    NotificationManager mgr=
      (NotificationManager)getSystemService(NOTIFICATION_SERVICE);

    if (Build.VERSION.SDK_INT>=Build.VERSION_CODES.O &&
      mgr.getNotificationChannel(CHANNEL_WHATEVER)==null) {
      mgr.createNotificationChannel(new NotificationChannel(CHANNEL_WHATEVER,
        "Whatever", NotificationManager.IMPORTANCE_DEFAULT));
    }

    NotificationManagerCompat mgrCompat=
        NotificationManagerCompat.from(this);
    NotificationCompat.Builder normal=buildNormal();
    NotificationCompat.InboxStyle big=
        new NotificationCompat.InboxStyle();

    big.setSummaryText(getString(R.string.summary))
        .addLine(getString(R.string.entry))
        .addLine(getString(R.string.another_entry))
        .addLine(getString(R.string.third_entry))
        .addLine(getString(R.string.yet_another_entry))
        .addLine(getString(R.string.low));

    NotificationCompat.Builder bigPage=
        new NotificationCompat.Builder(this, CHANNEL_WHATEVER)
            .setStyle(big);
    NotificationCompat.Builder twoPages=
        new NotificationCompat.WearableExtender()
            .addPage(bigPage.build())
            .extend(normal);

    mgrCompat.notify(NOTIFY_ID, twoPages.build());

    finish();
  }
Here, we:
NotificationManagerCompat instanceNotification, using the same process
as beforeInboxStyle structure with our expanded contentNotification via a NotificationCompat.Builder,
using the setStyle() method to associate the “big” style with the
Notification
NotificationCompat.WearableExtender, tell it to add the second
page using addPage(), and tell it to apply that second page to the
primary Notification via the extend() methodnotify() as normal to raise the Notification, using the already-created
NotificationManagerCompat instanceOn the primary device, we just see the primary Notification content:
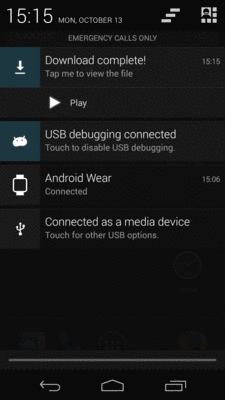
Figure 387: Pages Demo, on a Galaxy Nexus
On the Wear device, we see the main Notification and the second page
as separate pages on the wearable:

Figure 388: Pages Demo, on a Samsung Galaxy Wear, Showing Initial Notification
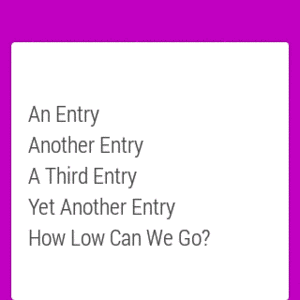
Figure 389: Pages Demo, on a Samsung Galaxy Wear, Showing Second Page
Note that you cannot use addAction() to define a custom action on the
extra pages added to the primary Notification. Instead, use
addAction() and setContentAction() on the WearableExtender to define
actions associated with those extra pages. We will see this in use in
the next section.
Sometimes, you may want certain actions to only be available on the Wear device, and not on the primary device. We will see a specific example of this coming up in the next section, when we cover voice input actions.
Sometimes, you may want a different mix of actions on the primary device versus the Wear device — some in common, some only on the primary device, some only on the Wear device.
To set up Wear-only actions, use addAction() on WearableExtender,
as opposed to (or in addition to) addAction() on NotificationCompat.Builder.
This takes an action as a parameter, which you create using
NotificationCompat.Action.Builder, a custom builder for building Notification
actions.
This is illustrated in the
Notifications/WearActions
sample project, yet another variation on the “launch an activity, show a
Notification” samples that we have been using. This time, though,
we will apply an action to the Wear device:
  @Override
  public void onCreate(Bundle savedInstanceState) {
    super.onCreate(savedInstanceState);

    NotificationManager mgr=
      (NotificationManager)getSystemService(NOTIFICATION_SERVICE);

    if (Build.VERSION.SDK_INT>=Build.VERSION_CODES.O &&
      mgr.getNotificationChannel(CHANNEL_WHATEVER)==null) {
      mgr.createNotificationChannel(new NotificationChannel(CHANNEL_WHATEVER,
        "Whatever", NotificationManager.IMPORTANCE_DEFAULT));
    }

    NotificationCompat.Builder normal=buildNormal();
    NotificationCompat.Action.Builder wearActionBuilder=
        new NotificationCompat.Action.Builder(android.R.drawable.ic_media_pause,
                                              getString(R.string.pause),
                                              buildPendingIntent(Settings.ACTION_DATE_SETTINGS));

    NotificationCompat.Builder extended=
        new NotificationCompat.WearableExtender()
            .addAction(wearActionBuilder.build())
            .extend(normal);

    NotificationManagerCompat.from(this).notify(NOTIFY_ID, extended.build());

    finish();
  }
Here, we:
NotificationManagerCompat instanceNotification, using the same process
as beforeNotificationCompat.Action.Builder, providing it
the icon, label, and PendingIntent to be invoked for this actionNotificationCompat.WearableExtender, adding the
newly-defined action to it, and using the WearableExtender to extend()
the primary Notification
Notification using the NotificationManagerCompat instanceHowever, note that we have also defined an action on the primary Notification:
  private NotificationCompat.Builder buildNormal() {
    NotificationCompat.Builder b=
      new NotificationCompat.Builder(this, CHANNEL_WHATEVER);

    b.setAutoCancel(true)
     .setDefaults(Notification.DEFAULT_ALL)
     .setContentTitle(getString(R.string.download_complete))
     .setContentText(getString(R.string.fun))
     .setContentIntent(buildPendingIntent(Settings.ACTION_SECURITY_SETTINGS))
     .setSmallIcon(android.R.drawable.stat_sys_download_done)
     .addAction(android.R.drawable.ic_media_play,
        getString(R.string.play),
        buildPendingIntent(Settings.ACTION_SETTINGS));

    return(b);
  }
addAction() on WearableExtender replaces, for the Wear device, any
actions defined on the Notification itself using addAction(), but
not the action defined via setContentIntent().
On the primary device, we do not see the wear-only action:
Figure 390: WearActions Demo, on a Galaxy Nexus
On a Wear device, though, we see both the wear-only and the main content
action, but not the device-only action added via addAction() on
the NotificationCompat.Builder:
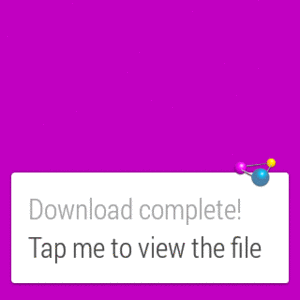
Figure 391: WearActions Demo, on a Samsung Galaxy Wear, Showing Notification
Figure 392: WearActions Demo, on a Samsung Galaxy Wear, Showing Wear-Only Action
Figure 393: WearActions Demo, on a Samsung Galaxy Wear, Showing Main Content Action
Hence:
WearableExtender and its addAction()
WearableExtender and its addAction()
addAction() (on NotificationCompat.Builder for the primary
device and on WearableExtender for the Wear device)In the spirit of Dick Tracy’s two-way wrist radio, Wear OS allows you to talk to your wrist and not seem like you are completely insane.
In particular, your Notification, when presented on the Wear, can request
that the user provide you with a response, via voice input or via canned
responses. This can be very handy:
In many cases, with a regular Notification, the result of the user
choosing an action is for us to display an activity. Sometimes, though,
that’s not what we want, such as a music player’s Notification handling
“pause” and similar events via its background service. Similarly,
actions from a Notification seen on a Wear device will sometimes need
to perform operations in the background, as the user may not be in position
to look at your UI. This is especially true with voice input — usually,
if we are bothering to dictate words to our wrist, that should happen
instead of opening up the primary device. As a result, our flow for
responding to the action is a little bit different, as is illustrated
in the
Notifications/VoiceInput
sample project.
Let’s walk through the MainActivity that sets up our Notification:
package com.commonsware.android.wearvoice;

import android.app.Activity;
import android.app.NotificationChannel;
import android.app.NotificationManager;
import android.app.PendingIntent;
import android.content.Intent;
import android.os.Build;
import android.os.Bundle;
import android.support.v4.app.NotificationCompat;
import android.support.v4.app.NotificationManagerCompat;
import android.support.v4.app.RemoteInput;

public class MainActivity extends Activity {
  private static final String CHANNEL_WHATEVER="channel_whatever";
  private static final int NOTIFY_ID=1337;

  @Override
  public void onCreate(Bundle savedInstanceState) {
    super.onCreate(savedInstanceState);

    NotificationManager mgr=
      (NotificationManager)getSystemService(NOTIFICATION_SERVICE);

    if (Build.VERSION.SDK_INT>=Build.VERSION_CODES.O &&
      mgr.getNotificationChannel(CHANNEL_WHATEVER)==null) {
      mgr.createNotificationChannel(new NotificationChannel(CHANNEL_WHATEVER,
        "Whatever", NotificationManager.IMPORTANCE_DEFAULT));
    }

    Intent i=new Intent(this, VoiceReceiver.class);
    PendingIntent pi=
        PendingIntent.getBroadcast(this, 0, i,
            PendingIntent.FLAG_UPDATE_CURRENT);

    RemoteInput remoteInput=
        new RemoteInput.Builder(VoiceReceiver.EXTRA_SPEECH)
          .setLabel(getString(R.string.talk))
          .setChoices(getResources().getStringArray(R.array.replies))
          .build();

    NotificationCompat.Action wearAction=
        new NotificationCompat.Action.Builder(
              android.R.drawable.ic_btn_speak_now,
              getString(R.string.talk),
              pi).addRemoteInput(remoteInput).build();

    NotificationCompat.WearableExtender wearExtender=
        new NotificationCompat.WearableExtender()
            .addAction(wearAction);

    NotificationCompat.Builder builder=
        new NotificationCompat.Builder(this, CHANNEL_WHATEVER)
            .setSmallIcon(android.R.drawable.stat_sys_download_done)
            .setContentTitle(getString(R.string.title))
            .setContentText(getString(R.string.talk))
            .extend(wearExtender);

    NotificationManagerCompat
      .from(this)
      .notify(NOTIFY_ID, builder.build());

    finish();
  }
}
We start by creating a broadcast PendingIntent, pointing to a
VoiceReceiver that will respond to the voice input. We will examine this
VoiceReceiver later in this example.
We then set up a RemoteInput.Builder. This is a builder-style API
for defining a RemoteInput configuration to attach to a Wear-only
action. Here, we configure it with:
VoiceReceiver
(VoiceReceiver.EXTRA_SPEECH)R.string.talk string resource)String array of canned responses that the user can choose from
rather than dictate their own answer and go through speech-to-text
conversion (pulled from an R.array.replies <string-array> resource)That RemoteInput is then applied to a NotificationCompat.Action, via
its NotificationCompat.Action.Builder and the addRemoteInput()
method. That Action, in turn, is wrapped in a
NotificationCompat.WearableExtender, which is used to extend()
a NotificationCompat.Builder.
Finally, the resulting Notification is raised using a
NotificationManagerCompat instance.
Our VoiceReceiver, registered in the manifest, is set up to respond
to the voice action:
package com.commonsware.android.wearvoice;

import android.content.BroadcastReceiver;
import android.content.Context;
import android.content.Intent;
import android.os.Bundle;
import android.support.v4.app.RemoteInput;
import android.util.Log;
import android.widget.TextView;

public class VoiceReceiver extends BroadcastReceiver {
  static final String EXTRA_SPEECH="speech";

  @Override
  public void onReceive(Context ctxt, Intent i) {
    Bundle input=RemoteInput.getResultsFromIntent(i);

    if (input!=null) {
      CharSequence speech=input.getCharSequence(EXTRA_SPEECH);

      if (speech!=null) {
        Log.d(getClass().getSimpleName(), speech.toString());
      }
      else {
        Log.e(getClass().getSimpleName(), "No voice response speech");
      }
    }
    else {
      Log.e(getClass().getSimpleName(), "No voice response Bundle");
    }
  }
}
It uses RemoteInput.getResultsFromIntent(i) to pick out the response
we got from the user for this action. There are three major possibilities:
Bundle is
missing our VoiceReceiver.EXTRA_SPEECH key (also should not happen)CharSequence from the VoiceReceiver.EXTRA_SPEECH key in the
decoded Bundle is the user’s response, whether from speech recognition
or from choosing one of our canned responsesIn this case, we just log the message to Logcat, but in principle you
could do whatever you wanted. Just bear in mind that your UI may not be
in the foreground, and that the device screen may be off entirely. It
is also possible that your process will have been terminated between
the time you raised the Notification and the user got around to responding
to it from the Wear device. Hence, you should be making few assumptions
about the environment at the point when you get the voice response.
The Wear device starts off with a typical action:
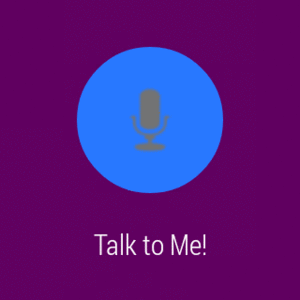
Figure 394: VoiceInput Demo, on a Samsung Galaxy Wear, Showing Voice Action
Tapping it brings up a voice input screen, where the user can dictate some text:
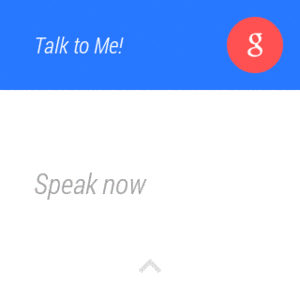
Figure 395: WearActions Demo, on a Samsung Galaxy Wear, Showing Voice Input
If the user delays too long without saying anything recognizable, or if the user swipes up the screen, they are taken to our list of canned responses:
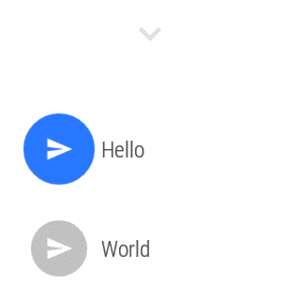
Figure 396: WearActions Demo, on a Samsung Galaxy Wear, Showing Canned Responses
If the user instead does dictate some text, initially they are shown just the interpreted text:
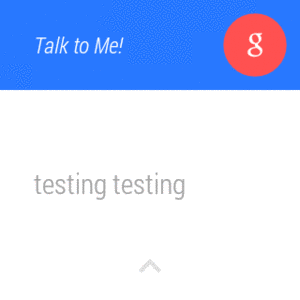
Figure 397: WearActions Demo, on a Samsung Galaxy Wear, Showing Voice Input Results
Then a cancel button with a progress indicator around the edge appears:

Figure 398: WearActions Demo, on a Samsung Galaxy Wear, Showing Voice Input Progress
If the user taps the cancel button before the progress indicator elapses, they are prompted to confirm or reject the input:
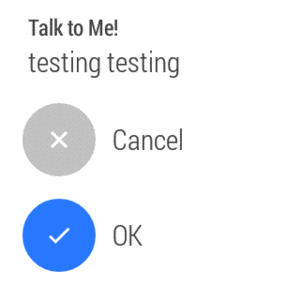
Figure 399: WearActions Demo, on a Samsung Galaxy Wear, Showing Voice Input Confirmation
As is noted above, Wear OS uses RemoteInput to get input from
the user. However, historically, that capability was limited to
notifications appearing on Wear.
Starting with Android 7.0, RemoteInput is also available for standard device
notifications. Rather than using voice input, you get a small EditText
into which the user can type something and submit it. You get what
the user typed in, and can use that as needed.
The
Notifications/RemoteInput
sample project is a near-clone of the Notifications/VoiceInput
sample project profiled in the advanced Notifications chapter.
Instead of putting the RemoteInput in an action on the WearExtender,
it puts the RemoteInput on the main Notification itself:
package com.commonsware.android.remoteinput;

import android.app.Activity;
import android.app.NotificationChannel;
import android.app.NotificationManager;
import android.app.PendingIntent;
import android.content.Intent;
import android.os.Build;
import android.os.Bundle;
import android.support.v4.app.NotificationCompat;
import android.support.v4.app.NotificationManagerCompat;
import android.support.v4.app.RemoteInput;

public class MainActivity extends Activity {
  static final String CHANNEL_WHATEVER="channel_whatever";

  @Override
  public void onCreate(Bundle savedInstanceState) {
    super.onCreate(savedInstanceState);

    NotificationManager mgr=
      (NotificationManager)getSystemService(NOTIFICATION_SERVICE);

    if (Build.VERSION.SDK_INT>=Build.VERSION_CODES.O &&
      mgr.getNotificationChannel(CHANNEL_WHATEVER)==null) {
      mgr.createNotificationChannel(new NotificationChannel(CHANNEL_WHATEVER,
        "Whatever", NotificationManager.IMPORTANCE_DEFAULT));
    }

    Intent i=new Intent(this, RemoteInputReceiver.class);
    PendingIntent pi=
        PendingIntent.getBroadcast(this, 0, i,
          PendingIntent.FLAG_UPDATE_CURRENT);

    RemoteInput remoteInput=
        new RemoteInput.Builder(RemoteInputReceiver.EXTRA_INPUT)
          .setLabel(getString(R.string.talk))
          .build();

    NotificationCompat.Action remoteAction=
        new NotificationCompat.Action.Builder(
              android.R.drawable.ic_btn_speak_now,
              getString(R.string.talk),
              pi).addRemoteInput(remoteInput).build();

    NotificationCompat.Builder builder=
      RemoteInputReceiver.buildNotificationBase(this)
        .addAction(remoteAction);

    NotificationManagerCompat
      .from(this)
      .notify(RemoteInputReceiver.NOTIFY_ID, builder.build());

    finish();
  }
}
The activity, when launched, will raise the Notification with a
“Talk to Me” action:
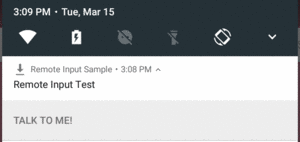
Figure 400: Notification with Action
Tapping on the action converts it into an EditText, with your action
prompt as the hint, plus an arrow-shaped “send” button:
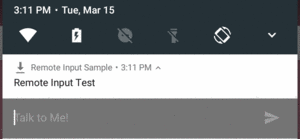
Figure 401: Notification with Remote Input
Typing something in and tapping that button converts the button into a progress spinner:
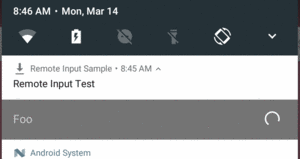
Figure 402: Notification with Remote Input and Progress Spinner
Also, the PendingIntent that you associated with the action is invoked.
In this case, that triggers a broadcast to RemoteInputReceiver:
package com.commonsware.android.remoteinput;

import android.content.BroadcastReceiver;
import android.content.Context;
import android.content.Intent;
import android.os.Bundle;
import android.support.v4.app.NotificationCompat;
import android.support.v4.app.NotificationManagerCompat;
import android.support.v4.app.RemoteInput;
import android.util.Log;

public class RemoteInputReceiver extends BroadcastReceiver {
  static final int NOTIFY_ID=1337;
  static final String EXTRA_INPUT="input";

  static NotificationCompat.Builder buildNotificationBase(Context ctxt) {
    NotificationCompat.Builder builder=
      new NotificationCompat.Builder(ctxt, MainActivity.CHANNEL_WHATEVER)
        .setSmallIcon(
          android.R.drawable.stat_sys_download_done)
        .setContentTitle(ctxt.getString(R.string.title));

    return(builder);
  }

  @Override
  public void onReceive(Context ctxt, Intent i) {
    Bundle input=RemoteInput.getResultsFromIntent(i);

    if (input!=null) {
      CharSequence speech=input.getCharSequence(EXTRA_INPUT);

      if (speech!=null) {
        Log.d(getClass().getSimpleName(), speech.toString());
      }
      else {
        Log.e(getClass().getSimpleName(), "No voice response speech");
      }
    }
    else {
      Log.e(getClass().getSimpleName(), "No voice response Bundle");
    }

    NotificationCompat.Builder builder=
      buildNotificationBase(ctxt);

    NotificationManagerCompat
      .from(ctxt)
      .notify(RemoteInputReceiver.NOTIFY_ID, builder.build());
  }
}
Here, we get what the user typed in via our designated extra
(EXTRA_INPUT, as requested via the RemoteInput.Builder), which we can
use as we see fit, such as logging it to Logcat.
However, we also have to update or cancel the Notification. Otherwise, that
progress spinner will spin indefinitely. If the Notification still
has value to the user after the RemoteInput, just update it, with or
without another RemoteInput (depending on whether one would now be
needed). You might also show the user’s input in the updated Notification.
Or, if the Notification is no longer needed, just cancel()
it. In this case, we raise a fresh Notification for this ID, just without
the RemoteInput that the activity added.
Note that setChoices() on RemoteInput is ignored for regular
device notifications. You can use this for Wear notifications to give
the user a list of strings to choose from, as an alternative to voice
recognition.
You can call setRemoteInputHistory()
on your Builder as well. This takes a CharSequence array, though
many developers will elect to use a simple String array. This represents
the inputs supplied by the user and accepted by your app, in reverse
chronological order (first element in the array is the most recent input).
Some of this history may be added automatically to the Notification
when you raise the updated Notification containing this input history.
Another concept introduced with Wear in mind was the notification group.
With this, you create a summary Notification, along with detail
Notifications for individual events. The quintessential example is
an email app, with a summary Notification indicating the unread message
count, and with detail Notifications for individual messages.
The idea for Wear was to allow the user to individually respond to
the detail Notifications without having to pull out the associated
phone or tablet. That phone or tablet would show the summary Notification,
since the user could just tap on it and bring up the activity to see
the detail.
For some reason, Google back-pedaled on that last part, as with Android
7.0, phones and tablets will also show the summary-and-detail
Notification hierarchy.
The
Notifications/Stacked
sample project, presented in
the chapter on advanced Notifications, demonstrates
this without any modifications. Initially, the user just sees the summary:

Figure 403: Stacked Notification, Showing Summary
A two-finger swipe gesture will expose the full hierarchy:
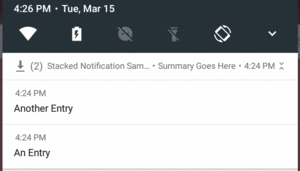
Figure 404: Stacked Notification, Showing Hierarchy
Historically, notification icons would be visible on the user’s lockscreen, but that was it. This would give the user an indication of what apps need attention, but no additional context.
Android 5.0 added notifications to the lockscreen, to help provide that missing context. Now users can have more details about the notifications, to determine whether it is necessary to unlock the device right now to deal with them.
Also note that on Android 7.0+, RemoteInput works
on the lockscreen. You can see this in action with the sample app — just
leave the Notification up, then lock the device. When you power on the
screen again,
you will get the lockscreen, and the Notification tile will appear.
It will not visibly show any sign of remote input, but if you swipe
down on the Notification, the remote input field will appear, and you can type in a message.
However, this also raises privacy concerns, as now notification text can be seen by anyone with access to the phone. As such, Android 5.0 introduced the concept of visibility to notifications, so developers can help control what is shown on the lockscreen versus what is shown only past the lockscreen.
However, these visibility options are only useful if:
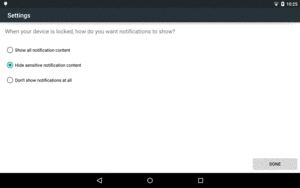
Figure 405: Choosing Notification Control, When Securing the Lockscreen
or in the “Sound & notification” portion of the Settings app:
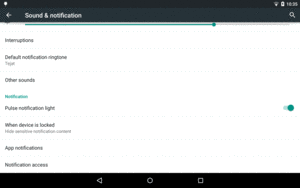
Figure 406: “Sound & notification” Settings
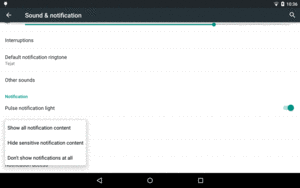
Figure 407: Notification Control Options in “Sound & notification” in Settings
Given that the user has enabled “hide sensitive notification content” mode, you as a developer can choose a visibility to apply to your notifications. There are three such visibility options — private, public, and secret — covered in the following sections.
The default behavior is a “private” Notification. Basic information
appears on the lockscreen, but not the whole Notification. However,
you as a developer can also provide a separate Notification that
will be shown on the lockscreen, so you can choose what information
appears publicly and what information does not.
The sample app for this section has a “public” edition of the Notification
that shows up on the lockscreen:

Figure 408: Public Edition of Private Lockscreen Notification, on a Nexus 7
Instead of creating a separate Notification for public visibility
on the lockscreen, you could flag your main Notification as having
public visibility. This is suitable for notifications where there is
little to no privacy implications for having the information appear
on the lockscreen.
A Notification with visibility set to “secret” will not show up on
the lockscreen at all. The ringtone, etc. will occur, as requested
(and based on device settings, like it being muted), but otherwise
there is no visible indication on the lockscreen that your
Notification exists. Only when the user gets past the lockscreen
will your Notification appear, in the status bar.
The
Notifications/Lollipop
sample project demonstrates the use of these visibility values.
It also demonstrates heads-up notifications, covered
later in this chapter.
The user interface consists of a Spinner of possible
Notification variants, a SeekBar to allow the user
to specify a delay period in seconds before showing the
Notification, and a Button to trigger showing the
Notification:
<?xml version="1.0" encoding="utf-8"?>

<TableLayout
    xmlns:android="http://schemas.android.com/apk/res/android"
    android:layout_width="match_parent"
    android:layout_height="match_parent"
    android:padding="8dp"
    android:stretchColumns="1">

    <TableRow>
        <TextView
            android:text="@string/type_label"/>

        <Spinner
            android:id="@+id/type"/>
    </TableRow>

    <TableRow>
        <TextView
            android:text="@string/delay_label"/>

        <SeekBar
            android:id="@+id/delay"
            android:progress="5"
            android:max="30"/>
    </TableRow>

    <Button
        android:text="@string/notify_button"
        android:id="@+id/download"
        android:onClick="notifyMe"/>
</TableLayout>
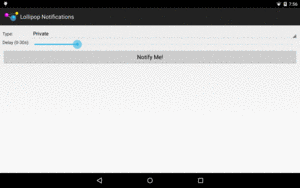
Figure 409: Lollipop Notifications Demo, on a Nexus 7
The onCreate() method of our launcher activity (MainActivity)
initializes the UI:
package com.commonsware.android.lollipopnotify;

import android.app.Activity;
import android.app.AlarmManager;
import android.app.PendingIntent;
import android.content.Intent;
import android.os.Bundle;
import android.os.SystemClock;
import android.view.View;
import android.widget.ArrayAdapter;
import android.widget.SeekBar;
import android.widget.Spinner;

public class MainActivity extends Activity {
  private Spinner type=null;
  private SeekBar delay=null;

  @Override
  public void onCreate(Bundle savedInstanceState) {
    super.onCreate(savedInstanceState);
    setContentView(R.layout.main);

    type=findViewById(R.id.type);

    ArrayAdapter<String> types=
        new ArrayAdapter<String>(this,
            android.R.layout.simple_spinner_item,
            getResources().getStringArray(R.array.types));

    types.setDropDownViewResource(android.R.layout.simple_spinner_dropdown_item);
    type.setAdapter(types);

    delay=findViewById(R.id.delay);
  }

  public void notifyMe(View v) {
    Intent i=new Intent(this, AlarmReceiver.class)
        .putExtra(AlarmReceiver.EXTRA_TYPE, type.getSelectedItemPosition());
    PendingIntent pi=PendingIntent.getBroadcast(this, 0, i,
                                                PendingIntent.FLAG_UPDATE_CURRENT);
    AlarmManager mgr=(AlarmManager)getSystemService(ALARM_SERVICE);

    mgr.set(AlarmManager.ELAPSED_REALTIME_WAKEUP,
        SystemClock.elapsedRealtime()+(1000*delay.getProgress()),
        pi);
  }
}
In particular, onCreate() populates the Spinner based on a
<string-array> resource:
<?xml version="1.0" encoding="utf-8"?>
<resources>
    <string-array name="types">
        <item>Private</item>
        <item>Public</item>
        <item>Secret</item>
        <item>Heads-Up</item>
    </string-array>
</resources>When the button is clicked, the notifyMe() method on MainActivity
is called. Here, we:
Intent pointing at an AlarmReceiver
Intent that contains the selected
position of the Spinner
Intent in a getBroadcast() PendingIntent
set() on AlarmManager to invoke the PendingIntent
after the delay period specified via the SeekBar
Since the targetSdkVersion of this project is below 19,
the set() method will behave in an exact fashion, triggering
our AlarmReceiver at the designated time.
AlarmReceiver, in turn, uses a switch statement to call
out to different private methods based upon which Spinner
item was selected:
package com.commonsware.android.lollipopnotify;

import android.app.Notification;
import android.app.NotificationChannel;
import android.app.NotificationManager;
import android.app.PendingIntent;
import android.content.BroadcastReceiver;
import android.content.Context;
import android.content.Intent;
import android.os.Build;
import android.provider.Settings;
import android.support.v4.app.NotificationCompat;
import android.support.v4.app.NotificationManagerCompat;

public class AlarmReceiver extends BroadcastReceiver {
  private static final String CHANNEL_WHATEVER="channel_whatever";
  private static final String CHANNEL_HEADS_UP="channel_heads_up";
  private static final int NOTIFY_ID=1337;
  static final String EXTRA_TYPE="type";

  @Override
  public void onReceive(Context ctxt, Intent i) {
    NotificationManager mgr=
      (NotificationManager)ctxt.getSystemService(Context.NOTIFICATION_SERVICE);

    if (Build.VERSION.SDK_INT>=Build.VERSION_CODES.O &&
      mgr.getNotificationChannel(CHANNEL_WHATEVER)==null) {
      mgr.createNotificationChannel(new NotificationChannel(CHANNEL_WHATEVER,
        "Whatever", NotificationManager.IMPORTANCE_DEFAULT));
      mgr.createNotificationChannel(new NotificationChannel(CHANNEL_HEADS_UP,
        "Heads Up!", NotificationManager.IMPORTANCE_HIGH));
    }

    NotificationManagerCompat mgrCompat=NotificationManagerCompat.from(ctxt);

    switch (i.getIntExtra(EXTRA_TYPE, -1)) {
      case 0:
        notifyPrivate(ctxt, mgrCompat);
        break;

      case 1:
        notifyPublic(ctxt, mgrCompat);
        break;

      case 2:
        notifySecret(ctxt, mgrCompat);
        break;

      case 3:
        notifyHeadsUp(ctxt, mgrCompat);
        break;
    }
  }

  private void notifyPrivate(Context ctxt, NotificationManagerCompat mgr) {
    Notification pub=
      buildBase(ctxt, CHANNEL_WHATEVER, R.string.public_title).build();

    mgr.notify(NOTIFY_ID,
      buildBase(ctxt, CHANNEL_WHATEVER, R.string.private_title).setPublicVersion(pub).build());
  }

  private void notifyPublic(Context ctxt, NotificationManagerCompat mgr) {
    mgr.notify(NOTIFY_ID,
        buildBase(ctxt, CHANNEL_WHATEVER, R.string.public_title)
            .setVisibility(NotificationCompat.VISIBILITY_PUBLIC)
            .build());
  }

  private void notifySecret(Context ctxt, NotificationManagerCompat mgr) {
    mgr.notify(NOTIFY_ID,
        buildBase(ctxt, CHANNEL_WHATEVER, R.string.secret_title)
            .setVisibility(NotificationCompat.VISIBILITY_SECRET)
            .build());
  }

  private void notifyHeadsUp(Context ctxt, NotificationManagerCompat mgr) {
    mgr.notify(NOTIFY_ID,
        buildBase(ctxt, CHANNEL_HEADS_UP, R.string.headsup_title)
            .setPriority(NotificationCompat.PRIORITY_HIGH)
            .build());
  }

  private NotificationCompat.Builder buildBase(Context ctxt, String channel,
                                               int titleId) {
    NotificationCompat.Builder b=
      new NotificationCompat.Builder(ctxt, channel);

    b.setAutoCancel(true)
        .setDefaults(Notification.DEFAULT_ALL)
        .setContentTitle(ctxt.getString(titleId))
        .setContentIntent(buildPendingIntent(ctxt, Settings.ACTION_SECURITY_SETTINGS))
        .setSmallIcon(android.R.drawable.stat_sys_download_done)
        .addAction(android.R.drawable.ic_media_play,
            ctxt.getString(R.string.play),
            buildPendingIntent(ctxt, Settings.ACTION_SETTINGS));

    return(b);
  }

  private PendingIntent buildPendingIntent(Context ctxt, String action) {
    Intent i=new Intent(action);

    return(PendingIntent.getActivity(ctxt, 0, i, 0));
  }
}
If the user chooses the “Private” option in the Spinner, we
call notifyPrivate(). That method builds two Notification
objects: the regular one and a separate public edition. We
attach the public edition to the regular Notification
via a call to setPublicVersion() on the NotificationCompat.Builder.
Then, we raise the regular Notification. This will show the
public edition if the lockscreen is locked; otherwise, it will
show the regular edition.
If the user chooses the “Public” option, we call notifyPublic().
That, in turn, calls setVisibility(NotificationCompat.VISIBILITY_PUBLIC)
on the NotificationCompat.Builder, causing our Notification to
appear normally both on the lockscreen and past the lockscreen.
If the user chooses the “Secret” option, we call notifySecret().
That uses setVisibility(NotificationCompat.VISIBILITY_SECRET)
to configure the Notification to only appear once the user has
gotten past the lockscreen.
The “Heads-Up” option — fourth in the Spinner — is covered
in the next section.
Notifications can have a priority associated with them. Normally, notifications with higher priority will appear higher in the list of notifications in the notification tray than will notifications with lower priority.
Android 5.0 took this a step further, showing high-priority
notifications in a “heads-up” style, popping up a small dialog-like
window over the main screen, with the same basic content as would
appear for the Notification in its tile in the notification tray:

Figure 410: Lollipop Demo, on a Nexus 7, Showing Heads-Up Notification
Users can interact with the heads-up Notification or ignore it;
in the latter case, the Notification will move into the status
bar and the “heads-up” display will disappear from the screen.
Note that the “priority” concept being described here seems to be
independent of the notion of “priority notifications” in the user’s
interruption configuration in Settings. There, “priority notifications”
is tied to the app, not tied to any sort of configuration of the
Notification itself.
Android 8.0’s notification channels introduced a separate concept, called importance, set on the channel. Roughly speaking, importance on a channel is the same as priority on a notification. Priorities are marked as deprecated on API Level 26+, though they still work.
NotificationCompat.Builder has a setPriority() method that allows
you to specify your requested priority. There are
five priority values accepted as a parameter, all defined as
constants out on the NotificationCompat class:
PRIORITY_MAXPRIORITY_HIGHPRIORITY_DEFAULTPRIORITY_LOWPRIORITY_MINThe actual priority applied to the Notification will depend upon
other factors, and so you should not assume that your requested
value will be accepted and applied as-is.
The heads-up Notification appears as shown in the above screenshot.
The pop-up itself is centered across the top of the screen, as
shown below:
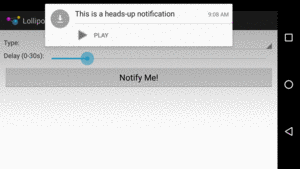
Figure 411: Lollipop Demo, Showing Heads-Up Notification
After a few seconds of inactivity, the pop-up vanishes, and the
Notification goes into the status bar.
The concept of priority was introduced in API Level 16 (Android 4.1). On Android 4.1 through 4.4, the only effect of priority was to help influence the sort order of notifications in the notification tray, with higher-priority items drifting towards the top.
While NotificationCompat.Builder will allow you to specify a priority
even on devices running older versions of Android than 4.1, the
requested priority will be ignored, simply because priority did not
exist back then. Hence, while your code will still work, it will have
no effect on such old devices.
Before Android 5.0 added heads-up notifications, while priority would
influence things like sort order, it would have no real impact on
how the user would be informed about whatever event triggered the
Notification. The user would still just get an icon in the status
bar, and perhaps a ringtone and other hardware output.
However, sometimes we need to be somewhat more “in the user’s face”, such as for a calendar event reminder, or for an incoming phone call from our VOIP app.
It is tempting to launch an activity in these cases. In fact, that is what the user tends to perceive as happening, on Android 4.4 and older devices. And some apps no doubt actually do launch an activity.
A “middle ground” between showing a Notification and launching an
activity is to use a full-screen Notification. Here, we provide a
PendingIntent that should be invoked if the user is actively using
the device at the time of the Notification. Typically, that
PendingIntent will display an activity. However, on Android 5.0+,
the behavior has changed, where a full-screen Notification actually
just triggers a heads-up notification, as would a high-priority
Notification.
Prior to Android 8.0, all that you need to do to set up a Notification to be full-screen is
to call setFullScreenIntent() on your NotificationCompat.Builder,
supplying two values:
PendingIntent to be invoked when the notification is added
to the screenboolean, where true indicates that even if the user has
blocked notifications, you want this one to appearFor example, in the
Notifications/FullScreen
sample project, MainActivity shows a Notification
constructed via the buildNormal() method:
  private NotificationCompat.Builder buildNormal() {
    NotificationCompat.Builder b=
      new NotificationCompat.Builder(this, CHANNEL_WHATEVER);

    b.setAutoCancel(true)
     .setDefaults(Notification.DEFAULT_ALL)
     .setContentTitle(getString(R.string.download_complete))
     .setContentText(getString(R.string.fun))
     .setContentIntent(buildPendingIntent(Settings.ACTION_SECURITY_SETTINGS))
     .setSmallIcon(android.R.drawable.stat_sys_download_done)
      .setNumber(5)
     .setFullScreenIntent(buildPendingIntent(Settings.ACTION_DATE_SETTINGS), true)
     .addAction(android.R.drawable.ic_media_play,
         getString(R.string.play),
         buildPendingIntent(Settings.ACTION_SETTINGS));

    return(b);
Here, the PendingIntent is created using the same
buildPendingIntent() method as before, this time opening up a distinct
screen from the Settings app.
On Android 5.0 through 7.1, the “full screen” Notification appears as a heads-up
Notification:
Figure 412: FullScreen Demo, on a Nexus 7, Showing “Full Screen” Notification
Note that there is no obvious way to actually invoke the PendingIntent
associated with the setFullScreenIntent() method. Hence, you need to make
sure that the Notification has some other means of getting the user to the
right place in your UI, such as via setContentIntent() or an action.
On API Levels 11 through 19 (Android 3.0 through 4.4), the effect
of a full-screen PendingIntent is to invoke the PendingIntent
when the Notification is added to the screen. This will happen
regardless of whether the user is using the device or not, though
if the device is asleep, the activity triggered by the PendingIntent
will only be visible once
the user gets past their lockscreen.
Note that the Notification is also shown, along with whatever
the PendingIntent does. That Notification is not automatically
cleared when the user exits out of that activity via BACK, HOME, etc.
Hence, it is up to you to clear that Notification if and when it
is no longer relevant. The primary value of the Notification is
to have the icon appear in the status bar on the lockscreen — even
though the user cannot interact with your Notification then, the user
may recognize your icon and therefore elect to unlock their device
to see what all the fuss is about.
Full-screen notifications were not supported prior to Android 3.0.
While NotificationCompat.Builder will allow you to call
setFullScreenIntent(), the value will be ignored prior to API Level
11.
In theory, there is nothing stopping NotificationCompat from
launching an activity itself, in addition to displaying the
Notification. However, at least at this time, it is not doing so,
and it is fairly likely that Google will not add this in at this
point.
Hence, the only way to do a “full-screen notification” is for your
app to launch the desired activity, in addition to (or instead of)
showing the Notification.
On these devices, setFullScreenIntent() has no effect.
Often, you will see a Notification with a ProgressBar in it, showing
progress of some long-running background work, such as a large download.
There are two approaches towards building this sort of thing:
Notification, as we will cover
later in this chapter
setProgress() on the NotificationCompat.Builder, periodically
updating the Notification to reflect the now-current amount of progressNeedless to say, the second option is simpler.
The
HTTP/OkHttpProgress
sample project demonstrates how this works in a fairly realistic
situation: tracking progress of a long download. In this case, we will
use OkHttp3, showing how you can integrate its somewhat convoluted
“interceptor” API to find out about download progress, then use that
information to update a Notification.
This sample app is a variation on other download samples shown elsewhere
in the book. We have a fragment with a large “Do the Download” button.
When the button is clicked, we want to start a Downloader service to
do the actual downloading on a background thread.
The two primary differences in this fragment’s onClick() method are:
Notification.finish() the activity, to emphasize the fact that our ongoing
UI is being handled by the Notification: @Override
public void onClick(View v) {
Intent i=new Intent(getActivity(), Downloader.class);
i.setDataAndType(Uri.parse("http://commonsware.com/Android/Android-1_1-CC.pdf"),
"application/pdf");
getActivity().startService(i);
getActivity().finish();
}
Also, we are not bothering to offer the user the ability to view the PDF immediately after downloading, to simplify the example a bit.
The significant changes come in the Downloader service. Previous
editions of this sample use HttpURLConnection, but here we switch to
OkHttp3, which offers a cleaner way to find out our download progress.
Plus, our foreground service Notification will employ the ProgressBar
to show how far along we are in downloading the file.
A large chunk of our Downloader IntentService does the same stuff as you
see in the
Notifications/Foreground
sample project.
Of particular note here, we call startForeground(), to elevate our
process priority while the download is happening and show a Notification
along the way:
      String filename=i.getData().getLastPathSegment();
      final NotificationCompat.Builder builder=
        buildForeground(filename);

      startForeground(FOREGROUND_ID, builder.build());
The Notification itself comes from buildForeground(), which takes the
name of the file as a parameter and builds a Notification with that
information:
  private NotificationCompat.Builder buildForeground(
    String filename) {
    NotificationCompat.Builder b=
      new NotificationCompat.Builder(this, CHANNEL_WHATEVER);

    b.setContentTitle(getString(R.string.downloading))
     .setContentText(filename)
     .setSmallIcon(android.R.drawable.stat_sys_download)
     .setOnlyAlertOnce(true)
     .setOngoing(true);

    return(b);
  }
Note that we use setOnlyAlertOnce(true) here. This tells Android to only do the
“alert” portion of the Notification once. Here, “alert” means things like
ringtones and vibration patterns. We will see why this flag is important shortly.
Eventually, we start using OkHttpClient to download the file:
      OkHttpClient client=new OkHttpClient.Builder()
        .addNetworkInterceptor(nightTrain)
        .build();
      Request request=
        new Request.Builder().url(i.getData().toString()).build();
      Response response=client.newCall(request).execute();
      BufferedSink sink=Okio.buffer(Okio.sink(new File(output.getPath())));

      sink.writeAll(response.body().source());
      sink.close();

      stopForeground(true);
      raiseNotification(null);
We start off by building an instance of OkHttpClient using an
OkHttpClient.Builder. We will take a closer look at the
addNetworkInterceptor() call shortly, as that is where we are hooking
in our code to find out about the progress of the HTTP request.
We then:
Request to GET our file, using the path supplied to use
via getData() on the Intent passed into onHandleIntent()
Content-type header, for use when constructing an ACTION_VIEW
Intent to view the downloaded fileBufferedSink on our desired output locationclose() the output filestopForeground())Notification
Other than using OkHttp3, little of that is different from the original
foreground service sample. Where things start to get interesting is
in that addNetworkInterceptor() call.
Interceptors are a way for you to hook into the flow of OkHttp3
processing, such that your code gets invoked for any request
made of this OkHttpClient. In particular, a network interceptor
allows you to get control during the actual network I/O of processing
the request.
The OkHttp Git repository contains some sample code that uses a network interceptor to track download progress, and that code forms the foundation of what is shown in this sample.
The addNetworkInterceptor() call in Downloader is using a local Interceptor
object, named nightTrain:
      Interceptor nightTrain=new Interceptor() {
        @Override
        public Response intercept(Chain chain)
          throws IOException {
          Response original=chain.proceed(chain.request());
          Response.Builder b=original
            .newBuilder()
            .body(
              new ProgressResponseBody(original.body(),
                  progressListener));

          return(b.build());
        }
      };
An Interceptor will be called with a Chain, representing the HTTP
request and response. The job of the Interceptor is three-fold:
chain.proceed() at some point, to kick off the actual
HTTP processingResponse object that will be used as the “real” response
of this requestInterceptor was designed to do, such as
request logging
The chain.proceed() call returns the Response that would be what
OkHttp3 would use in the absence of this Interceptor. The Interceptor
can either return that Response or some other Response. If you want
to monitor the actual network I/O — such as we want to do here, to see
how many bytes we have downloaded — the recipe is to use the wrapper
pattern and wrap something from the original Response in a wrapper that
has your business logic.
That is what this sample does. original.newBuilder() gives us a
Response.Builder that is based on the original Response. The
body() of a Response is a ResponseBody that manages an Okio
Source object, which handles the actual streaming. We wrap
the original ResponseBody in a ProgressResponseBody that will track
our download progress, put that ProgressResponseBody into the Response.Builder,
then return the Response that is built by that Builder. The net
effect is that all calls to the ResponseBody will go to our
ProgressResponseBody.
What we really want to wrap is the Source, an Okio object that
is responsible for the real streaming. However, to get there, we have
to wrap that original ResponseBody in a ProgressResponseBody.
ProgressResponseBody itself extends from a ResponseBodyWrapper,
which is a ResponseBody that forwards everything onto a wrapped
ResponseBody… except for a hook to allow us to wrap the Source:
package com.commonsware.android.okhttp3.progress;

import okhttp3.MediaType;
import okhttp3.ResponseBody;
import okio.BufferedSource;
import okio.Okio;
import okio.Source;

// inspired by https://github.com/square/okhttp/blob/master/samples/guide/src/main/java/okhttp3/recipes/Progress.java

abstract class ResponseBodyWrapper extends ResponseBody {
  abstract Source wrapSource(Source original);

  private final ResponseBody wrapped;
  private BufferedSource buffer;

  ResponseBodyWrapper(ResponseBody wrapped) {
    this.wrapped=wrapped;
  }

  @Override
  public MediaType contentType() {
    return(wrapped.contentType());
  }

  @Override
  public long contentLength() {
    return(wrapped.contentLength());
  }

  @Override
  public BufferedSource source() {
    if (buffer==null) {
      buffer=Okio.buffer(wrapSource(wrapped.source()));
    }

    return(buffer);
  }
}
Subclasses of ResponseBodyWrapper need to implement wrapSource()
to wrap the Source of the Response.
ProgressResponseBody does just that, wrapping the Source in a
subclass of ForwardingSource named ProgressSource:
package com.commonsware.android.okhttp3.progress;

import java.io.IOException;
import okhttp3.ResponseBody;
import okio.Buffer;
import okio.ForwardingSource;
import okio.Source;

// inspired by https://github.com/square/okhttp/blob/master/samples/guide/src/main/java/okhttp3/recipes/Progress.java

class ProgressResponseBody extends ResponseBodyWrapper {
  private final Listener listener;

  ProgressResponseBody(ResponseBody wrapped, Listener listener) {
    super(wrapped);

    this.listener=listener;
  }

  @Override
  Source wrapSource(Source original) {
    return(new ProgressSource(original, listener));
  }

  class ProgressSource extends ForwardingSource {
    private final Listener listener;
    private long totalRead=0L;

    public ProgressSource(Source delegate, Listener listener) {
      super(delegate);

      this.listener=listener;
    }

    @Override
    public long read(Buffer sink, long byteCount)
      throws IOException {
      long bytesRead=super.read(sink, byteCount);
      boolean done=(bytesRead==-1);

      if (!done) {
        totalRead+=bytesRead;
      }

      listener.onProgressChange(totalRead,
        ProgressResponseBody.this.contentLength(), done);

      return(bytesRead);
    }
  }

  interface Listener {
    void onProgressChange(long bytesRead, long contentLength,
                          boolean done);
  }
}
Our ProgressSource does two things:
ProgressResponseBody.Listener
with the number of bytes that have been read so far, the known content
length of the stream, and whether we are now done reading from the streamBack in Downloader, the nightTrain passed in a progressListener to
the ProgressResponseBody constructor. That progressListener is an
implementation of ProgressResponseBody.Listener, where we can actually
update our Notification:
      final ProgressResponseBody.Listener progressListener=
        new ProgressResponseBody.Listener() {
          long lastUpdateTime=0L;

          @Override
          public void onProgressChange(long bytesRead,
                                       long contentLength,
                                       boolean done) {
            long now=SystemClock.uptimeMillis();

            if (now-lastUpdateTime>1000) {
              builder.setProgress((int)contentLength,
                (int)bytesRead, false);
              mgr.notify(FOREGROUND_ID, builder.build());
              lastUpdateTime=now;
            }
          }
        };
Mostly, what we do is call setProgress() on the NotificationCompat.Builder.
This takes:
ProgressBar, for which we use the length of
the contentProgressBar should be indeterminate, for which we pass
false to get a ProgressBar that shows actual progressThen, we build() a fresh Notification from the Builder and
pass that to notify() with the same ID. This will update our existing
Notification, showing the updated progress. This is where setOnlyAlertOnce(true)
comes into play — the additional times we raise this same Notification
with the updated progress will not trigger the alert, so the device ringtone
does not play with each update.
However, our listener is going to be invoked fairly frequently, so much
that we might swamp the system just constantly updating the Notification.
To help with that, we track when we update the Notification and only
update it again if a second has passed.
You may want to be presenting the progress of the download in two places:
the Notification and the UI of your application, if a relevant bit
of that UI happens to be in the foreground. For example, you might
have a fragment that contained the button or action bar item that kicked
off the download. So long as that fragment is visible, you might want
to have a ProgressBar on it and update the progress there.
If you use an event bus, you can have your
ProgressResponseBody.Listener post an event with the progress of
the download. However, that event should include some sort of unique
identifier for the download itself, in addition to the progress. That
way, only the fragment related to this specific download will show
the progress, not similar fragments elsewhere.
The APK edition of this book takes this approach in the
Community Theater area, where you can download and watch
presentations on Android app development topics (“appinars”). An appinar
is a ZIP archive up on a CommonsWare server. When you browse the catalog
of appinars and choose one, the screen will either let you download the
appinar or play the appinar (if it is already downloaded). The download
will use code reminiscent of what you see in the sample app, with
the added feature of event bus messages publishing the progress to
the rest of the app. However, we only show the download progress on the
fragment for the particular appinar that is being downloaded. If, while
the download is progressing, you visit other appinar descriptions, we do
not want to show the download progress there, as you will think that you
are downloading those appinars too. The Notification shows the name
of the appinar that you are downloading, so it provides built-in context
for what appinar the progress pertains to.
When you specify a title and a description for a Notification, you
are implicitly telling Android to use a stock layout for the
structure of the Notification object’s entry in the notification
drawer. However, instead, you can provide Android with the layout to
use and its contents, by means of a RemoteViews.
In other words, by using the same techniques that you use to create
app widgets, you can create tailored notification
drawer content. Just create the RemoteViews and supply it to your
NotificationCompat.Builder via setContent().
To update the notification tile content, you update your
RemoteViews in your Notification and re-raise the Notification
via a call to notify(). Android will apply your revised
RemoteViews to the notification drawer content, and the user will
see the changed widgets.
The
Notifications/CustomView
sample project is a clone of the
HTTP/OkHttpProgress shown in the previous section.
The difference is that we will use our own custom layout and a RemoteViews
rather than use the standard Notification UI.
This sample app has its minSdkVersion set to 21, so we only need
to worry about providing a layout that looks OK on Android 5.0+ devices.
Google dramatically changed the look of notifications with Android 5.0, so
a layout that looks good on older devices may not blend in well with
newer devices. If you have a need to support a wider range of Android
versions, you will want to consider using versioned layout resources
(e.g., res/layout/ for older devices, res/layout-v21/ for API Level 21+
devices).
But, since this app’s scope is limited, we can directly refer to
Theme.Material-based themes, to get a layout that has elements that
resembles the actual notification tile content:
<?xml version="1.0" encoding="utf-8"?>
<LinearLayout xmlns:android="http://schemas.android.com/apk/res/android"
  android:layout_width="match_parent"
  android:layout_height="match_parent"
  android:orientation="vertical">

  <TextView
    android:id="@android:id/title"
    style="@android:style/TextAppearance.Material.Notification.Title"
    android:layout_width="wrap_content"
    android:layout_height="wrap_content"
    android:layout_margin="4dp"
    android:ellipsize="marquee"
    android:singleLine="true" />

  <ProgressBar
    android:id="@android:id/progress"
    style="@android:style/Widget.Material.ProgressBar.Horizontal"
    android:layout_width="match_parent"
    android:layout_height="wrap_content"
    android:layout_margin="4dp"
    android:indeterminate="false" />
</LinearLayout>Here, we are just showing a title and a ProgressBar. The TextView
uses @android:style/TextAppearance.Material.Notification.Title, which
is the same style as is used by the official Notification layout.
The ProgressBar uses @android:style/Widget.Material.ProgressBar.Horizontal,
also mirroring what you will see in real notifications.
The new sample’s buildForeground() method now creates a RemoteViews
for this layout, fills in the title, and uses that with NotificationCompat.Builder
and setContent():
  private NotificationCompat.Builder buildForeground(
    String filename) {
    NotificationCompat.Builder b=
      new NotificationCompat.Builder(this, CHANNEL_WHATEVER);
    RemoteViews content=new RemoteViews(getPackageName(),
      R.layout.notif_content);

    content.setTextViewText(android.R.id.title, "Downloading: "+filename);

    b.setOngoing(true)
      .setContent(content)
      .setSmallIcon(android.R.drawable.stat_sys_download);

    return(b);
  }
However, NotificationCompat.Builder has a write-only API. We cannot
get our RemoteViews back from that. But, we need the RemoteViews
to be able to update our progress. So, to that end, we hold onto
the actual Notification built by the Builder in onHandleIntent():
      NotificationCompat.Builder builder=
        buildForeground(filename);
      final Notification notif=builder.build();
Then, in our ProgressResponseBody.Listener, we get at the RemoteViews
via the contentView public field on the Notification. We can call
a setProgressBar() method on the RemoteViews, much as we called
setProgress() on the NotificationCompat.Builder in the preceding example:
      final ProgressResponseBody.Listener progressListener=
        new ProgressResponseBody.Listener() {
          long lastUpdateTime=0L;

          @Override
          public void onProgressChange(long bytesRead,
                                       long contentLength,
                                       boolean done) {
            long now=SystemClock.uptimeMillis();

            if (now-lastUpdateTime>1000) {
              notif
                .contentView
                .setProgressBar(android.R.id.progress,
                  (int)contentLength, (int)bytesRead, false);
              mgr.notify(FOREGROUND_ID, notif);
              lastUpdateTime=now;
            }
          }
        };
Then, we can notify() the NotificationManager with the updated
Notification, causing the ProgressBar to advance based on the
actual progress made.
The resulting Notification shows our RemoteViews in action:
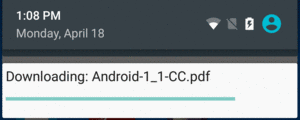
Figure 413: Custom Notification
A custom view for a Notification takes over the entire tile in the
notification shade. Sometimes, this may be necessary to achieve the
developer’s objective. Other times, though, while the main content
area of the Notification might need to be custom, the rest of the
“frame” around that content area could be left intact. This would
include things like the app’s icon, the time the Notification was
raised, any action buttons below the content, and so forth.
Android 7.0+ offers this via the
Notification.DecoratedCustomViewStyle and
Notification.DecoratedMediaCustomViewStyle styles. On your
Builder, call setCustomContentView() with the RemoteViews
for the content area, plus call setStyle(), passing in an instance
of DecoratedCustomViewStyle or DecoratedMediaCustomViewStyle,
to gain this effect.
Most of the time, you do not care about your Notification being
dismissed by the user from the notification drawer (e.g., pressing
the Clear button on Android 1.x/2.x devices). If you do care about
the Notification being deleted this way, you can supply a
PendingIntent in the deleteIntent data member of the
Notification — this will be executed when the user gets rid
of your Notification. Usually, this will be a getService() or
getBroadcast() PendingIntent, to have you do something in the
background related to the dismissal. Users are likely to get rather
irritated with you if you pop up an activity because they got rid of
your Notification.
Note that this only works for Notification objects that can be
cleared. If you have FLAG_ONGOING_EVENT set on the Notification,
it will remain on-screen until you get rid of it.
The Notification class has a number data member. On Android 1.x
and 2.x, setting that data member would cause a number to be
super-imposed on top of your icon in the status bar. That data member
no longer works as of Android 3.0.
However, NotificationCompat.Builder has a setNumber() method which
does work on API Level 11 and higher, though with slightly
different behavior. Instead of putting the number on top of your
status bar icon, the number will appear in your notification drawer
entry. This only works if you do not use setContent() with
NotificationCompat.Builder to define your own notification drawer entry
layout — in that case, you could put your own number in
wherever you would like.
Android 7.0 offers a new MessagingStyle to the roster of expanded
Notification styles. This one is designed for a chat-style presentation,
where you supply a series of chat messages (person, timestamp, and message),
and they are rendered in the Notification. It is designed to be used
with the RemoteInput option described earlier in this chapter,
for the user to be able to participate in a chat without having to open
up your activity.
As usual, there are two implementations of MessagingStyle:
Notification.MessagingStyle is part of Android 7.0’s SDK
and requires you to build for Android 7.0 (e.g., compileSdkVersion 24)NotificationCompat.MessagingStyle, from the Android Support libraries,
for backwards compatibilityThe
Notifications/Messaging
sample project demonstrates the use of the latter, along with the RemoteInput
support from earlier.
While the RemoteInput and MessagingStyle from NotificationCompat
will build and run on older devices, they do not work especially well. You
simply get a do-nothing Notification action for the RemoteInput and
no real context around the messages. As such, you only want to use these
options on Android 7.0 devices, gracefully degrading to some other experience
on older devices.
Also note that the NotificationCompat.MessagingStyle is from the v24
generation of the Android Support libraries. In this case, we are using
25.0.0 of support-compat, which contains NotificationCompat
and NotificationManagerCompat.
apply plugin: 'com.android.application'

dependencies {
    implementation 'com.android.support:support-compat:26.1.0'
}

android {
    compileSdkVersion 26
    buildToolsVersion '26.0.2'

    defaultConfig {
        minSdkVersion 15
        targetSdkVersion 26
        versionCode 1
        versionName "1.0"
    }
}
As with the RemoteInput sample, the MainActivity is here just to provide
us with an easy way to get the Notification to appear on the screen. In
this case, though, all we do is use NotificationManagerCompat to show
a Notification built elsewhere:
package com.commonsware.android.messaging;

import android.app.Activity;
import android.os.Bundle;
import android.support.v4.app.NotificationManagerCompat;

public class MainActivity extends Activity {
  @Override
  public void onCreate(Bundle savedInstanceState) {
    super.onCreate(savedInstanceState);

    NotificationManagerCompat
      .from(this)
      .notify(RemoteInputReceiver.NOTIFY_ID,
        RemoteInputReceiver.buildNotification(this).build());

    finish();
  }
}
Our RemoteInputReceiver is more complex as a result:
package com.commonsware.android.messaging;

import android.app.NotificationChannel;
import android.app.NotificationManager;
import android.app.PendingIntent;
import android.content.BroadcastReceiver;
import android.content.Context;
import android.content.Intent;
import android.os.Build;
import android.os.Bundle;
import android.support.v4.app.NotificationCompat;
import android.support.v4.app.NotificationManagerCompat;
import android.support.v4.app.RemoteInput;
import android.util.Log;
import java.util.Stack;

public class RemoteInputReceiver extends BroadcastReceiver {
  private static final String CHANNEL_WHATEVER="channel_whatever";
  static final int NOTIFY_ID=1337;
  static final String EXTRA_INPUT="input";
  static final Stack<Message> MESSAGES=new Stack<>();
  static final long INITIAL_TIMESTAMP=System.currentTimeMillis();

  static NotificationCompat.Builder buildNotification(Context ctxt) {
    NotificationManager mgr=
      (NotificationManager)ctxt.getSystemService(Context.NOTIFICATION_SERVICE);

    if (Build.VERSION.SDK_INT>=Build.VERSION_CODES.O &&
      mgr.getNotificationChannel(CHANNEL_WHATEVER)==null) {
      mgr.createNotificationChannel(new NotificationChannel(CHANNEL_WHATEVER,
        "Whatever", NotificationManager.IMPORTANCE_DEFAULT));
    }

    Intent i=new Intent(ctxt, RemoteInputReceiver.class);
    PendingIntent pi=
      PendingIntent.getBroadcast(ctxt, 0, i, PendingIntent.FLAG_UPDATE_CURRENT);

    RemoteInput remoteInput=
      new RemoteInput.Builder(RemoteInputReceiver.EXTRA_INPUT)
        .setLabel(ctxt.getString(R.string.talk))
        .build();

    NotificationCompat.Action remoteAction=
      new NotificationCompat.Action.Builder(
        android.R.drawable.ic_btn_speak_now,
        ctxt.getString(R.string.talk),
        pi).addRemoteInput(remoteInput).build();

    NotificationCompat.MessagingStyle style=
      new NotificationCompat.MessagingStyle("Me")
        .setConversationTitle("A Fake Chat");

    style.addMessage("Want to chat?", INITIAL_TIMESTAMP, "Somebody");

    for (Message msg : MESSAGES) {
      style.addMessage(msg.text, msg.timestamp,
        style.getUserDisplayName());
    }

    NotificationCompat.Builder builder=
      new NotificationCompat.Builder(ctxt, CHANNEL_WHATEVER)
        .setSmallIcon(
          android.R.drawable.stat_sys_download_done)
        .setContentTitle(ctxt.getString(R.string.title))
        .setStyle(style)
        .addAction(remoteAction);

    return(builder);
  }

  @Override
  public void onReceive(Context ctxt, Intent i) {
    Bundle input=RemoteInput.getResultsFromIntent(i);

    if (input!=null) {
      CharSequence text=input.getCharSequence(EXTRA_INPUT);

      if (text!=null) {
        MESSAGES.push(new Message(text));
      }
      else {
        Log.e(getClass().getSimpleName(), "No voice response speech");
      }
    }
    else {
      Log.e(getClass().getSimpleName(), "No voice response Bundle");
    }

    NotificationManagerCompat
      .from(ctxt)
      .notify(RemoteInputReceiver.NOTIFY_ID,
        buildNotification(ctxt).build());
  }

  private static class Message {
    final CharSequence text;
    final long timestamp;

    Message(CharSequence text) {
      this.text=text;
      timestamp=System.currentTimeMillis();
    }
  }
}
For the MessagingStyle, we need messages. In a production app, this
would be part of your app’s data model, probably saved in a file or database
somewhere, with an in-memory cache for speed. In this sample app, we just
have a static MESSAGES Stack, for our messages. Initially, this Stack
is empty, but we will eventually fill in Message objects, each of which
has text and a timestamp. Since this is a sample app, and all Message objects
will come from our app’s user, we do not need Message to track the sender
of the message — a real chat-style app would need this, in all likelihood.
The buildNotification() method starts off with the same basic code
shown in the RemoteInput sample. But then, mid-way through the method,
we build up the MessagingStyle:
    NotificationCompat.MessagingStyle style=
      new NotificationCompat.MessagingStyle("Me")
        .setConversationTitle("A Fake Chat");

    style.addMessage("Want to chat?", INITIAL_TIMESTAMP, "Somebody");

    for (Message msg : MESSAGES) {
      style.addMessage(msg.text, msg.timestamp,
        style.getUserDisplayName());
    }
The parameter to the MessagingStyle constructor is the name associated
with the user of this app. That name will appear alongside messages that
come from this user. A MessagingStyle can have a title, set via
setConversationTitle(), to provide some context for the chat transcript.
We then add one fake message, ostensibly from the chat partner,
via the addMessage() method. The version we use here takes the text,
timestamp, and name of the other party to use in the message.
Then, if there are messages in the MESSAGES stack, we add those to the
chat transcript as well. Note that our third parameter is
style.getUserDisplayName(), which returns the value that we passed into
the MessagingStyle constructor. We could
get the same effect by passing null for the third parameter.
That MessagingStyle then is attached to the NotificationCompat.Builder
via setStyle().
At the outset, since MESSAGES is empty, we get a single message from
“Somebody”:
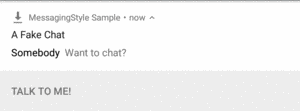
Figure 414: Messaging Demo Notification, As Initially Launched
If the user taps “Talk to Me”, types in a message, and clicks the send
button, our RemoteInputReceiver will take that text, put it in a Message,
push that Message into the MESSAGES Stack, then update the Notification
with the new transcript:
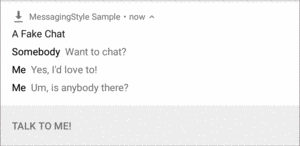
Figure 415: Messaging Demo Notification, After Two Replies
The timestamp does not show up; it is unclear how that is used by Android.
Historically, while we could supply a “large bitmap” (e.g., photo or
avatar) to a Notification for use in the tile in the notification tray
as a Bitmap, the “small icon” used for the status bar always had to be
a resource in our app. This was aggravating for developers that wanted
to tailor the small icon, such as a weather app showing the current
temperature. Now, we can supply an Icon object, which can wrap a
drawable resource, a Uri to a ContentProvider, a byte array
of encoded bitmap data, a Bitmap, or a path to a local PNG or JPEG
file. Any of those can be used for the small icon, offering greater
flexibility. That being said, please do bear in mind that the small
icon is small (i.e., tiny changes may not be noticeable) and that
ideally it should adhere to the platform aesthetic for notification
icons (i.e., do not use a photo).
The user can now disable our heads-up notifications, if the user finds
them irritating. We can get an idea of what the user’s chosen notification
policies are via getCurrentInterruptionFilter() and getNotificationPolicy(),
so we have some general sense of what the user is and is not expecting to
see in terms of notifications.
And, at long last, we can find out all of our active notifications, via
a getActiveNotifications() method. This will include any notification
that is visible to the user (i.e., the user has not dismissed it and we
have not gotten rid of it via cancel()).
You can put a custom ringtone on a Notification, via methods like
setSound() on NotificationCompat.Builder. This requires a Uri.
And, unfortunately, your options for that Uri are limited:
android.resource Uri values are fine, if the sound that you want
to play is a raw resourcefile Uri values will work prior to Android 7.0 and for apps
whose targetSdkVersion is below 24content Uri values are the preferred solution for sounds that
exist as files (e.g., by using FileProvider), but they do not work
on Android 7.0 without additional work, because Android may not have
read access to your contentThe best easy solution at the moment, for content Uri values,
is to grant read access to your content to the com.android.systemui
package, via the grantUriPermissions() method on Context:
grantUriPermission("com.android.systemui", sound,
  Intent.FLAG_GRANT_READ_URI_PERMISSION);
(where sound is the Uri that you want to use with setSound())
However, it is unclear if this is the right package to use for all versions of Android and all possible device manufacturer modifications to Android.
Another possibility is for you to create a read-only ContentProvider
that can serve your file, perhaps modeled after
this book sample, then export that provider.
The FileProvider from the Android Support library would work, except that
it cannot be exported.
Eventually, the author’s StreamProvider
will be updated to support this sort of public read-only pattern.
With luck, future versions of Android (and the NotificationCompat backport)
will address this more formally.
In Android 8.0+ can now provide a time when the notification should be automatically deleted, as if the user had cleared it personally. This is good for notifications whose value declines a lot after a particular point in time.
To use this, call setTimeoutAfter() on the NotificationCompat.Builder, supplying a
duration in milliseconds:
  public void raiseCoins(View view) {
    Notification n=new NotificationCompat.Builder(MainActivity.this, CHANNEL_COINS)
      .setContentTitle(getString(R.string.notif_coins_title))
      .setContentText(getString(R.string.notif_coins_text))
      .setSmallIcon(android.R.drawable.stat_sys_warning)
      .setTimeoutAfter(5000)
      .build();

    mgr.notify(NOTIF_ID_COINS, n);
Here, we set the notification to time out after five seconds. Five seconds would be far too short of an active window for ordinary users, but it allows a developer to see the results more quickly.
Depending on the home screen launcher implementation, your notifications may display a dot on the home screen launcher icon:
![]()
Figure 416: Home Screen Launcher Notification Dot, from Pixel
This will happen by default; you do not need to do anything to make it happen. However, it will only appear on a handful of devices that have a compatible home screen.
You can disable this by calling setShowBadge(false) on the NotificationChannel
when you create it.
For launchers that support badges, a long-press on the launcher icon may show details of the notification:
![]()
Figure 417: Home Screen Launcher Notification Details, from Pixel
You can control two elements of this, beyond what you would normally configure in the notification itself:
setBadgeIconType() on the NotificationCompat.Builder to indicate
whether the icon should be displayed or not, and whether the small or the large
icon will be usedsetNumber() on the NotificationCompat.Builder to offer up a number
to show in the details:
![]()
Figure 418: Home Screen Launcher Notification Details With Number, from Pixel
For example, you might use this for an unread message count, if that information is not otherwise present in the notification.