Kudos for making it this far! Now that your plants are growing and flowering, let’s look at a few other tricks of the trade to help you maintain your crop, including pruning, sexing, and cloning. Each can have a great impact on the quality and yield of your crop. Alongside watering, lighting, and feeding, these activities represent much of the real hands-on work of the indoor grower.
All about Pruning
Pruning is the process of trimming or removing dead or dying leaves and unnecessary plant matter. It may feel strange, but cutting off bits of your marijuana plant is important to improving both the quality of the plant and the yield. Pruning, when performed correctly, increases airflow and helps plants make better use of available light and energy. You can prune too much
, however, and cause irreparable harm to your crop. For this reason, pruning should be taken on in stages once you are comfortable growing and maintaining a crop and have seen how the plants grow naturally. For the grower new to pruning, it’s suggested to start with one or two plants and see the results before extending to your entire crop.
HOW TO PRUNE
Pruning is as much an art as it is a science and should largely be left to more experienced growers. If you are going to take a leap into pruning, here’s what to know:
What to look for:
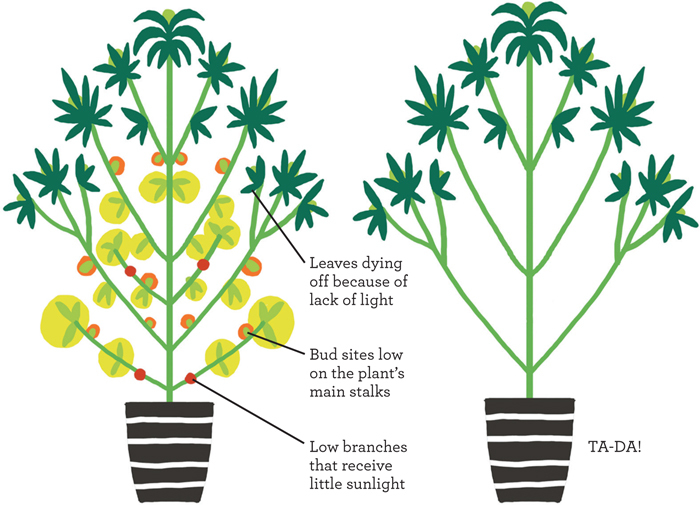
Look for leaves that are dead or dying, yellowing or discolored, or decaying. Look for bud flowering sites that are too low on the plant to get enough light to produce significant buds. Pruning, in general, can be hard to swallow, and some growers feel that removing buds specifically, even potential baby buds, crosses the line even further. The rationale for pruning such buds is that it is better to remove them and have the plant shift its energy to bud flowering sites with better potential due to their position on the plant.
How often:
Pruning should only be done once your plant is at least 12 inches tall and has several nodes or leaf pairs. Pruning stresses the plant, so you need to be careful to allow for recovery periods. It’s recommended to prune once as soon as possible and one or two more times while the plant is still in the vegetative state. Pruning while the plant is in the flowering stage is not recommended.
Cleanliness:
Wash your hands and/or wear gloves when pruning, as it’s easy to infect a plant during this process. Keep your tools visibly clean and sanitize often with isopropyl alcohol.
Procedure:
Determine which plant matter you want to remove. Use sanitized shears or scissors to cut large branches from the bottom and middle of the plant that are blocked from light by the canopy, and remove dead and dying leaves. Discard pruned material, making sure it doesn’t become incorporated into the soil, as decaying plant matter can attract pests.
TOOLS:
•
Clean, sharp pruning shears or scissors
•
Disposable or cleanable gloves
Light
One of the main goals of pruning is to allow otherwise hidden bud sites or growth areas to be bathed in light and thus grow and develop faster. By removing unnecessary plant matter, you allow the remaining foliage to fill in the spaces and gather that light that would have been wasted. Your lights and the energy to run them are the highest cost of your personal indoor grow operation. Because of this, you’ll want to make sure that the light you produce is effectively captured by the right parts of your plants. Fan leaves, the large, many-fingered leaves that tend to grow from older branches, are often removed during pruning. This frees up significant available light in the grow space.
Energy
Pruning doesn’t just increase lighting efficiency. It also reduces the amount of water, nutrients, and ventilation power wasted on growing unnecessary plant matter. Because these resources have a cost, you want to be as efficient as possible and get them to the right parts of the plant. Keep in mind the ultimate goal of your indoor grow is to produce buds. You want the lighting, nutrients, and ventilation delivered to your grow room to be focused on making buds instead of simply growing plant matter.
Dead Leaves
The process of removing dead or dying leaves is called defoliation and is the simplest form of pruning. Some cultivators limit their pruning to defoliation due to the risks involved with improper pruning. Dead or dying leaves pose a threat because they can attract pests and facilitate microbial infections. A small fraction of leaves will yellow and die naturally throughout the course of a plant’s life. Individual leaves showing symptoms—for example, a single, older fan leaf on a lower branch showing yellowing, some curling of the leaf, and brittleness—are often in this category and are not to be confused with leaves indicating nutrient deficiencies or excesses. These are a prime target for your defoliation, especially if nearby leaves show no similar symptoms. If nearby leaves do
show similar symptoms, evaluate your nutrient program for excesses/deficiencies before performing any pruning.
Airflow
When you prune away plant material, you not only increase available light but also enhance airflow, allowing air to penetrate into the plant where it couldn’t before. Marijuana plants like access to plentiful fresh air. The additional airflow allows the plant to respire more often and more effectively, increasing the plant’s growth rate and cannabinoid potency. Increased airflow also helps keep diseases like bud rot at bay.
Sexing Plants
As discussed in
Step 6: The Seeds
, marijuana plants are dioecious and, when grown from regular seeds, are either female or male. If you opted to purchase feminized seeds, there is a 99 percent chance they will produce females. Autoflowering seeds are a type of feminized seed that flower at a predetermined stage of growth independent of light or dark periods. Although it is rare, males and hermaphrodites may appear even when using feminized or autoflowering seed varieties. On the off chance they do produce a male, the following information will be useful to detect and eliminate it. It only takes one pollen producer to spoil a crop, so be aware of what to look out for.
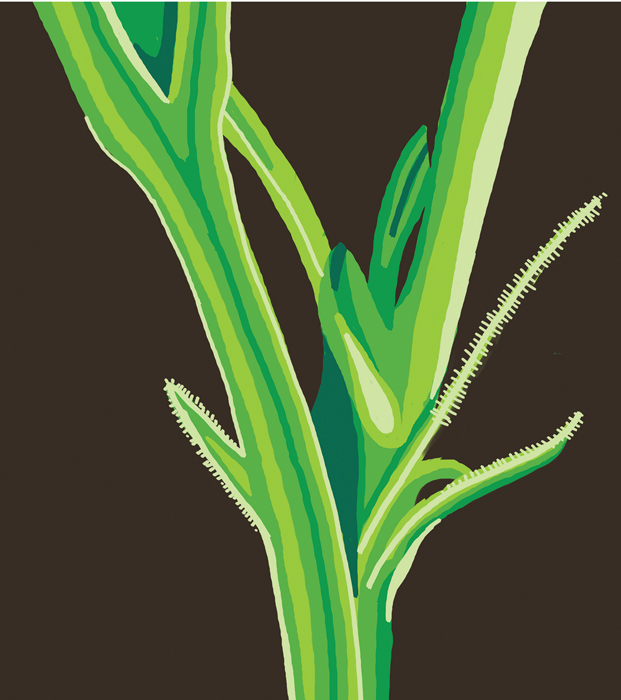
Preflowers are small structures that appear after about four to six weeks of vegetative growth in many strains of cannabis. They indicate the sex of the plant prior to the flowering stage and can be hard to see with the naked eye when fresh. They are found at the nodes, in the crook where a lateral branch emerges from a main stem. Grab an inexpensive magnifying glass if needed—it’s great for general plant inspection as well. Preflowers for both females and males are shown below.
Here’s how to identify them:
•
Male
preflowers look like a cluster of small green berries or one small green berry on a stick
•
Female
preflowers appear as two tiny bracts with thin white stigmas emerging
Female preflowers
Female Plants
Females plants are desired by growers because only females produce useable marijuana buds. As mentioned, flowering is initiated by changing the amount of light to mimic the autumnal equinox, when an equal number of daylight and dark hours occur. Once flowering commences, changes to the plant’s reproductive parts take place. Female plants exhibit characteristically thin white stigmas. Notice the fine frills that are perfect for attracting and capturing pollen floating through the air. If left unpollinated, these will continue to develop, swell, and produce sticky resinous buds. The goal of the buds, much like the stigmas before them, is to capture any pollen in the air and thus propagate their species. It’s one of the main jobs of the indoor grower to prevent this from taking place.
Male preflowers
Male Plants
Male plants exhibit “stick and ball”–type structures or cluster sacs that are easily distinguished from the female’s stigmas. These are the pollen sacs that contain the male’s pollen. If allowed to develop and deploy, the pollen will be released and attach to the delicate stigmas of the female. At this point your crop is said to be pollinated or to have “gone to seed.” This is because the formerly seedless buds, or sinsemilla, will rapidly create seeds, leaving you with low-quality, low-potency, seedy bud. When the female plant is pollinated, she shifts her energy into producing seeds, and so the bud quality suffers. When smoked, seeded bud, besides being generally lower in potency, tends to be bitter or harsh compared to its seedless counterparts. Unless you are actively breeding plants, males should be culled as soon as they are identified. Growers of regular seeds will often plant quantities of 50 to 100 percent extra seeds to allow for culling of male plants.
Hermaphroditic Plants
Hermaphrodites are genetically mutated plants that contain both male and female reproductive parts. Although this may sound like fun, hermies are a major problem for the indoor grower. A single hermaphrodite can pollinate your crop just as easily as a male can. The challenge with hermies is identifying them because the female parts sometimes mask the male parts early on in development. Hermaphroditism can occur due to stresses in the environment, especially issues related to lighting, such as light leaks during dark periods. Looking for hermaphrodites with the goal of removing them should be part of your standard maintenance of your grow room.
HOW TO SEX PLANTS
WHAT TO DO WHEN YOUR PLANTS ARE FLOWERING:
Most growers rely on preflowers to determine sex and then make the appropriate adjustments for males long before the males’ pollen sacs are developed enough to break open and pollinate the crop. By waiting until the flowering stage to sex your plants, you risk a male pollinating the crop before you’ve identified it. If you must wait until the flowering stage, check for the following:
Male:
Male flowers look like clusters of closed seed pods. Check the junctions where lateral branches or petioles (leaf stalks) come off the main stem. Male flowers tend to show and develop faster than female flowers, which helps the grower identify males sooner.
Female:
Female flowers have many white stigmas emerging from a multitude of calyxes. Calyxes combine to form what we recognize as bud, which grows and thickens from the base throughout the flowering stage. Flowers are not to be confused with stipules, which are thorn-shaped structures found at internodes on both male and female plants.
To Clone or Not to Clone
There are two basic ways to create a new cannabis plant. One method is the seed method, which has been the focus of this book as it’s most appropriate for beginners. With the seed method, you germinate and plant a seed, rear it through the seedling and vegetative stages, determine the sex, cull the males, take the females through the flowering stage, and so on. The other method is to make a clone. A clone is merely a cutting from an existing plant, known as the “mother,” that is encouraged to produce roots and thereby become a new plant. Whereas a seed is the combination of its mother and father plants’ genetics, a clone has exactly the same genetics, and therefore sex, as its mother plant.
Pros and Cons of Cloning
Pros:
The number one advantage of cloning is that it is practically free! Other than a little labor and some manageable stress on the mother plant, cloning costs you no more than the rooting hormone and grow blocks you use. Cloning allows you to create exact copies of your best-performing plants. Clones will not only grow the same but will also produce the same quality of bud in terms of aroma, flavor, and effect. Compared to buying seeds or sacrificing a crop just to produce seeds, cloning is the obvious way to go for many growers. Clones also lend themselves nicely to perpetual harvesting, making it easy to produce and keep plants in each of the various growth phases to cycle as needed. Clones will always be the sex of the mother plant, so the need for sexing and culling males is eliminated, saving additional labor hours in your garden.
Cons:
When you take a cutting, you face the risk of the clone not producing roots and failing to become a new plant. Both the clone and the mother plant are also susceptible to infection due to the wound from the cutting. Clones can experience “transplant shock” as well, where they fail to take root properly and do not become viable plants. For these reasons, cloning should be done in as sterile a manner as possible. Many growers take one cutting at a time and convert that cutting into a clone before taking additional cuttings in order to minimize the environmental exposure of the wound site.
Do Clones Change?
Because clones are genetically identical to the mother, they should exhibit exactly the same properties. If this is true, you should be able to take clones from clones forever and maintain the exact same genetic status, with all the aromas, flavors, and potency that go along with it. Although this sounds magical, some growers insist that a phenomenon called clonal degradation exists, which is said to cause the genetics of clones to “drift” away from the sought-after characteristics of the mother plant. For now the jury remains out on this discussion, but the majority of industrial indoor cannabis processors in the United States choose clones as the bedrock of their plant propagation programs.
Pest Management and Other Woes
There are bound to be issues that pop up as your plants grow. The key is dealing with each issue as soon as it arises. Pest management starts with having strong, healthy plants able to fight off pests and pathogens. Weak plants are easy prey. But even the healthiest of gardens will at times experience one or more pests.
Pest Prevention
Keep them out! The first line of defense for pest management focuses on excluding the pests from your grow. Make sure your area is sealed up against any access from outside the plant enclosure. Check for gaps in walls, floors, and ceilings that could allow pests to gain entry. Use caulk to seal any gaps, or hang plastic sheeting, and use tape as necessary. Remember, you
can be the biggest culprit of introducing pests into your indoor grow. Be careful not to wear clothing that was worn outside or at a friend’s grow. Hitching a ride on the grower’s clothes, shoes, and hair is a common route of pest entry. Some growers keep a smock or similar garment and boots inside the grow space and only use them for cultivation purposes while inside the grow. If you purchase clones, take precautions to not introduce any pests or diseases to your grow space. Some growers put newly purchased clones in a separate area for 10 to 14 days prior to introducing them into the grow space.
HOW TO CLONE
MATERIALS NEEDED:
•
Dome and tray setup
•
Isopropyl alcohol (70 percent)
•
Pruning shears
•
Razor blade or scalpel
•
Rooting hormone
•
Rooting media such as soil, Rockwool, or coco coir plugs
Make sure to wash your hands and wear gloves. Wet your growing media and prepare the rooting hormone, if necessary, according to the manufacturer’s instructions. Find a suitable cutting from a female marijuana plant in the vegetative state: a branch with at least two nodes above the cut. Sanitize pruning shears by spraying with alcohol, then cut the branch above the mother’s node. Sanitize a scalpel by spraying with alcohol, then cut the bottom of the cutting at a 45-degree angle to the stem below the lowest node. This increases the surface area from which roots will emanate and encourages root development. Immediately dip the end of the cutting into the rooting hormone, and place the cutting in the growing media. Trim the cutting by removing all but the top set of fan leaves and growth site. Lastly, square off the tips of the remaining fan leaves by making a straight cut perpendicular to the long axis of the leaf about one inch down from the tip. This encourages photosynthesis and reduces evaporation of water from the leaves. You can now relocate your clone to the tray and cover with the dome to keep humidity high. The rooting media will sit in the tray, which will retain some water.
Clones are similar to seedlings in their maintenance. They prefer high humidity and temperature: around 70 percent RH and 75ºF to 78ºF. Lighting should be similar to what is used for seedlings: often CFLs or other mild-intensity lights focused in the blue spectrum on a schedule of 18 hours on/6 hours off. In order to maintain clones continuously, many growers dedicate a small area of their grow to clones and/or seedlings that is light-blocked and isolated from the primary growing area. Keep the soil moist but not saturated by spraying water once per day. Roots should be one to two inches long after 10 to 14 days, at which point the clones can be transplanted and returned to the vegetative state or sent to flowering. Most growers wait at least one week after transplanting to shift into the flowering stage.
Pest Control
No intervention against pests is 100 percent effective, and managing them requires constant vigilance. Controlling your pests begins with monitoring for pests. You should check each of your plants for pests at least every few days. With the grow lights off, use a head-mounted light and magnifying glass to inspect the entire surface of the plant—the stem, branches, leaves, underside of leaves, and buds, including nooks and crannies—looking for any pests or signs of pests. Signs may include chewed plant material, dead pests, or waste matter. Many growers regularly use a prophylactic spray. If you’re not into spraying harsh chemicals, try organic alternatives such as neem oil or insecticidal soaps. No matter what you apply, make sure it is legal and you’re following the manufacturer’s instructions. Flowering plants can be sensitive to many foliar sprays, so spraying should be timed to avoid leaving residue at harvest. You’ll want to avoid spraying the buds directly unless absolutely necessary, as this can change the aroma and flavor of the finished bud.
Pest Identification
Many pests like the sweet stickiness of marijuana plants and buds. Some insect species with a craving for your pot garden are whiteflies, aphids, caterpillars, leaf miners, and thrips, among many others. If a general prophylactic spray is still allowing some pests to get through to your plants, identifying the species can help you target your efforts. A quick Google search reveals many websites that can assist with pest identification and mitigation.
Aphids:
like the underside of leaves; can be small, soft-bodied, wingless youths or winged adults
Caterpillars/worms, including loopers and budworms:
eat leaves and plant material and deposit waste
Leaf miners:
live inside leaves and eat from the inside out; winding, discolored trails are telltale sign
Mites, including spider mites and russet mites:
very small and often only seen once an infestation is present
Whiteflies:
look like small white moths; like the underside of leaves
Whiteflies
Caterpillars/worms
Leaf miners
Fungi and Mold
While not technically pests, fungi like molds and mildew can infect your cannabis plants. They like warm, humid environments, so your grow room provides optimal conditions. The same type of biocontrols mentioned under Pest Prevention (
here
), with dedicated shoes and garments, should be used to control molds as well. White powdery mildew (WPM) is a common pathogenic mold that affects cannabis plants. The disease manifests as a white powdery substance seen on leaves and plant matter. If left unchecked, it can break down your marijuana plants and produce unusuable bud. Be sure to clean and sanitize your grow room and any tools and vessels used at the end of a cultivation cycle, in preparation for the next cycle.
Bud Rot
Bud rot, aka gray mold, is caused by another type of fungi, Botrytis, which infects the leaves and buds of cannabis plants. This often occurs due to ineffective air circulation and ventilation, when the air around the colas stays excessively warm and humid. The first signs of bud rot are yellowing or paling of bud leaves or small patches of mold appearing at the base of the bud. Bud rot starts internally at the stem, so by the time you see external signs, you often already have dead or moldy bud on the inside. Marijuana buds with mold should be discarded, not ingested.
TAKEAWAYS & EQUIPMENT LIST
Holy smokes! You made it through Step 10: The Maintenance!
In this step, we showed you some more advanced techniques for caring for your grow. We covered:
•
The importance of pruning to increase yield, improve airflow, and keep your plant’s energy focused on making buds of the highest quality and potency
•
The advanced process of cloning by taking and growing a cutting of a plant
•
How to use preflowers to determine the sex of your plants and remove any males
•
The importance of inspecting your plants often to look for pests
SHOPPING LIST FOR CLONING, PLANT INSPECTION, AND PEST CONTROL
Dome and tray setup
Head-mounted lamp or similar hands-free light source
Isopropyl alcohol (70 percent)
Magnifying glass
Neem oil, insecticidal soaps, or prophylactic spray
Pruning shears
Razor blade or scalpel
Rooting hormone
Rooting media such as soil, Rockwool, or coco coir plugs
Maintaining a healthy grow is no small feat, but it’s the final step before the best part: the harvest. In the next step you’ll learn how to harvest your bud after all this hard work.