Chapter 5
The Examination of Printed Documents
5.1 Introduction
Traditionally, machine-produced documents fell into two separate categories: those produced in the office or home environment with machines capable of being used by most people with a minimal amount of knowledge as to how to operate them; and second, professional printing machines that typically would be located at a printworks dedicated to the production of high quality and usually large volumes of printed documentation ranging from letterheads to magazines. Into the former category, items such as typewriters, computer printers and photocopiers would fall (see Chapter 4). Into the latter category machines such as letterpress and offset lithographic printing presses would fall, which will be the focus of this chapter.
The distinction between ‘amateur’ and ‘professional’ printing of documents has become less marked. The computer and associated technological changes have tended to bring the two categories towards one another such that they now overlap significantly. For example, laser and inkjet printers are often to be found in a printworks and offset lithography presses can be scaled down into office machines for those wanting such devices (a trend that has largely been halted by the inkjet and laser printer).
Nonetheless, traditional printing techniques are still widely used and in this chapter some of the most frequently encountered processes will be described (Bruno, 2000) and related to the appearance of the printed product when viewed by the document examiner. This will make clear what features of a printed document can be determined when considering counterfeit and altered documents, especially those that are of particular importance in society such as currency and passports.
5.2 Some general principles of printing
Whatever printing process is used to produce a document, a number of general issues will often apply, such as the properties of the inks that are used, how different colours are produced and how to reproduce images (as opposed to text) without applying such large amounts of ink to the paper that it will soak in and spoil the product.
5.2.1 Ink properties
Ink properties will vary depending on the print process used and on the substrate that is being printed on, be it paper, plastic, metal or some other material. Some general considerations might include: the viscosity (thickness) of the ink – since if it is too thin it will have a tendency to run but if too thick it may stick to the print surface and not the substrate; the drying properties of the ink – because if it dries too slowly printed sheets must be kept apart to avoid ink transferring from one sheet to another, but if it dries too quickly it might dry on the print plate before being printed onto the paper; its properties once printed – as the printed product may need to last for many years and air and light may tend to degrade the ink over time. Because of such factors, printing inks are complex chemical formulations (see Box 5.1).
5.2.2 Colour management
Colour reproduction in printing is typically achieved using a colour combination usually abbreviated to CMYK which is a mix of cyan (a shade of blue), yellow, magenta (a reddish pink) and black (sometimes referred to as the key – hence the initial K). A perfect combination of cyan, yellow and magenta should in theory produce black, but in reality their combination tends to produce a dark grey, so to produce black (typically needed for text) the black ink is used to give a darker printed product using just one ink.
The CMYK is often called a subtractive colour model and requires the inks to be at least semi-transparent so that when the inks overlap they combine (as opposed to the second ink blocking out the first ink applied). By this means, cyan and magenta interact to produce blue, magenta and yellow produce red, and cyan and yellow produce green. Shade variations will depend on the relative amounts of the CMYK colours present.
Depending on what is being printed, the management of the ink colours can vary. For example, if a company letterhead is being produced using perhaps just one particular corporate colour then that ink can be specially made up and used on its own instead of being produced using a corresponding CMYK combination.
5.2.3 Registration
If printing requires the use of more than one colour, then separate printing plates have to be produced for each colour. It is then crucial that the printed details that are printed sequentially using the different colours line up properly otherwise the finished product will not be of a suitable quality. This alignment process is called registration. In addition, if a document is printed on both sides (such as currency or passports), the registration can be used to add a feature to the document so that when either side is viewed separately the pattern of printing in the area has no obvious image content but when held up to the light the printing on the two sides is simultaneously visible to reveal the intended image as can be found in a number of banknotes (See Figure 5.1).
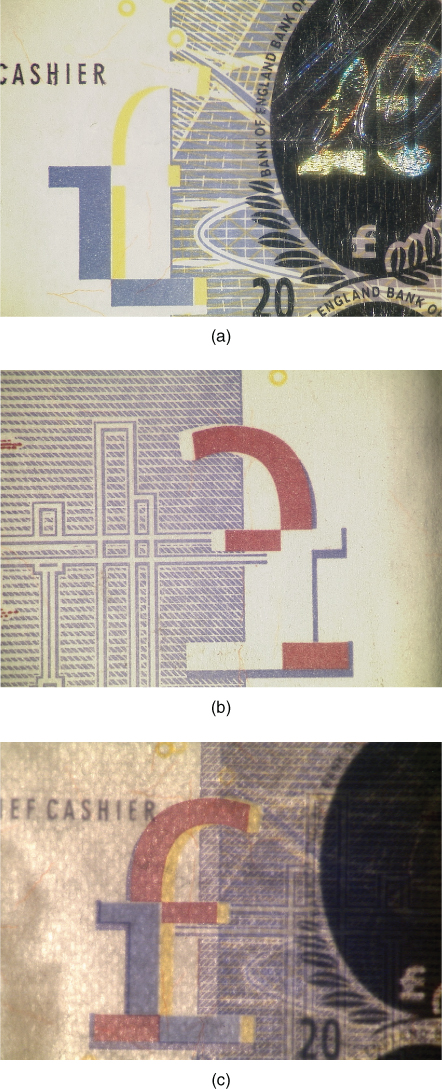
Figure 5.1 (a) The symbol on the front of the currency note; (b) the symbol on the reverse of the currency note; (c) the currency note viewed with transmitted light giving the completed symbol (x4 approx.).
5.2.4 Half tone printing
If an image is to be printed, the amount of ink that would need to be applied to create a solid image may be in excess of what the paper substrate can absorb. Halftone printing gets around this by converting the image into a series of dots of varying size and varying separation between dots (Figure 5.2). Large, closely spaced dots will give the illusion of a dark, solid colour, whereas smaller and more widely separated dots will give the illusion of a solid but paler colour. It is only when viewed under low power magnification that it becomes apparent that the image is not solid at all but is made up of many dots.

Figure 5.2 Close up of a half tone image showing how shades of grey are created by different densities of printed dots (x30 approx.).
The general principles of printing can be applied using a variety of printing techniques. Printing has changed a lot in recent times with the introduction of computer-based systems replacing more traditional techniques that used more conventional plate production and photographic methods. In the following sections some of the more widely encountered printing methods are described.
5.2.5 Traditional photographic and modern computer-based processes
Traditionally, printing involved manual processes, such as setting the letters of text or carving an image, which in time were overtaken by photographic processes after their discovery in the nineteenth century. With the advent of computers, their enhanced capability to manipulate text and images and the lower costs associated with reduced skilled manpower mean they are increasingly used. As far as the document examiner is concerned, the examination of all aspects of traditionally printing material was part of the scope of their expertise, but computers have become so complex that the examination of them has become a whole new discipline of digital forensics in its own right.
Notwithstanding considerable technological changes in printing technology, traditional printing techniques are still used, albeit often controlled in part by computers. There are a number of printing methods used and these will now be considered in turn.
5.3 Relief printing processes
Relief printing processes use a print plate in which the printing surface is above (in relief) the background, non-printing surface (Figure 5.3). The first devices to use relief printing were letterpress machines, which have a long history going back to the earliest machine-printed bibles produced by Johannes Gutenberg in fifteenth-century Germany and William Caxton in London soon after. Subsequent development of the basic method led to improvements and eventually such machines were widely used in the newspaper industry in particular.
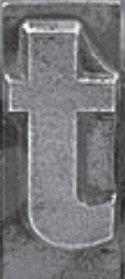
Figure 5.3 A letterpress printing surface (x25 approx.).
5.3.1 Letterpress
In letterpress, the text or images were traditionally arranged in a frame called a form and once all of the required elements were in place they could then be inked and printed onto the substrate, typically paper (Bruno, 2000). The contact between the raised and inked print surface and the paper would occur under some pressure to ensure good transfer of the ink onto the paper. This contact had consequences for the appearance of the print on the paper. The ink would tend to be squeezed out around the edges of the relief characters leading to a halo of ink around the character – so-called ink squash (Figure 5.4). In addition, the applied pressure would often lead to the relief printing surface being demonstrably impressed into the paper surface.
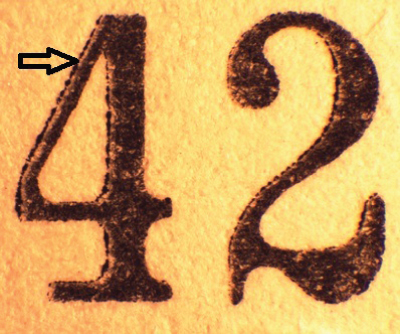
Figure 5.4 Ink squash around the edge of printed characters (x25 approx.).
The two features of ink squash and an impression on the paper surface can best be viewed under low power magnification and illuminated with an oblique light source to show the indentation.
A variant of letterpress is flexography, which uses a flexible print plate made from a light-sensitive plastic. Using a photographic film negative and ultraviolet light, the plastic hardens the surface of the plate where it is exposed to the light and the remaining surface areas are softer and can be washed away. A modern variant is to use a computer-guided laser to etch the surface of a flexible plastic print plate. Whatever method is used, the end result is similar, producing a flexible plastic sheet that has the print details in relief. Because it is flexible, it can be placed around a cylinder, inked and brought into contact with the paper under some pressure created by pressing up against a roller. Flexography has many commercial uses due to the flexible nature of the print plate, which allows it to be used on many different substrates such as cardboard packaging and plastic bags.
The even deposition of ink onto the printing plate is achieved by using an anilox roller that has a ceramic (pottery-like) surface covered by millions of small dimple-like depressions, or cells, of uniform spacing and depth. Ink applied to the anilox roller will fill the cells, which then can deliver a constant and consistent amount of ink to the print plate.
5.3.2 Stamp impressions
Stamping devices can come in a variety of constructions and be made from an assortment of materials. They all work by having a raised print surface which is inked and impressed onto the substrate, typically paper. Stamps can be used, for example, to put a date of receipt onto a document, to provide evidence of authorisation, or to apply a reference number to a document (such as the serial numbers found on currency or passports).
The stamp surface is usually either metal or a more flexible rubber-like material with the latter being made by a moulding process. Depending on the inks used and the degree of force applied, stampmarks made by such stamps often show ink squash and an impression into the paper surface.
Some stamping machines are highly automated (such as those used to add the serial number to currency) and produce stampmarks of regular appearance in terms of positioning on the document and the amount of ink applied. However, stamps can be applied by hand and in such cases the application may vary from one occasion to another in terms of both the pressure applied and also the evenness of application – if the stamp is twisted slightly, parts of the print surface may make better contact with the paper than others, resulting in an uneven application of ink. The majority of hand stamps are made of flexible material and this can ‘give’ when applied to the paper surface with some force (Figure 5.5). Eventually, the material of the stamp may break and deteriorate in a manner reminiscent of the way that single element typefaces get damaged (see Section 4.4 in Chapter 4).
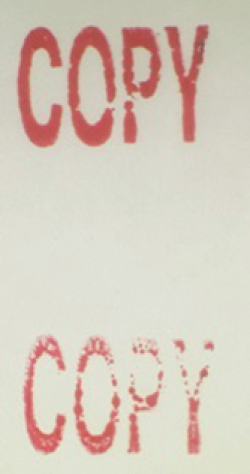
Figure 5.5 Stamp impressions vary in appearance depending on different conditions of applying. The upper stamp impression has been applied more heavily than the lower impression.
Damage to a stamp (due to wear and tear after manufacture of the stamp) can have forensic value since it is likely to be unique. Even if a number of hand stamps were made at the same time each from the same mould, damage caused by such random effects, over time and with use, show up as minor imperfections distinguishing one from another. However, if there is an imperfection in the moulds used at the manufacturing stage, this will be reproduced on all stamps made using that mould and hence it will be a form of class defect.
Some stamps consist of an invariable design, such as a company logo. However, some stamps have variable elements, such as a series of moveable bands with numerals, months and years to enable a date to be stamped onto a document. Such moveable parts of the stamp can also yield forensic evidence if they are out of alignment, for example. But caution is needed when interpreting such evidence since there may be some variability due to the design of the stamp in the relative positioning of the moveable parts.
One form of stamp that may also occur in cases is the pricing gun used usually in smaller stores to individually price items for sale. It too may become defective with heavy use and allow stolen goods to be traced back to the store from which they were taken, for example.
In some very busy finance departments, in order to save a particular person from signing their name on numerous occasions, a stamp of their signature may be made and used to authorise appropriate documents. Clearly, there needs to be controlled access to such a stamp, but it may be possible to copy a signature stamp or indeed any other stampmark. A photographic process is usually used to produce stamps, so a photo of a genuine stampmark can be used to produce copies. However, such copies will not be as true to the original since they are derived from an inked version on paper which is likely to lack the definition of detail of the original.
One last variant on relief printing using stampmarks is the seal used to make an impression in wax that even today may still be used on some official documents. Signature-based seals, known as chops, are still widely used in some areas of the world, particularly in parts of Asia. Detecting forged seals may require complex computer image comparisons using various mathematical algorithms to analyse the images of genuine and suspect stampmarks (Lee et al., 2012).
5.4 Planographic printing
In the relief printing processes discussed in the previous section, the printing surface is above the background non-printing areas (Bruno, 2000). In planographic printing, the printing and non-printing areas are in the same plane. The two areas are distinguished not by differing topology but by differing chemical properties. Lithography (the term is derived from the Greek for stone writing) has been around in various forms for a very long time, but in modern times it is most frequently encountered as offset lithography (often just referred to as offset). Printing plates are typically made from thin aluminium and they have a surface coating that reacts to light. In the presence of light (corresponding to the printing area) the surface becomes hydrophobic (water repelling, oil attracting) and the non-printing area is hydrophilic (water attracting, oil repelling). The printing inks used are oil based and are attracted to the image area and away from the hydrophobic non-printing areas.
Printing is often done using CMYK but can also be done using bespoke coloured inks. The inked plates are brought into contact with a rubber (or similar material) blanket (typically wound around a cylinder) and the ink is thereby transferred from the printing plate to the blanket – a process known as offsetting. The ink is then transferred from the blanket to the paper. The reason for offsetting is so that the ink is released from a more flexible material which makes better contact with the paper than would the flat printing plate. (In relief printing, good contact between the print surface and paper is ensured with the application of some pressure – see previous section.)
Because of the planographic process, it is possible to set up an offset printing press with two inks that will merge gradually into one another. For example yellow and blue inks may be used that gradually merge giving yellow then pale green, darker green and then blue inking across a document. This is often referred to as split duct printing (Figure 5.6) (or rainbow printing) and the result is difficult to copy by counterfeiters.

Figure 5.6 The gradual merging of colours found in split duct printing.
5.5 Recess printing
Recess printing uses print plates in which the image is below that of the non-printing area – in other words the complete opposite to relief printing processes such as letterpress – see Section 5.3. Recess printing processes are often called intaglio processes (Bruno, 2000).
The means by which the recesses are created can vary – traditionally the plate might be engraved (manually cut away – a print process known as gravure) or etched (using strong acid, for example, to eat into a metal plate surface) but increasingly automated processes are used, such as laser engraving of metal plates. The quality of the image produced by highly skilled engravers can be very high with very fine detail as might be found, for example, on banknotes and passports. These fine details are extremely difficult to copy by counterfeiters and constitute a security feature of a document. The depth and width of the engraved areas will determine the amount of ink that will fill the recesses, which in turn will affect the amount of ink on the paper. Because the non-printing area is above the ink, it is necessary to make sure that it is free from any traces of ink, and this is achieved by the presence of a so-called doctor blade that wipes across the plate surface to remove any residual ink.
The ink used in recess printing is very viscous (thick) since it has to be pulled out of the recess onto the paper under some pressure. Because the ink is so thick and because the amount of ink can be varied by altering the dimensions of the recess, recess printing methods are capable of producing very high quality images in terms of the depth of coloration achieved. The ink is so viscous that it will usually sit on the surface of the paper substrate (Figure 5.7), giving it a tactile effect that can be readily detected just by touching with a finger tip to feel the presence of the thick ink. This tactile quality is a security feature of this printing process that is often used in certain types of important documents such as currency and passports.
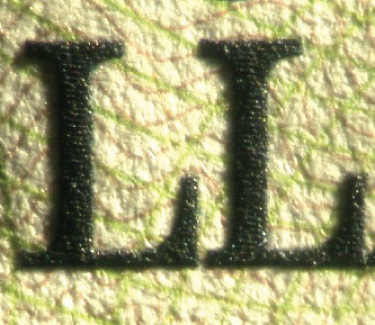
Figure 5.7 Close up showing raised ink on paper surface from a recessed printing process viewed under oblique lighting (x25 approx.).
5.6 Screen printing
In screen printing the ink is forced through a fine mesh using a squeegee device and the non-printing areas are represented by a stencil on the mesh that prevents the ink transfer through the mesh (Bruno, 2000). Inks of a variety of types can be used depending to some extent on the nature of the substrate, which can vary from paper to cloth to plastics and many other materials. In addition the substrate need not be planar but rather can be shaped, such as a bottle. It is rarely encountered on documents in casework but it may be relevant to an examination of counterfeit packing of pirated goods, for example. Because of the mesh through which the ink is forced, magnification shows a stepped cell-like appearance of the ink. If several colours are to be used, they are printed sequentially and this requires good registration of the printed images.
5.7 Security documents
The printing techniques described above are some of the main categories typically encountered in forensic casework. Printing, like any other business, runs along mainly commercial lines. In practice, this means that the processes used are partly dictated by cost for a given quality of product. However, there is another important dimension to many documents that occur in forensic contexts, namely – how easy is it to copy or alter a genuine document? Important documents involved in financial transactions (such as cheques and banknotes) or documents that give entitlement (such as passports and identity cards) should be made in such a way as to make them difficult to counterfeit or alter. In addition, access to the production processes from the original designs to the printing plates, inks and papers used need to be tightly controlled to prevent unauthorised access. Documents such as passports also have to be personalised when issued and the processes involved with that must also be tightly controlled to ensure that the final product is secure and there is a minimal chance of either tampering with it or completely counterfeiting it.
Preventing counterfeiting is only possible in the context of the person or machine that it has to fool. For this reason, counterfeit detection is often regarded as a staged process. A member of the public may have some notion of what features a banknote should have, for instance, perhaps aware that it might show up some distinctive details under ultraviolet light. Border security staff will have special training to detect suspect passports and identity cards often based on a rapid assessment of the document. The provision of detailed expert forensic evidence will then fall to those with the highest level of expertise to describe and explain to a court, for example, the reasons why a document is genuine or otherwise based on a detailed knowledge of the materials and processes used and their significance to a particular case situation. A counterfeit is less and less likely to fool those with the greater training and expertise.
The security of a document can be enhanced in a variety of ways. Starting with the design of the document, it is the case that the more intricate and involved the images that are to be printed, the more difficult it will be to copy. Any copying process, be it photographic or electronic scanning, will inevitably lead to a loss of image quality. The ways in which documents can be counterfeited must therefore be borne in mind at the design stage since, for example, colour photocopiers are readily available and it would not be a very secure document that could be convincingly copied simply using a colour copier. The choice of colours and design detail can make colour copying more difficult by exploiting the copier's inability to reproduce very fine detail and certain colours (especially some lighter, pastel shades) as clearly as on an original document.
Once the design has been finalised, the materials (paper and ink) and printing processes used to produce the document will in turn help to make it difficult to counterfeit. First the paper itself can be made secure (see Chapter 6). Most readily available paper contains optical brighteners to make the paper appear brighter (especially when viewed under ultraviolet light when the paper glows white) than it otherwise would. Paper that does not contain optical brighteners is not so easily obtained (such papers appear a dull purplish when viewed under ultraviolet light). To make the paper more secure, a watermark will certainly be created at the paper manufacturing stage. Watermarks vary in quality, ranging from a relatively simple design seen as grey against white when viewed with transmitted light to more complex designs that show tonal variation in the pattern. The latter watermarks are produced on cylinder mould paper, which is less readily available and is the result of a complex paper-making process.
Watermarks have been used in paper manufacture for a long time but remain one of the most effective anti-counterfeiting measures available. Introducing a watermark into paper after it has been manufactured is essentially impossible so counterfeiters can only attempt to create the appearance of a watermark being present.
The position of a watermark on a document can be made to coincide with particular areas of the document so that the viewing of the watermark is unhindered by obscuring ink. In a multi-page document such as a passport, it is possible to put different watermarks onto various pages thus further adding to the task of the counterfeiter. In banknotes it is possible to add a security thread that is woven into the paper at the time of manufacture. This process is again virtually impossible to re-create so the counterfeiter can only produce something that looks right but is in fact incorrectly constructed. The threads can have sophisticated details printed on them, such as inks having particular optical properties and microprinting – which, as its name suggests, is very small but high-quality printed detail barely legible and visible to the naked eye (Figure 5.8) but which, when copied, loses its distinct character forms and tends to become an illegible blur.
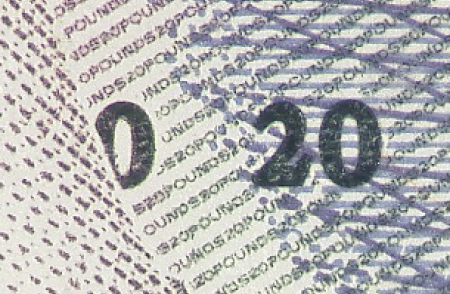
Figure 5.8 Microprinting (x25 approx.).
The printing processes used to produce security documents are essentially mainstream traditional printing techniques but they are of a very high quality and use inks of particular formulations, the components of which may impart particular properties to the ink that the counterfeiter cannot reproduce (see also Chapter 6). Some inks appear to change colour when viewed at different angles (optically variable inks); some inks have particular properties when viewed under ultraviolet light; and some inks have a pearl-like appearance (pearlescent inks). These properties are imparted by the complex materials present in the ink formulation.
Even relatively simple ideas can make counterfeiting difficult, such as printing details on each side of a sheet of paper which, when viewed with transmitted light shone through the document, make a particular pattern. Documents that have a serial number, such as passports and currency, typically have the number printed using letterpress. The numbers can be further embellished by using different coloured inks for the numerals, as can be found on a £20 note. Of course a serial number is intended to be unique to a given banknote and so the forger can either attempt to give each counterfeit a different serial number or, more commonly, a series of counterfeits will all have the same serial number.
5.7.1 Personalisation of documents
Documents that require the addition of details onto them are potentially vulnerable to misuse. If document production is securely controlled then access to blank documents should be difficult for unauthorised people. The addition of details nonetheless needs to also be done in such a way as to minimise the likelihood of someone being able to issue a fraudulently personalised, genuinely printed, document such as a passport or identity card.
Traditionally, personalisation was relatively crude in many cases, such as the manual typing in of information and the use of glue to stick in a passport-sized photograph that was endorsed by a signature across the photo to demonstrate its authenticity! Standards for the quality of modern security documents have improved immeasurably (although the rate of improvement does vary across the world) in recent times and the personalisation process is significantly more sophisticated, typically involving the digital printing processes that were described in the previous chapter, particularly laser printing and inkjet printing. In addition, the photographic image may be printed securely onto the page and many such documents have the biographical page laminated so as to reduce the ease with which the details can subsequently be tampered with. The laminates are made of clear plastic and they usually consist of several layers that are bonded together making it very difficult to separate the layers one from another and from the paper of the document itself. Some of the layers can have special properties, such as the capability of being etched by a laser beam to, for example, include an image of the document holder derived from their passport photo.
Documents can, therefore, be made so as to make them difficult to counterfeit in the first place, difficult to simulate the personalisation process successfully and secured to make tampering as difficult as possible. Despite all of these safeguards, there is an industry in both counterfeiting and altering documents that forms a significant challenge to the legal movement of people around the world and for this reason the authorities responsible for the production and administration of these important documents are constantly adding new and more sophisticated barriers designed to reduce yet further the misuse of such documents. As part of that endeavour, the paper itself makes a significant contribution to a document's security, and in the next chapter the manufacture of paper will be described.
5.8 Dry transfer lettering
Dry transfers are generally available as plastic backing sheets from which letters, numbers, symbols and other material can be transferred, usually to paper, by rubbing over the area of the sheet with a pen or some similar implement. This causes the character to be transferred onto the paper, thus leaving a gap on the backing sheet where the character was originally. They are used particularly in the production of artwork for various purposes. Many different font styles and sizes are available.
Dry transfers have been used in a number of case types that either require anonymity of the sender or else because they have a printed appearance, superficially at least, they can be used to replace some erased printed material on a document.
If dry transfers have been used on a suspect document and if sheets of dry transfers have been recovered from a suspect, then there may well be a request that a comparison be made to see if the recovered sheets were used to produce the document in question. The first step is essentially the same as with a typescript comparison, namely to make sure that the font style and size used on the document is the same as that on the sheet. Assuming it is, then the letters, numbers and any other relevant symbols that are missing from the sheet can be compared to those present on the document. The evidence available at this stage can be very strong if the particular characters missing from the sheet coincide exactly with the characters present on the suspect document. Of course this does depend on the extent of the coincidence. If just one letter E is missing from the sheet and just one letter E dry transfer is on the document then this could be a chance occurrence. But as more and more characters are transferred, the likelihood of an exact coincidental match decreases.
Occasionally, the transfer process is imperfect, leading to a partial transfer of a character. This provides potentially excellent evidence to link a transfer sheet to transfers on a page if the two partial transfers can be shown to have originally been part of the same character.
Another aspect can be examined, which is the transfer process carried out by the application of pressure from a pen or similar implement (Welch, 1986). In particular, some of the adhesive material that holds the transfer in place on its backing sheet is transferred with the transfer itself and this may show a pattern of pen movements on the document when viewed under an ultraviolet light source which can be compared to the pattern on the sheet.
5.9 Key diagnostic features of various printing methods
In Chapters 4 and 5 a variety of different methods of printing were described. Table 5.1 summarises some of the key features that can be used to determine the method of printing used on a document of unknown origin.
Table 5.1 Diagnostic features of printing processes
| Printing feature | Possibilities |
| Impression in surface of paper |
|
| Toner |
|
| Raised ink deposit |
|
| Ink soaked into paper, no impression |
|
| Sawtooth edge to characters |
|
| Waxy appearance |
|
5.10 Case notes in printing cases
Generally, the first step when examining a questioned printed document is to determine the process(es) used to produce it. Often there is specimen genuine material to compare it with and typically a counterfeit document will not have been produced using the same processes as a genuine document nor will the questioned document have been produced to the same standard as the genuine one. This is a reflection of the quality of the equipment and materials that are usually available to, and employed by, official (typically government) authorities rather than to the counterfeiter.
Identification of the print process, and the observations leading to it, must be noted. It is a good idea to note not only the positive observations but also the negative ones, such as an absence of indentation (thus making letterpress unlikely) or the absence of a thick ink deposit (thus making gravure unlikely). The reasoning behind this approach is that some printing processes, particularly offset lithography, tend to produce a printed product that has few characteristic features.
Obviously the notes made reflect the nature of the examination being undertaken. If, for example, the issue is how a questioned document has been printed and whether it is it genuine, then identifying the print processes involved may effectively complete the examination. However, in cases where there is suspected to be a particular source for the questioned documents, there may be a need to compare the printing on a number of suspect documents to determine whether or not they share a common source and to determine whether they have been produced using equipment and materials at a particular location (such as at a particular printworks). In these cases it is necessary to examine the printing with a view to identifying features that may link them, such as defects and imperfections (often microscopic) of the printed documents (similar in some ways to defects found on laser printed or photocopied documents) which recur from one to another showing that they share a common source. Notes must be made showing where these occur, for example on a photocopy of the document, so that they can be used as evidence.
If items such as printing plates or photographic images (artwork) are available for examination, then the same principles apply, namely detecting any characteristic features to link the images on the items with the printed documents. Any evidence found must be recorded clearly in the notes by whatever method is most convenient, with photographs or annotated photocopies often being ideal.
Printing ink and paper may be recovered from suspect premises but the forensic evidence is often limited from such items unless there is something characteristic about them. Often, the paper and ink used are readily available and as such are less likely to be distinctive. Nonetheless, notes should be made as to the nature of such materials even if little evidence of value accrues from their examination.
The combined value of the observations in the case in relation to the question being asked will then determine which findings are more (or less) relevant and hence inform a conclusion that is appropriately weighted given various possible explanations for the findings.
5.11 Reports in cases involving printing
Cases in this category often involve pieces of equipment, processes and materials with which the non-expert is less familiar (although of course the many printed products, ranging from newsprint to packaging, are familiar). For this reason, the expert's report may need to include some brief background information about the relevant printing processes being considered so the reader can put into context the expert's findings and conclusions. As with all reports it is ideal to avoid use of jargon terms, but if they have to be used a brief explanation of their meaning can be appended in a suitable way to help the reader.
Most printing cases fall into one (or both) of two main categories: (i) is the suspect document genuine or a counterfeit and (ii) how was the suspect document printed and (sometimes) was it printed using the particular equipment at a given place (such as a suspect's printworks)? The purpose of the forensic examination in a case can be set out according to these terms and thus any findings and conclusions can then be related to this purpose.
The findings that are central to cases of this type are often amenable to photographic records and these can be incorporated into a report to show each point as it is described in the report. It is a good idea to describe each feature of the printed document one at a time and to show photographs that will assist the reader to fully understand their significance.
As with any complex report, a brief summary describing the conclusions in the absence of explanatory findings will make it clear to the reader what the expert's opinion is.
References
- Bruno, M. H. (2000). Pocket Pal: A Graphic Arts Production Handbook (18th edition) Graphic Arts Technical Foundation.
- Kunjappu, J. (2003). Ink chemistry. Chemistry in Britain, 39(3), 22–25.
- Lee, J., Kong, S. G., Lee, Y., et al. (2012). Forged seal detection based on the seal overlay metric. Forensic Science International, 214(1–3), 200–206. doi:10.1016/j.forsciint.2011.08.009.
- Welch, J. R. (1986). The linking of a counterfeit document to individual sheets of dry-transfer lettering through the transfer of fluorescent glue. Journal of the Forensic Science Society, 26(4), 253–256. doi:10.1016/S0015-7368(86)72492-4.