Here’s the payoff for learning the JavaScript/jQuery basics covered in Chapter 8. You can apply those skills to your Animate projects. One of the easiest ways to start is to use Animate’s triggers and action snippets to write code, and then apply your own modifications to customize that code. That’s exactly how this chapter begins. Then it presents yet another version of the photo gallery, using a nifty image source swapping technique. Along the way you learn how to change an element’s dimensions, position, and background colors the JavaScript/jQuery way. This chapter explains how you can simplify your code by assigning symbols and elements to variables. Symbols have their own independent timelines. If you want to start, stop, and control those timelines, you’ll be interested in the example that shows how to do that from within and without the symbol. Last, but not least, you’ll learn how to create Animate compositions that make decisions for themselves through the use of conditional statements.
Chapter 5 showed several examples using the Show and Hide actions. Now it’s time to revisit that subject and see how you can bend those simple tricks to your own iron will. Consider a simple Animate composition like the one in Figure 9-1. You can find 09-1_HideAndSeek with the exercises for this chapter on the Missing CD at www.missingmanuals.com/cds/animatemm.
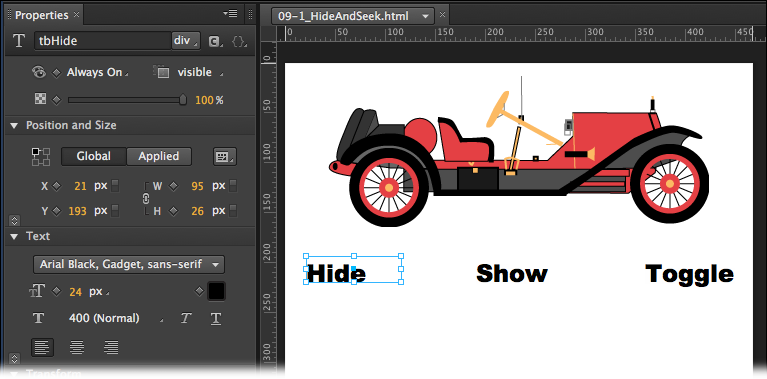
Figure 9-1. This Animate composition has an image of a car and three text boxes with the words “Hide,” “Show,” and “Toggle.” Guess what happens next.
The idea is to make the text boxes with the words Show, Hide, and Toggle behave like buttons. Click on the word and the car picture disappears or reappears. For example, as covered in Chapter 5, this is the quick way to make Hide work:
Note
In this example, the letters tb are added to the front of each element that is a text box. As your projects grow, you may want to use similar techniques to further distinguish the many elements inside. Two or three letter prefixes or suffixes work well.
That inserts the generic hide code, Figure 9-2, which looks like this:
sym.$("Text1").hide();You need to change “Text1” to car so that a click on the word hides the image of the car. When you’re done, it reads like this:
sym.$("car").hide();You go through a similar process when you create a trigger for the text box with the word “Show.” Just make sure you use the Show Element action.
Note
Check back on Trigger Your First Action if you need to brush up on showing and hiding elements using triggers and actions.
So what about that word “Toggle”? It can be awfully handy to have a single button or command to turn an element on the web page on and off. You could write something with one of those conditional statements like, “If the car is visible, hide the car; else show the car.” But there’s an even easier way. jQuery has a companion to the show and hide functions called toggle. All you need to do is follow the steps above to apply a click trigger and a hide action to the car element. Then you can edit the statement. You want to change the hide action to a toggle action. When you’re done, the code for Toggle looks like this:
sym.$("car").toggle();Save your work and give it a test. If the car is visible, clicking either Hide or Toggle makes it disappear. Likewise, if the car is hidden, clicking Show or Toggle makes it reappear.

Figure 9-2. When you use Animate’s triggers and actions, you often need to modify the code for your needs. For example, here the generic hide code needs to be edited to identify “car” as the element to hide.
If you read through Chapter 8, you may recognize that show(), hide(), and toggle() are functions. Somewhere deep in the JavaScript code that’s linked to your Animate composition are the routines that make these functions perform. When your browser comes across a function name like hide(), it looks up those routines and applies them to the car element. You don’t have to know the nitty-gritty coding details that make a function work; it’s enough to understand what they do and how to use them. It’s like the difference between driving a car and being an auto mechanic.
Here’s one more hide, show, and toggle trick. You can add arguments (sometimes called parameters) to the hide(), show(), and toggle() functions that change the way they behave. Open the click actions for the text box “hide.” Change the code by placing the number 4000 inside the parentheses after “hide.” The statement should look like this:
sym.$("car").hide(4000);Do the same for the show() function of the text box with the word “Show.” Now test the composition. When you click on “Hide” and “Show,” the box gradually shrinks from view or grows into view from the upper-left corner. You may have seen this technique used to show and hide menus on a navigation bar. Without any argument, “Toggle” still works instantaneously.
You may recall that JavaScript likes to divide time into milliseconds—that is, thousandths of a second. That’s exactly what’s happening in your hide() and show() functions. It takes 4 seconds for the shrinking and growing to take place. If you’d rather use words to specify the timing, try “slow,” “normal,” and “fast.” Don’t forget to include the quote marks.
As the infomercial salesperson likes to say: But wait! There’s more! The shrinking and growing from the previous example works well for some chores, like menus. For photos and other images, a nice dissolve animation works well. Sure, you can create this effect on the timeline and use “Play from” triggers, but why bother if you can do the same thing by swapping functions?
If you want to keep using the same composition, you can change the words in the text boxes to read “Fade Out” and “Fade In” or you can add new text boxes to do the job. You can continue to use click as the trigger. The action uses new functions:
Keep in mind, as always, JavaScript and jQuery are case sensitive, so be sure to fadeOut() rather than FadeOut or fadeout. As with the hide() and show() functions, you can use arguments to control the speed. These fading actions accept both numbers (in milliseconds) and the words “slow,” “normal,” and “fast.”
Order now and you’ll get sliding action, too! You guessed it: You can swap these functions in place of show() and hide().
As with the hide() and show() functions, you can use arguments to control the speed. These sliding actions accept both numbers (in milliseconds) and the words “slow,” “normal,” and “fast.”
If you completed all the steps, you’ll have a hide-and-seek sampler that you can view in your browser, as shown in Figure 9-3. If you haven’t followed along, you can find 09-2_HideAndSeek_done on the Missing CD at www.missingmanuals.com/cds/animatemm.


As explained in Chapter 7, formatting chores for web pages can be handled by CSS (Cascading Style Sheets). JavaScript and jQuery statements can rewrite the CSS rules and, in the process, change the way elements appear on a web page. The animate() function does just that. For example, using animate(), you can change the opacity of the car image, or you can change the appearance of the text in a text box.
The animate() function works a little differently from the previous ones, because it can use several arguments at once. For example, you can change the opacity of an image and crop the image at the same time. To do that with the car image, you’d write the function like this:
sym.$("car").animate(
{
   opacity: .25,
   width: 200px
}
);
There are a few new things to note in this example. The animate() function holds arguments inside parentheses like any self-respecting function. The opening parenthesis is at the end of line 1, and the closing parenthesis is at the beginning of line 6.
Inside those, there are curly braces that hold multiple arguments. In this case, the arguments specify the opacity and width of the image. These arguments match up with standard CSS specs, and they’re separated by commas. The function is considered a single command, so there’s only one semicolon at the end of the command.
In this case, the width spec scales the image by changing its width. Since the car graphic is over 380 pixels wide, the code scrunches the car, making it shorter.
You can use triggers to run more than one action, so you can change the car image and change the specs for a block of text all at once. This time, let’s suppose you want to use a rectangle as a button.
At the bottom of the 09-1_HideAndSeek example, draw a rectangle. Name it btnBar.
Right-click (Control-click) btnBar and choose Open Actions for “btnBar” from the shortcut menu.
Choose the click trigger.
In the btnBar Actions panel, write these lines of code:
sym.$("car").animate(
{
    opacity: .25,
    width: 200
}, 2000
);
sym.$("tbHide").animate(
{
    fontSize: '12',
    fontFamily: 'Times'
}, 2000
);
The font changes work for tbHide because it has a <p> tag associated with it. Paragraphs have font properties. If it had a <div> the changes woudn’t work, because in HTML divs don’t have any font properties. If you’re familiar with CSS, you may remember that you specify font size using a hyphenated identifier: font-size. Typefaces are also specified with a hyphenated identifier: font-family. In JavaScript, these identifiers don’t use a hyphen, which might be confused with a subtraction operator. Instead they use what’s known as camel text, where the first word begins with a lowercase letter and subsequent words start with an uppercase letter, as in fontSize and fontFamily.
You can specify the delay for animate() effects as you do with show() and hide() functions. In this example, the delay is set to 2000 for both the car image and the tbHide text box. The 2000 appears right before the closing parenthesis, and it is also separated by a comma. For a working copy of the Hide and Seek exercise, see 09-2_HideAndSeek_done from the Missing CD.
Note
The animate() function as written in this section changes the scale and opacity of the car image. The other show/hide functions only change its visibility. So, if you click Show or Hide after you’ve applied the animate effects, the car remains scrunched and semi-transparent. The quick fix is to reload the web page. The programmatic fix is to create a “reset” trigger and action that restores the Stutz Bearcat to its former glory.
You may have noticed the absence of “slideLeft” and “slideRight” methods in the tips that began on More Showing and Hiding Tricks. That’s because they don’t exist. The slideUp and slideDown methods are built into JavaScript, but if you want to slide left or right, you have to roll your own. Fortunately, it’s not that hard, now that you know the power of the animate() method. All you have to do is find out the position of the left edge of an element, and then change the position of that edge.
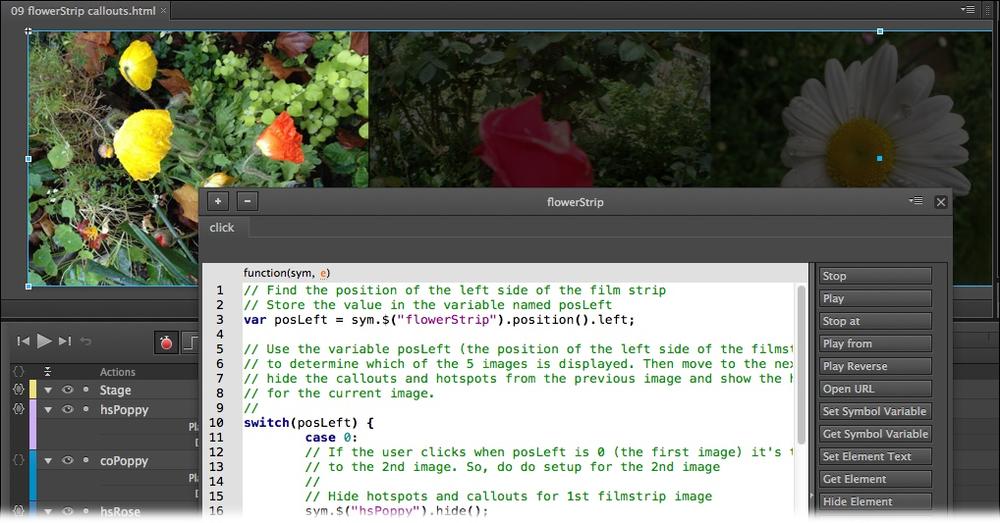
In the filmstrip project back on Animating a Filmstrip, several photos of flowers were combined into one long JPG image. That example was accomplished using the timeline: By moving the left edge of the filmstrip, you make different photos slide into view. (You can check out the finished project from the Missing CD: 04-6_Film_Strip_done.) You can create the same effect using triggers, actions, JavaScript. The first thing you need to do is find the left edge of the filmstrip, which you can do with a JavaScript statement like this:
sym.$("flowerStrip").position().left;The sym.$(“flowerStrip”) portion of the statement identifies the flowerStrip element. Then the .position().left method gets the left edge or the X position for the element. So, what can you do when you know the value of the left edge of an element? As explained on Checking Values with Text Boxes and Alert Dialogs, you can display that value using an alert() method, which is helpful when you’re debugging a project. An even more powerful use for the value is to store it to a variable. The last example in this chapter (Using switch() to Handle Multiple Conditions) does that using the value in a switch() conditional statement.
You can use the .animate() method to move the element to a new position on the stage. That statement looks like this:
sym.$("flowerStrip").animate({left:"-=500px"},"slow");
That code changes the position of the left edge of flowerStrip, slowly moving it 500 pixels to the left, as shown in Figure 9-5. Just what you want to make your filmstrip work. There’s a little JavaScript sleight of hand going on here that might not be apparent at first glance. It has to do with the -= operator, which is a kind of shorthand. It assigns a value and performs the subtraction at the same time. In this case, it’s saying “Get the value of the left edge of flowerstrip. Subtract 500px and then make that the new value for the left edge.” There’s a similar operator that performs addition and assignment (+=).
Tip
You can use the animate() method with the right, top, and bottom edges, too. In the case of the filmstrip, the left edge is the most logical choice for positioning.
If you want to experiment, use 09-3_Slide_Left from the Missing CD. If you’d rather cut to the chase, you can see a finished example: 09-4_Slide_Left_done. You’ll notice that there’s something lacking in the finished example: One click moves the filmstrip one image and that’s the end of the show. It takes a few more JavaScript tools to develop a smoothly functioning filmstrip, as you’ll see later in this chapter (so keep your files handy). You’ll need to know how to store a value to a variable where it can be manipulated (Using Actions to Assign Variables). You’ll also need a conditional statement that knows how to make a decision, like “If the left edge of flowerStrip is at -500px, change the value of the left edge to -1000px.” To perform this kind of JavaScript wizardry, check out the switch() conditional statement on Using switch() to Handle Multiple Conditions.

One of the keystones of web design is the image swap. You see it used all over the place, and JavaScript is usually the engine that’s working behind the scenes. In the earlier examples, you saw how JavaScript could rewrite CSS specifications for formatting and positioning. In the case of an image swap, JavaScript is rewriting the src (source attribute) for an image tag. Want to make a button change its appearance when the cursor is over it? Use the mouseover trigger. You’ll need a mouseout trigger to change it to its normal state when the cursor moves away. Want a button to change when it’s clicked? You can use mousedown and mouseup to change its appearance. In each case, you want to swap the source of the button image. The perfect place to practice your image swapping chops is a photo gallery.
One common technique for displaying a group of photos is to have one large main photo and smaller thumbnail images, as shown in Figure 9-6. Your audience can click or mouse over a thumbnail to display that pic as the main photo. This type of gallery works well for up to about a dozen photos. If you try to use too many photos, the thumbnail images are too small to be useful. The project 09-5_Rollover_Gallery is ready to go. If you want to see the end result, check out 09-6_Rollover_Gallery_done.
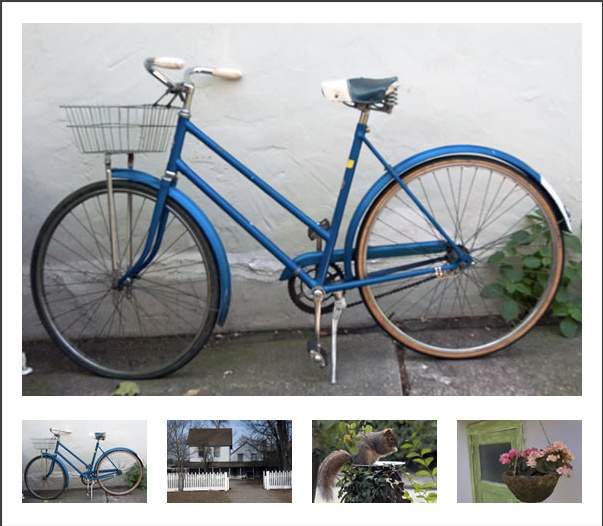
Figure 9-6. Here’s a common layout for a rollover photo gallery. Point to one of the images at the bottom, and it is displayed as the main photo at the top. This technique uses simple image swapping code and works on computers, tablets, and phones.
Examine the gallery files and you’ll find that some of the work has been done for you. The main photo and thumbnails are in place on the stage. In the Elements panel, you have four thumbnail images, each beginning with sm_ (think “small”). The main photo is named “bike.” Select it, and you’ll notice the filename listed in Properties. All the images, big and small, are in the images subfolder of your project. In fact, there are three other images that don’t appear on the stage: farmhouse, squirrel, and flowers. The project will use these photos, but they don’t need to be imported as long as they’re in the images subfolder. They’ll be referenced as sources for the main photo. Follow these steps to finish up the rollover gallery:
Select the large bike photo. Then, in Properties, change the div tag to img.
Animate automatically applies the <div> tag to everything you import. In this case, you want to use the src attribute of an <img> tag. This step is important, because later you want to use CSS properties that are unique to an img element.
With bike still selected, in Properties, change the image name to mainPhoto.
In the Elements panel, you see mainPhoto when the image is selected. The bike won’t remain a bike for long, so it’s best to give it a more generic name that will make sense in your code.
Right-click (Control-click) the farmhouse thumbnail and choose Open Actions for sm_farmhouse, and then choose mouseover from the triggers.
You’re making life easy for gallery visitors. They won’t even have to click to swap photos; all they have to do is move the cursor over a thumbnail.
On the left side of the Actions panel, click the Hide Element button.
You don’t really want to hide anything, but this is an easy, typo-free way to write much of the code you need. In the next step, you’ll make alterations.
Change “text1” to “mainPhoto”. Then change the hide() function to attr().
With these changes, your code should look like:
sym.$("mainPhoto").attr();Inside the parentheses for the attr() function, type: ‘src’,’images/farmhouse.jpg’.
Now the line of code looks like this:
sym.$("mainPhoto").attr('src','images/farmhouse.jpg');Make sure you use quote marks around the src and photo attributes. They can be single or double quotes as long as the pairs are matched up correctly.
The src attribute identifies the source for an image. The images/farmhouse.jpg text provides the path and name of the photo. You use similar code for each of the thumbnails.
On a new line in the Actions panel’s mouseover tab, type this line:
sym.$("sm_farmhouse").css('cursor','pointer');As explained in the box on Slip Sliding Up and Down, this line will change the cursor to that familiar pointing finger when it is over the farmhouse thumbnail. The box also explains how to use the cursor button in Properties to create this effect.
Click the X button in the upper-right corner of the Actions panel. Go to File→Save and then press Ctrl+Enter (⌘-Return).
The Actions panel closes, and you preview your project in your browser.
Move your mouse over the farmhouse thumbnail.
The cursor changes to the pointing finger and the main photo changes to show the farmhouse. If your project behaves differently, go back and double-check your code. Pay particular attention to the parentheses and those single quote marks. Make sure the photo path references the images folder, not the image folder. Make sure that you changed the mainPhoto’s tag to img, as described in step 1.
Open the Actions panel for sm_farmhouse. Select and copy (Ctrl+C or ⌘-C) the code in the panel.
You need to add similar code to the other three thumbnails. You might as well save time by copying, pasting, and editing the code.
Open one of the other thumbnails. Choose the mouseover trigger, and then paste (Ctrl+V or ⌘-V) in the code.
When you paste it in, the code looks like this:
sym.$("mainPhoto").attr('src','images/farmhouse.jpg');
sym.$("sm_farmhouse").css('cursor','pointer');
The text that needs to be edited to match the thumbnail is shown in bold.
Repeat the copy-and-paste process for the rest of the thumbnails.
When you’re done, you have a working photo gallery. The thumbnails are big enough that they should work for an iPhone as well as a computer. If you want to dress the project up a little more, you can create rollover highlights or a drop shadow to mark the currently selected pictures.
All you need to do is roam the Web a bit, and you’ll see all sorts of rollover examples, like changing the cursor to a pointing finger. They give your audience useful feedback. If you tackled the previous exercise, then you can see how you’d create a simple rollover button. Create two images for your button, one for its normal state and one for the mouseover state. As with the gallery example, give your images helpful names when you create them. With buttons, you may want to add something to the end of the name that identifies the state. For example, if you’re creating website navigation buttons, you could have image filenames like home.jpg, home_ovr.jpg, contact.jpg, and contact_ovr.jpg. Import the normal state button to your project, and make sure the mouseover state button is in your images file, and you’re ready to swap.
When you’re working with triggers and actions, half the battle is identifying the element that you want to change. The other half of the battle is changing its properties. When learning new coding techniques, it’s best to start simple and build your skills. Consider a composition with two elements: a rectangle and a text box. In this case, the text acts as a button changing the width of the rectangle. Here’s the lay of the land, as shown in Figure 9-7:
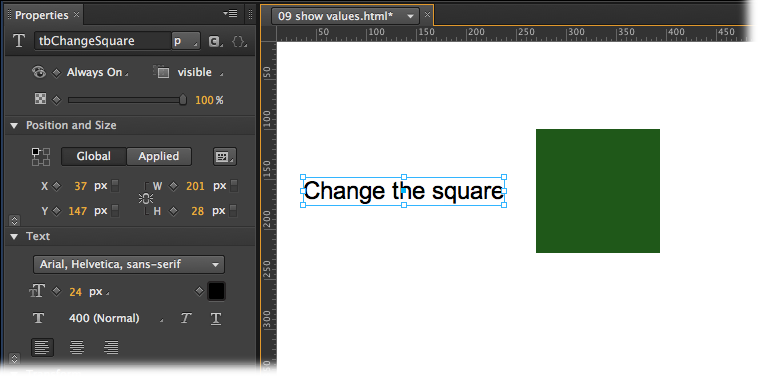
Figure 9-7. The stage is set for your first identification project. The rectangle’s ID is set to Square because that’s its shape to start. The text box’s ID is set to tbChangeSquare. It will act as a button that changes the width property of Square.
You want to put your code in the “click” trigger for the text box tbChangeSquare. (For a refresher on using a click trigger, see More Showing and Hiding Tricks.) Your code is like building blocks that you use to identify an element and its properties. You almost always start at the outermost level—that’s the main stage symbol. As explained back on Natural Selection the jQuery Way, you use the word “sym” to identify a symbol. The main stage and its timeline are the mother of all symbols for a project.
sym.
Animate, like JavaScript, uses dot (.) notation to separate elements that are inside of other elements. Here the stage (sym) is one element and Square is another. You also use dots to separate the properties and methods that belong to elements. Now that the stage is identified, it’s time to zero in on the rectangle with the ID “Square.”
sym.$("Square").Think back on More Showing and Hiding Tricks, during the discussion of show() and hide() functions, where the car element is identified using the jQuery selector. That’s what’s going on here. The dollar sign ($) along with the ID is used to zero in on a specific element. You’re going to use CSS to change the format of this element, so the next step is to add another building block:
sym.$("Square").css()A number of properties can be changed using CSS and, as explained on Reading CSS Files, the process involves pairs: a property name and a value. These pairs go inside the parentheses, with each listed inside quotes. The name/value pairs are separated by a comma. Suppose you want to change the width of Square to 400 pixels: The final bit of code looks like this:
sym.$("Square").css("width","400px");The units for width and height values are given in pixels (px). Lastly, you need to end the statement with a semicolon.
Right-click (Control-click) the text box tbChangeSquare and choose the click trigger. Paste or type your line of code and then test your project. It should look like Figure 9-8.

Figure 9-8. Here’s the code that gets attached to the “click” trigger of the text box ID’d as tbChangeSquare. When the text gets clicked, Square will be square no more.
It’s common to use variables to identify different symbols, elements, or values. In fact, that’s what many of Animate’s action buttons do. Look for ones with names like Get Symbol or Get Element. You get to choose the variable name, and then you assign a value to the variable. Suppose you want to shorten the way you identify Square. A line of code like this does the trick:
var theSquare=sym.$("Square");Now you can use the variable theSquare to reference the element with the ID of Square. No more need to mention the stage (sym) or use the jQuery selector with dollar signs, parentheses, quotes, and brackets. It gives you an easier way to make changes to that element. So, you can change the width, height, and fill color with commands like:
var theSquare = sym.$("Square");
theSquare.css("width","400px");
theSquare.css("height","400px");
theSquare.css("backgroundColor","blue");
But there’s an even better way to change multiple properties of a single element. You don’t have to repeatedly identify Square. You can identify it once and change multiple properties at once as long as the changes appear within curly braces. It works like this:
var theSquare = sym.$("Square");
theSquare.css({
    "width" : "400px",
    "height" : "400px",
    "backgroundColor": "blue"
});
Put curly brackets inside of the parentheses, and then you can list several properties within those brackets. As usual, you need to put both the property name and the value in quotes. In this case, separate property names and values with a colon, then separate each property/value pair using commas.
The Actions panel gives you snippets of code that can be used to assign symbols and elements to variables. For example, when you click on Get Element, Animate provides this snippet:
var element = sym.$("Text1");As always, you can change the code for your own purposes, replacing “element” with any variable name you want. In this case, sym identifies the stage level element. Then replace Text1 with the ID of the child element you want to identify.
Click the Get Symbol button to add this snippet:
var mySymbolObject = sym.getSymbol("Symbol1");In this case, the getSymbol() function replaces the jQuery selector, but really the drill is the same. Change the variable name (mySymbolObject) to something meaningful for your project. Then swap “Symbol1” with the ID of a symbol that’s on stage or listed in your Element panel. Remember, there may be many instances on stage of a single symbol in the Library. When you’re animating, you’ll want to identify specific instances on the stage. The getSymbol() method identifies a specific instance of a symbol by its ID, which you’ll find in the Properties panel when it’s selected. You can also see the instance names in the Elements panel whether the instance is visible on stage or not. Once you’ve identified a specific instance of a symbol, you have access to its timeline and any child elements within the symbol.
When you begin assigning values to element properties and variables, you may want to check them. One quick and dirty way to do that is to create a temporary text box and then place the property or variable in question in the box. For example, perhaps you’d like to check the width of the variable theSquare.
Add a new text box to your project and change its ID to tbValue.
Initially, you need to have some placeholder text in the box. Something like “Values” will work.
Open the click trigger that changes the size of theSquare.
In the previous exercise, tbChangeSquare had the click trigger.
Figure 9-9. The Code window is a great tool when your code and projects get more complex. With all the code for all the elements in one place, you can quickly and easily automate your composition. The Code window even checks for errors, as shown in the warning at the bottom. It caught an error in Line 12 of the displayed code. Someone forgot a closing parenthesis.
Add this line below the other code:
sym.$("tbValue").html(theSquare.css("width"));
Here’s the breakdown of that new line: sym identifies the main stage and timeline. $(“tbValue”) identifies the text box. html is a property of textboxes and it expects text—a string of characters.
Now, with a few explanatory comments, the code for the click trigger looks like this:
// Assign the Square element to the variable theSquare

var theSquare = sym.$("Square");

// Change the width, height and backgroundColor properties of theSquare
theSquare.css({
    "width"           : "400px",
    "height           : "400px",
    "backgroundColor" : "blue"

})

// Show the "width" value of theSquare in the text box tbValue
sym.$("tbValue").html(theSquare.css("width"));
There are some new things going on in that last line of code. The .html() method is used to add html code to a web page. (See the box on Adding HTML Anchor Tags to Text Boxes for more details on adding hyperlink tags to your text boxes.) Put a string of text inside of those parentheses and it appears on the page. In this case, it appears within the tbValue text box. You could put a string literal in the text box like this:
sym.$("tbValue").html('My manual is missing');If you want to see the value of a property, all you need to do is put the property name within the parentheses. So, to display the theSquare’s width you put theSquare.css(“width”) inside of the parentheses.
Test your composition.
When you click “Change the square,” all the width changes take place and the tbValue text box displays the value “400px.” If your composition doesn’t work as expected, double-check the parentheses. In particular, make sure the last line ends with two closing parentheses and a semicolon. You can check out a finished example in 09-7_Variables_Values_done from the Missing CD (www.missingmanuals.com/cds/animatemm).

Tip
If you think your value-checking text box will be getting a lot of use, you probably want to assign it to a variable, too. For example:
var valueBox=sym.$("tbValue");Then you can check values in this manner:
valueBox.html(theSquare.css("width"));Using variables often simplifies the identification of elements. It not only speeds things up when you’re coding, it means you’re less likely to create a script-stopping typo.
If you don’t want to clutter up the stage with temporary text boxes, you can use the alert() dialog box in a similar fashion. It works in a browser like a pop-up window. One of the downsides of this method is that you need to close the alert() window before you can continue previewing your animation. The code for an alert box looks like this:
alert("text appears here");Tip
If you place an alert() function in your code and the dialog box never appears, that’s a sign that there’s an error somewhere. Often, the error occurs before the alert() and so the script stops and the alert() function never runs.
The text within the quotes is displayed literally. However, you can use it just like the html property of the text box to display values of properties or variables. For example, you can do this:
alert(theSquare.css("backgroundColor"));The result is that the background color of theSquare is displayed in the alert dialog box. You used the shorthand “blue” to describe the background color. JavaScript prefers to refer to the color’s RGB values, so you see: rgb(0, 0, 255).
Tip
If you’re ready to move up to more powerful debugging tools for your JavaScript/jQuery projects, consider Firebug (http://getfirebug.com), an extension for the Firefox browser. Firebug, itself, has many extensions for different scripting languages and libraries. If you use Google’s Chrome browser, check out the built-in Developer Tools. You can find them by clicking the wrench icon in the upper-right corner, then choosing Tools→Developer Tools.
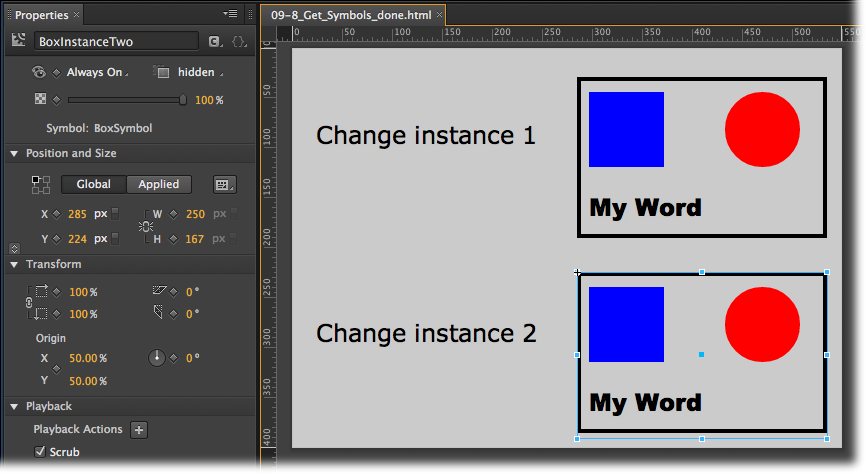
When you start putting elements inside of symbols, you add another layer of complexity to identifying parts of your composition. Just remember to start on the outside and work your way in. Think of onion layers or those wooden Russian dolls nested inside each other. Suppose you have a symbol instance on the stage and an element inside of that symbol. The order to identify that interior element is: stage then symbol instance then element.
For experimentation, draw a square, a circle, and a text box with “Words” shown, as shown in Figure 9-10. Give them these IDs:
Square ID = Square
Circle ID = Circle
Text Box ID = Words
Select all three elements and press Ctrl+Y (⌘-Y), the Modify→Convert to Symbol command. In the Library, name your symbol BoxSymbol. Drag two instances of BoxSymbol on to the stage. They’ll need better unique names than the ones Animate provides. Give them IDs of BoxInstanceOne and BoxInstanceTwo.
If you’re going to change the elements within an instance of a symbol on the stage, your first step should be to identify the instance. For ease of use later, you might want to assign that instance to a variable, like this:
var boxTwo = sym.getSymbol("BoxInstanceTwo");If you click the Get Symbol button, as explained on Using Actions to Assign Variables, you need to replace Symbol1 with the ID of the symbol instance. You may also want to change the variable name mySymbolObject to something more helpful. The next step is to identify the element within the symbol. Suppose you want to change the text in the Words text box in boxTwo. You can zero in on the text box like this:
boxTwo.$("Words")Next on the to do list is identifying the property for your text: html.
boxTwo.$("Words").html();Your text can be a string literal (as explained on Using Alert() Dialog Boxes to Check Values) or it can be a variable that has a string assigned to it. A string literal might look like this:
boxTwo.$("Words").html("To be or not to be");If you’re going to use a variable, it needs to be defined in advance. Like this:
var Hamlet = "To be or not to be";
boxTwo.$("Words").html(Hamlet);
If you want to change the height property of the element with the ID of Square, the code would look like this:
var boxTwo = sym.getSymbol("BoxInstanceTwo");
boxTwo.$("Square").css("height", "400px");
If you want to trim down the code even more, you can create a variable that identifies Square within the symbol:
var boxTwo= sym.getSymbol("BoxInstanceTwo");
var theSquare = boxTwo.$("Square");
theSquare.css("height","400px");
The first line is identical to the previous code. The second line creates a new variable called “theSquare” and assigns the element inside of boxTwo with the ID “Square” to the variable. The last line uses “theSquare” to identify the element within the symbol and assigns a value to the height property of the element. Even if there are several instances of the symbol on the stage, only the Square inside of boxTwo will change. For some more details about working with nested symbols, see the box on the next page.
You can explore some of these symbol and element techniques in the completed example called 09-8_Get_Symbol_done. See Figure 9-10. It shows how to change specific elements inside of two instances of the same symbol.
One of the great features of Animate symbols is that they have their own timeline, just like the main stage. You can start and stop that timeline using triggers, actions, or your own custom code. Here’s a project called 09-10_Control_Symbol_Timeline. As shown in Figure 9-11, it has a symbol that acts as a simple counter. Outside of the symbol are two text boxes: tbStop and tbPlay. The text serves as buttons to stop and start the timeline in the counter. If you’ve followed along since Other Uses for Rollovers, the technique for identifying the symbol with the ID myCounter should look familiar. The methods stop() and play() are part of all symbols. That includes the main stage and its timeline, and the timeline of any symbol that you create. Here’s the code in the click action for tbStop:
var mySymbolObject = sym.getSymbol("myCounter");
mySymbolObject.stop();
You can create that first line using the Get Symbol button in the actions panel. Just replace Symbol1 with myCounter, the ID for the symbol in your project. The code for tbPlay shouldn’t come as a surprise:
var mySymbolObject = sym.getSymbol("myCounter");
mySymbolObject.play();
In this case, the object with the trigger (the text box) is not part of the symbol, so it is necessary to identify the stage (sym) and the symbol you want to control (my-Counter). A variable (mySymbolObject) is created to easily identify the symbol. Then, the stop() and play() methods are used to control the timeline. If the object with the trigger were part of the symbol, or if everything were on the stage, you can use sym to identify the current symbol. Then the code to stop and play the timeline would be:
sym.stop();
sym.play();
Check the actions for the red and green blocks in the symbol, and you find exactly that code. You can also use some of the tricks you learned on Adding a Trigger to Loop Your Animation to jump to a particular point on the timeline. For example, you can make the timeline Play from a particular point in time:
var mySymbolObject = sym.getSymbol("myCounter");
mySymbolObject.play(4000);
The basic unit of time is the millisecond, so 4000 is the point four seconds into the timeline. As an alternative, you can use a timeline label as described on Using Labels in Your Timeline Code:
var mySymbolObject = sym.getSymbol("myCounter");
mySymbolObject.play("myLabel");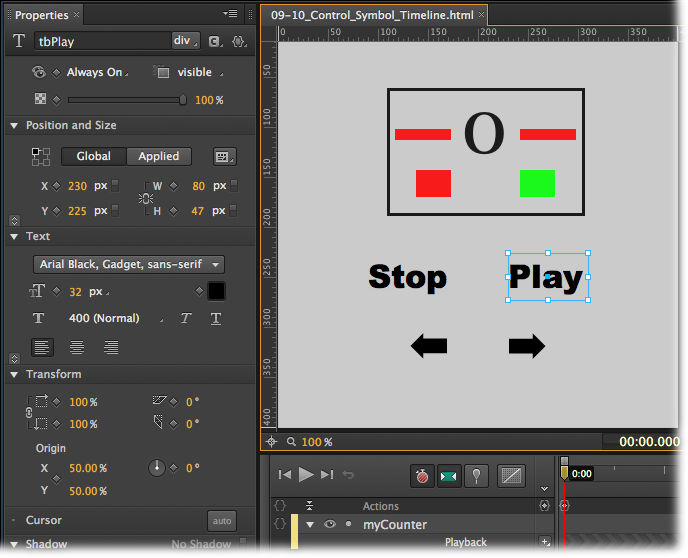
Figure 9-11. Animate provides several methods for playing and stopping the timeline. These methods work for symbols as well as the main timeline. To see the code for the examples described in this section, get 09-10_Control_Symbol_Timeline from the Missing CD at http://missingmanuals.com/cds/animatemm.
Sometimes you’ll want to know the current position of the playhead in a symbol or in your main timeline. Animate provides a function that does just that: getPosition(). It returns the number in Animate’s favorite unit of time, the millisecond, where 1000 equals a second. Suppose you have a variable for a symbol named theCounterSymbol. A statement that assigns the current playhead position to a variable looks like this:
var playPosition = theCounterSymbol.getPosition();
What can you do when you know the playhead position? For one thing, with a little arithmetic you could make the playhead jump ahead a couple of seconds.
var playPosition = theCounterSymbol.getPosition();
playPosition = playPosition + 2000;
theCounterSymbol.play(playPosition);
Line two adds 2000 (two seconds) to playPosition and then assigns the result to playPosition, giving it a new value that’s two seconds farther down the timeline. Want to go backwards? Just use subtraction. The third line uses playPosition with its new value to reposition the timeline playhead.
There’s one problem with the previous exercise that positions the playhead on the timeline. If the current position is too far along the timeline, the updated value for the variable playPosition may be greater than the duration of the symbol. That means you want to check the value and then perform different actions based on the result. That’s the perfect job for the if conditional statement described on Conditional Statements in JavaScript. The basic form is this:
if (this statement is true) {
     do these actions;
     }
     else {
     do these other actions;
     }
The parentheses and curly brackets are all vitally important. Forget one, and your carefully constructed conditional won’t work. The else portion of the statement is optional, but you need it for the current dilemma. Here’s a statement that checks to see playPosition is under the ten-second mark. If it is, the playhead is moved to playPosition. If not (the else portion of the statement), the playhead is moved to 0, the start of the timeline.
if (playPosition  < 10000) {
     theCounterSymbol.play(playPosition);
     }
     else {
     theCounterSymbol.play(0);
     }
Attach this code to the click trigger of a forward pointing arrow, and you have a way to jump ahead in your animation. With a little tweaking, you can create a back arrow and code that moves in the other direction. If you’d like to examine this code and some of the other symbol controls, take a look at 09-10_Control_Symbol_Timeline.
The great thing about using conditional statements like if() is that your programs and compositions get smart. They literally can make their own decisions. With a little careful coding, you can create compositions that are adaptable to different situations. For example, wouldn’t it be great to create a slideshow composition that can quickly be adapted to handle a varied number of photos? Using variables (explained on Assigning Variables) to keep the count and an if() statement to make decisions, you can do just that. The end result looks like Figure 9-12. The completed project on the Missing CD is named 09-11_Photo_Show_If. Here are some of the goals for this composition:
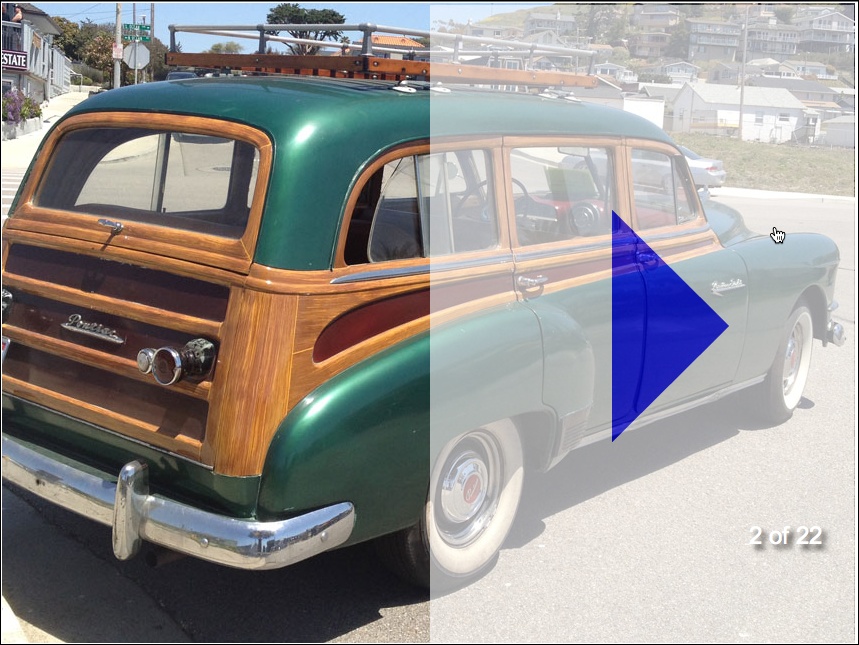
Figure 9-12. This versatile variation on the slideshow has hidden buttons that cover the left and right side of the photo. Click or tap on one side or the other to show the next photo or the previous one. For user feedback a semi-transparent button, like the one shown on the right side, appears briefly on mousedown then disappears on mouseup. The extra big buttons make this slideshow useful for mobile devices.
To handle multiple photo projects, this composition uses a common naming system: photo-01.jpg, photo-02.jpg, and so forth, up to photo-99.jpg. If you want to change photos, adding more or fewer, you can simply put new photos with the same naming convention in the images folder for your Animate project. After you add photos, you need to tell your composition the total number of photos in your project. That number is stored in two places—the “click” actions for the goNext and the goPrev buttons. To get at those actions panels, follow these steps:
Open 09-11_Photo_Show_If.edge.
One symbol is on the stage named thePhotos. If you explore the Library’s Assets panel, you see the photos starting with photo-01.jpg and the graphics for the goNext and goPrev buttons (arrowNext and arrowPrev). In the Symbols panel there are three symbols: thePhotos, goNext, and goPrev.
In the Elements panel, right-click thePhotos and choose Edit Symbol “thePhotos” from the shortcut menu.
In the innards of the symbol thePhotos, you see tbCount (a text box), mainImage (the photo visible on stage with an img tag), and the two symbols that work as buttons: goNext and goPrev.
In the Elements panel, click the Open Actions button next to goNext.
As shown in Figure 9-13, here’s the code for the “click” trigger of the goNext button.
var numOfPhotos = 22;
var pic = sym.$("mainImage");
var textCount = sym.$("tbCount");

var imageSource = pic.attr('src');
var imageCount = +(imageSource.slice(13,15));
imageCount = imageCount+1;
if (imageCount>numOfPhotos) {imageCount = 1}
var newCount = imageCount + ' of '+numOfPhotos;
if (imageCount<10) {imageCount = '0'+imageCount}
imageSource = 'images/photo-'+imageCount + '.jpg';
pic.attr('src',imageSource);
textCount.html(newCount);
On the first line a variable called numOfPhotos is declared. For the Car Show project, the value is set to 22, since there are 22 car photos.
If you change the number of photos for a new project, you need to change numOf-Photos from 22 to a new value. The code for the goPrev button is similar and you’ll find the numOfPhotos variable in the same place. When you add or remove photos, you can update the composition by changing those two numbers.

Figure 9-13. The hardworking code in this project is inside of the numOfPhotos symbol. Open it, then open the “click” actions for the goNext and the goPrev buttons. Tucked in there you’ll find the variables that keep the count and the if() statements that control the view.
While you have the goNext button’s click action displayed, take a look at the three variables created at the top:
var numOfPhotos = 22;
var pic = sym.$("mainImage");
var textCount = sym.$("tbCount");
After numOfPhotos, the pic variable is created to provide a short way to identify the mainImage. Next is a variable called textCount that is used to identify the text box (tbCount) that displays a message like “12 of 22”.
So, how does Photo Show keep track of the currently displayed photo? It steals that bit of information from the JPEG filename. Remember each photo is named something like photo-03.jpg or photo-05.jpg. The first task is to get the entire photo name:
var imageSource = pic.attr('src');The new pic variable is used to identify the mainImage. Then, its src attribute is stored in another new variable imageSource. That stores an entire path and filename like images/photo-03.jpg in imageSource as a string. The next line of code slices the number out of the filename.
var imageCount = +(imageSource.slice(13,15));
The value is stored in yet another variable, imageCount, but don’t yawn. This one’s important because it’s used all over the place in the rest of the code. For example, since this code is in the “click” action of the goNext button, the first thing it does is add one to imageCount.
imageCount = imageCount+1;
That new number will be used to advance to the next photo. But first there are a couple of conditions to check. For example, what if that new number is greater than the total number of photos in the project. In that case, Photo Show needs to display the first photo, looping back to the beginning. Here’s the if() statement to handle that condition:
if (imageCount>numOfPhotos) {imageCount = 1}When the new photo is displayed, you want to update the text box (tbCount) that keeps count. That’s done with a string of text that is stored in a variable called newCount.
var newCount = imageCount + ' of '+numOfPhotos;
The variable is created and the string is assembled from three pieces. The first is the photo number: imageCount. In the middle is a string literal—the text that appears in the middle: “of”. Lastly, the total number of photos is added to the string, in the case of the Car Show that number is 22. The result is that tbCount displays text like 3 of 22, providing handy, unobtrusive feedback to the viewer.
The next if() statement handles a sticky issue. When JavaScript sees a number like 03, it automatically lops off the leading zero. That’s great for showing the count in a text box like tbCount, but it’s a problem when you are trying to identify photos with names like photo-02.jpg and photo-04.jpg.
if (imageCount<10) {imageCount = '0'+imageCount}
imageSource = 'images/photo-'+imageCount + '.jpg';
So, the first line determines if imageCount<10. If that’s the case, it manually adds a 0 to the front of the string imageCount. Immediately, the next line builds the filename for the image that is to be displayed. The name includes the path to the images folder. So, a complete name might be: images/photo-03.jpg.
Tip
One caution about the names of the photo files. JavaScript and many web servers are extremely picky about the case of filenames. Make sure all filenames are lower case. It’s highly possible that a photo with a name like photo-03.JPG will not be displayed.
The last two lines of code update the visuals displayed on stage. Finally!
pic.attr('src',imageSource);
textCount.html(newCount);
The first line performs the old image swap using that carefully constructed filename. The second line updates the count that is shown in the tbCount text box. That’s how the goNext button works. The goPrev button has similar code except that it subtracts from imageCount to identify the previous image and it uses conditionals to provide smooth backward navigation.
The if..else conditional statement works fine when you only have a couple of possible conditions. It gets a little unwieldy when there are several. On Animating a Filmstrip, there is an example of a filmstrip with five photos of flowers. The photos are arranged horizontally edge to edge, and individual photos are displayed on the stage by sliding the filmstrip left or right. Suppose you want to write a click action that checks the position of the filmstrip and then moves it to show the next photo. If the filmstrip is on the last image, it rewinds to the first photo. With five possible conditions, that’s a little more than can be handled gracefully by if..else. The solution is to use JavaScript’s switch() conditional, which lets you handle as many cases (conditions) as you want. The basic format looks like this:
switch(value) {
    case value1:
       do this;
       do that;
       do the other;
    break;

    case value2:
       do a different this;
       do a different that;
       do a different other;
    break;

    case value3:
       do this 3;
       do that 3;
       do the other 3;
    break;

    case value4:
       do this 4;
       do that 4;
       do the other 4;
    break;

    case value5:
       do this 5;
       do that 5;
       do the other 5;
    break;
}
When you call the switch() conditional, you pass a value to it. That value is used to determine which case statements are performed. When the code reaches the break; statement, it skips the rest of the code. To use this with the filmstrip example, you get the value for the left edge of the filmstrip. You store that value to a variable with a helpful name like posLeft. Then, pass that variable to a switch() statement:
switch(posLeft)
Inside of curly braces, you assemble your cases. For the filmstrip, there are five possible posLeft values that display the flower photos: 0, -500,-1000,-1500,-2000:
switch(posLeft) {
     case 0:
        do this;
        do that;
        do the other;
     break;
     case -500:
        do a different this;
        do a different that;
        do a different other;
     break;
...continued with the rest of the five possible cases
}
To see a working example of the filmstrip project using the switch() statement, check out the 09-12_Film_Strip_Switch project (Figure 9-14). You’ll find plenty of comments in the code that explain its inner workings.