For close to ten years, a stubborn strand of linguine stuck to my kitchen ceiling. How did it get there? It was from a test our wonderful babysitter,
Fiona, conducted with our children to see if the
pasta was ready; if it stuck to the ceiling, it was ready to eat. That strand remained suspended above the kitchen table where we had family meals, a testimony to the children’s love of pasta, but also to the spirit of playfulness and exploration that should be part of kitchen activities. I renovated the kitchen recently; letting go of that strand of linguine was nearly as poignant as leaving a kid at college for the first time.
Pasta,
rice, and
grains are endlessly adaptable to seasons and cultures, appealing to adults who enjoy a wide range of flavors and to children who simply find pasta and rice very satisfying. They are fun foods and simple to prepare. There may not be a parent on the planet who wouldn’t agree that this is the no-worry category for kids’ meals. Easy to make, endlessly adaptable, pasta, noodles, and rice also provide an efficient way to bring the edible plant world to the table.
On a list of all-time favorites, mac and cheese, any pasta with pesto, and any sort of dumplings will surely be at the top. The flexibility of creating a dish with new ingredients—or finding a way to weave in your leftovers—is the beauty of these foods.
The world of grains is worth knowing, especially as they are a good source of protein. Pasta and grain dishes are the ones teenagers will make for themselves as they start to tinker in the kitchen or when they first leave home and have to fend for themselves.
1. Spaghetti with Burst Cherry Tomatoes
Small tomatoes can now be found in any supermarket throughout the year. Nothing equals fresh local tomatoes, but these small varieties—cherry, grape, and so on—are a welcome alternative in the dark months. Most are grown in greenhouses and some are imported from places such as Israel and Mexico and have great flavor.
I leave all tomatoes out at room temperature, but these especially benefit from a few days of ripening to deepen their flavor and bring out their sweetness. I make it a point to always have some small tomatoes on hand for salads, salsas, and quick pasta dishes like this one. When cooking this with children, make sure you have plenty of extra tomatoes for snacking.
SERVES 4 TO 6
4 cups cherry or grape tomatoes (about 40 tomatoes)
2 tablespoons olive oil, plus more to finish
Salt
½ teaspoon sugar
2 garlic cloves, chopped
1 teaspoon red chile flakes
1 tablespoon chopped fresh oregano, or a pinch dried
1 pound spaghetti
Freshly ground pepper
Grated Parmigiano-Reggiano (optional)
Heat the oven to 400 degrees.
Put the cherry tomatoes, 1 tablespoon of the olive oil, a big pinch of salt, and the sugar in a large bowl and toss to coat the tomatoes well.
Line a rimmed baking sheet with a piece of parchment paper or aluminum foil. Pour the tomatoes onto the baking sheet, place them in the oven, and roast for 25 to 35 minutes, or until they collapse and their skins begin to char. Remove the tomatoes from the oven and let them cool slightly. Carefully lift the paper and pour the tomatoes and all their roasting juices back into the bowl.
Bring a large pot of water to a boil over high heat.
Heat the remaining 1 tablespoon oil in a large skillet over medium heat. Add the garlic and red chile flakes and sauté for about 1 minute. Add the roasted tomatoes with their juices and the oregano. Use a spoon to break up the tomatoes and cook until they are heated through.
When the water is rolling, add a big pinch of salt, drop in the spaghetti, and stir. Cook the pasta according to the package instructions for al dente. Remove and reserve some of the pasta cooking water, then drain the pasta.
Add the pasta and about 1 tablespoon of the reserved cooking water to the tomato sauce. Stir and toss to thoroughly coat the spaghetti. Add a tablespoon or so of the remaining pasta water if the sauce is too dry
or thick; drizzle with olive oil and season with salt and pepper to taste. Turn the pasta into a serving bowl or individual bowls and pass the cheese, if using, at the table.
The tomatoes can be roasted and kept at room temperature for several hours or for a day or two in advance and refrigerated until needed.
For a different twist, add 2 cups diced eggplant to the tomatoes before roasting, and sprinkle the final dish with grated ricotta salata.
Or throw about ½ pound of rock shrimp or other small peeled shrimp into the skillet with the tomatoes, cook and stir for about 2 minutes, then add two generous handfuls of baby arugula and stir just to wilt.
2. Penne with Roasted Cauliflower
Here is another example of stale bread becoming an appealing ingredient in a dish. Particularly in the poor southern regions, Italian home cooks often grated it (pangrattato) onto pasta in place of more expensive cheese. Now such dishes are part of the pasta canon, revered for themselves.
SERVES 4
4 tablespoons olive oil, plus more for the baking sheet
1 small cauliflower (about 1 pound)
Salt and freshly ground pepper
1 cup fresh flat-leaf parsley leaves
1 tablespoon grated lemon zest
1 tablespoon capers, rinsed and drained
1 pound penne
½ teaspoon red chile flakes
Place the oven rack at the highest position and preheat the oven to 475 degrees. Thinly coat a baking sheet with a bit of olive oil.
Trim the cauliflower and cut it from top to bottom into thin slices, about ¼ inch thick. Toss the cauliflower with 2 tablespoons of the olive oil, spread it in a single layer on the prepared sheet, and season with salt and pepper. Place the sheet on the rack and roast the cauliflower for 18 minutes, or until lightly browned.
Place a large pot of water over medium-high heat.
Pulse the parsley, lemon zest, and remaining 2 tablespoons oil in a small food processor or chop them together on a cutting board until a chunky mixture forms. Add the capers and pulse until they are coarsely chopped.
When the water is at a rolling boil, add a big pinch of salt, drop in the penne, and stir; cook the pasta, stirring from time to time, until al dente, according to the package directions, about 9 minutes. Remove and reserve ½ cup of the cooking water and drain the pasta.
Toss the pasta with the cauliflower, parsley sauce, and red chile flakes in a large serving bowl; add the reserved cooking water as necessary if the dish seems too thick.
Sprinkle the garlic croutons over and serve from a serving bowl or divide among four individual bowls.
Coarse bread crumbs, lightly sautéed or baked with 1 or 2 minced cloves of garlic and a bit of olive oil, can be substituted for the croutons.
3. Sweet Potato Gnocchi
These melt-in-your-mouth little dumplings combine rich and sweet tastes. There are definitely fun chores for children here, especially the rolling of the little pieces of dough and making the typical indentations you see on gnocchi, which will also speed up the process of forming them. This is cooking casalinga, homemade, so don’t worry if the gnocchi are less than perfect—the word can even mean homely, in the best sense.
SERVES 10 TO 12
2 red-skinned sweet potatoes (2 pounds), rinsed, patted dry, and pierced all over with a fork
One 15-ounce container fresh ricotta cheese, drained in a sieve to remove excess moisture, overnight or for about 2 hours (factor in time to drain the ricotta before you begin)
1 cup finely grated Parmigiano-Reggiano
2 tablespoons (packed) light brown sugar
2 tablespoons plus 2 teaspoons salt
½ teaspoon freshly grated nutmeg
About 2¾ cups all-purpose flour
Preheat the oven to 375 degrees.
Line a large baking sheet with parchment paper, place the sweet potatoes on it, and bake until soft, about 40 minutes. Alternatively, the potatoes can be cooked in a microwave oven, on a plate, and then baked for 5 minutes on each side. Let the potatoes cool to room temperature.
Cut the sweet potatoes in half lengthwise and scrape the flesh into a medium bowl; mash with a fork and transfer 3 cups to a large bowl. Add the ricotta cheese and blend well. Add the Parmigiano-Reggiano, brown sugar, 2 teaspoons of the salt, and the nutmeg. Mash again to blend well. Mix in the flour, about ½ cup at a time, until a soft dough forms.
Turn the dough onto a floured surface and divide it into 6 equal pieces. With your palms flat, roll each piece into a 20-inch-long rope about 1 inch in diameter. Sprinkle the dough and your work surface lightly with flour as needed if the dough is sticky. Cut each rope into 20 pieces, then roll each piece over the tines of a fork to indent lightly. Transfer the pieces to a baking sheet.
Bring a large pot of water to a boil over high heat; add 2 tablespoons of salt. When the water returns to a rolling boil, begin to add the gnocchi, working in batches of 10 or so. Cook the gnocchi until tender, 5 to 6 minutes. As they finish cooking, remove the gnocchi with a skimmer or slotted spoon to a colander. Divide the gnocchi among shallow bowls, spoon the sauce over, and serve at once.
This makes a generous amount. If you don’t need it all for one meal, the prepared gnocchi can be frozen. Place the uncooked gnocchi on a baking sheet and put it in the freezer. Once they are frozen, dust the gnocchi lightly with flour and store them in a freezer bag. To cook, drop the still-frozen gnocchi into boiling water as above—do not defrost before cooking.
4. Fettuccine with Shredded Zucchini, Fresh Ricotta, and Lemon Zest
I realize that this seems almost too simple to mention, but it is such a perfect dish, and a good solution to a high-summer extravagance of zucchini and mint. And unlike some pasta dishes, it is light enough for a first course. I grate an additional bit of lemon zest over the finished dish.
SERVES 4 TO 6
Salt
1 pound fettuccine
4 tablespoons extra-virgin olive oil
3 or 4 garlic cloves, finely chopped or grated
Zest of 1 to 2 lemons
2 medium-large or 4 small zucchini, cleaned but not peeled, and shredded
Freshly ground pepper
¼ cup chopped fresh flat-leaf parsley
¼ cup chopped fresh mint
1 cup fresh whole-milk ricotta cheese, at room temperature
Place a large pot of water over high heat. When the water is at a rolling boil, add a big pinch of salt, drop in the fettucine, and stir.
Cook the pasta, stirring from time to time, according to package directions for al dente, usually about 12 minutes. Meanwhile, heat the olive oil in a large skillet over medium heat. When the oil is warm, add the garlic and sauté until golden, about 1 minute. Add the lemon zest and cook for 30 seconds longer. Increase the heat to medium-high, add the zucchini, and cook, stirring, until tender, 2 to 3 minutes. Season with salt and pepper.
Remove and reserve about ½ cup of the cooking water, then drain the pasta and quickly toss with the zucchini, parsley, and mint. Spoon on the ricotta and toss lightly again, add small amounts of the cooking water to lighten the cheese to the consistency you like, and serve.
Zucchini is easy to shred on the large holes of a box grater, with the shredding attachment of a food processor, or with a mandoline.
Like “
al dente,” “dandelion” is another word connected to the Italian for “teeth”:
dente di leone—lion’s teeth. Kids love knowing this sort of thing, especially if they can connect something they eat with a wild animal. They’ve seen pictures of those teeth, now show them the plant, which just might be growing on your lawn. The French is similar:
dent di lion. And while our word, “teeth,” is quite different, “dental,” “dentist,” and “denture” are all related to those foreign words.
Another good word from the Italian here is “ricotta,” which means “recooked,” referring to the process of making the cheese. Rifatti means “remade,” and is used for what we call leftovers, because Italian—and French—cooks like to give them a second life in dishes like frittatas, salads, or sauces for pasta.
5. Pasta with Artichokes and Eggs
This will remind you of spaghetti carbonara, a pasta dish made with eggs that cook as they are tossed with hot pasta. In this meatless version, we keep carbonara’s cheese, but artichokes replace the pork. The recipe comes from our friend the well-known cookbook author and Italian food authority
Giuliano Bugialli.
SERVES 4 TO 6
1 lemon
3 large artichokes
¼ cup olive oil
2 tablespoons unsalted butter
1 medium onion, preferably red, chopped
2 garlic cloves, minced
About ¼ cup chopped fresh flat-leaf parsley
Salt
Freshly ground pepper
1 pound rigatoni
2 extra-large eggs, at room temperature
2 tablespoons grated Pecorino Romano, Siciliano, or Parmigiano-Reggiano cheese, plus more for the table if desired
Squeeze the lemon through a strainer into a large bowl of water.
To prepare the artichokes, trim the stems flush at the bottom. Break off all the dark outer leaves until only very light greenish-yellow ones are left, with just a bit of dark green at the tips. Turn the artichokes on their sides and slice them horizontally; you will be left with about the bottom third of each. Cut the artichokes into quarters and remove the chokes with the tip of a knife (a grapefruit spoon is also good for this). Slice each quarter into 3 or 4 pieces and drop them into the bowl of water and lemon juice.
Place a large skillet or sauté pan over medium heat. Pour in the olive oil, then add the butter. When the butter has ceased bubbling, add the onion and garlic; stir for about 3 minutes, then add the parsley. Drain the artichokes and add them to the pan. Cover the pan, reduce the heat to low, and cook the mixture for 10 minutes, stirring from time to time.
Bring a large pot of water to a boil over high heat.
Add 1 cup of water to the artichokes and continue cooking until the artichokes have absorbed most of the moisture and are very soft, reduced almost to a sauce.
When the water comes to a boil, add a big pinch of salt, drop in the rigatoni, and stir. Cook, stirring from time to time, according to the package directions for al dente, usually about 10 minutes.
Meanwhile, break the eggs into a large serving bowl and whisk them lightly; whisk in the cheese and salt and pepper to taste. Drain the pasta well, then turn it into the bowl. Mix gently but thoroughly—the eggs will cook in the heat of the pasta; stir in the artichokes and pan juices and serve in individual bowls.
Pass additional cheese at the table, if desired.
Virtually 100 percent of this country’s artichokes are grown around the little town of Castroville, California, in the heart of the Central Coast farm region.
Castroville is close enough to San Francisco to make a terrific family day trip, even when the town is not holding its annual Artichoke Festival. Several restaurants on the main street do everything imaginable to offer more and better ways to prepare artichokes: dips, soups, tarts, omelets, pizza, pasta, and, of course, fried …and it does seem that some of the largest artichokes you will ever see are cooked and served right where they were grown. For children, the main attraction is the giant artichoke sculpture in front of the restaurant named, yes, the Giant Artichoke—the sculpture is taller than the building.
I have seen local artichokes at New York’s Union Square Greenmarket. Those came from a farmer in New Jersey; apparently, small family farmers, mostly Italians, still produce them in the southern part of the state. We had a small crop at Katchkie a couple of years ago and now are planting more and are very excited at the prospect. We think our valley, with its warm days and relatively cool nights, is somewhat similar to the California coastal region.
Baby artichokes, by the way, are simply the ones that grow lowest on the stalk; the big guys are at the top, and the artichokes are arranged downward in a size-based hierarchy.

6. Mac ’n’ Very Cheesy
Yes, this does seem like an awful lot of cheese, but there is no mistake in the amounts here. We serve this at
Dizzy’s Club Coca-Cola, the renowned club at Jazz at Lincoln Center in New York—it’s a little hot, and goes nicely with cool jazz.
At Dizzy’s, the mac ’n’ cheese is an appetizer size served with a salad. You can do the same, or have it as a side to a main dish. Otherwise, this will be enough for at least eight as a main course with a vegetable side.
SERVES 8 to 12
1 pound elbow macaroni
Salt
Freshly ground pepper
20 ounces shredded Cheddar, plus more for topping if desired
8 ounces shredded Swiss cheese
8 ounces shredded Monterey Jack cheese with jalapeños
4 ounces grated Parmigiano-Reggiano
1 cup sour cream
1 teaspoon dry mustard
1 teaspoon cayenne pepper, or to taste
1 egg
6 ounces half-and-half
Bring a large pot of water to a rolling boil, add a big pinch of salt, drop in the macaroni, and stir. Cook until barely al dente, about 5 minutes; the macaroni will cook more as it bakes. Drain and rinse under cold water.
Preheat the oven to 375 degrees.
Mix the remaining ingredients together in a large bowl, then stir in the macaroni to blend well. Season to taste with salt and pepper.
Spoon the mac and cheese into individual 6- or 8-ounce ramekins or one large baking dish, 9½ × 12 × 3 inches deep. Sprinkle on the extra Cheddar, if using, place the ramekins or dish in the oven, and bake until bubbly and browned on top, 15 to 20 minutes.
There is hardly a place on the earth where flour and water are not turned into noodles of one shape or another.
Marco Polo did not bring noodles back from China as legend has it. The earliest Italian cookbook, which was written in Florence long before Marco went off on his travels, includes
pasta recipes, and there is evidence that some versions of pasta were eaten in ancient Roman times (the word “lasagna” comes from a Latin word).
However, it is easy to believe that noodles in one form or another were already a part of the Chinese diet when Polo arrived. The Chinese culture was already old and quite advanced, and the reverence for excellent cooking had long been established.
7. Vegetable Lasagna
This is a big project but always worth it! When I decide to make my vegetable lasagna, I will usually make a few pans—one for the meal ahead, one for the freezer, and one for Farmer
Bob. Lasagna freezes beautifully (I first cut each batch into manageable thirds) and it is always helpful to be able to pull out a wedge for a late-night comfort meal or a surprise visitor. You can enlist lots of help in putting together the cheese mixture, making your own tomato sauce, selecting and slicing the veggies, and, of course, assembling the many layers—the process of mapping out the ingredients is good work for a young scribe.
When you see my ingredients, you will understand why I say that we grow vegetable lasagna at
Katchkie Farm. By late July and into September, I get all my vegetables from the field—peppers, onions, garlic, eggplant, zucchini, chard, and, of course, the tomatoes and herbs. I welcome any variations and additions. I will gather herbs and add them, including our parsley, basil, oregano, and thyme. Many times I end up with more prepared vegetables than needed for the lasagna. I then use those extras in a frittata or quiche; I add the cheese mixture and bake them in individual dishes for forty-five minutes.
This lasagna is quite open to interpretation; you may want to add or subtract an ingredient, or tweak the amounts and kinds of cheeses. For instance, I recently substituted 1 pound of quark, a soft cheese similar to cottage cheese, for 1 pound of ricotta—delicious.
Here are the basics, with details to follow. I’ve also included my schematic drawing; it always guides me as I construct the lasagna. You will need a deeper pan than the usual lasagna or other baking pan to accommodate this. A 13-×-9-inch roasting pan is better because it will be deeper, around 3 inches; I also like a deep gratin pan that I can bring to the table.
12 SERVINGS
2 to 3 quarts tomato sauce, organic if possible
Cheese filling
Prepared vegetables
1 bunch Swiss chard, tough leaves and ribs trimmed away, washed and thinly shredded
Olive oil, for the chard and pans
1 pound precooked lasagna noodles (see box for guidance) or fresh lasagna noodles
1 cup shredded mozzarella
2 sliced tomatoes
¼ cup grated Parmigiano-Reggiano
3 pounds fresh ricotta
¾ cup grated Pecorino Romano
3 large eggs
1 bunch flat-leaf parsley, chopped
Leaves from 5 sprigs thyme
½ medium zucchini, sliced into thin disks
½ medium yellow squash, sliced into thin disks
1 medium eggplant, peeled, sliced, and lightly salted; let the eggplant sit on paper towels for about ½ hour, then rinse and pat dry
1 medium yellow onion, sliced
5 cloves garlic, chopped
2 red bell peppers, or 1 red and 1 yellow or orange, seeded and sliced
Olive oil for dressing the vegetables
Salt and freshly ground pepper
Make the cheese filling: Mix all the ingredients together and reserve.
Prepare the vegetables: Toss the zucchini, yellow squash, eggplant, onion, garlic, and bell peppers with a bit of olive oil and season with salt and pepper. Lightly cook the vegetables as you wish: grill, sauté, or
roast in the oven. If you are using roasted tomatoes, roughly chop them and add them to the cooked vegetables, then set the vegetables aside.
Sauté the chard in a skillet with a little olive oil, just to wilt it, about 3 minutes. The chard can be added to the other cooked vegetables or kept separate.
Preheat the oven to 350 degrees.
Lightly oil a deep 9-×-13-inch baking pan.
Thoroughly combine the ingredients for the cheese filling.
Assemble the lasagna: Lightly cover the bottom of the pan with one-third of the tomato sauce. Lay three pieces of pasta side by side over the sauce. Spread about one-third of the cheese filling over the pasta (you might find it helpful to use your fingers). Add another layer of pasta, then another third of the tomato sauce, then about half the prepared vegetables. Layer on another third of the cheese filling, another layer of pasta, and the remaining vegetables; if you have kept the chard separate, lay the strips over the vegetables. Add the remaining cheese filling, cover it with the remaining tomato sauce, and sprinkle the mozzarella evenly on top. Lay the sliced tomatoes evenly across the top and sprinkle with the Parmigiano-Reggiano.
Cover the dish loosely with foil and bake in the oven for 45 minutes. Remove the foil, turn the temperature up to 375 degrees, and bake for an additional 20 minutes. Remove the dish from the oven and let it rest before cutting and serving.
Sometimes the lasagna will bubble over when cooking. You might want to place a sheet of aluminum foil under the pan or on the bottom of your oven.
8. Why We Like Couscous
Couscous seems so much like a grain that it sometimes surprises people to learn it really is a kind of tiny pasta found throughout North Africa and parts of the Middle East. “Couscous” also refers to the dish of endless variations that may involve meat and vegetables or, my favorite versions, just vegetables, a kind of stew of carrots, squashes, and chickpeas.
In the old days, couscous was made by rolling bits of moistened semolina wheat and pushing them through a series of ever-smaller sieves. Today’s couscous is quite the opposite: machine-made and presteamed, it can be found in just about any supermarket and is nearly an instant dish, faster to cook than rice.
At
Katchkie Farm, we sauté about a cup of diced yellow squash and some red onion, combine it with a couple cups of cooked whole-wheat couscous, and lots of basil and parsley, and dress it with a drizzle of good olive oil and a dusting of lemon zest. Try other combinations: zucchini, tomatoes, cucumbers, cooked fresh or dried beans, and other herbs—just about anything featured in the produce section or at a farm stand. Couscous is a great side dish, good for buffets or as a substitute for rice. Very young eaters like it with some butter and a light grating of Parmesan.
9. Crescent Moon Vegetable Dumplings
Corinne
Trang, author of several books on Asian cooking, has demonstrated dumpling making at the
Sylvia Center. The idea of making Chinese dumplings may be intimidating to grown-ups, but if you think about it, it is very close to the sorts of craft projects children do all the time. And this is one of those times when little fingers are an advantage. The kids can help with the assembly of the filling, even prepping some ingredients, but an adult should handle the stove chores. This could be a great weekend project for the family, or the main activity at a small kids’ party.
MAKES ABOUT 60 DUMPLINGS
1 cup plus 2 tablespoons soy sauce
2 tablespoons light sesame oil
1 large garlic clove, thinly sliced
1 scallion, thinly sliced
½ cup roughly chopped fresh cilantro
1 red hot chile, seeded and minced (optional)
1 pound firm tofu, drained
One 1-inch piece fresh ginger, peeled and minced
½ bunch spinach (or ½ bag baby spinach leaves), minced
6 shiitake mushrooms, stems removed, caps minced
1 teaspoon dark sesame oil
Freshly ground pepper
½ cup flour
60 fresh round wonton or dumpling wrappers (see
Note)
Put 1 cup of the soy sauce in a small bowl.
Heat the oil in a skillet over high heat, then add the garlic, scallion, cilantro, and red chile and stir-fry until fragrant and the scallion is lightly golden, about 2 minutes. Transfer to the bowl with the soy sauce and stir; this will be the dipping sauce.
Combine the tofu, ginger, spinach, mushrooms, dark sesame oil, and pepper to taste in a large bowl and mix thoroughly. Set the filling mixture aside.
To assemble the dumplings, pour some water into a small bowl. Dust a baking sheet with the flour. Put a wrapper on the palm of one hand. Dip your opposite pointer finger in the water and run it across the outer ½-inch edge of the wrapper. Put a heaping teaspoon of filling in the center of the wrapper and fold the wrapper into a half-moon, pressing the wet edges together to seal. Place the dumpling on the floured baking sheet (see
illustrations). Repeat with the remaining wrappers and filling.
Bring a large pot of water to a boil over high heat. Working in small batches (about 10 pieces at a time), lower the dumplings into the water, stirring a couple of times so they do not stick together. Once the dumplings rise to the surface, cook them for another 1 to 2 minutes. Using a slotted spoon, transfer the dumplings to a soup plate or large bowl. Drizzle lightly with the remaining 2 tablespoons soy sauce and serve with the dipping sauce on the side.
Nowadays, dumpling wrappers can be found in most supermarkets, often frozen. If you can, get fresh ones at an Asian market, where they are made daily. Or check for freshness if you buy packaged wrappers—if they separate when you ruffle the edges they are good; if they seem damp or stick together, avoid them.
10. Vegetable Soba Noodles
Japanese soba noodles are usually made with a combination of wheat and buckwheat flours (“soba” means “buckwheat” in Japanese). The proportions of each vary from region to region and there is even a special and expensive version that is 100 percent buckwheat. Soba are generally thicker than other Asian noodles, but some are thinner, so their cooking times can vary. Seven to 8 minutes is typical, but thin soba may cook in 5 to 6.
Soba noodles deliver more nutrition than regular pasta, with protein and vitamins B1 and B2.
SERVES 4
1 pound soba noodles
⅓ cup plus 1 tablespoon vegetable oil
2 tablespoons peeled and minced ginger
2 tablespoons minced garlic
2 tablespoons chopped scallion
⅓ pound
edamame, steamed and shelled
1 small or ½ medium bok choy, julienned
½ red bell pepper, seeded and julienned
½ pound bean sprouts
2 tablespoons vegetarian oyster sauce
¼ cup light soy sauce
¼ cup dark soy sauce
1 tablespoon sugar
2 teaspoons sesame oil
Bring a large pot of water to a boil, drop in the noodles, and stir. Cook the noodles according to the package directions until just tender, about 10 minutes. Drain, rinse well under cold water, and drain again. Toss the noodles with 1 tablespoon of the oil and set aside.
Heat the remaining ⅓ cup oil in a wok or large sauté pan and add the ginger, garlic, and scallion and cook, stirring, for about 1 minute. Add the edamame, bok choy, bell pepper, and bean sprouts and stir-fry until the vegetables begin to wilt. Add the noodles and toss to combine.
Add the oyster sauce and cook, stirring, until the noodles are heated through and the vegetables are tender. Finish with the light and dark soy sauce, sugar, and sesame oil and cook for 2 minutes more.
11. Basic Risotto
This is my basic formula for a risotto to accompany main courses, especially braised saucy dishes; add a pinch of saffron threads to serve with the classic osso buco Milanese. For a first or main course, see the list of
variations that follows.
SERVES 4 TO 6
1 quart chicken or vegetable stock,
homemade or good-quality store bought
1 tablespoon vegetable oil
3 tablespoons unsalted butter
1 small shallot, chopped
¼ cup minced onion
1½ cups Arborio rice
½ cup white wine
Kosher salt
¼ cup grated Parmigiano-Reggiano
Heat the stock to a simmer in a medium saucepan, then lower the heat to keep it hot.
Heat the oil and 1 tablespoon of the butter in a large, heavy-bottomed saucepan over medium heat. When the butter is melted, add the shallot and onion and sauté for 2 to 3 minutes, or until slightly translucent.
Add the rice to the pot and stir it briskly with a wooden spoon to coat the grains well with oil and butter. Sauté for another minute or so until you detect a slightly nutty aroma, but do not let the rice brown.
Add the wine and continue to cook, while stirring, until the wine is fully absorbed. Stir in 1 teaspoon of salt.
Add a ladle of hot stock and 1 teaspoon of salt to the rice and stir until the liquid is fully absorbed; lower the heat if the rice seems to be sticking. When the rice appears almost dry, add another ladle of stock and repeat the process; continue, adding ladles of hot stock and stirring the rice until the liquid is absorbed. While it cooks, you’ll see that the rice will take on a creamy consistency as it begins to release its starch.
The risotto is ready when the grains are tender but still firm to the bite, but not crunchy, which will take 20 to 30 minutes. If you run out of stock before you reach this point, add water, small ladles at a time.
Stir in the remaining 2 tablespoons butter and the cheese; taste and add more salt if needed.
Toward the end of cooking, stir in:
Sautéed or roasted wild or cultivated mushrooms, dried mushrooms, or a combination; finish with grated Pecorino Romano cheese.
Fresh tomatoes, seeded and chopped
Herbs, such as basil, thyme, and parsley
Lemon juice and zest
Fresh peas, cut asparagus, cooked artichokes, chopped greens; this is a good use for leftover vegetables
Seafood—chopped fresh shrimp, scallops, boned fish fillet. Add cooked seafood at the very end, or raw seafood when you think the risotto is about 5 minutes from finished. With this version, omit the cheese.
12. “Fried” Black and Gold Rice
My friend the chef
Bill Telepan shared this rice recipe with me. Bill is nothing short of remarkable. With a child in a New York City public school, he became involved with school lunch years before the national movement began. And if anyone knows the recipe for leadership and change, it is Bill; he helped create
Wellness in the Schools, an organization through which parent volunteers, school personnel, and local chefs are inspiring healthful eating. His passion for local food has been his signature and the flavors he coaxes to the table connect us to seasonal bounty. I love bumping into Bill on the street, in the market, or in his restaurant, usually in his chef coat and jeans; I am constantly learning from him.
Varieties of black rice are grown throughout Asia, in Japan, Indonesia, Thailand, and China, where it was once known as “forbidden rice,” which meant that no one but the emperor could have any. There also is an Italian black rice, riso Venere, hybridized with Asian strains and grown in the northern rice-growing region. Black rice is aromatic, with a nutty taste, and is more nutritious and less glutinous than white rice.
SERVES 6 TO 8
1 bunch asparagus
3 tablespoons vegetable oil
2 eggs, beaten
1 bunch scallions, white and about 1 inch green parts, thinly sliced
1 cup cold cooked black rice (see
headnote)
1 cup cold cooked Carolina Gold or brown rice
½ cup cooked peas
4 tablespoons vegetable stock,
homemade or good-quality store bought
Salt
If the asparagus are thin to medium, snap the ends; if they are fairly thick, trim the ends and, with a vegetable peeler, lightly peel the lower third of the stalks. Pour water into the bottom of a steamer and bring it to a boil. Put the asparagus in the top of the steamer, place it over the bottom, cover, and cook until the asparagus are just tender, 5 to 7 minutes, depending on the thickness of the stalks. Remove the asparagus from the steamer and set aside.
Heat 1 tablespoon of the oil in a small sauté pan over high heat. When the oil is hot, add the eggs and scramble until cooked through, 4 to 5 minutes. Chop the eggs up with a spatula and set the pan aside.
Heat the remaining 2 tablespoons oil in a large pan over medium-high heat; when the oil is hot, add the scallions and cook for 1 minute. Add the rice and peas and sauté for another minute; add the stock and cook the rice until the liquid is evaporated, about 5 minutes. Season with salt to taste and stir in the cooked eggs.
Divide the rice among four warm bowls or plates and top with the asparagus.
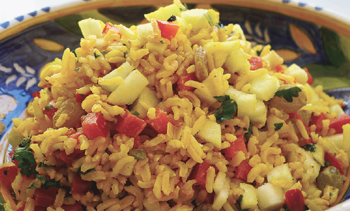
13. Brown Basmati Rice Salad
The apples, red pepper, and raisins give this dish a nice touch of sweetness, while the onion and lime juice give a sparkle of acid. See the list below for more suggested ingredients, or come up with your own. While I suggest using brown rice, this recipe works well with just about any rice you want to cook up. I love this more healthful version.
SERVES 6
1½ cups cooked brown basmati rice at room temperature
1 crisp green apple, peeled, cored, and chopped
1 red bell pepper, seeded and chopped
¼ cup yellow raisins
2 scallions or 1 medium red onion, chopped
2 tablespoons fresh lime juice
1 tablespoon canola or olive oil
2 teaspoons chopped fresh cilantro
½ teaspoon turmeric
½ teaspoon curry powder
Salt
In a large bowl, mix together the rice, apple, bell pepper, raisins, scallion, lime juice, oil, and cilantro. Season with the turmeric, curry powder, and salt to taste. Let the salad sit for a few hours before serving at room temperature.
Wild rice, white basmati, or long-grain brown rice
Quinoa substituted for rice
Chopped apricots
Pine nuts
Chopped walnuts
Pomegranate seeds
The proportions for cooking brown basmati rice are the same as for regular white rice: 2 cups water or other liquid to 1 cup rice. However, brown basmati will take longer to cook, 35 to 45 minutes.
14. Creamy White Polenta with Sage and Brown Butter
Leftover polenta can be cut into squares and then reheated in a small pan and served with maple syrup and eggs for breakfast. Or dust it with Parmigiano-Reggiano and crisp it under a broiler. Delicious.
SERVES 4
4½ cups water
1 cup coarse stone-ground white polenta, cornmeal, or grits, preferably organic
¼ cup heavy cream
¼ cup finely grated Parmigiano-Reggiano
1 teaspoon salt
¼ teaspoon freshly ground black pepper
1 cup cooking oil, such as canola or corn oil
18 sage leaves, washed and dried
4 tablespoons butter
Bring the water to a simmer in a 3- to 4-quart heavy saucepan. Add the polenta in a slow stream, constantly whisking until incorporated. Simmer, stirring occasionally with a long-handled wooden spoon, until the liquid is absorbed and the polenta is thick but still soft, about 30 minutes. The consistency will be like a loose risotto. Stir in the cream, 2 tablespoons of the Parmigiano, and the salt and pepper.
While the polenta is cooking, heat the oil in a small saucepan. When the oil is quite hot but not smoking, drop in the sage leaves for 5 to 10 seconds, or until they are crisp—this will happen very quickly. Remove the leaves with a slotted spoon, drain them on paper towels, and set them aside.
Melt the butter in another small saucepan or skillet and cook over medium heat until it is golden brown and develops a nutty aroma and flavor; take care not to let it burn.
To serve, place a portion of polenta on each plate, drizzle 1 tablespoon of brown butter over each serving, sprinkle with the remaining Parmigiano-Reggiano, and top with a few fried sage leaves. Serve immediately.
You could also try this version: Omit the oil and sage leaves; dollop 2 tablespoons of mascarpone on each serving and sprinkle with chopped flat-leaf parsley.
15. Farro Salad with Peas, Cucumber, and Chervil
Here we have a perfect mix of fresh and elegant spring flavors. This can begin a meal or be all you need at the side of fish, roasted chicken, or grilled lamb.
SERVES 6 TO 8
4 cups water
1½ cups farro
Salt
½ pound sugar snap peas, strings removed
1 English cucumber, washed but not peeled, seeded, and thinly sliced
About 1 cup cherry tomatoes, halved
1 teaspoon Dijon mustard
2 tablespoons white balsamic vinegar
Freshly ground pepper
¼ cup extra-virgin olive oil
¼ cup snipped chives, plus 1 teaspoon for garnish
¼ cup chopped flat-leaf parsley, plus 1 teaspoon for garnish
¼ cup chervil leaves, plus 1 teaspoon for garnish
Combine the water and farro in a medium saucepan. Add 2 teaspoons salt and bring to a boil over high heat. Reduce the heat to medium-low, cover, and simmer until the farro is tender,
about 30 minutes. Drain well and rinse under cold water, then transfer to a large bowl to cool.
Meanwhile, bring a medium pot of water to a boil and add a pinch of salt. Blanch the sugar snap peas for 3 minutes, then plunge them into a bowl of ice water to refresh.
Add the snap peas, cucumber, and tomatoes to the farro and toss to mix well.
Whisk the mustard, vinegar, and a few grindings of pepper together in a medium bowl; slowly drizzle in the olive oil, whisking to emulsify; add salt to taste. Pour this vinaigrette over the salad, add ¼ cup each of the chives, parsley, and chervil, and toss well.
Sprinkle the remaining herbs over the salad before serving.
When we say “emulsify” in cooking, we mean to meld ingredients together. This term is frequently applied to making salad dressings and other types of sauces that often involve fats such as butter or oil that bind themselves to other ingredients. For instance, when oil and vinegar or lemon juice are vigorously whisked together they become creamy, opaque, and stable. Mayonnaise is a classic example of an emulsified sauce; the oil is literally absorbed by the egg yolks and the result is a thick, stable sauce.
16. Dinah’s Farro with Roasted Eggplant, Red Pepper, and Olives
Dinah Herlands
Foer is my eldest niece and has been a vegetarian for several years, though from time to time she reminisces about carnivorous meals at home as a child. In a nod to sustainably raised meats (free range, drug free, humanely raised and slaughtered), she and her husband will enjoy beef, lamb, or chicken—from a source they are familiar with—on a special occasion. Otherwise, this represents a typical meal for them.
The Italian farro is nice, nutty, and a bit crunchy with the other classic Mediterranean ingredients here.
SERVES 4 TO 6
Salt
1½ cups farro
1 medium eggplant
Olive oil or cooking spray for coating
2 red bell peppers
½ cup good kalamata olives, pitted and roughly chopped
¼ cup olive oil
2 tablespoons fresh lemon juice
Grated Parmigiano-Reggiano, to finish (optional)
Shredded basil leaves, for garnish (optional)
Preheat the oven to 400 degrees.
Bring a large pot of water to a boil. Add a big pinch of salt and the farro; reduce the heat to medium and cook the farro just until tender,
about 30 minutes.
Slice the eggplant into medium-thick slices, toss with olive oil or spray both sides lightly and evenly with a vegetable cooking spray, and sprinkle with salt. Place the slices on a baking sheet and roast in oven, turning once, until nicely browned on both sides, 10 to 15 minutes.
Slice the peppers and toss with olive oil and salt. Place the slices on a baking sheet. Roast until shriveled and browned, about 10 minutes.
When the eggplant and peppers are cool enough to handle, roughly chop them, taking care not to lose their juices. Toss the vegetables with the farro and stir in the chopped olives.
Whisk the lemon juice with 4 tablespoons olive oil. Toss the farro and vegetables with ¼ cup of the dressing and let it sit for about 30 minutes before serving. Toss again with the remaining dressing, grate cheese over the salad, and sprinkle with the basil, if using.
To turn this into an entrée, add about 1½ cups cooked chickpeas, or a regular-size can, drained and rinsed, to the farro.
Crumbled feta can be used instead of the Parmigiano-Reggiano. The dish can be made ahead up to the final steps and refrigerated, then brought back to room temperature before serving.
17. Barley Risotto
The highly talented
Michael Anthony is the executive chef at
Gramercy Tavern, now nearly twenty years old and one of New York’s best and most popular restaurants. His barley risotto, shared here, is less a traditional expression of risotto and more a celebration of carrots and their sweetness. The carrots are cooked separately and layered with the barley, bound by the toasted quality of the grain and the spiced nuts. Treat yourself by using any variety of carrots you may find at the farmers’ market in fall; we find ours at the Union Square
Greenmarket.
As busy as he is as a chef and father, Michael manages to devote enormous amounts of time to working with children.
SERVES 10
4 tablespoons olive oil
1 cup minced onions
1 tablespoon plus 1 teaspoon minced garlic
2 cups pearl barley
Salt
8 to 10 cups vegetable stock,
homemade or good-quality store bought, or water
1 teaspoon peeled and minced fresh ginger
1 teaspoon toasted coriander seed
2 cups peeled and sliced carrots plus 4 tablespoons minced carrots
2 cups minced leeks, white part plus about 1 inch of green
2 shiitake mushrooms, trimmed and thinly sliced
1 tablespoon butter
3 tablespoons Parmigiano-Reggiano
2 tablespoons chopped fresh herbs (one part each flat-leaf parsley, chives, and tarragon)
Freshly ground pepper
Place a medium pot over low heat and pour in 2 tablespoons of the olive oil. When the oil is warm, add the onions and let them sweat until they are translucent but not colored. Add 1 tablespoon of the garlic and cook until fragrant, about 1 minute, then stir in the barley to coat it thoroughly with oil. Add a pinch of salt and pour in 5 cups of the vegetable stock, enough to cover the barley. Bring to a boil over medium heat, then lower the heat and simmer gently until tender, about 20 minutes.
Meanwhile, place another medium pot over low heat, pour in the remaining 2 tablespoons oil, the remaining 1 teaspoon garlic, the ginger, and coriander and sauté for 5 minutes; do not let the garlic burn. Add the sliced carrots and cook, stirring occasionally, for 2 minutes; do not let the carrots brown. Pour in 2 cups of stock, add a pinch of salt, and simmer until the carrots are tender, 5 to 10 minutes.
Transfer the carrots and the cooking liquid to a blender or food processor and puree until smooth.
Stir the 4 tablespoons minced carrots, leeks, and mushrooms into the cooked barley and simmer until tender, adding vegetable stock ½ cup at a time as needed to reach desired consistency, creamy like a good risotto, about 10 minutes. The amount of stock you use will depend on the heat under your pan, the amount absorbed by the carrots and barley as they cook, and your desired consistency. Stir the butter, carrot puree, cheese, and herbs into the barley. Season with salt and pepper to taste.
Garnish each serving with 1 teaspoon of the spiced nuts, if using.
Ground Spiced Nuts
This spiced nut mixture can be made ahead and kept in a tightly closed jar for several days. The nuts are delicious on their own—before grinding as for this dish—as a little snack as well. Makes about 2 cups.
½ cup almonds
½ cup pistachios
½ cup pine nuts
¼ cup coriander seeds
3 tablespoons sesame seeds
2 tablespoons cumin seeds
1½ teaspoons black peppercorns
1 teaspoon fennel seeds
1 teaspoon salt
Toast the nuts in a pan over low heat, stirring frequently and taking care not to let them burn, about 5 minutes, and set aside. Toast the remaining ingredients in a similar manner; the spices are ready when they release their fragrance.
When both the spices and nuts are cool, roughly grind them together in a food processor, using the pulsing button, or with a mortar and pestle, until the mixture resembles very coarse sand.
18. Late Summer Barley Salad with Roasted Portobello Mushrooms
With corn, tomatoes, and basil joining mushrooms and walnuts, this dish bridges the end of summer to early fall. If you have the time, marinate the mushrooms for a few hours before grilling and finishing the dish. This is another specialty of my niece Dinah Herlands
Foer.
SERVES 4
4 large portobello mushrooms
3 garlic cloves, minced, plus 1 whole clove
4 tablespoons olive oil, more if needed
1 to 2 tablespoons balsamic vinegar, or to taste (optional)
2 tablespoons red wine or red wine vinegar
2 tablespoons low-sodium soy sauce
3 or 4 sprigs fresh oregano
2 or 3 sprigs fresh rosemary
Salt and freshly ground pepper
Leaves from about 6 sprigs basil, plus extra for garnish
1 cup (packed) arugula
½ cup chopped walnuts
¼ cup grated Parmigiano-Reggiano (optional)
¾ cup grape or cherry tomatoes, cut in half
1½ cups cooked barley
Wipe the mushrooms clean and remove the stems. Place the mushrooms in a baking dish large enough that they are not overlapping. Combine the minced garlic, 1 tablespoon oil, vinegar, wine, and soy sauce and pour the mixture over the mushrooms. Place the oregano and rosemary sprigs under and over the mushrooms; sprinkle the mushrooms with salt and pepper and set them aside.
If the corn kernels are young and tender, they need no cooking. Otherwise, blanch them by dumping them into boiling water for 1 to 2 minutes, then refresh them quickly under cold water and drain them well.
Combine the basil, arugula, walnuts, garlic clove, cheese, and the remaining olive oil in a food processor and puree, adding small amounts of oil as needed to make a thick pesto. Season to taste with salt and pepper. Toss about half the pesto with the barley while it is still warm, then stir in the corn kernels and tomatoes.
Remove the mushrooms from the marinade and pat them dry. Grill the mushrooms over a charcoal fire or on a kitchen grill or broil them until nicely browned. Let the mushrooms sit for 10 minutes, then remove them from their cooking juices (reserve juices for another use, like stock or soup, or discard).
Arrange the barley salad on a serving platter. Slice the mushrooms and place them on the barley or serve the barley on individual plates and top each serving with a whole mushroom. Top with dollops of the remaining pesto and garnish with basil leaves.
This can be made in advance, but keep the barley and the mushrooms, along with their cooking juices, separate until you are ready to serve. If you refrigerate the components, bring them to room temperature before serving.