Above all else, the Droid 2 is about apps, apps, and more apps. Without them, the Droid isn’t much more than a glorified cellphone.
And what apps it has! The Application Tray is chock-full of them, and as you’ll see in Chapter 11, you can add countless more of your own. But right out of the box, the Droid 2 comes with a suite of remarkable apps, including a web browser, a camcorder, email software, a calendar, a photo gallery, and much more.
Many of these apps are covered elsewhere in this book, some with entire chapters devoted to them. This chapter covers road-warrior apps like Maps, Navigation, Weather, Calculator, and more.
The main way to get to your apps is via the Application Tray; to get there, tap the up arrow button at the bottom of the Home screen. You can access some apps, like the Weather widget, right on the panes. (For more details about panes, see Customizing the Home Screen and Panes.)

Google Maps on the Droid 2 is the mobile version of the renowned Google Maps website (http://maps.google.com). In fact, the Droid 2’s Maps app is even more powerful than the web version, since it can incorporate GPS information.
Type any address or point of interest in the U.S. (or many places all over the world), and you see a map. You can choose a street map, an aerial satellite photo, or a combination of the two. You can also find nearby businesses, points of interest, and traffic congestion. Maps can also give you turn-by-turn directions, even including public transportation in some cities.
Note
The Maps app on your Droid 2 may vary somewhat from what you see explained here. Google frequently updates its Maps app. The Maps app described here is the latest version as of the writing of this book. So if you have an older or newer version of Maps, it may vary from what you see.
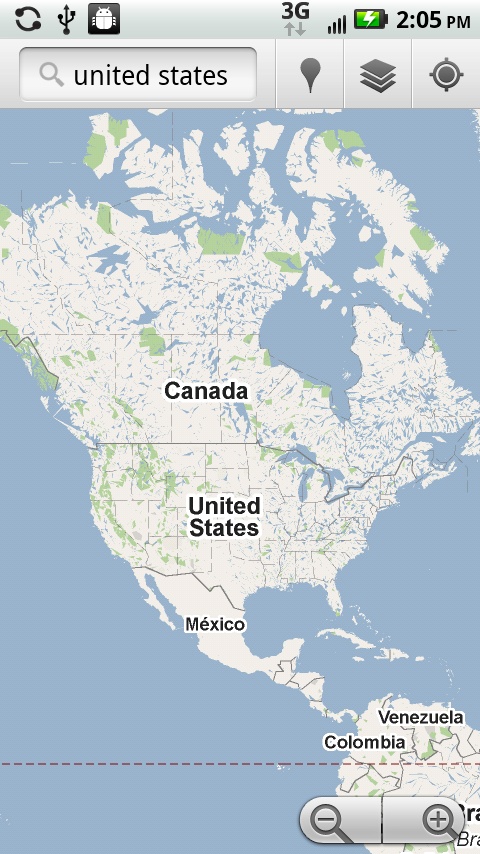
Tap the Maps icon in the Application Tray or on the Settings pane, and Google Maps launches. At first launch, if it finds your location, it shows a map of your neighborhood with a pointer to your location. If it can’t find you, you’ll likely see a map of the United States. You can get all the way down to street level. Navigate the map by dragging or flicking.
Note
If you’ve turned on your GPS, instead of displaying a map of the United States, Google Maps will most likely locate you and display a map of your current location.
Zoom out by pinching your fingers, tapping the – button, or by tapping the screen once with two fingers (the amazing, little-known two-finger tap).
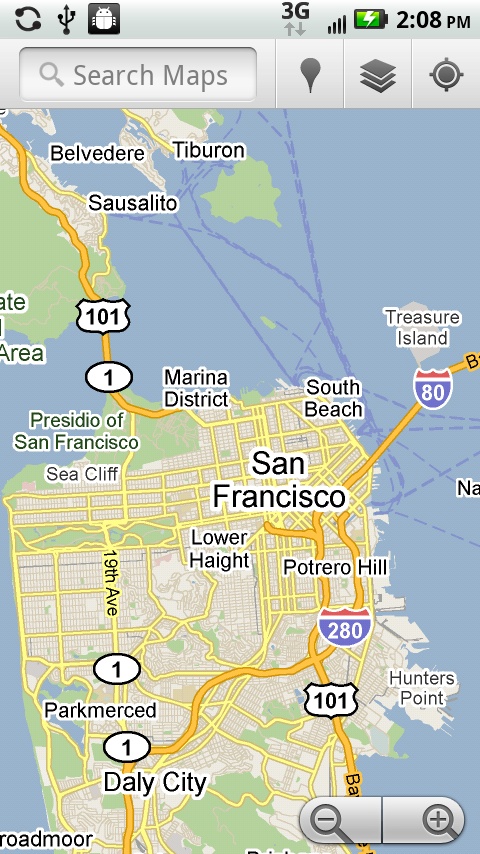
As you zoom in on the map, you’ll see locations of interest indicated—museums, libraries, schools, parks, restaurants, and so on. Tap any, and the name pops up in a balloon. Hold your finger on any, and a balloon pops up with both the address and the name.
Tap the balloon, and you come to a screen with more information, which lets you get directions to the location, search for businesses nearby, and share information about the location by email, text messaging, or direct Bluetooth file transfer.


Just being able to zoom in and out of a map down to the street level, or all the way out to the continent level, is pretty amazing. That doesn’t even begin to get at all the amazing things you can do with Google Maps, though.
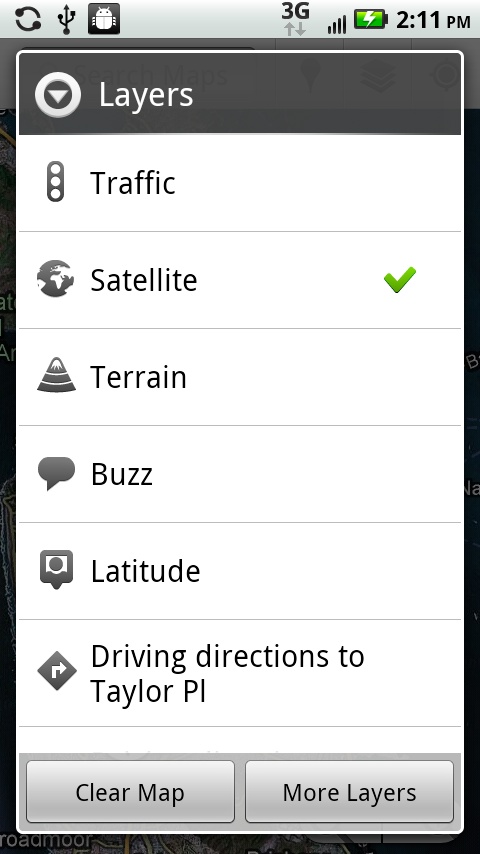
To get started, change your view of the map by using different layers. A layer is a different view, or information superimposed over a view. To change a view to a different layer, tap the Layers icon  at the top right of the screen, and you come to a menu that shows you a whole lot of choices, including a satellite view, a view of the terrain, a real-time traffic map, and so on. Your current view has a green checkmark next to it. To switch to any other view, tap it.
The satellite view is self-explanatory—it’s a satellite image of the location. As you zoom in, the photo may at first appear blurry, and it may take a little while for the photo to resolve itself, so be patient.

Note
The layers on Google Maps often change, as Google adds new information and makes deals with other companies to add their layers. So check Layers often, to see what nifty new things are in store for you.
The terrain view is reminiscent of a map in a geography textbook. It shows you a representation of an area’s elevation, forests, deserts, mountains, and so on.

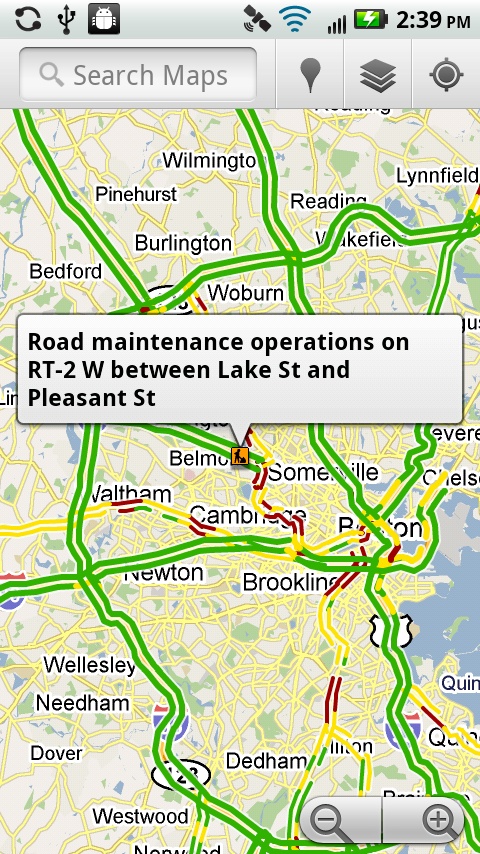
The map can show you how bad the traffic is on highways and major metropolitan thoroughfares. Turn on the Traffic layer, and, where available, the app indicates traffic congestion by the following color coding:

Note
You can help Google get more accurate information about traffic in your area. Before you start driving, enable GPS on your phone (see how below), and turn on the My Location feature (see Backup Assistant). When you do that, anonymous information about your location and driving speed is sent to Google, which uses that to help figure out the current traffic conditions.
Make sure to look for small orange icons with a symbol of a man at work. They show where there is construction or maintenance going on. Tap any of the symbols, and you get a description of the work.
You’ll find three other options on the Layers menu: Buzz, Latitude, and, if you’ve previously used turn-by-turn directions, the last set of directions you requested. Both Buzz and Latitude are Google services. Buzz is a social networking service that lets you post your current location and find out what the “buzz” is near you, and for you to post what you think the “buzz” is. Latitude lets you share your current location with your friends, and to see their locations on your Droid 2.
When you tap Layers at the top of Google Maps, down at the bottom of the screen, you’ll see a More Layers option. Tap it, and you get even more layers, some of them extremely useful, such as one that shows bike paths on a map, and another that shows transit lines. Keep checking back, because Google keeps adding new layers to Google Maps.
Google Maps’ usefulness really comes into play when it’s combined with the Droid 2’s ability to find your location. The Droid 2 finds where you are in three ways:
GPS. The Droid 2’s built-in GPS chip works just like the one in a Garmin or TomTom, although it’s not quite as accurate. (Hey, those devices only do GPS, not phone calls or games, so cut your smartphone some slack.) GPS works best when you have a good view of the sky. If not, the Droid 2 switches to one of the following two location methods.
Wi-Fi positioning. The Wi-Fi chip on your phone can do more than just connect you to a Wi-Fi network—it can also help determine your location. It does this by using information about Wi-Fi networks near you—information contained in a large database. Then, using the information about the Wi-Fi locations and your distance from them, it calculates your location. It’s not as accurate as GPS, but it still works pretty well.
Cellular triangulation. If GPS or Wi-Fi doesn’t do the trick, then the Droid 2 calculates your location based on how close you are to various cellphone towers near you. It’s not as accurate as GPS or Wi-Fi positioning, but it’s nice as a backup.
Tip
GPS and Wi-Fi can use up a lot of juice from your battery. When you don’t need them, turn them off.
Now that you know how the Droid 2 finds you, it’s time to tell it to do its tricks. You’ll need to tell the Droid 2 to find your location if you’re going to use any of its location-based services, such as giving you turn-by-turn directions.
Doing it is simplicity itself: In Google Maps, tap the location button  in the upper right; just to the right of the Layers icon Google displays a blinking blue arrow to show your location.

Note
If the Droid 2 is not exactly sure about your precise location, it draws a blue circle around the blinking arrow, to show that you may be anywhere inside that location. The larger the circle, the less certainty Google has about your location.
As you walk, drive, bicycle, or move in some other way, the blue arrow moves as well. The arrow changes direction to show the direction in which you’re moving.
Google Maps makes it easy for you to search for a business or other location. Given that Google is the premier search site on the Internet, would you expect anything less?
To search, type your search term into the search box at the top of the screen. When Google Maps finds what you’re looking for, it displays the location and shows a kind of pushpin in it.
There are countless ways to search the maps. Here are some of the most common:
Address. Just type an address, including the state or Zip code. Don’t bother with commas, and most of the time you can skip periods as well. You can use common abbreviations. So, if you type 157 w 57 ny ny, you’ll do a search for 157 West 57th Street, New York City, New York.
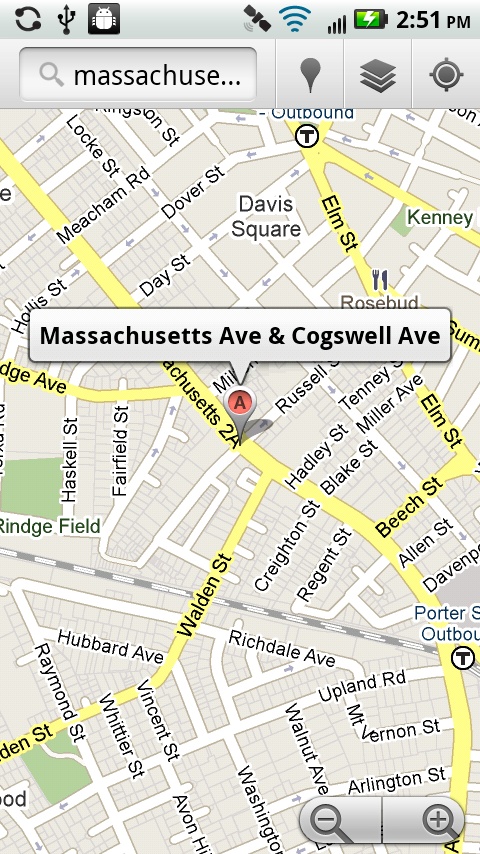
Intersection. Type, for example, massachusetts ave and cogswell cambridge ma, and Google Maps displays the location at the intersection of Massachusetts Avenue and Cogswell Avenue in Cambridge, Massachusetts.
City. Type, say, san francisco ca, and you’ll see that city.
Zip code. Type any Zip code, such as 02138.
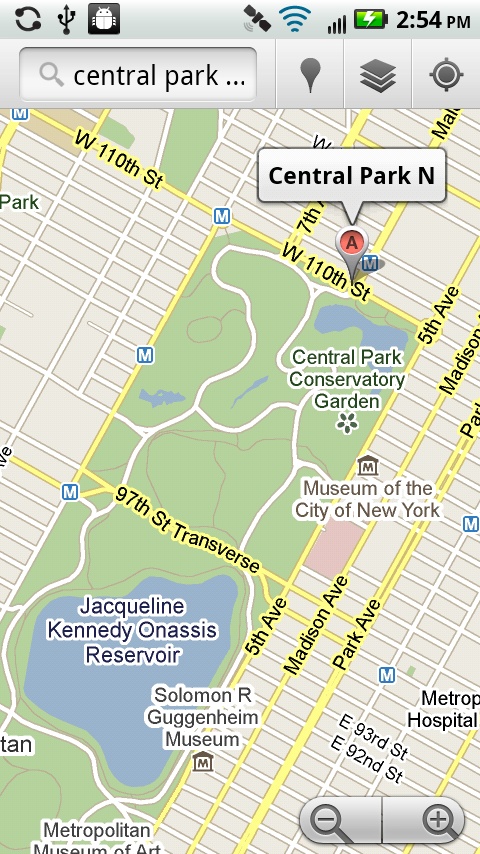
Point of interest. Type central park or washington monument.
Airport code. If you know the three-letter code, you can type, for example, sfo for the San Francisco International Airport, or bos for Boston’s Logan Airport.
When Google Maps finds the location, it marks it with a pushpin. Tap the pushpin for more information about the location, as explained earlier in this section.
Google Maps can easily find local businesses. Any business that you can find with a Google search, Google maps can find, too. But Maps can also find the home and business addresses of your friends, which it does by tying into your Contacts list.
If you want to search for a business near your current location, tap the Places icon  near the top of the screen to the left of the Layers icon. A screen appears, listing various types of businesses, such as restaurants, coffee shops, bars, hotels, attractions, ATMs, gas stations, and so on. Tap the icon of the type of business you want to display, and Google Maps will display all of those types of business near you.
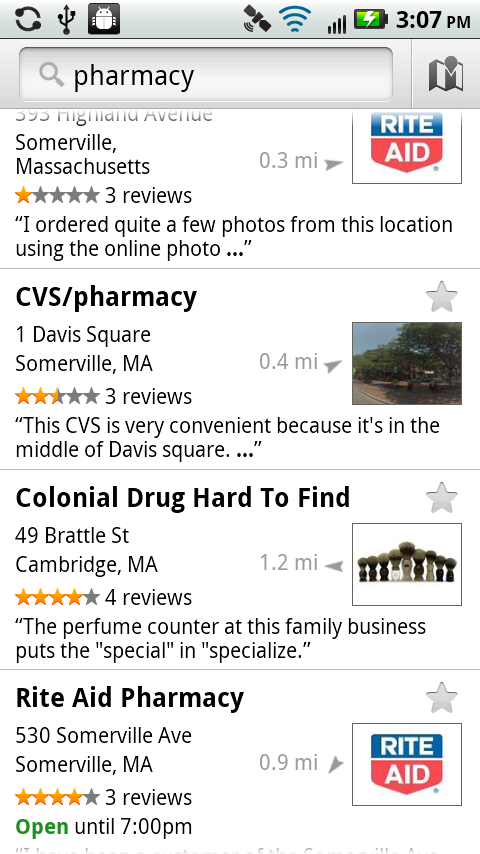
Alternately, you can do a search for a type of business by typing into the top of the screen—pharmacy, for example, or bakery.
Note
When you tap the Places icon and select a type of business to display, it displays businesses where you currently are. So, for example, if you’re in Boston but you’re displaying a map of New York City, when you tap Places and ask to display restaurants, you see a map with restaurants where you are, in Boston, not in New York City. To find restaurants in New York City, you would instead type restaurants into the search box.
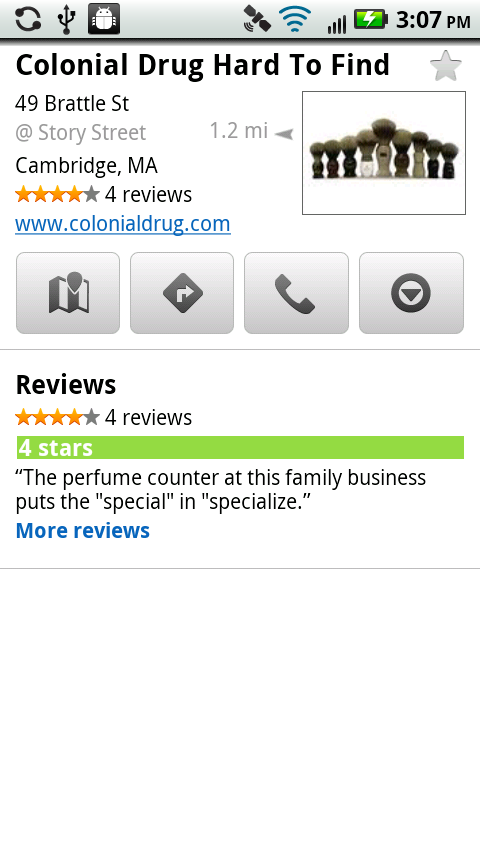
You see pushpins on the map, each of which represents a business in the area that matches your search. Tap the pushpin, and the business’s name appears above it. Tap the name, and you see far more detail about it, depending on whether the business has been reviewed by any users of Google’s content partners, such as Yelp.com. If it hasn’t been reviewed, you can share information about the location, type a Buzz about it, or add it as a contact. Tap “More information”, and you see even more reviews and details.

What if you want to see information about many of the businesses you find, not just one? Tapping them each individually gets to be time-consuming. So instead, tap the small note icon that appears on the lower-left portion of your screen. When you do, you see a summary of all the businesses nearby that match your search, along with reviews and address information. Tap any to get more information.
Note
You may notice that when you search for a business, ads sometimes appear in various locations—for example, at the top of the screen that gives you a business’s details. That’s one of the ways Google makes money out of Google Maps, by selling ads related to searches you do.
When you get details about a business, you see four buttons near the top of the screen. The leftmost one  brings you back to Google Maps and shows you the location of the business on the map; the next one
  gives you turn-by-turn directions to the business; the next one
  places a phone call to the business; and the rightmost
  brings up a menu with many more selections, including Street View, which shows you the location’s street view—an amazing piece of technology that you’ll learn more about on Street View.
What if you come across a business you like and want to be able to return to it later? Simple—when you’re viewing details about a business, look for a small gray star at top right. Tap it, and the star turns gold. You’ve just put that location on a Starred Items list so you can easily find it again. You can see the star right on the map or, to see the list, press the Menu key in Google Maps, select More, and then tap Starred Items. To take a business off the list, when you’re viewing its description, tap the gold star to turn it back to gray.
Note
Your map can quickly fill up with pushpins that become very distracting. You can delete them all in a single swoop. Press the Menu key, and then tap More→Clear Map.
Locating the address of your friend’s home or business on a Google Map is easy. You can do it, though, only if the address is in your Contact list.
In Google Maps, search for the friend’s name. If you have an address for the friend, it appears in the search results. Tap it, and you’ll see the location on a map.
You can also do it straight from the Contacts list. Find the person in your Contacts list (see Choosing from Your Contacts for details). Next to the person’s address or addresses, you see pushpins. Tap a pushpin to go to the location on Google Maps, complete with another pushpin.
You’ve heard the old cliché: Ask a Maine resident for directions, and the answer is inevitably, “Can’t get there from here.” Fortunately, Google Maps is much more helpful. Ask it the same question, and you get to choose how you want to get there: driving, walking, biking, or public transportation. Google provides directions for all four, or as many as it can find. (Not all types of directions are available to all places, but you’ll have more choices in major metropolitan areas.)
You can get directions in many places throughout Google Maps, and throughout the Droid 2, because that capability is embedded very deep in the phone. So expect to find directions in many different places. For example when you search for a business, find the location, and look at the page that gives you information about the business.
One surefire way to get directions anywhere in Google Maps: Press the Menu key, and then tap Directions. A screen appears, with a starting point, ending point, and icons for finding directions via car, public transportation, bicycle, and on foot.
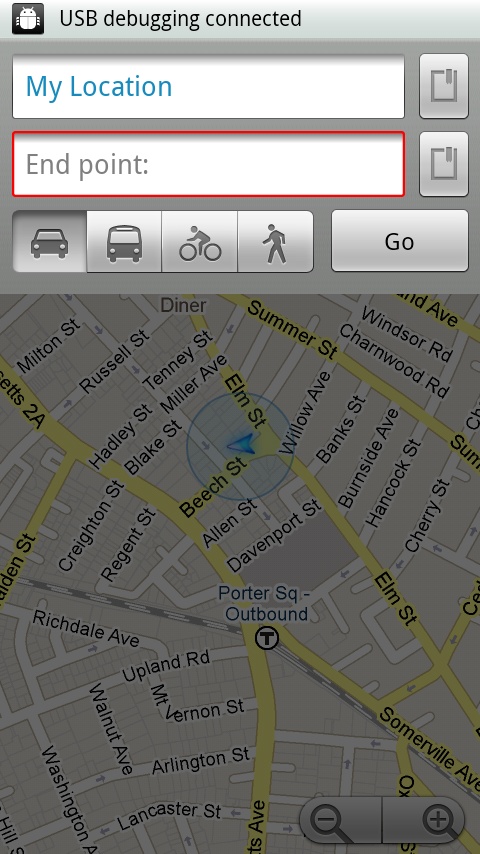
If the Droid 2 knows your current location, it uses that as the starting point, and puts the words “My Location” in the starting point box. If you want a different starting point, type an address into the My Location box, or instead tap the little icon to the right of the box . If you tap the icon, you can choose to have Google Maps use your current location as a starting point, to tap a point on the map to be your starting point, or to create a starting point from an address in your Contacts list.
Next, choose your destination—what Google Maps calls an end point. As with the starting location, you can type a location, or else tap the icon and choose an endpoint on the map, your current location, or a contact’s address.
Once you’ve set the starting and ending points, you’re ready to go. Tap which kind of directions you want, and then tap the Go button. You see a summary of your starting point, your ending point, the distance, how long it’s expected to take, and turn-by-turn (or step-by-step) directions of how to get there.
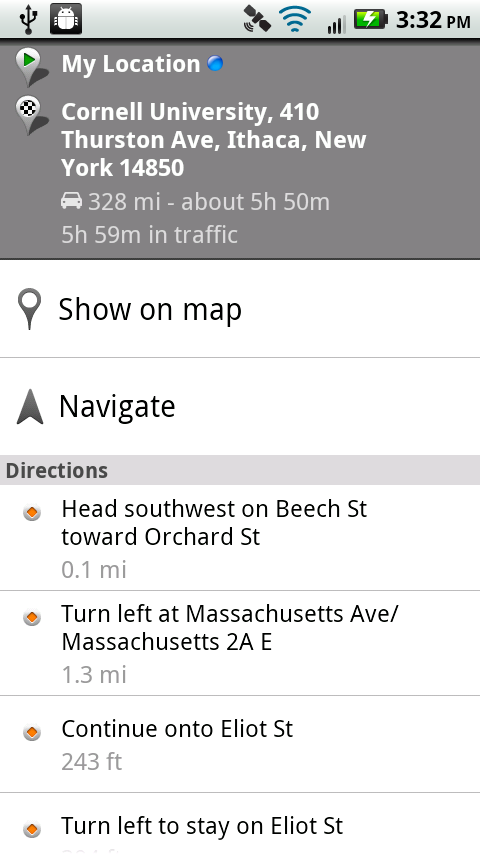
This example uses driving directions, but the other types of directions work much the same way. You can scroll through the entire list of directions, or view them section by section on the map instead. Tap “Show on map”, and you see your starting point, the route you’ll take, and the first few directions. You can zoom in and out in the usual ways.
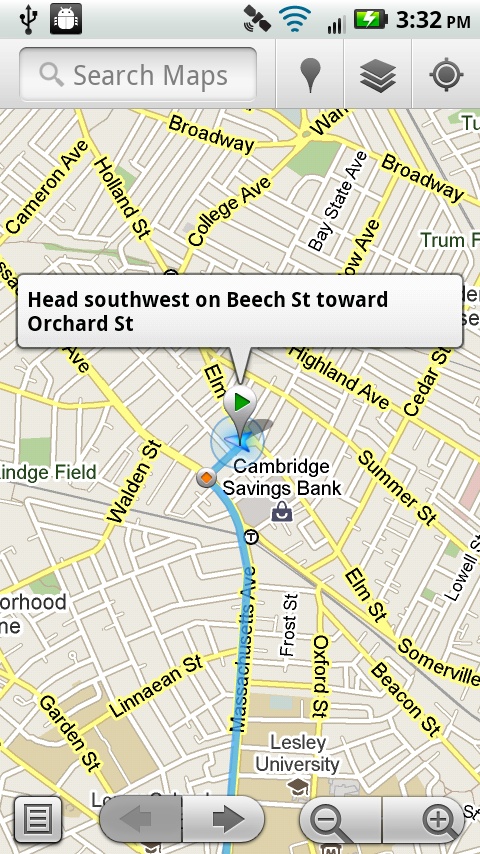
Tap the arrow buttons  to get to the previous or next driving instructions. You can also return to your master list of instructions by tapping the note icon
  in the lower-left portion of the screen. In this way, you can switch back and forth between your overall directions and your current one. When you’re looking at the list of overall directions, tap any instruction, and you’ll see a close-up of the directions on the map.