Chef vs street – how do you chop an onion?

One of the first techniques that I mastered in the kitchen was how to chop an onion. As the onion is economical, full of flavour and present in every recipe on the planet, I’d advise you to do the same.
From a very serious and very French manual, I learned the classic way of chopping an onion according to the rule book and, indeed, it works very well.
But one day, watching a video on YouTube, I learned another method used by streetfood sellers in India. I felt as though I’d received a slap in the face. This method is certainly less precise but much quicker (although, until you’ve got the hang of it, take it easy and watch your fingers).
I love it when everyday cooking gets one over on chef cuisine. It makes me happy. Here are the two techniques for you to decide which one suits you best.
The traditional method
For this technique, you will need any chef’s knife or paring knife.
Cut the onion in half, remove the skin and lay one half, cut side down, so it is flat with the root away from you.
Make vertical cuts down the onion half. This is when you determine how thick your chopped pieces will be.
Make two horizontal cuts across it (sounds daft to me but, as they mention it, I’ve added it here).
Turn the half onion 90 degrees so the root is on the left (I’m a rightie).
Chop it, with your fingers tucked under (like a claw) so they are away from the knife blade.
When the half becomes unstable (too tall and with a narrow base), flip it on its side and continue chopping until only the root itself remains. Repeat with the other onion half.
The streetfood method
For this technique, you will need a very sharp knife with a long, straight, thin blade.
Slice off a big piece at the top of the onion and a smaller piece at the base. Remove the skin. The onion must be able to stand upright on its root.
Run the knife blade down top to bottom through one half of the onion to make 4 or 5 vertical slashes but without going as far as the root. The idea is to use the length of the knife so that the tip stops as it touches the chopping board.
Spin the onion 90 degrees and do the same again on the other side.
The onion is still upright but is now scored into small dice. Let it fall on its side so it flattens out a bit and chop the rest.
When you reach the root, lie it flat and chop that as well.
This method requires more practice to perfect but when you have kilos of onions to chop, it is devilishly efficient.
Be warned: my way of cooking steak is a bit of a pain. Having said that, the end result is beyond epic. It involves using state-of-the-art culinary techniques like sous-vide and temperature control... But, don’t panic. It’s me and I promise I’ll keep it cheap, fun and easy. Let’s do it!
Everyone knows how they like their steak but fewer know that it’s all down to the core temperature of the meat. Rare steak is 54ºC [130ºF], medium rare 57ºC [135ºF], medium 60ºC [140ºF] and well done 65ºC [149ºF]. The problem is that if you cook a steak the classic way, either under a grill [broiler] or in a frying pan [skillet], its temperature rises very fast so, to ensure the steak is cooked how you like it, you have to guess when to remove it from the heat. GUESSING! Do this too early and it will be underdone; a bit too late and it will be over.
Even if you manage to get it right, there is another problem you only discover when you slice your steak. Take a look! The doneness you want is only in the very centre. Between that and the crust, the rest of the meat (what I call the gradient) isn’t right at all. My mission is to get rid of this gradient and have a perfectly cooked steak all the way through.
To do this, I use a cheat’s controlled-temperature cooking technique called sous vide or – avoiding ‘chef-speak’ – vacuum packed and for this you need an ice box. This brilliant insulator is perfect not just for keeping food fresh but also for keeping it warm for a long time and, believe it or not, it’s spot on for cooking steak. Something else you’ll need is a digital meat thermometer, which you can pick up from a kitchen store or online fairly cheaply.
Now, take your nice thick steak and put it in a ziplock bag with a bit of butter and a sprig of thyme. Tuck the end of a straw into the bag alongside the steak and seal the bag so it is almost closed. Suck the air out through the straw, then remove the straw and seal the bag completely. As the bag is in close contact with the steak this will ensure more even cooking.
Fill the bath of the ice box with warm water. As the water will lose 1–2 degrees’ heat per hour, I recommend that you have the water temperature slightly higher than the meat temperature you’re aiming at. Put the sealed bag in the warm water along with the probe of the meat thermometer and close the box lid tightly.
From now it should take about 2 hours to cook your steak if it’s 5cm [2in] thick or 1 hour if it’s 2.5cm [1in] thick. Check the temperature displayed on the thermometer occasionally to make sure it’s stable. If it needs adjusting, add a bit of hot water to the bath. The bigger the ice box, the more stable the temperature will be. The obvious but amazing consequence of cooking a steak like this is that the temperature cannot go higher than the starting temperature of the water, so the steak will never be overcooked. On the other hand, don’t leave it in for more than 3 hours and when it’s done, get it out of the bath.
When you remove the steak from the bag I admit it will look pretty miserable and lacking something crucial – a succulent, brown crust – but 1 minute on each side in a frying pan over a very high heat will soon fix that.
Slicing a steak cooked in this way is a thing of beauty. No gradient but beautiful pink meat, stretching from one caramelized crust to the other, that’s incredibly juicy. There will be no going back…
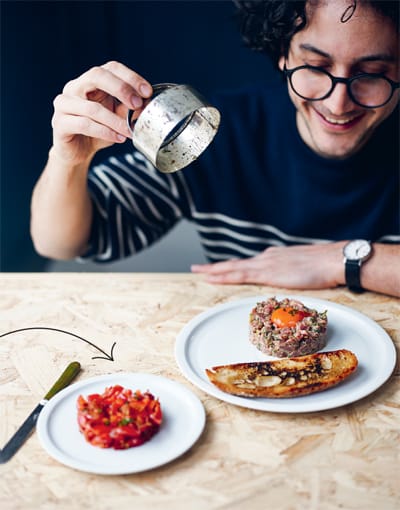
Terrifyingly terrific steak tartare
OK, I know this dish isn’t for everyone. Not only does it contain raw beef as Italian carpaccio does but also raw egg yolk like homemade mayonnaise and proper chocolate mousse so it comes with all the potential risks associated with those. This hasn’t prevented me from making steak tartare at home from time to time. How come? I source the very best ingredients money can buy and, as my butcher is a close friend, he advises me on which meat to choose. So, does that eliminate all the risks? Nope, but I’m hooked. It’s too good.
Serves 2
2 small gherkins [pickles]
1 Tbsp capers
1 small shallot
1 anchovy fillet
1 Tbsp each of fresh chopped parsley and chopped chives
100g [3½oz] highest-grade fresh sirloin steak, refrigerated
1 tsp each of mustard and tomato ketchup
a few dashes of Worcestershire sauce
sea salt flakes, freshly ground black pepper and a few drops of Tabasco
2 organic egg yolks
Finely chop the gherkins, capers and shallot and mash the anchovy fillet. Place in a bowl and mix in the chopped parsley and chives.
Take the steak out of the refrigerator and cut it into very thin slices, trimming off any fat or sinew. Stack the slices on top of each other and cut them into really small dice.
Add the diced steak to the bowl, along with the mustard, ketchup and Worcestershire sauce. Season with the salt, pepper and Tabasco. Mix everything together lightly but thoroughly. Divide in two.
Place a large, round cookie cutter, or just a piece of double foil folded into a ring (long live DIY!), on a serving plate and press one portion of the mixture into it to make a patty. Carefully remove the cutter or foil ring and place the egg yolk on top to serve.
VEGAN ALTERNATIVE?
Are you outta your mind? Probably, but try this. Leave out the egg and anchovy, add vegan mayonnaise, and replace the meat with a mixture of chopped cherry tomatoes, sun- dried tomatoes and red (bell) peppers, pretty tasty alternative, minus the muscle.
Rare? No thanks... Most of the bacteria in a steak is on the surface, which is why, after the outside has been well seared, it is acceptable indeed recommended to eat the steak rare. But when it comes to a burger, the process of mincing the steak mixes the bacteria that was just on the outside all the way through the meat. Also, eating a burger rare will be like licking a piece of raw barbak. Yum. ‘Barbak’ is a slang word we French guys use for meat... I have to confess it’s not very polite. I will make an exception for steak tartare, though...
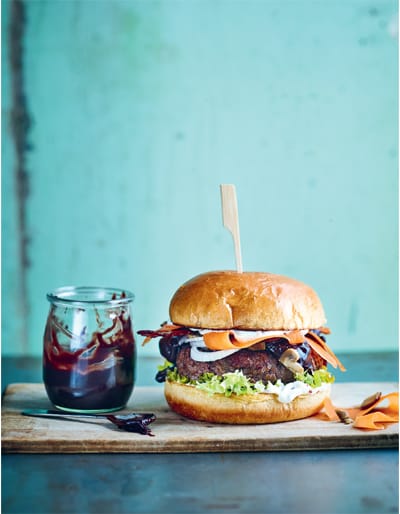
There is something truly wonderful about a mouthful of good burger. Crusty, soft, juicy, fresh, caramelized, salty, sweet, tangy... Every taste sensation bursts into life at the same moment. And, if you add a sauce made with red wine too, it’s paradise.
Serves 1
½ carrot
a little juice from a jar of pickles
2 medium shallots
salt and pepper
oil
3 glasses of red wine
a pinch of sugar
1 beef stock [bouillon] cube, crumbled
1 tsp butter
1 tsp plain [all-purpose] flour
125g [4½oz] minced [ground] steak, shaped into a burger
1 rasher [slice] of bacon
3 button mushrooms
a drizzle of vinegar
1 burger bun, split in half
1 Tbsp mayonnaise mixed with a pinch of chilli flakes
1 lettuce leaf
Using a speed [swivel] peeler, peel the carrot and shave into thin slices. Put the slices in a small bowl and spoon over a little juice from your jar of pickles in your refrigerator. Set aside while you prepare the rest of the recipe.
Peel and slice the shallots into thin rounds. Set one or two rounds aside. Season the rest and add to a saucepan with a little oil. Fry for a few minutes over a medium heat. Add the wine, sugar and stock cube and season with pepper. Leave to reduce over a medium-low heat for 30 minutes, stirring from time to time. Thicken the sauce by mashing the butter and flour together until smooth and whisking this into the sauce. Bring to a gentle boil, taste and season with salt, if necessary. Cool and chill until needed.
Season the burger and brush on both sides with oil. Cook in a frying pan [skillet] over a high heat for 2–4 minutes on each side (depending on how thick it is). Remove from the pan and set to one side covered. Fry the bacon and mushrooms in the pan for a few minutes, remove, finely chop the mushrooms and set to one side. Add a drizzle of vinegar to the pan, stir to incorporate the juices sticking to the bottom of it and add this liquid to the wine sauce.
Quickly toast the burger bun and spread lightly with the spiced mayonnaise. Place the base of the bun on a plate or board and layer ingredients on top in the following order: lettuce leaf, burger, raw shallot slices, chopped mushrooms, 1 tablespoon of red wine sauce, bacon and pickled carrot slices. And more spiced mayonnaise if you like. Top with the lid of the bun.
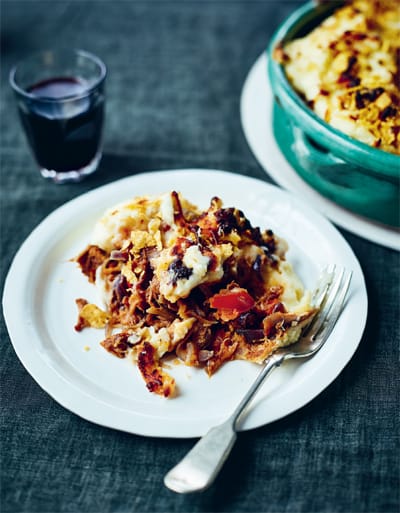
The purpose of this dish is to transform mashed potato and barbecue leftovers into something special. In fact, knowing how to make the most of leftover food is essential for anyone wanting to budget efficiently and, above all, not to waste any of the fresh produce they’ve chosen with such care.
Serves 4
400g [14oz] pulled pork or any another slow-cooked meat
2 red onions
2 garlic cloves
2 Tbsp oil
2 tomatoes, diced
1 Tbsp plain [all-purpose] flour
salt and pepper
1 egg, beaten
melted butter, for greasing
800g [1lb 12oz] mashed potatoes
100g [3½oz] tortilla [corn] chips, crushed into crumbs
50g [½ cup] grated cheese, e.g. Cheddar, Parmesan
Preheat the oven to 220ºC/200ºC fan/425ºF/Gas 7.
Chop the meat into very small pieces. Peel the onions and garlic cloves and chop those as well.
Heat the oil in a frying pan over a medium-high heat and fry the onions and garlic for a few minutes. Add the diced tomatoes and the chopped meat.
Sprinkle over the flour and season with salt and pepper, if necessary (salt might not be needed if the meat has already been well seasoned). Stir to mix in the flour, turn down the heat to low and cook for about 10 minutes. Take the pan off the heat and stir in the beaten egg.
Brush an ovenproof dish with butter, spoon the meat mixture into it and cover with the mashed potatoes. Sprinkle the crushed tortilla chips and the grated cheese on the top. Bake for about 15 minutes or until the top is golden brown.
Just so you know...
‘Hachis’ is the French word for meat that has been minced or finely chopped and ‘Parmentier’ is the name of the guy who imported the first potato into France.
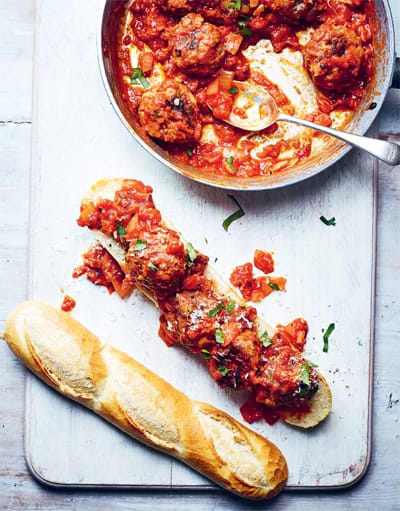
So, you think you can make a good meatball with only minced beef? Well, think again. It’s all about getting the mix exactly right as you need to add pork, veal, bread, cheese... anything to make the meatballs juicy and melt-in-the-mouth. If you don’t, not only will your meatballs be the same size as golf balls, they’ll have the same texture as well and you don’t want that, do you?
Makes about 20 meatballs
4–6 slices of white bread
milk
oil for frying
1 onion, very finely chopped
2 garlic cloves, crushed
400g [14oz] minced [ground] beef
150g [5½oz] minced [ground] pork
1 egg, beaten
50g [½ cup] finely grated cheese (pecorino or Parmesan)
flour for dusting
Serving suggestion
baguette
tomato sauce
fresh basil leaves
Dice the slices of bread, place in a bowl and pour over enough cold milk to cover. Soak until the bread is saturated and then squeeze out the excess milk. Heat a little oil in a frying pan over a medium heat, add the onion and garlic and fry until they are starting to brown.
Transfer the onion and garlic to a large bowl. Add the beef and pork, the bread, beaten egg and cheese. Knead well with your hands (if you don’t fancy doing this, wear rubber gloves) – it is important to obtain a good, sufficiently damp, texture otherwise the meatballs won’t work.
Shape the mixture into golf ball-size balls and dust them with flour. Heat oil in a frying pan and fry the meatballs in small batches over a medium-low heat. Allow about 20 minutes for this but, to double check the meatballs are done, cut one in half. It must be firm and cooked all the way through.
If you like, fill a small baguette with some of the meatballs, tomato sauce and basil, and tuck in.
Perfectionist or control freak?
Made this way the meatballs will flatten a little when you fry them but, for the perfectionists among you, if it’s going to keep you awake at night I feel your pain, you can ensure they remain perfectly round by poaching them first for a few minutes in a pan of simmering water.
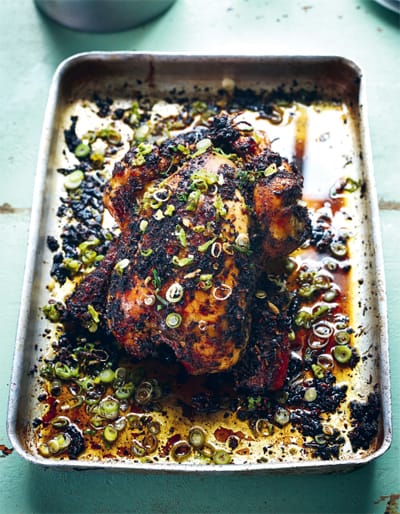
This recipe pays tribute to Jamie Oliver’s Empire Roast Chicken, which itself is a celebration of multicultural Britain. Hats off to you, Jamie!
Serves 4
For the five-spice powder
(Any leftover powder you make can be stored for several months in an airtight container away from light and heat. Also, I shouldn’t say this but feel free to use a ready-made five-spice mix if you need to: better one that’s done rather than none at all.)
1 Tbsp Sichuan peppercorns
5 whole star anise
1 tsp whole cloves
1–2 cinnamon sticks, depending on size
1 Tbsp fennel seeds
For the wet rub
4 spring onions [scallions], white and green parts separated
3 Tbsp neutral flavoured oil
2 garlic cloves, crushed
2.5-cm [1-in] piece of root ginger, grated
3 Tbsp light soy sauce
1 Tbsp rice vinegar or apple cider vinegar
1 Tbsp brown sugar
1.5kg [3lb 5oz] higher welfare chicken
1 tsp cornflour [cornstarch]
350ml [1½ cups] chicken stock
salt and pepper
For the five-spice powder, roast the whole spices in a dry pan over a high heat until they smell fragrant. Bash them to a powder with a pestle and mortar.
For the wet rub, finely chop the white parts of the spring onions and the green parts of two of the onions. Heat the oil in a pan over a medium-high heat and fry the chopped onions until golden. Strain, reserving the aromatic oil, and set the fried onions on kitchen paper [paper towels]. Mix the strained oil with the garlic, ginger, soy sauce, vinegar, sugar and 2 tablespoons of the five-spice powder to make a paste.
Cut deep slashes in the chicken legs and rub all over with three-quarters of the spice paste. If you wear rubber gloves to do this it’s less messy but also less fun. (Oh, these sassy French.) Put the chicken on a plate, cover with clingfilm [plastic wrap] and marinate in the refrigerator for at least 2 hours. Remove from the fridge 30 minutes before cooking.
Preheat the oven to 200ºC/180ºC fan/400ºF/Gas 6. Sit the chicken on a grill rack in a roasting pan, pour a glass of water into the bottom of the pan and roast for about 1 hour 30 minutes. While the chicken is roasting, put the remaining spice paste in a pan over a low heat. Mix the cornflour with the chicken stock and add to the pan. Bring to the boil, stirring, then simmer over a low heat until the mixture reduces to a syrupy sauce. Taste and season with salt and pepper.
Take the chicken out of the oven and push a knife into the flesh between the legs and the breast – the juice that runs out must be clear, not pink. If it is clear, the chicken is cooked! Cover it with foil and several tea towels [dish cloths] and leave to rest for 15 minutes. Serve the chicken with a flourish at the table, accompanied by the sauce. Finely slice the remaining green parts of the onions and sprinkle over the chicken with the fried onions.
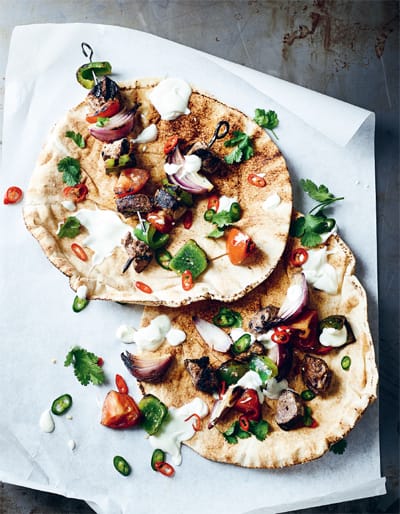
Street lamb shish kebab
A kebab, bought and eaten in the street, conjures up extreme emotions. If it’s well made, the combination of spices and grilled, juicy meat, will transport you to seventh heaven. If it’s badly made, it will be an urgent invitation to the nearest loo. You can’t get much more extreme than that.
Makes 6 kebabs
300g [10½oz] lean lamb, ideally from the leg
1 brown onion
215g [1 cup] natural full-fat yogurt
juice of 1 lemon
salt and pepper
1 tsp ground coriander
1 tsp ground cumin
1 tsp chilli powder
1 large tomato
1 green [bell] pepper
1 red onion
Serving suggestion
flat breads
yogurt
sliced chillies
Cut the lamb into flattened cubes (it’s a brand new geometric shape, surely you know that?), about 2 × 2 × 1cm [¾ × ¾ × ½in]. Chop the onion and blitz with the yogurt, lemon juice, salt, pepper and spices in a blender until you have a smooth paste.
Spoon the lamb pieces and yogurt paste into a ziplock bag, seal the bag and mix and knead the two together. Leave to marinate in the fridge overnight or, failing that, for at least 2 hours, in which case knead the contents of the bag frequently (this makes up for the shorter marinating time).
Cut the tomato, green pepper and red onion into chunks the same size as the meat.
Thread the meat, tomato, pepper and onion alternately onto skewers and cook the kebabs on a griddle pan over a medium-high heat or, better still, grill them on a barbecue – 5–8 minutes should do it – turning them over from time to time.
Serve the kebabs with flat breads, yogurt and chillies. My mouth’s watering just thinking about it.
Mussels marinière without the mussels
‘Moules marinières’, mussels cooked in a white wine and shallot sauce, is a classic French dish. It’s tasty, cheap, cooks in less than 10 minutes and is totally sustainable – so let’s do it. Except, let’s not. Don’t be square, that technique works fantastically well with any other small shellfish, like clams, for example!
Serves 2
5 shallots
2 garlic cloves
small bunch of fresh parsley
1 stick of celery
2–3 bay leaves
a few sprigs of fresh thyme
a few sprigs of fresh rosemary
1kg [2lb 4oz] fresh clams in their shells
1 Tbsp butter
about ½ bottle of acidic dry white wine, e.g. Muscadet, Sauvignon Blanc (or use a light beer or apple cider. If you don’t want to use alcohol, add vegetable stock with a drizzle of vinegar instead – your dish will still be amazing)
salt and pepper
3–4 Tbsp double [heavy] cream
Finely slice the shallots and crush the garlic cloves. Remove the leaves from the parsley and celery stick, chop them and set aside separately.
Tie the parsley stalks, the celery stick (cut into shorter lengths), bay leaves, thyme and rosemary together in a bundle with cook’s string. Scrub the clams with a small brush in plenty of cold water to remove any dirt or sand, discarding any that have broken shells or that are open and do not close when lightly squeezed.
Heat the butter in a very large saucepan and when it has melted, add the herb bundle first and fry for a minute or so to infuse it with the butter, and then add the shallots and garlic – the fresh herbs pimp and pump up the flavours of the dried ones. Fry until the shallots have softened, then add the wine (or whatever liquid you’re using) and bubble so the wine reduces a bit. Season with salt and pepper.
Tip in the clams and celery leaves. Put a lid on the pan and cook until all the clam shells have opened, stirring once or twice. Discard any that remain tightly closed. The cooking time for the clams will depend on their size. Small ones (which taste so good) will open in 3–4 minutes; larger ones can take longer. Stir a couple of times while they cook to ensure those at the bottom don’t open before the ones on top. When the clams are ready, I like to add a dash of cream. It’s not classic, I know, but, honestly, I couldn’t care less. Haha.
Remove and discard the herb bundle and then sprinkle in the chopped parsley. Pile the clams into serving dishes and ladle over the sauce. The flavours of the dish will be intense with the clams, shallots, butter and cream adding richness and the herbs freshness. Serve the clams on their own or with French fries on the side. And the rest of the bottle of wine.
I came across this scallop recipe while travelling through Northern Ireland and loved its simplicity, its rich and nutty taste and the fact that it used rapeseed rather than olive oil. Today, lots of people use olive oil in everything. It’s certainly very good but I think: (1) its distinctive flavour doesn’t work in EVERY dish and (2) there are lots of different and delicious oils out there just waiting to be discovered!
Serves 4
6 large sushi-grade scallops, corals removed
salt and pepper
1 lemon
3 Tbsp rapeseed [canola] oil
3 Tbsp chopped toasted hazelnuts
finely chopped fresh parsley sprigs
Cut the scallops horizontally into very thin slices, about 3mm [ in] thick. Season and divide the slices between 4 serving plates, overlapping them so they look nice.
Finely grate over a bit of lemon zest, but not too much, and squeeze over a little of the juice. Drizzle with the oil and scatter the hazelnuts and chopped parsley on top.
Serve at once.
Salmon, avocado and pickled beetroot rice bowl
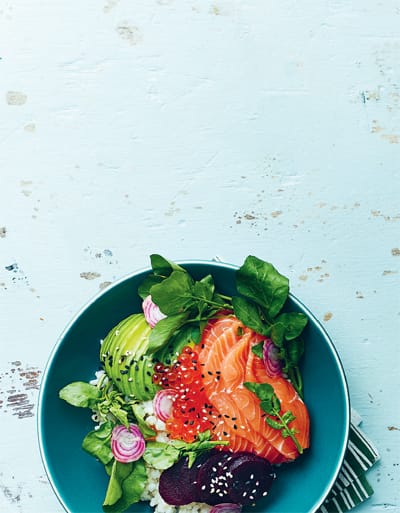
This recipe is the ideal excuse for learning how to cook rice for sushi. It’s also super–easy and looks great. So, what’s not to like?
Serves 2
For the rice and seasoning
190g [1 cup] short grain rice
300ml [1¼ cups] cold water
75ml [1/3 cup] rice vinegar
50g [¼ cup] sugar
1 tsp salt
For the toppings
200g [7oz] sushi-grade salmon fillet, skinned
1 small pickled beetroot [beet]
1 avocado, peeled and pitted
¼ bunch of watercress
2 Tbsp salmon roe
a sprinkle of black and white sesame seeds
Put the rice in a fine-mesh strainer or colander and run cold water through it until the water runs clear. Transfer the rice to a rice cooker, add the measured water and cook the rice according to the manufacturer’s instructions. If you like rice but you don’t have a rice cooker (a bit hard to believe), go and buy one now.
Place a saucepan over a low heat, add the vinegar, sugar and salt and heat, stirring regularly, until the sugar and salt have dissolved.
When the rice is cooked, spread it out carefully in a large, deep dish so it will cool quickly, and spoon the vinegar mixture evenly over it. Mix the rice gently with a spatula so you don’t crush or break the grains. As soon as the rice has cooled, it’s time to prepare the dish.
The rest is all about making it look good! Fill 2 serving bowls with the rice. Prepare the toppings by cutting the salmon, beetroot and avocado into thin slices. Divide the watercress into small sprigs, removing and discarding any yellow leaves and tough stalks. Arrange the salmon, beetroot, avocado and watercress sprigs over the rice and top each bowl with a tablespoon of salmon roe. Sprinkle with black and white sesame seeds. If you’re rubbish at making things look pretty, go to Pinterest and check out ‘Chirashi Bowl’.
For the recipe below, turn the page.
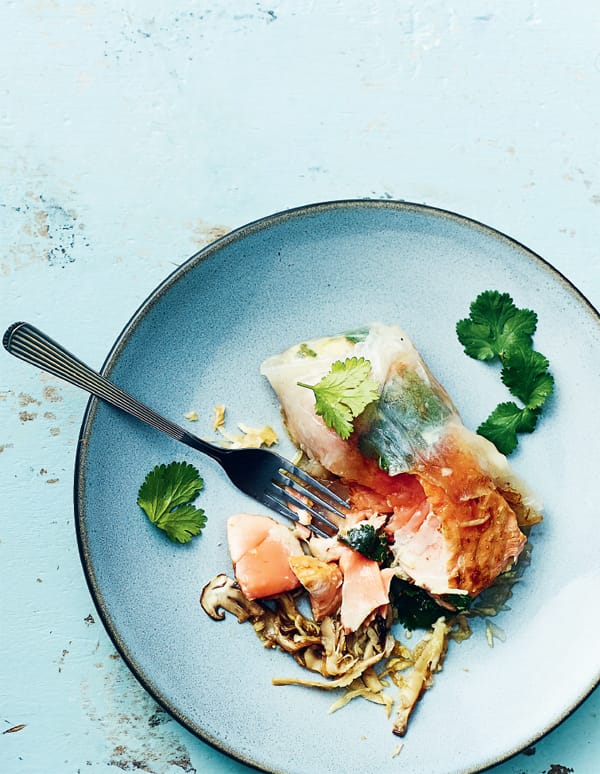
Fish fillet and tender vegetables in a rice wrapper
Cooking fish ‘en papillote’ (in a foil or paper parcel) conserves and even enhances all the flavours. The fish cooks slowly in the sealed parcel and the vegetables and herbs infuse its flesh. So far, so good, but the foil or paper wrapped around the fish is then thrown away. In my recipe, you can eat the wrapper as well. How come...?
Serves 1
3 rice wrappers
2 Tbsp grated white cabbage
2–3 mushrooms (depending on size), cut into thin strips
2 Tbsp bamboo shoots
175g [6oz] salmon or trout fillet, skinned
salt and pepper
a few sprigs of fresh coriander [cilantro]
1 tsp finely chopped root ginger
a few drops of sesame oil
a drizzle of olive oil
a drizzle of soy sauce
Soften the rice wrappers by dabbing them with a damp cloth or dipping them briefly in warm water. Place the wrappers on a board in a flower pattern so they overlap nicely.
Put the grated cabbage, mushrooms and bamboo shoots in the centre. Season the fish fillet well and place on top of the vegetables, then add some sprigs of coriander and some ginger. Drizzle over the sesame oil, olive oil and soy sauce. Fold the rice wrappers around the filling, making sure the packet is airtight.
If you don’t have a proper steamer, it’s not a problem – I don’t have one either. So, DIY time! Screw up 3 sheets of foil into equal-size balls, each about the size of a clementine. Place these in a large saucepan and cover them three-quarters with water. Stand a small heatproof plate on top of the foil balls – the plate must not touch the sides of the pan. DIY steamer done! As an added bonus, it needn’t only be used for fish in rice wrappers.
Rub the plate with a piece of oiled kitchen paper [paper towel] and then put the fish parcel on top. Cover the saucepan with a lid, place over a high heat and leave to cook for about 10–15 minutes.
It’s very important to remember:
Taste is not the only thing that matters in life. At the table, don’t neglect either the presentation or the drama as it’s the eyes that feast first.
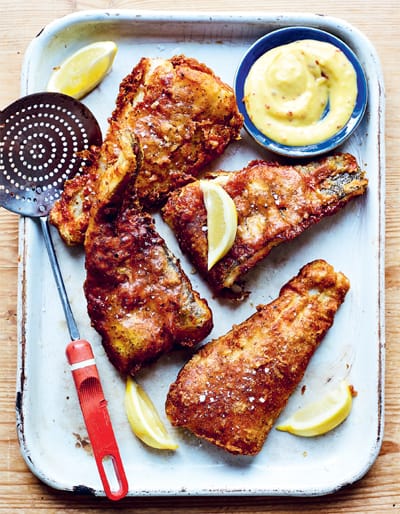
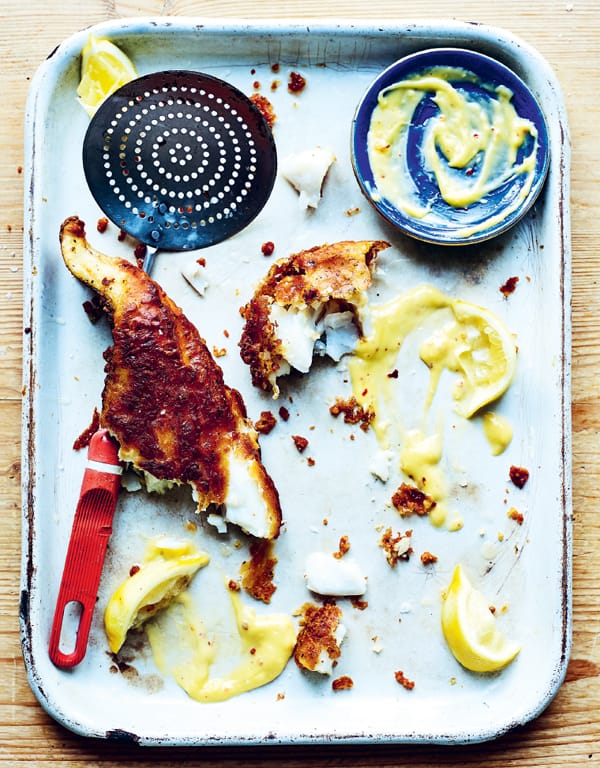
An unforgivable French take on fish ‘n’ chips
You have to do it at least once: the best fish ‘n’ chips are eaten in the street in London, on a bench that’s too narrow, surrounded by deafening car horns, in the pouring rain, with greasy hands and steamed up glasses. But, if that experience doesn’t appeal, you can also cook fish ‘n’ chips at home.
Serves 4
For the sauce
2 garlic cloves, crushed
1 egg yolk
salt, to taste
1 tsp mustard
75ml [1/3 cup] neutral flavoured oil, e.g. rapeseed [canola], groundnut [peanut]
75ml [1/3 cup] olive oil
finely grated zest and juice of ½ lemon, plus extra lemon wedges to serve
pinch of chilli flakes
For the batter
225ml [1 cup] beer (I use a light or pale ale)
100g [1 cup] cornflour [cornstarch]
60g [½ cup] plain [all-purpose] flour
1 tsp salt
1 tsp pepper
2 Tbsp dried Mediterranean herbs, e.g. oregano, thyme, herbes de Provence
1 tsp bicarbonate of soda [baking soda]
For the fish
4 × 175g [6oz] fish fillets, about 1cm [ in] thick at the tail end and 2cm [¾in] at the top – you can use cod, haddock or another white fish. I even made the recipe once with monkfish and it was great but, whichever fish you choose, make sure you go for one with an MSC certificate.
cornflour [cornstarch] for dusting
groundnut [peanut] oil for deep-frying
For the sauce, put the crushed garlic, egg yolk, salt, mustard and lemon zest in a bowl. Mix the 2 oils together and gradually whisk in until incorporated. Bravo! You’ve made a mayonnaise. Finally, whisk in the lemon juice and chilli flakes.
For the batter, pour the beer into a wide, deep dish and lightly mix in the cornflour, flour, salt, pepper, dried herbs and bicarbonate of soda. Any lumps? Even better.
To prepare the fish, dust the fillets with cornflour until coated, shaking off any excess. Heat the oil for deep-frying in a large pan to 180°C [350°F].
Dip the fish fillets in the batter until coated, then deep-fry until golden brown. Drizzling a little extra batter over the fillets while they are cooking makes for even more crispy and crunchy shards of batter when fried. Drain the fillets on a plate lined with kitchen paper [paper towels] and serve at once with the sauce and wedges of lemon.
So, what happened to the chips? Answer: there aren’t any. The fish is too good and anyway there is enough fat already. Instead, I suggest you accompany the fish with a crisp, full-flavoured salad.
Pictures overleaf.
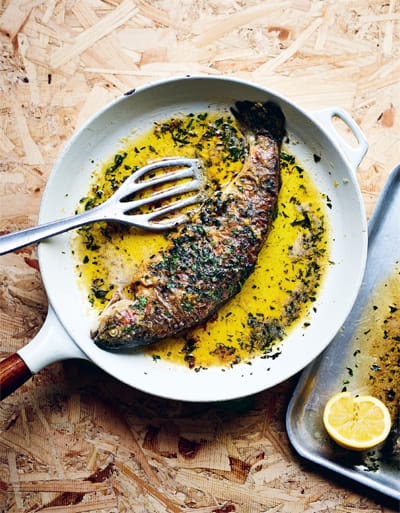
Any fish, meunière-style
A dish that is very, very classic in French cuisine is ‘sole meunière’ aka sole ‘à la meunière’, or – to translate – ‘sole in the style of a miller’s wife’. The fish is coated in flour before being fried in butter. It’s easy and super–quick, plus – and not many people know this – lots of other types of fish can be cooked in the same way.
Serves 2
salt and pepper
2 trout, total weight about 700g [1lb 9oz], trimmed, scaled and cleaned (a job for the fishmonger!)
60g [½ cup] plain [all-purpose] flour
3 Tbsp neutral flavoured oil
80g [1/3 cup] butter
½ lemon
chopped fresh herbs (basil, parsley, tarragon…) for sprinkling
Season the inside of the trout with salt and pepper. Dust them in the flour until coated, then shake off any excess.
Heat the oil in a frying pan over a medium heat. Add the fish to the pan and when they are lightly browned underneath, add the butter. Fry for 4 minutes, still over a medium heat, until they are golden brown. Using a spatula, turn the fish over.
Lower the heat and cook for a further 5 minutes, spooning the oil and butter over the fish constantly and making sure the butter doesn’t burn. Lift the trout out of the pan and onto serving plates.
Squeeze the juice from the lemon into the pan and whisk it into the hot, foaming butter and oil. Spoon over the fish, sprinkle with chopped fresh herbs and serve immediately.
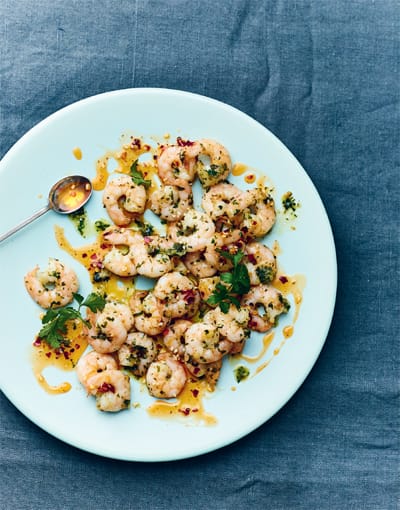
Prawns in garlic, butter and parsley with Sichuan chilli oil
The aromatic oil, spiced with Sichuan pepper, is the real reason why I’ve chosen this recipe. It’s easy, quick, fiery, spicy, full of flavour and you’ll feel the pain, but it’s also devilishly addictive. I find it fascinating to see how the aromatic profile of a dish can be changed completely with just a few drops of oil – don’t you agree?
Serves 2 or 4 as a starter
For the chilli oil
(Prepare this at least 24 hours ahead)
225ml [1 cup] neutral flavoured oil
2.5-cm [1-in] piece of root ginger, peeled and sliced
white part of 4 spring onions [scallions], sliced
1 bay leaf
1 cinnamon stick
6 whole cloves
8 Tbsp red chilli flakes
1 Tbsp sesame seeds
3–4 Sichuan peppercorns
For the prawns
1 garlic clove
25g [1 Tbsp] butter
½ tsp salt
2 Tbsp chopped fresh parsley
225g [8oz] cooked peeled prawns [shrimp]
1 Tbsp neutral flavoured oil
For the chilli oil, heat the oil in a saucepan with the ginger, spring onions, bay leaf, cinnamon stick and whole cloves over a medium-low heat for about 5 minutes until the onions start to brown.
Strain the oil, return it to the pan and place over a medium heat. Meanwhile, put 5 tablespoons of chilli flakes in a heatproof ceramic or glass bowl. When the oil is just starting to smoke, pour half of it carefully over the chilli flakes in the bowl. Leave until the bubbles in the oil die down before continuing.
Add the sesame seeds to the bowl with another tablespoon of chilli flakes and the peppercorns. Pour in the remaining oil and leave to infuse for 24 hours, by which time the oil will have turned orangey red.
The oil can be kept in a covered container for a few weeks at room temperature or even longer in the refrigerator.
When ready to cook the prawns, crush the garlic with the butter and salt. Add the parsley and pound everything together. You might not know it but you’ve just made a true classic of French cuisine called beurre maître d’hôtel. And that’s all I’m saying.
Heat the oil in a frying pan [skillet] over a medium heat and fry the prawns for a few minutes until lightly browned. Add the garlic and parsley butter, stirring so the prawns are coated, and serve hot. It’s already a very good dish but with a drizzle of the red oil, it’s to die for.