Mashawsha
This is a variation on hummus, and even though it uses almost all of the same ingredients, it somehow tastes completely different. It is a great starter, and in Israel it is the ultimate late Saturday breakfast after a night out. It is looser than hummus and the dressing is really important, so don’t skip it. We love serving it with slow-cooked eggs, a preparation that our kitchen crew calls dinosaur eggs here for reasons of their own.
Enough for 4–6 as a starter, or you could make half this quantity to share as a mezze
1¼ cups/250g dried chickpeas, soaked overnight in plenty of water so they double in volume
1 tsp baking of soda
1 tsp table salt and perhaps more to taste
1 heaped tsp ground cumin
2½ tbsp lemon juice
2½ tbsp tahini paste
For the dressing
juice from 1 lemon
3 cloves of garlic, peeled and finely chopped
1 green chili, finely chopped (I use the seeds too, for spiciness)
1 small bunch of parsley, chopped (about ½–¾ cup)
Drain the soaked chickpeas and check for any small stones or damaged chickpeas, discarding any you find. Tip the chickpeas into your largest pan and cover with plenty of fresh cold water. Bring to the boil and skim off the foam that forms. Allow to boil for 5 minutes, then skim again. Add the baking soda and mix well; the whole thing will bubble up like a volcano. Skim it thoroughly, then cook at a steady simmer, skimming regularly—this will give you a much clearer, paler result. It will take about 30–40 minutes for the chickpeas to soften entirely. The best indication will be the foam, which will become really thick and yellow. This is the time to check the chickpeas; scoop a couple out and try them: they should melt in your mouth without any resistance.
Remove the pan from the heat and drain the chickpeas into a colander sitting on a bowl or jug, as you want to retain the cooking liquid. Tip the chickpeas into a separate bowl—the drained weight should be about 1¼ lb/600g. To this you want to return a scant ¾ cup/160ml of the cooking liquid while everything is still hot.
Mix in the salt, cumin and lemon juice. Mash the mixture using a stick blender or a potato masher—if you’re using a stick blender, plunge it in for a second in a couple of places then stop, so that most of the texture stays chunky. Now use a spoon to fold in the tahini paste and allow to cool a little—but this is traditionally served warm, so don’t place it in the fridge.
Mix the dressing ingredients together and drizzle all over the mashawsha. You could top with wedges of dinosaur eggs here and, if you want, a touch of paprika for color.

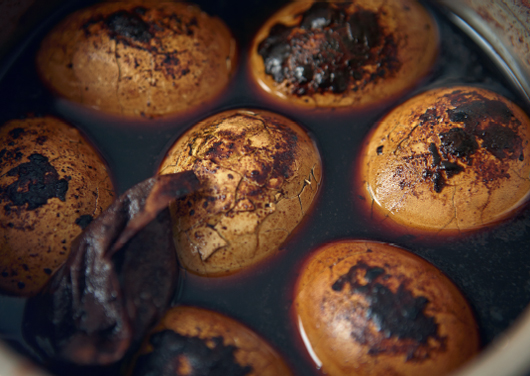
Dinosaur eggs
The recipe for these eggs originates from the Jewish ban on cooking on the Sabbath, which gave birth to many dishes throughout the Jewish world, dishes that would cook slowly from Friday afternoon till Saturday lunch. Traditionally the eggs would be placed in a pot with a big joint of meat and some pulses and grains, then left to cook overnight. The eggs would be pulled out and eaten for breakfast, and the rest of the dish kept warm for lunch. The slow cooking of the eggs makes the whites go a light brown color and gives the eggs a soft, yielding texture. We use the cheats’ way to make them here—without the joint of meat—but the texture is still something completely different from any egg you will have tried, and they are very pretty.
Allow 1–2 per person (up to you—we prefer more than 1 per person)
4–6 eggs
enough water to cover
1 tsp salt
1 tbsp coffee grounds
1 tea bag
Place the eggs with the water and salt in an ovenproof pan on the stove and bring to the boil, then simmer for 3 minutes. Remove the eggs from the pan and crack the shells all over with the back of a spoon—but try to leave them intact. Return the eggs to the water, add the coffee grounds and tea bag and place in the oven for 2 hours at between 350°F and 400°F (we usually make these when we are using the oven for some other slow-cooked dish, so we cook them at the temperature that dish calls for). Check the eggs every 30 minutes to see whether they are still submerged, and top up the water if need be.
Cool and peel them before serving. These go really well with mashawsha here, but you can also use them to fill a sandwich or to add something extra to your daily salad.
Matbucha
Matbucha simply means “cooked” in Arabic and this is what it is—a savory, smoky, sweet cooked vegetable jam with endless uses: as a dip at the start of a meal with bread and oil; in a sandwich with any kind of cheese; as a sauce in which to cook fish or seafood, or eggs for Middle Eastern breakfast-favorite shakshuka; or as a relish with anything grilled. It is a great staple, so it’s worth doubling up the recipe. The only reason we stopped making this in the restaurant was out of deference to our beloved kitchen porter Pierre Paolo, a scrawny boy from Sardinia who captured our hearts with his endless energy and crooked smile. He would slave away trying to restore our pots to usable form after each batch we made—matbucha will always burn, which is what gives it the smoky flavor. We think it is still worth making as it really is delicious and versatile. Just do as Pierre Paolo does and put some cold water in the burnt pan, add a teaspoon of baking soda or baking powder and place on the stove to simmer for 5–10 minutes, after which you should be able to return the pan to its former condition.
For 4–6 to share as a mezze
1 tbsp olive oil
1 medium onion, peeled and diced
1 medium green pepper, seeded and diced
1 medium red pepper, seeded and diced
4 cloves of garlic, peeled and thinly sliced
1 green or red chili, thinly sliced (keep the seeds if you want a kick, or discard if you prefer a milder flavor)
½ tsp salt, divided, plus more to taste
½ tsp whole caraway seeds
½ tsp whole cumin seeds
3–4 plum tomatoes, coarsely chopped (about 1¾ cups/350g)
2 slices of lemon
a pinch of chili flakes, to finish (if you wish)
Place a heavy-bottomed pan on a high heat. Add the olive oil and onion, and stir around while the onion cooks for a minute. Then add the peppers, garlic, chili and a quarter-teaspoon of the salt. Mix well and continue cooking for 4–5 minutes, keeping the heat high, until everything starts to soften.
Tip in the caraway and cumin seeds and stir to combine. The pan will start to blacken—this is fine, as it is what will give the dip its smokiness. Add the tomatoes and the second quarter-teaspoon of salt, combine thoroughly and allow to cook for 2 minutes on high. Stir in the lemon slices, then lower the heat and simmer until you have a thick rich paste, making sure to scrape the bottom of the pan once in a while. This should take about 30 minutes, and I like to set a timer every 5 minutes to remind me to stir.
Taste to see if you need to add a little more salt and—if it is missing some heat—add the chili. You can use it straight away as a sauce, or allow it to cool before serving as a dip, relish or sandwich filling. Matbucha will keep for up to a week in an airtight container in the fridge, and freezes and defrosts without harm.
Butternut & tahini dip with roasted hazelnuts
This recipe brings together two great ladies who have never met. We picked up the original recipe from a cookbook by Sherry Ansky (a most gifted cook and even more gifted writer), and though we prepared it many times with great success, we got the best results with the heather honey we received from our good friend who is now our publisher, Elizabeth. This is a simple preparation with few ingredients, but it is one of the best recipes in this book. The hazelnuts are there for their good looks and crunch, and they add a special nuttiness to the whole thing, but of course you can omit them if you wish.
Serves 6–8 to share as a mezze
1 large butternut squash (about 1½–1¾ lbs/700–800g, to give 3¼ cups/600g once peeled and deseeded)
½ tsp salt
¼ cup/60g tahini paste
2½ tsp heather honey
¼ cup/30g whole hazelnuts, salted, roasted and roughly chopped
Peel the butternut squash and scoop out the seeds. Because I have small hands, peeling a whole squash can be quite hard, and I find it easier to cut it into wedges and peel each wedge separately. Cut the peeled butternut into large dice (about ¾ in/2cm square). Try to make the pieces evenly sized so that they cook in the same time. Put in a heavy-bottomed saucepan with a lid, sprinkle with the salt and cover.
Place the saucepan on the stove on a very low heat and set a timer for 10 minutes. Don’t be tempted to remove the lid before then, as you want some steam to start developing. When the timer sounds, lift the lid and give the squash a good stir, then cover again and set the timer for a further 10 minutes. I repeat this four or five times. You will see the progress—the cubes will start to break down and become a purée. If some of the butternut sticks to the bottom of the pan, scrape it with the tip of a wooden spoon, as there is so much flavor down there. You want to stop cooking once the squash has formed a thick paste with no visible water content.
Remove the pan from the stove and add the tahini and honey. Mix well and allow to cool before adjusting the flavor with more honey or salt, as it will change when cool. You may need to add a little water to get a lighter consistency—it’s a matter of personal preference how light or thick you want to make it.
Sprinkle the hazelnuts over the dip just before serving. Any leftover dip will keep in an airtight container in the fridge for up to 2 days.

Celeriac purée with burnt yogurt
This is a slightly Middle Eastern treatment for what we consider a very British vegetable. The celeriac we get in Israel is a tight, angry, sandy little root—nothing like the large, generous, creamy-fleshed beauties we discovered when we came to this country. To us this is a truly exotic vegetable.
For 4–6 to share as a mezze
1 small celeriac head (about 500g)
2½ tbsp olive oil
6 cloves of garlic, peeled
2 sprigs of thyme
1¼ tsp sea salt
2 tsp/10g unsalted butter
½ cup/100g natural yogurt
Peel the celeriac and cut into small dice. Place in a heavy-bottomed pan with the oil, whole garlic cloves, thyme sprigs and salt. Start on a high heat for about 5–6 minutes to give the dice some color, then reduce the heat and cook until they go really soft (about 10 minutes). If they catch too much on the bottom of the pan, add 1–2 tablespoons of water and continue cooking until soft.
Tip the cooked celeriac and garlic into a bowl and remove the thyme sprigs. Put the butter in the empty pan and return it to the stove on a high heat to melt it, then continue heating until it starts to go golden-brown. This develops a very different flavor, so don’t be scared to let it happen.
Remove from the heat and pour onto the celeriac dice. Add the yogurt and use a stick blender (or food processor) to purée everything together to a chunky dip. Don’t make it too smooth, as getting a little surprise cube of soft celeriac is the best bit.
This is best eaten at room temperature. If you want to store it, just pop it in an airtight container in the fridge (where it will keep well for 2–3 days) and allow it to come up to room temperature before serving.
Zucchini dip with yogurt & mint
This preparation—simple though it is—is one of the nicest things you can do with zucchini, a vegetable with more texture than flavor. We picked up this little number in Istanbul, where they mix the cooked pulp with a traditional burnt butter and yogurt sauce. We don’t normally mess with tradition, but in this case we think that this dip is good enough with plain yogurt.
Serves 4–6 to share as a mezze
1¼ lbs/600g zucchini (about 2 large)
6 cloves of garlic (about 1oz/30g)
½ tsp salt
2½ tbsp olive oil
2 tbsp water (if needed)
¼ cup/50g natural yogurt (we love goats’ but you can use cows’), to finish
2 sprigs of mint, to finish
Wash the zucchini and pat dry.
Remove the stem and cut in half lengthways, then cut into ¾ in/2cm-thick slices. Place in a heavy-bottomed saucepan or large frying pan. Peel the garlic cloves and press each one with the side of the knife to flatten—this helps to release flavor. Add to the zucchini in the pan and sprinkle with the salt and olive oil.
Place the pan on a medium-high heat, cover and set the timer for 8 minutes. After this time, remove the lid and mix well—this will help get the liquids flowing out of the zucchini. Reduce the heat to medium and let the zucchini and garlic cook down to a mushy pulp, stirring regularly (I like to set a timer every 5 minutes to remind me). You can be vigorous in the stirring, as the end result should be a rough purée. If the zucchini begins to stick to the bottom of the pan, use your spoon to scrape up all the lovely flavor. If it is catching too much, reduce the heat slightly and add 2 tablespoons of water. The total cooking time will depend on the water content in the zucchini, but it will take at least 30 minutes (and can take up to 50 minutes) for them to soften entirely.
Remove from the heat and check the seasoning. I find that it doesn’t usually need anything more, but you can add a little salt if you wish. You can serve this straight away while it is warm or wait until it has cooled to room temperature. It is best eaten on the day you make it, but will keep well in an airtight container in the fridge for up to a week. Just remember to allow it to come up to room temperature before eating.
Spread the dip on a serving plate—it’s nice to use a flat plate—and drizzle all over with the yogurt, so each mouthful will get a bit. Pick the mint leaves and tear them up, then sprinkle over the plate just before serving.
Muhamra
Our floor girls are always experimenting with their diets, always following the latest diet fad, always driving the kitchen crazy with their staff lunch requests (“Is it Tuesday? I can only eat millet today”). When, for a few days in 2013, all of London turned vegan, so did our girls, and they discovered this wonderful dip. They kept on asking for “just a spoonful” to add to their drab lunches, and have kept on asking even though the vegan period is now behind us. With a name from the Arabic word for “clay” or “red,” this is our humble take on the Lebanese classic. It has so many good things in it, so much good flavor and such good looks, it will lift any plate, but I find roast chicken or quail to be a particularly good match.
For 4–6 to share as a mezze
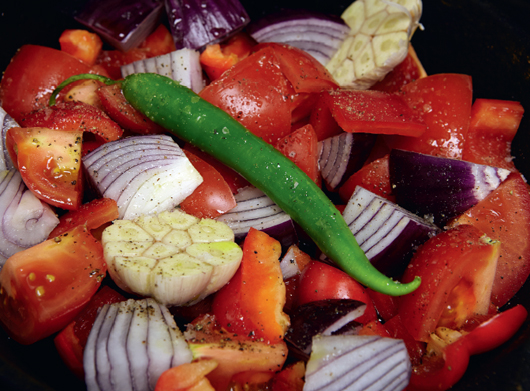
1 large red pepper
2 medium plum tomatoes
1 medium red onion
1 head of garlic, unpeeled
1 chili (red or green)
2 tbsp olive oil, divided
½ tsp salt
¼ tsp freshly ground black pepper
½ cup/60g walnuts, roasted
3½ tbsp pomegranate molasses
½ tsp smoky paprika
Preheat your oven to 475°F and line a roasting tin with parchment paper.
Quarter the pepper and remove the seeds, then cut each piece into three. Cut the tomato into six wedges. Peel the red onion and cut into six wedges. Hold the head of garlic on its side and cut through the middle so all the cloves are halved and exposed. Place the pepper, tomato, onion, garlic and whole chili in the roasting pan, drizzle all over with half of the olive oil and sprinkle with the salt and pepper. Place the tin in the oven to roast. After 15 minutes carefully open the oven and mix everything well, then roast for a further 15–20 minutes, checking as you go. It will take about 30 minutes in total, as you want the vegetables to start to burn slightly. You may need to give them a little more or less time depending on your oven, but the end result should be strongly caramelized, soft vegetables. Remove from the oven and allow to cool.
Once you can handle the vegetables, squeeze the soft flesh of the garlic cloves out of the skins—it should just pop out, then you can discard the skins. Remove the top stem-part of the chili. Mix all the vegetables and most of the walnuts together (leave 5–6 walnuts to garnish the top of the dip). Add the pomegranate molasses, the remaining olive oil and the paprika, then use a food processor or a stick blender to purée to a chunky consistency. It shouldn’t be smooth, but it should be brought together to create a paste. Taste and see if you need to add a touch more salt (or, if you like spicy food, you could add a little cayenne or chili flakes). Transfer to a serving plate and use the reserved walnuts, chopped roughly, as a garnish.
This dip will keep really well for up to a week in an airtight container in the fridge, so you too can add a little lift to your lunches.