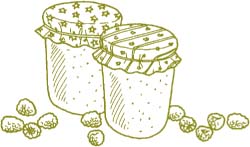
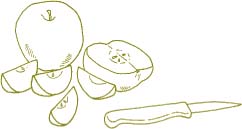
AT MY HOME IN NORTH CAROLINA it would not seem like August if I weren’t making jams from the bounty of seasonal fruit that bursts into and overflows from the farmer’s markets. The trick is to “transform” and “transfix” the booty into beautiful rows of preserved concoctions that wait patiently to be taken from the shelf in the leaner times of winter. The comforting pleasure of a cup of herbal-blend tea accompanied by toast with homemade apple butter is an underrated joy of life. (The toast is merely the vehicle for getting as much apple butter as possible to the palate.)
The perfume of simmering raspberries wafting through the house is another memory maker. The seasonal ritual can include berry picking with the children. Go to a pick-your-own orchard, or pick wild blackberries. (I once had to throw away the clothes my children wore for blackberry picking because they were so stained. But years later, nobody remembers that part — only the fun we had together!)
The art and science of turning fresh fruits into tempting fruit spreads make for a satisfying experience. Frequently, young berry pickers like to help make the jam as well. It’s never too early to learn creative, economical, environmental, and conservation-minded habits. Besides, preserving can turn your kitchen, pantry shelf, or freezer into a virtual rescue mission for the distressed cook. A half-pint jar of apple jelly can serve not only for breakfast bread but also as a basting sauce for a pork roast or a grilled chicken. A supply of orange marmalade can be added by the tablespoonful to gravy or sauces for duck, pork, or Cornish hens. Let your culinary imagination run wild.
Making homemade fruit spreads is easy. The main ingredients are sugar, fruit (which contains acid), additional fruit acid (for nonacidic fruits), and pectin. The ratio of these ingredients creates the gel and preserves the flavor of a homemade fruit spread.
Sugar. This acts as a preserving agent in the large quantities called for in fruit spread recipes.
Fruit. The distinctive flavor comes from the fruit. Also, depending on the fruit and its ripeness, natural fruit acids contribute to the gel quality. If the fruit is not naturally acidic enough, the recipe will call for added acid, usually in the form of lemon juice.
Pectin. Along with the fruit acid and sugar, pectin makes the proper consistency for a fruit spread.
Fruit spreads are easy to make and a good project for beginning canners. However, be sure to follow the recipe without changing the ratio of sugar, fruit, and pectin; nor should you change the order in which they are added in a recipe. Your Cooperative Extension agent can help if complicated changes need to be made to a recipe.
Fresh fruit may be frozen for future jam or jelly making.
While each spread is slightly different, you will, as always, want to start with the best fresh produce. I steer away from supermarket produce unless I am sure of its origin. However, you can freeze just-picked fruit to make fruit spreads later without losing a significant amount of flavor.
There’s no need to thaw frozen fruit before cooking; just combine it in the kettle with the other ingredients in your recipe. For jams, mash the fruit and add a little fruit juice, if necessary — ¼ cup for each 1 quart of fruit.
Pectin is a gelling agent found naturally in all fruits. Fruit that is underripe contains much more pectin than ripened fruit. Including some underripe fruit in the fruit portion called for in a recipe can help the final product gel. You can buy pectin in either powdered or liquid form in most supermarkets. Commercial pectins are usually made from the white material under the skin of citrus fruits, though some kinds are made from apples. Recipes that call for purchased pectins will benefit in flavor and consistency from using ripe fruit.
The fruit’s ripeness, its natural pectin content, its natural acid content, and the amount of sugar added all influence the quality of the gel of the finished product. In recipes that do not call for commercial pectin, the sugar acts as a preservative and gel agent, along with the natural pectin found in the fruit.
TIP
Stick with the original recipe. Don’t change the proportions or the ratio of sugar to fruit or the order in which ingredients are added — you may end up with syrup or glue instead of jelly! Don’t double a recipe, either. It is better to make one batch at a time.
Fruit spreads are slow cooked or fast cooked, depending on whether the pectin is added or is only derived from the fruit used. In the slow-cook method (see page 185), no pectin is added, and the ¾-to-¼ ratio of fully ripe to slightly ripe fruit is used to produce the gel. This slow-cooked, no-added-pectin method requires a lot of guesswork, however, and can be chancy for the less experienced cook, who may not be able to judge the fruits’ ripeness accurately.
The fast-cooked method, in which purchased pectin is added, can reduce guesswork (see page 184). The recipe will tell you the exact quantity of pectin and the exact cooking time. Never cook a recipe for more than 20 minutes when pectin is added, because after that the pectin will begin to break down. Less fruit, of course, is required for recipes with added pectin.
Underripe apples are all you need to make your own pectin. In mid-August in my area, small, immature green (underripe) apples begin appearing before the regular crop of apples starts rolling in. These little apples are loaded with natural fruit pectin and acid and can be used to contribute pectin for preserving. You can get the jump on the apple crop by using these small apples, but if you want crystal-clear jelly, you’ll be better off waiting for the mature apples to appear.
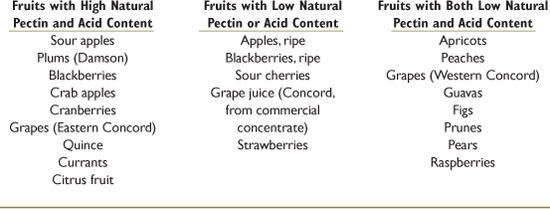
The amount of naturally occurring pectin and acid varies from fruit to fruit and depends on the fruit’s ripeness. The fruits in the lists below are given from highest pectin and acid content to lowest.
Our trees are Golden Delicious, and we don’t spray them. I have found that these young apples, even with insect holes and bruises and bumps, can be used successfully for making pectin by merely cutting away the damage. No need to peel the apples, as the pectin is mostly found in or near the peelings. Do wash them carefully, however, and slice them rather thinly.
TIP
Make your own pectin the day before you make your fruit spread. Store it in the refrigerator overnight. This will save considerable time on jelly-making day.
TIP
If you’re not using purchased pectin in a recipe, use 1 part barely ripe fruit to 3 parts very ripe fruit.
Low-methyl pectin, a natural product used for gelling, is derived from citrus peel and requires the addition of dicalcium phosphate, a calcium salt, in order to gel. It can be purchased in most health food stores and has the advantage of needing no sweetener (except for taste) in order to gel. Follow the package directions to combine the low-methyl pectin and the dicalcium phosphate. Recipes that call for low-methyl pectin cook much more quickly and thus result in a fruit spread with a fresher flavor.
The disadvantage is that recipes made with low-methyl pectin sometimes “weep.” Liquid will puddle around a spoonful of the jam on a plate, or the whole jar will have a puddled liquid. This is a natural occurrence and is caused by the calcium. Simply blot the liquid with paper towels or spoon it or drain it out of the jar. Another disadvantage to low-methyl pectin is that the absence of sugar (which is a natural preservative) means you can’t store the fruit spread as long after it is opened. You must use it within 2 to 3 weeks of opening the jar and, of course, refrigerate it. Low-methyl pectin recipes are processed in a boiling-water-bath canner for 5 minutes for jellies using half-pints and for 10 minutes for jams using half-pints; correct for altitude as necessary. Follow your recipe instructions carefully.
Spreads made with low-methyl pectin sometimes “weep.”
Sweeteners for fruit spreads vary greatly. Following is a list of choices both natural and artificial. Most artificial sweeteners cannot be used in fruit spreads that require cooking, as the sweetener breaks down under heat. Sugar’s purpose goes beyond making the fruit sweet; it is used as a preservative and gelling agent in large quantities when making fruit spreads. Never change the ratio of sugar, fruit, and pectin in your recipes.
Sugar. Besides adding flavor to fruit spreads, sugar is a key ingredient in the gelling process. (A large amount of sugar does, however, add calories.) Granulated sugar made from cane or beets or light brown sugar, which has maltose added, is appropriate for making fruit spreads.
Honey. Light and mild honey can be used instead of sugar. Because it has double the sweetening power of sugar, it adds fewer calories. Choose a recipe that specifies the use of honey. Don’t switch from sugar to honey on your own. Honey will cause more foam on top of the cooked fruit mixture.
Artificial sweeteners. Saccharin, aspartame, and other artificial sweeteners cannot be used in cooked products, as they break down when heated. Use artificial sweetener only in uncooked fruit spread recipes for the freezer or refrigerator. For a cooked and processed recipe, add artificial sweetener when you open the individual jar for use.
The method for preserving jams, jellies, conserves, preserves, and other fruit spreads is boiling-water-bath canning, the same method used for fruits and other high-acid foods. If you have canned fruits or other foods, you probably have most of the equipment you need, since the same equipment is used and the same process is followed. For a more detailed explanation of the boiling-water-bath method, refer to chapter 2 (page 27).
A food mill is useful for separating the raw fruit pulp from the seeds and skins. Several brands of food mills are available. You may also use a potato ricer, which forces the raw fruit pulp through small holes, but smaller seeds can slip through.
A candy or cooking thermometer is essential for the beginning cook. It allows a foolproof method of gelling. Treat your thermometer kindly when it’s not in use and avoid mistreatment, such as dropping or bumping it.
A timer is a valuable tool for anyone who wants to master the art and science of canning. Precision is the order of the day for fruit-spread making, as well as for other forms of canning.
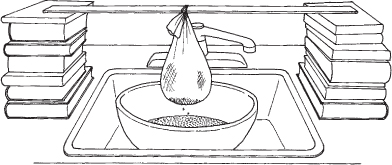
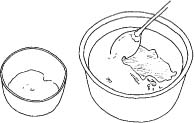
A jelly bag is used to strain juice from the fruit pulp. It is a simple cloth bag that can be purchased or made from several layers of muslin or cheesecloth, filled with fruit pulp, and tied into a pouch with kitchen twine. Be sure to dampen it first in water to prevent juice from being wicked into the fabric instead of dripping into the bowl. The bag is then suspended by the string over a clean glass or enamel bowl. The weight of the fruit pulp allows the juice to drip into the bowl below, a process that usually takes 8 to 10 hours. I like to use an 8-cup glass mixing/measuring bowl with a handle.
TIP
Begin straining the juice in the evening the night before and have your bowl of juice ready for jelly making early in the morning. You can also freeze fresh juice for making jelly later.
You may have to be creative to find an effective setup for the jelly bag.
TIP
For a less labor-intensive procedure, use frozen prepared juice concentrate and add commercial pectin.
As always, start with ripe, blemish-free fruit. Wash the fruit well to remove all grit. Crush the fruit before adding it to the wet jelly bag. You don’t need to remove the seeds or skins, since straining through the jelly bag will take care of that.
Unless your recipe specifies it, don’t squeeze the bag and force more juice out, as this may make the final product cloudy. Add a little water to the pulp and continue the straining if you come up short.
Be sure to wash the bag thoroughly after use. The pulp makes a great addition to your compost pile!
Making fruit spreads is relatively simple, though sometimes experience is needed to achieve the perfect taste and texture. The challenge is to combine the fruit, the sugar, and in some cases the pectin, depending on the fruit and method used, in the correct ratio and for the right amount of time to create the desired gel consistency when the fruit is cooked and then canned. The recipes included in the second part of this chapter will take the guesswork out of the process.
The goal of cooking the fruit is to acquire the proper gel for the final fruit spread product. Follow the recipe instructions exactly; add ingredients in the order given.
There are two ways to cook the fruit and juice for fruit spreads: the fast way, which uses added pectin, and the slow way, which relies on the pectin found naturally in the fruit being processed.
Bring the mixture to a full boil that you cannot stop by stirring and maintain it for the exact amount of time called for in your recipe. If pectin is overcooked, it may break down, resulting in runny jam. Always add the liquid or powdered pectin exactly how and when the recipe indicates. Never substitute liquid pectin for powdered, or vice versa.
The less exact way, the slow or “cook-down” method of preserving fruits for spreads, worked great for Granny and it still works today as well. This method relies on the pectin found in fruit to make the spread congeal. Use fruits that have a high pectin content, such as sour apples, crab apples, blackberries, Concord grapes, lemons, oranges, Damson plums, quince, and cranberries. Place the fruit or fruit acid and the sugar in an uncovered pot and cook for the proper time to create the gel. Because the amount of pectin in fruit will vary, depending on ripeness as well as variety, there is some guesswork involved. The recipe will indicate approximate cooking times to achieve the gel, but there are other ways to determine whether the fruit mixture is ready to pour into the jars.
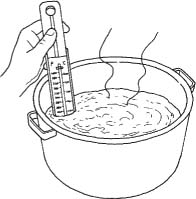
When making jelly or marmalade without added pectin, use a thermometer to determine when it is ready.
Some recipes may not indicate a specific cooking time but may say instead, “Cook until done,” or “Cook until it reaches 220°F.” In such cases, you’ll need to use your candy or cooking thermometer for making jelly or marmalade. When it reaches 220°F, your jelly is ready. For jams and preserves, you know it is ready when a spoonful holds its shape or “mounds up” on a cold spoon or plate. At high altitudes, subtract 2 degrees for every 1,000 feet above sea level.
Preserves and conserves. When a spoonful of fruit mixture holds its shape or mounds up on a cold spoon or plate, it’s ready for canning. Remove the fruit mixture from the heat and stir it for about 5 minutes before you fill the jars. This prevents the fruit from floating after canning.
Jams. When a spoonful of fruit dropped in a cold bowl holds its shape, it is ready for the canning jar and boiling-water-bath canner.
Butters. This is a slow, cook-down process that can work quite well in your oven at 300 to 325°F. The mixture will become a thick brown mash. Using the oven takes 4 to 5 hours and helps prevent burning and the labor intensity of watching the pot.
One alternative to using a thermometer to test for doneness is the sheeting method.
Jelly or marmalade. If you don’t have a candy or cooking thermometer, try one of these old-fashioned methods of testing for doneness:
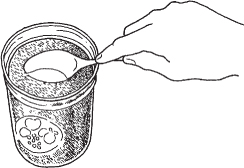
• The sheeting method. Put 1 tablespoon or so of the hot fruit mixture on a cold plate or spoon, then turn the plate or spoon on its side over the sink. If the fruit mixture falls off or “sheets off” in one large drop, the jelly is done.
• The freezer method. Put 1 tablespoon of the hot fruit mixture on a cold plate and place it in the freezer for 2 to 3 minutes. Remove and shake the plate. If the fruit mixture quivers, it is done.
• The metal bowl method. Take a metal bowl from the freezer and drop 1 teaspoon of hot fruit mixture into it. Wait 1 minute. Run your finger through it; if it separates into two parts and doesn’t run back together, the mixture is ready for processing.
The jars you use for jellies and jams must fit the same standards as those you use for other canning methods. They must be free of cracks and chips and otherwise in good condition. Jars made for commercial use should never be used; they are not of the same sturdy quality as jars made specifically for canning and may not be able to withstand the lengthy exposure to the high temperatures of the boiling-water bath. Commercial jars can shatter, destroying your food and possibly causing injury to you or others.
Most recipes for fruit spreads call for half-pint jars. Each jar must have a two-piece lid that consists of a new metal vacuum lid and a new or used metal screw ring. Special jars and lids for canning fruit spreads fill this requirement.
The screw ring holds the vacuum lid in place and, unlike the vacuum lid, can be used year after year. Twenty-four hours after the canning process, when the jars have thoroughly cooled, remove the metal screw rings from the jars before storing your canned goods in the pantry. Metal screw rings that are left on jars may rust. If a screw ring is stuck or stubborn, don’t force it and risk breaking the seal, but rather leave the ring in place. Under no circumstances should you tighten the screw ring after processing. This action could break the seal and leave the contents vulnerable to spoilage.
TIP
You can use the dishwasher to prewash jars for canning fruit spreads as long as the canning time is longer than 10 minutes. If the processing time is less than 10 minutes, you must wash and then sterilize the jars.
The USDA says it is not necessary to sterilize jars for fruit, tomatoes, or pickled foods that will be processed longer than 10 minutes in a boiling-water bath. Instead, before each use, wash your empty jars and rings in the dishwasher or submerge them in hot soapy water. Rinse the jars and rings thoroughly, being careful to remove all traces of soap. Keep the lids and rings hot in gently boiling water until you are ready to use them.
For boiling-water-bath processing times of less than 10 minutes, it is necessary to sterilize the containers by submerging clean, prewashed jars in a boiling-water bath. To do this, fill the jars with hot tap water and lower the water-filled jars into a canner of hot (not boiling) water, making sure the water level rises to 1 inch above the jar tops. At sea level, boil the jars for 10 minutes. At higher elevations, boil 1 additional minute for every 1,000 feet.
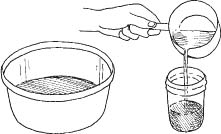
After the proper number of minutes has passed, use a jar lifter to remove one sterilized jar at a time and fill immediately with the prepared fruit spread. Be sure to leave appropriate headspace. Repeat until every jar is filled. Be sure to wipe any spillage from the jar rims with a clean cloth. Add the metal lid and rings by the method below, doing one jar at a time. (Save the boiling water for the canning process.)
Begin filling the jars one at a time. This is where the canning funnel and ladle are invaluable.
Be careful to avoid drips when you remove the funnel from the filled jar. Not only can drips burn the cook, but they can also spoil the canning seal if they are allowed to remain on the lid or the mouth of the jar. I like to use a very clean, thin, wet dish towel pulled over my index finger to rub around the rim of the jar to get the smallest drip of food or liquid. This allows you to feel the slightest chip on the rim as well. A wet paper towel works for this cleaning job, also.
Do not overfill or leave too much headspace in the jars. Be sure to fill the fruit spread according to the headspace requirements and in the exact size jar specified in the recipe. Precision is important here. Too little headspace may cause the food to be forced out of the jar during processing when the heat causes the contents of the jar to expand. In addition to being messy, the leakage prevents the proper seal from forming. Too much headspace leaves too much air to be forced out during processing, which also prevents a seal from forming.
TIP
Jars and metal rings may be reused if they’re in good condition, but never recycle the self-sealing metal lids.
If bubbles appear in the liquid, tap the side of the jar with a knife handle. If your fruit spread has pieces of fruit in it, run a clean, plastic spatula along the sides of the jar to help remove bubbles between the pieces of fruit. Don’t stir. That creates more bubbles.
In a saucepan, prepare the metal self-sealing lids by submerging them in boiling water for 10 minutes. Place the clean metal lids on the mouth of the jars and secure with the metal ring.
The canning lids are best kept clean and hot in the boiling-water bath mentioned above. After filling the first hot, sterile jar with fruit spread, place the hot metal lid on the jar and secure it with the metal ring. Then proceed to the next jar until all the jars are filled with fruit spread and ready to be processed.
Follow these steps for successful boiling-water-bath canning of jellies, jams, preserves, marmalades, and conserves:
1. Fill the canner halfway with water.
2. Preheat the water to 180°F for hot-pack fruit spreads.
3. Load the filled jars, fitted with lids, one at a time into the canner rack and use the handles to lower the rack into the hot water; or fill the canner one jar at a time with a jar lifter.
4. Add boiling water, if needed, so the water level is at least 1 to 2 inches above the jar tops.
5. Turn the heat to its highest position until the water boils vigorously.
6. Set a timer for the minutes required for processing the fruit spread.
7. Cover with the canner lid and lower the heat setting to maintain a gentle boil throughout the amount of time stated in the recipe. Adjust for altitude (page 40).
8. Add more boiling water, if needed, to keep the water level 1 to 2 inches above the jars.
9. When the jars have boiled for the recommended time, turn off the heat and remove the canner lid.
10. Using a jar lifter, remove the jars and place them on a clean towel, leaving at least 1 inch of space between the jars as they cool.
After the filled and finished jars of fruit spread have cooled, in 12 to 24 hours, use your thumbs to test the seal of the metal lids. Press hard on the center of one. If the lid does not move downward or “give,” your jar is sealed. If one or two aren’t sealed, you can store those faulty jars in the refrigerator to enjoy, though you must use them quickly.
Another method to ensure that your jar is properly sealed is to remove the screw ring and try lifting your newly canned jar by its lid using the weight of the jar to test the strength or weakness of the seal. (Protect yourself and the jar by doing this over the sink prepared with a towel to pad the possible fall.)
TIP
The best storage temperature for fruit spreads is between 50 and 70°F.
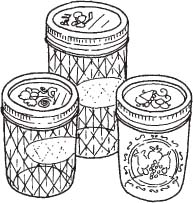
Always label fruit spreads with the contents, the processing method, and the date. You can purchase decorative glue-on labels, which are wonderful to use when you plan to make a gift of your fruit spread. You can make your own labels on the computer, as well.
Home-canned fruits require no expensive storage equipment — just a cool shelf in a dark, dry place. No matter how you label your fruit spreads and where you store them, make sure they are in a place where they won’t be knocked off a shelf or exposed to high temperatures or sunlight. The many attributes of home canning, including the pleasure of enjoying and sharing quality, chemical-free food all winter long, are lost when jars fall and break the seal or your food spoils.
Homemade jams, jellies, and preserves always make wonderful hostess gifts, and they are a great way to say “thank you” to a neighbor who was kind enough to collect your mail while you were away for the weekend. They can serve as the focal point of more elaborate gifts, too. Refer to chapter 9 (page 317) for gift ideas.
Evaluating your jams and jellies can teach you as well as, if not better than, any instructions. Here are the questions to ask after preserving fruits:
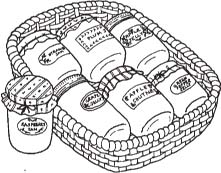
A basket of homemade jams and jellies makes a wonderful gift.
1. Did I examine each jar carefully before storing them? This gives you a good chance to admire your work as well as time to spot problems.
2. Are my jars sealed properly? If the top inch of a jar of fruit spread turns dark, it can indicate an improper seal or storage in a place that’s too warm. Mold is the most common indicator of spoilage from improper seals, but if the fruit spread is discolored, doesn’t look the same as other jars, or has an unpleasant, “off” odor, don’t take chances; throw it away. (Also, see box on page 48.) However, if you used honey instead of sugar, your spread will be darker in color. If the seal is good and no other signs of spoilage are present, the fruit spread is probably okay. Bright fruits, such as strawberries, darken naturally after processing.
3. Has the fruit in my preserves floated to the surface? Stirring off the heat for 5 minutes after kettle cooking and before bottling can eliminate this problem.
4. Is the fruit spread too soft? When the jar is tilted sideways does the fruit mixture move more like a liquid? If the consistency is too liquid and you used pectin, it may mean you boiled the mixture too long. Or perhaps you doubled the recipe, used liquid instead of powdered pectin, or used honey instead of sugar. If pectin wasn’t used, it could mean you didn’t cook the mixture long enough.
5. Is the finished fruit spread too thick? This can be caused by the pectin-fruit-sugar ratio being off. Also, overcooking a no-pectin spread can make the finished product stiff.
6. Is the finished product weeping? Too-warm storage or the use of low-methyl pectin can cause weeping. Also, honey recipes tend to weep more than sugar ones because sugar is a natural gelling agent. If there are no signs of spoilage, the spread is probably still safe to eat. Before using, drain off the liquid or blot it with paper towels.
For those on special diets or who enjoy the sometimes-tart taste of fresh fruit, try this unconventional way of making fruit spreads.
Agar is a gelling, stabilizing agent that is used to solidify the no- or low-sugar, no-cook fruit spreads. This plant product, sometimes called Asian gelatin or agar-agar, is derived from ocean algae and is available in natural food stores and Asian markets.
Common household gelatin, which is an animal product, also can be used as a solidifying agent for low- or no-sugar cooked fruit spreads for the refrigerator or freezer.
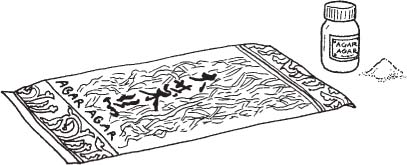
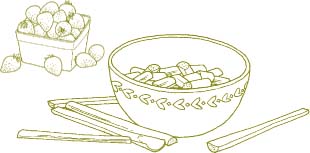
Agar strands and flakes are used to solidify fruit spreads.
Strawberry Jelly with Liquid Pectin
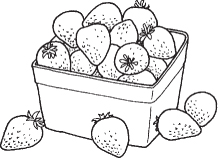
1. Using a wooden spoon, crush 2½ quarts of washed, hulled, ripe strawberries.
2. Put the pulp into a damp jelly bag or cheesecloth and allow the juice to drip through. This will vary from a few hours to overnight, depending on the juiciness of the fruit. To avoid cloudy jelly, don’t squeeze.

3. Measure 3¾ cups of juice into a large saucepan. Add ¼ cup of lemon juice and 7½ cups of sugar. Place over high heat and bring to a boil, stirring constantly. Stir in the liquid pectin, bring to a full rolling boil, and boil hard for 1 minute, stirring constantly. Skim off the foam with a metal spoon.
4. Remove from the heat and skim off all the foam with a metal spoon.
5. Pour quickly into hot, sterilized jars, leaving ¼ inch of headspace. Wipe the rims clean.
6. Adjust the lids and process in a boiling-water bath for 5 minutes to ensure a good seal. Be sure to adjust for altitude (page 40). Set the jars upright to cool.

7. Cool the jars for 12 to 24 hours. Remove the screw rings and test the seals.
Spiced Strawberry Jam Using Fruit Pectin
Baked Low-Sugar Strawberry Jam
Blackberry, Cranberry, and Pink Grapefruit Preserves
Spiced Grape Jelly for the Freezer
Blueberry and Cherry Preserves
This no-process, low-sugar fruit jam is wonderful with strawberries, raspberries, blackberries, or blueberries. Experiment with combinations.
1 tablespoon lemon juice
3 cups washed, hulled, and finely chopped berries, at room temperature (about 1 quart whole)
1 cup cold water
2 tablespoons agar flakes
¼ cup mild-flavored honey, such as clover
1. In a mixing bowl, stir the lemon juice into the fruit. Set aside.
2. Place the water in a small saucepan and stir in the agar flakes. Wait 1 minute and then, without further stirring, bring the agar to a simmer over medium-low heat. Once it’s simmering, stir for 2–5 minutes, or until the agar is completely dissolved.
3. Stir the honey into the agar. Use a heatproof rubber spatula to scrape the sides and bottom of the pot.
4. Pouring with one hand and stirring with the other, add the agar mixture to the fruit (do not add the fruit to the agar). Continue stirring until they are completely mixed. Taste at this time and add more honey, up to 3 tablespoons, if desired.
5. Pour the jam into hot, scalded half-pint jars, leaving ½ inch of headspace.
6. Cap and seal. Let cool in the refrigerator for 10–12 hours before freezing. Label and freeze the jam for up to 6 months.
7. When ready to use, thaw the jam in the refrigerator. It will keep about 3 weeks in the refrigerator.
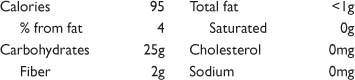
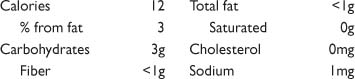
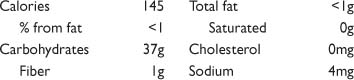
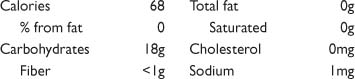
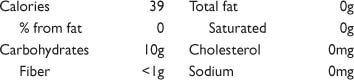
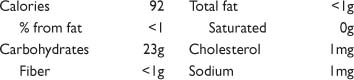
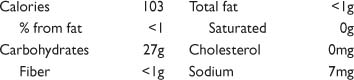
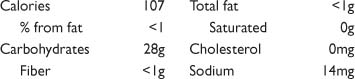
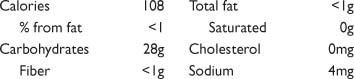
YIELD: FOUR ½-PINTS (THIRTY-TWO 1-OUNCE SERVINGS)
NUTRITION PER SERVING
This no-sugar, no-cook jam using gelatin is adapted from Stocking Up, Rodale Food Center.
1 cup water
1 envelope unflavored gelatin
2 cups coarsely chopped strawberries (about 1 quart whole berries), hulls and stems removed
2 tablespoons honey
2 teaspoons lemon juice
4 packets (.035 ounce each) aspartame
1. Pour the water into a saucepan and sprinkle the gelatin on top. Let stand for 5 minutes.
2. Heat the mixture over medium heat for 1 minute, stirring constantly to dissolve the gelatin.
3. Remove the mixture from the heat and add the fruit, honey, and lemon juice. Stir well and cool slightly.
4. Add the aspartame and stir well.
5. Pour the mixture into hot, scalded containers, leaving ½ inch of headspace.
6. Cap and seal. Label and store in the refrigerator. Use within 3 weeks.
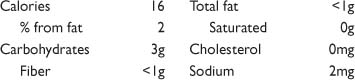
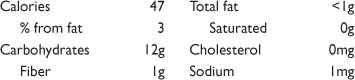
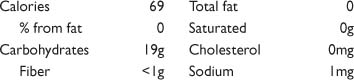
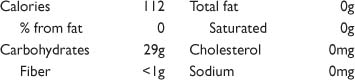
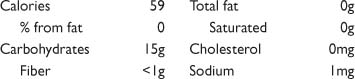
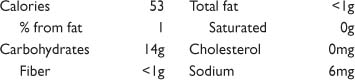
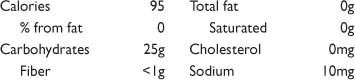
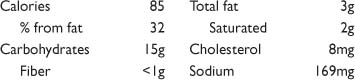
YIELD: THREE ½-PINTS (TWENTY-FOUR 1-OUNCE SERVINGS)
NUTRITION PER SERVING
Easy to prepare and spicier than most, this jam will delight children and adults alike.
5 cups crushed strawberries (about 2 quarts cleaned and stemmed)
½ teaspoon ground allspice
½ teaspoon ground cinnamon
¼ teaspoon ground cloves
1 box (1¾ ounces) powdered fruit pectin
½ teaspoon butter or margarine
7 cups sugar
1. In an 8-quart saucepan, combine the strawberries and the spices. Add the pectin and butter to the saucepan.
2. Bring to a full boil on high heat, stirring constantly.
3. Stir in exactly 7 cups of sugar and mix well.
4. Return to a full boil and boil for 1 minute exactly, stirring constantly.
5. Remove the saucepan from the heat and skim off any foam using a metal spoon.
6. Ladle into sterilized jars, leaving ¼ inch of headspace.
7. Cap, seal, and process for 5 minutes in a boiling-water-bath canner. Adjust for altitude (page 40), if necessary.
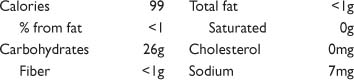
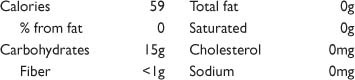
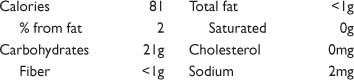
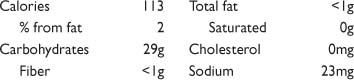
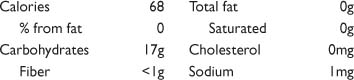
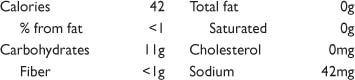
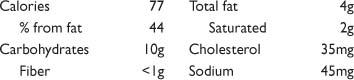
YIELD: FIVE ½-PINTS (FORTY 1-OUNCE SERVINGS)
NUTRITION PER SERVING
Try substituting raspberries or blackberries for the strawberries.
8 cups strawberries, washed, drained, patted dry, and halved
1 cup sugar
3 tablespoons lemon juice
1. Preheat the oven to 375°F.
2. Combine all the ingredients in a 2-quart casserole dish.
3. Bake, uncovered, for about 15 minutes.
4. Reduce the heat to 325°F. Bake for 1–1½ hours. Stir often. Let a spoonful of jam cool and test for gelling capabilities (see pages 185–86).
5. If it is too runny, return it to the oven and bake at 325°F for up to 45 minutes longer, then test again for thickening.
6. Place in clean freezer cartons. Refrigerate for up to 2 weeks or freeze for up to 6 months.
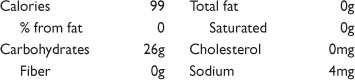
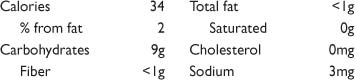
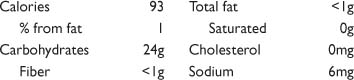
YIELD: THREE ½-PINTS (TWENTY-FOUR 1-OUNCE SERVINGS)
NUTRITION PER SERVING
This jelly recipe, which is a southern tradition, has been adapted from the USDA.
1½ pounds red rhubarb stalks, washed and cut into 1-inch pieces
1½ quarts strawberries, washed, hulled, and crushed
6 cups sugar
6 ounces liquid fruit pectin
1. Purée the rhubarb by pulverizing it in a blender or food processor.
2. Prepare a jelly bag by pouring boiling water through it. Squeeze out the excess moisture. Line the bag with a double layer of cheesecloth.
3. Place both fruits in the bag, let drain into a bowl, and squeeze gently to remove the excess juice.
4. Measure 3½ cups of strained juice into a 3-quart saucepan. Add the sugar, mix thoroughly, and boil until the sugar dissolves.
5. Remove the pan from the heat and stir in the pectin.
6. Return to the heat and bring to a full boil. Boil for exactly 1 minute. Remove from the heat and skim off any foam with a metal spoon.
7. Ladle into sterile half-pint jars, leaving ¼ inch of headspace.
8. Seal and process for 5 minutes in a boiling-water-bath canner. Adjust for altitude (page 40), if necessary.
YIELD: SEVEN ½-PINTS (FIFTY-SIX 1-OUNCE SERVINGS)
NUTRITION PER SERVING
This old favorite is adapted from the Ball Blue Book.
2 cups strawberries, rinsed, hulled, halved, and crushed
1 cup firmly packed blackberries
3 tablespoons lemon juice
1 package (1¾ ounces) powdered pectin
½ cup light corn syrup
3½ cups sugar
1. Combine the berries and lemon juice in a large bowl; stir well.
2. Slowly add the pectin, stirring constantly for 2 minutes.
3. Let the mixture stand for 30 minutes, stirring occasionally.
4. Add the light corn syrup and stir well.
5. Gradually stir in the sugar, beating well. The jam is ready when the sugar has completely dissolved.
6. Pour the jam into canning or freezer jars, leaving ½ inch of headspace.
7. Cap, seal, and cool in the refrigerator. Let stand until set, about 24 hours.
8. Label and freeze.
YIELD: SIX ½-PINTS (FORTY-EIGHT 1-OUNCE SERVINGS)
NUTRITION PER SERVING

James R. Coffee shared this recipe with me after he read my book Preserving Fruits and Vegetables. His recipe won the 1996 Ball Canning award at his local Pennsylvania fair.
3 quarts blackberries*
6 cups sugar
1. In a 4-quart saucepan, heat the berries slowly until the juice is extracted, then add the sugar. Boil the mixture, uncovered, for 20 minutes.
2. Skim off the foam with a metal spoon. Pour the preserves into sterilized jars, leaving ½ inch of headspace.
3. Wipe each sealing edge clean. Cap and seal.
4. Process in a boiling-water-bath canner for 15 minutes. Adjust for altitude (page 40), if necessary.
YIELD:4-PINTS (SIXTY-FOUR 1-OUNCE SERVINGS)
NUTRITION PER SERVING

*Note: Blackberries can be frozen, then made up later as needed. Do not wash them before freezing. Just put them in containers and freeze. When you’re ready to use the berries, put them in a colander and rinse them thoroughly. This washes them and starts the thawing process. Place the washed berries in a bowl and cover with plastic wrap. Store them in the refrigerator overnight, then proceed with the recipe instructions.
Present this tart but sweet spread to a neighbor and you’ll have a friend for life.
1 bag (12 ounces) fresh cranberries
6 cups frozen blackberries, thawed, with their juice
1½ cups sugar
2 pink or ruby red grapefruit, juiced (about 1 cup)
1. Pick over the cranberries to remove any stems or bad berries.
2. Mix the cranberries, 4 cups of the blackberries, sugar, and grapefruit juice in a heavy nonreactive saucepan.
3. Bring to a boil over medium to high heat until the mixture sheets on the end of a spoon (see page 186), about 25 minutes. Stir frequently and be careful not to burn the mixture.
4. As the mixture cooks, gradually add the remaining blackberries and their juice to the hot mixture and return to a boil.
5. Ladle the hot mixture into clean jars, leaving ¼ inch of headspace. Cap and seal. Process in a boiling-water-bath canner for 15 minutes. Adjust for altitude (page 40), if necessary.
YIELD: 4 PINTS (SIXTY-FOUR 1-OUNCE SERVINGS)
NUTRITION PER SERVING

A classic — not only a favorite, but also easy to prepare.
4 cups raspberries, washed, picked over, and drained
3 cups sugar
¼ cup fresh lemon juice, strained
1. Combine all the ingredients in a ceramic 2-quart bowl, stirring occasionally to let the sugar dissolve, about 2 hours.
2. Pour the mixture into a heavy 3-quart saucepan.
3. Bring to a boil, reduce the heat, and simmer, stirring frequently, until a cooking thermometer reaches 220°F or until it passes one of the jelly tests on page 186. (Allow about 5 minutes, depending on how juicy the berries are.)
4. Remove from the heat and skim off any foam that may have formed with a metal spoon.
5. Ladle into three sterile half-pint jars, allowing ¼ inch of headspace. Cap and seal.
6. Process for 15 minutes in a boiling-water-bath canner. Adjust for altitude (page 40), if necessary.
YIELD: THREE ½-PINTS (TWENTY-FOUR 1-OUNCE SERVINGS)
NUTRITION PER SERVING

A trip to England produced this recipe. Try it instead of the more familiar orange marmalade.
3 pounds (about 18) large Persian limes, peeled, zest cut into thin strips 2 inches long
9 cups water
6 pounds (13½ cups) sugar
Note: My British exchange student’s family advised softening citrus in a microwave for 10 seconds per fruit to make it easier to peel or juice.
1. Cut the peeled limes in half and squeeze the juice. Set the juice aside.
2. Scrape the pulp and seeds from the lime halves. Place in a cheesecloth bag.
3. Place the cheesecloth bag, zest, juice, and water in a 6-quart saucepan, then cover them and soak overnight, or for about 8 hours.
4. Bring the water mixture to a boil and cook about 2 hours, until the peels are soft.
5. Remove the cheesecloth bag.
6. Add the sugar to the pan and stir to dissolve.
7. Boil, stirring often, until a cooking thermometer reaches 220°F.
8. Ladle into clean jars, leaving ¼ inch of headspace. Cap and seal.
9. Process for 10 minutes in a boiling-water-bath canner. Adjust for altitude (page 40), if necessary.
YIELD: 10 PINTS (ONE HUNDRED-SIXTY 1-OUNCE SERVINGS)
NUTRITION PER SERVING
Delicious with tea and toast, this jelly is also great on angel food cake with fresh strawberries for a nonfat dessert.
3 pounds (about 15) lemons
9 cups water
3 pounds (6% cups) sugar
1. Peel the lemons and cut the zest into 2-inch strips.
2. Halve the peeled lemons. Squeeze the juice into a large bowl. Set aside.
3. Scrape the pulp from the lemon halves. Set aside. Save the seeds.
4. Combine 2½ cups of the water with the seeds and zest and boil for 30 minutes in a 2-quart saucepan. Cover and let cool.
5. Place the lemon pulp, lemon juice, and remaining water in a 4-quart saucepan. Strain in the seed/zest water and simmer, uncovered, for 40 minutes.
6. Pour the pulp mixture through a wet jelly bag and let drain over a 6-quart saucepan overnight. Don’t squeeze the bag.
7. Measure the juice. In a saucepan, combine 2 cups of sugar for each 2½ cups of juice.
8. Stir over low heat to dissolve the sugar.
9. Bring to a boil, stirring frequently, and boil until the mixture reaches 220°F on your cooking thermometer, about 10 minutes.
10. Ladle into clean jars, leaving ¼ inch of headspace. Cap and seal.
11. Process for 5 minutes in a boiling-water-bath canner. Adjust for altitude (page 40), if necessary.
YIELD:5 PINTS (EIGHTY 1-OUNCE SERVINGS)
NUTRITION PER SERVING
This is delicious on banana bread or toast at breakfast, or on a muffin at teatime.
3 large lemons
3 pounds (about 2 whole) fresh pineapple, cleaned, cored, and chopped
2 ½ cups water
3 pounds (6% cups) sugar
1. Squeeze the lemons of all their juice. Reserve the seeds and lemon hulls. Strain the juice.
2. In a cheesecloth bag, combine the lemon hulls and seeds.
3. Combine the strained lemon juice, pineapple, water, and cheesecloth bag in a 4-quart saucepan. Bring to a boil and simmer until the pineapple is tender, about 15–20 minutes.
4. Remove the cheesecloth bag and add the sugar to the pan, stirring to dissolve.
5. Bring to a boil and simmer, stirring frequently, until a cooking thermometer reaches 220°F, about 12–15 minutes.
6. Ladle into clean jars, leaving ¼ inch of headspace. Cap and seal.
7. Process for 20 minutes in a boiling-water-bath canner. Adjust for altitude (page 40), if necessary.
YIELD:6 PINTS (NINETY-SIX 1-OUNCE SERVINGS)
NUTRITION PER SERVING
What can be said about such a classic?
1 quart water
½ teaspoon ascorbic acid (crystals, powder, or crushed tablets)
3½ pounds (about 7 large) peaches, peeled, pitted, and chopped
5 cups sugar
¼ cup lemon juice
¾ teaspoon almond extract

1. Prepare an acid bath by pouring the water into a medium-sized bowl and adding the ascorbic acid.
2. Dip the peaches in the acid bath; drain well. Combine the fruit, sugar, and lemon juice in a heavy 6–8 quart saucepan. Stir over medium heat to dissolve the sugar.
3. Boil slowly, stirring constantly, until the mixture thickens, the fruit is translucent, and a cooking thermometer reaches 220°F.
4. Stir in the almond extract.
5. Remove from the heat and skim off the foam, if there is any, with a metal spoon. Ladle into sterile jars, allowing ¼ inch of headspace. Cap and seal.
6. Process for 10 minutes in a boiling-water-bath canner. Adjust for altitude (page 40), if necessary.
YIELD: 7 PINTS (ONE HUNDRED TWELVE 1-OUNCE)
NUTRITION PER SERVING
This is an old standby enjoyed by all who try it.
4 pounds (about 8 large) peaches, peeled, pitted, and chopped
5 cups sugar
2 tablespoons lemon juice
½ teaspoon ground nutmeg
⅛ teaspoon ground cinnamon
1. Place all the ingredients in a heavy 8-quart saucepan. Cook over medium heat, stirring constantly, to dissolve the sugar.
2. Bring to a boil, stirring constantly, and boil until the mixture reaches 220°F on a cooking thermometer. (Or use one of the methods to test for doneness found on page 186.)
3. Ladle into sterile jars, allowing ¼ inch of headspace. Cap and seal.
4. Process for 15 minutes in a boiling-water-bath canner. Adjust for altitude (page 40), if necessary.
YIELD: FIVE ½-PINTS (FORTY 1-OUNCE SERVINGS)
NUTRITION PER SERVING
Using green grapes creates a finished product that is surprisingly pink!
3 pounds green grapes, washed, stemmed, picked over, and chopped
2 lemons, juiced
2⅓ cups water
2¼ cups sugar
1. Bring the grapes, lemon juice, and water to a boil in an 8-quart saucepan and simmer for about 30 minutes, until the fruit is very soft.
2. Meanwhile, scald a jelly bag by pouring boiling water through it. Squeeze out the excess water. Hang the bag in a convenient but out-of-the-way place with a large drip pot positioned underneath. (I use a dowel threaded through cabinet hardware for the bag, with the drip pot on the counter below.)
3. Pour the mixture into the wet jelly bag. Let drip for 24 hours or less. (Do not squeeze the pulp in the bag.)
4. Measure the strained juice. Add 2¼ cups of sugar for each 2⅓ cups of juice. Pour into a heavy 3-quart saucepan.
5. Stir the mixture over medium heat until the sugar has dissolved.
6. Boil the mixture for 10–12 minutes, or until a cooking thermometer reaches 220°F. Read about other methods of testing for doneness on page 186.
7. Skim off any foam with a metal spoon. Ladle into sterile jars, leaving ¼ inch of headspace. Cap and seal.
8. Process for 5 minutes in a boiling-water-bath canner. Adjust for altitude (page 40), if necessary.
YIELD: FOUR ½-PINTS (THIRTY-TWO 1-OUNCE SERVINGS)
NUTRITION PER SERVING
Just a touch of cinnamon and nutmeg makes this jelly a whole new flavor sensation.
2 cups lukewarm water
1 package (1¾ ounces) powdered pectin
6 ounces frozen grape juice concentrate
3½ cups sugar
⅛ teaspoon ground cinnamon
⅛ teaspoon ground nutmeg
1. Carefully combine the lukewarm water and the pectin in a 4-quart bowl, stirring constantly. Let stand for 45 minutes.
2. Thaw the grape juice concentrate and pour it into a 2-quart bowl.
3. Add 1¾ cups of the sugar to the juice bowl, stirring to dissolve it completely.
4. Add the remaining sugar to the pectin mixture, again stirring well to dissolve the sugar completely.
5. Add the juice mixture to the pectin mixture, then add the spices.
6. Ladle the jelly into freezer containers, leaving ½ inch of headspace. Cap the containers.
7. Let the containers stand until the mixture sets.
8. Label and freeze.
YIELD: FOUR ½-PINTS (THIRTY-TWO 1-OUNCE SERVINGS)
NUTRITION PER SERVING
This is a new combination of flavors that is certain to please.
1 lemon
1 medium orange
¾ cup water
⅛ teaspoon baking soda
4 cups blueberries, rinsed, picked over, and crushed
5 cups sugar
6 ounces liquid pectin
1. Peel the lemon and orange and chop the zest.
2. Remove the white membranes from the citrus and chop the pulp. Set aside.
3. Combine the chopped zest, water, and baking soda in a small saucepan. Bring to a boil, reduce the heat, and simmer for about 10 minutes, stirring occasionally. Drain well and reserve the zest.
4. Combine the blueberries, citrus pulp, and sugar in an 8-quart saucepan and bring to a boil. Reduce the heat and simmer for 5 minutes.
5. Remove from the heat. Let cool for 5 minutes. Add the drained zest.
6. Add the liquid pectin and return to a boil. Boil for exactly 1 minute, stirring constantly.
7. Skim off the foam with a metal spoon.
8. Ladle into sterile jars, leaving ¼ inch of headspace. Cap and seal.
9. Process in a boiling-water-bath canner for 10 minutes. Adjust for altitude (page 40), if necessary.
YIELD: SIX ½-PINTS (FORTY-EIGHT 1-OUNCE SERVINGS)
NUTRITION PER SERVING

Two great taste sensations team up to make a mellow-spiced spread.
3 cups cherries, washed, pitted, and crushed
3 cups blueberries, rinsed, picked over, and crushed
4 ½ cups sugar
1 tablespoon thinly sliced lemon zest
½ teaspoon ground nutmeg
1. Combine all the ingredients in a heavy 4-quart saucepan. Stir over medium heat to dissolve the sugar.
2. Boil over high heat, being careful not to burn, until the mixture reaches 220°F on a cooking thermometer (or use one of the methods found on page 186).
3. Ladle into sterile jars, allowing ¼ inch of headspace. Cap and seal.
4. Process for 15 minutes in a boiling-water-bath canner. Adjust for altitude (page 40), if necessary.
YIELD: FIVE ½-PINTS (FORTY 1-OUNCE SERVINGS)
NUTRITION PER SERVING

A particular favorite of adults, this has just the right blend of flavors to delight the palate.
3 lemons
2½ cups water
3 pounds (9–10) apples, peeled, cored, and sliced, about 7½ cups (reserve the peelings)
8 cups sugar
4 ounces crystallized ginger, finely chopped
2¼ teaspoons ground ginger
1. Grate the zest from the lemons and reserve. Cut the lemons in half and squeeze, reserving the juice.
2. Make a “stock” with the water and apple peelings. Boil, covered, in an 8-quart saucepan for about 15 minutes.
3. Remove the peelings from the stock and add the apple slices. Simmer until soft, about 10 minutes.
4. Add the sugar, ginger, ground ginger, lemon zest, and lemon juice.
5. Boil, stirring occasionally, until the spread thickens or until a cooking thermometer reaches 220°F. Or you may use one of the tests for doneness found on page 186. (Remember to allow for thickening when the spread has cooled.)
6. Ladle into sterile jars, leaving ¼ inch of headspace. Cap and seal.
7. Process for 10 minutes in a boiling-water-bath canner. Adjust for altitude (page 40), if necessary.
YIELD: TEN ½-PINTS (EIGHTY 1-OUNCE SERVINGS)
NUTRITION PER SERVING
My friend Marion lives in the middle of an apple orchard. She makes many creative treasures out of her abundance of Rome apples. My very favorite is her recipe for apple butter. The ground spices and peelings give the mixture a deep, rich flavor and appearance.
10 large (about 5 pounds) tart apples
2 cups apple cider
3–5 cups sugar
3 teaspoons ground cinnamon
¾ teaspoon ground cloves
½ teaspoon ground allspice
½ teaspoon ground nutmeg
1. Wash, core, and quarter the apples. No need to peel them.
2. Cook the apples slowly in the cider until tender. Blend in a food processor. You should have about 12–14 cups of pulp.
3. Add 3 cups of the sugar, then more sugar, if needed, to attain the desired sweetness. Add the spices and mix thoroughly.
4. Cook in a 350°F oven or slow-cooker for 6–8 hours, stirring often. Test for desired thickness by spooning the mixture onto a cold plate. If no liquid oozes around the edges, it is thick enough.
5. Ladle into sterile jars, leaving ¼ inch of headspace.
6. Process in a boiling-water-bath canner for 10 minutes. Adjust for altitude (page 40), if necessary. This apple butter can also be frozen.
YIELD: TEN ½-PINTS (EIGHT 1-OUNCE SERVINGS)
NUTRITION PER SERVING
Note: The apple butter will keep for up to 2 weeks in the refrigerator after it is freshly made or thawed and opened.
A variation on an old favorite, this is sure to delight your family.
2½ pounds (about 15 medium) plums, washed and pitted
1 cup water
½ cup lemon juice
2½ pounds apples, peeled, cored, and sliced
5½ cups sugar
1 teaspoon ground cinnamon
¼ teaspoon ground cloves
¼ teaspoon ground nutmeg
½ teaspoon salt
1. In a covered 3-quart saucepan, combine the plums, ½ cup of the water, and ¼ cup of the lemon juice. Cook over medium-high heat until the plums are soft, about 20 minutes.
2. Meanwhile, in another 3-quart saucepan, combine the apples, the remaining water, and the remaining lemon juice. Cook over medium-high heat until the apples are soft, about 10 minutes.
3. Let both mixtures cool slightly; combine in a blender or food processor and purée.
4. Pour the mixture into a heavy 8-quart flameproof roasting pan along with the sugar, spices, and salt.
5. Preheat the oven to 300°F.
6. Cook on top of the stove over medium heat until all the sugar dissolves.
7. Transfer the roasting pan to the oven.
8. Bake uncovered, stirring occasionally, until the mixture thickens. This will take 1–3 hours.
9. Test for doneness by spooning some onto a plate. If no liquid appears on the edges, it is ready.
10. Ladle into sterile jars, leaving ¼ inch of headspace. Cap and seal.
11. Process for 10 minutes in a boiling-water-bath canner. Adjust for altitude (page 40), if necessary.
YIELD: SIX ½-PINTS (FORTY-EIGHT 1-OUNCE SERVINGS)
NUTRITION PER SERVING
This is a delicious way to use abundant zucchini in late summer. The brown sugar gives it a rich taste.
4 pounds zucchini, peeled and chopped
5 tablespoons salt
2 pounds cooking apples, peeled, cored, and chopped
3 medium onions, chopped (2 cups)
5 cups distilled white vinegar
2⅔ cups firmly packed light brown sugar
1 piece dried ginger root (about 2 inches long)
2 tablespoons pickling spice
1. Layer the zucchini and salt in a large ceramic bowl. Cover and let stand for 12 hours or overnight.
2. Rinse and drain the zucchini and place in a 6-quart saucepan. Add the apples, onions, vinegar, and sugar.
3. Tie the whole spices in a cheesecloth bag and add to the pan.
4. Slowly bring to a boil, stirring often, until the mixture thickens, simmering uncovered for about 1–1½ hours. Be careful not to burn the mixture. Remove the spice bag.
5. Ladle into clean jars, leaving ¼ inch of headspace. Cap and seal.
6. Process for 10 minutes in a boiling-water-bath canner. Adjust for altitude (page 40), if necessary.
YIELD: 6 PINTS (NINETY-SIX 1-OUNCE SERVINGS)
NUTRITION PER SERVING
On a biscuit, with pork or chicken, or spread over pineapple cream cheese, this herb jelly is a winner.
2 cups apple juice
⅓ cup dried basil
3 ½ cups sugar
3 tablespoons fresh lemon juice, strained
¼ teaspoon butter or margarine
3 ounces liquid pectin
1. In a 5-quart saucepan, bring the apple juice to a boil. Add the dried basil, remove from the heat, and let stand for 2 hours.
2. Strain the apple-basil infusion through a paper coffee filter.
3. Rinse out the saucepan and return the mixture to it. Add the sugar, lemon juice, and butter.
4. Bring the new mixture to a boil over high heat, stirring constantly.
5. Add the liquid pectin and return the mixture to a full boil. Boil for exactly 1 minute, stirring constantly. Ladle the jelly into clean jars, leaving ½ inch of headspace. Cap and seal.
6. Process in a boiling-water-bath canner for 5 minutes. Adjust for altitude (page 40), if necessary.
YIELD: 2 PINTS (THIRTY-TWO 1-OUNCE SERVINGS)
NUTRITION PER SERVING
Golden amber in color and subtle in flavor, this jelly stands up best on delicate dinner rolls or breakfast breads.
3 cups water
⅓ cup coriander seeds, bruised
3 cups sugar
¼ cup fresh lemon juice, strained
¼ cup mild honey
1 package (1% ounces) powdered pectin
Note: To bruise coriander seeds, partially crush them with the back of a spoon.
1. Boil the water and coriander seeds for 2 minutes in a 3-quart saucepan. Let stand, covered, for 6 hours or overnight.
2. Strain the infusion through a coffee filter and return 2½ cups of the liquid to the pan.
3. Add the sugar, lemon juice, and honey. Mix well. Boil hard and add the pectin.
4. Bring to a boil again and boil for exactly 1 minute. Remove from the heat and skim off any foam with a metal spoon.
5. Pour into four half-pint sterile jars, leaving ¼ inch of headspace. Cap and seal.
6. Process for 5 minutes in a boiling-water-bath canner. Adjust for altitude (page 40), if necessary.
YIELD: FOUR ½-PINTS (THIRTY-TWO 1-OUNCE SERVINGS)
NUTRITION PER SERVING

You’ll find this aristocratic concoction in specialty food stores. Now that you have the recipe, you can wow your family and friends.
4 cups apple juice
2 cups nutmeg-scented geranium leaves, washed and dried (always make sure plants have not been sprayed with insecticides)
5 cups sugar
3 tablespoons fresh lemon juice
3 ounces liquid pectin
¼ teaspoon freshly grated nutmeg
1–2 drops all-natural green food coloring (optional)
1. Boil the apple juice and geranium leaves for 2 minutes in an 8-quart saucepan. Strain. Let the mixture cool overnight. You can do this step several days ahead and refrigerate the mixture until needed.
2. Combine the juice mixture, sugar, and lemon juice in an 8-quart saucepan. Boil, stirring frequently, over high heat for 5 minutes.
3. Add the pectin. Return the mixture to a boil, timing it for exactly 1 minute.
4. Remove the pan from the heat. Skim off any foam. Add the grated nutmeg.
5. Add a drop or two of all-natural green food coloring, if using.
6. Pour the jelly into clean jars, leaving ¼ inch of headspace.
7. Process in a boiling-water-bath canner for 5 minutes. Adjust for altitude (page 40), if necessary.
8. Let the jars cool, check the seals, label, and then store them for about a week so the flavors can marry.
YIELD: SIX ½-PINTS (FORTY-EIGHT 1-OUNCE SERVINGS)
NUTRITION PER SERVING

This subtle but delicious classic has endless possibilities.
2 cups apple juice or cider
2 bags peppermint tea, or 8 tablespoons (½ cup) fresh peppermint leaves
1 ½ cups sugar
3 tablespoons fresh lemon juice, strained
¼ teaspoon butter or margarine
1–3 drops all-natural green food coloring (optional)
3 ounces liquid pectin
1. In a heavy 5-quart saucepan, bring the apple juice and tea bags to a full boil, and then let the tea steep for 10 minutes. If you use fresh mint, strain the liquid after cooking.
2. Remove the tea bags and add the sugar, lemon juice, butter, and food coloring, if using. Bring to a boil over high heat, stirring constantly.
3. Add the liquid pectin and return the mixture to a boil, timing it for exactly 1 minute and stirring constantly.
4. Remove from the heat and ladle into clean jars, leaving ¼ inch of headspace. Cap and seal.
5. Process in a boiling-water-bath canner for 5 minutes. Adjust for altitude (page 40), if necessary.
Note: Try using 2 tablespoons of dried mint leaves instead of tea bags; strain the finished mixture through a coffee filter before ladling into jars for processing.
YIELD: 2 PINTS (THIRTY-TWO 1-OUNCE SERVINGS)
NUTRITION PER SERVING
This recipe gives new meaning to tea and toast.
2 lemons
8 medium-sized tart apples, peeled, cored, and sliced (about 7 cups)
2½ cups water
1 teaspoon ground ginger
6 cups sugar
½ cup chopped crystallized ginger
1. Peel the lemons, reserving the zest. Cut the peeled lemons in half and squeeze the juice. Reserve the juice.
2. In an 8-quart saucepan, cook the apples, water, lemon zest, lemon juice, and ground ginger until the apples are soft. Add the sugar and stir until it is dissolved.
3. Boil the mixture rapidly for 15 minutes, stirring frequently, until a candy thermometer reaches 220°F.
4. Remove the pan from the heat and stir in the crystallized ginger. Skim off any foam and let stand for 10 minutes.
5. Pour it into clean jars, leaving ½ inch of headspace. Cap and seal.
6. Process for 10 minutes in a boiling-water-bath canner. Adjust for altitude (page 40), if necessary.
YIELD: TEN ½-PINTS (EIGHTY 1-OUNCE SERVINGS)
NUTRITION PER SERVING
This spread is something of a mystery — your family will never guess that it has carrots in it!
6 cups water
4 cups raw carrots, peeled and grated
4 medium lemons, 2 rinds grated, then all 4 juiced and strained
2 medium oranges, 1 rind grated, then both juiced and strained
4 cups sugar
⅛ teaspoon salt
1. In a 4-quart saucepan, combine the water, carrots, and zest of two lemons and one orange. Cook, covered, until tender, about 30 minutes.
2. Add the strained lemon and orange juices to the citrus zest and carrots. Measure the mixture. There should be about 6 cups.
3. Add ⅔ cup of the sugar for each cup of the mixture. Stir over medium heat until the sugar has dissolved.
4. Boil, uncovered, until the mixture reaches 220°F on a candy thermometer or sheets off a spoon (see page 186). This should take 30–45 minutes. Stir and watch the pot so the mixture does not burn.
5. Add the salt and remove the mixture from the heat.
6. Pour the marmalade into clean, hot jars. Leave ¼ inch of headspace. Cap and seal.
7. Process in a boiling-water-bath canner for 10 minutes. Adjust for altitude (page 40), if necessary.
YIELD: TEN ½-PINTS (EIGHTY 1-OUNCE SERVINGS)
NUTRITION PER SERVING
When yellow squash are abundant, try this recipe. It is a great accompaniment to lamb, chicken, or pork.
2 pounds small, tender yellow squash, peeled and sliced
5 cups sugar
1 can (13½ ounces) crushed pineapple in its own juice, drained
Juice of 2 lemons
2 tablespoons chopped crystallized ginger
1 teaspoon grated lemon zest
1 package (1¾ ounces) powdered pectin
1. Combine the squash, sugar, pineapple, lemon juice, ginger, and grated lemon zest in a heavy saucepan. Bring to a simmer, lower the heat, and cook, uncovered, for about 15 minutes, stirring frequently.
2. Remove the pan from the heat and add the powdered pectin, stirring well. Return the mixture to a boil for exactly 1 minute. Remove the pan from the heat.
3. Pour the hot mixture into clean jars, leaving ¼ inch of headspace. Cap and seal.
4. Process for 15 minutes in a boiling-water-bath canner. Adjust for altitude (page 40), if necessary.
YIELD: 5 PINTS (EIGHTY 1-OUNCE SERVINGS)
NUTRITION PER SERVING

Serve this aromatic sweet-and-tart jelly with your next roast of beef — or mix it with low-fat cream cheese and eat it with vegetable sticks or crackers.
2 cups white wine vinegar
1 bottle (6 ounces) prepared horseradish (not cream style)
6 cups sugar
2 cups water
6 ounces liquid pectin
1. Heat the vinegar in a nonreactive saucepan and pour it into a clean 1-quart jar.
2. Add the horseradish, cover the jar, and let stand for 24–48 hours at room temperature.
3. Strain through a wire strainer into a 2-quart saucepan. The mixture will measure 2 cups.
4. Add the sugar and water, stirring to dissolve the sugar. Bring to a full boil.
5. Add the liquid pectin and boil the mixture for exactly 1 minute, stirring constantly.
6. Pour the jelly into clean jars, leaving ¼ inch of headspace. Cap and seal.
7. Process in a boiling-water-bath canner for 10 minutes. Adjust for altitude (page 40), if necessary.
YIELD: SEVEN ½-PINTS (FIFTY-SIX 1-OUNCE SERVINGS)
NUTRITION PER SERVING
This jelly is great with meats or mixed with cream cheese and spread on crackers.
¼ cup (4–6 medium) seeded, chopped jalapeño chiles (wear rubber gloves)
6 cups sugar
2 ½ cups cider vinegar
1 medium-sized green bell pepper, chopped
6 ounces liquid pectin
1. Prepare the chiles while wearing rubber gloves, then mince in a food processor.
2. Combine the sugar, vinegar, chiles, and bell pepper in a heavy saucepan. Bring to a full boil over high heat, stirring constantly.
3. Remove from the heat and stir in the liquid pectin. Return to a full boil. Boil for exactly 1 minute.
4. Remove from the heat and skim off any foam with a metal spoon.
5. Ladle into sterile jars, leaving ¼ inch of headspace. Cap and seal.
6. Process for 5 minutes in a boiling-water-bath canner. Adjust for altitude (page 40), if necessary.
YIELD: SEVEN ½-PINTS (FIFTY-SIX 1-OUNCE SERVINGS)
NUTRITION PER SERVING

Serve this jelly with corn bread or over cream cheese as an appetizer. Try prepared pineapple cream cheese, available at supermarkets.
2 large red bell peppers, seeded and chopped
1 large green bell pepper, seeded and chopped
1 small onion, peeled and finely chopped
4 jalapeño chiles, seeded and very finely chopped (wear rubber gloves)
2 teaspoons salt
2½ teaspoons cumin seeds, toasted 1 whole, small red chile
5 cups sugar
1½ cups red wine vinegar
½ cup fresh lemon juice
¼ teaspoon chili powder
¼ teaspoon cayenne pepper
6 ounces liquid pectin
1. Combine the red and green peppers, onion, jalapeño chiles, and 1 teaspoon of the salt in a colander. Let stand for about 3 hours. Drain well and press the mixture with the back of a spoon to remove moisture. (Wear rubber gloves.)
2. Make a spice bag of the cumin seeds and red chile.
3. Combine the pepper mixture, sugar, spice bag, vinegar, lemon juice, chili powder, cayenne, and remaining salt. Bring to a boil in a 6-quart saucepan. Stir and simmer for 10 minutes.
4. Add the pectin and return to a boil. Boil for exactly 1 minute. Remove from the heat. Remove the spice bag.
5. Ladle into sterile jars, leaving ¼ inch of headspace. Cap and seal.
6. Process for 5 minutes in a boiling-water-bath canner. Adjust for altitude (page 40), if necessary.
YIELD: SEVEN ½-PINTS (FIFTY-SIX 1-OUNCE SERVINGS)
NUTRITION PER SERVING
After all, tomatoes are in the fruit family. When combined with citrus, they make a remarkable marmalade.
1 medium orange, peeled (reserve the zest and cut into strips)
1 lemon, peeled (reserve the zest and cut into strips)
5 pounds tomatoes, peeled, cored, and chopped (about 8 cups)
3 cups sugar
¼ cup cider vinegar
1½ teaspoons ground allspice
1½ teaspoons ground cinnamon
½ teaspoon ground cloves
1. Carefully remove and discard the white membrane from the citrus and chop the fruit.
2. Combine the citrus and tomatoes in a heavy 8-quart nonreactive saucepan.
3. Add the sugar, vinegar, and spices to the saucepan and bring to a boil over high heat. Lower the heat and simmer, uncovered, for 1 hour or more, or until the mixture is reduced to about 4 cups. Stir frequently and be careful not to burn.
4. Ladle into sterile jars, leaving ¼ inch of headspace. Cap and seal.
5. Process for 10 minutes in a boiling-water-bath canner. Adjust for altitude (page 40), if necessary.
YIELD: FOUR ½-PINTS (SIXTEEN 2-OUNCE SERVINGS)
NUTRITION PER SERVING
Try this on a garlic bagel with cream cheese.
8 pounds tomatoes, peeled, cored, and chopped in a food processor
2 tablespoons sugar
2 teaspoons salt
¼ cup apple cider vinegar
¼ cup firmly packed light brown sugar
1 teaspoon ground cinnamon
½ teaspoon ground white pepper
1. Combine the tomatoes, sugar, and salt in a 4-quart saucepan. Bring to a boil over medium heat, and then simmer for about 30 minutes.
2. Skim off the foam as it rises with a metal spoon.
3. Add the vinegar, brown sugar, and spices and simmer until thick, about 30 minutes longer, or until the mixture mounds up on a cold spoon.
4. Ladle into sterile jars, leaving ¼ inch of headspace. Cap and seal.
5. Process for 15 minutes in a boiling-water-bath canner. Adjust for altitude (page 40), if necessary.
6. Store for 2 weeks before using to allow the flavors to marry.
YIELD: FOUR ½-PINTS (THIRTY-TWO 1-OUNCE SERVINGS)
NUTRITION PER SERVING

This jam is delicious on a bagel, bran muffin, or warm piece of corn bread.
4 cups sugar
¾ cup water
6 cups tiny pear-shaped yellow tomatoes*
3 jalapeño chiles, seeded and finely chopped (wear rubber gloves)
3 tablespoons chopped fresh basil leaves
3 tablespoons fresh lemon juice
2 tablespoons distilled white vinegar
1. In a 6-quart saucepan combine the sugar and water. Bring to a boil over medium heat and simmer until the syrup reaches 234°F on a cooking thermometer.
2. Remove from the heat and add the tomatoes, mixing well. The syrup may change consistency, but continue stirring and eventually the tomatoes will mix evenly.
3. Return to the heat and add the chiles, basil, lemon juice, and vinegar. Simmer, uncovered, on very low heat until the mixture thickens, about 1½–2 hours. Stir often, being careful not to burn. The jam will darken.
4. Ladle into clean jars, leaving ¼ inch of headspace. Cap and seal.
5. Process for 15 minutes in a boiling-water-bath canner. Adjust for altitude (page 40), if necessary.
YIELD: FFOUR ½-PINTS (THIRTY-TWO 1-OUNCE SERVINGS)
NUTRITION PER SERVING
*Note: Don’t substitute red cherry tomatoes, as they are more acidic and less sweet.
Serve this remarkable condiment with steamed vegetables, grilled chicken, or pork.
10 shallots, sliced
2 tablespoons peeled and julienned ginger root
2 tablespoons unsalted butter
1 clove garlic, sliced
½ cup chicken broth
⅓ cup balsamic vinegar
¼ cup honey
¼ teaspoon salt
¼ teaspoon freshly ground black pepper
1. In a heavy skillet, sauté the shallots and ginger in the butter until they are tender, about 10–12 minutes. Add the garlic and sauté, stirring constantly, about 1 minute longer. Do not let the garlic brown.
2. Stir in the remaining ingredients and increase the heat, stirring frequently, until the mixture thickens and most of the liquid has been absorbed.
3. Store in a clean refrigerator container for up to 2 weeks.
YIELD: 1 CUP (EIGHT 1-OUNCE SERVINGS)
NUTRITION PER SERVING
Use this condiment as a flavorful accompaniment to lamb, pork, or chicken.
3 cups white wine vinegar
½ cup fresh garlic, peeled and finely chopped (about 50 cloves)
6 cups sugar
2 cups water
6 ounces liquid pectin
1. In a 2½-quart saucepan, simmer the vinegar and garlic for about 15 minutes. Remove the pan from the heat and cool slightly.
2. Pour the liquid into a clean 1-quart glass jar. Cover the jar and let stand at room temperature for 24–48 hours.
3. Strain the vinegar and garlic through a wire strainer into a 6-quart kettle. Measure 2 cups of liquid. Add more uncooked white wine vinegar, if necessary.
4. Add the sugar and water to the vinegar, stirring to dissolve the sugar. Bring to a full rolling boil over high heat.
5. Stir in the liquid pectin and return the mixture to a boil for exactly 1 minute, stirring constantly.
6. Skim off any foam with a metal spoon.
7. Pour the jelly into hot, clean jars, leaving ¼ inch of headspace. Cap and seal.
8. Process in a boiling-water-bath canner for 10 minutes. Adjust for altitude (page 40), if necessary.
YIELD: THREE ½-PINTS (TWENTY-FOUR 1-OUNCE SERVINGS)
NUTRITION PER SERVING

Serve these as a tangy flavor enhancer for fish, lamb, or chicken.
5 small organically grown lemons
⅔ cups canning salt
1 cup fresh lemon juice (about 6 lemons)
½ cup olive oil
1. Scrub the lemons under cold water. Dry and cut each into four wedges.
2. Toss the lemon wedges with the salt in a decorative airtight glass jar.
3. Add the lemon juice and mix well.
4. Store at room temperature (72°F) for 7–10 days. Stir or shake the jar each day to remix the salt and juice.
5. Add the oil to cover the lemon mixture and store in the refrigerator for up to 6 months.
6. Before using, rinse each slice under cold running water. Chop and sprinkle over baked fish or serve alongside roasted lamb or chicken. Delicious and beautiful.
YIELD: 20 LEMON WEDGES (TWENTY SERVINGS)
NUTRITION PER SERVING

Note: Lemons may darken as they age.
Spread this condiment on breads or use it as a sauce for chicken, turkey, or pork. For more information on curds, see page 180. For a speedy shortcut, try the canned cranberry version.
2 cups whole cranberry sauce, or 1 can (16 ounces) cranberry sauce
4 eggs
½ cup (1 stick) butter, softened
½ cup fresh lime juice (about 4 medium limes)
½ cup sugar
2 teaspoons grated lime zest
1. Purée all the ingredients in a food processor until smooth.
2. Pour the mixture into a double boiler over hot, not boiling, water. Stirring constantly, cook until the mixture is thick, smooth, and shiny. This should take about 20 minutes. Do not overcook.
3. Ladle into hot, clean jars, leaving ½ inch of headspace. Cap and seal.
4. Process in a pressure canner at 10 pounds of pressure for 10 minutes. Adjust for altitude (page 40), if necessary. Store in the refrigerator; use within 3 months.
YIELD: THREE OR FOUR ½-PINTS (TWENTY-FOUR THIRTY-TWO I-OUNCE SERVINGS)
NUTRITION PER SERVING
Here is a great new way to enjoy an old-fashioned favorite. Energy saving and speedy, this pear butter will delight all who try it.
12 ripe Bosc or Bartlett pears, peeled and chopped
¾ cup sugar
Juice of 1 lemon
¼ cup water
3 2-inch strips lemon zest, ¼ inch wide
1 vanilla bean
1. Combine all the ingredients in a heavy 8-quart saucepan. Cook over low heat for 2½ hours, until fruit is very soft. Be careful not to burn. Stir frequently.
2. Remove the vanilla bean and the strips of lemon zest.
3. Put the mixture through a food mill. Pour into sterile jars. Cap and seal.
4. Refrigerate immediately. This will keep for 2 weeks in the refrigerator.
YIELD: TWO ½-PINTS (SIXTEEN 1-OUNCE SERVINGS)
NUTRITION PER SERVING