
We are all used to working with traditional cotton fabrics for our quilts. Combining linen and wool with cotton adds a new dimension. Use fabrics with designs such as flowers, circles, leaves, and paisleys for flower centers, birds, butterflies, and dragonflies. The prints add interest, light, and shade, as well as a little more punch, especially when they are fussy cut.
After working on a few of these projects, you will start to look at fabrics with a different eye. The simple shapes for the appliqué are easy to cut and stitch, and one project tends to lead to another. Soon you will end up with a variety of completed masterpieces. This is a time to throw caution to the wind and try something new where there are few rules.
Appliqué Basics
Wool
Wool is available in a great range of textures and blends. I like pure wool, but wool blends can be used as well. Try to choose wools that are either felted or have a tight weave. Wool fabrics with a looser texture can be backed with fusible (iron-on) interfacing to give them more stability and to reduce the fraying on the edges. I use wool on projects that do not require a lot of durability, such as a wallhanging.
Wool also comes in a variety of colors and textures. Heavily textured wool that has a fuzzy or furry texture is great to use for animals.
Before you begin, there are a few things to consider in order to get the best outcome from wool:
•Before using wool fabric, check for colorfastness by wetting the wool and steam pressing it on top of a piece of white cotton fabric. If there is no color bleed, then it is fine to use. If the color bleeds, you need to prewash the wool separately using a color catcher to catch any excess dye and to see whether the color has run.
•Wool should also be preshrunk prior to cutting. You can do this by washing it or by giving it a good steam press.
•Wool that is not machine washable can often be felted. To do this, prepare the wool in a washing machine with hot water and detergent. Dry it in the clothes dryer on hot to complete the felting process. Then give the wool a good steam press. Wool that is machine washable cannot be felted.
•Thrift shops are often a good source of wool. You can buy used wool clothes and blankets and cut them into usable pieces.
•You can also experiment with dyeing wool. If you throw fabrics with different colors and textures into the same dye bath, you will get an array of different shades of one color.
Wool Felt
Wool felt is my preferred medium. It is more durable than wool, which means it can be used on items that will receive a fair amount of use, such as a bag or pillow. It has a very soft feel and is a pleasure to work with. You should use only pure wool felt; synthetic craft felt is not suitable, as it will pill and wear over time.
•Wool felt tends to shrink, so either prewash it in cold water or steam press it. Check for colorfastness as you did for wool fabric (see page 5). I don’t prewash mine, but I do give it a good steam press. The wool felt that I use is machine washable and colorfast.
•Wool felt is a delight to work with because the edges are so clean once they are cut. You can let your imagination run wild—cut shapes as simple or as intricate as you like. Small circles that are quite tricky in other forms of appliqué are easy in wool felt.
•When stitching the wool felt, you need only take a small stitch into the fabric, as the edges won’t fray.
•When cutting wool felt, make sure that you get a neat, smooth edge, as this will be the finished edge.
•Wool felt gives a lovely soft effect and stands out beautifully on heavily quilted backgrounds.
•Wool felt comes in an array of colors, from bright to soft pastels. It has a very soft feel and is a pleasure to work with.
Choosing Threads for Appliqué
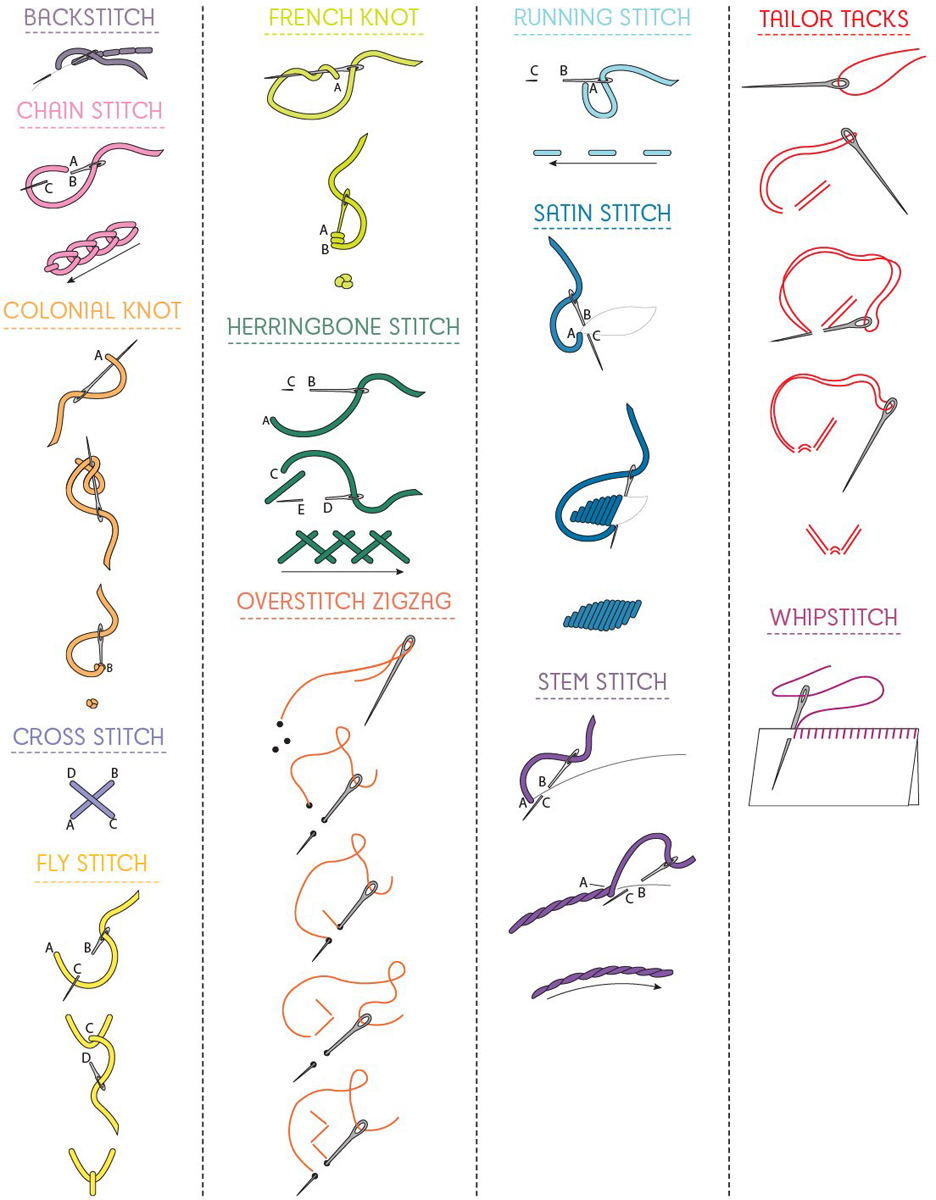
When selecting threads, anything goes. You can use a variety of threads to attach wool to the background and to make embellishments. I like to use size 5 and 8 perle cottons, as they are readily available. You can use any embroidery threads, including stranded embroidery thread, which allows you to choose the number of strands depending on how fine or thick you want the stitching to be. Whichever thread you choose, you will need a variety of colors. As you work with this appliqué technique, you can slowly build up a wide color palette. The projects in this book are also great for using all those fancy threads that you may have in your collection. Try some metallic and variegated threads. You really can’t make a mistake.
For my style of appliqué, I like all of the stitching to be a feature. Therefore, I tend not to use the wool threads that are usually associated with wool appliqué. If you use these threads, keep in mind that they blend in beautifully with wool. If you want your stitching to stand out, you can add embellishing threads later.
Using Freezer Paper for Appliqué
I use freezer paper to make my appliqué templates. It’s easy, convenient, and works for needle-turn and raw-edge appliqué.
1.Trace the appliqué patterns onto the dull (paper) side of the freezer paper and cut on the drawn lines.
2.Use an iron to press the freezer-paper templates onto the right side of the appropriate wool, wool felt, cotton, or linen fabric. The shiny side of freezer paper is plastic and sticks to fabric. You can peel the templates right off when you are done and use them several times before they won’t stick anymore.
3.Cut the appliqué pieces:
•For woven fabrics, such as cotton or linen, trace around the freezer paper and cut each piece with a ¼˝ seam allowance, then see the technique in Needle-Turn Appliqué (page 7).
•For wool or wool felt, cut along the edge of the template for raw-edge appliqué. There is no need to trace around the template or to leave a seam allowance.
4.Remove the freezer-paper template.
Needle-Turn Appliqué
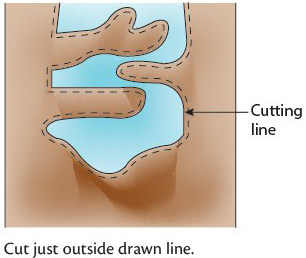
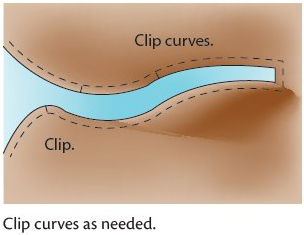
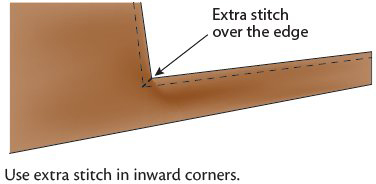
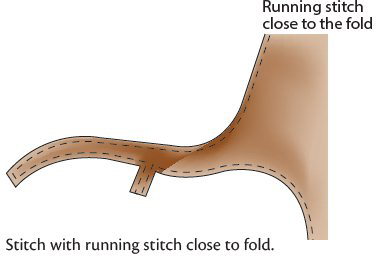
For my style of needle-turn appliqué, just turn under the fabric on the drawn line after tracing and cutting the appliqué pieces. Use a running stitch (page 9) to stitch close to the turned edge. On corners and inward curves, it may be necessary to make a small stitch over the edge to hold the fabric securely.
Needles for Appliqué
You can use a variety of needles, such as embroidery, straw, and chenille, in a range of sizes. You may already have most of these needles in your sewing kit.
Embroidery needles work well for all the basic stitches. You may want to use chenille needles when working on linen, because they are easy to thread with perle cotton and have a nice sharp point.
Straw needles or milliners needles are great for making colonial knots and French knots. The needle width is an even thickness along its length, including the eye, which makes wrap stitches much easier to do.
That being said—in the end, use any needle that works well for you.
Scissors
I am quite particular about the scissors I use for cutting my wool and wool felt. My favorite pair has a blade length of approximately 2˝ (5cm) and a blunt end. They aren’t particularly expensive, but they cut beautifully. I can cut most of my shapes with this pair. To cut small circles, I use a smaller blade. To cut large trees and so on, I use my everyday fabric scissors, which have a 5˝ (13cm) blade. Remember to keep your scissors exclusively for fabric. Use a cheap, everyday pair of scissors for cutting paper patterns.
Cutting
The appliqué shapes can be cut out freehand, or you may prefer to use freezer-paper templates. When cutting the wool and wool felt, you don’t need to add a seam allowance; when the designs overlap, just make sure to leave a small amount to tuck under.
I like to do as much of the decorating as I can before I appliqué the shape to the background. It is much easier to work with the pieces when they are small, and they are much more portable that way. This also gives me the option of auditioning the shapes on different backgrounds. I often have a few background fabrics beside me while I work so that I can place the pieces onto them when they are done and get a feeling for the color combinations. Don’t be afraid to change your mind on your background choice as you work; it is all a part of the process.
Using a Design Wall
I always use a design wall or board to audition fabrics for the background and appliqué. You can make a simple board, which is great for smaller projects, by stapling polyester batting over an artist’s canvas.
I use flat-head pins or appliqué pins to hold the appliqué pieces in place until they are stitched.
You can use glue baste or gluesticks to hold the shapes in place temporarily instead of pinning. If you do use glue, use it sparingly, as it can make it more difficult to stitch through an area that is glued.
Backgrounds
You can choose wool, cotton, or linen for the background, depending on the look you are trying to achieve.
•Wool looks softer and has more of a folk or country look. You can piece the backgrounds or use the wool as a wholecloth background. If you are piecing the wool for a background, it is better to press the seams open to reduce bulk. Alternately, you may like to press the seams together and topstitch the seam to the background by hand or machine.
•Cotton is great for bed quilts, as it is finer and more readily available. Cotton is also available in a larger range of colors and patterns than wool. Using printed backgrounds tends to give the quilt a more contemporary look. You can piece the background or use the cotton as a wholecloth. If using it as a wholecloth, however, you are restricted to the width of the fabric—it will be approximately 44˝ (110cm) wide maximum. You can easily add borders using any of your favorite traditional blocks.
•Linen is beautiful to use as a background, as it is delightful to embroider on. Also, widths up to 58˝ (150cm) are available. Linen comes in a wide range of colors, textures, patterns, and prints. Linen/cotton blends are also great to work with. When appliquéing onto linen, you may need to neaten (zigzag or overlock) the outer edges, as linen tends to fray more easily because of its more open weave.
Batting
I use high-loft wool batting in my quilts, as it gives extra dimension to the quilt after it is quilted. I like to machine quilt the background heavily. Outlining the appliqué makes the shapes stand out or pop on a completed quilt. Wool batting also gives quilts a soft, modern feel.
Laundering
Quilts made from a mixture of wool, linen, and cotton are as washable as any other quilt. I have product tested a piece that was appliquéd with many colors of wool on a solid background. I machine washed it by throwing it into the machine with a load of my everyday washing (not something I would normally do with my quilts). Even without pressing, it performed beautifully.
Appliqué patterns for all the projects are at the back of the book, starting on page 73. Some of the larger patterns are on the pullout pages. You’ll notice that the appliqué patterns are not numbered, and there is no placement diagram to show you exactly where to place each piece. Instead, you are referred to the project photograph and given free rein to place the appliqués as you choose. While you may closely follow the placements that I have used, you may also decide to strike out on your own and follow your own whims. Either way, enjoy!
