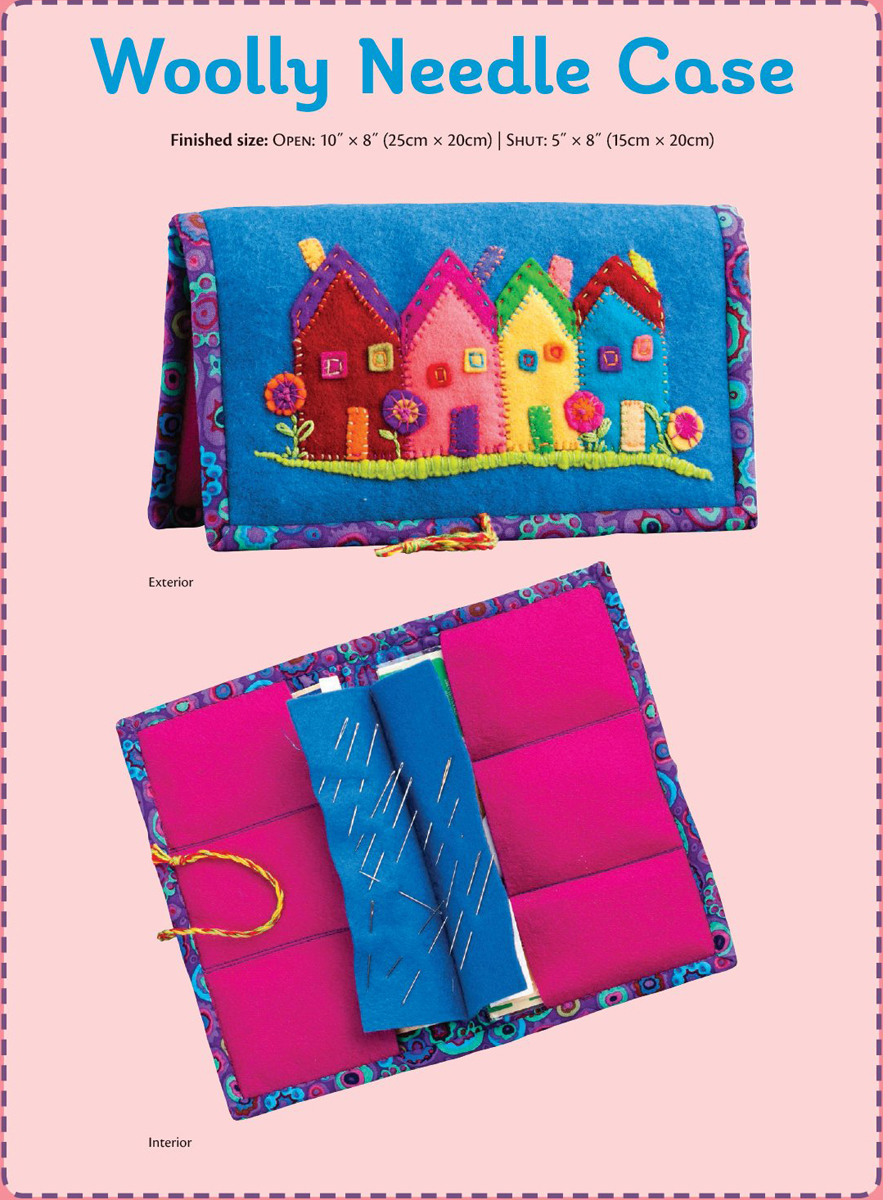

This little needle case not only looks great but is also really practical and easy to use. The pockets inside store all of your needles in their packets, and the folded sleeve is great for loose needles and pins.
Make this in your favorite colors and decorate with a little row of houses like mine or use some of the other designs in this book. Make more than one—they make great gifts for your stitching friends.
MATERIALS
Yardage is based on 44˝ (112cm) wide fabric, unless otherwise noted.
Wool felt: 2 pieces 8˝ × 10˝ (20cm × 25cm) in different colors for exterior of case and interior pockets
Wool felt: 1 piece 4˝ × 7˝ (10cm × 18cm) of a coordinating color for center flap
Wool felt: 10 squares 4˝ × 4˝ (10cm × 10cm) in a variety of colors, including lime green
Cotton print: ¼ yard (23cm) for inside of case
Binding: ⅛ yard (11cm)
Fusible batting: 8˝ × 10˝ (20cm × 25cm)
Button: ½˝ (12mm) diameter
Perle cotton thread: size 8 in a variety of colors
CUTTING
Wool felt
From an 8˝ × 10˝ piece, cut 2 pieces 3½˝ × 8˝ for the interior pockets.
Cotton print
Cut 1 piece 8˝ × 10˝.
Appliqué pieces
Copy the Woolly Needle Case appliqué patterns (page 109) at 100%. The patterns give you the shapes to cut, and the pattern pieces show suggested stitching.
Note: All of these pieces are cut from wool felt, so there is no need to trace around the pattern to leave a seam allowance.
1.Trace the appliqué patterns onto the dull (paper) side of freezer paper and cut on the drawn lines.
2.Press the freezer-paper templates onto the right side of the appropriate felt colors and cut around the templates (there is no need to leave a seam allowance).
3.Cut out all the appliqué pieces. Refer as needed to the following suggestions for fabric for the appliqué pieces:
Colored felt: Cut out all the buildings, roof pieces, chimneys, windows, and flowers.
Lime-green felt: Cut out a narrow, curving strip for the grass below the buildings.
Appliqué
Note: I like to stitch as much of the appliqué as I can before I apply it to the background. Refer to Appliqué Basics (page 5) and Embroidery Stitches (page 9) as needed.
1.Fold the exterior background wool felt 8˝ × 10˝ piece in half so the folded piece is 5˝ × 8˝. This creates the front appliqué area.
2.Using the project photo (page 69) and appliqué patterns (page 109) as a guide for placement, start adding the shapes to the background. Keep in mind that there is a ¼˝ seam allowance along the raw edges. Use appliqué pins to hold the shapes in place while you stitch them to the background.
3.Appliqué all of the windows, doors, and roofs. Add flowers using small dots of wool and colonial knots. Stitch the stems with backstitch and the leaves with chain stitch.
TIP
You can add extra embellishment to the design if you wish. Beads and buttons will add extra dimension.
Make the Case
Seam allowances are ¼˝.
1.Following the manufacturer’s instructions, fuse the fusible batting to the wrong side of the print 8˝ × 10˝ piece.
2.Place the 2 wool felt 3½˝ × 8˝ pieces for the pockets onto the right side of the print fabric, aligning the 8˝ outside edges. Draw chalk lines on the felt 2¾˝ from each end as shown and stitch in place along these lines to create the pockets.

3.Pin the exterior appliquéd piece to the print piece so the batting is sandwiched between the wrong sides of the wool felt and the print piece. Stitch close to the outer edge all the way around the sandwich.
4.With wrong sides together, press the binding strip in half along the long edge, folding in the ends as you would for a quilt binding.
5.Attach the binding to the needle case as you would for a quilt binding, machine stitching onto the outside of the case and hand stitching along the inside edge.

6.With the sewing kit open, center and pin the wool felt 4˝ × 7˝ piece onto the print fabric as shown. Stitch in place through the center length, stitching through all layers.

Make the Closure
1.Cut 2 lengths each 16˝ long of perle cotton.
2.Secure to a door handle or have someone hold one end tight while you twist the threads together. When the threads start to twist and curl up on themselves, hold the twist in the center and release the 2 ends. This will allow the threads to twist together. Knot the end to prevent it from raveling.
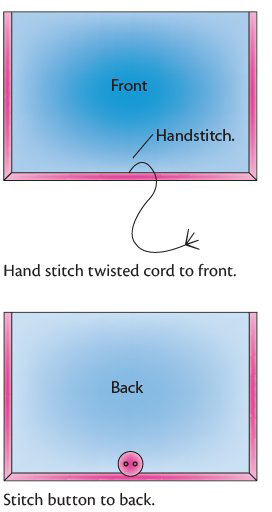
3.Hand stitch the twisted cord to the front of the needle case along the binding seam. Stitch the button to the back of the needle case as shown. To close, simply twist the cord around the button.

For all printable patterns or digital content, click here.
For all printable patterns or digital content: http://tinyurl.com/11047-patterns
For all printable patterns or digital content: http://tinyurl.com/11047-patterns
For all printable patterns or digital content: http://tinyurl.com/11047-patterns
For all printable patterns or digital content: http://tinyurl.com/11047-patterns
For all printable patterns or digital content: http://tinyurl.com/11047-patterns
For all printable patterns or digital content: http://tinyurl.com/11047-patterns
For all printable patterns or digital content: http://tinyurl.com/11047-patterns
For all printable patterns or digital content: http://tinyurl.com/11047-patterns
For all printable patterns or digital content: http://tinyurl.com/11047-patterns
For all printable patterns or digital content: http://tinyurl.com/11047-patterns
For all printable patterns or digital content: http://tinyurl.com/11047-patterns
For all printable patterns or digital content: http://tinyurl.com/11047-patterns
For all printable patterns or digital content: http://tinyurl.com/11047-patterns
For all printable patterns or digital content: http://tinyurl.com/11047-patterns
For all printable patterns or digital content: http://tinyurl.com/11047-patterns
For all printable patterns or digital content: http://tinyurl.com/11047-patterns
For all printable patterns or digital content: http://tinyurl.com/11047-patterns
For all printable patterns or digital content: http://tinyurl.com/11047-patterns
For all printable patterns or digital content: http://tinyurl.com/11047-patterns
For all printable patterns or digital content: http://tinyurl.com/11047-patterns
For all printable patterns or digital content: http://tinyurl.com/11047-patterns
For all printable patterns or digital content: http://tinyurl.com/11047-patterns
For all printable patterns or digital content: http://tinyurl.com/11047-patterns
For all printable patterns or digital content: http://tinyurl.com/11047-patterns
For all printable patterns or digital content: http://tinyurl.com/11047-patterns
For all printable patterns or digital content: http://tinyurl.com/11047-patterns
For all printable patterns or digital content: http://tinyurl.com/11047-patterns
For all printable patterns or digital content: http://tinyurl.com/11047-patterns
For all printable patterns or digital content: http://tinyurl.com/11047-patterns
For all printable patterns or digital content: http://tinyurl.com/11047-patterns
For all printable patterns or digital content: http://tinyurl.com/11047-patterns
For all printable patterns or digital content: http://tinyurl.com/11047-patterns
For all printable patterns or digital content: http://tinyurl.com/11047-patterns
For all printable patterns or digital content: http://tinyurl.com/11047-patterns
For all printable patterns or digital content: http://tinyurl.com/11047-patterns
For all printable patterns or digital content: http://tinyurl.com/11047-patterns
For all printable patterns or digital content: http://tinyurl.com/11047-patterns