

As you may have learned from the preceding chapter, certain oral agents, such as ISAs and insulin mimetics, are valuable for controlling blood sugars but can only go so far. If you’re taking the maximum effective doses of oral agents and your blood sugars remain elevated—in spite of diet, exercise (where feasible), and weight loss—injected insulin will be essential to bringing your blood sugars down to your target range.*
Although many patients initially balk at the idea of injecting insulin, you should look at this as an opportunity, not a curse, because insulin injections will increase the likelihood that you can bring about a partial recovery of your pancreatic beta cell function. This is especially true if you are a slim type 2 or a recently diagnosed type 1.
If you’re afraid of insulin because you imagine that once you start, you’ll never be able to stop, you’ve fallen victim to a common myth. In reality, injected insulin is the best means we have at this writing for preventing beta cell burnout.
The Biostator GCIIS, an “artificial pancreas,” was a device developed in the 1970s when the average insulin-using diabetic took a single, daily, industrial dose of insulin. The device may still be available. In any case, its initials stood for “glucose-controlled insulin infusion system.” That’s exactly what it aimed to do—infuse insulin as a pancreas would, based on blood glucose levels. It attached to the patient through two intravenous connections, one that measured blood sugars constantly and another that delivered glucose or insulin to correct blood sugars to 90 mg/dl virtually instantaneously. Although it was not practical for home use (it had a staff of two—one to operate the machine and one to service it—and rented for tens of thousands of dollars a month), it did useful research, the most important element of which was that it showed that beta cell burnout could be reversed or halted, even by relatively short exposure to normalized blood sugars. How?
Many years ago, Gerald Reaven, MD, author of Syndrome X, conducted a study with thirty-two diabetics, half of them female, half of them male. One at a time, he put them into the hospital and had them attached to the Biostator for two weeks. His staff checked HgbA1C on arrival, at discharge, and every three months thereafter. They found that HgbA1C plummeted during the two-week treatment period, but the most important thing they found was that when the subjects went back to their ordinary lives and their poor diets, their HgbA1C measures took an average of two years to return to their high, pretreatment values.
Considerable beta cell recovery clearly occurred after just two weeks of normal blood sugars. In fact, it took two years to undo those two weeks of healing. I’m not inviting you to normalize your blood sugars for two weeks and then go back to your old diet. My intent is to demonstrate the value of using insulin, and the value of normalized blood sugars. We might envision that a mild diabetic still has three types of beta cells, active, dying, and dead. My own beta cells may be all of the last variety—dead. I’ve mentioned it previously, but if I’d had the kind of treatment upon my diagnosis sixty-five years ago that I advocate today, I might still have a significant number of working beta cells. If you have some beta cell function left, you can probably increase it by normalizing your blood sugars.
If the prospect of injecting yourself horrifies you, don’t let it. Many people assume injections must be painful, but they needn’t be. If you’ve already been using insulin for years and find the shots painful, the likelihood is you were taught to inject improperly.

If you have type 2 diabetes, sooner or later you may require insulin injections, either temporarily (as during infections) or permanently. This is nothing to be afraid of, even though many people with long-standing type 2 diabetes spend literally years worrying about it. I usually teach all my patients how to inject themselves at our first or second meeting, before there’s any urgency. Once they give themselves a sample injection of sterile saline (salt water), they find out how easy and painless it can be, and they are spared years of anxiety. If you’re anxious about injections, after you read this section please ask your physician or diabetes educator to allow you to try a self-administered injection (without the insulin).
Insulin is usually injected subcutaneously. This means into a layer of fat under the skin. The regions of the body that are likely to contain appropriate deposits of fat are illustrated in Figure 16-1. Examine your body to see if you have enough fat at the illustrated sites to comfortably grab a big hunk between your thumb and first finger.
Most diabetics are erroneously taught to inject into their thighs in spite of the obvious: most thighs have inadequate fat for satisfactory injections. The net result is that the injection ends up going into muscle instead of fat and the timing of the insulin is sped up inappropriately. This intramuscular injection usually hurts.
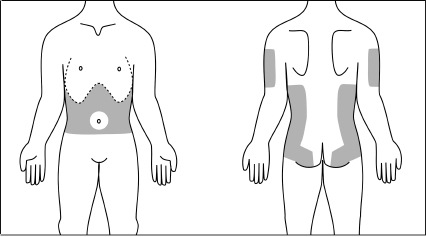
Fig. 16-1. Potential sites for subcutaneous injections.
To show you how painless a shot can be, your teacher should self-administer a shot to illustrate that no pain is felt. Your teacher should next give you a shot of saline or “throw” the needle into your skin to prove the point. Now it’s time for you to give yourself an injection, using a syringe that’s already empty or has been partly filled for you with about 5 “units” of saline.
First, with your “nonshooting” hand, grab as big a chunk of skin plus underlying fat as you can hold comfortably. If you have a nice roll of fat around your waist, use this site. If not, select another site from those illustrated in Figure 16-1. Nearly everyone has enough subcutaneous buttocks fat to inject there without grabbing any flesh. Just locate a fatty site by feel. To inject into your arm, use the top of a chair, the outside corner of two walls, or the edge of a doorway to push the loose flesh from the back of your arm to a forward position that you can easily see and reach with the needle.
Hold the syringe like a dart, with the thumb and first two or three fingers of either hand.
Now comes the most important part. Penetration must be rapid. Never put the needle against the skin and push. That’s the method still taught in many hospitals, and it’s often painful. If you can find only a small amount of flesh to hold, the needle should pierce the skin at a 45-degree angle, as in Figure 16-2, or even better, use one of the new insulin syringes with a short needle  inch, or 8 mm). If you can grab a hefty handful, you should plunge the needle straight in, perpendicular to the skin surface, or at any angle between 45 degrees and 90 degrees, as shown in Figure 16-3.
The stroke should begin about 4 inches from your target to give the moving needle a chance to pick up speed. Pretend you’re throwing a dart—but don’t let go of the syringe. Move your entire forearm and give the wrist a flick at the end of the motion. You shouldn’t get hurt. The needle should penetrate the skin for its entire length.
As soon as it’s in, rapidly push the plunger all the way down to inject the fluid. If the demonstration syringe is empty, then don’t bother to push the plunger. Now promptly remove the needle from the skin.
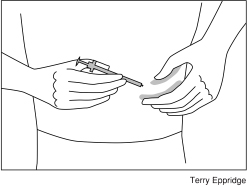
Fig. 16-2. If you are skinny, pierce the skin at a 45-degree angle, or use a short ( -inch) needle.
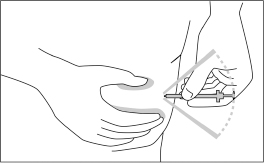
Fig. 16-3. If you’re chunky, pierce the skin at any angle between 45 degrees and 90 degrees.
There’s no need to practice injecting oranges, as has been taught in the past. If you’re going to practice anything, you might first practice “throwing” a syringe, with the needle cover on, at your skin.
All you need do is experience one rapid stick to realize that speed makes it painless. Never has it taken more than a moment for me to get a patient to self-inject. I’ve had grown men in tears at the prospect of injecting insulin who soon discover that it’s easy and painless and of considerable value in treatment. It doesn’t demand much skill, and certainly doesn’t require bravery.

In recent years, a number of new insulin syringes have appeared on the market in the United States. Although they are all sterile, plastic, and disposable, some are better than others. The important features to consider are described below. Refer to Figure 16-4, which identifies the parts of a typical insulin syringe that you might find at your local pharmacy.
When selecting a syringe, the printed scale is the most important feature, because the spacing of the markings determines how accurately you can measure a dose. Think Laws of Small Numbers: accuracy and consistency of dose are both highly important.
Insulin doses are measured in “units.” One unit of our most-rapid-acting insulin will lower my blood sugar by 100 mg/dl. One unit will lower the blood sugar of a 45-pound child by about 255 mg/dl. Some of my slim adult patients with mild type 2 diabetes find that 1 unit will drop them by 150 mg/dl. Clearly, an error of only ¼ unit can make the difference between a normal blood sugar and hypoglycemia for many of us. My insulin-using patients never inject as much as 8 units in a single dose. It would therefore be ideal to have a long, slender syringe with a total capacity of 10 units and markings for every ¼ unit spaced far enough apart that  unit can be accurately estimated visually. The numbers on the scale should be easy to read. The lines should be dark, but no thicker than
  unit. Such a syringe, unfortunately, does not exist quite yet.*
A currently available preferred syringe is illustrated in Figure 16-4. Note that the scale line nearest to the needle is longer than the other lines. This is the zero line. It overlies the end of the gasket when the plunger is pushed in fully. It is not the 1-unit line. The upper scale in the figure displays whole units; the lower scale shows half units.
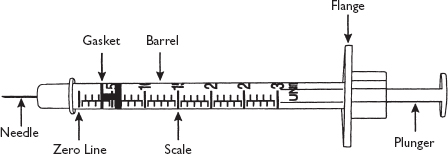
Fig. 16-4. A preferred insulin syringe, calibrated in half-unit increments (enlarged image).
This is the dark-colored piece of synthetic rubber at the end of the plunger nearest the needle. It indicates a given dose by its position along the scale. The best gasket has a surface that’s flat and not conical, as some are, so that doses can be read without confusion. Note: the end of the gasket that is nearest the needle is the end that should be set at the dose.
The needle should be ¼– inch (about 8 mm) long. Longer needles may go too deeply into thin people. Until 1996 all disposable insulin syringes sold in the United States had ½-inch (12 mm) needles. Syringes with shorter (
 -inch) needles are now available. With these syringes you do not always need to “grab a hunk of flesh” or inject at a 45-degree angle unless, like me, you have very little fat at the injection site. Just throw it in. Do not, however, use short needles for intramuscular injection, as described here.
Needle thickness is specified by gauge number, just as for nails and wire. The higher the gauge number, the thinner the needle. With a very thin gauge, even penetrating the skin too slowly may not hurt. With too thin a gauge, the needle might bend or break when puncturing tough skin. The ideal compromise between thinness and strength is probably 31 gauge, which is now widely available.
The needle points of disposable insulin syringes currently sold in the United States are quite sharp. Advertising that claims special sharpness for a particular brand is usually exaggerated.

My technique for filling a syringe with insulin differs from what is usually taught, but it has the advantage of preventing the development of air bubbles in the syringe. Although it is not harmful to inject air bubbles below your skin, their presence in the syringe interferes with accurate measurement of small doses.
This step-by-step approach may be followed for all clear insulins. Only one insulin now on the market is cloudy. It is called NPH in the United States and isophane overseas. If you use cloudy insulin, read Filling a Syringe with Cloudy Insulin, here, before proceeding.
Take the cap off your needle and the second cap off the end of the plunger.
Draw room air into the syringe by pulling the plunger back until the end of the rubber gasket nearest the needle is set close to the dose you intend to inject. If the gasket has a dome or conical shape, the dose should be set at the widest part of the gasket, not at its tip.
Puncture the midpoint of the insulin vial’s rubber stopper with the needle and inject the air into the vial. This seemingly useless step has a purpose. If you were not to inject air to replace the insulin you withdrew, after many fillings a vacuum would eventually develop in the vial, which would make subsequent fillings difficult.
Invert the syringe and vial and hold them vertically, as shown in Figure 16-5. Press the syringe barrel against your palm with the little finger of the hand that holds the vial to ensure that the needle remains in the stopper, then rapidly pull back on the plunger until the barrel is filled with insulin well beyond your dose (e.g., to about 15 units if your dose is to be 5 units).
Slowly push the plunger in, still holding vertically, until the appropriate part of the rubber gasket reaches the desired dose.
Continue to hold the syringe and vial vertically as you remove the filled syringe and needle from the vial.
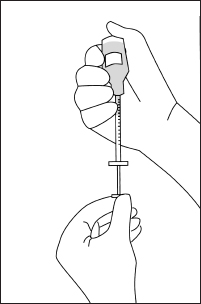
Fig. 16-5. Filling the syringe, holding the vial and syringe vertically.
The one intermediate-acting insulin (NPH) sold today comes in vials that contain a clear liquid and a gray precipitate. The gray particles tend to settle rapidly from the liquid when the vial is left undisturbed. They must be resuspended uniformly in the liquid immediately prior to every use. Failure to do this will result in inconsistent effects upon blood sugars from one shot to another. The way to secure a uniform suspension is to shake the vial. Many years ago, egg white–based vaccines were of a syrupy consistency and tended to form a permanent foam when shaken. This is not the case with today’s water-based insulins. Yet most textbooks—and even the American Diabetes Association—still tell nurses and doctors to roll the vial between the hands and not to shake it. This misinformation is unfortunate, because we don’t get consistent results when vials are rolled.
When filling a syringe with a cloudy insulin, observe the following procedure to ensure an even suspension.
1–3. Remove the cap(s) from the syringe, draw air into it, and inject the air into the vial as described in steps 1–3 here.
4. Before drawing out any insulin, while still holding the vial and syringe in one hand, vigorously shake them back and forth 6–10 times as shown in Figure 16-6. Holding the upward-pointing syringe and vial vertically, rapidly draw back the plunger immediately after shaking to fill the syringe with insulin well beyond your dose. Do not delay, as the gray particles will settle very rapidly.
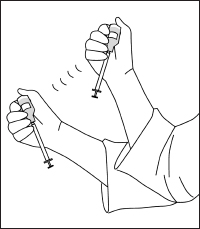
Fig. 16-6. Shaking a vial of cloudy insulin before drawing out the dose.
5–6. Still holding vertically, slowly push the plunger in until the desired dose is reached, then remove the needle and filled syringe from the vial (see steps 5–6, here).

The annual cost of sterile disposable insulin syringes can be considerable, especially if you take multiple daily injections. You may become tempted to reuse your syringes, especially if your medical insurance doesn’t fully reimburse you for the cost. (Many medical insurance policies in the United States do at least partially cover this expense.) Although I haven’t encountered any infection caused by a single person reusing his own syringes, I have encountered the problem of polymerization of insulin.*
Many of my patients pass through a stage when they routinely reuse their syringes several times, to save money or to enable them to travel with only a small supply. These patients never use the same syringe for two different types of insulin, so we can’t say that one insulin is contaminating another. Inevitably, I get a telephone call with the message, “My blood sugars are high and I can’t get them down.” I ask, “Bring your clear insulin to the phone. Is it crystal clear, like water?” Inevitably the reply is, “No, it’s slightly hazy.” Insulin that becomes hazy has been partially deactivated by polymerization and will not adequately control blood sugars. This is not found by people who do not reuse their syringes.† Of course, I advise such patients to immediately replace all insulin vials, whether long- or short-acting, that have been used to fill reused syringes. Replacement of the vials always cures the problem. Naturally, syringes should not subsequently be reused.
What if you encounter a situation where you have only one syringe to last for a week and have no way of getting new ones? Flush the syringe with air several times after each use to clear out any remaining insulin. When filling the syringe, do not inject air into the insulin vial (step 3), and don’t inject the excess insulin back into the vial (step 5). Just draw the needle from the vial and squirt the excess into the air. This way, you won’t contaminate your vial with the minute amount of old insulin that may remain in the needle or syringe. If you have a second unused syringe, you can use it just to inject air into your vials, making certain the needle does not come into contact with the insulin in the vials.
If for financial reasons you really must reuse your syringes, the following procedure should help minimize contamination with polymerized insulin. You will, at the minimum, need three syringes, but four would be better.
Use your insulin vials for a week without injecting air into them. Squirt any excess insulin from each filling into a sink or wastebasket, not back into the vial.
At the end of a week, remove the plunger from an unused syringe. Stand the vial stopper up on a flat surface and push the needle of the unused syringe into the stopper of the vial. Within seconds, the vacuum in the vial will suck in enough air through the needle to replace the vacuum.
Pull the needle out of the stopper, reinsert the plunger, and recap the “air” syringe for use the next week. Since my insurance will not fully pay for insulin syringes, this is the method that I use.

The needle will not last forever, so discard a syringe:
When the needle doesn’t go through your skin as if it were butter.
When, on pulling the needle out, you feel it briefly catch, as from a hook.

As discussed in Chapter 19, “Intensive Insulin Regimens,” you might have to inject several different insulins at the same time. For example, when you arise in the morning, you might inject a most-rapid-acting insulin (e.g., Humalog) to bring down a slightly elevated blood sugar, then a rapid-acting insulin (regular) to cover your breakfast, then a long-acting (basal) insulin (Levemir). Take the most-rapid-acting (Humalog), then the less-rapid-acting (regular), and last the long-acting, one injection after another, all using the same syringe. Use different sites for each injection. You can safely do this because the insulin has not had enough time to polymerize in the needle (this takes several hours). If your long-acting insulin is Lantus,* however, don’t use the same syringe. Just a small amount of Humalog or regular in the needle may inactivate some of the Lantus. This is very important.
Don’t mix different insulins together, either in the same syringe or in the same vial, as this will result in a new insulin with new, inappropriate timing. The only exception would be to use NPH to slow down the action of regular insulin before a meal when dealing with gastroparesis.

Most textbooks and instruction sheets that teach insulin injection or finger sticking advise that the skin should be “sterilized” with alcohol before puncturing with a needle. Alcohol will not sterilize your skin. At best it will clean off dirt. My patients and I have given millions of injections and finger sticks without using alcohol. None of us has become infected as a result. Certainly it’s a sensible idea to clean off visible dirt first, but you can do this with simple soap and water on the rare occasions that it may be necessary. I often inject myself right through my shirt.

After I inject, I wipe my hand over the injection site, then smell my hand. If some insulin has leaked out of the site, my hand will smell of a preservative called metacresol. Whenever this occurs, I write on my GLUCOGRAF form “lost some.” This will explain an elevated blood sugar later on.

I recommend the following cost-free, safe method for disposing of used syringes. Again, this is contrary to the recommendations of the ADA.
Recap the needle.
Put the capped syringe into a large plastic bottle such as that used for bleach, bottled water, seltzer, or soft drinks. Alternatively use a large coffee can.
When the container is full, replace the cover or cap and discourage its removal by applying duct tape.
Put the container into your trash* or take it to your physician, hospital, or pharmacy for pickup by the special disposal service that they might use.
If you are in a hotel or restaurant, don’t put used syringes in the trash containers unless you first put them with the needle recapped in an opaque plastic bag, sealed with tape or knotted closed.† The cleaning people will not appreciate seeing loose syringes. In an airplane, recap the needle and put the syringe in the trash bin in the lavatory.
Do not clip needles off your used syringes. This poses serious hazards to others and should be outlawed, even though it is promoted by the ADA.
It’s now possible to melt needles off insulin syringes. If you are especially conscientious about our environment or would enjoy using a brilliant technological device, you might try the Disintegrator Plus. This is a small device in a plastic box measuring about 6 × 3½ × 2½ inches (15.24 × 8.9 × 6.35 cm) and powered by a built-in rechargeable battery. It sells for $99 at Amazon.com.
To operate the device you merely insert the needle into a hole and press on the activating button for 3 seconds. The needle will disappear, melted into a tiny metal blob that is stored inside the instrument. You can then drop the plastic syringe into your ordinary trash container.
The stored metal blobs can be removed after a month or so by unscrewing a small screw in a hatch on the bottom and pouring them out. This may take 30 seconds.
Disintegrator Plus is distributed by Perfecta Products, Inc., of North Lima, Ohio, phone (800) 319-2225, www.perfectaproducts.com. It’s fun to use and keeps needles off our beaches.

Nowadays, most of us will inject through a thin shirt when it’s inconvenient to undress. This can cause a problem on the rare occasion that the needle encounters a small blood vessel. A drop of blood can appear at the puncture site and stain your clothing. Finger punctures sometimes bleed more freely than you expect, so that upon squeezing you may get a squirt in the eye, or blood on your tie, if you’re not careful.
The answer to bloodstains on clothing is hydrogen peroxide solution. Hydrogen peroxide is very inexpensive and is sold in all pharmacies. Purchase several small bottles. Keep a bottle of peroxide handy at every location where you measure blood sugars. Put 2 ounces into a small brown medicine bottle when you travel. Once a bottle has been opened and closed, the solution will remain stable for perhaps six months, so you might want to have a backup bottle available.
You can make bloodstains disappear very simply without bleaching the dyes in your clothing. It’s best if you treat the stain while the blood is still wet, as dried blood bleaches very slowly. If you allow the blood to dry, it may take 20 minutes of rubbing to get rid of the stain. Pour some peroxide on a handkerchief and rub it into the stain. The peroxide will foam when it contacts blood. Keep applying and rubbing until the stain has vanished.
If you don’t have any peroxide handy, try milk or saliva—they work almost as well. Do not put hydrogen peroxide on wounds. It will destroy fibroblasts and thereby impede healing.

Many devices have been advertised with the claim that they inject insulin “without pain.” Since most diabetics have not been taught the high-speed painless injection technique described in this chapter, many of these special, spring-driven devices are sold every year. I found that they add to the “pain” by slowing the insulin delivery. If your injections are already painless, it makes little sense to use them.
Other “painless” devices, called jet injectors, use very precise construction to inject a high-pressure jet of insulin, penetrating the skin without a needle. These injectors do not require a separate syringe since they must be loaded directly with insulin, using special adapters that plug into the insulin vial. Although the concept is very enticing, spray injectors pose some problems. First, they’re very expensive, costing from $300 to $600 in the United States. Although this is a substantial initial investment, the cost can be recovered over the course of a year or two if you’re discarding lots of disposable syringes.
They’re not as convenient as disposable syringes because they must be taken apart and sterilized in boiling, deionized water every one to two weeks. Also, the adapters for the insulin vials sometimes leak when the vials are carried in a purse or bag.
You will require considerable training and experimentation with pressure settings in order to give yourself a proper jet injection. This can delay getting your blood sugars normalized. You will likely experience slightly more pain than you would with a speedily injected shot from a conventional syringe, and there’s a high incidence of black-and-blue marks on the skin, minor bleeding, and even loss of small amounts of insulin at the puncture sites.
Despite these drawbacks, jet injectors do have two unique advantages, aside from reducing the number of syringes you must dispose of. First is that you will require about one-third less insulin, since the shots are better absorbed. Second, if you use rapid-acting insulin to lower elevated blood sugars, it will work even faster. But not faster than an intramuscular injection (see here). Finally, jet injectors should not be used for longer-acting insulins.
My conclusion: don’t use jet injectors.

Several manufacturers are advertising “insulin pens.” These are syringes into which small cartridges of insulin can be loaded. They are intended to relieve you of the burden of carrying a vial of insulin if you have to inject away from home. None of those marketed as of this writing can be set at estimated quarter-unit increments, and only one of those sold in the United States can be set at half-unit increments. Most therefore cannot provide the fine-tuning of blood sugars that our regimens require. Stay away from them unless you are very obese and require large doses of insulin. With large doses, an error of ½ or ¼ unit is insignificant.
The cartridges used for insulin pens are less than one-third the size of standard insulin vials and are consequently more convenient to carry in a pocket or purse. To remove the cartridge from a pen, merely remove the plastic cover first. You can puncture the cap with the needle of a standard insulin syringe and slowly draw out insulin. Do not inject air or reinject insulin into these cartridges.
Pens used for the incretin mimetics Byetta and Victoza (see Chapter 13) do not pose the problems found with insulin pens.
I will personally answer questions from readers for one hour every month. This free service is available by visiting www.askdrbernstein.net.