Once you are able to tune in your detector and know how to cover a search area methodically, you are ready to move on to the next stage. When you have located a target, listen carefully to the signal and decide if it is of a type and quality worth further investigation and recovery. If so, you must now learn how to get the artefact out of the ground safely without damaging it.
Before we start to dig, however, our detector can help give us a much clearer impression of what lies beneath the surface, for example how deep it is buried, what kind of shape it may be and what kind of metal it is composed of.
A metal detector works by reading the differences in the magnetic field below it, so each different type of metal produces its own individual signal. Learning these signals will improve your enjoyment and make your detecting much more efficient.
The strength of the signal can tell us two things: the size of the target and its depth. Only dedicated practice and experience can teach you the differences, but it is worth learning to decipher them. Every make of machine will handle these differently, so it is important to study the maker’s manual and then practise.
The electronics in the detector can help us determine the shape of our find and its exact position. You will have found the signal by slowly walking forward and swinging the detector from side to side in a steady flat arc. By moving the detector repeatedly side to side over the target, you can hold in your mind the spot where the signal is strongest. The target, however, could be anywhere across the diameter of the coil, so turn through 90 degrees and repeat the sweep across the target. This should give you a point where the two sweeps of the detector cross on the ground. The target lays where the signal is strongest in both directions. This process is known as ‘pinpointing’.
Some machines incorporate a visual pinpoint facility, which, when activated, effectively turns the detector into a TR machine. The detector does not have to be moved to generate a signal, but instead produces its strongest signal when the target is directly beneath the centre of the coil. On some detectors this pinpointing is included in the visual display.
To summarize, once we have a target signal we can know exactly where it’s located and, by the strength of the signal, we may be able to tell how deep it is in the ground (the stronger signals will be shallow, weak signals will be deeper ones). Finally we know from the tone what metal it may be made of.

Pinpointing by crossing the swings of the detector.
One last bit of wizardry the detector can do for us is to help identify what shape the target might be:
![]() A coin gives a sharp, clear signal.
A coin gives a sharp, clear signal.
![]() A ring gives a double signal.
A ring gives a double signal.
![]() A nail or spike gives a repeated signal along its length, but a single signal across its width.
A nail or spike gives a repeated signal along its length, but a single signal across its width.
![]() A chain or bracelet often gives a repeated signal in both directions.
A chain or bracelet often gives a repeated signal in both directions.
![]() Tinfoil often gives a spluttering or crackling signal.
Tinfoil often gives a spluttering or crackling signal.

The circle on the right of the screen is complete when the target is pinpointed.
It is important to learn what shape the target may be since, to put it simply, this knowledge might prevent you from damaging an article that may be of immense historic value. If, on the other hand, it should prove to be a piece of modern jewellery, its monetary value could be dramatically reduced if irreparably damaged. From personal experience I know what damage can be done if you do not dig accurately.
You should now be in a position to appreciate why it is so important to practise with your detector. Learn its language. It is continually giving you information that, if you can decipher it, should help you find and safely recover interesting and possibly valuable artefacts.

Inaccurate recovery can cause damage, as shown on this gold ring, which was not the author’s most successful find.
REMOVING THE ARTICLE FROM THE GROUND
Having established the precise location of the artefact, it is now time to remove it from the ground and recover it. In my experience the safest means is to remove a small plug of ground that contains the artefact. For small objects, cut three sides of a 15cm cube around the artefact using a small stainless-steel recovery spade or a diver’s knife. Cutting a hinged plug will ensure that it is returned to the correct place and also reduces the chance of damaging the find.
Scan the plug and the hole with the detector or, if you have one, a handheld pinpoint detector. If the artefact is in the plug, you should be able to locate it by careful probing with a knife or screwdriver. If the artefact remains in the hole you may have to remove more soil, each time repeating the scanning process by passing a handful of recovered soil across the detector’s coil until the find is safely located. Make sure you do not have any rings or metal items on your hands or wrists.
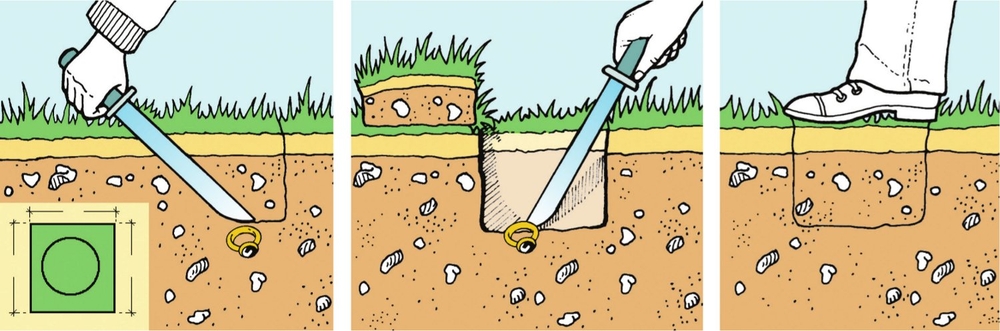
The recovery process using a knife or chisel. The procedure is the same if using a spade.

Scan every handful of soil removed from the hole until you recover the target.
Make a further search of the area for additional signals. There have been cases of up to fourteen coins being found in and around a single hole by repeatedly scanning the hole and the spoil, so don’t get carried away with the excitement of the first find.
It is very important to look after the environment by making only a small hole and then replacing the sand, soil or turf as neatly as possible. It is essential for the good name of the hobby that you do not leave a field or beach looking like a First World War battlefield. Should you find you have recovered an item that is rubbish (or what most detectorists prefer to call junk), always take it with you and dispose of it responsibly in the appropriate recycling bin.
An important word of warning is needed at this stage. Never detect without gloves of some kind. The actual type is up to each individual, but they should be ‘fit for purpose’ and provide protection from sharp articles. Some of the best have Kevlar, the materiel from which police stab vests are made, on the inner fingers and the area of the palm. Always be aware there can be some very unpleasant things lurking both on and in the ground, ranging from chemicals to germs, and from old nails to broken glass. A cut hand is not the best way to find them. (For further details on this subject, see Chapter 7.)
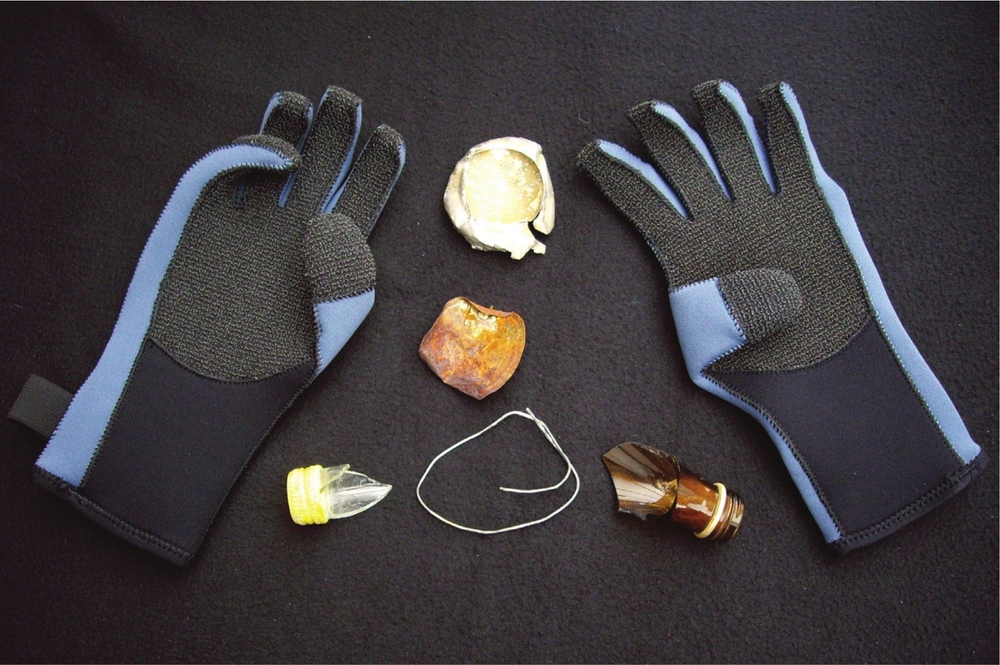
Kevlar-faced gloves are recommended when dealing with sharp pieces of junk.
RECOVERY TOOLS
You may already have some of the tools that can be used for recovering the artefacts that we locate around your house or in the garden shed, but others are more specialized. Many detectorists develop their own preference for digging tools. The following list, with some of their uses, is presented in no particular order:
![]() Gardener’s hand trowel or hoe, used to recover items in soft sand or soil.
Gardener’s hand trowel or hoe, used to recover items in soft sand or soil.
![]() Gardener’s hand rake, used to recover items from a stony surface or a shingle beach.
Gardener’s hand rake, used to recover items from a stony surface or a shingle beach.
![]() Sheath knife or diver’s knife, used to cut out a small sod of grass and soil, and making possible a very neat recovery.
Sheath knife or diver’s knife, used to cut out a small sod of grass and soil, and making possible a very neat recovery.
![]() A strong, long screwdriver, useful as a probe.
A strong, long screwdriver, useful as a probe.
![]() A lady’s small gardening spade. This can be used in many detecting conditions, but make sure it’s not too heavy, since even a light one will feel quite heavy after carrying it for two or three hours.
A lady’s small gardening spade. This can be used in many detecting conditions, but make sure it’s not too heavy, since even a light one will feel quite heavy after carrying it for two or three hours.
![]() A lady’s small garden fork, useful on ploughed fields or heavy ground.
A lady’s small garden fork, useful on ploughed fields or heavy ground.
There are also ranges of specialist tools available from companies such as Black Adder. These may be bought from local metal-detecting dealers or from advertisements in the detecting magazines.
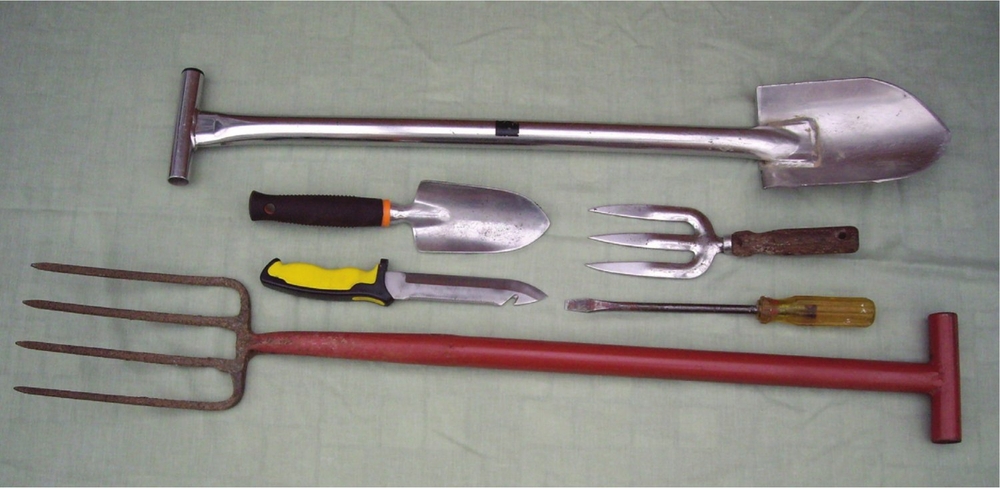
A selection of recovery tools.
TAKING CARE OF YOUR DETECTOR
If by now you have used your detector out in the field, and perhaps have even made your first find, do not go home and just leave it in a cupboard. Follow the simple advice on looking after your machine that you may already have read in the instruction book. It would do no harm, however, to run through the do’s and don’ts of caring for a detector.
Taking care of your detector is mostly common sense. All detectors are complex electronic instruments that have required extensive research in their design and development. Manufacturers will have taken into account the environment in which they will be used, but they also need a little help and tender loving care from the owner. A few general points apply to all types and makes of machines:
![]() Avoid rapid changes in temperature. Large temperature swings can create condensation inside the machine, which could damage the electronics.
Avoid rapid changes in temperature. Large temperature swings can create condensation inside the machine, which could damage the electronics.
![]() Never leave the machine in direct hot sunshine as the temperatures of the coil and the control box could easily reach 60 or 70 degrees Celsius, which again could damage the electronics.
Never leave the machine in direct hot sunshine as the temperatures of the coil and the control box could easily reach 60 or 70 degrees Celsius, which again could damage the electronics.
![]() After using the machine always clean off any mud, soil or sand with a moist cloth or soft brush. Wipe it over with a cloth dampened with a little WD40. Then undo the plugs to the control box and give them a clean with WD40.
After using the machine always clean off any mud, soil or sand with a moist cloth or soft brush. Wipe it over with a cloth dampened with a little WD40. Then undo the plugs to the control box and give them a clean with WD40.
![]() Remove the coil cover and clean both the coil and the cover with a moist cloth. This is especially important if you have been beach or water detecting since fine sand and silt will get in between the coil and its cover. This condition can produce ghost signals or, even worse, mask out signals altogether, so causing us to miss that gold coin or ring.
Remove the coil cover and clean both the coil and the cover with a moist cloth. This is especially important if you have been beach or water detecting since fine sand and silt will get in between the coil and its cover. This condition can produce ghost signals or, even worse, mask out signals altogether, so causing us to miss that gold coin or ring.
![]() Always remove the batteries if you are not planning to use your detector for a few days. This prevents corrosion that could ruin your machine. If you do remove the batteries, store them somewhere warm such as an airing cupboard. This helps the batteries to recover and they will perform better when you go to use them the next time.
Always remove the batteries if you are not planning to use your detector for a few days. This prevents corrosion that could ruin your machine. If you do remove the batteries, store them somewhere warm such as an airing cupboard. This helps the batteries to recover and they will perform better when you go to use them the next time.
![]() Never pull or tug at the leads, since it can damage the wiring and produce erratic signals.
Never pull or tug at the leads, since it can damage the wiring and produce erratic signals.

A gold bracelet found on a beach that had already been ‘done’. Remember that we are only sampling when we search.
As you make your first steps in metal detecting, you may find yourself mixing with experienced detectorists who seem to have all the luck. Don’t become disheartened, but keep plugging away at it. Watch them, copy their good habits, reject their bad ones and, above all, keep practising.

SIMPLE TROUBLESHOOTING GUIDE
No sound
- Check batteries are fitted correctly.
- Check batteries are fully charged.
- Check the detector is switched on.
- Check headphone lead.
Inconsistent signals
- Check batteries are fully charged.
- Check headphone lead.
- Reduce the sensitivity setting.
- Check for sand and grit between the coil and its cover.
- Check for overhead electricity wires or cables.
- Check that no mobile phones are switched on close to your detector.
- Move away from any other detectorists working close to you.
- If none of these corrects the fault, contact your dealer. Do not open up the machine as this may invalidate any warranty and could cause further damage.
Towards the end of my first year of detecting I found a 20 gram gold bracelet on a beach in Spain. It was by far my best find at the time. I had been staying at the beach for a few days, during which I had probably spent about eight to ten hours detecting. A local man who came to the beach with a detector every evening tried to put me off by claiming it was ‘his beach’ – and anyway there was nothing left as he had done it all. As the photograph on the previous page shows, that was not the case.