Picnic tables can be made for the beach, dock, backyard, or anywhere that is likely to host a barbeque or fun time.
Picnic tables can be made for the beach, dock, backyard, or anywhere that is likely to host a barbeque or fun time.
Picnic tables are easy to make and, for the cost of the wood, give you a useful outdoor table that will last for years. The only thing I would caution with these tables is that you should not sit four or five people on one side without a similar group to balance them on the other side!
I recommend using pressure-treated wood for the legs, which are in direct contact with the ground. The rest of the table can be made of regular, untreated wood.
 TIME
TIME
4 to 5 hours
» Screwdriver or hammer
» Rotary or hand saw
» Large hole saw or hand keyhole saw
» Measuring tape
OPTIONAL TOOLS
» Table saw
» Router or dado saw
 MATERIALS
» Nine 2″ × 6″ × 8’ boards for tabletop and seats (Round off the outermost table top corners with a 3″ radius saw.)
» Two 2″ × 4″ × 27″ cross braces to secure the tabletop
» Four 2″ × 6″ × 36″ boards for legs (You will need to cut angles at top and bottom.)
» Two 2″ × 6″ × 60″ boards for seat supports (Round off the bottom outer corners with a 3″ radius saw.)
» Two 2″ × 4″ × 24″ boards for longitudinal braces
» Four 3 1/2″ × 3/8″ bolts with washers and nuts to bolt seat supports to table legs
» 2 1/2″ #10 or #8 galvanized or ceramic-coated screws to assemble the table
STEP 

Assemble the top. The tabletop will be 30″ wide (actually 27 1/2″ wide because of dimensional lumber sizes) by 8’ long. Lay out and align five 2″ × 6″ pieces of lumber side-by-side on a flat surface and screw the 27″ long cross braces to them. Locate the cross braces exactly 9″ from the each end of the underside and screw them in place, as shown in Figure 11-1. (The legs will also be screwed to the inside face of these cross braces.) If you screw through the underside of the cross braces to the table top, you will not have any screw heads showing on the table top.
STEP 
Attach the legs. Position the legs so that the width across the top outside edges of the legs is 18″ and the bottom outside edges is 56″. Make sure they’re centered. Figure 11-2 shows the table to this stage.
Screw and bolt the seat supports to the legs with the top of the support exactly 14 1/2″ from the bottom of the leg, as shown in Figure 11-3. This gives a seat height of 16″. Use two screws to hold each seat support to the legs and then drill and bolt the seat supports to each leg using the four 3/8″ bolts.
STEP 
Install the 2″ × 4″ longitudinal braces to increase the rigidity of the legs. These are 24″ long with a 45-degree angle on each end. They are screwed to the underside of the table and the seat support. Figure 11-4 shows the center brace from the table end.
STEP 
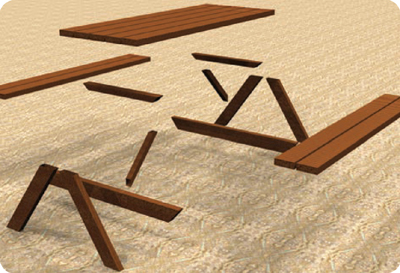
Turn the table upright and screw the seats into place. Use two 2″ × 6″ × 8’ seat pieces for each seat and position them at the outer ends of the seat supports. If you wish, you can round off the outer corners of the seats with a 3″ radius. Figure 11-5 shows the finished table, and Figure 11-6 shows an exploded view.
STEP 
That completes the basic construction of your picnic table. If you wish, you can sand and paint it, but most people leave the wood to turn silver. I would suggest that you roll wood preservative or sealer on the table top and seats to prevent them splintering after a year or three of use.
 OPTIONS
You can build a mini picnic table for children as well. The table is also made of 2″ × 4″ lumber. In this case, the dimensions are: table width, 18″; length, 30″; height, 19″ or 20″; seat height, 10″; length of seat support, 37″; tabletop cleat location, 8″ from end of table.