FINISHED BLOCK: 12˝ × 12˝
FINISHED QUILT: 48˝ × 60˝
This quilt uses a variation of the same block found in Faceted Jewels I. It’s perfect for a little girl’s room when you want to have the striking lines of modern design mixed with the comfort of a traditional quilt. Can’t you imagine all the great tea parties that will take place on top of it?
Materials
I used 3 values of 2 different hues (violets and red violets) to create this quilt. The values don’t need to correlate exactly between the 2 colors (for example, my lightest red violet is much lighter than my lightest violet) as long as you have one light, medium, and dark value for each.
White: 4½ yards (for background)
Colorway A (red violets):
Light value: Kona Petunia, 1⅛ yards
Medium value: Kona Violet, 1¾ yards
Dark value: Kona Magenta, 1 yard
Colorway B (violets):
Light value: Kona Wisteria, 1⅛ yards
Medium value: Kona Crocus, 1¾ yards
Dark value: Kona Tulip, 1 yard
Backing: 56˝ × 68˝
Batting: 56˝ × 68˝
Binding: ½ yard (for 2½˝-wide binding strips)
Fabric labels or your favorite fabric-marking pen
Patterns: Make 40 copies of Faceted Jewels II patterns A and B on your favorite 8½˝ × 11˝ paper-piecing paper. Cut out both parts of the pattern and tape them together using painter’s or masking tape.

Cutting Directions
WOF = width of fabric
All the fabric pieces are assigned a number (to coordinate with the order in which they are used on the pattern piece). As you cut out the fabric pieces, label each piece with the number indicated. Keep them in piles organized by their labels. Each block is composed of 2 quadrants made in colorway A and 2 quadrants made in colorway B.
WHITE (BACKGROUND):
•Cut 12 strips 7½˝ × WOF. Subcut each strip into 20 rectangles 7½˝ × 2˝ (Pieces A2, B2, A8, A9, B8, and B9).
•Cut 20 strips 3˝ × WOF. Subcut each strip into 4 rectangles 3˝ × 10˝ (Pieces A3 and B3).
COLORWAY A
LIGHT VALUE (PETUNIA):
•Cut 4 strips 8½˝ × WOF. Subcut each strip into 20 rectangles 8½˝ × 2˝ (Pieces A4 and A5).
MEDIUM VALUE (VIOLET):
•Cut 2 strips 12˝ × WOF. Subcut each strip into 16 rectangles 12˝ × 2½˝ (Piece A1).
•Cut 3 strips 2½˝ × WOF. Subcut each strip into 3 rectangles 2½˝ × 12½˝ (Piece A1; this will yield 1 extra piece).
•Cut 5 strips 2½˝ × WOF. Subcut each strip into 16 squares 2½˝ × 2½˝ (Pieces A10 and A11).
•Cut 2 strips 4˝ × WOF. Subcut each strip into 10 squares 4˝ × 4˝. Subcut into HSTs (half-square triangles) by cutting the squares in half diagonally, corner to corner (Piece A6).
DARK VALUE (MAGENTA):
•Cut 2 strips 12˝ × WOF. Subcut each strip into 16 rectangles 12˝ × 2½˝ (Piece A7).
•Cut 3 strips 2½˝ × WOF. Subcut each strip into 3 rectangles 2½˝ × 12½˝ (Piece A7; this will yield 1 extra piece).
COLORWAY B
LIGHT VALUE (WISTERIA):
•Cut 4 strips 8½˝ × WOF. Subcut each strip into 20 rectangles 8½˝ × 2˝ (Pieces B4 and B5).
MEDIUM VALUE (CROCUS):
•Cut 2 strips 12˝ × WOF. Subcut each strip into 16 rectangles 12˝ × 2½˝ (Piece B1).
•Cut 3 strips 2½˝ × WOF. Subcut each strip into 3 rectangles 2½˝ × 12½˝ (Piece B1; this will yield 1 extra piece).
•Cut 5 strips 2½˝ × WOF. Subcut each strip into 16 squares 2½˝ × 2½˝ (Pieces B10 and B11).
•Cut 2 strips 4˝ × WOF. Subcut each strip into 10 squares 4˝ × 4˝; then subcut each square into HSTs by cutting the squares in half diagonally, corner to corner (Piece B6).
DARK VALUE (TULIP):
•Cut 2 strips 12˝ × WOF. Subcut each strip into 16 rectangles 12˝ × 2½˝ (Piece B7).
•Cut 3 strips 2½˝ × WOF. Subcut each strip into 3 rectangles 2½˝ × 12½˝ (Piece B7; this will yield 1 extra piece).
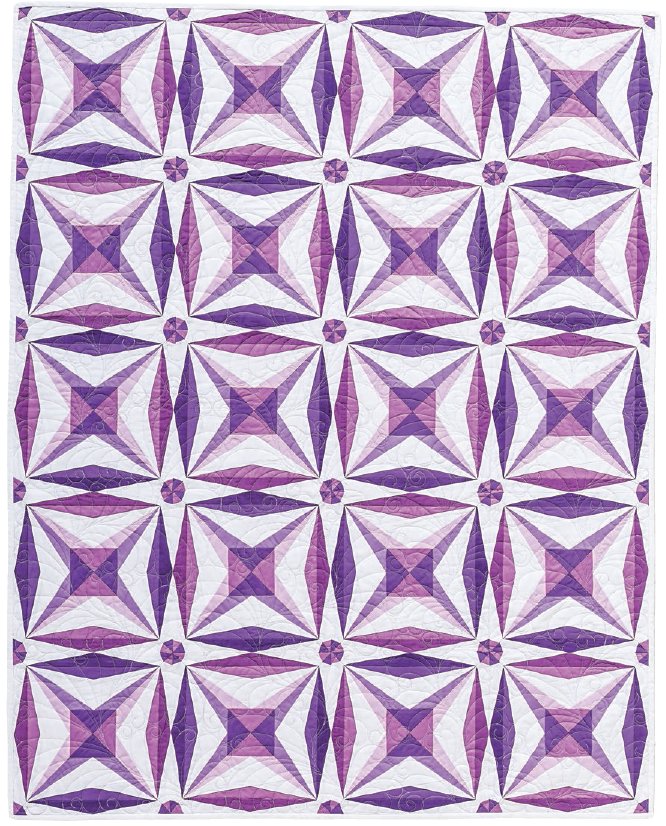
Faceted Jewels II, 48˝ × 60˝, pieced by Amy Garro; quilted by Emily Sessions
Quilt Top Construction
PAPER-PIECING ASSEMBLY
Sew each printed paper-piecing pattern. Begin with Piece 1 and work your way through Piece 11 on each pattern. Press each seam open after piecing. Refer to Paper-Piecing Basics as needed.
Tricky Pieces
•Many of the pieces in these blocks are triangles with extreme angles. Refer to Extreme Angles for more information.
•Piece 1 is very long and skinny, so pin it carefully. You don’t want the pins to cross over into the locations for Pieces 2 and 3, so angle them accordingly.
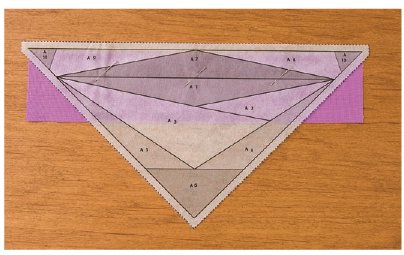
•Piece 10 and Piece 11 have jutting corners. Follow the directions in Jutting Corners to place your fabric correctly.
BLOCK ASSEMBLY
1. Piece together 1 Pattern A and 1 Pattern B to create a half-block. Press the seams open, using a firm hand where multiple seams meet. If needed, press the seams open a second time from the front of the block after pressing them open from the back.
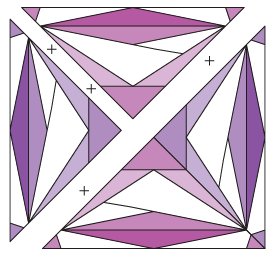
2. Piece together 2 half-blocks to create an entire block. Press the seams open in the same manner as in Step 1. Make sure every block has the same value placement as shown in the block assembly diagram.
LAYOUT AND FINAL ASSEMBLY
1. Piece 20 blocks total. Arrange the blocks into 5 rows of 4 blocks. Rotate every other block, as shown in the layout and assembly diagram, to alternate color placement.
2. When pleased with your arrangement, sew the blocks into rows. Then sew the rows together.
Finishing the Quilt
Baste, quilt, and bind using your favorite methods. Refer to Finishing Your Quilts as needed.
SUGGESTED QUILTING OPTIONS
This quilt is seam heavy. Try choosing quilting options that allow you to avoid the bulkiest areas; this will make your life a little easier.
•An allover curvy pattern is a great option to soften this angular quilt. Emily quilted a meandering feathery pattern to bring just the right girly, floral touches to this purple quilt.
•Diagonal straight-line quilting quietly echoes the lines found in the blocks without detracting from the intense pattern.