
In this section we shall examine positions which in fact belong to the ABC of every player and scarcely need any further elucidation. However, we mention them briefly here for the sake of completeness, first of all looking at the force required to mate a lone king.
This is always a win, the only danger being a possible stalemate.

One possible winning method from diagram 1 is the following: 1 ♕c3 ♔e4 2 ♔b7 ♔d5 The black king obviously wishes to remain in the centre as long as possible. 3 ♔c7 ♔e4 4 ♔d6 ♔f4 5 ♕d3 ♔g5 6 ♔e5 ♔g4 7 ♕e3 ♔h5 8 ♔f5 ♔h4 9 ♕d3 ♔h5 10 ♕h3 mate.
This is perhaps not the shortest way, 1 ♔b7 being possibly quicker, but the given method shows how easily the enemy king can be mated in such positions.
This too is always a win. As in the above example, the enemy king must be driven to the edge of the board before he can be mated, although the task is slightly more difficult. Whilst the queen can drive the king to the edge without the help of its own king, it is essential for the rook and king to co-ordinate their action to achieve this aim.

In diagram 2, White’s task is not especially difficult. In order to force the black king to the side of the board, it is simplest to cut off the king by using the rook along the rank or the file, beginning with 1 ♖a4 or 1 ♖e1. However, as no further progress can be made without the help of the white king, the clearest method is 1 ♔b7 ♔e4 2 ♔c6 ♔d4 3 ♖e1 To force the enemy king towards the a-file. 3 ... ♔c4 4 ♖e4+ ♔d3 5 ♔d5 Now the black king is denied access to both the e-file and the fourth rank. 5 ... ♔c3 6 ♖d4 ♔c2 7 ♔c4 ♔b2 8 ♖d2+

8 … ♔c1 The king already has to go to the back rank. 9 ♔c3 ♔b1 10 ♔b3 ♔c1 11 ♖d3 ♔b1 12 ♖d1 mate. Note especially the use of waiting moves by the rook.
King and two Bishops against King
It is clear that king and one bishop cannot possibly mate a lone king, but two bishops easily force the win, as can be seen in the play from diagram 4.
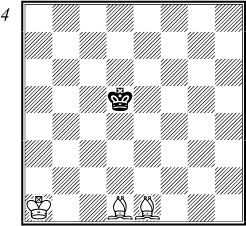
The winning procedure is the same as in the previous examples. The black king is gradually driven to the edge of the board by coordinating the bishops to control its escape squares. The following line of play is readily understandable: 1 ♔b2 ♔e4 2 ♔c3 ♔d5 3 ♗f3+ ♔e5 4 ♗g3+ ♔e6 5 ♔d4 The black king is now completely cut off by the bishops and can easily be forced into the corner. 5 ... ♔f5 6 ♔d5 ♔f6 7 ♗g4 ♔g5 8 ♗d7 ♔f6 9 ♗h4+ ♔g6

The black king’s movements are even further restricted but he must be driven into the corner. 10 ♔e5 ♔f7 11 ♔f5 ♔g7 12 ♗e8 ♔f8 13 ♗g6 ♔g7
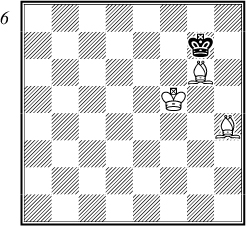
14 ♗e7 ♔g8 15 ♔f6 ♔h8 16 ♗f5 ♔g8 17 ♔g6 ♔h8 18 ♗d6 ♔g8 19 ♗e6+ ♔h8 20 ♗e5 mate.
There may of course be quicker ways but the winning method remains in all cases the same.
King and two Knights against King
Whilst it is clear that a single knight and king cannot mate the enemy king, it is not so obvious that there is no way to force a win with two knights. In this case there is a theoretical mating position, but White cannot bring it about against correct defence. Diagram 7 makes this clear, for White cannot strengthen his position even though the black king is in the corner.

The attempt to restrict the king’s movements by 1 ♘e7 or 1 ♘h6 leads to stalemate. White can try 1 ♘f8 ♔g8 2 ♘d7 ♔h8 3 ♘d6 ♔g8 4 ♘f6+
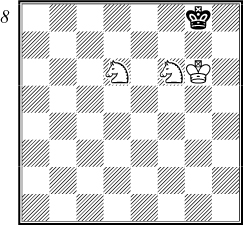
…and if 4...♔h8? 5 ♘f7 mate, but Black simply plays 4 ... ♔f8 and White must start all over again. However hard White tries, there is no forced way of mating the black king with two knights only.
King, Bishop and Knight against King
White can indeed force mate in this ending, and it is worthwhile to acquire the necessary technique. Once again the black king must naturally be driven into the corner of the board, and mating positions are possible in all four corners. However, mate can be forced only in the two corners which are of the same colour as the bishop controls. In the two other corners, mate is only possible if the defender makes a mistake, as was the case with the two knights.
This means that the task of the attacker is fairly tricky. Firstly, the enemy king has to be driven to the edge of the board, then into the corner, and finally into the other corner if the colour is the wrong one for his bishop. And whereas with the queen, rook or two bishops it was easy to cut the king off along the ranks, files or diagonals, with knight and bishop such control is more difficult. The two pieces constantly require the support of their own king, so that the knight and king can guard those squares which the bishop cannot control. Let us see how it all works by examining the play from diagram 9.
White must of course first bring up his king, whilst the black king tries to remain in the centre for as long as possible. As soon as he is driven away, he heads for the ‘wrong’ corner, a8 or h1, where he cannot be mated with correct defence.

Play might continue as follows: 1 ♔b2 ♔d3 2 ♘c7 ♔c4 To hold back the enemy king. 3 ♘e6 ♔d5 4 ♘d4 ♔c4 5 ♔c2 ♔b4 No better would be 5 ...♔d5 6 ♔d3. 6 ♔d3 ♔c5 7 ♗h2 As we can see, the white pieces supported by the king have taken many squares away from the black king. 7 ... ♔d5 8 ♘b3

8 … ♔c6 The king must retreat, so he heads for a8, whereas 8 ... ♔e6 9 ♔e4 would drive him towards h8. 9 ♔c4 ♔b6 Better than 9 ... ♔d7 10 ♔d5. 10 ♘c5 ♔c6 11 ♘a4
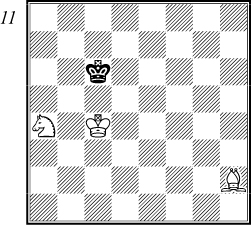
Reaching a similar situation to the one after White’s eighth move and showing a typical method of driving back the enemy king with bishop and knight. 11 … ♔b7 12 ♔b5 ♔c8 After 12 ... ♔a7 13 ♔c6 we reach a position which occurs later in the main variation. 13 ♔c6 ♔d8 14 ♔d6
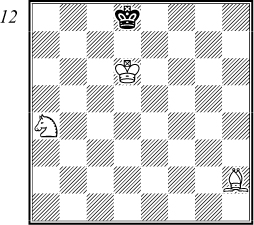
14 … ♔c8 If Black tried to escape by 14 ... ♔e8, he would be driven over to h8 after 15 ♔e6 ♔f8 16 ♗e5, or here 15 ... ♔d8 16 ♘b6, without being able to slip away towards a8. 15 ♘b6+ ♔b7 16 ♔c5 ♔a6 17 ♔c6 ♔a5 18 ♗d6 ♔a6
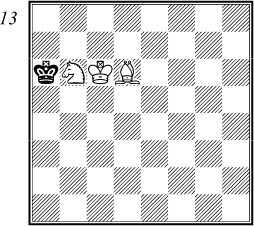
19 ♗b8 Barring the king’s retreat towards a8 and beginning the manoeuvre to drive him towards a1. 19 ... ♔a5 20 ♘d5! ♔a4 White’s task is simpler after 20 ... ♔a6 21 ♘b4+ ♔a5 22 ♔c5 ♔a4 23 ♔c4 ♔a5 24 ♗c7+ etc. 21 ♔c5 ♔b3
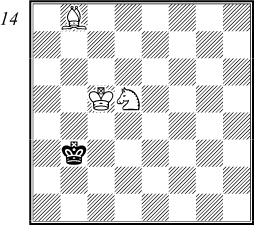
22 ♘b4! A very important knight move and a typical way of driving the king from one corner to the other, 22 ... ♔c3 23 ♗f4 and we can see that the splendid position of the knight stops the black king escaping. 23 ... ♔b3 24 ♗e5 ♔a4 25 ♔c4 ♔a5 26 ♗c7+ ♔a4 27 ♘d3 ♔a3

28 ♗b6 A waiting move; the black king is now compelled to go to a1. 28 ... ♔a4 29 ♘b2+ ♔a3 30 ♔c3 ♔a2 31 ♔c2 ♔a3 32 ♗c5+ ♔a2 33 ♘d3 ♔a1
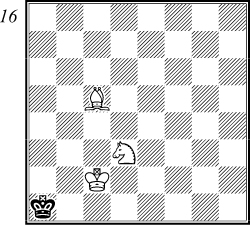
At last! The black king is now mated in three moves. 34 ♗b4 ♔a2 35 ♘c1+ ♔a1 36 ♗c3 mate.
The reader will now realize that this ending is by no means easy. It is worth noting standard positions such as those after White’s 8th, 19th and 22nd moves, and the beginner would do well to try to drive the black king into the corner from various positions on the board, in order to get used to the way in which the three white pieces co-operate. It must not be forgotten that the king must be mated within 50 moves, or else a draw can be claimed. This makes it all the more imperative for us to be thoroughly conversant with the winning method, so as not to lose valuable time driving the enemy king back.
We could have examined this ending in the section on pawn endings, but as we are dealing with simpler examples here, it seems best to include it in this section on elementary endings. In this type of ending it is difficult to give general principles, as everything depends on the placing of the pieces. It goes without saying that a win is only possible if the pawn can be promoted, so our task is to establish when this can or cannot be done.
Of course, White wins easily when the enemy king is too far away to prevent the pawn queening. It is equally clear that the game is drawn when the white king cannot prevent the capture of his pawn. We are primarily concerned with those positions where the black king is placed somewhere in front of the pawn. Let us begin by examining the basic situation given in diagram 17, with the pawn on the sixth rank and the black king on the back rank in front of the pawn.
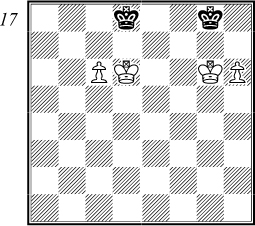
On the left is a typical position in this ending, always attainable even with the pawn originally further back, as its advance to the sixth rank cannot be prevented. The win here depends on who has the move. With White to move the game is drawn, as 1 c7+ ♔c8 2 ♔c6 gives stalemate, and White cannot bring about the same position with Black to move. For instance, after 1 ♔d5 ♔c7 2 ♔c5, Black plays the correct move 2 ... ♔c8! and now both 3 ♔d6 ♔d8 and 3 ♔b6 ♔b8 amount to the same situation. Black’s defence is easy: he keeps his king for as long as possible on c7 and c8 until the white king reaches the sixth rank when Black must immediately place his king directly in front of the white king.
In connection with this ending, I would like to stress one extremely important point concerning the position of the two kings. In all pawn endings, when the kings face each other as above (i.e. standing on the same rank or file with one square in between), they are said to be in ‘opposition’ or more specifically in ‘close opposition’, as compared with ‘distant opposition’ when the kings are 3 or 5 squares apart. Diagonal opposition occurs when there are 1, 3 or 5 squares between both kings.
We say that a player ‘has the opposition’ when he has brought about one of the above-described positions with his opponent to move. In such cases the latter has lost the opposition. We could now define the left half of diagram 17 as follows: the win in this position depends on who has the opposition. If White has it, he wins; if Black has it, the game is drawn.
This rule applies to all similar positions, except those where a rook’s pawn is involved. For example, in the right half of diagram 17, White cannot win even with the opposition, as 1 ... ♔h8 2 h7 gives stalemate.
If the pawn is not on the sixth rank but further back, Black’s drawing chances will increase significantly. Consider the bottom half of diagram 18.
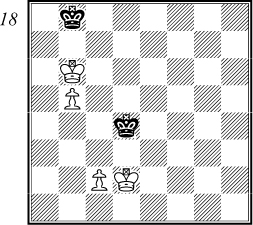
This and similar positions are drawn, whoever has the move. Black defends according to the principles we have given above, with the play going as follows: 1 c3+ ♔c4 2 ♔c2 ♔c5 3 ♔d3 ♔d5 4 c4+ ♔c5 5 ♔c3 ♔c6 6 ♔d4 ♔d6 7 c5+ ♔c6 8 ♔c4 ♔c7 9 ♔d5 ♔d7 10 c6+ ♔c7 11 ♔c5 ♔c8! 12 ♔d6 ♔d8! and we have reached the known drawing position in which Black has the opposition.
One might think that we have now finished with the king and pawn ending, but this is far from being the case. What happens, for instance, when the white king occupies a square in front of his pawn? In this case equally there are no general rules for winning, but White’s winning chances are much greater, especially if the pawn is advanced, as in the upper half of diagram 18.
The white king has managed to reach the important square in front of his pawn and this fact ensures the win in all cases, whoever has the move and however far back the pawn may be. With Black to move, there is a simple win after 1 ... ♔a8 2 ♔c7 or 1 ... ♔c8 2 ♔a7, followed by the advance of the pawn. Even with White to move, there are few problems, for after 1 ♔a6 ♔a8 2 b6 White has the opposition, so wins as we have seen above. All similar positions are won, except for those which again involve the rook’s pawn.
It is, however, worth pointing out one small fact about positions with a knight’s pawn. Returning to the upper half of diagram 18 with White to move, it may seem at first sight that White can also win with 1 ♔c6, as 1 ... ♔c8 2 b6 is lost for Black. However, 1 ♔a6! is the correct move although White can reach this position again even after 1 ♔c6 which Black answers with 1 ... ♔a7!.
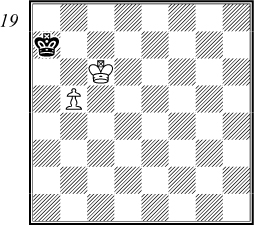
If White now carelessly plays 2 b6+? Black replies 2 ... ♔a8! with a draw, for both 3 ♔c7 and 3 b7+ ♔b8 4 ♔b6 give stalemate. So White must swallow his pride and play 2 ♔c7 ♔a8 3 ♔b6! ♔b8 4 ♔a6! returning to the winning plan.
If the white king is in front of the pawn but not so advanced, we arrive at the left half of diagram 20.
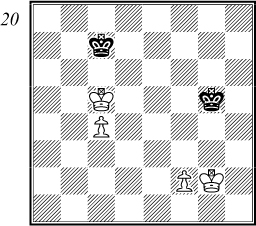
In this typical position the win depends on who has the move. If White has the opposition, then Black loses after 1 ... ♔b7 2 ♔d6 ♔c8 Or 2 ... ♔b8 3 ♔d7. 3 c5 ♔d8 4 c6 ♔c8 5 c7 etc. However, with White to move, Black draws after 1 ♔d5 ♔d7 2 c5 ♔c7 3 c6 ♔c8! 4 ♔d6 ♔d8 with the well-known drawing position.
From this example, it is clear that White wins easily if his pawn is further back, for in this case he can always gain the opposition by moving the pawn. Hence a useful rule for conducting this type of ending is as follows: the white king is advanced as far as possible in front of his pawn (of course, without losing the latter), and only then is the pawn moved.
The right half of diagram 20 illustrates the application of this rule. If Black has the move, he draws easily with 1 ... ♔g4 or 1 ... ♔f4, but White to move wins in the following instructive way: 1 ♔g3! Gaining the opposition, as compared with 1 ♔f3? ♔f5! when Black has the opposition and draws. 1 ... ♔f5 2 ♔f3! Maintaining the opposition; note that 2 f4? ♔f6 would again draw. 2 ... ♔e5 3 ♔g4 ♔f6

4 ♔f4! Once more White takes over the opposition and applies our rule of advancing his king without moving the pawn; a mistake would be 4 f3? ♔g6 5 ♔f4 ♔f6! drawing. 4 ... ♔e6 5 ♔g5! ♔f7 6 ♔f5 6 f3 is possible, but not 6 f4? ♔g7! drawing. 6 ... ♔e7 7 ♔g6 ♔e8 8 f4 Only now, with the white king on the sixth rank, is the pawn advanced; 8 ♔g7 would be pointless, as 8 ... ♔e7 9 f4 ♔e6 would force 10 ♔g6. 8 ... ♔e7 9 f5 ♔f8

10 ♔f6! It is vital to gain the opposition once more, as 10 f6? ♔g8 only draws. 10 ... ♔e8 11 ♔g7 ♔e7 12 f6+ and the pawn queens.
In conclusion we would like to mention two exceptional cases involving the rook’s pawn. The defence has better chances in this type of ending, drawing from positions that would be hopeless with any other pawn. For example, in the left half of diagram 23, even with the move White cannot win.
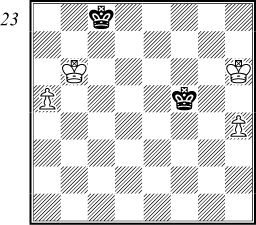
After 1 ♔a7 ♔c7 2 a6 ♔c8 3 ♔a8 Or 3 ♔b6 ♔b8. 3 ... ♔c7 4 a7 ♔c8 White himself is stalemated for a change. As a rule we can state that Black draws if he can reach the critical square c8 (or f8 on the other wing). An obvious exception to this rule is when the white king already occupies c6 or b6 and 1 a7 can be played.
The right half of diagram 23 gives us another draw for Black in a situation that would be a loss against any other pawn. Again White cannot win even with the move, as 1 h5 ♔f6 2 ♔h7 ♔f7 3 h6 ♔f8 gives us the drawing position we have just seen. So in general Black draws against a rook’s pawn.
With this example we complete our treatment of elementary endings and move over to more complicated cases, dealing in turn with pawn, queen, rook, bishop, and knight endings. We shall however examine only those positions illustrating general principles which can be applied to various endings. As already stated, we are not compiling an endgame reference book but presenting important basic positions which every chess player must know how to handle.