Of all endings there is no doubt that rook endings are by far the most common. For this reason they are probably the best analysed, with most examples coming from practical play. In spite of all this, however, they form the most difficult part of endgame theory, and amongst leading specialists only a few have a thorough grasp of them. Even the best grandmasters in the world have had to work hard to acquire the technique of rook endings. It is said of Capablanca that in his early years he exhaustively analysed more than
a thousand such endings, before he attained his splendid mastery in this field.
In view of the above, one can hardly exaggerate the importance of a good understanding of this type of ending. As in queen endings, there is a vast range of possibilities, but these are easier to classify and assess. In the following section we intend to give the reader a limited selection of positions which are basic to rook endings.
The rook usually wins against a pawn but there are many exceptions, especially when the king cannot be brought up quickly enough and the rook has to stop the pawn on its own. Occasionally there are exceptions when the pawn proves stronger than the rook, and we shall begin with the classic case of this.

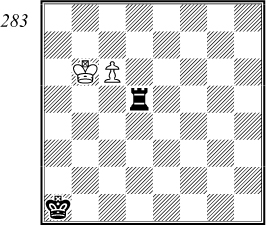
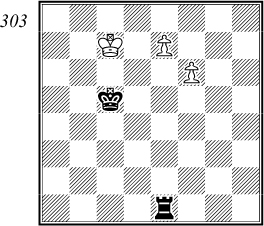
F. Saavedra 1895
This position occurred in a game played in 1895 which ended in a draw. After the game Saavedra demonstrated that White can win in the following imaginative way:
1 |
c7 |
♖d6+ |
This is forced, as d8 and c5 are inaccessible to the rook. The next few moves can easily be understood in this light.
2 |
♔b5 |
♖d5+ |
3 |
♔b4 |
♖d4+ |
4 |
♔b3 |
♖d3+ |
5 |
♔c2! |
Only now does White play his king to the c-file, as 5 ... ♖d1 is now impossible. The game seems over, but Black is not finished yet.
5 |
... |
♖d4 |
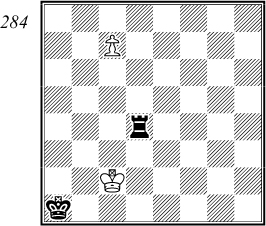
6 |
c8♖! |
6 c8♕ ♖c4+! 7 ♕xc4 is stalemate. White now threatens 7 ♖a8 mate, so Black’s reply is forced.
6 |
... |
♖a4 |
7 |
♔b3 |
...and White wins the rook or forces 8 ♖c1 mate. A glorious position of classical beauty!
The same idea is presented in an even more complicated form in the following study by A. Selesniev:
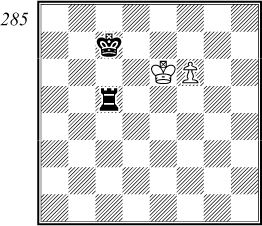
White wins as follows: 1 f7 ♖c6+ 2 ♔e5! But not 2 ♔e7 ♖c1! 3 f8♕ ♖e1+ and 4 ... ♖f1+ drawing. 2 ... ♖c5+ 3 ♔e4 ♖c4+ 4 ♔e3 ♖c3+ 5 ♔f2! ♖c2+ 6 ♔g3 ♖c3+ 7 ♔g4 ♖c4+ 8 ♔g5 ♖c5+ 9 ♔g6 ♖c6+ 10 ♔g7 and White queens next move.
As already stated, however, these are rare occurrences. More useful to us are those positions in which the rook can stop the pawn, the main question being whether or not they are won. Such positions arise when the pawn is protected by the king and cannot immediately be stopped by the enemy king. Let us begin with a typical set-up:
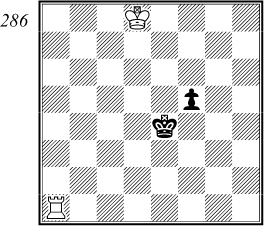
It is clear that the rook on its own cannot win, but can the white king arrive in time to stop the pawn queening? It is fairly easy to answer this question if we count moves. In order to stop the pawn, the white king must reach g2 (or e2 if the black king is on the g-file). He needs six moves for this, whereas Black needs only five moves to reach a position with his king on e2 and pawn on f2. We can conclude from this that White wins only if he has the move, as follows:
1 |
♔e7 |
Black to move draws by 1 ... f4 2 ♔e7 f3 3 ♔f6 f2 4 ♔g5 ♔e3 5 ♔g4 ♔e2 etc.
1 |
... |
f4 |
2 |
♔f6 |
f3 |
It makes no difference whether Black moves his pawn or his king.
3 |
♔g5 |
f2 |
4 |
♔g4 |
♔e3 |
5 |
♔g3 |
♔e2 |
6 |
♔g2 wins. |
|
Of course, positions are not always so clear-cut. We have seen that the white king has to approach on the opposite side to the enemy king, for his way not to be blocked. Black can sometimes gain valuable time by preventing the king’s approach and this can be an effective method of defence.
For example, if we change diagram 286 by placing the white king on c7, White cannot win with the move, even though theoretically his king only needs five moves to reach g2. The reason for this is that the black king can force White to waste time, as follows:
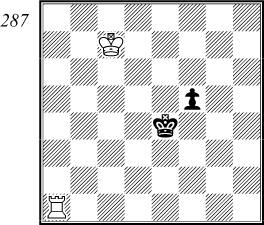
1 ♔d6 f4 2 ♖a4+ Or 2 ♔e6 f3, or 2 ♔c5 f3 3 ♔c4 f2 4 ♔c3 ♔e3 etc. 2 ... ♔e3 3 ♔e5 f3 4 ♖a3+ ♔e2 5 ♔e4 f2 6 ♖a2+ ♔e1 7 ♔e3 f1♘+! and Black draws. Or 1 ♖e1+ ♔d4 2 ♖f1 ♔e4 3 ♔d6 f4 4 ♔e6 Or 4 ♔c5 f3 5 ♔c4 ♔e3 6 ♔c3 f2 etc. 4 ... f3 5 ♔f6 ♔e3 6 ♔g5 f2 7 ♔g4 ♔e2 again drawing.
If the white king is on the wrong side, he must be correspondingly nearer the queening square to win. For example, if we place the king on c6 in diagram 286, White wins by 1 ♔c5 f4 2 ♔c4 ♔e3 Or 2 ... f3 3 ♖e1+ and 4 ♔d3. 3 ♔c3
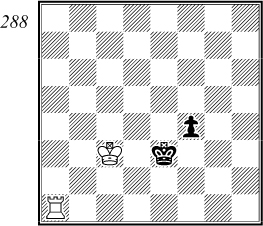
3 … ♔e2 Or 3 ... f3 4 ♖e1+ ♔f2 5 ♔d2 ♔g2 6 ♔e3 f2 7 ♖e2. 4 ♔d4 f3 5 ♖a2+ followed by 6 ♔e3.
We have not yet exhausted all the possibilities of diagram 286. Instead of moving the white king, let us place the white rook on d1, with White to move.
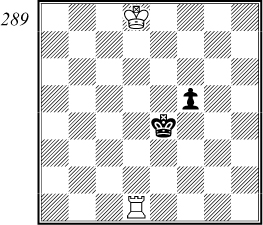
The normal sequence comes up against a difficulty, as after 1 ♔e7 f4 2 ♔f6 f3 3 ♔g5 f2 4 ♔g4 ♔e3 5 ♔g3 ♔e2 the white rook is attacked, so the game is drawn. In order to win from this position, White must first improve the placing of his rook by 1 ♖e1+! ♔d4 or 1 ... ♔f3 2 ♖f1+ ♔g4 3 ♔e7 f4 4 ♔e6 f3 5 ♔e5 ♔g3 6 ♔e4 f2 7 ♔e3 etc. 2 ♖f1! ♔e4, and only now play 3 ♔e7! f4 4 ♔f6 f3 5 ♔g5 ♔e3 6 ♔g4 f2 7 ♔g3 winning.
In practice, positions occur where the rook is not on the first rank but somewhere behind the pawn along with the king. Let us analyse such a position:
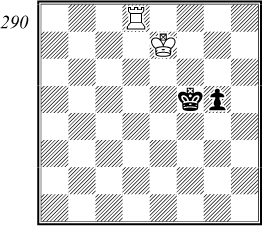
M. Euwe 1934
White has various ways of winning, so we will choose one of them as our main line:
1 |
♔d6 |
Alternatives are 1 ♖f8+ ♔e4 2 ♔f6 Or 2 ♖g8 ♔f4 3 ♔f6 g4 4 ♔g6 g3 5 ♔h5 etc. 2 ... g4 3 ♔g5 g3 4 ♔h4 g2 5 ♖g8 ♔f3 6 ♔h3 winning, or 1 ♖g8 Or first 1 ♔f7. 1 ... g4 2 ♔f7! ♔f4 3 ♔g6 g3 4 ♔h5 ♔f3 5 ♔h4 with an easy win.
1 |
... |
g4 |
If Black tries to prevent the king’s advance by 1 ... ♔e4 White wins after 2 ♖g8 ♔f4 3 ♔d5 etc.
2 |
♔d5 |
♔f4 |
3 |
♔d4 |
♔f3 |
If 3 ... g3 4 ♖f8+ and 5 ♔e3 wins.
4 |
♔d3 |
g3 |
Or 4 ... ♔f2 5 ♖f8+ ♔g2 6 ♔e2 etc.
5 |
♖f8+ |
♔g2 |
6 |
♔e2 |
♔g1 |
7 |
♔f3 |
g2 |
8 |
♖g8 |
♔h1 |
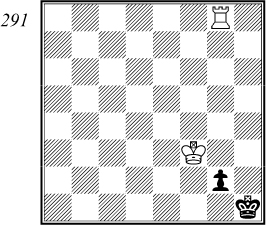
9 |
♔f2! wins. |
However, if we change the placing of the white rook, our assessment of this position may alter. For example, with the rook on a6, White can no longer win, as the rook is unfavourably placed on the sixth rank.
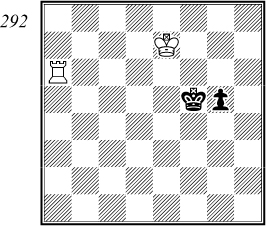
After 1 ♖f6+ ♔e4! the rook blocks its own king and must lose a tempo by 2 ♖g6 ♔f4 3 ♔f6 Or 3 ♔e6 g4 4 ♔d5 g3 5 ♔d4 ♔f3 draws. 3 ... g4 with the rook again blocking his king’s approach via g6. Or here 2 ♔d6 g4 3 ♔c5 g3 4 ♖g6 ♔f3 5 ♔d4 g2, both drawing.
If instead 1 ♔f7 g4 2 ♔g7 g3 3 ♔h6 ♔f4 4 ♔h5 g2 and 5 ... ♔f3 draws, or 1 ♔d6 g4 2 ♔d5 g3 3 ♔d4 g2! (king moves would lose), as the rook cannot go to g6, Black draws after 4 ♖a1 ♔f4 5 ♔d3 ♔f3 etc. One final attempt by White is 1 ♖a5+ ♔f4 2 ♔f6, but Black still draws by 2 ... g4 3 ♖a4+ ♔f3 4 ♔f5 g3 5 ♖a3+ ♔f2 6 ♔f4 g2 7 ♖a2+ ♔f1 8 ♔f3 g1♘+! etc. This ending cannot be won as we shall see later.
However, if in the diagrammed position we place the white king on f1, White wins wherever his rook is positioned. The reader can check for himself.
Finally let us look at a most interesting study by Réti:
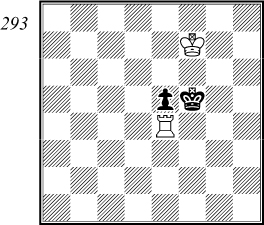
R. Réti 1928
The rook must retreat, because 1 ♖a4 (or h4) fails to 1 ... e4 2 ♖a5+ ♔f4 3 ♔e6 e3 4 ♖e5 ♔f3 5 ♔d5 e2 6 ♔d4 ♔f2 drawing, as White is a tempo too late.
1 |
♖e2(e3)!! |
This retreat is not only surprising but even incomprehensible without a thorough analysis of the position. 1 ♖e1 seems more logical, as after 1 ... e4 2 ♔e7 ♔f4 3 ♔d6 e3 4 ♔d5 ♔f3 5 ♔d4 e2 6 ♔d3 White wins easily. However, Black has a more cunning defence in 2 ... ♔e5! when both 3 ♔f7 ♔f5! and 3 ♔d7 ♔d5! lead to no progress for White. He must therefore move his rook, and as it dare not leave the e-file because of 3 ... e3, 3 ♖e2 is forced (3 ♖e3 transposes). But now Black can play 3 ... ♔d4 or 3 ... ♔f4 4 ♔e6 e3 5 ♔f5 ♔d3! gaining the vital tempo to draw.
In other words, 2 ... ♔e5! would place White in zugzwang, which explains the text move.
1 |
... |
e4 |
Or 1 ... ♔f4 2 ♖e1 e4 3 ♔e6, or here 2 ... ♔f5 3 ♔e7 etc winning easily.
2 |
♖e1! |
Only now does the rook go to the first rank.
2 |
... |
♔e5 |
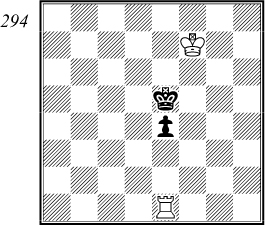
3 |
♔e7! |
Now it is Black who is in zugzwang and he must give way to the white king. 3 ♔g6? would spoil everything, as 3 ... ♔f4! 4 ♔h5 e3 5 ♔h4 ♔f3 draws.
3 |
... |
♔d4 |
Or 3 ... ♔f4 4 ♔d6 e3 5 ♔d5 etc.
4 |
♔f6 |
e3 |
5 |
♔f5 |
♔d3 |
6 |
♔f4 |
e2 |
7 |
♔f3 wins. |
One of the best studies with this material. It is amazing how much subtlety is contained in such a simple setting.
Before we end this part, let us consider two useful positions given in diagram 295.
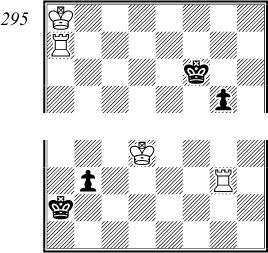
In the top position White wins by a noteworthy manoeuvre which often occurs in such endings:
1 |
♖a5! |
White profits from the fact that the pawn cannot advance to the sixth rank without the help of the king which is now shut off from one side of the pawn. He must not play the alternative 1 ♔b7? ♔e5! 2 ♔c6 g4 3 ♖g7 or 3 ♔c5 g3 4 ♔c4 ♔e4! 5 ♖g7 ♔f3 6 ♔d3 g2 7 ♔d2 ♔f2 8 ♖f7+ ♔g3!. 3 ... ♔f4 4 ♔d5 g3 5 ♔d4 ♔f3 6 ♔d3 Or 6 ♖f7+ ♔e2!. 6 ... g2 and Black draws.
1 |
... |
♔g6 |
The pawn cannot advance as after 1 ... g4 2 ♔b7 g3 3 ♖a3! it is lost, and even if the pawn does not go to the sixth the king is permanently cut off.
Black now intends to bring his king up first, but this costs a great deal of time which White uses to advance his own king.
2 |
♔b7 |
♔h5 |
3 |
♔c6 |
♔g4 |
Black must lose even more time in order to prevent the white king’s advance, as 3 ... ♔h4 loses at once to 4 ♔d5 g4 5 ♔e4 g3 6 ♔f3 etc.
4 |
♔d5 |
♔f3 |
Or 4 ... ♔f4 5 ♔d4 g4 6 ♔d3 ♔f3 7 ♖f5+ etc.
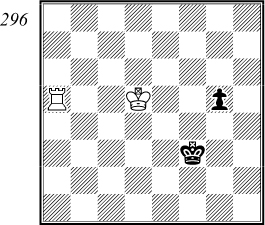
5 |
♔e5! |
Much simpler than 5 ♔d4 g4 when White must avoid the pitfall 6 ♔d3? g3 7 ♖f5+ ♔g4! 8 ♖f8 Or 8 ♖f1 g2 9 ♖a1 ♔f3 etc. 8 ... g2 9 ♔e2 g1♘+! White must play instead 6 ♖a3+ ♔f4 Or 6 ... ♔f2 7 ♔e4. 7 ♔d3 ♔f3 8 ♔d2+ ♔f2 9 ♖a8 g3 10 ♖f8+ followed by 11 ♔e2 winning.
5 |
... |
g4 |
6 |
♖a3+ |
…with an easy win.
The reader should remember this idea of using the rook on the fifth rank to cut off the enemy king.
The bottom position of diagram 295 is drawn, despite the fact that White has the move. The reason for this lies in the unfavourable position of White’s rook. For instance, if the rook were on g8, White would win easily by 1 ♔c3 b2 2 ♖a8+ ♔b1 3 ♖b8 ♔a1 4 ♔c2! etc.
Play from the diagram might go as follows:
1 |
♔c3 |
b2 |
2 |
♖g2 |
Or 2 ♖g8 b1♘+! draws.
2 |
... |
♔a1 |
3 |
♖xb2 stalemate. |
|
If Black has two pawns, then everything depends on the placing of the pieces. If the pawns are advanced and supported by the king, they can often win, but if they are blockaded, the rook wins. Let us consider a few examples:
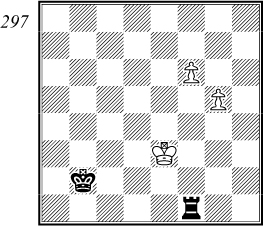
S. Tarrasch – D. Janowski
Ostend 1907
This instructive position occurred in an important tournament game. White has strong passed pawns but they still need the support of the king, as otherwise the rook would simply pick them up by 1 ... ♖f5, 2 ... ♖xg5 and 3 ... ♖f5. As it is, White can support the pawns with his king, but must play exactly.
1 |
♔d4! |
Following the principles we have already stated, White advances his king whilst at the same time hindering the black king’s approach. Black to move would easily draw by 1 ... ♔c3 2 ♔e4 ♔c4 3 ♔e5 ♖g1 4 f7 (or 4 ♔f5 ♔d5 and Black wins!) 4 ... ♖xg5+ 5 ♔e4 (or 5 ♔e6 ♖g6+) 5 ... ♖g1 6 ♔e5 with a draw.
1 |
... |
♔b3 |
Black must bring his king nearer the pawns as quickly as possible. Rook moves are useless, for after 1 ... ♖f5 2 ♔e4! ♖xg5 3 f7 ♖g4+ 4 ♔e3 ♖g3+ 5 ♔f2 wins.
2 |
♔e5 |
Maizelis subsequently showed that 2 ♔d5! would have made White’s task easier. Black’s king is kept away from c4, and 2 ... ♖f5+ loses to 3 ♔e6 ♖xg5 4 f7. After 2 ... ♔c3 3 ♔e6 ♔d4 4 f7 wins, or here 3 ... ♖e1+ 4 ♔f7 ♔d4 5 g6 ♔e5 6 ♔g7!.
2 |
... |
♔c4 |
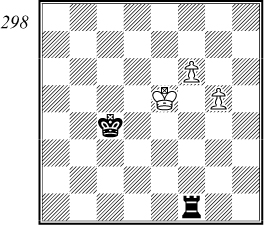
3 |
g6 |
Stronger according to Maizelis is 3 ♔e6! ♖e1+ (as 4 f7 was threatened) 4 ♔f7 ♔d5 5 g6 threatening 6 g7 and after 5 ... ♔e5 or 5 ... ♖g1 6 ♔g7! and 7 f7 wins.
3 |
... |
♖e1+ |
4 |
♔d6 |
But not 4 ♔f5 ♔d5! 5 f7 ♖f1+ and 6 ... ♔e6 drawing, or here 5 g7 ♖f1+ 6 ♔g6 ♖g1+ 7 ♔f7 ♔e5 8 ♔e7 ♖g2 etc.
4 |
... |
♖g1! |
In the actual game Janowski played the weaker 4 ... ♖d1+ 5 ♔e7 ♖e1+ 6 ♔f7 and had to resign. On the other hand, the text move poses interesting problems.
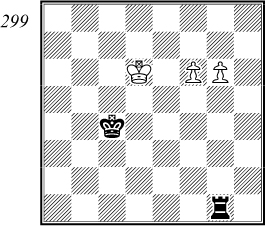
5 |
g7 |
The only move, as Black draws after 5 f7 ♖xg6+ 6 ♔e5 ♖g5+ 7 ♔e4 ♖g1! etc.
5 |
... |
♔d4 |
Preventing 6 f7 when he draws by 6 ... ♖g6+ and 7 ... ♖xg7. Now White cannot win by 6 ♔e6 ♔e4 7 ♔f7 ♔f5, nor by 6 ♔e7 ♔e5 etc.
6 |
♔c6! |
Threatening 7 f7. If now 6 ...♖g6 7 ♔b5 wins.
6 |
... |
♔c4 |
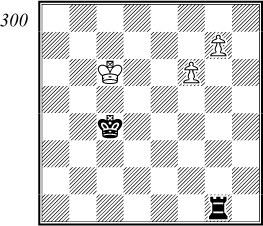
7 |
♔d7! |
Profiting from the fact that Black cannot play 7 ... ♔e5. Instead 7 ♔b6 would only draw after 7 ... ♖g6 8 ♔a5 (8 ♔c7 ♔d5 9 ♔d7 ♔e5) 8 ... ♖g5+ 9 ♔a4 ♖g1 10 ♔a3 ♔c3 11 ♔a2 ♖g2+ etc.
7 |
... |
♔d5 |
8 |
♔e8 |
And now 9 f7 cannot be stopped.
8 |
... |
♔e6 |
9 |
f7 |
♖a1 |
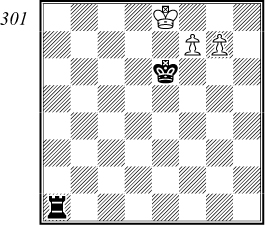
The last try, threatening mate.
10 |
f8♘+! |
…followed by 11 g8♕ winning.
This example has shown us that the rook has excellent defensive chances against advanced pawns, sometimes in seemingly hopeless situations. Our next position reinforces this point.
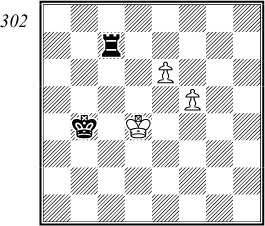
H. Keidanski 1914
Compared to the previous example, the black king is here more favourably placed, whereas the rook is at the moment in rather a passive position, being unable to prevent the threatened f6. Black’s first task, therefore, is to improve the position of this rook.
1 |
... |
♖c1! |
Even simpler according to Kopayev is 1 ... ♖c4+! 2 ♔e5 (2 ♔d5 ♖c5+ 3 ♔d6 ♖xf5!. Or 2 ♔d3 ♖c3+ 3 ♔e2? ♖c8! and 4 ... ♔c5 etc) 2 ... ♔c5 3 e7 ♖c1 giving us the main variation.
2 |
e7 |
This move gives the defence the most problems, whereas 2 ♔d5 is harmless after 2 ... ♖f1 3 ♔e5 ♔c5, or here 3 e7 ♖xf5+ 4 ♔d4 ♖f1! etc.
2 f6 is also easier to answer, Black plays 2 ... ♖d1+ 3 ♔e5 ♔c5 4 f7 (or 4 e7 ♖e1+ and 5 ... ♔d6) 4 ... ♖e1+ 5 ♔f6 ♖f1+ 6 ♔e7 ♔d5 7 ♔d7 ♖f6 drawing.
2 |
... |
♖d1+ |
3 |
♔e5 |
♔c5 |
4 |
♔e6 |
Again 4 f6 ♖e1+ and 5 ... ♔d6 gives an easy draw, or 4 ♔f6 ♖e1 5 ♔f7 ♔d6 6 e8♕ (6 f6 ♔d7 7 ♔f8 ♖e6 etc) 6 ... ♖xe8 7 ♔xe8 ♔e5 draws.
4 |
... |
♖e1+ |
5 |
♔d7 |
♖d1+ |
6 |
♔c7 |
If 6 ♔e8 ♖f1 and the king must return to the d-file. Or 6 ♔c8 ♖e1 7 f6 ♔d6 8 ♔d8 ♖a1! draws.
6 |
... |
♖e1 |
7 |
f6 |
7 |
… |
♖e6! |
The only move, preventing the threatened 8 ♔d7 ♖d1+ 9 ♔e8 and 10 f7.
8 |
♔d7 |
♖d6+ |
9 |
♔c8 |
Not 9 ♔e8 ♖xf6. White now hopes for 9 ... ♖e6 10 f7 winning, but Black has a stronger move.
9 |
... |
♖c6+ |
10 |
♔b7 |
♖b6+ |
11 |
♔a7 |
♖e6! |
...and the draw is clear, for White cannot prevent 12 ... ♔d6 and 13 ... ♖xe7.
We have already seen that far advanced pawns can be neutralized or captured by the rook, if they are unsupported by the king. Here is a further example of this:
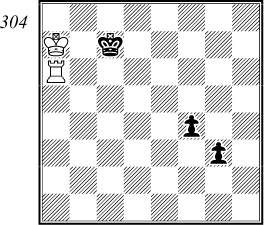
Black to move wins easily by 1 ... f3 or 1 ... g2, but with White to move the rook can destroy the pawns on its own by 1 ♖g6! ♔d7 2 ♖g4 g2 Or 2 ... ♔e6 3 ♖xf4 and 4 ♖g4. 3 ♖xg2 ♔e6 4 ♖g5! ♔f6 5 ♖a5 with an easy win, as the pawn can never advance.
Very interesting positions arise when the king is cut off at the side of the board but his pawns are far advanced, as in our next example.
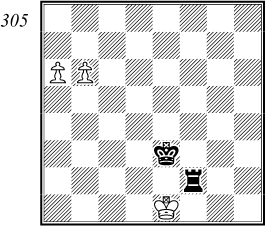
after J.Moravec 1924
With White to move, the position seems hopeless for Black as the pawns cannot be stopped. However, Black saves himself by using the unfavourable position of White’s king which cannot escape the constant mating threats.
1 |
b7 |
Similar variations arise after 1 a7 ♖a2! 2 ♔d1 (2 ♔f1 ♔f3) 2 ... ♔d3 3 ♔c1 ♔c3 4 ♔b1 ♖a6 5 b7 ♖b6+ 6 ♔c1 ♖h6! 7 ♔d1 ♔d3 8 ♔e1 ♔e3 9 ♔f1 ♔f3 10 ♔g1 ♖g6+ 11 ♔f1 ♖h6 and White cannot escape the mating threats. An astonishing draw!
1 |
... |
♖h2! |
The only square for the rook. 1 ... ♖b2 loses to 2 ♔d1 ♔d3 3 ♔c1 ♔c3 4 a7 ♖h2 (if 4 ... ♖a2 5 b8♕) 5 ♔d1 ♔d3 6 ♔e1 ♔e3 7 ♔f1 ♔f3 8 ♔g1 ♖g2+ 9 ♔h1 etc. Or 1 ... ♖a2 2 ♔d1 ♔d3 3 ♔c1 ♔c3 4 b8♕ ♖a1+ 5 ♕b1 wins.
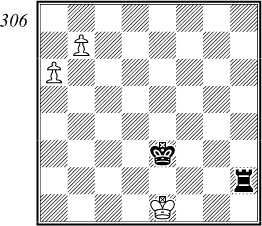
2 |
♔f1 |
If 2 ♔d1 ♔d3 3 ♔c1 ♔c3 4 ♔b1 Black can draw either by 4 ... ♖b2+ 5 ♔a1 ♖b6 6 a7 ♖a6+ 7 ♔b1 ♖b6+ 8 ♔c1 ♖h6! or by 4 ... ♖h1+ 5 ♔a2 ♖h2+ 6 ♔a3 ♖h1 7 ♔a4 ♔c4 8 ♔a5 ♔c5 and the king must return.
2 |
... |
♔f3 |
3 |
♔g1 |
♖g2+ |
Not 3 ... ♖b2? 4 a7 ♖b1+ 5 ♔h2 ♖b2+ 6 ♔h3 ♖b1 7 b8♕ ♖h1+ 8 ♕h2 winning, but 3 ... ♖h8 is equally possible.
4 |
♔h1 |
♖g8 |
5 |
a7 |
♖h8+ |
6 |
♔g1 |
♖g8+ |
7 |
♔f1 |
♖h8 |
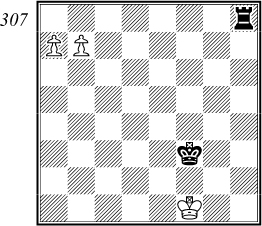
…and White cannot make any progress, e.g. 8 ♔e1 ♔e3 9 ♔d1 ♔d3 10 ♔c1 ♔c3 11 ♔b1 ♖h1+ 12 ♔a2 ♖h2+ 13 ♔a3 ♖h1 14 ♔a4 ♔c4 15 ♔a5 ♔c5 16 ♔a6 ♖a1 mate, so the king must turn back.
When the pawns are isolated, the rook usually wins, unless they are far advanced. An instructive position from practical play is given in diagram 308.
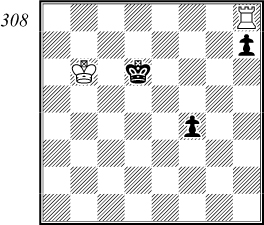
H. Lehner – A. von Rothschild
1881
In the actual game, play went 1 ♖xh7? ♔d5! 2 ♖f7 ♔e4 3 ♔c5 f3 4 ♔c4 ♔e3 5 ♔c3 f2 6 ♔c2 ♔e2 7 ♖e7+ ♔f3! ½-½. White’s first move was a serious error for the dangerous pawn is the f-pawn not the h-pawn. He could have won as follows:
1 |
♖f8! |
Or 1 ♖d8+ ♔e5 2 ♔c5 etc, with the same result.
1 |
... |
♔e5 |
2 |
♔c5 |
♔e4 |
After 2 ... h5 3 ♖e8+ ♔f5 4 ♔d4 h4 the simplest win is 5 ♔d3 and 6 ♔e2.
3 |
♔c4 |
♔e3 |
4 |
♔c3 |
h5 |
Or 4 ... f3 5 ♖e8+ ♔f2 6 ♔d2 h5 7 ♖h8 ♔g2 8 ♔e3 followed by 9 ♖g8+ with an easy win.
5 |
♖e8+ |
♔f2 |
6 |
♔d2 |
6 ♖h8 would waste time after 6 ... ♔e2 when White must play 7 ♖e8+ again, as 7 ♖xh5 f3 draws.
6 |
... |
h4 |
7 |
♖h8 |
♔g3 |
8 |
♔e2 |
h3 |
9 |
♖g8+ |
...followed by
10 |
♔f1 |
...with an easy win.
Endgames with rook against three or more pawns belong to the sphere of the practical ending. Of some interest to us here is the case when the rook is up against three connected pawns, as in our next diagram.
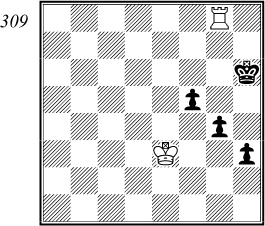
H. Lehner 1887
In this position Black to move is in zugzwang and loses quickly, e.g. 1 ... ♔h7 or 1 ... ♔h5 2 ♔f4 ♔h6 3 ♔xf5. 2 ♖g5 ♔h6 3 ♖xf5 h2 4 ♖f1 g3 5 ♔f3.
However, White to move can seemingly do nothing decisive, as after 1 ♔f4 ♔h7 2 ♖g5 ♔h6 White cannot capture the f-pawn because of 3 ... h2 winning. If he continues 3 ♖g8 ♔h7 4 ♖a8 Black plays 4 ... ♔g7! but not 4 ... ♔g6 5 ♖f8! ♔h6 6 ♖f6+ and 7 ♖xf5 winning. 5 ♖a6
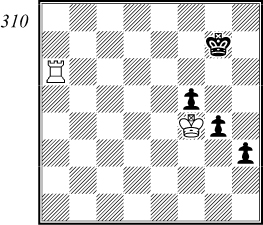
5 … ♔f7! Not 5 ... ♔h7 6 ♔g5! ♔g7 7 ♖a7+ followed by 8 ♔f4 and 9 ♖a5; 5 ... ♔g8 or 5 ... ♔f8 also lose to 6 ♖a5. 6 ♖h6 ♔g7 7 ♖h5 ♔g6 8 ♖g5+ If 8 ♖xf5 h2 9 ♖g5+ ♔h6 10 ♖g8 ♔h7 wins. 8 ... ♔h6 9 ♖g8 ♔h7 10 ♖a8 ♔g7 and we are back where we started. Black must watch that the rook does not reach f8 or, as we shall see later, in some lines g8.
Yet despite all this, White to move can still force a win, as Kopayev has shown in the following fine analysis:
1 |
♔e2 |
White intends to lose a tempo and bring about the same diagram with Black to move. As we shall see, Black cannot prevent this, so diagram 309 must now be assessed as won for White, whoever has the move.
1 |
... |
♔h5 |
There is no pawn move available.
2 |
♔f2 |
♔h4 |
If 2 ... ♔h6 3 ♔e3 gives us diagram 309 with Black to move, and 2 ... f4 3 ♖h8+ leads to the main line.
3 |
♖g7 |
f4 |
Or 3 ... ♔h5 4 ♔e3 ♔h6 5 ♖g8 and again White has achieved his aim. Even the present position was long thought to be drawn, but the following winning plan of Kopayev is convincing enough.
4 |
♖h7+ |
♔g5 |
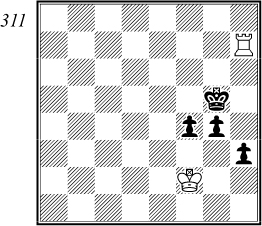
5 |
♔g1! |
This is the subtle point. White’s king heads for h2 to prevent for ever the advance of the pawns. Black will then be forced to play ... f3 when ♔g3 proves decisive.
5 |
... |
♔f5 |
Even easier for White is 5 ... f3 6 ♔f2 ♔f4 7 ♖f7+ and 8 ♔g3.
6 |
♔h2 |
♔e4 |
Nor would previous play be any better. After 6 ... ♔g5 7 ♖f7! or 6 ... ♔e5 7 ♖g7 ♔f5 8 ♖g8! White forces 8 ... f3 when 9 ♔g3 wins easily.
7 |
♖g7 |
♔f3 |
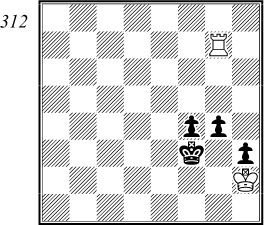
8 |
♖g8! |
Zugzwang! Black must give up a pawn.
8 |
... |
♔e2 |
Or 8 ... g3+ 9 ♔xh3 ♔f2 10 ♖a8 etc.
9 |
♖xg4 |
f3 |
10 |
♖e4+ |
♔f1 |
11 |
♔g3 |
But not 11 ♔xh3 f2 with a draw.
11 |
... |
f2 |
Or 11 ... h2 12 ♔xh2 f2 13 ♖f4 and 14 ♔g2.
12 |
♖f4 wins. |
We can draw various conclusions from this fine piece of analysis. Against three connected pawns, White wins if his king is near and the pawns are no further advanced than the fourth rank. With a pawn on the sixth, Black has good drawing chances, and a pawn on the seventh usually forces White to look for a draw.
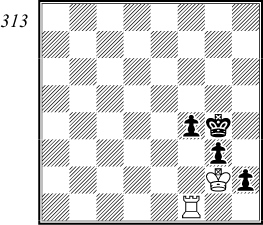
For example in diagram 313 Black to move wins by 1 ... f3+! 2 ♖xf3 h1♕+ 3 ♔xh1 ♔xf3 4 ♔g1 g2.
White to move can draw by 1 ♔h1! as 1 ... f3 or 1 ... ♔h3 2 ♖f3. 2 ♖xf3 ♔xf3 gives stalemate.
Finally, another interesting study by Réti:
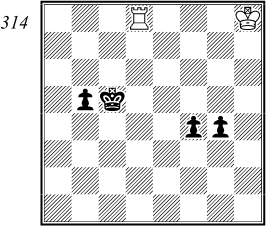
R. Réti 1929
As the white king is far away from the scene of action, his only hope is to draw. To do this he must eliminate at least one of the dangerous connected pawns, but which one is the all-important question. Réti’s solution gives us the answer:
1 |
♖g8! |
The alternative 1 ♖f8 would lose in the following instructive way: 1 ... f3 2 ♖f4 b4 3 ♖xg4 b3 4 ♖g1 (4 ♖g5+ ♔d4 5 ♖g4+ fails to 5 ... ♔e5! 6 ♖g5+ ♔f4, but not here 5 ... ♔d3 6 ♖b4 ♔c2 7 ♖c4+ ♔d2 8 ♖d4+ ♔e2 9 ♖e4+ etc) 4 ... f2 5 ♖f1 b2 6 ♔g7 ♔d4 7 ♔f6 ♔d3! wins. 8 ... ♔e2 is threatened and 8 ♖b1 fails to 8 ... ♔c2 and 9 ... b1♕. We shall soon see the difference between this and the main line.
1 |
... |
g3 |
The only chance, as 1 ... f3 2 ♖xg4 and 3 ♖f4 wins the f-pawn, and 1 ... ♔d4 2 ♖xg4 ♔e3 3 ♖g5 leads to the capture of the b-pawn.
2 |
♖g4 |
b4 |
3 |
♖xf4 |
b3 |
4 |
♖f1 |
The only way of holding both pawns.
4 |
… |
g2 |
5 |
♖g1 |
b2 |
6 |
♔g7 |
♔d4 |
7 |
♔f6 |
♔e3 |
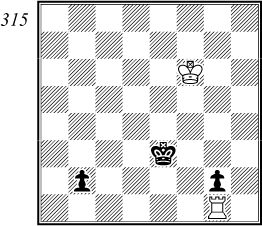
Again threatening to win by 8 … ♔f2, but White in this case has a satisfactory defence.
8 |
♖b1! |
♔d3 |
9 |
♖g1! draw. |
|
Black can bring his king no nearer. For White to draw like this, there must be at least four files between the pawns.
We could show many more interesting positions in which the rook has to fight against several pawns, but this would take us too far afield. Let us instead turn to perhaps the most important part of the simpler rook endings, rook and pawn against rook.
We have already mentioned that rook endings are in practice the most common of all endings and therefore represent an especially important part of endgame theory.
For this reason the reader must devote special attention to the following section. In spite of their apparent simplicity, rook endings are in reality very difficult to play well and often contain subtleties which one would hardly suspect at first glance.
Before we proceed to a thorough examination of basic positions, let us briefly consider the few exceptional situations in which rook against rook can win, even without pawns on the board. Of course, this can only happen when a king is in a mating net or when there is a forced win of a rook.
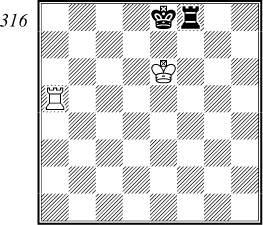
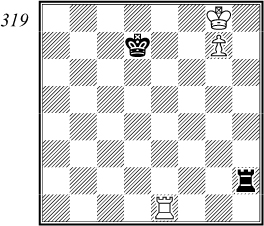
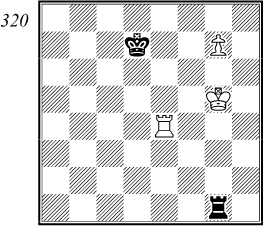
For example, in diagram 316, Black loses even with the move, for he must give up his rook to prevent mate. Black equally loses in the position with White’s king on e6, rook on a6, and Black’s king on e8, rook on f5.
Finally, in diagram 317
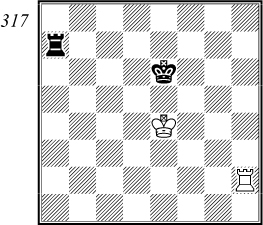
…White to move wins the rook by 1 ♖h6+ and 2 ♖h7+. Naturally, these exceptional positions usually occur during a more complicated ending rather than on their own (see the Saavedra position), but are worth learning.
The reader will soon see how complicated even the simplest looking ending can be, but these basic positions must be fully understood before more complex positions can be attempted.
This is why a relatively large part of this book is devoted to these endings. Many chess players may find it a little dull to study such basic elements but this knowledge is indispensable if any progress is to be made.
We can usually talk of a win only when the defending king is not in front of the pawn and the attacking king is near the pawn. Apart from this, it is difficult to give any general indications about a win or a draw, as the result of each position can often be changed by a slightly different placing of the pieces. This makes it all the more vital for the reader to learn the basic positions thoroughly, so that he understands the various nuances.
Finally, before we look at particular positions, there are one or two general considerations which apply to most rook endings.
Firstly, the passed pawn should be supported by the king and the enemy king kept as far away as possible, usually by cutting it off by use of the rook along a rank or file.
Secondly, the rook is best placed behind the pawn, either to support its advance most effectively, or to prevent its advance whilst maintaining maximum mobility. These important rules in rook endings will often be applied in the following pages.
Let us begin our examination by considering a classic example, the Lucena position, known about 500 years ago.
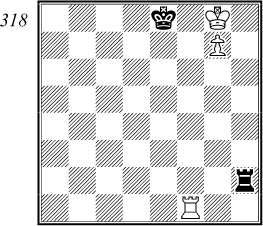
Lucena (?) 1497 (?)
This is a typical winning position when the pawn is on the seventh rank with its own king in front of it and the enemy king cut off. The win is forced by the following characteristic manoeuvre:
1 |
... |
♔e7 |
2 |
♖e1+ |
It is clear the black rook must not leave the rook’s file, when the white rook would take it over, allowing ♔h8. White would get nowhere by 2 ♖f7+ ♔e8 3 ♖f8+ ♔e7, as his own king is still tied in.
2 |
... |
♔d7 |
A quicker way to lose is 2 ... ♔f6 3 ♔f8, or 2 ... ♔d6 3 ♔f8 ♖f2+ 4 ♔e8 ♖g2 5 ♖e7 followed by 6 ♔f8.
3 |
♖e4! |
We shall soon see why the rook plays here. Instead 3 ♔f7 would be pointless, for after 3 ... ♖f2+ 4 ♔g6 ♖g2+ 5 ♔f6 ♖f2+ 6 ♔e5 ♖g2 the king must go back to f6.
3 ♖e5 would also win, although the ending after 3 ... ♔d6 4 ♔f7 ♖f2+ 5 ♔e8 ♔xe5 6 g8♕ would offer White more difficulties than the text continuation.
3 |
... |
♖h1 |
Black must wait, as 3 ... ♖f2 loses to both 4 ♔h7 and also 4 ♖h4 followed by 5 ♔h8.
4 |
♔f7 |
♖f1+ |
5 |
♔g6 |
♖g1+ |
6 |
♔f6 |
♖f1+ |
White was threatening 7 ♖e5 and 8 ♖g5, and 6 ... ♔d6 loses to 7 ♖d4+ followed by 8 ♖d8 or 8 ♖d5.
7 |
♔g5 |
♖g1+ |
8 |
♖g4! |
Here is the reason for playing this rook to the fourth rank. All checks are stopped and the pawn now queens.
Another classic position must be known before we can move on, the famous Philidor position in diagram 321, in which the black king is placed directly in front of the pawn.
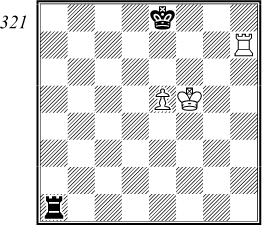
F. Philidor 1777
Such positions are usually drawn but there are one or two exceptions. Philidor demonstrated how the defence should handle this type of ending:
1 |
... |
♖a6! |
Black’s plan is simple. He first stops the king’s advance so that he can answer checks by playing his king between e7 and e8. If White plays his rook to g6, Black exchanges rooks and draws the pawn ending. To make any progress White must advance his pawn, when Black immediately plays his rook up the board so as to check the white king away from behind.
2 |
♖b7 |
♖c6 |
3 |
♖a7 |
♖b6 |
4 |
e6 |
Forced sooner or later. White now threatens 5 ♔f6.
4 |
... |
♖b1! |
Now that the e6 square has been denied to the white king, Black’s rook can calmly move away. The draw is clear for the white king cannot defend effectively against the coming checks.
White to move could try to win by 1 ♔f6 but does not succeed against best defence which is 1 ... ♖e1!. Even Philidor’s continuation 1 ... ♖f1+ 2 ♔e6 ♔f8! does not lose, as the composer wrongly assumed. We shall be returning to these possibilities later, after we have looked at some other basic positions.
It seems best to classify these endings according to the placing of the pawn, assuming that the black king is never in front of the pawn.
With a rook’s pawn, White’s winning chances are restricted when his rook is in front of the pawn. The reason is clear: the king can support the pawn from one side only. However, as many different positions are possible which are difficult to assess, we intend to examine this type of ending in more detail.
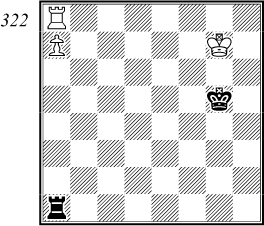
J. Berger 1922
This is perhaps the most unfavourable position for White, with his pawn on the seventh rank and his rook tied to the defence of it, with no freedom of movement at all. White can hope to win only if the black king is badly placed, but even this factor is insufficient here. Play might go:
1 |
♔f7 |
♔f5 |
Black has little choice, as 2 ♖g8+ was threatened.
2 |
♔e7 |
♔e5 |
3 |
♔d7 |
♔d5 |
4 |
♔c7 |
♔c5 |
5 |
♖c8 |
The last attempt, as 5 ♔b7 ♖b1+ followed by 6 ... ♖a1(+) gets him no further.
5 |
... |
♖xa7+ |
6 |
♔b8+ |
♔b6 |
...draw.
In such positions Black’s king is best placed on g7 or h7, after which White has no winning chances at all. For example, in diagram 323, White can do nothing.
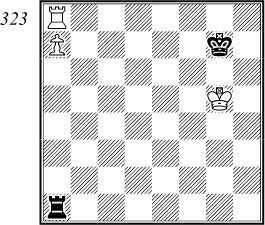
For example: 1 ♔f5 ♖a2 2 ♔e5 ♖a1 3 ♔d5 ♖a2 4 ♔c5 ♖a1 5 ♔b6 ♖b1+ 6 ♔c6 ♖a1 etc. The king cannot guard the pawn without being driven away immediately.
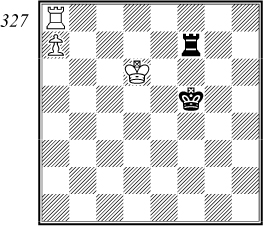
However, if the black king were in a worse position in diagram 322, White could win, as in the following study by A. Troitsky.
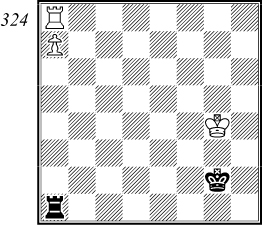
White wins by 1 ♔f4 ♔f2 2 ♔e4 ♔e2 3 ♔d4 ♔d2 4 ♔c5 ♔c3 Or 4 ... ♖c1+ 5 ♔b4 ♖b1+ 6 ♔a3 and Black has no defence against 7 ♖d8+. 5 ♖c8! ♖xa7 6 ♔b6+.
If the black rook is placed less actively on the second rank instead of at a1, then White usually has good winning prospects. Here is an example of how to handle such positions:
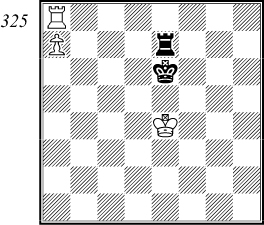
A. Chéron 1923
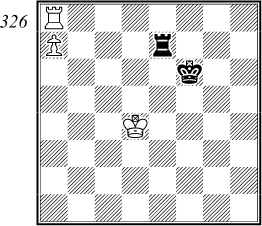
White to move would of course win easily by 1 ♔d4 ♖d7+ 2 ♔c5 ♖e7 3 ♔b6 etc. However, Black to move draws in the following interesting way:
1 |
... |
♔f6+ |
Surprisingly enough, the black king has to move away from the pawn, as 1 ... ♔d6+ loses to 2 ♔d4 ♔e6 or 2 ... ♖d7 3 ♔c4 ♖c7+ 4 ♔b5 ♖d7 5 ♔b6, or here 4 ... ♖c5+ 5 ♔b4 winning. 3 ♔c5 ♔e5 4 ♔c6! when Black is in zugzwang, e.g. 4 ... ♔e6 5 ♔b6, or 4 ... ♔e4 5 ♔d6, or finally 4 ... ♖e6+ 5 ♔d7 ♖d6+ 6 ♔c7.
2 |
♔d4 |
2 |
... |
♖f7! |
Thus setting up a new defensive position on the f-file. We shall soon see that this file offers him certain advantages compared to the e-file. We have already seen that 2 ... ♔e6 loses to 3 ♔c5, and 2 ... ♖d7+ to 3 ♔c5 ♖f7 4 ♔b6 etc.
3 |
♔d5 |
Or 3 ♔c5 ♔f5 4 ♔b6 ♖f6+ and 5 ... ♖f7 draws. Black cannot be brought into zugzwang.
3 |
... |
♔f5 |
4 |
♔d6 |
4 |
… |
♔f6! |
Black must be careful, as 4 ... ♖f6+ loses to 5 ♔e7.
5 |
♔c6 |
♔f5 |
6 |
♔c5 |
♔f4! |
The only move. If 6 ... ♔f6 or 6 ... ♖c7+ then 7 ♔b6 wins at once.
7 |
♔b6 |
♖f6+ |
8 |
♔c7 |
♖f7+ |
9 |
♔c6 |
♔f5 |
White cannot make any progress, as his king cannot simultaneously threaten the critical squares b6 and e6, when he could zugzwang Black. The position is drawn.
These examples have demonstrated how badly placed White’s rook is on a8, cutting down his winning chances. Let us now examine positions in which the white king is in front of the pawn.
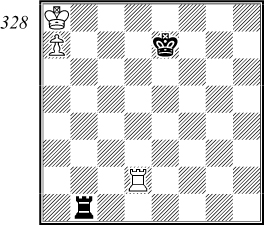
M. Karstedt 1909
This is a typical drawing position. White’s king can get out only if his rook reaches b7 or b8, but this gives Black’s king time to reach c7 with a drawn result.
1 |
♖h2 |
♔d7 |
2 |
♖h8 |
♔c7 |
3 |
♖b8 |
♖c1 |
Simplest, although 3 ... ♖d1 4 ♖b7+ ♔c6 5 ♖b2 ♖d8+ 6 ♖b8 ♖d1 7 ♖c8+ ♔d7 8 ♖c2 ♖b1 etc, also draws.
4 |
♖b2 |
♔c8 |
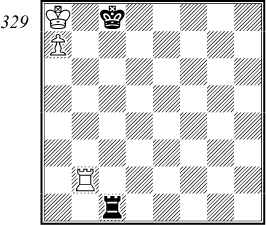
The position is drawn, as White can make no further progress if Black keeps his rook on the c-file and plays his king to c7 and c8. Leaving this file could be dangerous, e.g. 5 ♖b4 ♖h1? 6 ♖c4+ ♔d7 7 ♔b7 ♖b1+ 8 ♔a6 ♖a1+ 9 ♔b6 ♖b1+ 10 ♔a5 ♖a1+ 11 ♖a4 wins.
White can win only if the black king is at least as far away as the f-file, as in our next example.
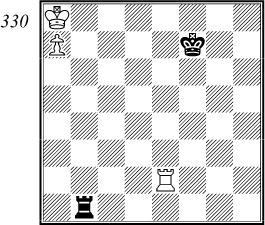
M. Karstedt 1909
The white rook can reach b8 without the black king having time to occupy c7. The winning method is very instructive:
1 |
♖c2 |
♔e7 |
2 |
♖c8 |
But not 2 ♖c7+? ♔d8 3 ♖b7 ♖c1! when 4 ♔b8 allows 4 ... ♖c8 mate, so Black draws.
2 |
... |
♔d6 |
White wins more easily after 2 ... ♔d7 3 ♖b8 ♖a1 4 ♔b7 ♖b1+ 5 ♔a6 ♖a1+ 6 ♔b6 ♖b1+ 7 ♔c5 ♖c1+ 8 ♔d4 and so on.
3 |
♖b8 |
♖a1 |
4 |
♔b7 |
♖b1+ |
5 |
♔c8! |
Now 5 ♔a6 would be a waste of time after 5 ... ♖a1 6 ♔b6 ♖b1+ 7 ♔a5 ♖a1+ etc.
5 |
… |
♖c1+ |
6 |
♔d8 |
♖h1 |
7 |
♖b6+ |
♔c5 (137) |
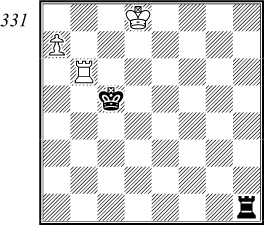
8 |
♖c6+! |
The simplest, although 8 ♖b1 would also win after 8 ... ♖h7 (or 8 ... ♖h8+ 9 ♔c7 ♖h7+ 10 ♔b8 ♖h8+ 11 ♔b7 ♖h7+ 12 ♔a6 ♖h6+ 13 ♔a5 ♖h8 14 ♖b8 ♖h1 15 ♖c8+ wins) 9 ♖a1 ♖h8+ 10 ♔d7 ♖a8 (or 10 ... ♖h7+ 11 ♔e6 etc) 11 ♔c7 wins. Not, however, 8 ♖a6? ♖h8+ 9 ♔e7 ♖h7+ 10 ♔e8 ♖h8+ 11 ♔f7 ♖a8 12 ♔e7 ♔b5 13 ♖a1 ♔b6 14 ♔d6 ♖xa7 15 ♖b1+ ♔a5! drawing.
8 |
... |
♔d5 |
Or 8 ... ♔b5 9 ♖c8 ♖h8+ 10 ♔c7 ♖h7+ 11 ♔b8 wins, whereas now 9 ♖c8 is answered by 9 ... ♔d6.
9 |
♖a6 |
♖h8+ |
10 |
♔c7 wins. |
|
Let us now turn to positions in which the pawn is on the sixth rank, and begin with the white rook in front of the pawn.
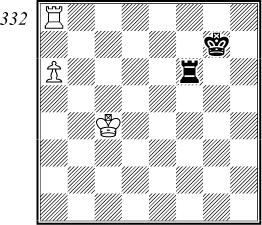
J. Vancura 1924
This is one of the most important drawing positions in this type of ending (the pawn could be further back). It is characterised by the placing of the white rook in front of the pawn, the black king on g7 or h7 and the black rook attacking the pawn from the side. White can make no progress and the position is drawn.
1 |
♔b5 |
♖f5+ |
The king must be driven from defence of the pawn, as 2 ♖c8 was threatened.
2 |
♔c6 |
♖f6+ |
3 |
♔d5 |
♖b6 |
No further checks are required, but the rook must maintain the attack on the pawn.
4 |
♔e5 |
♖c6 |
Or 4 ... ♖b5+ and 5 ... ♖b6, but not 4 ... ♖f6? 5 ♖g8+!.
5 |
♖a7+ |
♔g6 |
Or 5 ... ♔g8. It is clear that White cannot strengthen his position, if Black sticks to his drawing plan. As soon as White plays a7, Black plays ... ♖a6 and draws as in diagram 322.
Now that we are acquainted with this basic drawing position, we can consider a more general set-up in which the win or the draw depend upon the placing of White’s king.
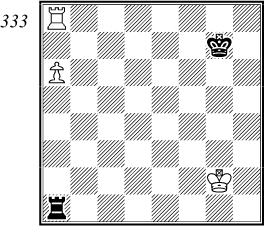
S. Tarrasch 1908
Over the years the assessment of this position has changed. In 1908, Tarrasch gave analysis proving a win for White (in the book of the Lasker – Tarrasch match). Vancura’s drawing position (diagram 332) changed all this, and we now know that Black draws with best defence. Let us first ascertain the plans to be followed by both sides.
The first point is whether White has to bring his king across to the pawn quickly to prevent the approach of the black king. As Black must always bear in mind the possibility of a7, his king has to be ready to return to g7 or h7, which means it can go to f7 or f6 but dare not move onto the e-file. For example, 1 ... ♔f7 2 ♔f2 ♔e7(e6)? 3 a7! ♔d7 4 ♖h8 was the threat. 4 ♖h8 ♖xa7 5 ♖h7+ wins. So there is no danger of the black king approaching the pawn.
The second point of interest is whether Black can play passively and allow White’s king to reach a7. He cannot, for White wins as follows: 1 ♔f2 ♔h7? 2 ♔e2 ♔g7? 3 ♔d3 ♖a4 4 ♔c3 ♔f7 5 ♔b3 ♖a1 6 ♔b4 ♖b1+ 7 ♔c5 ♖c1+ 8 ♔b6 ♖b1+ 9 ♔a7 ♔e7 10 ♖b8 ♖c1 11 ♔b7 ♖b1+ 12 ♔a8 ♖a1 13 a7, continuing as in our analysis of diagram 330.
All this means that Black must take active measures if he is to draw. His aim is to reach the drawing position shown in diagram 332, as follows:
1 |
♔f2 |
♖a5! |
2 |
♔e3 |
|
2 ♖a7+ changes nothing, as Black simply plays 2 ... ♔g6, although 2 ... ♔g8 is possible.
2 |
... |
♖e5+ |
3 |
♔d4 |
♖e6! |
And we have reached Vancura’s position which we know is drawn.
It would, however, be wrong to assume from this that all positions similar to diagram 333 are drawn. As we have said, everything depends on the placing of White’s king. For example, with the king on the fourth rank, the rook can obviously not use the same method to arrive at Vancura’s position.
Is it then essential for Black’s rook to gain a tempo to reach the third rank? Why cannot Black leave his king on g7 and play his rook away from the a-file, then back to the third rank? Play might go, from diagram 333, 1 ♔f2 ♖c1, and as Black is threatening 2 ... ♖c6, White must move his rook. 2 ♖b8 ♖a1 3 ♖b6 ♔f7 4 ♔e3 ♔e7 5 ♔d4 ♔d7 6 ♔c5 ♔c7 7 ♖b7+ ♔c8 8 ♔b6 ♖b1+ 9 ♔a7 ♖c1 gives White nothing (even simpler here 3 ... ♖a3!) so he must try 2 ♖a7+.
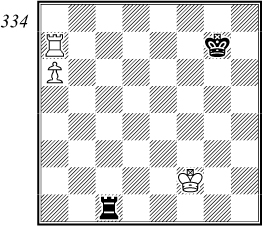
Where does Black now play his king? Black loses after 2 ... ♔f8 3 ♖b7 and 4 a7, but draws with 2 ... ♔g6 3 ♖b7 ♖a1 4 a7 ♖a3 5 ♔e2 ♔f6 etc.
This means that Black has a second way of reaching Vancura’s position, so long as the white king is far enough away. How far must this be then, if Black is to draw?
Before defining these limits, let us examine a further position, as seen in diagram 335.
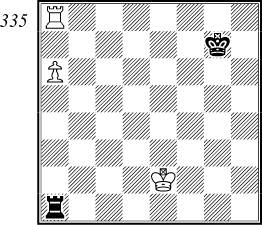
The white king is just near enough to his pawn to achieve the win in the following instructive fashion:
1 |
♔d3 |
The only winning move, as 1 ♔e3 fails to 1 ... ♖e1+ and 2 ... ♖e6, and 1 ♔d2 ♖b1 2 ♖a7+ ♔g6 draws for Black, e.g. 3 ♖b7 ♖a1 4 ♖b6+ (or 4 a7 ♔f6 5 ♔c3 ♔e6 6 ♔c4 ♔d6) 4 ... ♔f7 5 ♔c3 ♔e7 drawing. Equally ineffective is 1 ♖a7+ ♔f6 2 ♔d3? ♔e6 3 ♔c4 ♔d6 and Black draws.
This analysis shows that, with Black to move, the position is drawn after 1 ... ♖c1 or 1 ... ♖a5.
1 |
... |
♖a4 |
The alternative method 1 ... ♖d1+ 2 ♔c4 ♖d6 fails to 3 ♔b5! ♖d5+ 4 ♔c6 ♖a5 5 ♔b6 winning.
Or 1 ... ♖f1
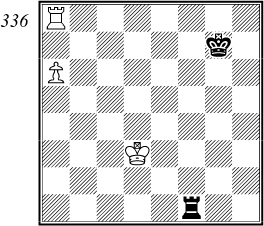
2 ♖a7+! Not 2 ♖c8 ♖a1 3 ♖c6? ♔f7 4 ♔c4 ♔e7 5 ♔b5 ♔d7 6 ♖c4 ♖b1+ 7 ♔a5 ♖a1+ 8 ♔b6 ♖b1+ 9 ♔a7 ♖b2 etc. 2 ... ♔g6 Or 2 ... ♔f6 3 ♖h7! ♔g6 4 ♖b7 transposing; or here 3 ... ♖a1 4 a7 ♔e6 5 ♔c4 ♔d6 6 ♔b5 winning. 3 ♖b7 ♖a1 4 a7 ♔f6 Or 4 ... ♖a4 5 ♔c3 ♔f6 6 ♔b3 ♖a1 7 ♔c4 ♔e6 8 ♔c5 or 8 ♖h7 wins. 5 ♔c4 ♔e6 6 ♔c5 or 6 ♖h7 with an easy win.
Finally, Black can try 1 ... ♖h1 to prevent 3 ♖h7 after 2 ♖a7+ ♔f6! and to draw after 3 ♖b7 ♖a1 4 a7 ♔e6 5 ♔c4 ♔d6. However, the rook is badly placed on the h-file and allows White to win by 2 ♔c4! ♖h6 3 ♔b5 ♖h5+ 4 ♔b6 ♖h6+ 5 ♔b7, as the black king now interferes with the rook’s action.
2 |
♔c3 |
♖h4 |
Black cannot wait, because 3 ♔b3 and 4 ♔b4 is threatened.
If 2 ... ♖f4 3 ♖a7+ ♔f6 4 ♖h7 ♔g6 5 ♖b7 wins as we have already seen.
3 |
♖a7+ |
♔f6 |
The point of his previous move. White wins after 3 ... ♔g6 4 ♖b7, whereas now 4 ♖b7 ♖a4 5 a7 ♔e6 6 ♔b3 ♖a1 draws for Black.
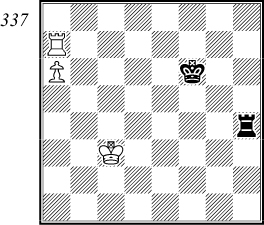
4 |
♔b3! |
♖h1 |
The black king dare not play to the e-file because of 5 ♖a8 followed by 6 a7, and if 4 ... ♖h8 5 ♖b7 ♔e6 6 a7 ♖a8 7 ♔c4 ♔d6 8 ♔b5 wins.
5 |
♖a8 |
♖a1 |
The threat is 6 a7, and 5 ... ♔g7 6 ♔c4 wins, as we saw in our note to move 1.
6 |
♔b4 |
And White wins by playing his king to a7. Black cannot play 6 ... ♔e7 (or e6) because of 7 a7. We have already demonstrated this winning method.
We can now define the zone within which the white king must be situated for Black to draw with the move. Diagram 338 illustrates this.
In order to give an example of correct defence by Black, let us assume that the white king is on f4.
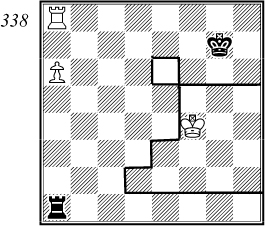
P. Romanovsky 1950
1 |
… |
♖c1 |
Black has an alternative and perhaps even simpler drawing method in 1 ... ♖a5! 2 ♔e4 ♖c5
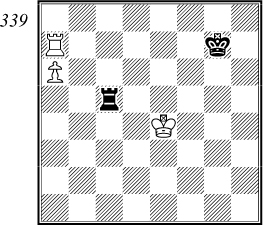
3 ♖a7+ Black threatened 3 ... ♖c6, and 3 ♖b8 ♖a5 4 ♖b6 ♔f7 5 ♔d4 ♔e7 6 ♔c4 ♔d7 also draws. 3 ... ♔g6! But not 3 ... ♔f6? 4 ♔d4 ♖c6 5 ♖h7 ♔g6 6 a7 ♖a6 7 ♖b7 winning. 4 ♖b7 ♖a5 5 a7 Or 5 ♖b6+ ♔f7 6 ♔d4 ♔e7 etc. 5 ... ♔f6 6 ♔d4 ♔e6 7 ♔c4 ♔d6 8 ♔b4 ♖a1 and Black draws comfortably.
However, other moves lose for Black. 1 ... ♖b1 fails to 2 ♖a7+ ♔g6 (or 2 ... ♔f6 3 ♔e4 ♖b6 4 ♖h7 etc) 3 ♖b7 ♖a1 4 ♖b6+! ♔f7 5 ♔e5 as Black is forced into 5 … ♔e7 6 ♖b7+ and 7 a7 winning.
Or 1 ... ♖h1 2 ♖a7+ ♔f6 3 ♔e4! ♔e6 4 ♖a8! and 5 a7 wins.
Or 1 ... ♖f1+ 2 ♔e5 ♖f6 3 ♖g8+ wins.
2 |
♖a7+ |
As already mentioned, White only draws after 2 ♖b8 ♖a1 3 ♖b6 ♖a5! 4 ♔e4 ♔f7 5 ♔d4 ♔e7 etc. Meanwhile, Black is threatening 2 ... ♖c6.
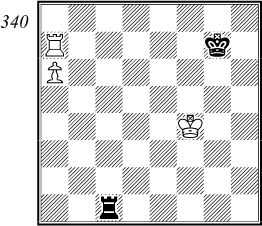
2 |
... |
♔g6 |
The only move. After 2 ... ♔f6? (or 2 ... ♔f8? 3 ♖b7 and 4 a7 wins) 3 ♔e4! ♖c6 (3 ... ♔e6 4 ♖a8! and 5 a7) 4 ♖h7 ♔g6 5 a7 ♖a6 6 ♖b7 ♖a5 7 ♔d4 ♔f6 8 ♔c4 ♔e6 9 ♔b4 and 10 ♔b5 wins.
After the text move, Black again threatens to play 3 ... ♖c6.
3 |
♖b7 |
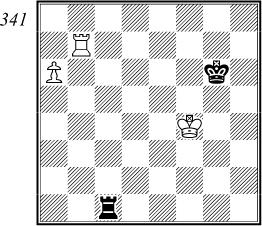
3 |
… |
♖c5 |
An alternative drawing line is 3 ... ♔f6! as 4 ♔e4 can be answered by 4 ... ♖a1 5 ♖a7 ♔e6 6 ♖a8 ♔d6 7 a7 ♔c7 etc. After 4 ♖b8 ♖a1 5 ♖a8 ♖a4+! 6 ♔e3 ♔g7 7 ♔d3 ♖f4 8 ♖a7+ ♔g6! 9 ♖b7 ♖a4 10 a7 ♔f6 11 ♔c3 ♔e6 12 ♔b3 ♖a1 13 ♔c4 ♔d6 Black draws.
Notice that this variation does not disprove our indicated drawing zone for the position of the white king, as diagram 338 is only valid with the black king on g7, not e6 as here, after White’s sixth move.
4 |
a7 |
After 4 ♔e4 ♖a5 5 ♖a7 ♖c5! again threatens 6 ... ♖c6.
Or else 4 ♖b8 ♖a5 5 ♖a8 ♔g7 followed by 6 ... ♖c5, and White can make no progress.
4 |
... |
♖a5 |
5 |
♔e4 |
♔f6 |
And draws after 6 ♔d4 ♔e6 7 ♔c4 ♔d6 8 ♔b4 ♖a1 etc.
Now let us see how White to move can win from diagram 338:
1 |
♔e5 |
Or 1 ♔e4, as illustrated by our zone, with play similar to the main line.
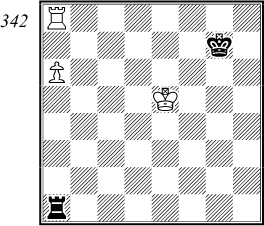
1 |
… |
♖a5+ |
Black has no choice, as 1 ... ♖e1+ only helps the white king to reach a7 and 1 ... ♖b1 2 ♖a7+ ♔g6 3 ♖b7 ♖a1 4 a7 wins.
2 |
♔d4 |
We give this continuation because it could also arise from the 1 ♔e4 line. White can also win by 2 ♔d6 ♖f5 3 ♖a7+ ♔f8 (or 3 ... ♔g8 or 3 ... ♔g6 4 ♖e7 wins, whereas now 4 ♖e7 fails to 4 ... ♖a5 5 a7 ♖a6+) 4 ♔e6 ♖a5 5 ♖a8+ ♔g7 6 ♔d7 ♖f5 7 ♖e8 winning.
2 |
... |
♖b5 |
3 |
♖a7+ |
♔f6 |
Or 3 ... ♔g6 4 ♖b7 ♖a5 5 a7 ♔f6 6 ♔c4 ♔e6 7 ♔b4 ♖a1 8 ♔c5 wins.
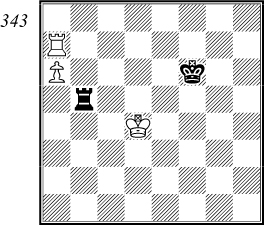
4 |
♔c4 |
4 ♖h7 also wins after 4 ... ♖a5 (or 4 ... ♔g6 5 ♖b7) 5 a7 ♔e6 6 ♔c4 ♔d6 7 ♔b4 ♖a1 8 ♔b5 etc. Not, however, 4 ♖b7 ♖a5 5 a7 ♔e6 6 ♔c4 ♔d6 7 ♔b4 ♖a1 drawing.
4 |
... |
♖b6 |
Or 4 ... ♖a5 5 ♖a8 and the white king reaches a7.
5 |
♔c5 |
♖e6 |
6 |
♖h7 |
And White wins easily after 6 ... ♔g6 7 a7 ♖a6 8 ♖b7 etc.
In order to complete our discussion of diagram 338, let us finally examine what happens with the white king on f5.
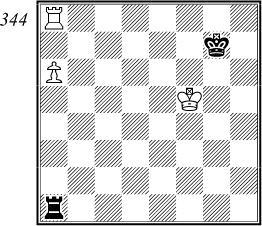
Black draws by 1 ... ♖a5+! but not 1 ... ♖f1+ 2 ♔e5! ♖f6? 3 ♖g8+, or 1 ... ♖b1 2 ♖a7+ ♔h6 3 ♖b7 and 4 a7. 2 ♔e6 Or 2 ♔e4 ♖c5, as already analysed. 2 ... ♖h5! If 2 ... ♖g5, then White wins by 3 ♖a7+ ♔g8 4 ♔f6 ♖a5 5 ♔g6 ♔f8 6 ♖a8+ ♔e7 7 a7. 3 ♖a7+ Or 3 ♔d7 ♖h6 4 ♔c7 ♖f6! with Vancura’s position. 3 ... ♔g8 4 ♖f7 ♖a5! and now 5 a7? fails to 5 ... ♖a6+.
This analysis points to the correct defence with the white king on e6. Black draws by 1 ... ♖h1! (not 1 ... ♖g1? 2 ♔f5! or 1 ... ♖f1? 2 ♔e5!) transposing to our indicated drawing line.
We can now turn to positions in which the white king has been driven in front of his pawn, beginning with diagram 345.
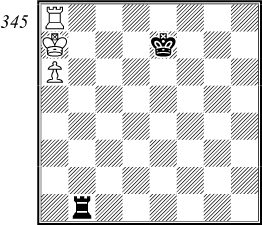
This typical set-up is won for White, if he has the move, as follows:
1 |
♖b8! |
♖d1 |
Or 1 ... ♖a1 2 ♔b7 with play similar to our main line.
2 |
♔b7 |
♖b1+ |
Or 2 ... ♖d7+ 3 ♔b6 ♖d6+ 4 ♔a5 ♖d5+ 5 ♔b4 ♖d1 6 a7 wins.
3 |
♔a8 |
♖a1 |
4 |
a7 |
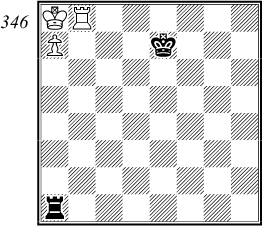
…and we have arrived at the main variation arising from diagram 330. White wins easily after 4 ... ♔d7 5 ♔b7 ♖b1+ 6 ♔a6 ♖a1+ 7 ♔b6 ♖b1+ 8 ♔c5, or after 4 ... ♔d6 5 ♔b7 ♖b1+ 6 ♔c8 ♖c1+ 7 ♔d8 ♖h1 8 ♖b6+ ♔c5 9 ♖c6+!.
If Black has the move, he draws by 1 ... ♔d7 2 ♖b8 ♖c1 3 ♔b7 ♖b1+ 4 ♔a8 ♖c1 followed by 5 ... ♔c7.
In the same way we can state that the following position is drawn:
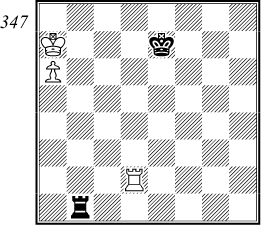
White can do no better than reach diagram 328 by playing ♔a8 and a7. However, if the black king is on f7, with White’s rook on e2, then White wins easily by ♔a8 and a7 followed by ♖c2-c8-b8 (see diagram 330).
To complete our examination of positions with a white pawn on a6, let us consider diagram 348.
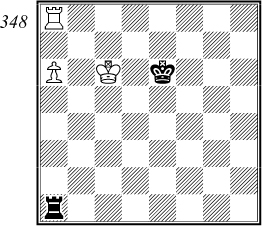
N. Grigoriev 1936
White to move wins at once by 1 a7, but Black cannot save the game even if he has the move. Play might then go:
1 |
... |
♖c1+ |
If Black tries 1 ... ♔f7 in order to answer 2 a7 with 2 ... ♔g7! White plays 2 ♔b7 ♖b1+ 3 ♔a7 ♔e7 4 ♖b8, giving us diagram 345, so Black must seek salvation in checks.
2 |
♔b5 |
After 2 ♔b7 ♖b1+ 3 ♔a7? Black draws by 3 ... ♔d7! (diagram 345).
2 |
... |
♖b1+ |
The threat was 3 a7.
3 |
♔c4 |
An alternative is 3 ♔a4 ♖a1+ (or 3 ... ♔f7 4 ♔a5 ♖a1+ 5 ♔b6 ♖b1+ 6 ♔a7 ♔e7 7 ♖b8) 4 ♔b3 ♔f7 5 ♔b4, the black king dare not play to the e-file because of a7.
3 |
... |
♖c1+ |
4 |
♔b3 |
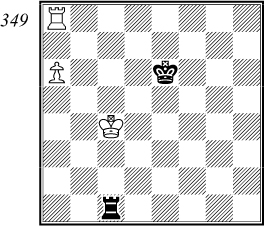
White wins equally by 4 ♔d3 ♖d1+ 5 ♔e3! ♖d7 6 ♔e4! Not 6 a7? ♔d5! drawing. 6 ... ♔d6 Or 6 ... ♔f6 7 ♖b8 ♖a7 8 ♖b6+. 7 a7! ♖e7+ 8 ♔d4 ♖d7 9 ♔c4 etc, but an even simpler winning method is 4 ♔b4! ♖b1+ Or 4 ... ♖c7 5 ♖h8. 5 ♔a3 ♔f7 5 ... ♖a1+ 6 ♔b2 and 7 a7. 6 ♔a4 etc.
4 |
... |
♖c7 |
5 |
a7 |
♖e7 |
6 |
♔c4 |
♔e5 |
7 |
♔c5 wins easily. |
|
If White’s pawn is not so far advanced, it is clear that Black’s drawing prospects are increased. In general, however, the defensive methods remain the same, except for the fact that Black can sometimes advantageously post his rook in front of the pawn, as shown in diagram 350.
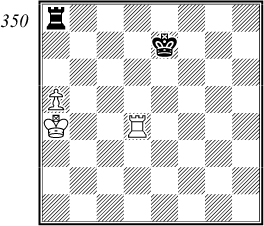
A. Chéron 1927
To all appearances White has all factors in his favour. The black king is cut off and his rook alone cannot prevent the combined advance of White’s king and pawn. Despite all these advantages, however, Black can save himself by an extremely subtle defence:
1 |
♔b5 |
♖d8! |
We here see one advantage of the rook being in front of the pawn. Black can offer exchange of rooks, as he would draw the ending after 2 ♖xd8 ♔xd8 3 ♔b6 ♔c8. This means that White’s rook is driven from the d-file, which allows Black to bring his king nearer to the pawn.
Note that the careless 1 ... ♖b8+ loses. 2 ♔c6 ♖b1 (or 2 ... ♖a8 3 ♖a4 ♖c8+ 4 ♔b7 ♖c1 5 a6 ♖b1+ 6 ♔c7 ♖c1+ 7 ♔b6 ♖b1+ 8 ♔a5 wins) 3 a6 ♖a1 4 ♔b5 ♖b1+ 5 ♔a5 ♖a1+ 6 ♖a4.
2 |
♖c4 |
Or 2 ♖a4 ♔d7 3 a6 ♔c7 drawing.
2 |
… |
♖b8+! |
Black must play exactly. After 2 ... ♔d7 3 a6 ♖a8 (or 3 ... ♖c8 4 a7!) 4 ♔b6 ♖b8+ 5 ♔a5 ♖a8 6 ♖h4! ♖g8 7 a7 ♔c7 8 ♖h7+ and 9 ♔a6 wins.
3 |
♔a4 |
Or 3 ♔a6 ♔d7 or 3 ♔c6 ♖c8+ 4 ♔d5 ♔d7, both drawing.
3 |
... |
♔d7 |
4 |
a6 |
♖c8 |
Even simpler is 4 ... ♖b1 5 ♔a5 ♖a1+ 6 ♔b6 ♖b1+7 ♔a7 ♖b2 etc.
5 |
♖b4 |
5 |
… |
♔c6 |
We select the most complicated defensive method for Black in order to show that he draws even this way. There was again a simpler line in 5 ... ♖h8 6 ♔a5 or 6 a7 ♖a8 7 ♖b7+ ♔c6. 6 ... ♔c7 7 ♖b7+ or 7 a7 ♖h5+ 8 ♔a4 ♖h8 etc. 7 ... ♔c8! Not 7 ... ♔c6? 8 ♖b6+ ♔c7 9 a7 ♖h1 10 ♖a6! winning, or here 9 ... ♖h5+ 10 ♔a6 ♖h2 11 ♖c6+!. 8 ♖b5 Or 8 ♔b6 ♖h6+ 9 ♔a7 ♖c6. 8 ... ♖h7 and White cannot make any progress.
6 |
♔a5 |
♖c7! |
7 |
♖b6+ |
♔c5 |
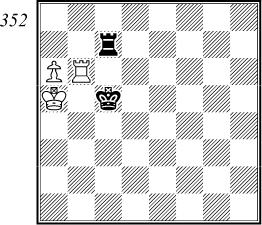
The black king cannot now be driven from the c-file, so Black draws. For example 8 ♖b7 ♔c6 9 ♖b1 ♔c5 10 ♖b6 ♔d5 or 10 ... ♖h7 11 ♖b7 ♖h1 12 ♖c7+ ♔d6 13 ♖c4 ♖a1+ 14 ♔b6 ♖b1+ draws. 11 ♖h6 11 ♔b5 ♖c5+ 12 ♔b4 ♖c4+ 13 ♔b3 ♖c7 draws. 11 ... ♔c5 12 ♖g6 ♖f7 13 ♖g5+ ♔c6 14 ♖g6+ ♔c5 15 ♖g1 ♖c7 16 ♖c1+ ♔d6 followed by 17 ... ♔c6, and White is back where he started.
It must be stressed that Black’s defence is only possible because of the favourable position of his pieces.
Even slight alterations would allow White to win.

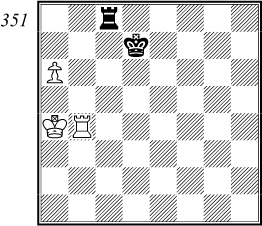
For example, in diagram 353, White wins by 1 ♔b5. Black no longer has the 1 ... ♖d8 resource.
Equally, in diagram 354
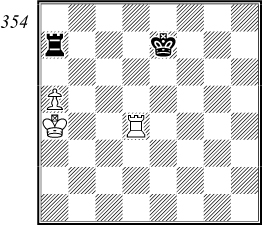
…White wins by 1 ♔b5 ♖d7 2 ♖a4! since the black king cannot stop the pawn.
If White’s rook is, for example, on d2 (diagram 355) his winning chances disappear, even though Black cannot play 1 ... ♖d8.
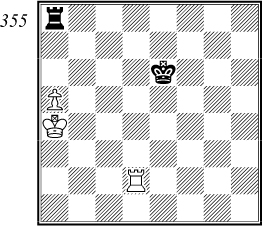
Play might go: 1 ♔b5 ♖b8+ 2 ♔c6 ♖c8+ 3 ♔b7 ♖c1! 4 a6 Both 4 ♖b2 and 4 ♖a2 are answered by 4 ...♔d7. 4 ... ♖b1+ 5 ♔c7 5 ♔a7 ♔e7 draws. 5 ... ♖c1+ 6 ♔d8 ♖a1 7 ♖h2 ♖d1+! 8 ♔e8 ♖g1 9 ♖h6+ ♔d5 10 a7 Or 10 ♔d7 ♔c5 11 ♔c7 ♖g7+ etc. 10 ... ♖g8+ 11 ♔f7 ♖a8 draws.
There are of course many more interesting positions of rook and rook’s pawn against rook, containing subtle and surprising points. However, for our purpose enough has been seen. We shall now consider rook endings with pawns other than the rook’s pawn, and shall discover that they offer even more interesting and complex possibilities.
Rook and Pawn other than Rook’s Pawn
It is clear that these endings offer White more winning chances than was the case with the rook’s pawn. Firstly, Black can hardly ever exchange rooks. Secondly, the white king can now support his pawn from both sides, and thirdly, the white rook has more freedom of action, with space on both sides of the pawn. Black thus finds it much harder to draw such positions, and sometimes fails to draw even if his king occupies the pawn’s queening square.
We shall systematically examine the most important positions in this type of ending, beginning with the cases where the white pawn has already reached the seventh rank.
We have already discussed an example of this in Lucena’s position (diagram 318), where we showed how White converted his advantage into a win. Let us now consider further basic positions.
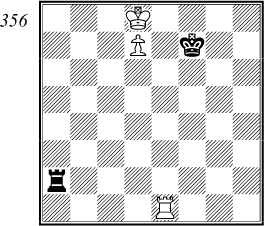
S. Tarrasch 1906
This is a win for White, even with Black to move. As 1 ♖f1+ ♔e6 2 ♔e8 is threatened, Black must begin checking the white king at once. but this proves insufficient.
1 |
... |
♖a8+ |
2 |
♔c7 |
♖a7+ |
3 |
♔c8 |
White can also win by 3 ♔c6 ♖a6+ (or 3 ... ♖a8) 4 ♔b7 etc.
3 |
... |
♖a8+ |
4 |
♔b7 and |
|
5 |
♔c7 wins. |
|
This example demonstrates that Black lost only because his rook was not far enough away from the pawn and this allowed the white king to gain a vital tempo by attacking the rook.
If we move every piece, except the black rook, one square to the right (diagram 357), then Black can draw.
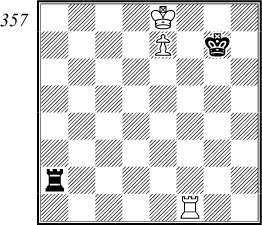
S. Tarrasch 1906
1 |
… |
♖a8+ |
2 |
♔d7 |
♖a7+ |
3 |
♔d6 |
♖a6+ |
4 |
♔d5 |
Or 4 ♔c7 ♖a7+. Or 4 ♔c5 ♖a5+, or even 4 ... ♖e6.
4 |
... |
♖a5+ |
And the game is drawn, for the white king cannot escape the checks without forsaking his pawn which is then captured by the black rook.
Both these examples show us how Black must defend, but what happens if the position of the pieces is slightly changed? In diagram 356 White wins no matter where his rook is, except on b7.
In diagram 358
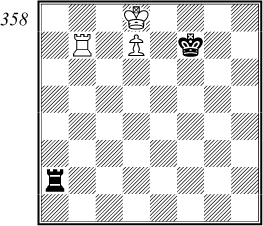
…Black draws by 1 ... ♖a8+ 2 ♔c7 ♔e7! as the white rook cannot check on the e-file. One might imagine that the same would apply with the rook on b6, but White wins after 1 ... ♖a8+ 2 ♔c7 ♔e7 by playing 3 ♖a6! ♖h8 3 ... ♖d8 4 ♖e6+!. 4 ♖a1!
Even here, however, Black would draw if he had an extra file for his rook on the queenside.
In diagram 357, matters are not so simple. Admittedly, if the white rook were on the h-file, nothing would be changed, but with his rook on the d- or c-file White would win easily. For example, placing the white rook on c3, we have: 1 ... ♖a8+ 2 ♔d7 ♖a7+ 3 ♖c7 winning, and the white rook on the d-file can interpose either on d8 or, after ♔d7-e6, on d6. The b-file is no good for the rook, as an exchange of rooks would lose the pawn.
An exception to this is if the rook is on b8, preventing 1 ... ♖a8+. White wins after 1 ... ♖d2. The threat was 2 ♔d7 ♖d2+ 3 ♔c6, and 1 ... ♖a7 fails to 2 ♔d8. 2 ♖d8 followed by 3 ♔d7.
White also wins with his rook on the e-file, as his king can simply escape the checks, when the pawn must queen.
Once again, exceptional draws are possible with the white rook on c6 or c7, allowing 1 ... ♖a8+ 2 ♔d7 ♔f7 etc.
Changing the position of Black’s pieces can also have important consequences. For example, with the black rook on the b-file (say, b2) White wins after 1 ... ♖b8+ 2 ♔d7 ♖b7+ 3 ♔d8 ♖b8+ 4 ♔c7 ♖a8 5 ♖a1! followed by 6 ♔d7.
Black is also lost if his king is on g8.
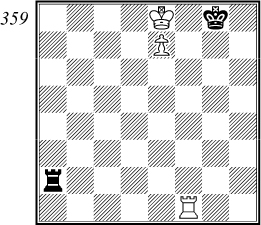
For example: 1 ... ♖a8+ 2 ♔d7 ♖a7+ 3 ♔d6 Or 3 ♔e6 ♖a6+ 4 ♔e5 ♖a5+ 5 ♔f6! ♖a6+ 6 ♔g5 ♖a5+ 7 ♔g6 and 8 ♖f6-d6 wins. 3 ... ♖a6+ 4 ♔c5 ♖a8 Or 4 ... ♖a5+ 5 ♔c6!. 5 ♔c6! ♔g7 Or 5 ... ♖a6+ 6 ♔b7 ♖e6 7 ♖f8+ – the point! 6 ♖a1! ♖b8 7 ♔c7 followed by 8 ♔d7 wins.
We can generalize about such positions by stating that Black can draw if:
1) his king is on the shorter side of the pawn and not more than one file away,
2) his rook is at least three squares away and can check horizontally, and
3) the white rook stands relatively passively (see notes to diagram 357).
In conclusion, the reader may be interested in the next exceptional position:
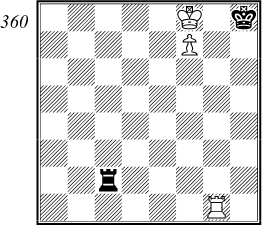
N. Kopayev 1953
At first it would seem that Black can draw this position for, as will be seen, White cannot use the same winning method as in the corresponding position of diagram 357 (black king on g8). However, White can win in the following instructive fashion, by using the fact that the black rook is only two files away from the pawn:
1 |
… |
♖c8+ |
2 |
♔e7 |
♖c7+ |
3 |
♔f6 |
If 3 ♔e6 ♖c8, White has nothing better than to transpose to the main line with 4 ♔f6, as 4 ♔d7 ♖a8 5 ♖a1 fails 5 ... ♖b8! (the extra square!).
3 |
… |
♖c6+ |
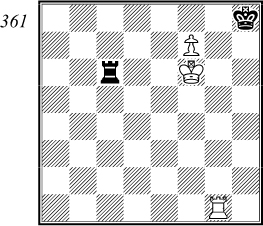
4 |
♔e5! |
Our previous winning method does not work here, as after 4 ♔f5 ♖c5+ 5 ♔g6 ♖c6+ 6 ♔h5 ♖c5+ 7 ♔h6 ♖c6+ 8 ♖g6 ♖xg6+ 9 ♔xg6 Black is stalemated.
4 |
... |
♖c8 |
Or 4 ... ♖c5+ 5 ♔d6 ♖c8 6 ♖e1! ♔g7 7 ♖e8 wins. Note that if Black’s rook were now on the b-file, he would draw here by 4 ... ♖b5+ 5 ♔d6 ♖b8 6 ♖e1 ♔g7 7 ♖e8 ♖b6+ 8 ♔c5 ♖f6.
5 |
♖g6! |
The winning move, made possible only because the white king has left the sixth rank.
5 |
... |
♔h7 |
If 5 ... ♖a8 6 ♖a6 and 7 ♔f6 wins.
6 |
♖c6 |
♖a8 |
7 |
♔f6 |
♖b8 |
8 |
♖e6 and |
|
9 |
♖e8 wins. |
|
With the pawn on the sixth rank, Black’s drawing chances are increased. Although his king must still be no more than a file away from the pawn and on the short side, the position of his rook is not so critical.
Before we examine systematically this type of ending, let us consider an important basic set-up.
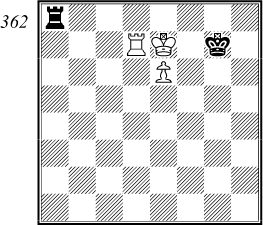
S. Tarrasch 1906
This position is drawn and has three distinguishing factors:
1) the pawn is on the sixth rank,
2) the black king is one file away from the pawn,
3) the black rook is three files away from the pawn.
Play might go:
1 |
♖d8 |
After 1 ♔d6+ ♔f8 or 1 ... ♔f6 2 ♖f7+ ♔g6 Black draws comfortably. Other moves transpose into the main line.
1 |
... |
♖a7+ |
Black dare not play 1 ... ♖a1? 2 ♔e8! ♔f6 3 e7 ♔e6 4 ♖b8 ♖a6 5 ♔f8 winning, but 1 ... ♖a6 2 ♖d6 ♖a8! etc is possible.
2 |
♖d7 |
There is nothing better, as 2 ♔e8 ♔f6 is an immediate draw, and 2 ♔d6 ♖a6+ 3 ♔e5 ♖a5+ 4 ♖d5 ♖a1 5 ♔d6 ♔f8 gives Black equality.
2 |
... |
♖a8 |
The rook can play to other squares, except a6, as we shall see later.
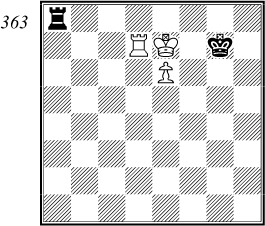
3 |
♖d6 |
A crafty move against which Black must defend exactly. Other rook moves on the d-file allow 3 ... ♖a7+ 4 ♔e8 ♔f6 which would now be answered by 5 e7+ winning. Nor can White play waiting moves with the rook, e.g. 3 ♖b7 ♖a1 Or 3 ... ♔g6. 4 ♔e8+ Or 4 ♔d7 ♖a8 5 e7 ♔f7 transposing, or 4 ♔d6+ ♔f6 5 ♖f7+ ♔g6. 4 ... ♔f6 5 e7 ♖a8+ 6 ♔d7 ♔f7 7 ♖b1 ♖a7+ with a clear draw.
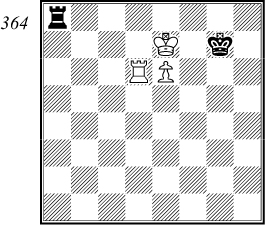
3 |
... |
♔g6! |
The only move to save Black. He would lose after 3 ... ♖a7+ (or 3 ... ♖a1) 4 ♔e8 ♔f6 5 e7+, or here 4 ... ♖a8+ 5 ♖d8, and 3 ... ♖b8 fails to 4 ♖d8 ♖b7+ 5 ♔d6 ♖b6+ 6 ♔d7! ♖b7+ (or 6 ... ♔f6 7 ♖f8+ and 8 e7) 7 ♔c6 winning.
4 |
♖d7 |
Or 4 ♔d7 ♔f6. Or 4 ♖d8(d1) ♖a7+ 5 ♔e8 ♔f6. White can make no progress.
4 |
... |
♔g7 |
5 |
♖c7 |
♖a1 |
6 |
♖d7 |
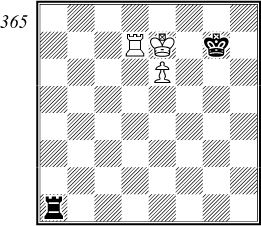
6 |
… |
♖a2 |
The last moves are played so as to prove that Black does not need to play his rook to a8. Only 6 ... ♖a6? would lose after 7 ♔e8+ ♔f6 8 e7 ♔e6 9 ♔f8!, as Black cannot now check on the f-file.
7 |
♔e8+ |
After 7 ♖d6, threatening 8 ♔e8, Black’s only move is 7 ... ♖a8! drawing.
7 |
... |
♔f6 |
8 |
e7 |
♔e6! |
9 |
♔f8 |
Strangely enough, White cannot win. 9 ♖d1 ♖a8+ 10 ♖d8 ♖a7 gives him nothing.
9 |
… |
♖f2+ |
10 |
♔e8 |
♖a2 |
|
½-½ |
|
We can now turn to further examples, beginning with diagram 366.

N. Grigoriev 1937
The remaining positions are all with Black to move, as otherwise the white rook would check the king away from the g-file, with a decisive advantage. Despite the fact that Black’s rook is not far enough from the pawn, he draws in the following way:
1 |
... |
♖b7+ |
2 |
♔d6 |
♖b6+ |
Not of course 2 ... ♔f8 3 ♖a8+ or 2 ... ♔f6 3 ♖f1+ etc.
3 |
♔d7 |
♖b7+ |
4 |
♔d8 |
♖b8+ |
Black checks the king until it leaves the d-file.
5 |
♔c7 |
♖b2 |
6 |
♖f1 |
To prevent the threatened 6 ... ♔f8 which Black would play after 6 ♖e1.
6 |
... |
♖a2! |
…and Black has obtained the drawn position which we saw in our analysis of diagram 357.
Taking diagram 366 as our starting point, we can now discuss the variations which arise if we change the position of White’s rook or Black’s king. Nothing happens if we place the rook on the f- or h-files, or on a1-a6, as Black would successfully defend in the same way. However, most other positions of the rook win for White. Diagram 367 has the rook on a7.

White wins, as Black cannot check on b7, but the winning method is both interesting and instructive. It is worth mentioning that, with the rook on a8, White wins fairly easily. He threatens 2 ♔e8 and 3 e7, and after 1 ... ♖b7+ or 1 ... ♖b1 2 ♔e8 ♖h1 3 ♖a7+ ♔f6 4 e7 ♖h8+ 5 ♔d7 ♔f7 6 ♖a1 wins. 2 ♔d6 ♖b6+ 3 ♔d7 ♖b7+ 4 ♔c6 ♖e7 5 ♔d6 ♖b7 6 e7 the pawn queens. Now to our analysis of diagram 367.
1 |
... |
♖b8! |
The best defence. Other waiting moves such as 1 ... ♖b1 or 1 ...♔g6 would allow White to play 2 ♖a8, transposing to the main variation. The text move prevents this and sets White complex problems.
2 |
♔d6+! |
The only move. If 2 ♖a1 ♖b7+ draws (diagram 366). If 2 ♖d7 ♖a8 draws (diagram 362), and if 2 ♔d7 both 2 ... ♔f6 and 2 ... ♔f8 draw.
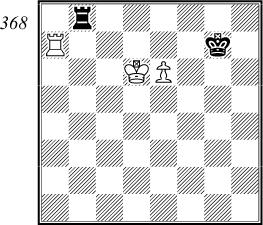
2 |
… |
♔f6 |
Black has no choice as the following lines show:
1) 2 ... ♔f8 3 ♔d7! ♖e8 3 ... ♔g7 4 ♔e7! transposes to the main line, and 3 ... ♔g8 4 ♖a1 ♖b7+ 5 ♔d8 ♖b8+ 6 ♔e7 ♖b7+ 7 ♔f6 wins. 4 ♖a1 ♖e7+ 5 ♔d6 ♖b7 6 ♖a8+ ♔g7 7 e7 wins.
2) 2 ... ♔g6 3 ♖a1! ♖b6+ Or 3 ... ♖b2 4 ♖e1. 4 ♔d7 ♖b7+ 5 ♔c6 ♖b8 6 ♔c7 ♖b2 7 ♖e1! ♖c2+ 8 ♔d7 ♖d2+ 9 ♔e8 and 10 e7 wins.
3 |
♔d7! |
But not 3 ♖f7+ ♔g6 4 ♖f1 ♖a8! etc. The text move brings about a zugzwang position which White wins only because it is Black to move. The reader can check this for himself.
3 |
... |
♔g7 |
After 3 ... ♔g6 White wins as in variation 2 in the note to Black’s second move, and rook moves quickly lose to 4 e7. However, White now seems to be in difficulties.
4 |
♔e7! |
Another subtle move, again placing Black in zugzwang. Not of course 4 ♖a1 ♖b7+ drawing (diagram 366).
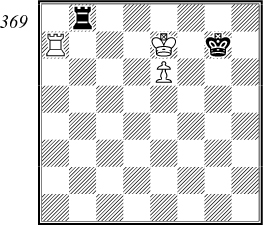
4 |
... |
♖b1 |
After 4 ... ♔g6 5 ♖a1 ♖b7+ 6 ♔d6 we again arrive at variation 2 in the notes to Black’s second move, and after 4 ... ♔g8 5 ♔f6 (or 5 ♖a1) 5 ... ♖f8+ 6 ♔g6 ♖b8 7 ♖g7+ ♔h8 8 ♖f7 ♔g8 9 e7 wins. If 4 ... ♖c8 5 ♖a1 ♖c7+ 6 ♔d8 and 7 e7 wins.
5 |
♖a8! |
…and we have finally obtained diagram 367 with the white rook on a8, already analysed as a win. A very fine sequence of moves worthy of an endgame study.
If we place the white rook on c1, we have the position given in diagram 370.
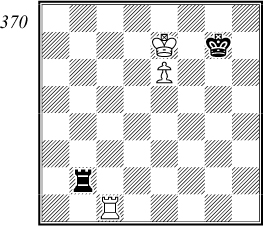
This is a win for White, as are all placings of the rook on the c-file, except c4, c5 and c6. We shall see later why these squares only lead to a draw.
1 |
... |
♖b7+ |
2 |
♔d8 |
|
This move would only draw with the white rook on c8 (2 ... ♔f6), but in that case 2 ♔d6 ♖b6+ 3 ♔d7 ♖b7+ 4 ♔c6 wins easily. With the rook on c4 or c5, 2 ♔d8 allows Black to draw by 2 ... ♔f6 3 e7 ♖xe7! 4 ♖f4+ ♔e5 etc.
An alternative winning method is 2 ♔d6 ♖b6+ 3 ♔d7 Not 3 ♖c6 ♖b8! 4 ♖c1 ♔f8!, or here ♔f6 drawing in both cases. 3 ... ♖b7+ With the white rook on c4 or c5, 3 ... ♔f6! draws. 4 ♖c7 ♖b8 5 ♖c8! ♖b7+ 6 ♔c6 winning easily.
2 |
... |
♔f6 |
With the white rook on c6, Black could now draw by 2 ... ♔f8! and on the previous move, after 2 ♔d6, by 2 ... ♔f6! If instead 2 ... ♖b8+ then 3 ♖c8 wins quickly.
3 |
e7! |
Only this subtle move can win for White.
3 |
... |
♖b8+ |
4 |
♔d7 |
Also possible is 4 ♔c7 ♖a8 5 ♖a1! ♖e8 6 ♔d6, or here 4 ... ♖e8 5 ♔d6 ♖a8 6 ♖f1+ ♔g7 7 ♖a1! winning.
4 |
... |
♖b7+ |
5 |
♔d6 |
♖b6+ |
Or 5 ... ♖b8 6 ♖f1+ ♔g7 7 ♔c7 ♖a8 8 ♖a1! wins.
6 |
♔c7! |
♖e6 |
7 |
♔d8 |
♖d6+ |
8 |
♔e8 |
...and wins easily.
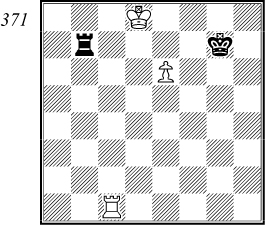
If the white rook in diagram 370 is placed on e1. White wins after 1 ... ♖b7+ 2 ♔d8 ♖b8+ 3 ♔d7! Not 3 ♔c7? ♖a8! drawing. 3 ... ♖b7+ 4 ♔c8 ♖e7 5 ♔d8 etc. However, with the white rook on e5, we have an exceptional draw, as in this final position Black could play 5 ... ♔f6!. It is also known that, with the white rook on e8, Black can draw by 1 ... ♖a2!.
Diagram 372 illustrates the white rook on the d-file.
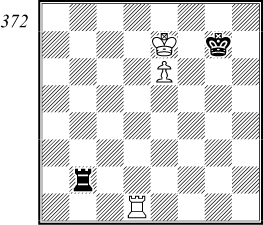
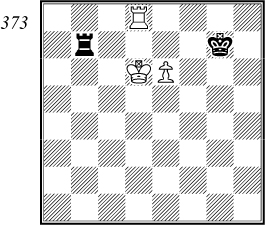
Again this is won for White, on whichever square on the file the rook is placed, the only exception being d7 when Black draws by 1 ... ♖a2! (see the analysis to diagram 362).
1 |
... |
♖b7+ |
With the white rook on d5, Black could try 1 ... ♔g6 but White still wins by 2 ♖d8 Or 2 ♖d1. 2 ... ♖b7+ The threat was 3 ♔e8, and 2 ... ♔f5 loses to 3 ♔f7. 3 ♖d7 ♖b8 Or 3 ... ♖b6 4 ♖a7 ♔f5 5 ♖a5+ ♔g6 6 ♖a1! ♖b7+ 7 ♔d8 ♖b8+ 8 ♔c7 ♖b2 9 ♖e1! winning, a position we shall come back to later. 4 ♖a7! ♔g7 and White wins, as we saw from diagram 367, with 5 ♔d6+ ♔f6 6 ♔d7! ♔g7 7 ♔e7!.
2 |
♖d7 |
♖b1 |
Transposition would occur after 2 ... ♖b8 3 ♖d8 ♖b7+ 4 ♔d6, and 2 ... ♖b6 fails to 3 ♔e8+ ♔f6 4 e7 ♔e6 5 ♔f8!.
3 |
♖d8 |
Threatening 4 ♔e8 which cannot be played at once because of 3 ... ♔f6 4 e7 ♔e6! drawing.
3 |
... |
♖b7+ |
4 |
♔d6 |
4 |
… |
♖b6+ |
Black is unable to prevent the threatened 5 e7 by 4 ... ♔f6 as 5 ♖f8+ and 6 e7 follows.
5 |
♔d7 |
♖b7+ |
6 |
♔c6 |
♖e7 |
Or 6 ... ♖a7 7 ♖d7+ wins.
7 |
♔d6 wins. |
We have now analysed all possible displacements of the white rook in diagram 366. To summarize our conclusions: White wins if his rook stands on the c-, d-, e- or g-files, with the exception of White’s c4, c5, c6, e5 and e8 squares. He also wins with his rook placed on a7 or a8. All other positions of the rook give Black a draw with correct defence.
Let us now change diagram 366 by moving the black king to g6. This slight alteration can sometimes be vitally important and lead to different treatment of the position. Diagram 374 can be our starting point for a discussion of this.
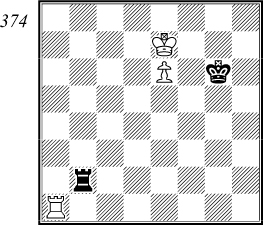
N. Grigoriev 1937
Although with the black king on g7 this position was drawn, it is now a win for White as follows:
1 |
... |
♖b7+ |
Forced, as White was threatening 2 ♖g1+ ♔f5 3 ♔f7 winning.
2 |
♔d8 |
♖b8+ |
After 2 ... ♔f6 3 e7 ♖b8+ White wins either by 4 ♔c7 ♖e8 5 ♔d6 ♖b8 6 ♖f1+ ♔g7 7 ♔c7 ♖a8 8 ♖a1! or by 4 ♔d7 ♖b7+ 5 ♔d6 ♖b6+ 6 ♔c7 ♖e6 7 ♔d8 ♖d6+ 8 ♔e8 etc.
If the white rook were on a5, Black would draw by 2 ... ♔f6 (even after 2 ♔d6). We shall return later to the drawing position with the rook on a4 and a6.
3 |
♔c7 |
♖b2 |

4 |
♖e1! |
Here lies the difference! With his king on g7, Black could play 4 ... ♔f8, whereas now the pawn cannot be stopped. Not however 4 ♖f1 ♖a2! drawing, as we saw in our analysis of diagram 357.
4 |
... |
♖c2+ |
5 |
♔d7 |
♖d2+ |
6 |
♔e8 and |
|
7 |
e7 winning easily. |
|
With White’s rook on a4 (or a6)
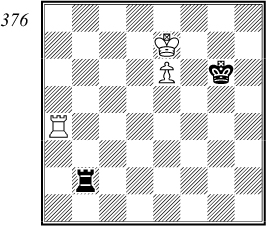
…the position is drawn after 1 ... ♖b7+ 2 ♔d8 or 2 ♔d6 ♖b6+ 3 ♔d7 ♔f6! 4 ♖f4+ ♔e5, or here 4 ♖a1 ♖b7+!. With the white rook on a6, 2 ♔d6 ♔f6! draws. 2 ... ♔f6! Or, with the rook on a6, 2 ... ♖b8+ 3 ♔c7 ♖b1 as White cannot play his rook to the e-file. In this position, however, 2 ... ♖b8+ loses to 3 ♔c7 ♖b1 4 ♖e4!. 3 ♖e4 Or 3 e7 ♖xe7!. 3 ... ♖b8+ 4 ♔d7 Or 4 ♔c7 ♖a8!. 4 ... ♖b7+ 5 ♔d6 ♖b6+ and Black draws, as is clear.
The position is equally drawn with White’s rook on the f- or h-files.
For instance, with the rook on f1, Black defends by 1 ... ♖b7+ 2 ♔d8 ♖b8+ 3 ♔c7 ♖a8! drawing as in the play from diagram 357.
With the rook on the c-, d- or e-files, White wins as from diagram 366, but there are two noteworthy differences:
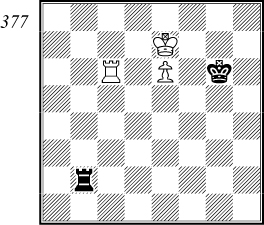
Firstly, White now wins with his rook on c6 after 1 ... ♖b7+. Or 1 ... ♖b8 2 ♖c1 ♖b7+ 3 ♔d8 ♖b8+ 4 ♖c8 and 5 e7, or here 3 ... ♔f6 4 e7 ♖b8+ 5 ♔d7 ♖b7+ 6 ♔d6 ♖b6+ 7 ♔c7 ♖e6 8 ♔d8. 2 ♔d8 ♖b8+ Black no longer has the saving 2 ... ♔f8!. 3 ♖c8 and 4 e7 winning easily.
Secondly, and this time in Black’s favour, White cannot now win if his rook is on e4, as it is too near the pawn.
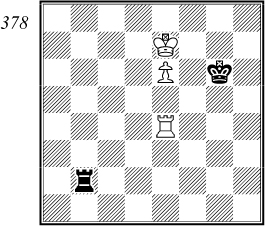
Play might go: 1 ... ♖a2! This draws equally against the rook on e5, but with the rook on e8 Black draws by 1 ... ♖b7+ 2 ♔d6 ♖b6+ 3 ♔d7 ♖b7+ 4 ♔c6 ♖a7. 2 ♖g4+ Otherwise Black reaches the drawing position seen in diagram 362. 2 ... ♔f5 3 ♖d4 If the white rook were not attacked, 3 ♔f7 would now win. 3 ... ♔e5! But not 3 ... ♔g6 4 ♔e8! followed by 5 e7, or 3 ... ♖a7+ 4 ♖d7 ♖a6 5 ♖d6 ♖a7+ 6 ♔f8 winning. 4 ♖d1 ♖a7+ 5 ♖d7 ♖a6 and Black draws.
With other rook positions, the winning method is the same as against the black king on g7, except with the rook on the d-file.
In this case, White has more problems, as we see in diagram 379.
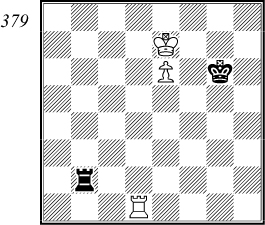
1 |
… |
♖b7+ |
With the white rook on d5, Black would draw by 1 ... ♖a2! 2 ♔e8 ♔f6 3 e7 ♔e6!, and 1 ... ♖a2! also draws against the rook on d7.
White wins, however, with his rook on d4, after 1 ... ♖a2 2 ♔e8! ♔f6 3 e7 ♔e6 4 ♖e4+ etc.
2 |
♖d7 |
♖b8 |
Or 2 ... ♖b6 3 ♖a7 ♔f5 4 ♖a5+ ♔g6 5 ♖a1 winning as in diagram 374. Or 2 ... ♖b1 3 ♖a7 again wins.
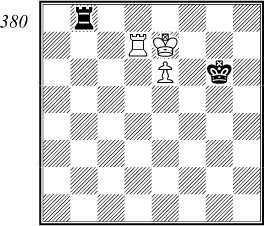
3 |
♖a7! |
In diagram 372 (with Black’s king on g7) White could win easily here by 3 ♖d8 ♖b7+ 4 ♔d6 ♖b6+ 5 ♔d7 ♖b7+ 6 ♔c6 etc, but now 6 ... ♖a7! would draw as 7 ♖d7 would no longer be check. This means that White has to choose a longer way.
3 |
... |
♔g7 |
And we arrive at diagram 372 (with Black’s best defensive move 1 ... ♖b8). As we saw there, White wins by 4 ♔d6+ ♔f6 5 ♔d7! ♔g7 6 ♔e7! ♖b1 7 ♖a8 ♖b7+ 8 ♔d6 ♖b6+ 9 ♔d7 ♖b7+ 10 ♔c6 ♖e7 11 ♔d6 ♖b7 12 e7 etc. The reader must refer back to diagram 372 for detailed analysis of this important line.
To summarize our conclusions: White can win from diagram 374 if his rook is on the a-, c-, d-, e- or g-files, with exception of his a4, a5, a6, c4, c5, d5, d7, e4, e5 and e8 squares. The game is drawn if the rook is on these squares or on the f- or h-files.
We have devoted a fair amount of space to endings with the pawn on the sixth rank, but not without good reason. Such positions form the basis of all endings with rook and pawn against rook, and therefore need to be known in some detail, with all their refinements. Time spent on acquiring this knowledge is by no means wasted.
If all these positions were moved one file to the right, it is clear that Black’s drawing chances would be increased, as his rook would have more manoeuvring space. However, the basic treatment of such positions remains the same. To complete our discussion, let us consider an example where the black king is situated on the wrong (i.e. the longer) side of the pawn.
The main result is that the black rook is short of space for effective horizontal checking. Black loses, even with the move, as follows:
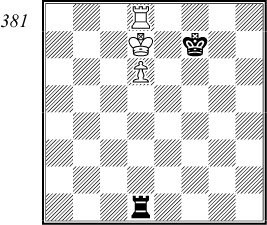
1 |
… |
♖a1 |
Black could draw, if he had another move, by 1 ... ♖a7+ 2 ♔c6 ♖a6+ 3 ♔b7 ♖a1! etc. Equally, Black could draw, if his king were on b7, by 1 ... ♖h1! (diagram 362).
2 |
♖c8 |
♖a7+ |
White threatened 3 ♔d8 and 4 d7.
3 |
♔c6 |
♖a6+ |
4 |
♔c7 |
♖a7+ |
5 |
♔b6 |
♖d7 |
6 |
♔c6 wins. |
|