HANGING TABLE
Give your living area a unique focal point with this truly amazing hanging table. While it can be used to display lighter ornaments, all eyes will be on the macramé itself. The hanging ‘chain’ is created from Chinese crown knots, and a beautiful square knot picot design has been used for the hanging straps. Please note: to hang the table, a hook must be inserted into a ceiling beam with a minimum weight-bearing capacity of 10kg (22lb).
MATERIALS:
- 147m (482ft) length of 5mm (1⁄4in) rope
- Metal rings: one 6cm (23⁄8in); one 9cm (31⁄2in)
- 30cm (1ft) length of 2.5mm (1⁄8in) cotton twine
- 40–60cm (155⁄8–231⁄2in) circular tray of your choice
KNOTS & TECHNIQUES:
- Wrapped Knot
- Chinese Crown Knot
- Double Half Hitch
- Square Knot
- Alternating Square Knot Pattern
- Square Knot Picot Design
- Overhand Knot
- Fraying
PREPARATION:
- Cut sixteen 9m (291⁄2ft) lengths of 5mm (1⁄4in) rope
- Cut two 1.5m (5ft) lengths of 5mm (1⁄4in) rope

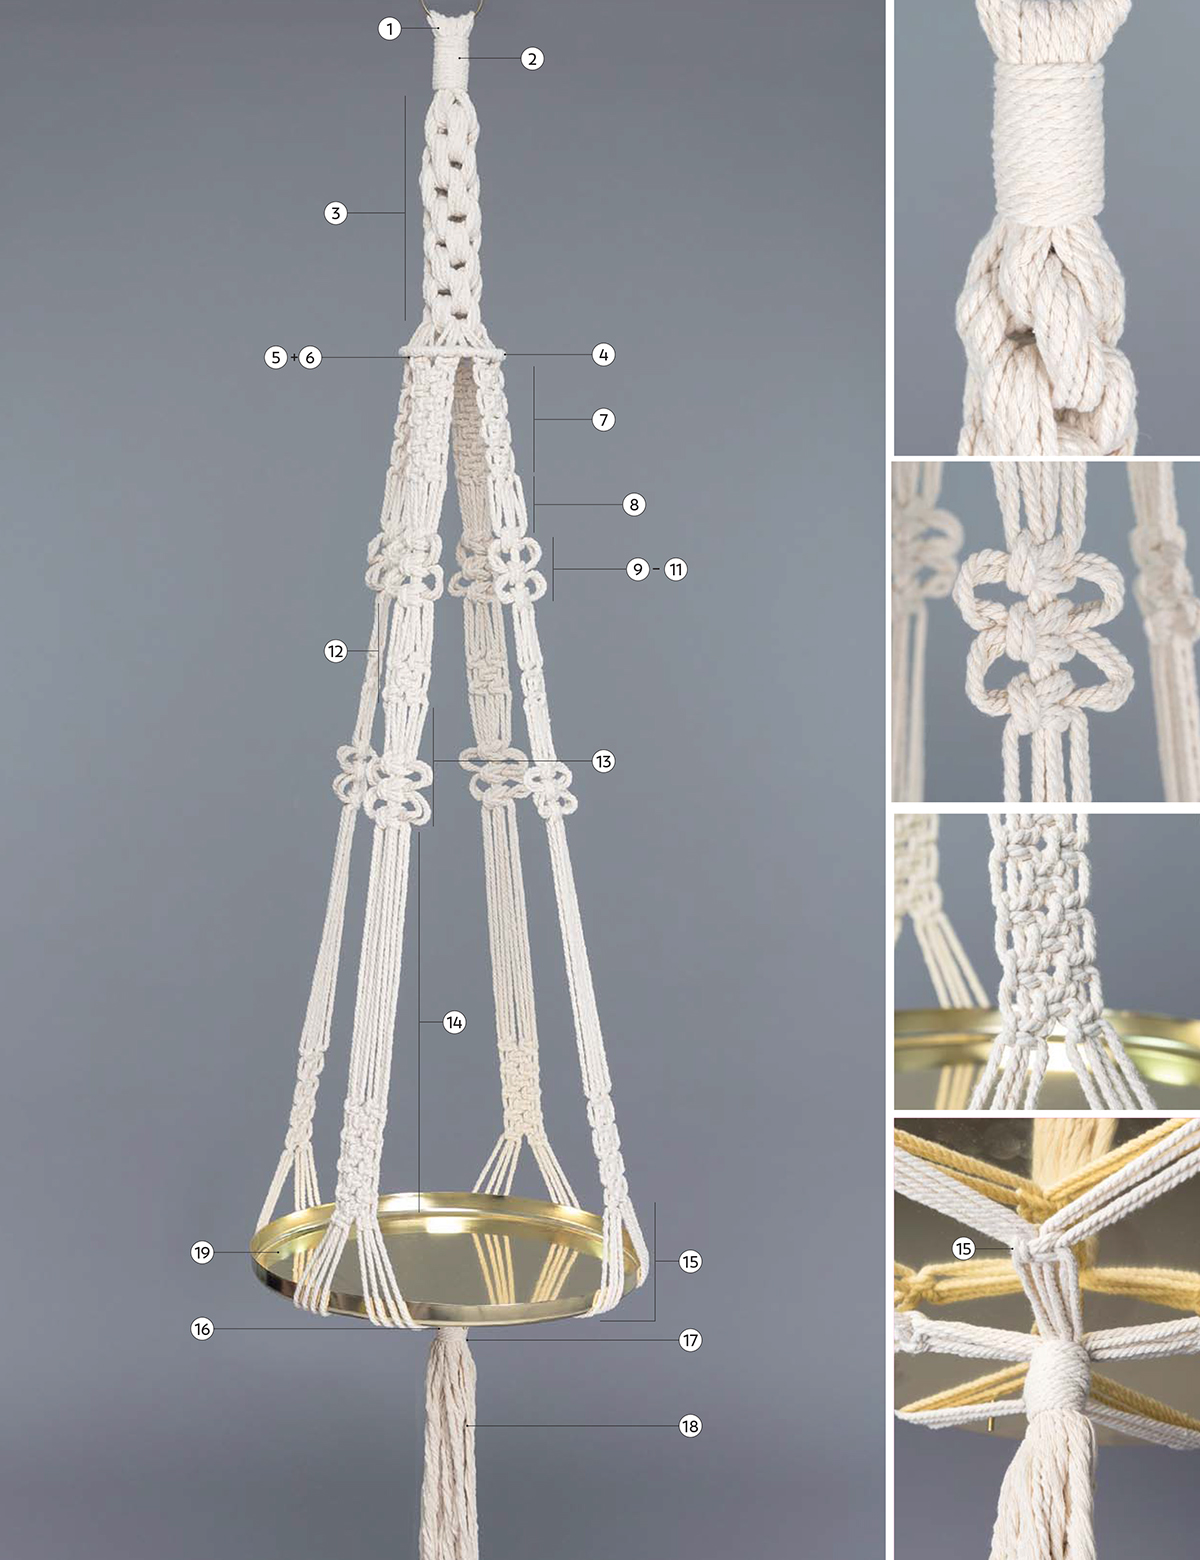
Method
- Mount the sixteen 9m (291⁄2ft) lengths of rope onto the 6cm (23⁄8in) metal ring by folding them in half over the inside of the ring.
- Using a 1.5m (5ft) length of rope, secure the cords together with a 5cm (2in) wrapped knot (see Wrapped Knot).
- Separate the cords into four groups of eight cords and tie six Chinese crown knots (see Chinese Crown Knot).
- Directly beneath the Chinese crown knots, place all the cords inside the 9cm (31⁄2in) metal ring. The metal ring sitting horizontally is now to be used as the holding cord (see Knotting Terminology). Keeping the ring level at all times, tie double half hitches (see Half Hitch Knots) with all cords onto the ring.
- Secure the ring in place by tying a row of eight square knots (see Square Knot) directly beneath the ring.
- Separate the cords into four groups of eight cords. Each group now becomes a sinnet (see Knotting Terminology). Repeat steps 7–14 for each sinnet.
- Tie eight rows of alternating square knots (see Alternating Square Knot Pattern).
- Drop down 5cm (2in) and tie a square knot using four filler cords and two working cords on either side. This is an 8-cord square knot (see Square Knot).
- Drop down 3cm (11⁄8in) and tie another 8-cord square knot.
- Drop down 3cm (11⁄8in) and tie another 8-cord square knot.
- Slide the square knots up the filler cords to create a square knot picot design (see Square Knot Picot Design).
- Drop down 5cm (2in) and tie three rows of alternating square knots.
- Repeat steps 8–11.
- Drop down 27cm (105⁄8in) and tie nine rows of alternating square knots.
- Alternate cords (see Knotting Terminology) by taking four cords from each adjacent sinnet and bringing them together. Drop down 22cm (85⁄8in) and tie an 8-cord square knot (so that each sinnet is joined to the one next to it with an 8-cord square knot).
- Drop down 7cm (23⁄4in), gather all cords together and use the 30cm (1ft) length of cotton twine to tie a double overhand knot (see Overhand Knot).
- Cover the overhand knot with a 5cm (2in) wrapped knot using the remaining 1.5m (5ft) length of rope.
- Trim the cords to the desired length and fray (see Fraying).
- Insert the circular tray to create the table top.