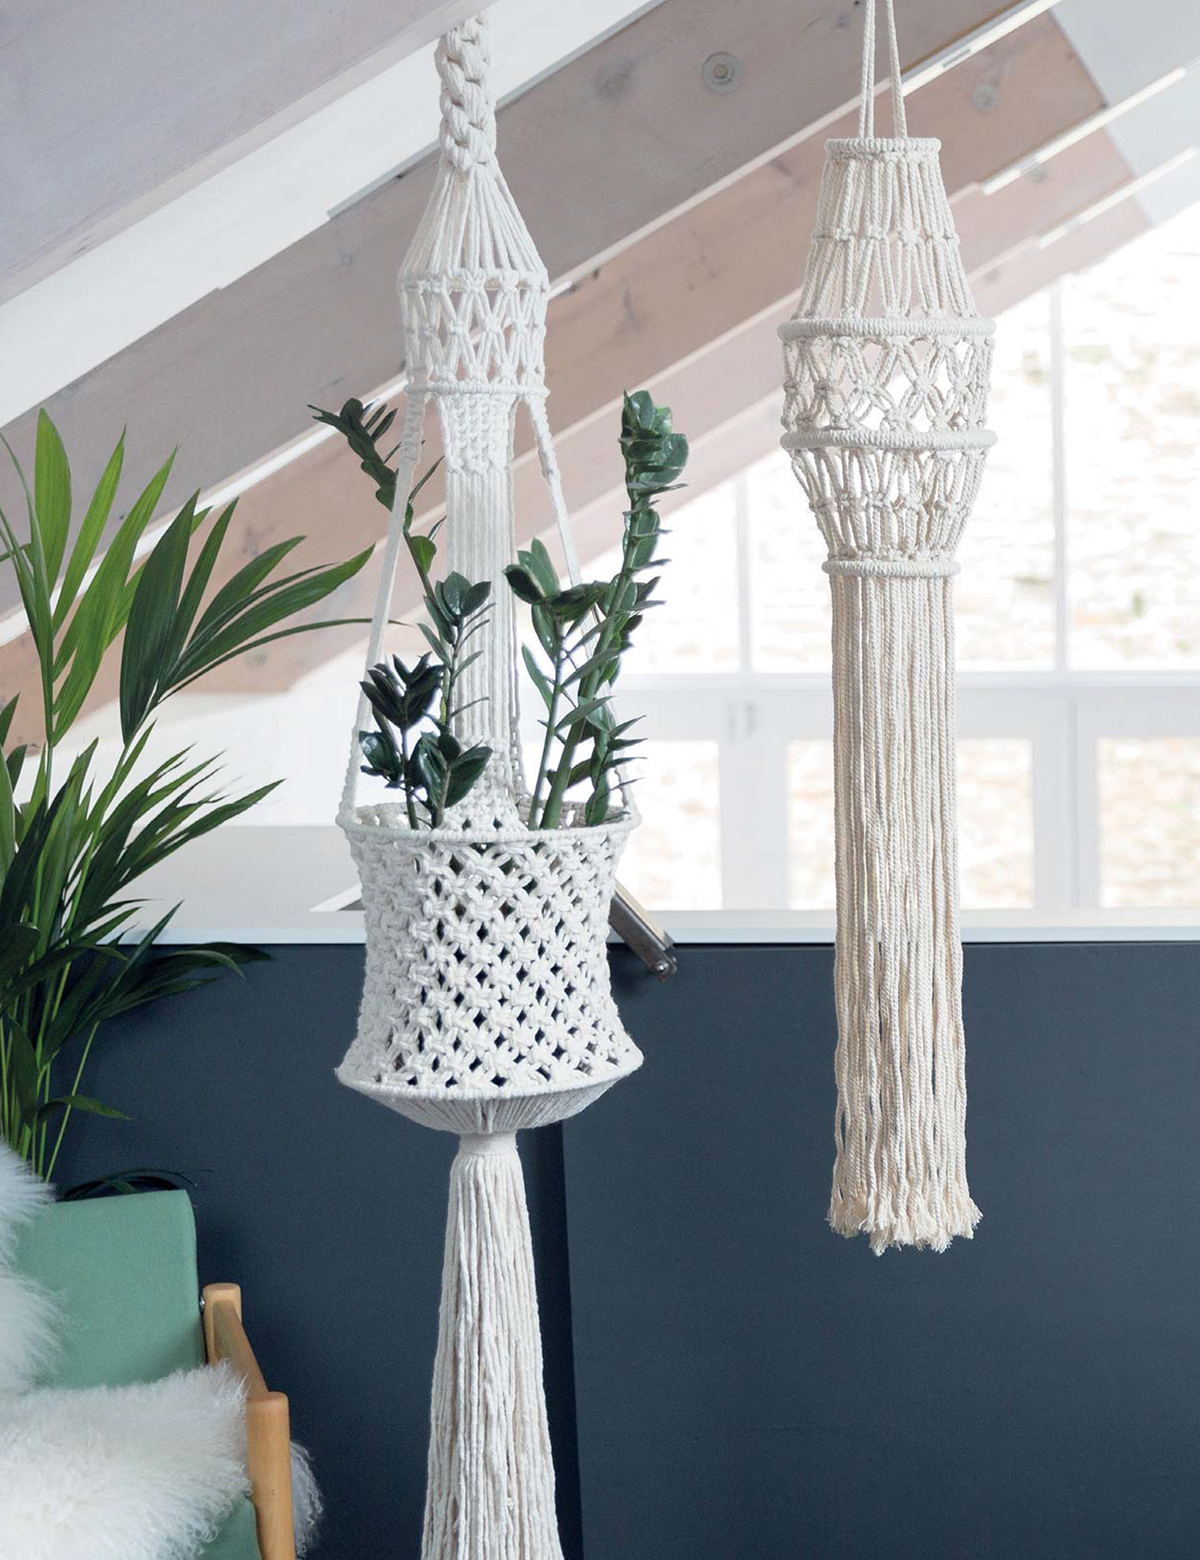
Before you start creating the knots, there is some basic terminology that you need to familiarize yourself with. This list covers all of the terms used in this book:
Sinnet: A vertical column of tied knots.
Row: A series of knots tied side by side.
Working cords: The cords that are used to create the knot.
Filler cords: The non–working cords around which the working cords are tied.
Holding cord: The object onto which cords are tied, that is a ring, a dowel or another piece of rope.
Alternate cords: The means by which you create a new knot by taking half of the cords from a previous knot together with half of the cords from its adjacent knot to form a new group.
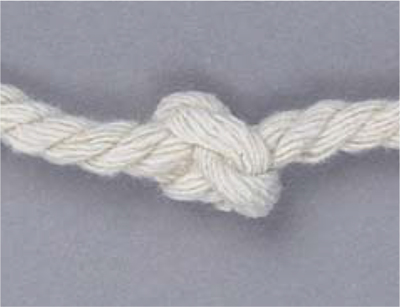
An overhand knot is the most basic way of tying a knot. To make a double overhand knot, simply repeat the steps.


1 Hold both ends of the cord and make a loop by bringing the left end over the right end.

2 Pull the left end through the loop and pull to secure.
Half hitch knots are important and widely used in macramé. They are made with a working cord and holding cord, and can be used in a vertical, horizontal or diagonal manner by changing the angle of the holding cord. These instructions show you how to create various half hitch knots.
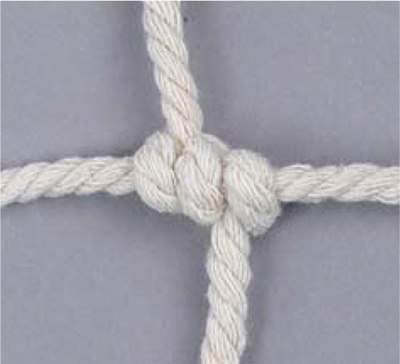

1 Begin with the working cord 2 under the holding cord 1. Bring the working cord up and over the holding cord and down through the loop. This is a Half Hitch.
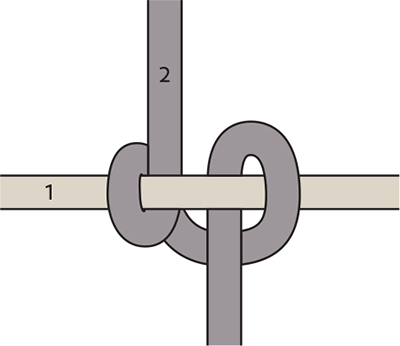
2 Bring the working cord up and over the holding cord again, completing the Double Half Hitch.
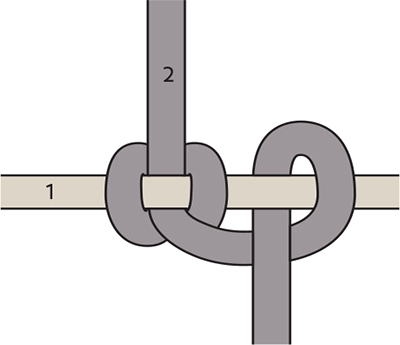
3 Bring the working cord up and over the holding cord a third time to create a Triple Half Hitch
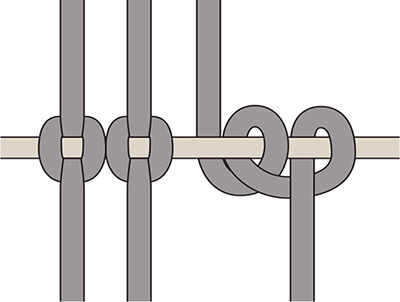
This is a series of double half hitches tied along a horizontal holding cord.

This is a series of double half hitches tied along a diagonal holding cord.
The reverse lark’s head knot is most commonly used as a way of mounting cords onto a piece of dowel or another horizontal holding cord.
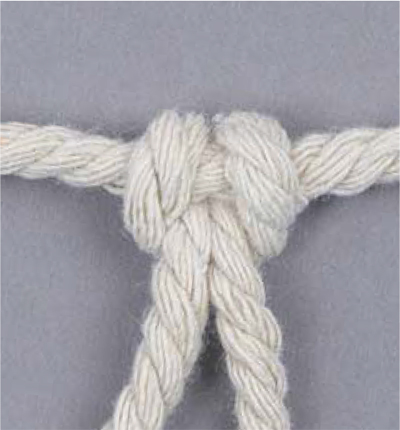

1 Fold one length of cord in half and place it over the holding cord or dowel.

2 Bring the cord ends through the loop.
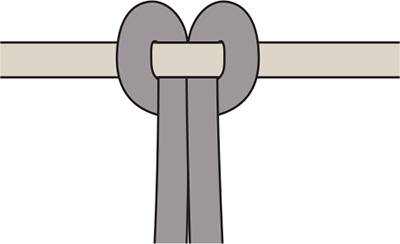
3 Pull the cord ends to secure the knot.
A wrapped knot is generally used at the top and bottom of a hanging piece to secure the cords together.
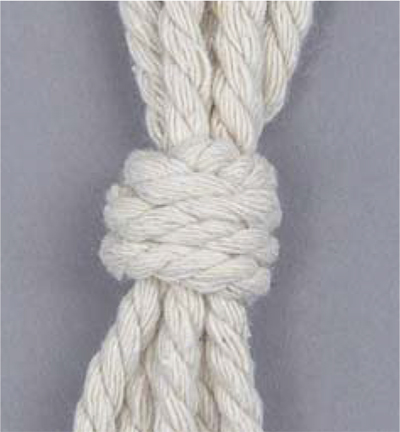

1 Form a loop just below the cords to be wrapped, with the short end facing upwards.

2 Bring the long end back up to just below the short end and wrap firmly around all of the cords. Wrap until it reaches your desired length, ensuring that you do not cover the loop. Bring the long end down through the loop.
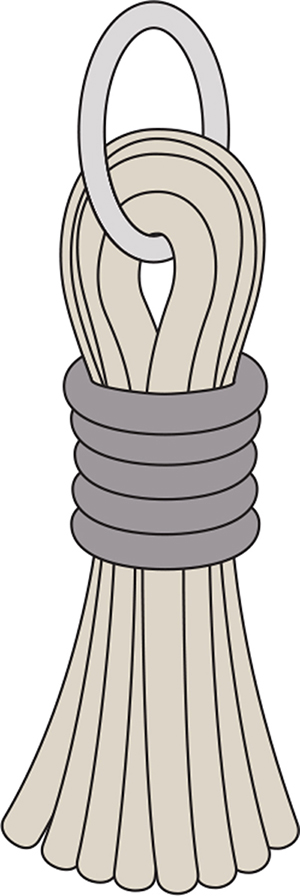
3 Pull the short end up until the loop is about half way through the wrap. Trim the ends of the cords used to make the wrapped knot.
The square knot is one of the most commonly used macramé knots. Variations of the square knot can be achieved by using different numbers of filler cords and working cords. However, a standard square knot only uses four cords (as the diagrams shown). The basic square knot can be used to create lots of different patterns.
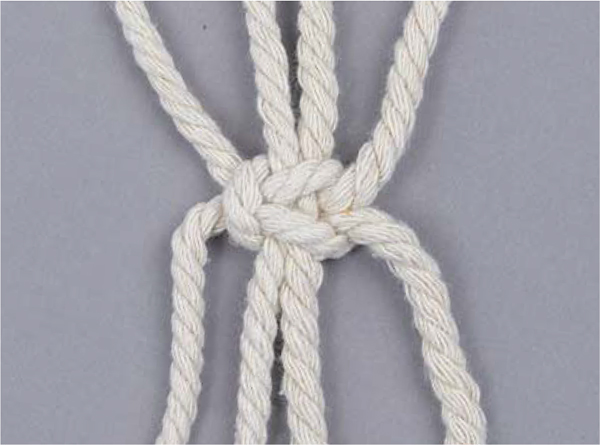
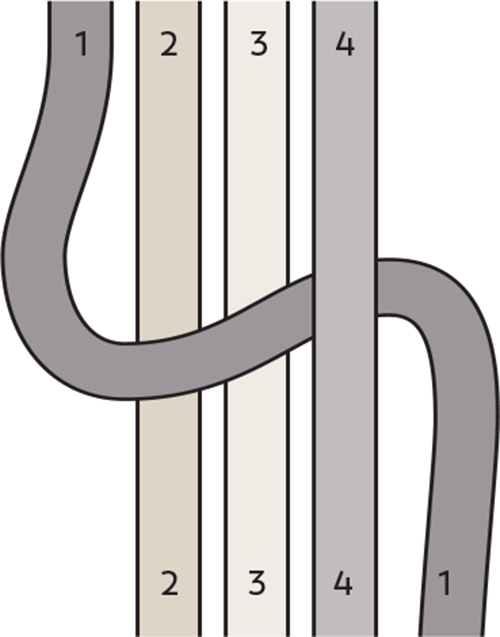
1 Number cords 1 to 4. The outside cords 1 and 4 are the working cords and cords 2 and 3 are the filler cords. Bring cord 1 over the filler cords and under cord 4.
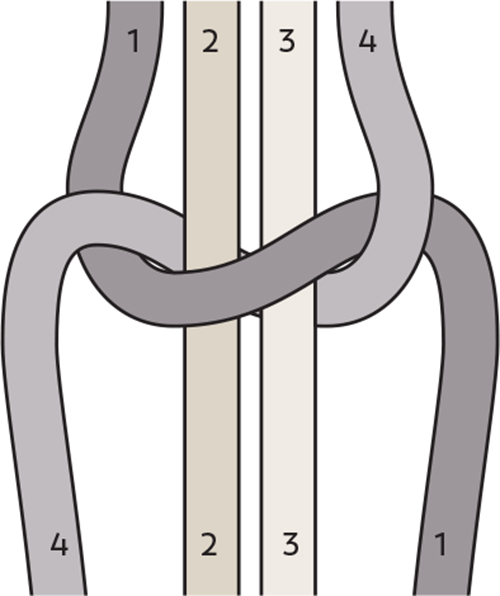
2 Now bring cord 4 under the filler cords and back up between cords 1 and 2 to lay over cord 1.

3 Bring cord 1 back over the filler cords and under cord 4.

4 Now bring cord 4 under the filler cords and back up between cords 3 and 1, and pull the working cords to tighten the knot.
This is a decorative pattern created from basic square knots.
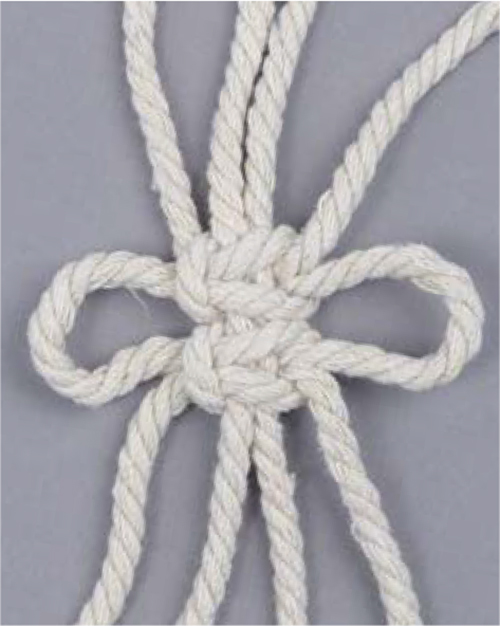

1 Tie a square knot (see Square Knot). Move down to the required area (this will be referred to in the individual pattern) and tie another square knot.
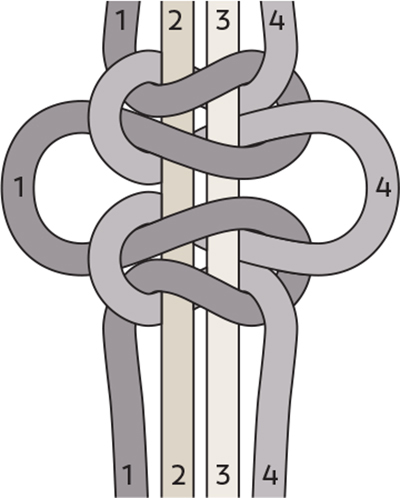
2 Slide the second knot up along the filler cords, resting it below the first knot tied.
The alternating square knot pattern is one of the most commonly used in macramé.
For alternating double square knot pattern (see advanced wall hanging), repeat each square knot row before alternating cords.

1 Tie square knots in a horizontal row (see Square Knot); for the purpose of this diagram two have been used, however this technique can be used with more square knots.

2 Alternate cords, bringing together cords 3 and 4 with cords 5 and 6, to create a square knot on a new row, using cords 3 and 6 as the working cords and cords 4 and 5 as the filler cords.

3 For the next row, tie two square knots as in step 1, with cords 1–4 for the first square knot and cords 5–8 for the second square knot.
Starting with a single square knot row, the number of square knots tied increases by one in each consecutive row. For the diagrams as shown, the increasing square knot pattern has been worked using twelve cords (finishing with three square knots); however, fewer or more cords may be used (this will be referred to in the individual pattern).

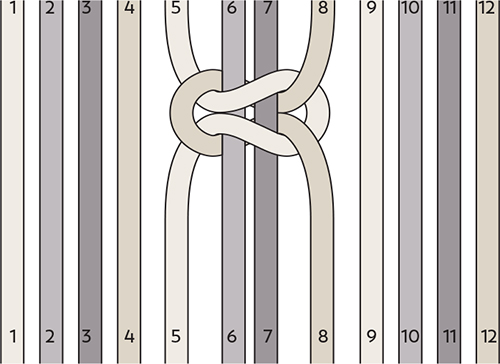
1 Number the cords 1 to 12. Tie a square knot (see Square Knot) with cords 5–8.
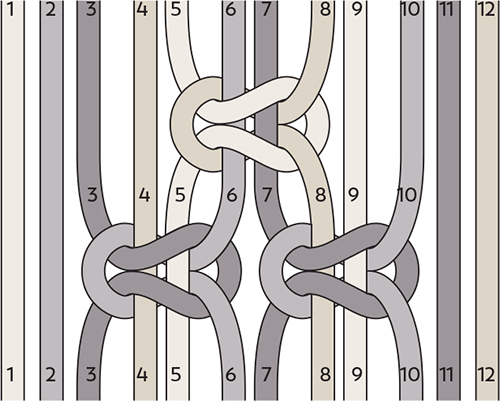
2 Tie the second row of square knots with cords 3–6 and 7–10.

3 Tie the third row of square knots with cords 1–4, 5–8 and 9–12.
With this pattern, the amount of square knots tied in each consecutive row decreases. For the diagrams as shown, the decreasing square knot pattern has been worked using twelve cords (beginning with three square knots); however, fewer or more cords may be used (this will be referred to in the individual pattern).
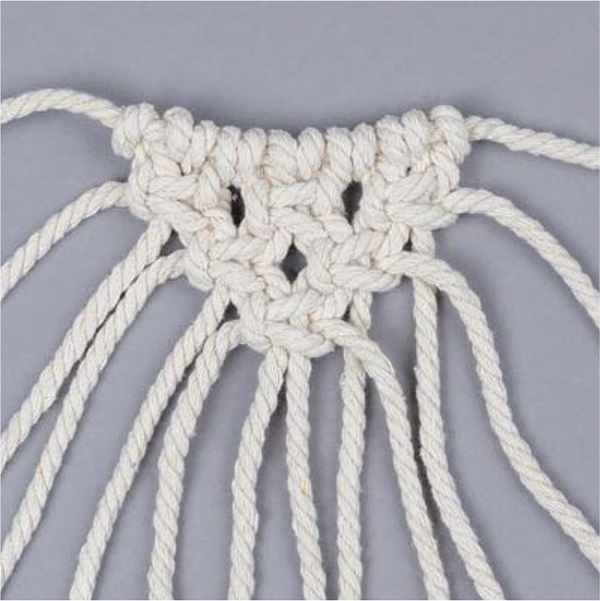
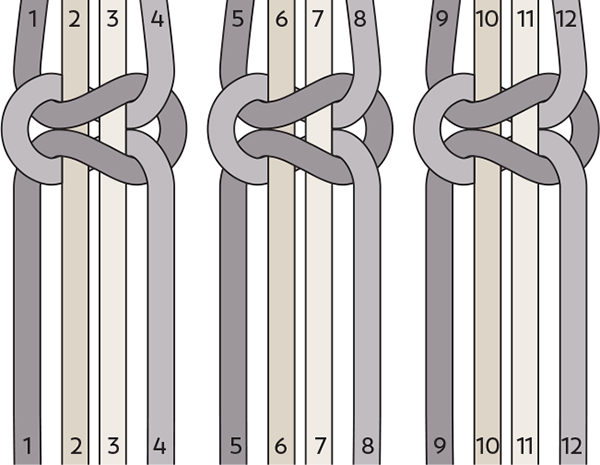
1 Tie a row of square knots (see Square Knot) with cords 1–4, 5–8 and 9–12.

2 Tie the second row of square knots with cords 3–6 and 7–10.
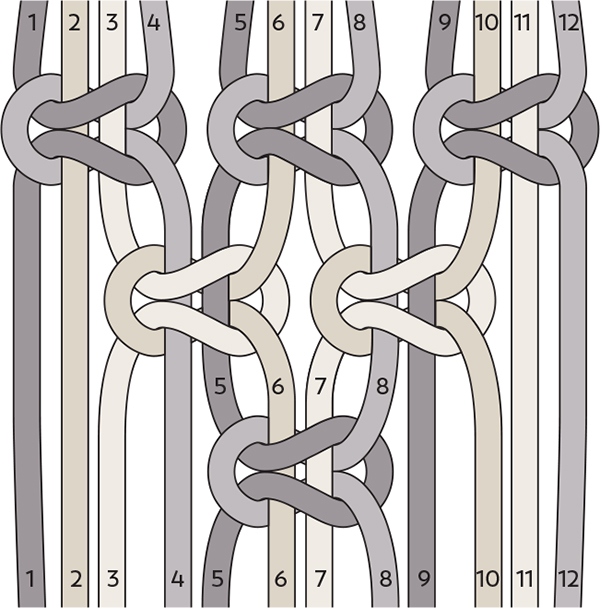
3 Tie the third row of square knots with cords 5–8.
A half knot is basically half a square knot. Half knots can be tied in rows and worked to create an alternating pattern, too.

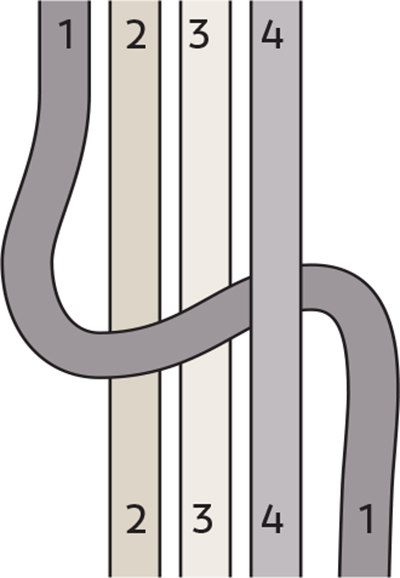
1 Number cords 1 to 4. The outside cords 1 and 4 are the working cords and cords 2 and 3 are the filler cords. Bring cord 1 over the filler cords and under cord 4.
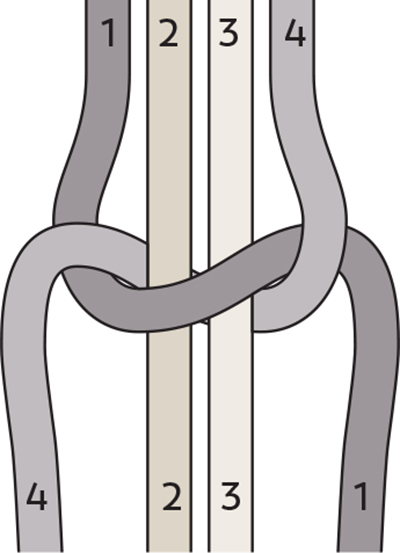
2 Now bring cord 4 under the filler cords and back up between cords 1 and 2 to lay over cord 1.
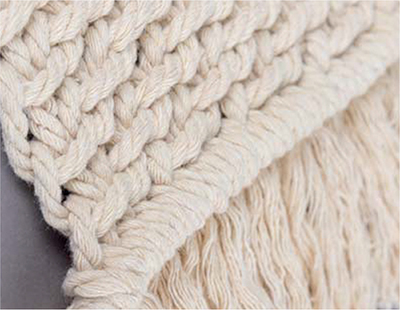
Half knots can be worked in an alternating half knot pattern in the same way that square knots can be worked in an alternating square knot pattern (see Square Knots: Alternating Square Knot Pattern). The table mat project is made with an alternating half knot pattern.
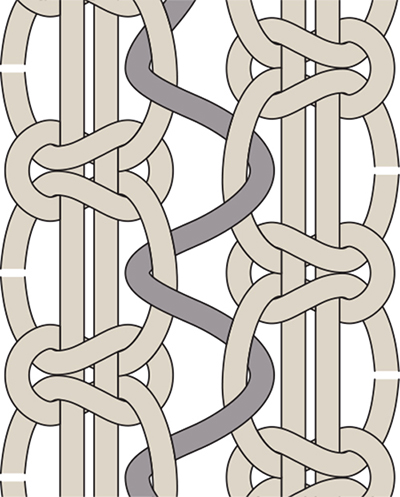
The half knot spiral is a sinnet (vertical column) made with half knots, which naturally twist as you continue to tie them. You can help to create a uniform look by deliberately rotating and tightening the knots at regular intervals.

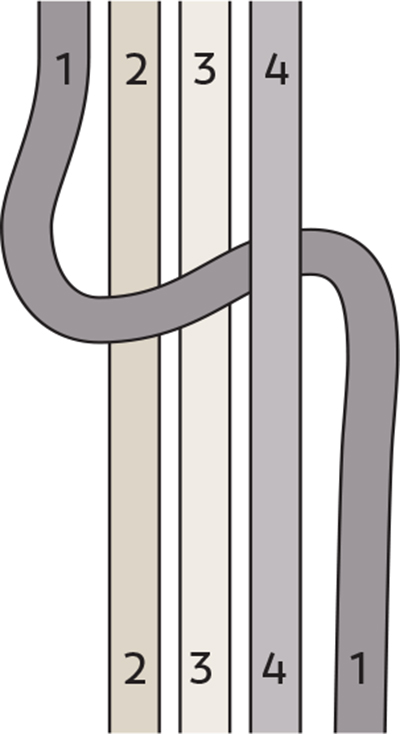
1 Number cords 1 to 4. The outside cords 1 and 4 are the working cords and cords 2 and 3 are the filler cords. Bring cord 1 over the filler cords and under cord 4.
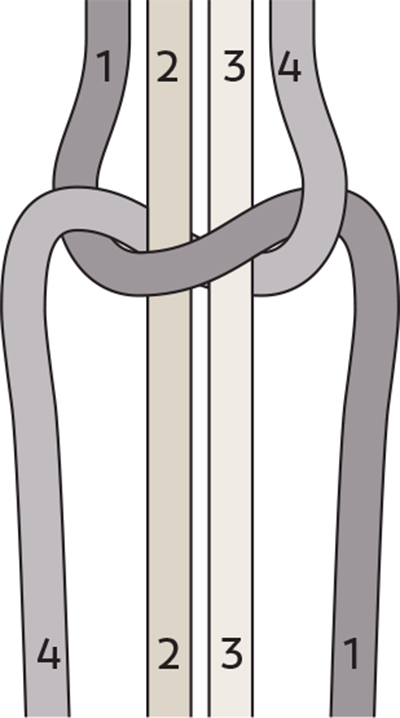
2 Now bring cord 4 under the filler cords and up between cords 1 and 2 to lay over cord 1.
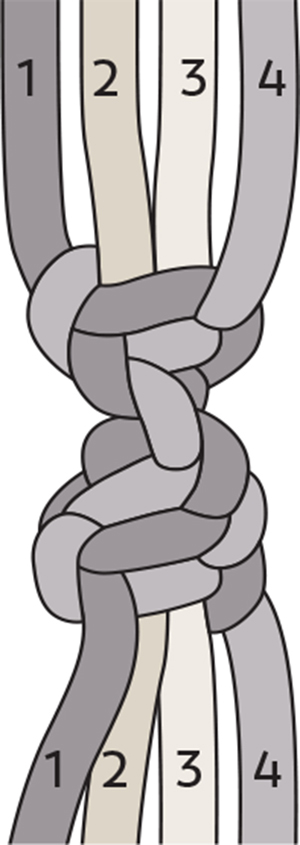
3 Continue to repeat steps 1 and 2 as many times as instructed in the individual pattern to create a half knot spiral.
To tie a Chinese crown knot you’ll need to place the cords upside down on your lap and secure them in place between your knees. The single cords shown in the diagrams and photo sample represent cord groups of several cords.
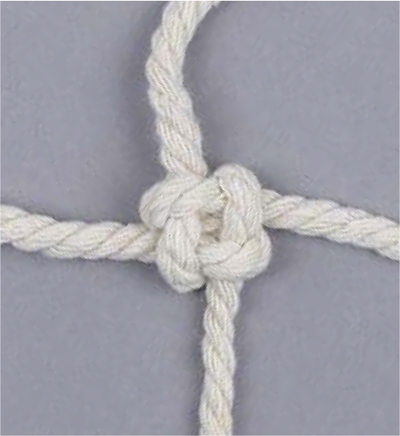

1 Divide the cords into four equal groups and place the cord groups in their allocated positions, with cord groups labelled 1 to 4 and the spaces in between the cord groups labelled A to D.

2 Place cord group 1 into space A, ensuring that there is a loop at the fold.
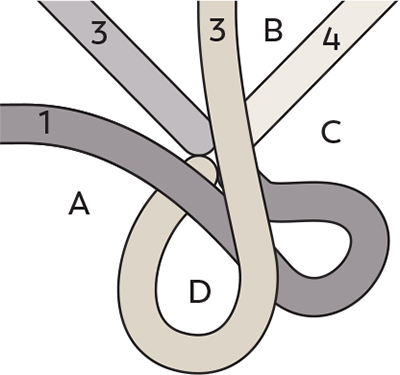
3 Place cord group 2 over cord group 1 and into space B. Bring cord group 2 all the way into the centre (see step 4) and do not leave a loop.
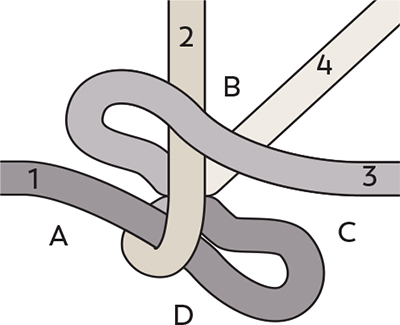
4 Place cord group 3 over cord groups 2 and 4 and under the loop into space C.

5 Place cord group 4 through the loop bringing it into space D.
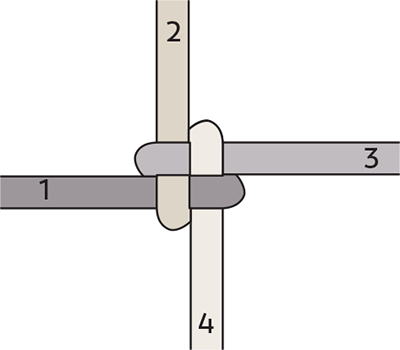
6 Pull all cord groups together evenly until the knot is formed.

There are a few basic techniques that you will need to complete the projects in this book and these are explained here.
It is important to achieve a firm tension when tying your knots, so you need to set yourself up before you get underway, following the advice below.
For small projects, such as the clutch purse, where you use rope as your holding cord, or when making finer items such as jewellery, a project board and T-pins are particularly useful (see Tools & Materials). Alternatively, mount your holding cord to a board, wall or other flat surface, and secure it with adhesive tape.
For wall hangings or plant hangers, where you use a dowel or a metal ring to mount your cords from, a clothes rack becomes a great work station. Simply tie your dowel or metal ring to the horizontal rail of the clothes rack or use S-hooks to secure these holding cords in place. Alternatively, use a single wall hook to hang a metal ring from when making a plant hanger, or two wall hooks to rest a piece of dowel onto when making a wall hanging.
For large width projects, such as our celebration arch, you can suspend your dowel from a curtain rod or two strong wall hooks, but do be aware of the weight-bearing capacity of the wall hooks.
For projects with a long vertical holding cord, such as the hanging light or indoor swing, you can use a hook anchored into a ceiling beam to suspend your working project from, but do make sure that the weight-bearing capacity of the hook is appropriate to your project.
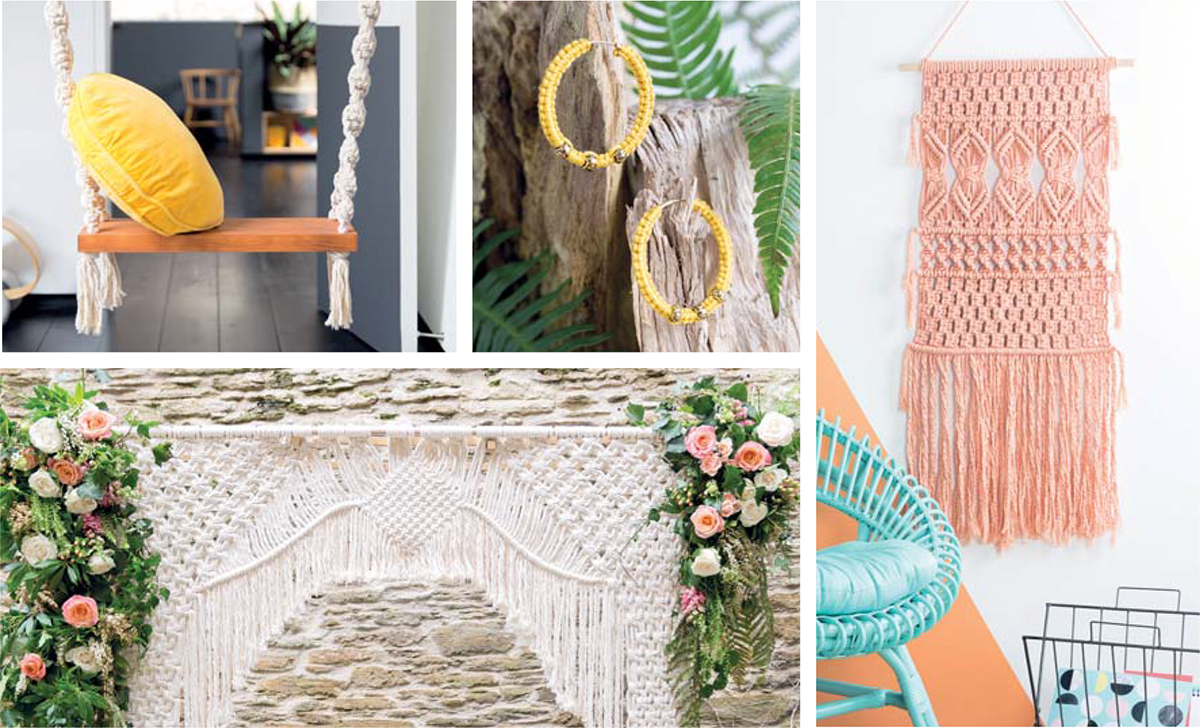
Take your length of rope and secure one end of it onto the metal ring by tying a double half hitch (see Half Hitch Knots). Taking the long end of the cord through the ring, wrap the rope around the ring to cover it completely leaving just enough space to secure it to the ring with another double half hitch. Trim any excess cord.
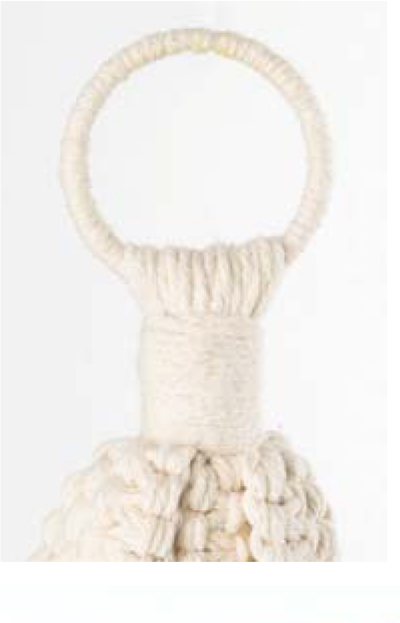
This is a finishing technique where the rope is unravelled by separating each strand into its constituent parts to create a fringing effect or for a fuller tassel.

A finishing technique where the ends of the rope are woven underneath the knots on the back of the design for a neat finish.
Plaiting is the interlacing of three cords or groups of cords to create a braid. Cross the left-hand cord over the centre cord to become the centre cord. Then cross the right-hand cord over the new centre cord so that it now takes the centre position. Continue to alternate left- and right-hand cords to the centre position to form the braid.
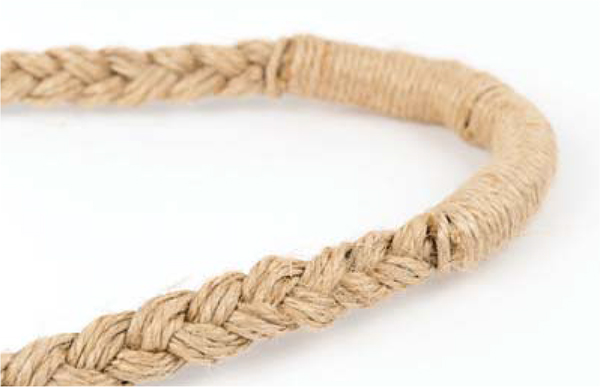
This is a way of counting cords to find the exact section to begin working from in a macramé pattern. Cords are counted from left to right; for smaller projects where fewer cords are used, this can be done mentally. When working on large projects that use many cords to create the pattern, the celebration arch for example, it is easy to lose count. To help you to keep track, you can temporarily tie a piece of bright yarn around every tenth cord, or you can use pegs to keep groups of cords together.
The sides of the pocket on the clutch purse are laced together by threading the holding cord through the spaces in the alternating square knot patterns.
