I start the list of annoyances at the desktop, as that's where most new users learn to work with Linux. While most geeks believe in the command-line interface, new users demand an intuitive GUI configured with the applications they need. To add to configuration demands, many organizations demand a standard desktop environment, with a common set of applications, icons, login managers, and so on. Cleaning up every last detail can be annoying for the geek.
In this chapter, I illustrate some of the annoyances related to configuring the desktop environment.
The major question for a Linux user or site administrator, after the selection of a distribution, is which graphical desktop environment to use. While this annoyance focuses on the two major desktops (GNOME and KDE), there are over a dozen other options you can install on the major Linux distributions.
Whatever your choice, you can still take advantage of applications associated with either desktop and other applications that use the X Window System or display their output on a terminal. In this annoyance I show you several ways to integrate KDE applications into a GNOME environment and vice versa.
Each distribution has its preferred desktop. Ubuntu originally went to an extreme, shipping with just GNOME; later the developers created the Kubuntu project to include KDE support. If you choose something other than the preferred desktop in any distribution, expect to do more administration and fix some glitches. Another criterion that can affect your choice is the background of the new user coming to Linux from another operating system. As shown in this annoyance, KDE more closely resembles Microsoft Windows, and GNOME more closely resembles the Apple Macintosh.
While most Linux administrators prefer to configure using the command-line interface, I use GUI tools where possible in this annoyance. This is because when you're configuring a GUI, it's important to be in the GUI to confirm that your changes match your intent.
GNOME is short for the GNU Network Object Model Environment. The current version of the GNOME Desktop (2.12) has a look and feel similar to the Apple Macintosh GUI. The default settings include menus, dates, and system information applets on a top taskbar and a list of currently open applications in a bottom taskbar, as shown in Figure 1-1.

GNOME is the default desktop environment associated with the most popular Linux distribution, Red Hat/Fedora Linux. It provides GUI-based configuration tools through a variety of icons under the Control Center submenu.
KDE is short for the K Desktop Environment. The current version of the KDE desktop (3.5) has a look and feel similar to the Microsoft Windows GUI. The default settings include menus, dates, and system information applets on a bottom taskbar (see Figure 1-2). The K Menu button in the lower-left corner works in a fashion similar to the Microsoft Windows Start button.

KDE is the default desktop environment associated with most Linux distributions, including SUSE Linux. KDE centralizes GUI-based configuration tools within its Control Center.
Some distributions preconfigure applications in the appropriate GNOME menu. For example, when I install the Synaptic Package Manager on a GNOME Debian Linux desktop, it automatically includes a link from the System → System Settings submenu. But while it is less friendly to KDE applications, you can still include them in the GNOME menu. I'll show you how you can configure them on a single computer using the GUI, and then how to tweak a configuration file, a solution you can automate through a script and therefore share with a large number of users on your network.
As this section shows, it's easy to change menus by editing the configuration files for each user. But this flexibility contains its own annoyance for site administrators, because it means all users can edit their own GUI menus. That may be a problem for managers who want a standard GUI desktop. If you want to freeze your users' menu configurations, see the "My Users Mess Up Their Desktops" annoyance later in this chapter.
If possible, I recommend that you use the Simple Menu Editor for GNOME (SMEG). It is easy to use. But as of this writing, none of the distributions that we examine in this book use SMEG. (However, it is available as part of the alacarte RPM in the Fedora Extras repository.)
Alternatively, you can start the Nautilus File Browser and then open a window that specifies the applications in the main menu. For the purposes of this example, I'll add the KOffice Write application under the Office submenu. To do so, take the following steps, which apply to older versions of GNOME (=< 2.8) associated with active distributions such as Red Hat Enterprise Linux 3 and 4:
Tip
To find the applications listed in your GUI menus, run the gnome-menu-spec-test command, available from the gnome-menus-devel RPM in Fedora or the gnome-menus RPM in SUSE. You'll have to edit the .desktop files shown by the tool. Whenever you delete a file from this directory, the associated application is immediately removed from the GUI menus. Alternatively, you can use these files as a template for adding menu items; as they are text files, they are readily editable for new menu items. Once you've made your changes, you can share them with other systems on your network, and they'll apply to all users.
In a command line in a GUI desktop, run the nautilus command. This opens the Nautilus browser.
Press Ctrl-L. In the Location text box, navigate to applications:///. This opens the Applications window. Compare the entries to what you see in your Applications menu. They should be nearly identical. My version is shown in Figure 1-3.
Use the Office icon to open a window that shows the current items in the Office submenu. Right-click in the menu and select Create Launcher from the pop-up menu.
In the Create Launcher window, enter the information associated with the application. In this example, to add the KOffice Word application, in the Name text box, enter
KOffice Word, which is what gets shown in the Applications submenu.In the Comment text box, enter a name that will be shown when the user hovers the pointer over the menu item.
In the Command text box, enter the complete path,
/usr/bin/kword.If you can't find the complete path to your desired application, the locate command can help. For more information, see the "I Don't Remember Where That File Is" annoyance in Chapter 2. If you know the name of the file, the dpkg -S
packagenameor rpm -qlpackagenamecommands list all files installed from the package.Click Icon to see options for icons you can link to this entry. Alternatively, click Browse to find the icon you prefer.
When you click OK to exit from the Create Launcher window, the item is added to the menu and is ready for use.

Now you can share your changes with other systems configured to use GNOME. All you need to do is share the files in the ~/.gnome2/vfolders/ and ~/.gnome/apps/ subdirectories, to make them a part of the home directory of each user. The activities in this section do not actually install KOffice Write, of course; you must do that separately.
To make sure these changes are part of the home directories of new users, add these files and subdirectories to the /etc/skel directory. They're then automatically added to the home directory of every new user you create.
To make sure they're part of the home directories of existing users, you need to adapt your solution to the particular distribution you're using. You could copy the subdirectories directly to each user's home directory, but you also have to assign ownership and read permissions to each user. Default permissions vary slightly by distribution.
Alternatively, you could edit the base configuration files directly; they're located in the /etc/gnome-vfs-2.0/vfolders directory and are in XML format. If you choose to edit these files, back them up first! Once you've edited them and tested them to make sure they aren't corrupt, you can copy them to the other systems on your network.
While Linux distributions preconfigure many GNOME applications under the appropriate KDE menus, you'll need to do more to complete the job. Not all applications are picked up by the KDE desktop. KDE may even miss some that are not GNOME-specific applications.
Tip
One option that goes beyond GNOME to other X Window System applications (also known as "legacy applications") is the KAppfinder tool, which scans your executable directories for applications you can add to your KDE menu. Start this tool with the kappfinder command.
For this example, I decided to include the XWhois application under the KDE Internet submenu. To do so, take the following steps:
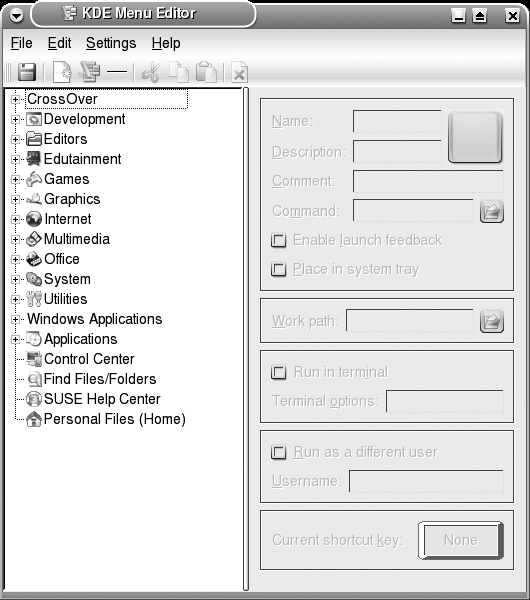
As a regular user, run the kmenuedit command. This opens the KDE Menu Editor shown in Figure 1-4.
If you encounter an error message, such as
failed to create
              /home/michael/.config/menus/
, you may already have a .config file in your home directory. You'll have to move it. If you see an error message such askmenuedit: WARNING: Could not read /home/michael/.config/menus/applications-kmenuedit.menu, which tends to appear the first time someone uses the KDE Menu Editor on a given desktop, ignore the message.Note how the lefthand pane matches what you see when you click the K Menu button in the lower-left corner of your desktop.
Highlight the submenu of your choice—in this case, the Internet menu.
Click File → New Item. This opens the New Item window, where you can enter the name you want to see in the K Menu. Here, I use
XWhois. Click OK.Back in the Menu Editor, you'll see the Internet submenu open, with the new entry. You can now add a Description and Comment of your choice in the respective text boxes.
In the Command text box, enter the path to the application. In this case, on Debian Linux, it's /usr/bin/xwhois.
If you want an icon for this application, click on the icon to the right of the Name and Description text boxes. This opens a list of icons in the /usr/share/icons subdirectory. (The actual icon files may be deep in this sudirectory.) I've used an icon that came with the xwhois package.
When you're done, click File → Save and then File → Quit. KDE saves the changes to the applications-kmenuedit.menu file associated with the error message described in step 1.
Now you can share your changes with other systems configured to use KDE. All you need to do is share the applications-kmenuedit.menu file in the ~/.config/menus/ subdirectory, to make it a part of the home directory of each user you've configured with KDE.
To make sure these changes are part of the home directories of new users, add this file to the appropriate subdirectory of the /etc/skel directory. It's then automatically added to the home directory of every new user you create.
As with GNOME, you need to adapt to each distribution in adding changes to the home directories of existing users. You could copy the subdirectories directly to each user's home directory, but then you also have to assign ownership and read permissions to each user, and these permissions vary slightly by distribution.
Alternatively, as with GNOME, you can edit the generic KDE configuration files directly; they're located in the /etc/xdg/menus directory and are in XML format. Back the files up first in case you make a mistake. After editing them, you can copy them to the other systems on your network.
One thing many managers like is consistency. In many organizations, that starts with what everyone sees at the beginning of the day, the login menu. In this annoyance, I'll show you how you can customize and standardize the GNOME and KDE login menus. But first, you need to select a standard login manager for your workstations.
Whether you want to use GNOME, KDE, or another GUI desktop, you need to select your preferred login manager. Even if you're running GNOME desktops, you can still use the KDE login manager, and visa versa. Each of the book's preferred distributions allows you to select the preferred login manager in a configuration file specific to that distribution, as described in Table 1-1.
Table 1-1. General tab of the GDM Login Screen
Distribution | File | Description |
|---|---|---|
Debian | /etc/X11/default-display-manager | Use the full path to the login manager of your choice, such as /usr/bin/kdm or /usr/bin/gdm. |
Red Hat/Fedora | /etc/X11/prefdm | Set the |
SUSE | /etc/sysconfig/displaymanager | Set the |
Tip
There are other login managers available. Some people prefer the X Login Manager, also known as xdm. Its simple interface does not include menu options for other desktops, languages, or shutdown/reboot commands. If you've installed the X Login Manager, you can substitute xdm for gdm or kdm in Table 1-1.
As you review what each login manager can do in this annoyance, you may change your mind on what's best. You can always return to this section and configure a different preferred login manager for your systems. If you're configuring a standard across many users' computers, you'll have to copy the appropriate file to the other systems that you administer.
Before you start editing the GNOME Login Menu, back up the defaults in the GNOME configuration directory. The location of this directory varies by distribution. As of this writing, it is:
/etc/X11/gdm on Red Hat/Fedora
/etc/opt/gnome/gdm on SUSE
/etc/gdm on Debian
As distributions evolve, these directories may change. To find the directory on your distribution, run one of the following commands:
rpm -ql gdm | grep gdm.conf
dpkg -L gdm | grep gdm.conf
If you get no output, either you haven't installed the GNOME Login Menu package or the name of the directory has changed.
The standard tool to edit the GNOME Login Menu is the Login Screen Setup tool, which you can start with the gdmsetup command. This opens the Login Screen Setup window shown in Figure 1-5. I'll examine each of the tabs in turn.

Tip
If you want to do some arcane customization that you can't find in the Login Screen Setup window on the GNOME display manager, you can try directly editing the associated gdm.conf configuration file. It includes a wide variety of options that go beyond the scope of what I can cover in this annoyance. For more information, run the yelp command to open the GNOME help documentation and navigate to Desktop → GNOME Display Manager Reference Manual. The version associated with Fedora Core 5 includes two additional tabs: "XServer settings for remote servers" and Users, where you can specify the visible users in the GDM login screen.
The General tab defines the basic settings associated with the GNOME Display Manager login screen and allows you to configure several options, which are described in Table 1-2. Be aware that SUSE Linux Professional enables automatic logins by default. This is all right for a system dedicated to a single user in an environment, such as laptop or home office, where intruders are not expected to meddle with it. It also is a good choice for a locked-down public terminal offering a guest account. It should be disabled otherwise.
Table 1-2. GDM Login Screen General tab
Under the "Standard greeter" tab, you can configure the look and feel of the Standard Greeter for local and remote users. You can configure a logo and an image (or enable "choosable" images so each user can configure her image to her taste), as well as a background image and color. The Standard Greeter is known as the GTK+ Greeter in Fedora Core.
Under the "Graphical greeter" tab, you can configure the look and feel of the Graphical Greeter for local and remote users. Linux distributions include several optional themes, and you can configure your own. In fact, this is one way to create a customized look and feel for your organization. The Graphical Greeter is known as the Themed Greeter in Fedora Core.
You can use the current themes as a model for your own. With a little trial and error, you can replace the .png files in the appropriate themes/ subdirectory with the images of your choice.
The location of the themes/ subdirectory varies. While the default is /usr/share/gdm/themes, SUSE stores Graphical Greeter themes in /opt/gnome/share/gdm/themes. Alternatively, you can download your own themes; one source is http://themes.freshmeat.net/browse/991/, where most of the themes are available under the GNU General Public License (GPL).
If I had to create a custom theme for my organization, I'd use one of the themes available as a template and substitute the appropriate image files. Of course, you can create your own, using one of the many models available.
The Security tab includes several options, described in Table 1-3.
Table 1-3. GDM Login Screen Security tab
Setting | Description / recommendation |
|---|---|
Allow root to log in with GDM | I recommend you disable this setting to discourage administrators from logging in with the root account. |
Allow root to log in remotely with GDM | I strongly recommend disabling this setting, as it would transmit the root password over the network, without encryption. |
Allow remote timed logins | Associated with the timed login setting under the General tab. |
Show actions menu | Displays the Actions menu in the login screen. |
Secure actions menu | Supports options that require the root password, such as reboot and shutdown. |
Allow configuration from the login screen | Supports access to the GDM Login Screen Setup Tool from the login screen; disable unless you're experimenting with the login screen. |
Allow running XDMCP chooser from the login screen | Enables logins to remote GUI systems. |
Always disallow TCP connections to X server | Disables GUI logins from remote systems. |
Retry delay (seconds) | Specifies the delay after a failed login attempt. |
Accessibility modules support users who need assistive technologies, particularly those who are unable to use keyboards or pointing devices in a "standard" fashion. For more information, see Appendix A of the GNOME Desktop Accessibility Guide; a version for GNOME 2.10 is available from http://www.gnome.org/learn/access-guide/2.10/. (The GNOME 2.12 Desktop Accessibility Guide was not available as of this writing.)
The X Display Manager Control Protocol (XDMCP) supports logins to remote GUI systems. As you can see from the XDMCP tab, there are several ways you can configure this protocol if you want to allow remote users to log in to your system using the GNOME Display Manager, as described in Table 1-4.
Warning
XDMCP is inherently insecure. A potentially more secure option for remote access to your GUI applications is the Secure Shell protocol. I describe its use for GUI applications in Chapter 11.
Table 1-4. XDMCP Configuration options
Option | Description |
|---|---|
Enable XDMCP | Enable if you want to allow remote GUI access. |
Honour Indirect Requests | Supports access even if GDM is not available on the remote system (note the British spelling of "Honour"). |
Listen on UDP port | Specifies the TCP/IP port for XDMCP communication; the default is 177. |
Maximum pending requests | Sets the maximum number of requests from remote displays; can vary from maximum remote sessions. |
Max pending indirect requests | Sets the maximum number of requests from remote displays that do not have a display manager. |
Maximum remote sessions | Limits the number of actual (not pending) remote sessions. |
Maximum wait time | Limits the time a request can wait; may help if the network is slow. |
Maximum indirect wait time | Limits the time a request from a system without a display manager can wait; may help if the network is slow. |
Displays per host | Limits the number of displays allowed to a particular remote system. |
Ping interval (seconds) | Checks connections with remote systems periodically, as defined here. |
Once you're satisfied with the changes on one system, you'll want to transmit those changes to other systems on your network. As the GNOME Login Manager is system-wide instead of specific to each user, associated settings depend on standard configuration files in the distribution-dependent directories defined earlier. Just copy the files in the noted directories from system to system to implement the changes on the desired computers.
Before you start editing the KDE Login Manager, back up the defaults in the KDE configuration directory. The location of this directory varies by distribution. As of this writing, it is:
/etc/kde/kdm on Red Hat/Fedora and Debian (Red Hat links to a number of files in the /etc/X11/xdm directory)
/opt/kde3/share/config/kdm on SUSE
In any case, the key file is kdmrc , which you can edit directly.
Alternatively, you can start the KDE Login Manager editing tool from the KDE Control Center. Navigate to System Administration → Login Manager. You can also run the kcmshell kdm command. Either action opens the Login Screen Setup window shown in Figure 1-6. I'll examine each of the tabs in turn.

Tip
As with the GNOME display manager, you can edit the associated kdmrc configuration file directly to change KDE. It includes a wide variety of options that go beyond the scope of what I can cover in this annoyance. For more information, run the khelpcenter command to open the KDE help documentation and navigate to Control Center Modules → Login Manager.
The options under the Appearance tab allow you to customize the overall look and feel of the KDE Login Manager, as described in Table 1-5.
Table 1-5. KDM Appearance tab
Setting | Description /recommendation |
|---|---|
Greeting | Provides a standard greeting; the
default is |
Logo area | Determines what is displayed in the lefthand part of the main screen; if you select "Show logo," you can use the logo of your choice (such as your corporate image). |
Position | Defines the location of the upper-left corner of the main screen, relative to the upper-left corner of the display. |
GUI style | Allows you to select from available themes, in /usr/share/apps/kstyle/themes or /opt/kde3/share/apps/kstyle/themes; if you create your own, add them to the themes/ subdirectory appropriate to your distribution. |
Color scheme | Allows you to select from available color schemes, available in /usr/share/apps/kdisplay/color-schemes or /opt/kde3/share/apps/kdisplay/color-schemes; if you create your own, add them to the color-schemes/ subdirectory appropriate to your distribution. |
Echo mode | Defines the number of asterisks displayed for each keystroke when typing in your password. |
Locale | Selects from available languages. |
The options under the Font tab allow you to customize the fonts you see in the KDE Login Manager. There are three categories and one other option, as described in Table 1-6.
Table 1-6. KDM Fonts tab
Setting | Description |
|---|---|
General | Default font for most of the KDE Login Manager |
Failures | Font for error messages and failed login attempts |
Greeting | Font for the Greeting, as defined in Table 1-5 |
Use anti-aliasing for fonts | Supports the use of smoothing for fonts; don't use unless necessary, as this may slow your system |
The options under the Background tab allow you to customize the display behind the main part of the KDE Login Manager. While details go beyond the level of annoyances, the impact is that you can add the picture or slideshow of your choice. You may use this tab to customize the login screen with a corporate or organizational seal.
The Shutdown tab defines who can shut down or reboot a computer from the KDE Login Manager window. By default, all users are allowed to shut down or reboot the local computer using the KDE Login Manager. I recommend that you disable this option for most systems (with the possible exception of single-user workstations) because no password is required.
The Users tab defines the users listed in the KDE Login Manager. By default, all regular and nonstandard users as defined in /etc/passwd within a certain UID range are listed. I believe this is a bad default. Even if you've disabled users such as ftp with a home directory such as /sbin/nologin, this is a clue that a cracker might be able to use to break into your system.
I recommend that you disable this setting by deselecting the Show List option. If you're focused on user convenience, see the next tab.
Sometimes it's OK to configure a workstation with an automatic login. In fact, it's the default for SUSE Linux Professional Workstation. If you need to choose "Enable auto-login," I recommend that you do so for a specific user, selected under the Preselect User area, with relatively minimal permissions. If you're comfortable with the relative security of that account, you may also want to choose "Enable password-less logins."
I define a standard desktop as one with a consistent look and feel after login. It's consistent for all users, at least before individual users customize their desktop environments.
In general, desktop settings are the sum of their parts. Both KDE and GNOME have standard desktop environments, defined in specific directories, such as /etc/kde3 or /opt/gnome/share, as well as hidden directories associated with specific users, such as ~/.kde/share.
If you want a standard desktop, you need consistency with respect to the following:
Installed packages
Desktop resolution
Program menu
Menu bar
Uniform group of icons
Login screen
Background
I address some of the other components of a standard desktop (desktop resolution, a consistent program menu, a standard menu bar, a custom login screen, and a uniform group of icons) in different annoyances. In this annoyance, I show you how to configure a consistent background and screensaver for a KDE and a GNOME desktop environment.
One benchmark in a consistent organizational image is what people see when they walk through your offices. Everyone has different items on their desks, such as family photos, personal souvenirs, etc. However, almost everyone has a computer with a monitor.
Personally, I think people should be able to put what they want (with the possible exception of obscene words and pictures) on their monitor desktops and screensavers at work. But your manager and/or company may think differently. They might tell you that what visitors (and his bosses) see on everyone's GUI desktop background and screensaver should look and feel professional, as it affects their opinion of your organization.
The foundation of a consistent look and feel on the desktop is a consistent background. Assuming you use one of the two standard Linux desktop environments, you can configure it through the KDE Control Center or the GNOME desktop background applet.
If you want to customize the background on a KDE desktop, run the kcmshell background command to open the Configure - Background window. This applet is surprisingly versatile; it allows you to configure the image or even a slideshow of images. If you want to set up your corporate logo as the background on your KDE desktops, you could add the image to the /usr/share/wallpapers directory and then configure it as the picture for your background.
To make this background the standard for your users, copy the kdesktoprc, kcmshellrc, and kdeglobals files from your ~/.kde/share/config directory to the home directories of the other KDE users on your network.
If you want to customize the background on a GNOME desktop, run the gnome-background-properties command to open the Desktop Background Preferences window. This applet is simple; it allows you to select the image of your choice for a desktop background.
If you want to add a standard image for a background, put it into the /usr/share/images/desktop-base directory (/usr/share/backgrounds/images on Red Hat/Fedora and /usr/share/wallpapers on SUSE). You can then copy this directory to the other GNOME desktop systems on your network.
Any changes are saved to the backgrounds.xml file in the individual user's ~/.gnome2/ directory. To make this the standard background for your GNOME systems, you'll have to copy this file to each user's home directory.
If you want to keep users from changing their backgrounds, you can disable regular user access to the gnome-background-properties applet. What I do is limit executable access to the root user with the following command:
chmod 700 /usr/bin/gnome-background-properties
In a secure environment, you may not want customers or visiting rivals (or anyone who might be considered a security risk) to see what your users are doing. When your users leave their workstations temporarily, they often don't shut down their computers. With password protection on their screensavers, you can help protect any critical or confidential information.
In addition, screensavers are one more opportunity to set up a consistent look and feel in your office environment.
The GNOME desktop environment takes advantage of a group of standard screensavers available to all Linux systems, part of the xscreensaver package. The configuration tool is xscreensaver-demo, which is in either /usr/bin (SUSE, Fedora, and Debian) or /usr/X11R6/bin (Red Hat Enterprise Linux). This opens the Screensaver Preferences window.
There are a substantial number of things you can configure in the Screensaver Preferences window. I'll focus on only those two items critical to your system security:
- Blank after _ _ minutes
Specifies the amount of time before a screensaver activates. If you want to keep your systems secure after a user walks away, you should keep this to a minimum; I suggest one minute.
- Lock Screen after _ _ minutes
Sets the amount of time, after the screensaver starts, after which a password is required to dismiss the screensaver and start work again. This should also be kept to a reasonable minimum; zero minutes is probably too short, as it would make users enter a password each time they turn away from the computer for a few seconds.
Once you select a screensaver and close the utility, the configuration is saved in the ~/.xscreensaver configuration file, which you can copy to each of your users' home directories.
Before any changes take effect, you'll need to restart the xscreensaver daemon (it's not a standard daemon, as it doesn't have a start script in the /etc/init.d directory). The easiest way to restart it is from the xscreensaver-demo utility; click File → Restart Daemon. Alternatively, you can restart the daemon from the command line. First, find the Process Identifier (PID) associated with the xscreensaver daemon with the following command:
ps aux | grep xscreensaver
The PID is the number in the second column. For example, if the PID is 1111, you can restart the daemon with the following command:
kill -hup 1111
There is little difference in the workings of the GNOME and KDE screensaver tools; both use the xscreensaver package described earlier. To start the KDE screensaver tool, run the kcmshell screensaver command. This opens the Configure - Screen Saver (which may be named Configure KDE Control Module) window. If available, select the XScreensaver and then click Setup. You'll see the same Screensaver preferences window described earlier.
Alternatively, if you want to use one of the KDE screensavers, the menu is straightforward. For system security, two settings are critical:
- Start automatically after _ _
Specifies the amount of time before a screensaver activates. If you want to keep your systems secure after a user walks away, you should keep this to a minimum; I suggest one minute.
- Require password to stop after _ _
Sets the time, after the screensaver starts, after which a password is required. This should also be kept to a reasonable minimum; don't make it too short, or your users will be highly annoyed at entering a password every time they turn away from their computers.
Once you select a screensaver and close the utility, the configuration is saved in the ~/.kde/share/config/kdesktoprc configuration file, which you can copy to each of your users' home directories.
There are lots of things you can do to customize each desktop environment. If you want to keep a standard environment for your users, take away the tools that they can use to change their environment. Remove or limit permissions to use key configuration tools. For example, you could limit use of the KDE Control Center to the root administrative user with the following command:
chmod 700 /usr/bin/kcmshell
(In SUSE Linux, kcmshell is in the /opt/kde3/bin directory.) Naturally, you should change the permissions of each GNOME Control Center utility that you don't want your users to take advantage of.
Creating and locking GUI desktop icons is a straightforward process and is one more thing that you can do to configure a consistent look and feel for the GUI desktops in your office. In general, the easiest way to lock the icons on the desktop is by assigning appropriate ownership on the ~/Desktop directory. What you do may vary slightly if you're using the KDE Desktop Environment or SUSE Linux Professional.
You can easily configure a standard set of desktop icons for the KDE Desktop Environment either within the GUI or from the command line. To use the GUI, right-click on the desktop and select Create New → File → Link to Application. You can then create the desktop icon that you need from the properties menu that appears.
To create a desktop icon from the command-line interface, use a procedure such as the following. Essentially, you will use an existing text file that configures a desktop application as the model for one customized for your new application. For this example, I added a desktop icon for the OpenOffice.org Writer as follows:
KDE icons are stored in each user's Desktop/ subdirectory. I have an existing Clock icon file, which I've copied with the following commands:
cd /home/michael
cp Desktop/Clock.desktop Desktop/OpenOffice\ Writer.desktop
I opened the newly created OpenOffice Writer.desktop file in a text editor. The minimum directives I needed to change to make the file work for a new application were:
NameWhat you see on the desktop, which I set to
OpenOffice.org Writer.ExecThe full path to the application—in this case, /usr/bin/oowriter.
IconThe file containing the icon to be displayed. Unless you know the default directory (which varies by distribution), it's best to specify the full path to the icon of your choice. In my case on SUSE Linux, I used /usr/share/pixmaps/ooo-writer.png.
For more detailed information on the KDE Desktop, see the KDE User Guide, available from http://people.fruitsalad.org/phil/kde/userguide-tng/.
I saved my changes. You may need to log out and log back in to KDE to see the changes. Test your new icon.
For future users, I copied the contents of my personal Desktop/ subdirectory to /etc/skel, so all new users get the same subdirectory.
cp -a /home/michael/Desktop /etc/skel/
I ran the chown command on the Desktop/ subdirectory to assign ownership to root, so the icons can't be changed by new users.
Once you're satisfied with your icons, add the following to the kdesktoprc configuration file:
[KDE Action Restrictions][$i]
editable_desktop_icons=false
The location of kdesktoprc varies by distribution. On Red Hat/Fedora, it's in /usr/share/config; on SUSE, it's in /opt/kde3/share/config; on Debian, it's in /etc/kde3. Once configured, all you need to do is copy this file to other servers that contain your user's home directories. Alternatively, you can use the individual configuration directory for each user, which happens to be consistent for all three distributions: ~/.kde/share/config/kdesktoprc.
Whatever your selection, check the result. The next time you start the KDE Desktop, right-click on the screen. Notice how the pop-up menu has changed. Right-click on an icon. See how that pop-up menu has changed. If you made the change of ownership recommended in the procedure, you won't be able to use the Create New option. Generally, all you can do once you've made this change is click on the icon to open the associated application, directory, or linked file.
For more information on restricting actions on KDE, see the "My Users Mess Up Their Desktops" annoyance.
As with KDE, you can configure a standard set of desktop icons for the GNOME desktop environment through its GUI. For example, I added a desktop icon for OpenOffice.org Writer with the following steps:
In the GNOME desktop environment, I right-clicked on the desktop. In the pop-up menu that appeared, I clicked Create Launcher to open the Create Launcher window.
In the Name text box, I entered
OpenOffice.org Writer, which is the name I want to see on the desktop.In the Comment text box, I added a simple description—in this case,
The OpenOffice.org Word Processor.In the Command text box, I added the full path to the command that starts the OpenOffice.org Writer—in this case,
/usr/bin/oowriter.I didn't change the type, as this word processor is an application. However, I could have set the type to a directory, a link, or a filesystem device (
FSDevice) for directories mounted on specific devices. The other options in this drop-down box are not used.Now it was time to configure this launcher with an icon to be shown on the desktop. I know that there's an ooo_writer.png icon available from the openoffice.org package. So I clicked on the icon and navigated to the associated location. When successful, the icon is shown in the Create Launcher window.
If I were configuring a command-line application such as the vim editor, I'd want to run it in a terminal. However, that's not appropriate for a GUI application such as OpenOffice.org Writer.
I clicked OK and saw the OpenOffice.org Writer icon appear on my desktop. I can click on this icon to open the word processor.
I continued creating any more icons that I need.
Once complete, I froze the configuration. I changed the permissions on the files in the ~/Desktop/ directory with the following command (my home directory is /home/michael):
chmod 400 /home/michael/Desktop/*
And then I changed ownership on the ~/Desktop/ directory. The following command takes ownership, and the ability to change any files contained within, from any regular user.
chown root.root /home/michael/Desktop
Now, if I try deleting any icon, I get an error message. While users can still right-click to change permissions, this helps preserve a standard desktop. Other issues are discussed in the following section.
Then I wanted to add the same icons to other users' desktops on this server. I could do so with a command similar to:
find /home/*/Desktop -maxdepth 0 -exec cp /home/michael/Desktop/* '{}' ';'This command copies all files, but no directories, from /home/michael/Desktop to every user's Desktop/ subdirectory.
I also needed to change the ownership and permissions of each user's Desktop/ subdirectory, as I did with my own. Fortunately, that command is simpler; all I needed was the proper wildcard to make sure ownership and permissions were changed on the ~/Desktop directory of all users (the -R ensures that the changes are made recursively through Desktop/ subdirectories):
chown -R root.root /home/*/Desktop
chmod -R 770 /home/*/Desktop
For future users, I copied the contents of my personal Desktop/ subdirectory to /etc/skel, so all new users get the same subdirectory.
cp -a /home/michael/Desktop /etc/skel/
Finally, I applied the chown command to the Desktop/ subdirectory to make sure icons aren't changed by new users.
SUSE presents special problems for custom desktop icons. When you customize the SUSE Desktop as described earlier, it works on KDE. However, changing ownership of each user's Desktop/ subdirectory to root renders the icons unusable on GNOME.
The solution is to change the permissions on SUSE Desktop icons without changing ownership to root. You can then keep users from changing the permissions on their icons, courtesy of the immutable flag.
Specifically, to add the immutable flag to the files in my Desktop/ subdirectory, I ran the following command:
chattr +i /home/michael/Desktop/*
Extend this to all users with the following command:
chattr +i /home/*/Desktop/*
I'm nearsighted, so I don't fully appreciate the focus on higher dot pitches on the latest monitors. Yes, more dots do mean a higher level of resolution, which is important in many applications. If you're working on something with a lot of detail, such as an airplane drawing, you need to see those little details, such as those parts that might interfere with one other.
However, as I type this chapter, I much prefer bigger letters. I use a resolution of 800 × 600 on my 15" laptop screen. While I could increase font sizes on a higher-resolution screen, that means additional work to customize applications, desktop icons, and more.
You can configure the resolution directly in the associated X configuration file. But even most Linux geeks use tools to help. In this annoyance, I'll show you how you can use the standard X Window tool, as well as the graphical tools from Red Hat/Fedora, SUSE, and Debian. I'll also show you how to use the GNOME and KDE display tools, which allow individuals to modify the display resolution on their workstations.
With the exception of the GNOME and KDE display tools, all the tools in this annoyance require root account privileges. While you can disable the GNOME and KDE display tools, I recommend against it. After all, people work more efficiently with screens set to the resolution that is most comfortable for their eyes. However, if you do want to disable those tools for individual users, use the techniques described in the "My Users Mess Up Their Desktops" annoyance in this chapter.
You can configure your GUI from the command-line interface. While it can be difficult, a Linux expert like yourself should know the basics, at least to know if the tool that you've used has caused problems with your configuration. If you aren't confident in your distribution's graphical tool, you can invoke the command-line tool with the xf86config command.
Because of licensing issues, most Linux distributions have recently converted from the XFree86 to the X.org GUI server. Others, such as SUSE, use the standard X.org configuration filename /etc/X11/xorg.conf. This also affects the associated utilities; for example, the xf86config and xf86cfg utilities may be known by new names, such as xorgconfig and xorgcfg. While Red Hat Enterprise Linux 4 still uses XF86Config, in the /etc/X11 directory, Fedora and Debian have recently made the switch as well.
If you're more familiar with the XFree86 configuration files, don't worry. Whatever configuration file you see in the /etc/X11/ directory, the format of the file remains the same.
Before you change any configuration file, you should back it up in a secure location such as your home directory. Many tools do back up the X configuration file. So if you make a mistake, you may be able to restore your original configuration from a file with a name such as /etc/X11/XF86Config-4.bak. However, if you make a mistake and then use the same tool again, you'll overwrite the automatic backup. So it's best to keep a working backup of the X configuration file in your home directory; then you won't be out of luck.
The X configuration file is split into several sections. If you prefer to configure your X configuration files directly, you need to know at least how these sections interact. If you need to know how each directive in your X configuration file works, refer to the online documentation for that server, either XFree86 or X.org.
As described earlier, xf86config and xorgconfig are two names for the same utility, and the name depends on whether you're using the XFree86 or X.org servers. (The GUI versions of this utility are xf86cfg and xorgcfg, respectively.) If this utility is not available on your distribution, you should be able to install the RPM or DEB package of the same or similar name. On Debian Linux, the associated package is xbase-clients; on SUSE Linux, the package is xorg-x11.
Tip
Red Hat discourages the use of the generic xorgconfig or xf86config tools; they're not included in either the Red Hat Enterprise Linux or Fedora Core distributions. If you prefer, you can install these tools from third-party sources; alternatively, you can use Red Hat's Display Management tool, which you can start with the system-config-display command.
When you start the xorgconfig or xf86config utility, you'll see a warning that you need to know your video card, the amount of video memory, and the associated chipset. If you don't have this information (or if you have a problem with any of the other queries), you can press Ctrl-C to abort the utility before writing a new X configuration file. Otherwise, to run this utility, use the following steps:
Run the xorgconfig (or for XFree86 servers, the xf86config) command. Read the associated warning. Assuming you know your video card, memory, and associated chipset, continue to the next step.
Specify the protocol most appropriate for your mouse or pointing device. The latest versions of this utility support auto-detection. Accept auto-detection (option 1 when auto-detection is available) or enter the number associated with the protocol.
If you specified a mouse-related protocol and have a two-button mouse, you can now support emulation of a third button (pressing the left and right buttons simultaneously produces the same effect as pressing the middle button on a three-button mouse). As described in "My Mouse Doesn't Do What I Want," later in this chapter, the third mouse button lets you do more in some GUI desktop environments.
Option "Emulate3Buttons" "true"
Now, specify the device associated with the mouse. The default, /dev/mouse, is sufficient if it is already linked to the actual mouse device. To confirm, go to another text console and run the ls -l /dev/mouse command. If you don't see a link, you should either specify the right device for your mouse in this step or accept the default and create a symbolic link to the right device yourself.
Next, select the keyboard most closely related to what you have. If you don't see your keyboard at first, press Enter without making a selection. The utility scrolls through the available options.
In the following step, you can specify a language associated with your keyboard. As before, if you press Enter without making a selection, the utility scrolls through the available options.
Now enter the name of your choice. The name becomes associated with the
XkbVariantdirective in the configuration file.There are additional keyboard options available in the next step; some are language-dependent.
Read carefully when you see the note about monitor specifications. If you don't know the specs for your monitor, check your documentation. If it isn't readily available, you may see reference to a monitor database file, which can help. Incorrect settings can damage the monitor.
Enter the horizontal sync range and allowable resolution of your monitor. Several preconfigured selections are available. Whatever you select here and in the next step must be within the limits specified in your monitor documentation.
Enter the vertical refresh rate of the monitor.
At the note associated with video card specifications, type
yand hit Enter to check out the available database of graphical cards. If you can't find yours among the 500+ available in the database, you may select an option such as "Generic VESA compatible," which is also known as Super VGA.Select the amount of video memory available for your card.
Enter a name of your choice. The name becomes associated with the
Identiferof your video card in the configuration file.Based on the video card, monitor, and memory, the utility now calculates possible video modes, also known as resolutions. Review them and make any changes if needed.
Specify the default color depth. Generally, 24 or 32 bits is best, unless you have a limited amount of video memory—less than 8 MB—or a monitor that can handle only the simplest color modes.
Finally, specify the name for your configuration file. By default, the utility overwrites the current X Window configuration file; however, if you're just experimenting with options, you can specify the filename of your choice.
Linux offers additional graphical X Configuration tools. As it's one way distributions distinguish themselves, you may find different GUI tools available on each distribution that you try.
As each of these tools is elementary for the geek, I'll just briefly describe the tools available for the major distributions covered in this book.
The tool associated with SUSE Linux is known as SaX2, the SUSE advanced X11 configuration tool, version 2. If you're already in the GUI and just want to tweak your configuration, you can start SaX2 with the /usr/X11R6/bin/sax2 command. If you haven't yet configured a GUI, you may be able to start SaX2 from the command-line interface with the /usr/X11R6/bin/sax2-vesa command.
In Figure 1-7, I've started SaX2 from a remote computer using the sax2-vesa command. It's helpful to be able to configure the GUI on remote workstations.
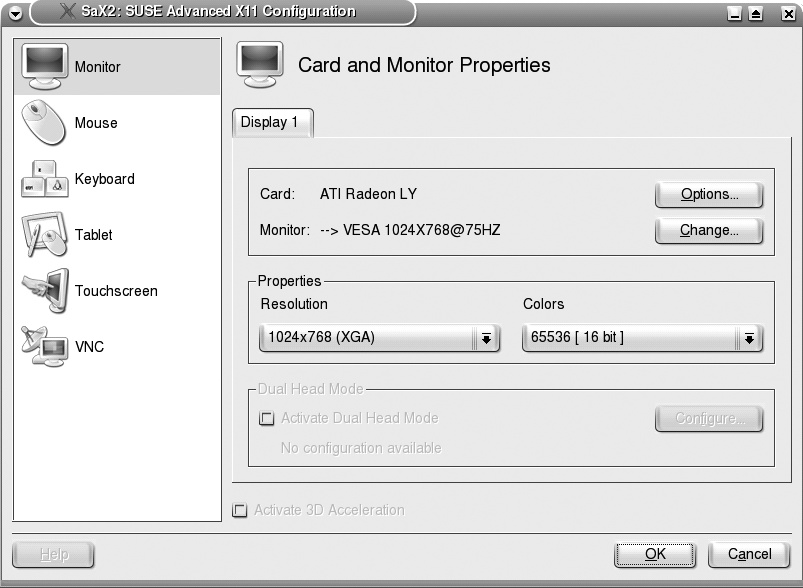
As you can see, SaX2 is quite capable. It can help you configure your GUI over and above the generic xorgconfig/xf86config tool, including (but not limited to):
The 3-D acceleration option, which includes a database of video cards that support this capability
Multihead mode, which supports multiple monitors
VNC configuration, which allows you to control how the GUI is seen using the remote access service of the same name
The current X configuration tool associated with Red Hat distributions is known as "Display settings," which you can start with the system-config-display command. In Figure 1-8, I've started the Red Hat GUI tool from a remote computer.

This is just the latest in the evolution of Red Hat tools. Much older versions of Red Hat used the Xconfigurator, as well as the now-ancient XF86Setup tool. Prior to Fedora Core 1 and Red Hat Enterprise Linux 4, you could start the "Display settings" tool with the redhat-config-display command. As you can see, the "Display settings" tool is quite capable. It can help you configure your GUI over and above the generic xorgconfig/xf86config tool, including the ability to configure two monitors for this workstation.
Debian's X configuration tool is surprisingly straightforward. It's a frontend to the xorgconfig/xf86config tool, which you can start with the following command:
dpkg-reconfigure xserver-xfree86
This command walks you through the different steps associated with the text-based tool, as described earlier. One weakness is that you can't easily exit from this tool, because Ctrl-C does not stop the utility. Run the ps aux | grep dpkg command to find the associated process and then use the standard kill command to stop the process.
GNOME includes a very simple tool, Screen Resolution Preferences, that can help you reconfigure the resolution and refresh rate applied to your display. It works within the limits configured by the previously mentioned X configuration tools.
Start the Screen Resolution Preferences tool with the gnome-display-properties command. This command can be invoked by regular users on each of the distributions discussed in this book. The settings are limited to what was previously configured for the monitor and video card.
Both the GNOME and KDE X configuration tools use the X resize, rotate, and reflection (Xrandr) extension, which is designed to help individual users customize the resolution of their GUI desktops. Changes are reflected in the user's home directory, in the ~/.gconf/%gconf-tree.xml configuration file. For more information, see http://www.xfree86.org/4.4.0/Xrandr.3.html.
Tip
As of this writing, the Screen Resolution Preferences tool does not work in Red Hat Enterprise Linux 4. For more information, see bug ID 163385 at bugzilla.redhat.com.
KDE includes a similar tool, which also uses the Xrandr extensions to help individual users customize the resolutions on their desktops. You can start it as a regular user with the kcmshell display command. It starts the Configure - Display tool, associated with the KDE Control Center.
This command can be invoked by regular users on each of the distributions discussed in this book. The settings are limited to what was previously configured for the monitor and video card. Changes are saved to each user's home directory, in the ~/.kde/share/config/kcmrandrrc configuration file.
The mouse (or pointing device, such as a touchpad) is important to users on any graphical desktop environment. Each button has its function. Left-handed users often find it helpful to switch the functionality of the left and right buttons. All users may want to customize the size of the cursor, as well as the speed of motion. Many users may have problems with the scroll wheel.
The middle mouse button is important for some users. It activates a pop-up menu in the KDE desktop environment, and it pastes recently highlighted text into editors and the command-line interface.
But most PC-based pointing devices, including mice, have only two buttons—or it might just seem that way. In many cases, you can configure a middle mouse button using the appropriate X Window configuration tool; I've described several in the previous annoyance and won't describe their uses here.
Tip
If you have a two-button mouse and a scroll wheel in the middle, you may really have a three-button mouse. Press down on the scroll wheel. If it clicks, it can function as a middle mouse button and is often detected as such by Linux X Window System configuration tools.
You may be able to configure what you need with the GNOME Mouse Preferences tool or the KDE Configure - Mouse tool. If you need to do more, such as configure a scroll wheel or touchpad, you may need to modify your X Window configuration file directly. I illustrate how to help you meet both needs in this annoyance.
Any user can start the GNOME Mouse Preferences tool with the gnome-mouse-properties command. In each of the distributions discussed in this book, it includes three tabs:
- Buttons
Under the Buttons tab, you can configure a "left-handed" mouse, which switches the left and right buttons on a standard mouse. This is often preferred by left-handed users. The double-click timeout specifies the amount of time that can pass between clicks when double-clicking on an item. Users who have problems with double-click speed may want to experiment with this setting.
- Cursors
Under the Cursors tab, you can specify the size of the cursor. The default size may be too small, especially for nearsighted users who have configured a high dot-pitch resolution (such as 1600 × 1200).
- Motion
Under the Motion tab, you can specify the speed (Acceleration) with which you can move the pointer, the Sensitivity of your pointer to motion, and the Threshold associated with drag-and-drop actions.
If you're running Debian or SUSE Linux, changes are saved to the individual user's home directory, in the ~/.gconf/%gconf-tree.xml configuration file. If you're running Red Hat/Fedora Linux, changes are saved to the %gconf.xml file in the ~/.gconf/desktop/gnome/peripherals/mouse directory (which you won't see if you use default settings).
Any user can start the KDE Configure Mouse tool with the kcmshell mouse command. In each of the distributions discussed in this book, it includes four tabs:
- General
Under the General tab, you can configure a "left-handed" mouse, which switches the left and right buttons on a standard mouse. You can even reverse the effect of a scroll wheel. You can also modify the behavior of single- and double-clicks with respect to opening files and folders.
- Cursor Theme
You can select the cursor theme of your choice. Some themes may be easier to see in your GUI than others.
- Advanced and Mouse Navigation (two tabs)
You can customize the way the mouse moves on your screen, as well as the drag-and-drop behavior of the mouse, using the options available under both of these tabs. Users with problems working with their pointing devices may want to experiment with some of these settings.
Changes are written to several KDE configuration files in each individual user's ~/.kde/share/config directory. The actual files vary by distribution. If you need to know what they are, after you make changes, log in as the target user and run the following command:
ls -ltr ~/.kde/share/config
When you're in an application with a long array of data, such as a 30-page document or a big web page, you can often use the scroll wheel to move up and down the document. The scroll wheel is usually a wheel in the center of a mouse. Virtual scroll wheels are also offered by some touchpads. In many cases, if you move your finger up and down the right quarter of the touchpad, the effect is the same as that of a scroll wheel.
Linux may have already configured your scroll wheel when it detected your mouse. If so, you should have no problems using your scroll wheel.
However, the configuration of a virtual scroll wheel on a touchpad is a more difficult exercise. I illustrate the necessary changes to the xorg.conf file here using the working configuration from my SUSE workstation on a Sony laptop. The same settings work well on my Debian workstation on an HP laptop, with a couple of modifications:
Section "InputDevice"
  Driver       "synaptics"
  Identifier   "Mouse[2]"
  Option       "Device" "/dev/input/mice"
  Option       "Emulate3Buttons" "on"
  Option       "InputFashion" "Mouse"
  Option       "Name" "Synaptics;Touchpad"
  Option       "Protocol" "explorerps/2"
  Option       "SHMConfig" "on"
  Option       "Vendor" "Sysp"
  Option       "ZAxisMapping" "4 5"
EndSection
These directives may not work for your touchpad. If you have a touchpad on a laptop computer, you may be able to benefit from the experience of others. Search for the name of your laptop computer online. Alternatively, search for your laptop on a web site such as http://www.linux-laptop.net.
Now, I'll explain each of these directives in Table 1-7. The first and
last directives are straightforward; they bracket the stanza. All
mice, touchpads, other pointing devices, and even keyboards are known
as the InputDevice
directive.
Table 1-7. Directives for a touchpad
Directive | Description |
|---|---|
Section "Input Device" | Start of the stanza. |
Driver "synaptics" | Points to the Synaptics driver; may work for touchpads of other brands. |
Identifier "Mouse[2]" | Identifies this |
Option "Device" "/dev/input/mice" | Specifies the device associated with the touchpad; may also be /dev/psaux. |
Option "Emulate3Buttons" "on" | Supports middle-mouse-button emulation; the features of the middle button can be invoked by clicking the left and right mouse buttons simultaneously. |
Option "InputFashion" "Mouse" | Allows input from the touchpad as if it were a regular mouse. |
Option "Name" "Synaptics;Touchpad" | Specifies an appropriate name for
the |
Option "Protocol" "explorerps/2" | Most touchpads work as a PS2 device;
if you're not sure of yours, you may be able to substitute
|
Option "SHMConfig" "on" | Allows sharing of the touchpad space between the main area for navigation and the right-hand quarter for scrolling. |
Option "ZAxisMapping" "4 5" | Configures scrolling up and down. |
Option "RTCornerButton" "0" | Disables a middle click when you tap on the upper-right corner of the tap area, which provides more control on desktops with middle-mouse-button functionality, such as KDE. |
Option "RBCornerButton" "0" | Disables a right click when you tap on the upper-right corner of the tap area, which requires you to use the touchpad button for right clicks. |
EndSection | End of the stanza. |
Tip
You may note that the Option "Vendor"
"Sysp" directive is missing from the table; it's a label.
RTCornerButton and RBCornerButton are directives you might
consider if you have a touchpad.
Configuration data for other types of pointing devices is available in the README.mouse file, typically available in the /usr/X11R6/lib/X11/doc directory. It includes configuration information for an alternative touchpad, the Alps GlidePoint.
If this configuration doesn't work for you, make sure you've inserted the names of the appropriate drivers into a file such as /etc/modprobe.conf, /etc/modules.conf, or /etc/modprobe.d/mouse.
You may want to customize your touchpad further. While there is
no dedicated HOWTO or FAQ that explains the directives that you can
use, there is hard-won experience available from other Linux users on
web sites such as http://tuxmobil.org. They include directives
such as LeftEdge, RightEdge, TopEdge, BottomEdge, FingerLow, FingerHigh, MaxTapTime, MaxTapMove, VertScrollDelta, MinSpeed, MaxSpeed, EdgeMotionSpeed, and AccelFactor.
Some trial and error may be required, so remember to back up your X Window configuration file before you start editing!
Once you've made all of these changes, you may want to keep your users from messing them up. While I personally prefer allowing every user to customize his system, your managers may not agree.
There are two basic approaches to this process. First, you can disable access to the key tools. Second, you can change ownership and permissions on associated configuration files to prevent changes by regular users.
Tip
If you're interested in more detailed information, there's an excellent discussion on configuring a standard KDE desktop environment at http://enterprise.kde.org/articles/kiosk-lp.php. An excellent guide to configuring a standard GNOME desktop environment is available in a Gentoo wiki at http://gentoo-wiki.com/HOWTO_Gnome_Desktop_Admin_Guide, and you can also refer to the Red Hat Desktop Deployment Guide available at http://www.redhat.com/docs/manuals/enterprise/RHEL-4-Manual/desktop-guide/.
You can also make your changes a part of the /etc/skel directory, which causes them to be copied into the home directories of all users created subsequently. For example, the following command creates the new user nancy; the -m option (not required on Red Hat/Fedora) creates Nancy's home directory in /home/nancy, and activates the defaults in /etc/default/useradd, copying the files from /etc/skel,with appropriate ownership and permissions, into Nancy's home directory:
useradd -m nancy
The KDE desktop configuration is driven by both default and individual configuration files. Naturally, what you do depends on what you want to customize; do you want a standard desktop for just a few users or for every user on your network?
The default configuration files depend on the distribution, as shown in Table 1-8.
Table 1-8. KDE default configuration directory
Distribution | KDE default configuration directory |
|---|---|
Red Hat/Fedora | /usr/share/config |
SUSE | /opt/kde3/share/config |
Debian | /etc/kde3 |
Individual configuration files are stored in each user's home directory in the ~/.kde/share/config directory. If you haven't yet configured custom settings for a specific user, the user-specific configuration file probably does not yet exist.
Once you make desired changes to one individual's ~/.kde/ directory, you can copy it to the home directory of other users. You can also copy it to the /etc/skel directory. As described earlier, this directory is often used to populate the home directories of new users with standard configuration files.
The key to preventing changes by pesky users is the immutable
flag. In KDE configuration files, you can specify it through [$i]. For example, to lock the standard
configuration, I've added this flag to the beginning of each
stanza—for example:
[Desktop0][$i]
In any case, changes aren't displayed until the next time you log in to the KDE desktop environment.
The KDE desktop environment includes a number of options suitable for kiosks, which are common locations for public terminals. If you administer a public terminal, you'll probably want to freeze the desktop configuration of that terminal. What you do for workstations in an office may also incorporate some of the same limitations.
In the previous section, I've covered some of the things you can do to disable configuration changes. You can also restrict such actions as starting a command-line interface, running as the root user, or changing the background. Open a kdeglobals configuration file and start a stanza with the following title:
[KDE Action Restrictions][$i]
On a workstation, you may want to keep certain users away from the command-line interface. You can do so in this stanza with the following directive:
shell_access=false
By default, users can also start applications from the Run Application window, invoked through Alt-F2. If you want to disable access to this window, add the following directive:
run_command=false
You can keep users from using any KDE utilities that require the root account with a directive such as:
user/root=false
But users don't need the root account to customize many things on the KDE desktop. You can further limit access to different modules in the KDE Control Center, in a different stanza, starting with:
[KDE Control Module Restrictions][$i]
Here, you can limit access to the modules of your choice. For example, if you want to keep users from changing their own KDE desktop backgrounds, add the following directive to this stanza:
kde-background.desktop=false
To keep your users from changing their screensavers, include the following directive:
kde-screensaver.desktop=false
If you want to limit access to another module, you simply need to know the name, as defined in the output from the following command:
kcmshell --list
Then, to limit access to the module of your choice, just substitute the name of that module in the following directive:
kde-module name.desktop=falseThe key to a standard GNOME desktop environment is the GConf system. Readers familiar with Microsoft Windows might notice parallels to the Registry Editor. You can start the GConf editor with the gconf-editor command (normally, it's in the /usr/bin directory; on SUSE, it's in the /opt/gnome/bin directory). There are three types of GNOME settings. What each user sees is an amalgamation of these:
- Mandatory
Mandatory settings can't be changed by regular users, unless they have access to the GConf system or the associated configuration files in the /etc/gconf/gconf.xml.mandatory directory. (For SUSE, it's the /etc/opt/gnome/gconf/gconf.xml.mandatory directory.) Mandatory settings supersede default settings.
- Default
Default and mandatory settings, taken together, define the standard desktop environment seen by regular users; however, default settings can be changed. The associated configuration files are in the /etc/gconf/gconf.xml.default directory. (For SUSE, it's the /etc/opt/gnome/gconf/gconf.xml.default directory.)
- User
User-specific and customizable settings are stored in each user's home directory, in ~/.gconf.
To configure system-wide settings on the GNOME Desktop Environment, open the GConf editor as the root user. In some distributions, this is possible only with the sudo command; for example, on Debian Linux, I can open GConf while logged in to the K Desktop Environment with the following command:
sudo gconf-editor
Tip
Some distributions return an error messaoe if you try to open GConf as root. In that case, use the sudo gconf-editor command as a regular user. Access to the sudo command for a regular user requires that user be configured as part of the /etc/sudoers file, which you can configure with the visudo command.
Sometimes the easiest way to keep users from changing their standard desktop environments is to disable the GUI menu items. In other words, if the user doesn't see the administrative tool, he's less likely to want to try to use it.
Tip
You can disable KDE menu items with the KDE Menu Editor described in the first annoyance in this chapter, "I Want the Advantages of Both KDE and GNOME."
Default GNOME main-menu files are located in the /usr/share/applications directory. User-specific menu files are located in each user's home directory, in ~/.config/menus. Managing the GNOME menu items is a straightforward process; for example, if your SUSE Linux computers are configured with the GNOME Desktop Environment, and you want to disable GNOME menu-based access to the YaST configuration tool, move (don't delete) the YaST.desktop file from the /usr/share/applications directory. (I move it to my home directory, in case I ever want to restore the menu option.)
If you're already in the GNOME Desktop Environment, check your menu. The changes are shown immediately on the Red Hat/Fedora and Debian distributions. The changes aren't shown on SUSE Linux until the next time you start GNOME.
Now you can implement these changes to the other desktop systems on your network. Remember, if you're removing items from the GNOME desktop menus, you'll have to remove the corresponding items from the /usr/share/applications directory on each of your target systems.
When you press the eject button on your CD or DVD drive, you'd think that the drive should open. Unfortunately, it doesn't always happen. Anything that is using a file or reading a directory on that CD/DVD can keep your system from opening that drive. This could be something as simple as a user whose current directory lies on the CD/DVD drive.
If you're running Linux as a server, you probably need to accept the locking of the CD/DVD drive. Other users may be installing Linux from a shared DVD on your system and may need access to the data on the drive. While you may have good reasons as an administrator to unlock a drive, be aware that you may be interrupting some task being run by one or more of your users (or fellow administrators).
On the other hand, if you're working with a single-user Linux workstation, users won't understand why their CD/DVD is locked. They'll just complain, and you'll be annoyed, as they won't be interested in learning "simple" commands such as umount. All they'll tell you is that the CD is broken.
In this annoyance, I'll show you how I believe servers and workstations should be configured with respect to the CD/DVD drive. The defaults vary depending on your distribution. Based on those defaults, if you still have problems, there are a series of common steps that you can follow.
When you configure a server, you'll want full control over any CD/DVD drives on your system. Generally, you'll want to limit privileges to administrative users. Take the following default entry from my /etc/fstab on Red Hat Enterprise Linux 4, with a regular CD/DVD drive:
/dev/hdc /media/cdrecorder auto pamconsole,exec,noauto,managed 0 0
The applicable entry from my SUSE Linux workstation is:
/dev/cdrecorder /media/cdrecorder subfs noauto,users,gid=users 0 0
Finally, the associated directive from my Debian system is:
/dev/hdc /media/cdrecorder auto ro,users,noauto,unhide,exec 0 0
As you should already know, the first column is the CD/DVD drive
device file, and the second column is the default directory where the
drive is mounted. The third column specifies the filesystem, such as
ext3 or reiserfs. auto auto-detects the filesystem. subfs represents the Linux
removable-media-handling system and is most closely associated with
SUSE. The fourth column specifies the mount options, and that's the
focus for this annoyance. (For more information on the fifth and sixth
columns, which are rarely changed these days, see the
fstab manpage.) Examine the options described in
Table 1-9. This
table is not comprehensive, but is limited to options that may
contribute to problems unmounting a CD/DVD drive.
Table 1-9. Some /etc/fstab mount options
Option | Description |
|---|---|
| Generally, |
| Many distributions permit mounting
and unmounting by all users with the |
| A Red Hat innovation that supports mounting by all users. It works only for explicit mounting at the console. However, this does not prevent regular users from mounting automatically in the GUI, thanks to other options. |
| Limits mount access to a specific user. |
| Limits mount access to a specific group. |
| |
| Any directive with this parameter is rewritten by the fstab-sync command when you reboot. |
| Prevents execution of SUID or SGID scripts on the CD/DVD. |
| Supports reading of some hidden partitions, such as DVDs. |
With these options in mind, I recommend that you change the
directives associated with the CD/DVD drive in your
/etc/fstab to disallow mounts by regular users.
I'd change the SUSE Linux 9.3 directive to delete users access by user and group:
/dev/cdrecorder /media/cdrecorder subfs noauto 0 0
I'd change the Debian Sarge directive to delete regular user
access by removing the users and
uid options.
/dev/hdc /media/cdrecorder auto ro,noauto,unhide,exec 0 0
The situation with Red Hat Enterprise Linux 4/Fedora Core is different. The directive associated with the CD/DVD drive is governed by the relatively new Hardware Abstraction Layer daemon, using the storage-policy.fdi configuration file. On Fedora Core, this file is located in the /usr/share/hal/fdi/90systempolicy/ subdirectory; on Red Hat Enterprise Linux 4, it's located in the /usr/share/hal/fdi/90defaultpolicy/ directory.
By default, the user who owns the device file associated with the CD/DVD drive can also mount and unmount that drive. In other words, based on the following, the user michael, and no other regular user, is allowed to mount the CD/DVD drive associated with /dev/hdd:
$ ls -l /dev/hdd
brw------- 1 michael disk 22, 64 Jul 22 02:35 /dev/hdd
If the specified user is your regular account as an administrator, that's generally good enough for a server.
As an alternative to changing fstab, you can remove the following line from the noted storage-policy.fdi configuration file:
<merge key="storage.policy.default.mount_option.pamconsole" type="bool">true</merge>
When you restart the HAL daemon with the /etc/init.d/haldaemon restart command, not even the regular owner of the CD/DVD device file is allowed to mount that drive. Access is limited to the root user, and that's appropriate on a server.
Workstations should be configured differently from servers. One difference is in the way they handle removable media. Regular users expect CDs and DVDs to be automatically mounted when placed in their drives.
It's important that the applicable directives in /etc/fstab support access by normal users. Based on the directives from the previous section, I'd make sure at least the user option is included in the appropriate directive; the following example works on my SUSE Professional workstation:
/dev/cdrecorder /media/cdrecorder subfs noauto,users,gid=users 0 0
The following works well on a Debian Sarge workstation:
/dev/hdc /media/cdrecorder auto ro,users,noauto,unhide,exec 0 0
The situation is a bit different with Red Hat/Fedora workstations. The directive is acceptable as is; all you need to do is make sure the owner of the CD/DVD device file, such as /dev/hdc or /dev/hdd, is the primary user of the workstation.
GNOME provides removable device-management tools that are not affected by the options in /etc/fstab. For example, in the GNOME Desktop Environment, run the gnome-volume-properties command. This starts the Drives and Media Preferences tool, which allows you to control how GNOME reacts when you insert a CD/DVD into the drive. On a server, I recommend that you disable all automatic mounting.
There is no corresponding stable utility available on the KDE Desktop Environment; the last information I can find on the Kautorun software is from 2000. However, you can take advantage of the .kde/Autostart directory to create your own Autorun system on KDE. The Autorun system is available only on Red Hat distributions. The associated RPM doesn't work on SUSE Linux, so if you want Autorun on KDE for SUSE or Debian Linux, you'll have to compile it from the source code. To do so, take the following steps:
Download the latest source package from the Autorun project web site at http://sourceforge.net/projects/autorun/.
Unpack the package. For this example, I've downloaded it to my /home/michael directory, so I've run the following commands (substitute the version number for
versionnum):cd /home/michael tar xzvf autorun-
versionnum.tar.gzNavigate to the directory that's created; it's the autorun-
versionnumsubdirectory:cd autorun-
versionnumConfigure the source code; the local configure file is already set up as a script for this purpose:
./configure
Address any errors that may arise during the configuration process. I did not find any errors when I ran this command on my SUSE and Debian Linux workstations.
Run the following command as the root user (to make sure you have permissions and PATH access to appropriate directories) to compile the code:
make
You may get errors at this point because of other packages that you may need to install. Some educated guesses may be required. For example, on my Debian workstation, I installed the libxml-parser-perl package because of the following error message:
checking for XML::Parser... configure: error: XML::Parser perl module is required for
intltool
Some error messages are simpler; the following from my SUSE workstation led me to install the xmlto RPM (and several dependencies):
make[2]: xmlto: Command not found
Run the following command to install the compiled packages in appropriate locations:
make install
Pay attention to the final messages, which list the location of the Autorun.desktop script.
Copy the Autorun.desktop script to an appropriate location on desired users' home directories, and, if necessary, make sure ownership is appropriate:
cp /usr/local/share/autorun/Autorun.desktop /home/michael/.kde/Autostart/
chown michael.users /home/michael/.kde/Autostart/Autorun.desktop
Update the Autorun.desktop script to point to the actual location of the autorun command; when I compiled from source, it was copied to the /usr/local/bin directory. The next time you start KDE, it will automatically look for and mount any drive in your CD/DVD drive.
Remember to tell your users how they can unmount their drives—at least how they can right-click on the CD/DVD icon in their GUI desktops to bring up a menu that lets them unmount the drive. I describe this and other options in the next section.
As problems with a CD/DVD drive can vary, I provide a simple checklist of steps you can take. The first steps may seem elementary for geeks but are shown because we all forget the obvious sometimes:
If you're in the GUI, you may see an icon related to the CD/DVD drive. Right-click on it; on the menu that appears, you'll probably have an option such as "eject" or "umount." Click on the available option (if both are available, try "eject" first).
You may get an error message to the effect that the mounted volume is not in /etc/fstab (especially if you're not the root user). In that case, proceed to the next step.
Check to see if your CD/DVD drive is mounted. You can do so with the mount command (by itself). If you're not sure how your CD/DVD drive is mounted, check your /etc/fstab and /etc/auto.misc configuration files for clues.
It's certainly possible for another administrator to mount your CD/DVD drive on a different directory, which should show up in the output to the mount command.
You can get a more complete list of mounted devices from the /proc/mounts file.
Tip
If your system has mounted the CD through your /etc/auto.misc file, see "Regular Users Can't Mount the CD/DVD Drive" in Chapter 7.
If your drive is mounted on a directory defined by /etc/fstab (or another directory shown in the output from mount), try ejecting it. For example, if it's mounted on /media/cdrecorder, try the following command:
eject /media/cdrecorder
If your drive is automounted as configured in /etc/auto.misc, the eject command may not work. But after there's been no activity for a timeout defined in /etc/auto.master, the automounter automatically unmounts the drive.
If you get an error message such as:
umount: /media/cdrecorder: device is busy
you know that some process, local or remote, is trying to read the device. Before you unmount the CD/DVD, you'll need to somehow stop the process. Proceed to the next step.
Try unmounting the drive in question with a command such as the following. Remember, the umount command is spelled differently from the English-language word:
umount /media/cdrecorder
You can substitute the device to be unmounted. You may get an error message such as that described in the previous step. Otherwise, try pressing the button on your drive to see whether you can manually eject the disk.
If you're still having problems unmounting the drive, you should now try to identify the process that's reading the drive. That's where the list-open-files (lsof) command can help. It even shows files shared via Samba; for example, the following output from the lsof +D /media/cdrecorder command points to a remote user accessing your CD via Samba (the +D switch is key; without it, the command doesn't know where to start looking):
COMMAND  PID    USER   FD   TYPE DEVICE SIZE NODE NAME
smbd    4812 michael  cwd    DIR  22,64 2048 1856 /media/cdrecorder
The limitation of the lsof command is that it can't help you with files opened via a shared NFS directory.
If you've shared your CD/DVD via Samba, you can check if anyone has accessed any of your Samba shares with the smbstatus command.
If you've shared your CD/DVD via NFS, checking access is more problematic. The showmount -a command, in concert with the shares defined in /etc/exports, can only help you define the workstations that have accessed shares from your NFS server.
If there are current users on other workstations using your CD/DVD, warn them. You may need to use other means, such as Instant Messaging, to warn them that you're about to cut off all processes that access the CD/DVD. Then issue the following command as root:
fuser -km /media/cdrecorder
Sometimes the GUI just won't start. You've configured your /etc/inittab to boot Linux in a runlevel associated with the GUI. You may see a command-line login prompt for a very few seconds. You may get to a GUI Login Manager and enter the correct username and password, and the GUI Login Manager just reappears.
There are several possible causes of this failure:
The key packages associated with the GUI desktop environment aren't installed.
The configuration files aren't set to automatically start the GUI.
The X font server is not running.
Key directories are either full or missing.
In this annoyance, I limit coverage to the most popular desktop environments, KDE and GNOME.
If you can't start the GUI, you might have forgotten to install the associated packages. You could navigate to the package-management tool of your choice, but for Red Hat and Fedora's system-config-packages or pirut, that requires the GUI. If all you're familiar with on Debian is the Synaptic package manager, that requires the GUI. SUSE's YaST won't work if the /tmp directory is completely deleted. I'll describe what you can do in each of these cases.
Fedora Core Linux comes with an excellent command-line update system, known as the Yellowdog Updater, Modified, or yum for short. I'm assuming that the repositories specified in your /etc/yum.repos.d directory are up-to-date, as described in "Find the Right Update Repository" in Chapter 8.
There are two approaches that you can take with yum. One approach is to focus on a key package and make sure it's installed or up-to-date. Either of the following commands upgrades the noted package if it's already installed:
yum install gnome-desktop
yum install kdebase
Alternatively, you can focus on the package group. For example, if you want to install the KDE Desktop Environment on your system, the following command installs the default and mandatory packages from the associated package group, as defined in the comps.xml file in the /usr/share/comps/i386/ directory (if your architecture is different, substitute accordingly for i386):
yum groupinstall KDE
If you want to see a list of package groups, run the following command; you may want to pipe it to a pager such as more or less:
yum grouplist
If you're running Red Hat Enterprise Linux and need to install a GUI, you don't have the option of yum for updates from the Red Hat Network. You'll need to install the appropriate packages via the Red Hat Network. As the up2date utility also installs any dependent packages, the following commands will install the packages required for the GNOME and KDE Desktop Environments:
up2date -u gnome*
up2date -u kde*
If you need to install the GNOME or KDE desktop environments on Debian Linux, first make sure your apt databases are up-to-date with the following command. You may need to run it more than once if you get an error message, as the packages in some repositories may depend on others:
apt-get update
While there are no appropriately configured package groups for Debian Linux, you can take advantage of dependencies. Install critical packages with commands such as:
apt-get install gnome-desktop-environment
apt-get install kdebase
If you need to list packages associated with a desktop environment, you can use a command such as the following to get a full list:
apt-cache search kde
The associated list is long; you may want to pipe the output to a pager such as less or more. For more information on the apt commands, see "Avoid Dependency Hell with apt" in Chapter 8.
When you configure a desktop for ordinary users, you'll generally want to let them log directly in to the GUI. The "I Need a Custom Login Menu" annoyance, earlier in this chapter, illustrates how you can create a custom GUI login menu. You'll also need to make sure the boot system, as defined in /etc/inittab, starts you in a runlevel appropriate for the GUI.
Assuming you've installed the appropriate GUI login manager,
open the /etc/inittab file in a text editor.
Inspect the line with the id
directive. If you're running Debian Linux, make sure this directive
reads as follows:
id:2:initdefault
If you're running SUSE, Fedora Core, or Red Hat Enterprise
Linux, make sure the id directive
reads as follows:
id:5:initdefault
The X Font Server is important to the GUI only on Red Hat/Fedora distributions. If it isn't running, the X Window System won't start. If your system is configured to start in GUI runlevel 5, the screen will just flash for a while. If you try navigating to another console with the Alt-Ctrl-F2 keys, you'll see the console login prompt for a second or two.
After a couple of minutes, you'll see a blue screen with the following message:
I cannot start the X server (your graphical interface). It is likely that it is not set up
correctly. Would you like to view the X server output to diagnose the problem?
If you see the message, you're offered the opportunity to review the logfiles, and then a chance to start the Red Hat display tool. If the X Font Server is not running, the display tool won't start. If you refuse to restart X, Red Hat/Fedora disables the GUI and returns you to the command-line console.
If you can't get back to the command-line console, you'll have to reboot the computer and make sure to restart in a different runlevel. Generally, you can do so at the bootloader with the following steps:
Restart the computer. If necessary, use the power button.
At the bootloader, use the up or down arrow keys to stop the timer.
If a password is required, press
pand enter your GRUB bootloader password when prompted.Press
ato display the kernel command line. At the end of the line, enter the runlevel of your choice. For Red Hat/Fedora, this should be runlevel 3, which corresponds to full multiuser mode without the GUI.
Now you can start diagnosing problems with the X Font Server:
Make sure it's configured to run in runlevel 5 with the following commands:
chkconfig xfs on
chkconfig --list xfs
Make sure the X Font Server runs with the following command:
/etc/init.d/xfs restart
As the GUI depends on the X Font Server, this command won't work from the GUI.
If there are other problems with the X Font Server, do an Internet search based on the error messages.
As described in the next annoyance, the GUI depends on files stored in the /tmp directory. You'll see that the cron jobs that clear temporary files on a regular basis take care to exclude directories and files required to start the GUI.
If for some reason someone deletes the /tmp directory, users won't be able to start the GNOME or KDE desktops. The quickest solution is to re-create the directory with appropriate permissions:
mkdir /tmp
chmod 1777 /tmp
init 5
As you've seen throughout this chapter, key configuration files are stored in each user's home directory. If the partition with /home is full, the GUI won't be able to update those files, and it can't start. In that case, you may see an error message such as:
Fatal server error:
could not open default font 'fixed'
It's true that Linux could not start the X window because it couldn't open the default font. However, the problem is not related to the X Font Server just described; it's just a symptom of the lack of space on the aforementioned directories. The df command can tell you whether one or more critical partitions are full. What you do to make more space is up to you.
As with all annoyances in this book, there is more than one method available to solve problems. In this case, I'll show you how you can keep downloads to a minimum on our selected Linux distributions.
The basic premise is that, as an administrator, you've limited downloads to the /tmp directory. You can further limit user downloads with appropriate quotas as described in "Some User Is Taking Too Much Disk Space" in Chapter 10.
Alternatively, you can extend the scripts shown in this annoyance to the applicable subdirectories for each user.
You can configure the default download directories associated with Internet-related applications such as Firefox. I'll describe the options briefly in Chapter 3. For more information on customizing Firefox for consistent settings, see Firefox Hacks by Nigel McFarlane (O'Reilly).
Tip
There may be security vulnerabilities associated with the Linux tools that maintain /tmp. While I believe they've been addressed by the major distributions, the article on this subject is worth reading; it's available from: http://www.bindview.com/Services/Razor/Papers/2002/mkstemp.cfm.
The Red Hat/Fedora distributions configure the /usr/sbin/tmpwatch command to check various temporary directories and remove old files as part of a daily cron job in the /etc/cron.daily directory. tmpwatch is a script of three commands that look more complex than they are.
With the -x option, the first command excludes from consideration a number of directories essential to starting the GUI. Then it specifies that files older than 240 hours in the /tmp directory (other than those already excluded) will be deleted.
/usr/sbin/tmpwatch -x /tmp/.X11-unix -x /tmp/.XIM-unix -x /tmp/.font-unix -x /
tmp/.ICE-unix -x /tmp/.Test-unix 240 /tmp
The next command in the script deletes files older than 720 hours from the /var/tmp directory. This directory usually holds temporary configuration files associated with the KDE desktop environment.
/usr/sbin/tmpwatch 720 /var/tmp
The final command searches through caches of manpages. As a geek, you know that manpages are organized into nine different categories. When a manpage is loaded, it is stored in cache for easier retrieval. If you haven't accessed that manpage in 10 days (720 hours), the cache is purged by the following loop:
for d in /var/{cache/man,catman}/{cat?,X11R6/cat?,local/cat?}; do
 if [ -d "$d" ]; then
 /usr/sbin/tmpwatch -f 720 $d
fi
done
Remember that the ?
represents a wildcard for a single character, so the for directive shown covers the
/var/cache/man/cat1 through
/var/cache/man/cat9 directories.
SUSE Linux manages temporary files through a daily cron job in the /etc/cron.daily directory, known as suse.de-clean-tmp. It's a substantial script that depends on directives set in the /etc/sysconfig/cron configuration file. Generally, you won't need to change anything in the cron job; just modify the /etc/sysconfig/cron as needed. This configuration file includes the directives defined in Table 1-10.
Table 1-10. SUSE tmp management directives
Directive | Description |
|---|---|
| By default, SUSE sets this to
|
| By default, SUSE sets this to
|
| Normally set to /tmp. |
| Set to the directory of your choice; commonly used for /var/tmp. |
| Specifies the owner for files to be retained; commonly assigned to root, which retains the files in /tmp required for the GUI. |
| Normally set to |
| Configures re-creation of the
manpage database; normally set to |
| Deletes preformatted manpages, as
stored in /var/catman directory; normally
set to |
| Specifies a time after which preformatted manpages are deleted. |
| Deletes older databases of files created with the updatedb command; don't change unless you have installed the findutils-locate RPM. |
| Specifies a maximum age for file databases, in days. |
Debian Linux configures the /usr/sbin/tmpreaper command as part of a daily cron job in the /etc/cron.daily directory. It depends on settings that you can configure in /etc/tmpreaper.conf and /etc/default/rcS. I'll examine both the configuration files and the script.
The /etc/default/rcS file is key to a number of configuration files associated with the boot process. The default version of this file includes one related directive:
TMPTIME=0
This specifies the time that files are stored in
/tmp in days. The default of 0 specifies that files in
/tmp are stored per the TMPREAPER_TIME directive in
/etc/tmpreaper.conf.
Now examine the /etc/tmpreaper.conf configuration file, as that is where you can set the directives used in the /etc/cron.daily/tmpreaper cron job. This configuration file includes directives as defined in Table 1-11.
Table 1-11. Debian /etc/tmpreaper.conf management directives
Directive | Description |
|---|---|
| Related to the README.security.gz warning in the /usr/share/doc/tmpreaper directory. |
| If |
| Lets you specify file patterns to protect from deletion; some are already protected in the default tmpreaper cron job. |
| Specifies the directories to apply the tmpreaper cron job. |
| Sets additional options to pass to the tmpreaper command. |
These directives are applied to the tmpreaper cron job in the first few lines of the script. First, this stanza makes sure that the tmpreaper command exists:
if ! [ -x /usr/sbin/tmpreaper ]; then
exit 0
fi
The next stanza checks for and then uses the /etc/tmpreaper.conf configuration file:
if [ -s /etc/tmpreaper.conf ]; then
. /etc/tmpreaper.conf
fi
The script then checks key directives; the default TMPREAPER_TIME is seven days, and the
default TMPREAPER_DIRS is
/tmp.
TMPREAPER_TIME=${TMPREAPER_TIME:-7d}
TMPREAPER_PROTECT_EXTRA=${TMPREAPER_PROTECT_EXTRA:-''}
TMPREAPER_DIRS=${TMPREAPER_DIRS:-'/tmp/.'}
Finally, the script is run, with a lowered priority (courtesy of nice -n10) to help prevent this job from interfering with other running processes. It avoids deleting directories critical to the running of the Linux GUI.
In this annoyance, I describe the elementary utilities available to our major distributions for configuring sound cards. I then describe the utilities that can help you manage sound events. As this chapter is focused on the desktop, I focus on sound events associated with the GNOME and KDE desktop environments. I also focus on the Advanced Linux Sound Architecture (ALSA), which was incorporated into the current Linux kernel (2.6). If you need detailed information on support for your sound card, refer to ALSA's web site at http://www.alsa-project.org.
When your distribution detects a sound card, it may include commands for the appropriate modules in a file such as /etc/modprobe.conf, /etc/modules.conf, or /etc/modprobe.d/sound.
I've broken this annoyance into distribution-specific sections, followed by the tools associated with the GNOME and KDE desktop environments. You can control the sound environment for all users with the distribution-specific tools. Your users can control their individual sound settings with the GNOME and KDE-based tools.
All three distributions include the alsaconf utility. As you can run it from the console, it's not associated with any particular desktop environment. For more information, see the description of the utility later in this annoyance.
Immediately after the installation process, Red Hat/Fedora distributions normally test the sound card as part of the firstboot process. This process calls the system-config-soundcard utility. If it finds an ALSA-compliant sound card, it installs the card for you and allows you to check the result with a standard set of musical notes.
For more details on how you can configure ALSA-compliant sound cards, refer to the commands associated with the alsa-utils RPM. This package includes a number of utilities that can even help you configure and coordinate multiple sound cards.
As with most systems, SUSE encourages hardware configuration of sound cards with YaST. Sound configuration options are available when you start YaST, under the Hardware section.
If SUSE detects a sound card, it's listed in the YaST Sound Configuration menu. Alternatively, if the card wasn't properly detected, you may be able to configure it from the available database. In the YaST Sound Configuration menu, select the Add Sound Card option. You'll be able to select from a wide variety of sound-card vendors and associated hardware models.
YaST configures your sound card and adds the result to the /etc/modprobe.d/sound configuration file. Other important SUSE sound configuration files include /etc/modprobe.conf* and /etc/sysconfig/sound.
Debian includes the generic ALSA configuration tool, /usr/sbin/alsaconf. While available for the distributions covered in this book, it's the primary tool for Debian—part of the alsa-utils package. Install it, and it can help you configure just about any ALSA-compatible sound card. While you're at the installation process, make sure to download and install the alsa-source, alsa-base, and the libasound2 packages. As the database of ALSA drivers, the alsa-source package is especially important if you have a slightly obscure sound card.
Tip
The alsaconf tool is available as part of the alsa RPM in SUSE Linux; for Red Hat/Fedora, it's been superseded by system-config-soundcard.
When you start the ALSA configuration tool, take the following steps:
Stop all currently running applications that require sound, such as Real Player.
Start the ALSA configuration tool with the /usr/sbin/alsaconf command. When you click OK, it unloads any currently running ALSA kernel modules and loads the ALSA sound-card database.
The tool should find any ALSA-compatible cards. If you're not satisfied with the results, refer to the documentation and mailing lists at http://www.alsa-project.org/.
If you have a legacy sound card, select the legacy option. The steps that follow allow you to probe, using the drivers, for several different fairly generic sound cards.
Any special sound-card settings are saved to the /etc/modprobe.d/alsa-base file.
If you want to make sure any changes to sound settings are saved and reapplied the next time you boot Debian Linux, take the following steps:
Stop the ALSA service with the following command:
/etc/init.d/alsa stop
Use the dpkg-reconfigure command to reset the ALSA base parameters:
dpkg-reconfigure alsa-base
You'll be able to select from three options: to
always
            autosave
, toautosave once at next shutdown, or tonever autosave.If you select
always autosave, Debian Linux always saves your sound settings when it shuts down. The setting is saved as thealsactl_store_on_shutdowndirective in the /etc/default/alsa configuration file.
Now, you can adjust the default sound settings for your system. To do so, run the alsamixer command, which opens a console-based volume tool, as shown in Figure 1-9.
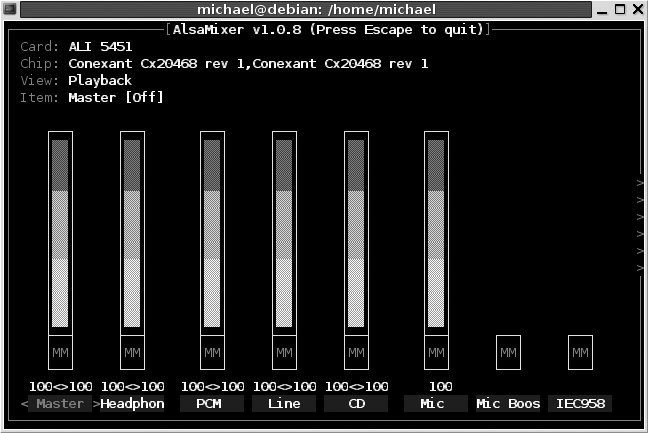
You can navigate among the options with the left and right arrow keys, and change volume levels with the up and down arrow keys. As shown in the figure, you can exit the utility with the Esc key.
Once you make changes, you'll need to run the following command to store the current sound level in /var/lib/alsa/asound.state:
alsactl store
GNOME sound events are managed through the Sound Preferences tool, which you can start with the gnome-sound-properties command. It's part of the capplets package in Debian, the control-center RPM on Red Hat/Fedora, and the control-center2 RPM on SUSE.
When you start this utility, you'll immediately see its value. As shown on the first tab, it determines whether the sound server is started when you log in to the GNOME Desktop Environment. It also allows you to activate Sounds For Events, as defined under the Sound Events tab. Many of these events require the gnome-audio RPM or DEB package.
The System Bell tab allows you to activate a sound for events such as errors. One standard is to activate the Sound An Audible Bell option. For hearing-impaired users, you can also activate visual feedback, which leads to a flash on the screen for sound events.
Sound-event settings are saved in gconf (GNOME Configuration) settings, described in the "Disabling Changes on GNOME" annoyance earlier in this chapter.
There are three tools associated with sound management on the KDE desktop, at least if you're looking for tools functionally equivalent to the GNOME Sound Preferences tool. They include the following:
- Sound System Configuration
You can start the KDE Sound System Configuration tool with the kcmshell arts command. It includes two tabs. The General tab allows you to enable the sound system and manage its relative priority. The Hardware tab allows you select and configure the audio and MIDI devices.
- System Bell Configuration
You can start the KDE System Bell Configuration tool with the kcmshell bell command. If you activate the system bell, it supersedes settings in the System Notifications Configuration tool.
- System Notifications Configuration
If you haven't activated the KDE system bell in the System Bell Configuration tool, you can customize sounds for different events. You can start the KDE System Notifications Configuration tool with the kcmshell kcmnotify command. It allows you to configure and customize sounds in several categories.
These tools are straightforward; they directly configure the sound settings on a per-user basis. Changes are written to several files in each user's ~/.kde/share/config directory.