Chapter 5. Deploying Automated Machine Learning Models
Microsoft Azure Machine Learning enables you to manage the life cycle of your machine learning models. After you have trained the models by using Azure Machine Learning’s automated ML tool, you can retrieve the best model identified, and register the model with Azure Machine Learning. Model registration enables you to store varying versions of models in the machine learning workspace and makes it possible for you to easily deploy the models to different target environments.
In this chapter, we explore how to use Azure Machine Learning to do the following:
-
Register the best model produced by automated ML.
-
Specify and develop the scoring file. The scoring will be included as part of the container images that will be generated.
-
Deploy the models to Microsoft Azure Container Instances (ACI) and Azure Kubernetes Service (AKS).
-
Troubleshoot failures during model and web service deployments.
Deploying Models
In Chapter 3, you learned how to build a machine learning model using automated ML. In this section, you’ll learn how to register and deploy the best model that is identified by automated ML. Azure Machine Learning supports a rich set of deployment environments, ranging from REST APIs hosted in Azure, to models deployed to different edge devices and hardware. These environments include the following:
-
Azure Machine Learning Compute
-
ACI
-
AKS
-
Azure IoT Edge
Tip
To learn more about the up-to-date list of deployment options that are supported by Azure Machine Learning, go to the Microsoft page about deploying models.
Now, let’s walk through the steps that you will use to register, deploy, and test the best models that have been produced by automated ML:
-
Retrieve the best model.
-
Register the model.
-
Create the container image.
-
Deploy the model to a test environment, then test it.
-
Deploy the model to production.
Because the steps for deploying a model to the different environments are similar, we focus on deployment to ACI.
To get started with model deployment, you need one or more trained machine learning models. If you do not have a trained model yet, you can follow the steps described in the sample notebook (in this book’s GitHub repository) to train a simple regression model for predictive maintenance. The code for creating an automated ML run and submitting the experiment using an AutoMLConfig object is as follows:
Automl_config=AutoMLConfig(task='regression',primary_metric='r2_score',iteration_timeout_minutes=15,iterations=10,max_cores_per_iteration=1,preprocess=False,experiment_exit_score=0.985,X=X_train,y=y_train,X_valid=X_valid,y_valid=y_valid,debug_log='automl_errors.log',verbosity=logging.ERROR,path=project_folder)# Training the predictive maintenance model using AutoMLexperiment=Experiment(ws,experiment_name)local_run=experiment.submit(Automl_config,show_output=True)
After the experiment has completed successfully (see Figure 5-1), you’ll have access to the local_run object that you will use to register the model.
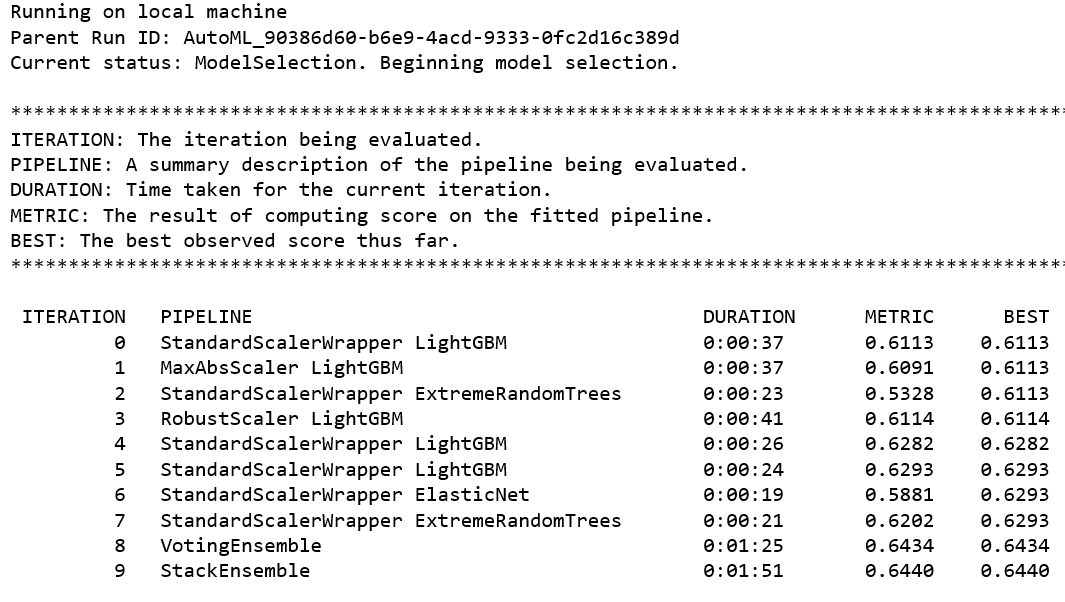
Figure 5-1. Output from an automated ML experiment
Note
The sample notebook for using automated ML to build and deploy the predictive maintenance model discussed in this chapter is available at https://bit.ly/2k2e6VC.
The predictive maintenance model uses the NASA turbofan failure dataset. More details on the dataset are available at https://go.nasa.gov/2J6N1eK.
Registering the Model
Before you register the trained model, you can use the get_output() function to find out more about the run that corresponds to the best-performing model. The get_output() function returns both the best run as well as the corresponding fitted model.
Note
What types of machine learning model can you register? You can register Python or R models using Azure Machine Learning, as well as models that have been trained using Azure Machine Learning, or pretrained models that are available externally.
Figure 5-2 shows the output from running the code block that follows. You will notice that under the hood, a regression pipeline is created. The regression pipeline consists of several steps: StackEnsembleRegressor, StandardScalerWrapper, and LightGBMRegressor). Notice that the number of folds for cross-validation is set to 5:
best_run,fitted_model=local_run.get_output()(best_run)(fitted_model)
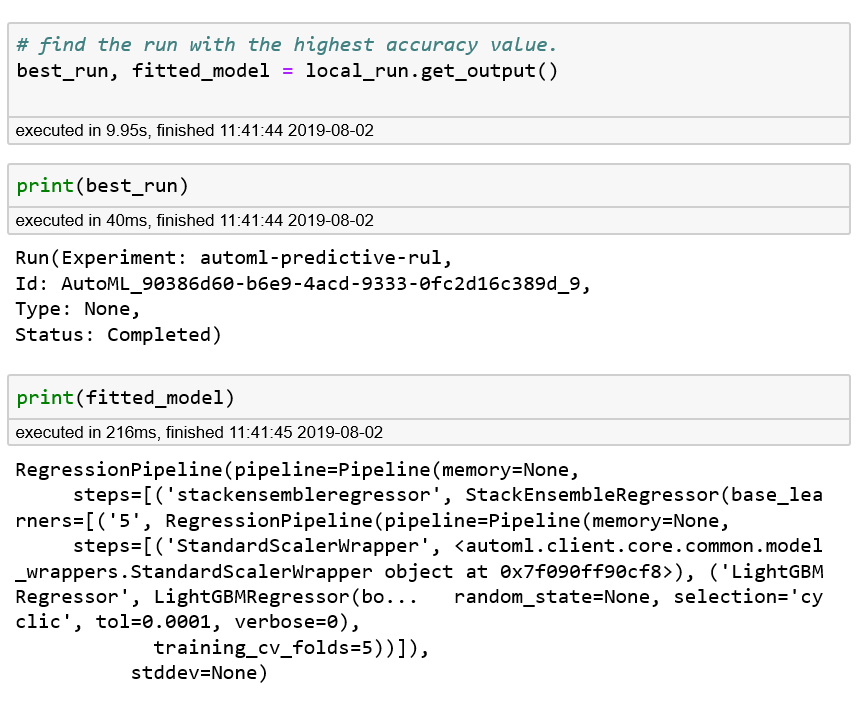
Figure 5-2. Retrieving the best run, and details of the corresponding fitted model
You are now ready to register the model. First, you specify the descriptions and tags for the model, and use the register_model() function to register the model with Azure Machine Learning. By registering the model, you are storing and versioning the model in the cloud.
Each registered model is identified by its name and version. When you register a model (with the same name) multiple times, the registry will incrementally update the version for the model stored in the registry. Metadata tags enable you to provide more information about the models that you are registering with the model registry. You can search for the model using the metadata tags that are provided when the model is registered.
After you have registered the model, you can get the model’s identifier. In the following code, you retrieve the identifier using local_run.model_id (Figure 5-3 shows the output of running the code):
# Register best model in workspacedescription='AutoML-RUL-Regression-20190510'tags=Nonemodel=local_run.register_model(description=description,tags=tags)(local_run.model_id)
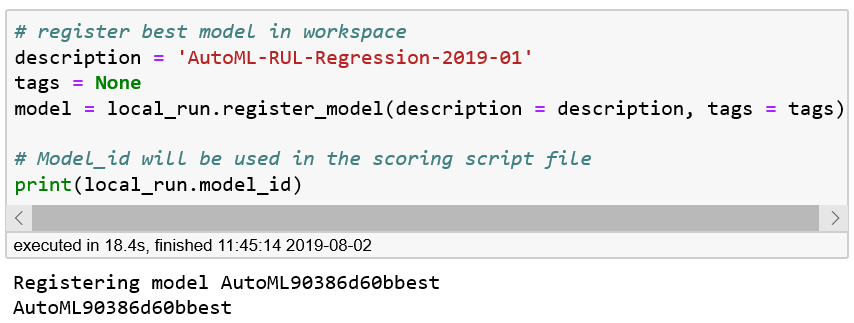
Figure 5-3. Getting the identifier for the model registered with Azure Machine Learning
So far, you have learned how to use the register_model() function to register a model that has been trained with Azure Machine Learning. You might have trained a model without using Azure Machine Learning or obtained a model from an external model repository (or model zoo). For example, to register the MNIST Handwritten Digit Recognition ONNX model provided in this repo, you can use Model.register() to register it by providing a local path to the model. The following code shows how to do this:
onnx_model_url=https://onnxzoo.blob.core.windows.net/models/opset_1/mnist/mnist.tar.gzurllib.request.urlretrieve(onnx_model_url,filename="mnist.tar.gz")!tarxvzfmnist.tar.gzmodel=Model.register(workspace=ws,model_path="mnist/model.onnx",model_name="onnx_mnist",tags={"onnx":"automl-book"},description="MNIST ONNX model",)
Tip
You can find out more about the Model class on Microsoft’s Models documentation page.
Creating the Container Image
Next, we work toward deploying the model as a REST API. Azure Machine Learning helps you create the container image. The container image can be deployed to any environment where Docker is available (including Docker running on-premises). In this chapter, you’ll learn how to deploy and serve the model by using either ACI or AKS.
To do this, you will need to create a scoring file (score.py) and the YAML file (myenv.yml). The scoring file is used for loading the model, making the prediction, and returning the results when the REST API is invoked. In the scoring file, you will notice that two functions need to be defined: init() and run(rawdata).
The init() function is used to load the model into a global model object. When the Docker container is started, the function is run only once. The run() function is used to predict a value based on the input data that is passed to it. Because this code is mostly used in a web service, the input that is passed via rawdata is a JSON object. The JSON object needs to be deserialized before you pass it to the model for prediction, as shown in the following code:
%%writefilescore.pyimportpickleimportjsonimportnumpyimportazureml.train.automlfromsklearn.externalsimportjoblibfromazureml.core.modelimportModeldefinit():globalmodel# This name is model.id of model that we want to deploymodel_path=Model.get_model_path(model_name='<<modelid>>')# Deserialize the model file back into a sklearn modelmodel=joblib.load(model_path)defrun(input_data):try:data=json.loads(input_data)['input_data']data=np.array(data)result=model.predict(data)returnresult.tolist()exceptExceptionase:result=str(e)returnjson.dumps({"error":result})
After the code is run, the content will be written to a file called score.py. Figure 5-4 shows the output from running the code. We will replace the value for <<modelid>> in a later step with the actual model identifier value from local_run.model_id.
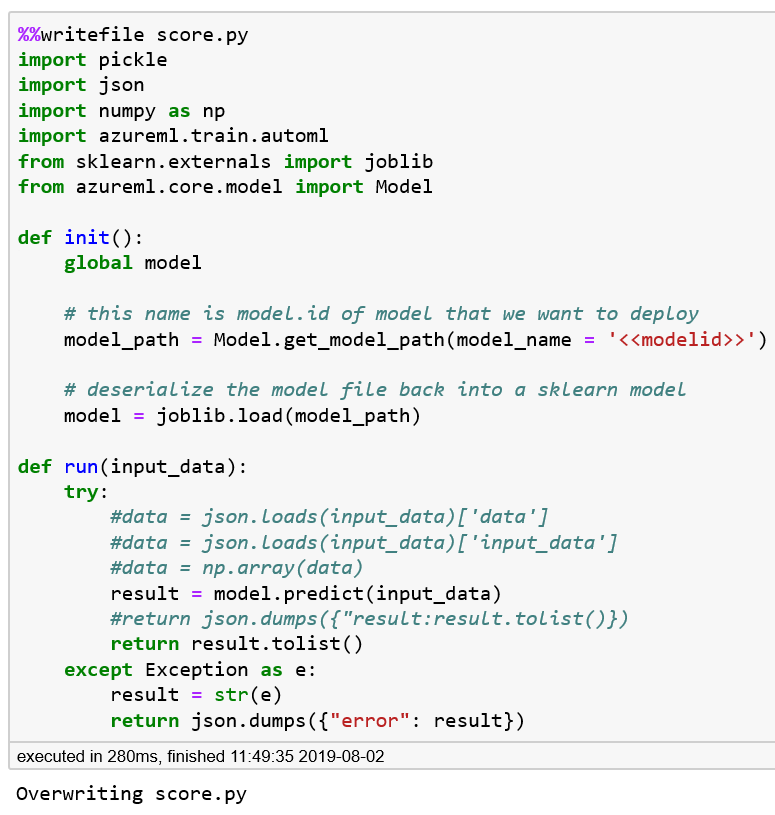
Figure 5-4. Creating the scoring file—score.py
After the scoring file has been created, we identify the dependencies from the run and create the YAML file, as demonstrated in the following code (Figure 5-5 shows the output from running the code):
experiment=Experiment(ws,experiment_name)ml_run=AutoMLRun(experiment=experiment,run_id=local_run.id)dependencies=ml_run.get_run_sdk_dependencies(iteration=0)forpin['azureml-train-automl','azureml-sdk','azureml-core']:('{}\t{}'.format(p,dependencies[p]))
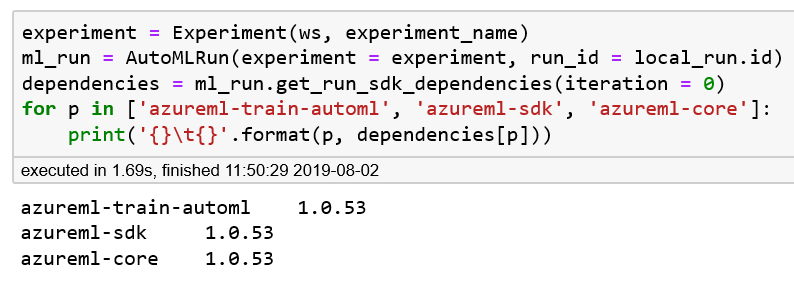
Figure 5-5. Retrieving the version of the Azure Machine Learning SDK
After you have identified the dependencies, you can create the YAML file with all of the dependencies specified by using the function CondaDependencies.create(). The function creates the environment object and enables you to serialize it to the myenv.yml file by using the function save_to_file(). Figure 5-6 shows the output from running the following code:
fromazureml.core.conda_dependenciesimportCondaDependenciesmyenv=CondaDependencies.create(conda_packages=['numpy','scikit-learn','lightgbm'],pip_packages=['azureml-sdk[automl]'])conda_env_file_name='myenv.yml'myenv.save_to_file('.',conda_env_file_name)
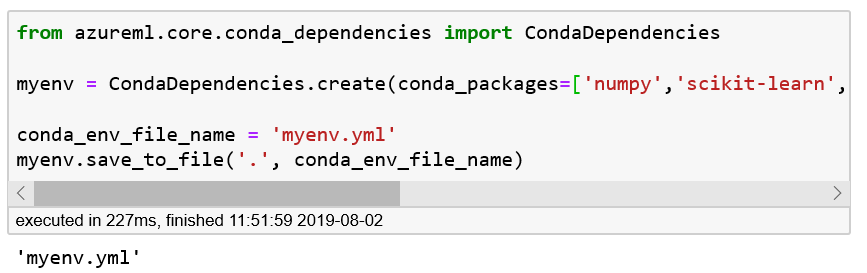
Figure 5-6. Creating the environment YAML file—myenv.yml
Now that we have created both the scoring and environment YAML files, we can update the files’ content with the version of the Azure Machine Learning SDK and model identifier that we obtained earlier. The following code reads the file, replaces the affected values, and writes it back to disk:
withopen(conda_env_file_name,'r')ascefr:content=cefr.read()withopen(conda_env_file_name,'w')ascefw:cefw.write(content.replace(azureml.core.VERSION,dependencies['azureml-sdk']))# Substitute the actual model id in the script file.script_file_name='score.py'withopen(script_file_name,'r')ascefr:content=cefr.read()withopen(script_file_name,'w')ascefw:cefw.write(content.replace('<<modelid>>',local_run.model_id))
With the values now replaced, you’re ready to configure and create the container images, which will be registered with the ACI. In the configuration of the container image, using the function ContainerImage.image_configuration(), you specify the runtime used, the environment file that provides the Conda dependencies, metadata tags, and a description for the container image.
When you invoke Image.create(), Azure Machine Learning builds the container image, and registers the container image with the ACI. Running the container creation code (from “Creating image” to “Running”) usually takes several minutes. By using image.creation.status, you can learn whether the image creation was successful. Figure 5-7 shows the output from running the following code and verifying that the container creation is successful:
fromazureml.core.imageimportImage,ContainerImageimage_config=ContainerImage.image_configuration(runtime="python",execution_script=script_file_name,conda_file=conda_env_file_name,tags={'area':"pred maint",'type':"automl_regression"},description="Image for AutoML Predictive maintenance")image=Image.create(name="automlpredmaintimage",models=[model],image_config=image_config,workspace=ws)image.wait_for_creation(show_output=True)ifimage.creation_state=='Failed':("Image build log at: "+image.image_build_log_uri)
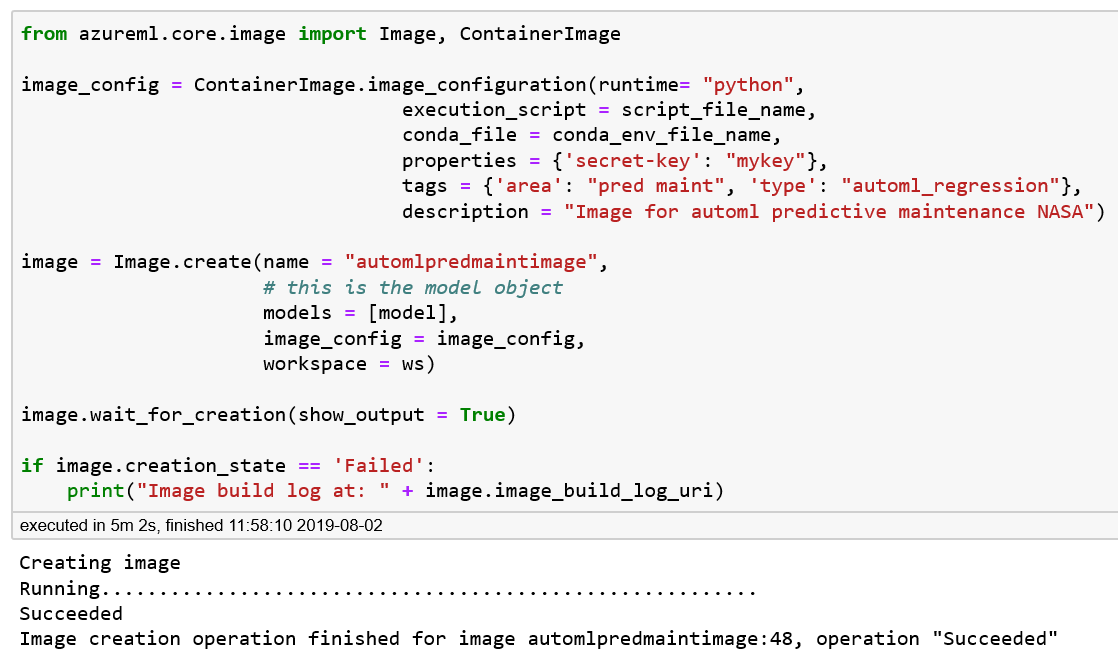
Figure 5-7. Creating the Docker container for the predictive maintenance model
Deploying the Model for Testing
After the Docker container images have been created successfully, you are ready to deploy the model. You can deploy the container to any environment in which Docker is available (including Docker running on-premises). These include Azure Machine Learning Compute, ACI, AKS, IoT Edge, and more. Begin by deploying the Docker container to ACI for testing. For this deploy, do the following:
-
Specify the deploy configuration.
-
Deploy the Docker image to ACI.
-
Retrieve the scoring URI.
The AciWebservice class is used to specify the deploy configuration. First, we specify this for the ACI web service. In the following code, we specify a configuration that uses one CPU core with 2 GB of memory. In addition, we add metadata tags as well as a description:
fromazureml.core.webserviceimportAciWebserviceaciconfig=AciWebservice.deploy_configuration(cpu_cores=1,memory_gb=2,tags={"data":"RUL","method":"sklearn"},description='Predict RUL with Azure AutoML')
Next, we use the Webservice class to deploy the Docker image to the ACI. We use wait_for_deployment(True) after invoking deploy_from_image(). This requires you to wait for the completion of the web service deployment to ACI. When this is done, we print the state of the ACI web service. Figure 5-8 shows the output from running the following code:
fromazureml.core.webserviceimportWebserviceaci_service_name='automl-book-pred-maint'(aci_service_name)aci_service=Webservice.deploy_from_image(deployment_config=aciconfig,image=image,name=aci_service_name,workspace=ws)aci_service.wait_for_deployment(True)(aci_service.state)
Note
The Webservice class provides various functions for deployment, including deployment from the image (what we’re using here) and from the Model object, building and deploying a model locally for testing, and more. To learn how to use the various functions from the WebService class, see the Microsoft documentation page.
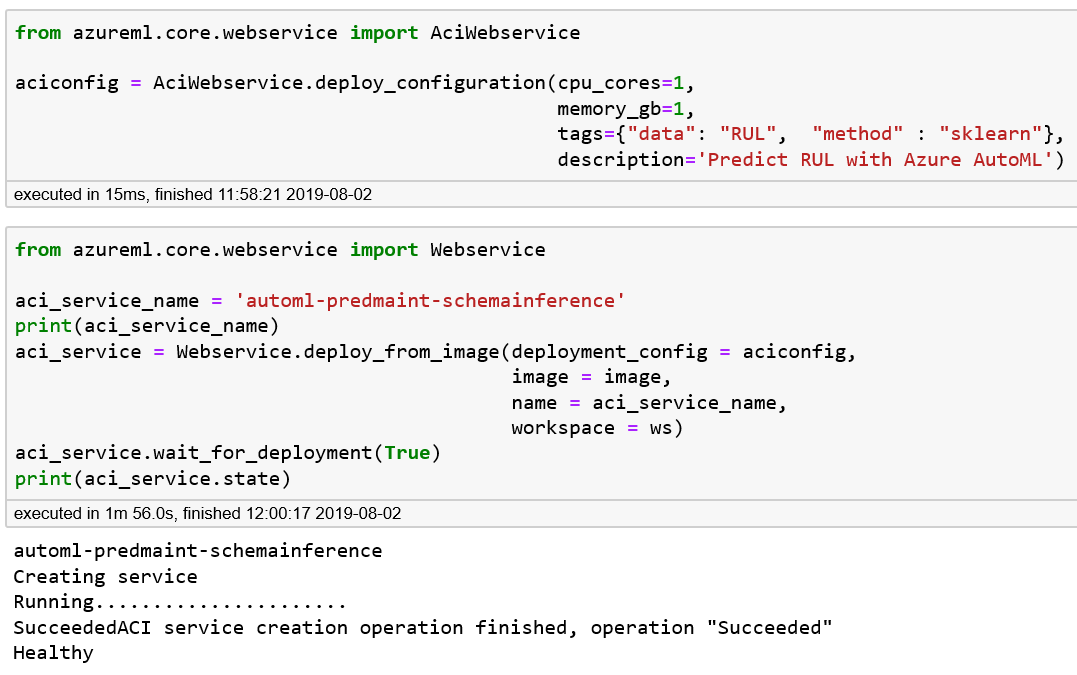
Figure 5-8. Deploying the web service to ACI and checking that the operation completed
Tip
Here you’re learning how to use the Azure Machine Learning SDK for deploying the models created by automated ML. Azure Machine Learning supports deployment of models using the Azure CLI, via the command az ml model deploy. To learn how to do that, refer to this Microsoft Azure documentation page.
After the ACI service deployment is complete, you will be able to use the Azure portal to see the deployment. When an ACI–based web service is created, you will notice the following:
-
A deployment is created in the Azure Machine Learning workspace (see Figure 5-9).
-
When an ACI instance is created for the deployment, two containers are deployed:
azureml-fe-aci(ACI frontend for Azure Machine Learning that includes AppInsights logging), and a container (with the name that is provided during deployment) that includes the scoring code.
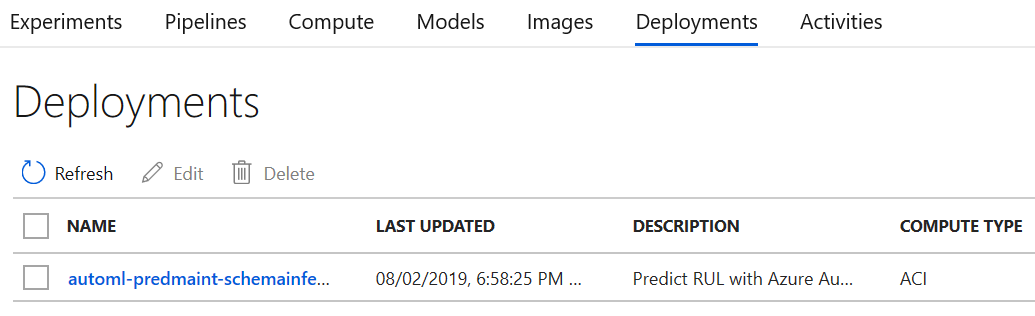
Figure 5-9. Azure portal—verifying that the deployment to ACI is complete
Using the Azure portal, you can navigate to the ACI created and click Containers. You will see the two aforementioned containers. Click the container for scoring and then click Logs. You can observe the received input and how it is processed. You can also connect to the container by clicking the Connect tab. For the Start Up Command, choose /bin/bash, and then click Connect.
If you navigate to /var/azureml-app, you will find the files that you have been specified during deployment (e.g., score.py) as well as other supporting files needed for enabling the web service to be instantiated.
Once the deployment from the image is successful, you’ll have a scoring URI you can use to test the deployed model:
(aci_service.scoring_uri)
Figure 5-10 shows the scoring URI for the web service that is created.

Figure 5-10. Scoring URI for the new web service
Using the Azure portal, you can also dive deeper into the deployment log, or use the portal to connect to the container that is running. Figure 5-11 shows the deployed containers in the ACI.
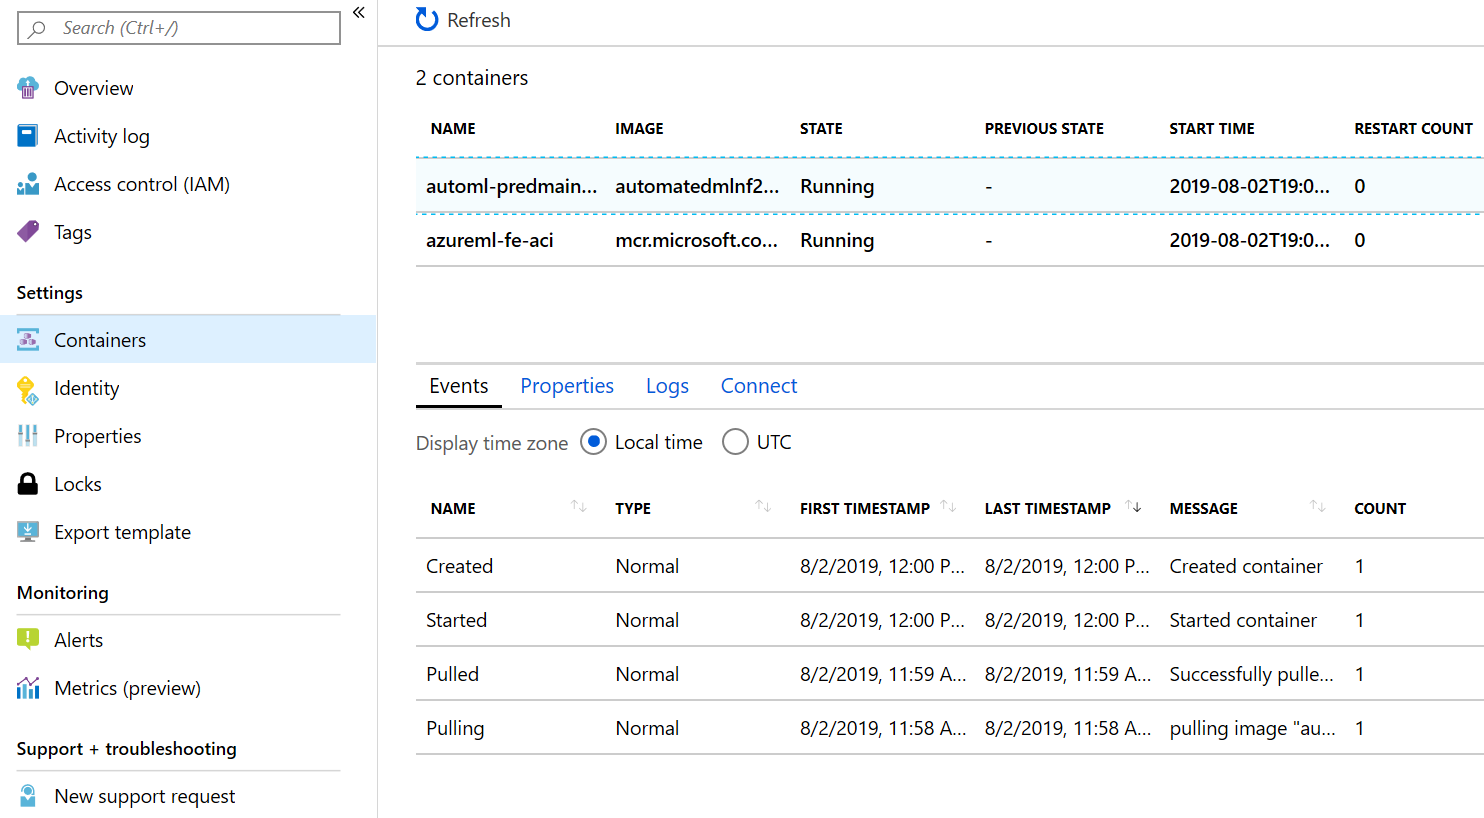
Figure 5-11. Azure portal showing the deployed container instance
Figure 5-12 shows the processes that are running in the deployed container.

Figure 5-12. Connecting to the running container
Testing a Deployed Model
With the web service deployed to ACI, you are now ready to test the web service. To do this, you randomly identify a row from X_test. X_test contains the test rows from the NASA data. You then construct the JSON payload, and perform a POST to the scoring URI, which returns the result. Figure 5-13 shows the output from running the following code:
importrequestsimportjson# Send a random row from the test set to scorerandom_index=np.random.randint(0,len(X_test)-1)X_test_row=X_test[random_index:(random_index+1)]Y_test_row=y_test[random_index:(random_index+1)]input_data="{\"input_data\": "+str(X_test_row.values.tolist())+"}"headers={'Content-Type':'application/json'}resp=requests.post(aci_service.scoring_uri,input_data,headers=headers)("POST to url",aci_service.scoring_uri)("input data:",input_data)("label:",Y_test_row)("prediction:",resp.text)(resp.status_code)(requests.status_codes._codes[resp.status_code])

Figure 5-13. Testing the ACI web service by using the NASA dataset
Notice in this example that we are sending a POST request directly to the scoring URI. Because the web service is backed by an ACI instance, authentication is not enabled. Deploying models to ACI is good for quickly deploying and validating your models as well as testing a model that is still in development.
Deploying to AKS
For production deployment, consider deploying the models to AKS. To do that, you will need to create an AKS cluster. You can either use the Azure CLI or Azure Machine Learning SDK to create the cluster. After you create the AKS cluster, you can use it to deploy multiple images.
Let’s start by creating the AKS cluster by using the following code:
fromazureml.core.computeimportAksCompute,ComputeTarget# Use the default configuration# You can also customize the AKS cluster based on what you needprov_config=AksCompute.provisioning_configuration()aks_name='myaks'# Create the clusteraks_target=ComputeTarget.create(workspace=ws,name=aks_name,provisioning_configuration=prov_config)# Wait for the AKS cluster to complete creationaks_target.wait_for_completion(show_output=True)
After you’ve created the AKS cluster, you can deploy the model to the service. In the following code, notice that we are specifying the AKS cluster that we have created as a deployment_target:
fromazureml.core.webserviceimportAksWebserviceaks_service_name='aks-automl-book-pred-maint'(aks_service_name)aks_target=AksCompute(ws,"myaks")aks_service=AksWebservice.deploy_from_image(image=image,name=aks_service_name,deployment_target=aks_target,workspace=ws)aks_service.wait_for_deployment(True)(aks_service.state)
With the model deployed to AKS, you will need to specify the service key in the header of the request before being able to invoke the scoring URI. To do that, let’s modify the test scoring code that you developed earlier:
importrequestsimportjson# Send a random row from the test set to scorerandom_index=np.random.randint(0,len(X_test)-1)X_test_row=X_test[random_index:(random_index+1)]Y_test_row=y_test[random_index:(random_index+1)]input_data="{\"input_data\": "+str(X_test_row.values.tolist())+"}"# For AKS deployment you need the service key in the header as wellheaders={'Content-Type':'application/json'}api_key=aks_service.get_keys()[0]headers={'Content-Type':'application/json','Authorization':('Bearer '+api_key)}resp=requests.post(aks_service.scoring_uri,input_data,headers=headers)("POST to url",aks_service.scoring_uri)("input data:",input_data)("label:",Y_test_row)("prediction:",resp.text)(resp.status_code)
Swagger Documentation for the Web Service
After you have deployed the machine learning web service to various compute environments, it is important to provide good documentation describing how to use the APIs. This helps to accelerate development of applications that depend on the APIs for prediction. Because the machine learning APIs that you need to manage will evolve over time (especially during development), it is important to keep the documentation up-to-date.
Swagger is an open source software framework that is used by many developers who are designing, developing, and documenting RESTful web services. Swagger documentation makes it easy for a developer to quickly describe and document the inputs and outputs of a web service. Swagger documentation has evolved over the years to become a common way of describing RESTful APIs. Having autogenerated Swagger documentation helps to ensure that up-to-date information is always available when you deploy your machine learning model and make it available as a web service.
When you deploy a model using Azure Machine Learning, you can use the Python inference-schema package when creating the scoring file. The inference-schema package allows you to add function decorators that enable Swagger documentation to be generated as well as enforce the schema types.
First, import the relevant classes from the inference-schema package, as follows:
frominference_schema.schema_decoratorsimportinput_schema,output_schemafrominference_schema.parameter_types.numpy_parameter_typeimportNumpyParameterType
After you have imported the various classes, you can specify the input and output schema, by providing the input_schema and output_schema as decorators for the run() function. The sample input and output data is provided as part of the input_sample and output_sample variables:
@input_schema('input_data',NumpyParameterType(input_sample))@output_schema(NumpyParameterType(output_sample))
The following code shows the score.py file, with the decorators specified:
%%writefilescore.pyimportpickleimportjsonimportnumpyasnpfromsklearn.externalsimportjoblibimportazureml.train.automlfromazureml.core.modelimportModelfrominference_schema.schema_decoratorsimportinput_schema,output_schemafrominference_schema.parameter_types.numpy_parameter_typeimportNumpyParameterTypedefinit():globalmodel# Identifier for the model (model.id) to be deployedmodel_path=Model.get_model_path(model_name='<<modelid>>')# Deserialize the model file back into a sklearn modelmodel=joblib.load(model_path)X_test_row=np.array([[-0.0006,−0.0004,100.0,518.67,642.25,1589.25,1412.42,14.62,21.61,553.88,2388.15,9043.21,1.3,47.45,521.88,2388.18,8131.61,8.4807,0.03,392.0,2388.0,100.0,38.6,23.2946]])input_sample=X_test_rowoutput_sample=np.array([120.0])@input_schema('input_data',NumpyParameterType(input_sample))@output_schema(NumpyParameterType(output_sample))defrun(input_data):try:result=model.predict(input_data)returnresult.tolist()exceptExceptionase:result=str(e)returnjson.dumps({"error":result})
After you have the score.py file defined and the model deployed, you can retrieve the Swagger using the Swagger URI, using print(aci_service.swagger_uri).
This enables you to download the file swagger.json, which contains the Swagger documentation for the API. For an example of the swagger.json generated, visit this book’s GitHub repository. You can also generate the documentation by importing the API using SwaggerHub.
Debugging a Deployment
As you work toward deploying your machine learning models to various compute environments (e.g., ACI, AKS), you might encounter situations in which the deployment fails (e.g., container terminated) or the scoring API is not returning the results you are expecting. In this section, we cover some common deployment failures and show you how to resolve them.
Web Service Deployment Fails
After a container image is created and you deploy the image using Webservice.deploy_from_image(), the ACI deployment might fail and the web service will not be available. As a result, you might see the following error message:
[test]

FailedACI service creation operation finished, operation "Failed"
Service creation polling reached terminal state, current service state: Failed
{
  "code": "AciDeploymentFailed",
   "message": "Aci Deployment failed with exception: Your container application
   crashed. This may be caused by errors in your scoring file's init() function.
   Please check the logs for your container instance automl-book-pred-maint2.
   You can also try to run image
   automatedmlnf2e4863f.azurecr.io/automlpredmaintimage-bug:1 locally.
   Please refer to http://aka.ms/debugimage for more information.",
   "details": [
   {
      "code": "CrashLoopBackOff",
      "message": "Your container application crashed. This may be caused by
      errors in your scoring file's init() function.
      \nPlease check the logs for your container instance
                                                automl-book-pred-maint2.
      \nYou can also try to run image
      automatedmlnf2e4863f.azurecr.io/automlpredmaintimage-bug:1 locally.
      Please refer to http://aka.ms/debugimage for more information."
   }
 ]
}
Failed
To debug what caused the service creation to fail, download the container image using the URI provided in the error message. At the same time, you can use the Azure portal to investigate. Navigate to the resource group where the Azure Machine Learning workspace has been created, and find the ACI that corresponds to the service you’re creating. Figure 5-14 shows an example of the ACI. To investigate, do the following:
-
In the pane on the left, click Containers.

Figure 5-14. The container instance (automl-book-pred-maint2) to which the container image is deployed
-
Click the container that displays the state as Waiting, and the previous state as Terminated, as shown in Figure 5-15.
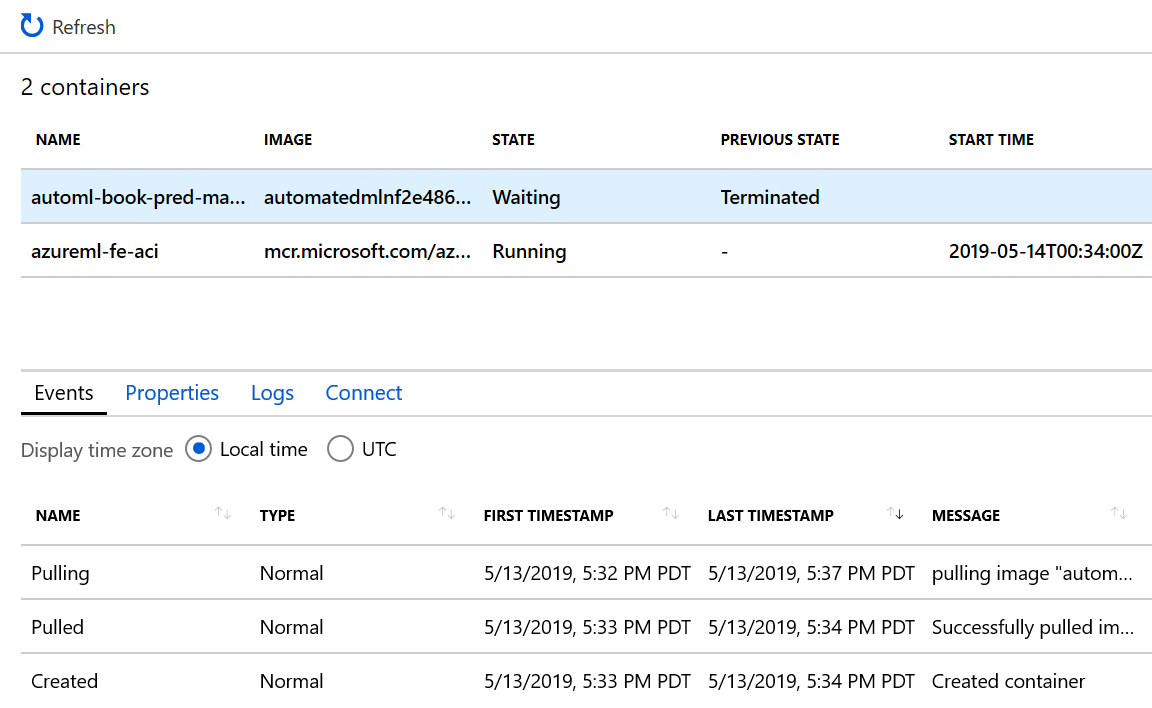
Figure 5-15. Investigating a terminated container in ACI
-
Click the Logs tab, and you will see the logs and the errors causing the container to fail to boot, as depicted in Figure 5-16.
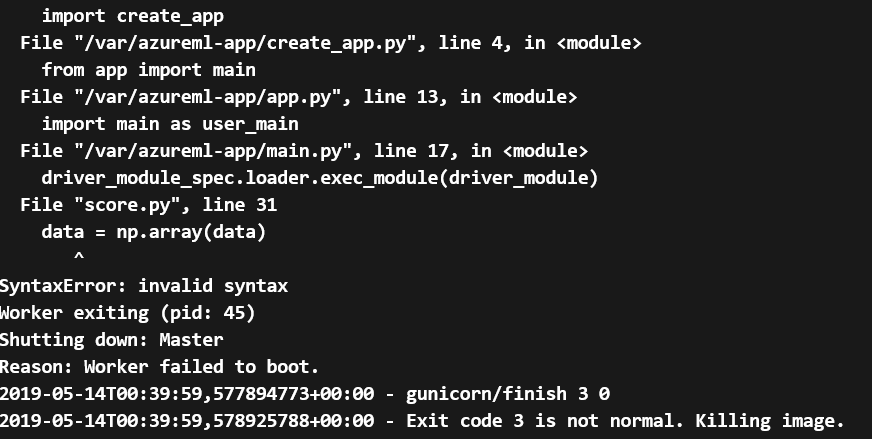
Figure 5-16. Error causing the container to fail to start
Tip
To learn how to troubleshoot Azure Machine Learning AKS and ACI deployments, see this Microsoft documentation page on the topic.
Conclusion
In this chapter, you learned how to register, deploy, and test the models produced by automated ML to ACI. You also learned how to specify the input and output schema for the web service so that you can generate Swagger documentation. Sometimes you might have a buggy scoring script that causes deployment to fail, and containers might fail to start. For these circumstances, you learned how to use the Azure portal as well as the Azure Machine Learning Python SDK to debug a failed deployment.