Chapter 8. Automated ML for Developers
Earlier, you learned how to use the automated ML tool in Azure Machine Learning with Jupyter Notebooks. In this chapter, you’ll learn how to use automated ML in other environments: Azure Databricks, ML.NET, and SQL Server.
Azure Databricks and Apache Spark
Azure Databricks is a fast, easy, and collaborative Apache Spark–based analytics platform. It is a managed Spark service in Azure and integrates with various Azure services. This means that Azure manages not only the Spark cluster nodes, but also the Spark application running on top of it. It has other helpful features, as follows:
-
Azure Databricks, with its goal of improving productivity for users, is designed to be scalable, secure, and easy to manage. It has a collaborative workspace, shared among users who have appropriate permissions. Users can share multiple notebooks, clusters, and libraries from within the workspace.
-
The Azure Databricks workspace is a single place where data engineers, data scientists, and business analysts can work with all of the required libraries. The data sources can be available in the same workspace as well.
-
In an Azure Databricks workspace, authentication and authorization is based on a user’s Azure Active Directory (Azure AD) login. Important from a governance perspective is that it’s easy to add or remove a user from the Azure Databricks workspace, and users can be given different permissions, as a reader, contributor, or owner. And it’s important from a security perspective that an Azure Databricks cluster deploys in Azure Virtual Network by default and it can be changed to a customer’s VNet.
Apache Spark is currently the most popular open source analytics engine for big data processing. You can use Scala, Python, R, or SQL to write Spark-based applications. It’s also fast: with Spark, you can improve performance 10 to 100 times over traditional big data technologies because it does some computation in memory instead of reading data from disk. As shown in Figure 8-1, Spark offers powerful libraries like MLlib for distributed machine learning, and Spark SQL for distributed SQL and other libraries on top of the core Spark application.
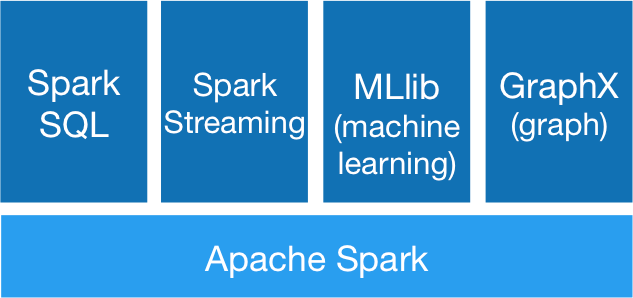
Figure 8-1. Apache Spark stack (source: https://spark.apache.org/)
We’ll begin by creating a workspace via the Azure portal (Figure 8-2).
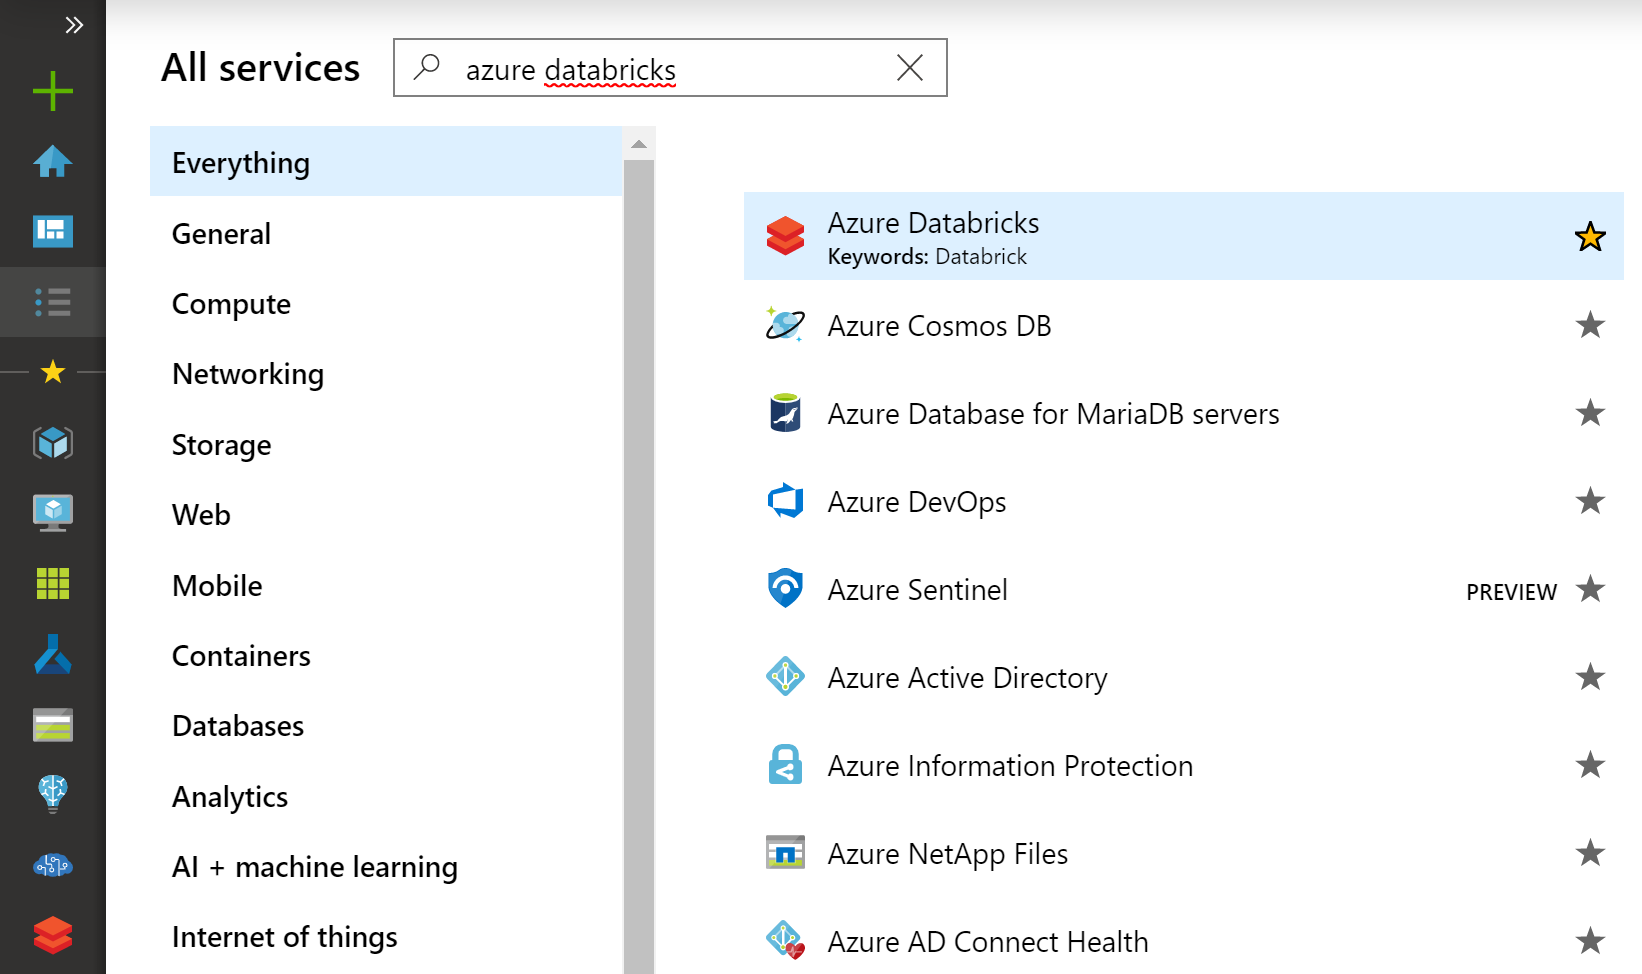
Figure 8-2. The Azure portal
You can search for Azure Databricks or use the Analytics menu option (Figure 8-3).

Figure 8-3. Search for Azure Databricks in the Azure portal
Figure 8-4 shows the options for creating the workspace.

Figure 8-4. Provide details in the Azure Databricks pane
The workspace setup process only takes about a minute:
-
Name the workspace and select the appropriate Azure subscription.
-
Create a new resource group, or an existing resource group.
-
Select a region that will host this workspace. It should have enough quota assigned for your subscription.
-
Select the pricing tier. For this exercise, select Premium.
-
Keep Custom VNET set to No.
Once this is done, the overview page opens, as shown in Figure 8-5.

Figure 8-5. Overview of the Azure Databricks resource
From the overview page, click Launch Workspace to open the Azure Databricks workspace page, shown in Figure 8-6. This workspace will have our cluster, notebooks, and related assets. This workspace can be the central place for people who want to run notebooks to do advanced analytics with your data. As we mentioned earlier, you can sign in using your Azure AD credentials. On the left side of the workspace are the options to get data, create clusters, and more.

Figure 8-6. The Azure Databricks workspace
Let’s begin by creating a cluster, as shown in Figure 8-7. A Databricks cluster has driver and worker nodes. When creating a cluster, you provide a cluster name, a Databricks runtime, worker type, and driver type. You can select these values based on the type of experiment that you plan to run. For example, for a large dataset, the VM type should have more memory.

Figure 8-7. The cluster creation page
The cluster uses underlying Azure virtual machines (VMs). As Figure 8-8 shows, you can pick and choose the VM type based on the memory and CPU for the worker and driver type.

Figure 8-8. Selecting a worker VM type
You now need to consider two autopilot options: autoscaling and autoterminate (Figure 8-9). Setting a time limit for when the cluster will terminate helps you to avoid paying for the cluster when it is not in use. Enabling autoscaling allows you to increase or decrease the compute capacity on demand based on the resources needed.
It can take 10 to 15 minutes to configure your cluster for the first time. This includes installing the libraries that you want to set up for the cluster. For automated ML, install azureml-sdk[automl] on Databricks runtime 5.4 and higher.

Figure 8-9. Cluster configuration in the Azure Databricks workspace
For older runtimes, you can install azureml-sdk[autom_databricks], as shown in Figure 8-10. This is a single package that has everything needed to run automated ML on Azure Databricks. You can install it from the libraries page.
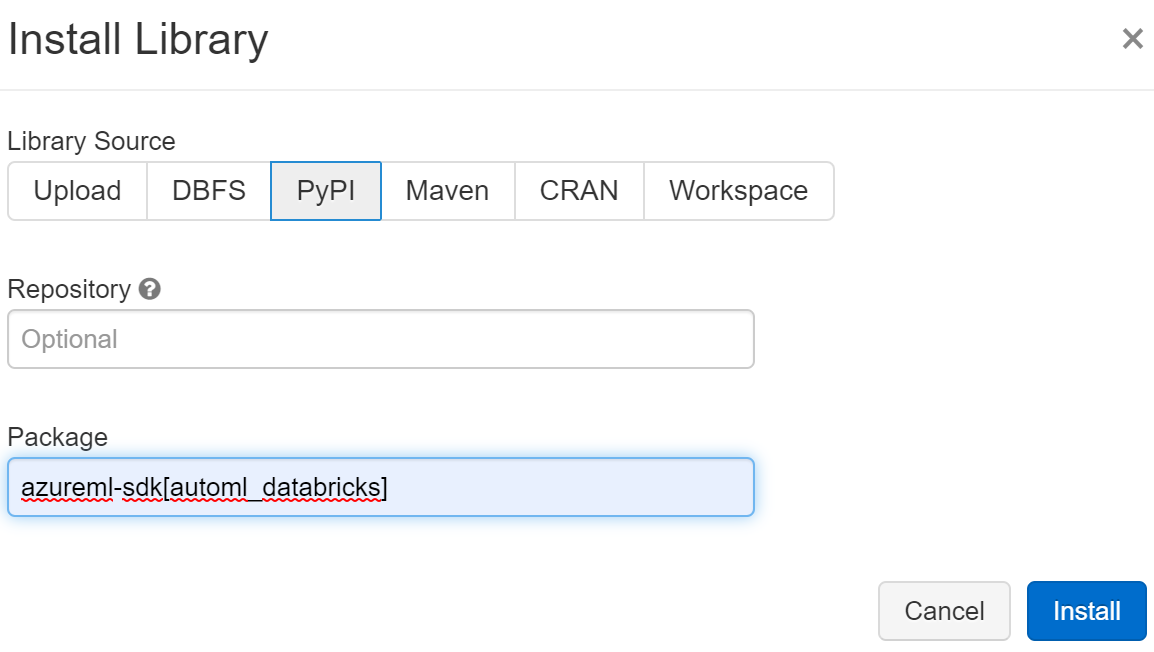
Figure 8-10. Specifying the automated ML PyPi package
If everything goes well, after the cluster is running and a library is installed on it, your page should like Figure 8-11.
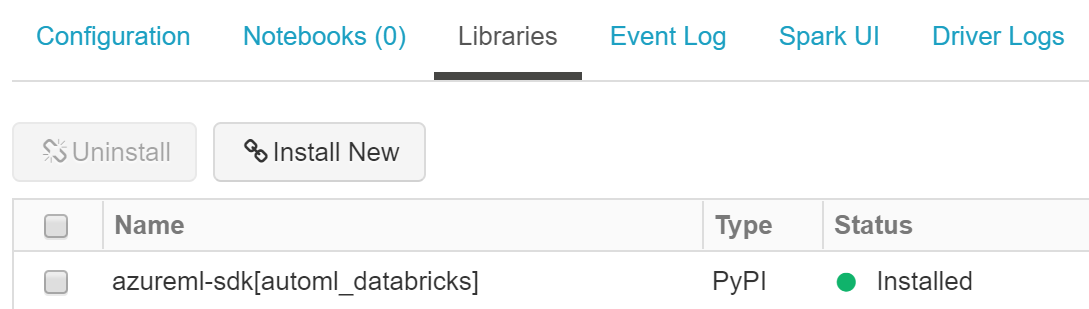
Figure 8-11. Library status
Now let’s look at the data options. Select the Data option from the pane on the left, as shown in Figure 8-12.
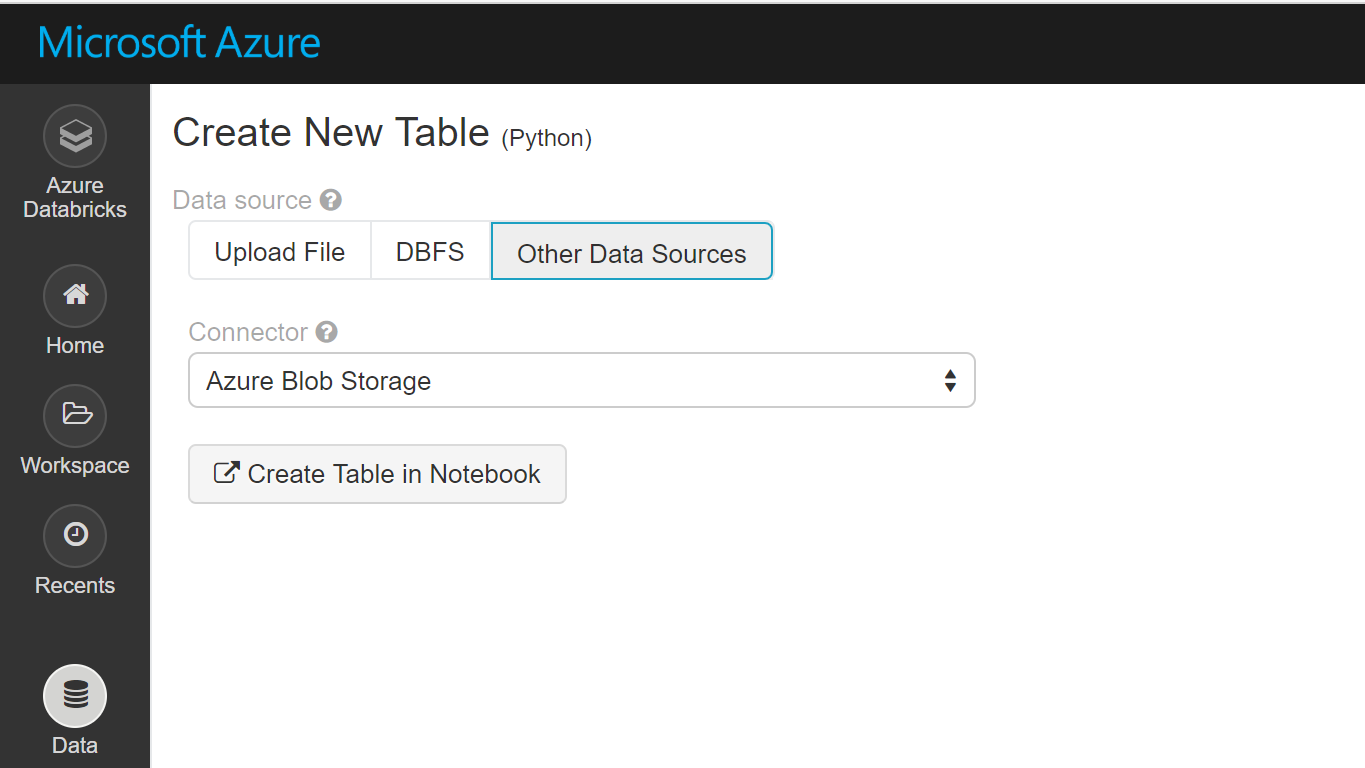
Figure 8-12. Data sources options
You can bring data into your Azure Databricks workspace in multiple ways. Different templates are available to easily start connecting to various data sources. Let’s explore the simplest option of connecting to Azure Blob storage, as shown in Figures 8-13 and 8-14 Figure 8-13. We provide the credentials to connect to the storage. The result is a dataframe.

Figure 8-13. A sample notebook for data, part 1
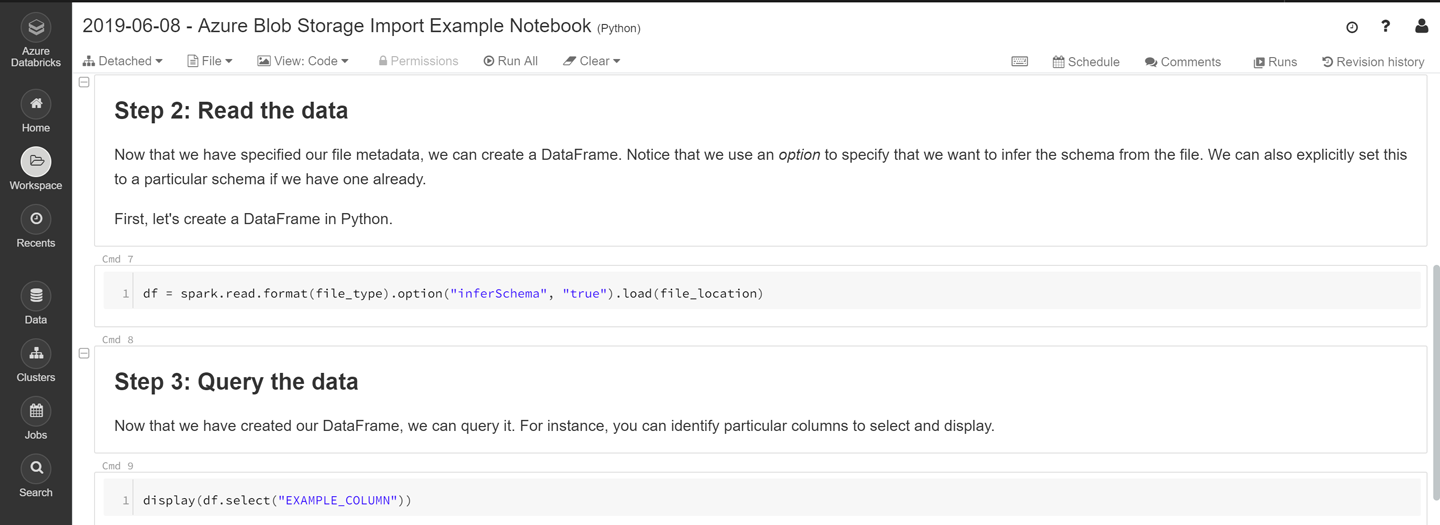
Figure 8-14. A sample notebook for data, part 2
You can use this dataframe for further data preparation. Let’s now import a notebook to this Azure Databricks workspace so that you can write machine learning code. You can import a notebook by importing a file or from a URL, as shown in Figure 8-15.

Figure 8-15. Importing a notebook in the workspace
After you import the Notebook, you can attach the cluster to it, as shown in Figure 8-16. Just to read a notebook, you don’t need a cluster attached to it, but you need a cluster to execute code.

Figure 8-16. Attaching a cluster to the notebook
After you’ve attached this notebook to your cluster, it can execute the code. To use automated ML, your dataframe must be converted into a dataflow object, as shown in Figure 8-17. This is sample code to convert it.
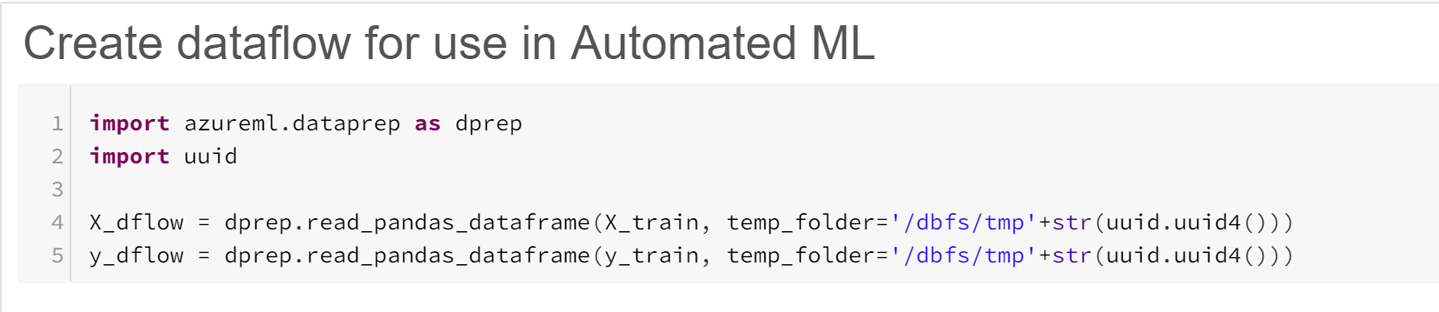
Figure 8-17. Converting a Pandas dataframe to dataflow
After you have a dataflow object, the steps to run automated ML are the same as running a notebook on Jupyter, except for a couple of configuration parameters; Figure 8-18 shows a sample. You can find more details on this Microsoft documentation page.

Figure 8-18. Sample configuration settings for automated ML
After you submit the experiment for training, you get an outcome that you can view in the Azure portal, as shown in Figure 8-19. Here, we show the summary and the primary metric of each run. You can track the results in a single Azure Machine Learning service workspace independent of which environment that you use to run it.
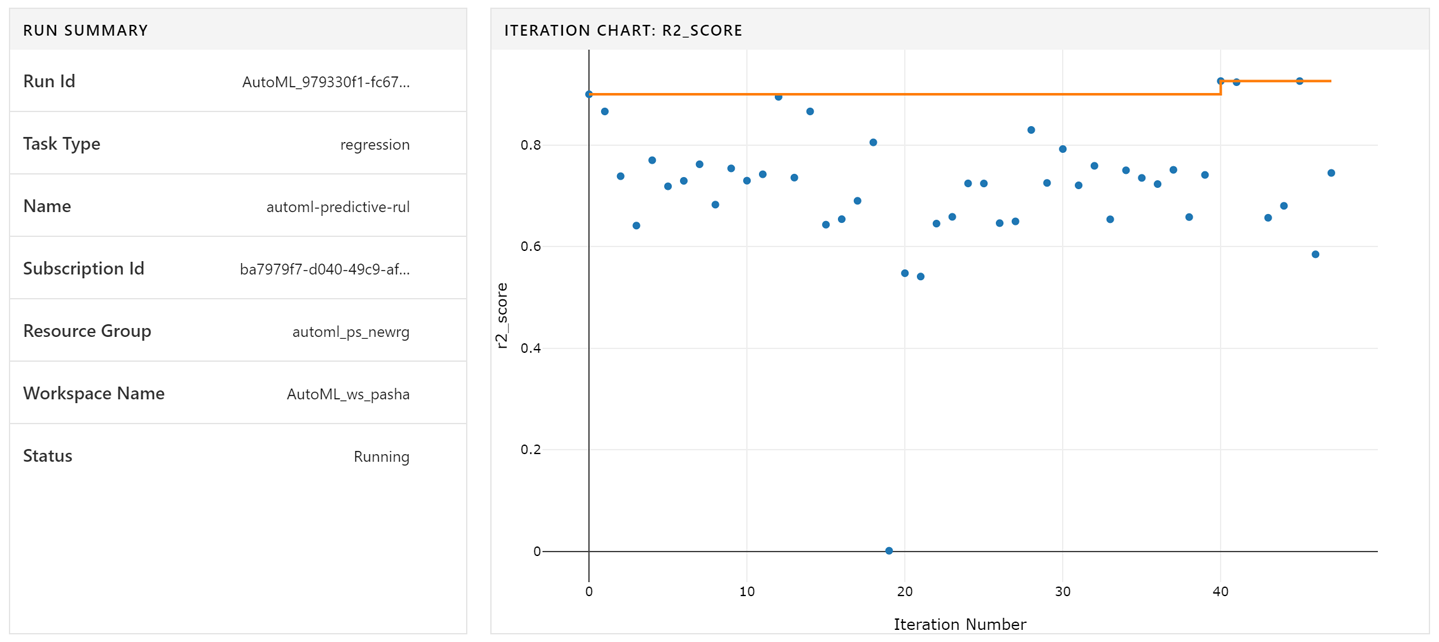
Figure 8-19. Output of an automated ML
After you complete the training, look at the hyperparameters used in the run. Figure 8-20 presents the code for printing the parameters. You can run this code in any environment; it is not specific to Azure Databricks.

Figure 8-20. Sample code for getting hyperparameters
The output will be like that shown in Figure 8-21 (this is with respect to the model trained in your example notebook). This presents some of the parameters used in training the model.
The notebook to try the full experiment is available on this book’s GitHub repository.

Figure 8-21. Sample hyperparameters
Now that you’ve used an Azure Databricks cluster as your compute for training with automated ML, let’s see how you can use remote compute from within an Azure Databricks notebook. This is another option that you can use for automated ML training. You might want to use an Azure Databricks cluster for data preparation using Spark and then instead of using the worker nodes from the same cluster, you can use a remote compute option. It can be a viable scenario when your Azure Databricks cluster is being used for other tasks or doesn’t have enough worker nodes capacity. This approach can sometimes be more economical, depending on the experiment.
You can find a sample notebook for using remote compute at http://bit.ly/2lJzVtq.
ML.NET
Let’s learn another way of using automated ML. If you know Visual Studio and are familiar with C#.NET and are interested in building machine learning models but might not know Python, you can use automated ML on ML.NET. To install ML.NET:
-
First install a Terminal on your laptop or use the Terminal in Visual Studio code (installer found on the Visual Studio site; download the appropriate setup). This works on Linux, Windows, or Mac.
-
Next, install .NET Core SDK (not Runtime). To install the SDK, download the installer.
-
If you need to, restart the Terminal for these changes to take effect.
-
After you finish this setup, run the
dotnet tool install -g mlnetcommand in your Terminal. -
When installation is complete, test whether
mlnethas been installed successfully by running themlnetcommand in your Terminal. -
Next, to start using ML.NET, download the dataset to the laptop on which you installed
mlnet. In this case, you will use the same NASA dataset we used in previous experiments. You can start the training by giving a simple command on the Terminal as follows:mlnet auto-train --task regression --dataset "df_new.csv" --label-column-name rul
This training takes the default configuration for automated ML. When the training is complete, you will see the results in the same Terminal as that shown in Figure 8-22.

Figure 8-22. Automated ML results
Currently, automated ML on ML.NET with CLI supports the following:
-
Binary classification
-
Multiclass classification
-
Regression
You can also change the default configuration by using the following command on the Terminal:
mlnet auto-train
It will give a list of the various parameters available to customize. For example, the default training time is 30 minutes, but you can change that based on your needs.
The experiment generates the following assets in the output folder:
-
A serialized model ZIP (“best model”) for doing our predictions
-
C# solution with the following:
-
C# code to predict using the generated model, which can be integrated in your app
-
C# code with the training code used to generate the model as a reference
-
A log file with information of all iterations across the multiple algorithms evaluated
-
You can also call the APIs directly in Visual Studio without using the CLI. It will use the same core automated ML technology as the CLI. Next, let’s look at how to use SQL Server to train an automated ML model.
SQL Server
In true democratization style, automated ML is also available to SQL users. We don’t need to know Python for that. To get started, we will utilize the ability to run Python code in SQL Server 2017. We can use the sp_execute_external_script stored procedure to call AutoML.
You can use SQL Server Management Studio or Azure Data Studio for running automated ML experiments. To give this a try, follow the steps listed in this post on Microsoft’s SQL Server Blog.
Conclusion
In this chapter, you learned how to use automated ML from within Azure Databricks, ML.NET, and SQL Server. In Chapter 9, you’ll learn how to use Azure UI and Power BI for automated ML.