Now, let’s take a closer look at the interface of Inkscape:

Of course you don’t have to work in the small window that Inkscape starts with by default. Feel free to maximize it to fill the whole screen. You can even press  to enter fullscreen mode.
Most of the window is occupied by the canvas, surrounded by rulers (top and left) and scrollbars (bottom and right). On the canvas, you can see a rectangular shade of a page (A4 paper size by default). This page frame defines the edges of your document. However, Inkscape allows you to freely draw anywhere, both on and off the page: The page frame is not a restriction, just a hint. This frame only matters when exporting into some vector formats and when viewing the SVG file in an external viewer; in both these cases you will see only the objects that overlap the page rectangle. You can easily hide the page frame if you don’t care about it.
The part of the canvas you see is far from all the canvas there is. In fact, the canvas is so huge, it is almost infinite. You can see more of it by zooming out or by scrolling in any direction, as we’ll see in the next section. You’ll never run out of room in Inkscape! (In fact, you can even get lost in the vastness of canvas; to return to the page frame, just press the  key at any time.)
To the left of the canvas, there’s the vertical main toolbox. The buttons on this toolbox activate various Inkscape tools. Each tool has its own purpose, features, controls, keyboard shortcuts, mouse cursors, and other stuff. Some tools create new objects, others edit them in various ways, and still others help you navigate in your document. We’ll briefly look at some of the tools in this chapter and explore them all in detail in the rest of the book.
Above the canvas you see two more toolbars, both horizontal. Of these, the top one, called the commands bar, is a regular toolbar of the type you’ll find in many programs. It has buttons for actions such as Save, Open, Undo, and so on. The other toolbar, immediately above the canvas, is more interesting: It is called the tool controls bar (or simply the controls bar) and contains various options and controls applicable to the currently selected tool. Click some tool buttons on the left and watch the contents of the controls bar change.
Below the canvas, there’s the color palette; it can be scrolled horizontally by a scrollbar of its own. Further below, there’s the status bar, a motley bag of stuff whose components we will explore in detail later. For now, take note of the message area of the status bar, which always displays some message relevant to what you’re doing now. Pay attention to what the message area is saying; it may save you a lot of time and frustration!
Finally, to the right of the canvas, there’s the dock for Inkscape’s dialogs. By default the dock is hidden, but if you call up a dialog (for example, the Fill and Stroke dialog by pressing  ), it will appear in the automatically expanded dock:
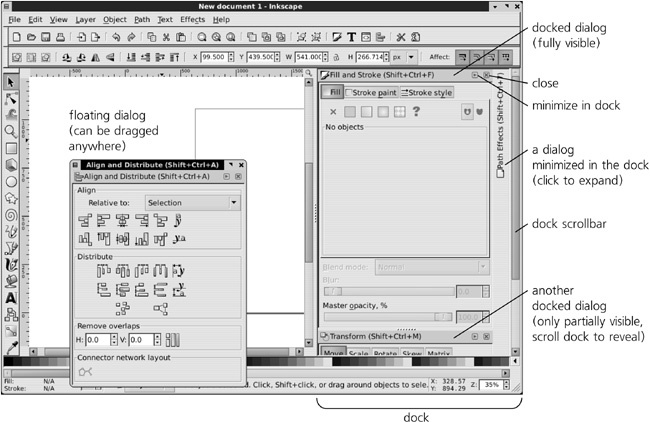
The dock may contain many different dialogs; if there are too many of them to fit vertically, the dock gets a scrollbar. Each dialog in the dock can be minimized (the button with the triangle) or closed (the button with the X). You can drag dialogs around in the dock to rearrange them. You can also drag a dialog off the dock, in which case it becomes floating and can be placed anywhere on your screen. In most cases, however, working with docked dialogs is more convenient.
Note
As of version 0.47, not all Inkscape dialogs can be docked (see 3.7 Dialogs for more on that).
All elements of the interface except the menu, the canvas, and the dock can be shown or hidden using commands in the View ▸ Show/Hide submenu.