The XML Editor is what sets Inkscape apart from all other vector editors. This is where you can see the entire raw source of your document, with nothing hidden or (mis)interpreted. Quite simply, if something cannot be seen in the XML Editor, it’s not in your document.
If you want to learn SVG or are simply interested in what is behind some of the objects or properties of your document, the XML Editor is your primary tool. Here, you can do absolutely anything to your document. One might claim that the XML Editor is the only essential part of the program, everything else being just optional conveniences!
The XML Editor is completely synchronized with the rest of the program. Any changes you make in the XML tree are immediately reflected on your canvas, and any changes you make with any other tools are immediately visible as element or attribute changes in the XML Editor.
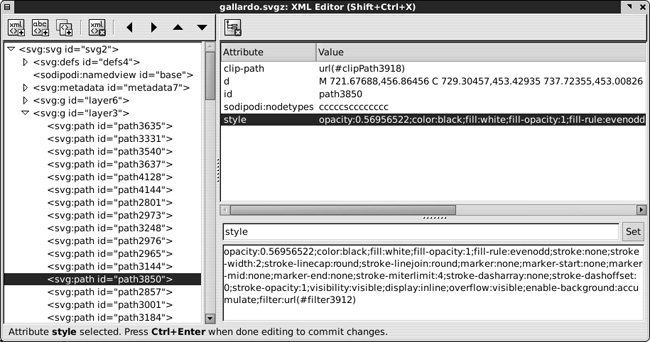
The XML Editor has three main panes, as shown in Figure 4-11. There’s also a status bar of its own at the bottom, displaying various status information and hints.
Left pane
Shows the entire tree of the document you are editing. Each node of the tree (each line in this list) is either an XML element or a text node. In SVG, text nodes are only used for holding the text content of text objects; all other objects are element nodes. For example,
svg:rectis a rectangle andsvg:gis either a group or a layer (here,svgis the namespace prefix; see A.2 Vocabularies and Namespaces).Not every element in the list is an object, however; some elements represent things (such as metadata) that you don’t see on the canvas. For more on various SVG and Inkscape elements, refer to Appendix A.
Note
In the XML Editor, all elements are listed in the document order: Objects and layers that are topmost in the z-order on the canvas are the last in the list. In particular, this means that the order of layers in the XML Editor is reversed compared to that in the Layers dialog or the current layer indicator.
In the document tree, you can select any element by clicking on it. This selection in the list is synchronized with the regular object selection in Inkscape: If the selected element corresponds to a visible object, that object gets selected on the canvas; conversely, if you select an object on the canvas, the XML tree pane scrolls to the corresponding element and highlights it. This is one way to reach elements that are otherwise inaccessible, such as those that are locked or hidden (4.1 Object Properties).
Above the tree pane, there’s a small toolbar with buttons for generic XML operations: creating new elements or text nodes and duplicating or deleting the selected node. The last four buttons are for moving the selected node (and all its children) in the tree: The up or down arrows reorder the nodes (you can also do this by dragging the selected node with your mouse), while the left and right arrows change their nesting. For example, to turn a node from a child of its parent to its sibling, click the left arrow button; conversely, the right arrow button turns a node into a child of its preceding sibling.
Top-right pane
Displays all the attributes of the selected element node. (If you select a text node instead of an element node, this pane will allow you to edit the text of the node.) Every attribute has a name and a value, which are listed in two columns of a table. The order of the attributes does not matter in XML, so the dialog shows them alphabetically sorted. Above the pane, there’s a button for deleting the selected attribute.
Bottom-right pane
Allows you to edit the attribute you selected in the top-right pane. It consists of a single-line field for the name of the attribute, a bigger pane for its value, and a Set button (when done editing, you can press
 instead of clicking Set).
You can add a new attribute to an element by editing both the name and the value fields. If the attribute name you entered matches that of an existing attribute, that attribute gets replaced with your value; otherwise, a new attribute is created and added to the element.
Note that the value editing pane wraps long attribute values to make editing easier. This is particularly handy when editing the
styleattributes (A.8 Style), whose values tend to be quite long.