Blend modes are another type of filter for which Inkscape has a dedicated control. Choosing a blend mode affects how the colors of an object blend (i.e., mix) with those of the background objects beneath it.
However, unlike blur, which can be applied to any single object, Inkscape allows you to assign blend modes only to layers (4.6 Layers); the corresponding control is in the Layers dialog. This has its reasons in the way SVG treats these filters; for you, this means that you can only change the blending mode of all objects in a layer at once, and that blending mode will affect how the objects in this layer blend with those in layers below, not between themselves.
The five blend modes are: Normal (default; switch to this option to remove any unusual blending), Multiply, Screen, Darken, and Lighten. In Normal mode, only non-100 percent opacity allows the objects in the top layer to be translucent; in all other modes, bottom-layer objects can “show through” even without any transparency. Here is a demonstration:
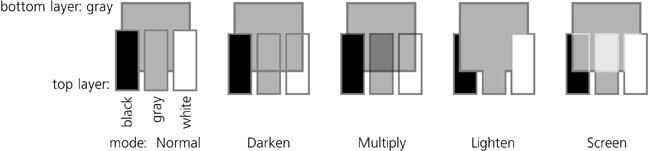
Figure 17-6. All large rectangles are in the background layer, all small rectangles are in foreground layers with various blend modes set; opacity is 100% everywhere.
Perhaps the most common application of blend modes is for tinting bitmaps. For example, imagine you have a color photo but want to render it completely or nearly monochrome, for example, in sepia or blue tones, to match the color scheme of your composition.
Of course, you can just overlay a semi-transparent rectangle of the target color over your bitmap, but that does not entirely get rid of the bitmap’s own color; worse, the bitmap fades out and loses contrast. You can also adjust the colors of the bitmap in an external bitmap editor (if it’s not yet embedded into your SVG, 18.2 Linking vs. Embedding), or you can use a predefined composite filter such as Sepia, but these options are not as flexible. Instead, place the photo on one layer and the colored rectangle on its own layer above, and change the blend mode of that top layer (see Figure 13 on the color insert).
The Multiply and Darken modes apply tinting primarily to the light areas of the photo. Therefore, if the tint color is itself light, it will nicely color your photo while preserving its contrast; if the tint color is dark, the result will likely be too dark.
The difference between Multiply and Darken is that for each pixel, Darken just chooses whichever of the background and foreground colors is darker, whereas Multiply actually combines the two colors. Try both and choose whichever suits your photo.
The Screen and Lighten modes apply tinting primarily to the dark areas of the photo. Therefore, if the tint color is itself dark, it will nicely color the photo while preserving its contrast; if the tint color is light, it will just “bleach out” the photo, making it too light overall.
Again, the difference between Screen and Lighten is that for each pixel, Lighten just chooses whichever of the background and foreground colors is lighter, whereas Screen actually combines the two colors. Try both and choose whichever suits your photo.
Summarizing, if your tint color is dark, use the Screen or Lighten modes; if it is light, use Multiply or Darken. Change the opacity of the tint layer object to adjust the amount of tinting.