Basically, layers in Inkscape are just what the name suggests: “levels” or “floors” within a document, stacked on top of each other and containing other objects. Every layer has a name; layers can be easily hidden, locked, or rearranged.
Every object belongs to one and only one layer. To find out which layer the object belongs to, just select that object and look at the status bar: It will say something like Rectangle in layer Layer 1 (here, Layer 1 is the name of the layer). You may easily select objects from different layers, in which case the status bar will say, 2 objects in 2 layers.
One of the layers in the document is always current. Any new objects you create, paste, or import are always added to the current layer. To make layer switching in complex drawings easier, Inkscape follows selection: That is, if you are in layer A and select some objects in layer B (for example, by clicking it), layer B becomes your new current layer. Conversely, if you change the current layer, your selection is deselected.
Inkscape remembers the current layer when saving the document and restores it when you load it the next time. A new document template (see 3.2 Document Templates) usually contains one initial layer called Layer 1; it is made current when you load the template, so if you don’t create any new layers all your created objects will end up in Layer 1.
Just like individual objects, layers may be locked or hidden. In a locked layer, objects are visible but cannot be selected. In a hidden layer, objects are both invisible and cannot be selected. Also, you cannot add new objects to a hidden or locked layer.
Typically, layers are hidden when you want to temporarily simplify a complex artwork to work on some parts of it. Hiding complex layers may speed up screen redraw considerably and thus make your work more comfortable. Locking layers is useful when you want some background objects to be visible but not selectable, so it’s easier to select the foreground objects by clicking or dragging around them.
At a more advanced level, layers in Inkscape are closely related to groups. In fact, a layer is just a kind of group that Inkscape treats in a special way.
XML
In XML, both layers and groups are represented by the same element, g. The only difference is that a layer has the attribute inkscape:groupmode="layer" (A.5 Layers and Groups).
Just as groups may include other groups as members, layers may contain further sublayers. This makes it easier to organize complex artwork: Instead of a flat list of layers, you may have a hierarchical tree, where related layers are grouped by a common parent and it’s easy to rearrange the structure by raising or lowering the entire branches of the tree instead of individual layers one by one.
Furthermore, you can temporarily enter a group, i.e., tell Inkscape to temporarily treat this group as a sublayer and to make that sublayer current. For that, just select the group and double-click it, or press  , or right-click it and choose Enter group from the pop-up menu.
This technique combines the advantages of groups (a group is easy to select, move, transform, style, view its bounding box, and so on) with the advantages of layers (a layer defines a context that you can enter and work inside, for example, by adding new objects to it). In particular, the easiest way to move some object into an existing group without ungrouping is to cut the object ( ), enter the group, and paste the object there (
 or
or  ).
).
To leave a sublayer—whether it’s a real sublayer or just a group that you entered—press  , or right-click anywhere on the canvas and choose Go to Parent from the pop-up menu.
The most important layer commands are collected in the Layer menu:
The Add Layer, Rename Layer, and Delete Current Layer commands do what they say they do. The two latter commands apply to the current layer; the first one creates a new layer and asks you to provide a name and decide whether to place it below the current layer (default), above the current layer, or inside the current layer as a sublayer (see Figure 4-7). Layer names need not be unique and can use arbitrary characters. Be careful: Deleting a layer deletes all objects that were in that layer!
The two Switch commands just switch the current layer to one below or above it. These commands simply define the context for other operations; they do not change anything visible on the canvas and cannot be undone (only the commands that actually change the document can be undone).
The next two commands, Move Selection to Layer Above (
 ) and Move Selection to Layer Below (
 ), take the current selection and move it to the layer above or below the current one. (If there is no layer above or below the current layer, these commands do nothing and complain with a message in the status bar.) By crossing the layer boundaries, these commands are complementary to the regular z-order changing commands, such as Raise or Lower (4.3 Z-Order), that work within the same layer.
Note
Here’s a method to move objects from one layer to any other, not necessarily adjacent: Cut the object ( ), switch to the target layer, and paste it in place (
 ).
).
The four z-order commands—Raise Layer (
 ), Lower Layer (
 ), Layer to Top (
 ), and Layer to Bottom (
 )—are equivalent to the z-order commands for objects (4.3 Z-Order), except that they act on the current layer and move it (with all of its objects and sublayers) up or down among its sibling layers. Note that the keyboard shortcuts for these commands are the same as for the object z-order commands but with
  added.
Finally, the Layers . . . command (
 ) opens the Layers dialog (4.6.4 The Layers Dialog).
Inkscape has two main UI controls for working with layers: the basic current layer indicator in the status bar and the more powerful Layers dialog.
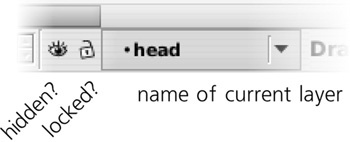
The current layer indicator displays the name of the current layer and, by the two toggle buttons on the left, indicates if that layer is hidden (the eye button) and/or locked (the lock button):
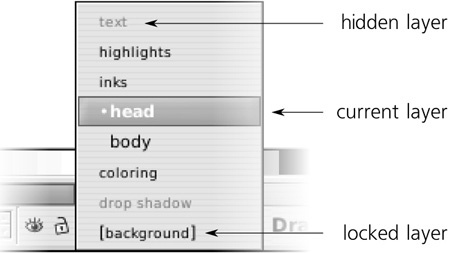
It’s an interactive control, not just a display; you can toggle the buttons and use the pop-up menu of all layers to switch the current layer:
In the menu of the layers, the current layer is marked by bold face and a bullet. Locked layers have square brackets around their names (for example, [Layer 1]); hidden layers’ names are gray. A temporary layer (such as a group that you entered) uses italics for its name.
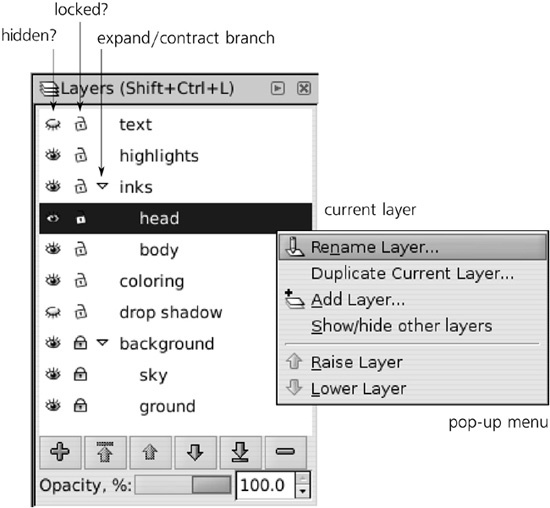
The current layer indicator’s advantages are that it is always active and takes very little space on screen. However, it is only adequate if your layer structure is small and simple. In more complex documents, it quickly becomes unwieldy. That’s when you should check out the Layers dialog ( ), shown in Figure 4-10.
In its list of layers, branches of sublayers inside layers can be expanded and collapsed by clicking the triangle markers. Also, here you can lock or unlock and hide or unhide any layer, without making it current, by clicking the corresponding icon to the left of the layer name.
AI
Unlike Adobe Illustrator, Inkscape’s Layers dialog cannot yet show individual objects within layers. To some extent, you can use the XML Editor (4.7 The XML Editor) for viewing the entire tree of the document, including all layers and objects.
Below the list of layers, the six buttons correspond to the following commands, left to right: Create a new layer (a name is requested), Raise the current layer to the top, Raise the current layer, Lower the lower layer, Lower the current layer to the bottom, and Delete the current layer. You can also rename a layer by clicking its name in the list and typing a new name.
By right-clicking a layer name, you will open a pop-up menu with commands for adding, renaming, lowering or raising, as well as duplicating a layer. The Show/hide other layers command toggles all other layers (except the current one) between visible and hidden states.
At the bottom of the dialog, there’s a list of blend modes that can be applied to the entire current layer (see 17.2 Blend Modes for more on blend modes) and a slider control for setting the opacity of the current layer. This opacity affects all the objects in the layer and works the same as group opacity (4.5.1 Uses of Grouping); it provides a handy way to peek under a layer by making it almost transparent but not entirely hidden.


