Grouping is a way to make a single object out of a number of independent objects. It is an easily reversible action; objects combined into a group can be ungrouped and made independent again. Moreover, many of the tools in Inkscape completely disregard grouping and allow you to work directly with individual objects regardless of whether they are grouped or not. The Selector tool by default selects the group as a whole, but even in it, there are methods to select an object inside the group without ungrouping it (5.10 Selecting in Groups).
To group some objects, just select them and choose Object ▸ Group ( ). Groups can be further grouped just like any other objects. You can even group a single object; for example, select a rectangle and press . Now you have a group with a single rectangle inside (such groups may be useful in a number of situations, such as blurring a clipped object; see 18.4 Clipping and Masking).
When a single group is selected, the status bar indicates how many member objects are within this group, for example: Group of 3 objects in layer Background.
To ungroup a group, select it and choose Object ▸ Ungroup ( ); the group no longer exists, but all its former members, now released, remain where they were on the canvas (both the coordinates and the z-order of the objects are preserved).
You can select any number of groups and ungroup them all at once. Moreover, you can select any number of different objects, only some of which are groups, and press ; groups will be ungrouped, but all nongroup objects will remain intact.
Note
The Ungroup command removes only the topmost level of grouping. For example, if you have a group containing two other groups, pressing will release the two groups—they will stay selected but not ungrouped. You will need to press again to ungroup them. To ungroup all groups in a complex drawing, just select all objects and keep pressing until the status bar says, No groups to ungroup in the selection.
XML
In XML, a group is the g element (see A.5 Layers and Groups), which is a parent of its member objects. This means, among other things, that objects with unset style properties (8.1.1 Paint) will inherit these properties from their parent group or from an ancestor further up the tree.
Why group objects? There may be different reasons to use grouping.
First, groups are an easy way to select sets of objects: With the Selector tool, click any object in a group and the entire group gets selected. In this sense, a group is a “saved selection.” After selecting, it is easy to move, scale, or paint the group just as you would a number of separate selected objects.
Second, grouping is a quick and simple way to organize complex artwork. When you have thousands of objects in your drawing, sorting out what belongs together is difficult. One way to structure such complex documents is via layers, as we’ll discuss later in this chapter. However, often layers are too much hassle; if you just want to ensure that the objects of the nose and the eyes in your portrait are never accidentally moved relative to each other, the easiest way to achieve this is by grouping them together.
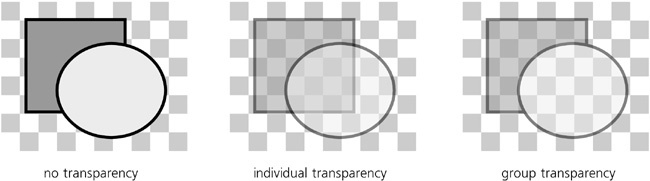
Finally, sometimes groups allow you to achieve effects that would be impossible otherwise. The most common of these effects is group transparency (see 8.1.2 Opacity for more on transparency). When you apply transparency to a group, it is made transparent as a whole, which may look quite different from the effect of applying the same level of transparency to the individual objects (Figure 4-6).
On the left, two independent objects are fully opaque (zero transparency). In the middle, they are made 50 percent transparent as individual objects; note that the corner of the rectangle shows through the ellipse. On the right, the same opaque objects are grouped and the group is made 50 percent transparent; note that now, the checkered background shows through, but the overlapping area of the rectangle is still obscured by the ellipse and does not show through.
An important thing to remember is that a group, as an object in its own right, has its own place in the z-order stack of your document, and all the members of the group share its z-order position.
This means that if object A is on top of B and B is on top of C, you cannot group A and C without changing the z-order. If you attempt to do that, C will jump up under A, and you will have a group containing A and C lying on top of the object B.
Ungrouping a group in that case does not restore the original z-order. If you ungroup the “A and C” group, you will get three independent objects, but they will be now in the order A, C, B (top to bottom). (Of course, if you simply Undo ( ) right after grouping, both grouping and the z-order change will be reverted.)
For the same reason, you cannot group objects from different layers. Both layers and groups are branches of the XML tree of the document, and you cannot have a branch (group) growing from more than one parent branch (layer). If you try to group objects selected in different layers or within different groups, Inkscape will complain (with a message in the status bar) and do nothing.