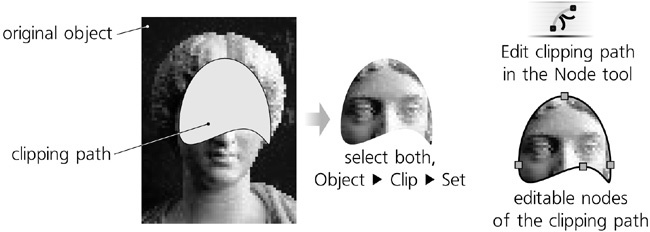
Another approach to cropping images is to use clipping or masking. Although here, these techniques are illustrated by bitmap objects, you can in fact clip or mask any kind of object, including groups.
Inkscape allows any object to be clipped by a path, so that only the part of the object inside that path will be visible. Starting from a bitmap object, draw a clipping path or shape over it using any convenient tool—for example, Calligraphic pen or Pencil. Then, select both the bitmap and the path and choose Object ▸ Clip ▸ Set. The clipping path disappears (it now resides in defs, A.4 Defs, View, and Metadata) but the bottom object is now clipped by it. To edit the clipping path without unclipping, click the corresponding button in the Node tool’s controls bar, as shown in Figure 18-5.
At any time, you can do Object ▸ Clip ▸ Release to remove the clipping and get the object and its clipping path as two separate objects again.
Masking is very similar to clipping: You select the object and the mask and choose Object ▸ Mask ▸ Set to mask it, or Object ▸ Mask ▸ Release to remove the mask. The main difference between clipping and masking is that a clip limits the object to the interior of the clipping path, disregarding any embellishments such as fill color, stroke style, gradient, or blur. Clipping is binary; at any point, the clipped object is either visible or not. Masking, however, is gradual—it may make an object partially transparent.
The rule to remember is this: In a mask, black makes masked objects transparent (invisible) and white makes them opaque (visible). What’s more, the “no color” fill or full transparency in a mask is considered “transparent black”—that is, areas of the object not covered by a mask at all or areas that fall into gaps or holes in a mask disappear. To make a part of an object visible, the mask over that part must be non-black; pure opaque white gives 100 percent opacity in the masked object, while anything darker or more transparent produces less than 100 percent opacity.
Obviously, masking is most useful when you use gradients or blurring. For example, you can easily blend a photo strip with the background (using linear gradient mask) or feather the irregular edges of a photo cutout (using blurred mask):
Just as a clipping path, a mask can be a group of objects instead of a single object. The Node tool has another button for editing the mask of the selected object. Unfortunately, this button only allows you to node-edit the single path or shape of the mask—you can’t change its color, gradient, or blur; for this, you need to release the mask and set it again after changing.

