Inkscape has quite a number of dialogs, commands, and tools that deal with the style of objects. If you’re using Inkscape for anything practical, you’re likely already using at least some of them. Instead of discussing these UI elements one by one, we will start by looking at the general style concepts and specific properties, examining the corresponding tools when they are relevant.
One style-related command you should know up front is Edit ▸ Paste Style ( ). It takes the style of the object you last copied to the clipboard and applies it to all selected objects. This is a true lifesaver when you want some objects to be mostly but not completely identical in style; it is usually much easier to first paste the same style on all of them and then only change those properties that need to be different.
Note
The way object style is expressed in the source of an SVG document is not defined solely by the SVG standard; for this purpose, SVG reuses another standard called Cascading Style Sheets (CSS). However, SVG uses only a subset of CSS properties and concepts; refer to the SVG standard (http://w3.org/TR/SVG11) as well as to Appendix A for details.
As you probably already know, objects have fill and stroke, which are collectively called paint. One could say that an object is filled by one paint and stroked by another. A paint may take several different types, including:
None (no paint)
An object with its fill set to
nonehas only stroke, and an object with its stroke set tononehas only fill. If both fill and stroke arenone, the object is completely invisible (and cannot be selected by clicking, 5.4 Selecting by Clicking: The Selector), just as it would be when set to zero opacity.
Flat color
This is the most common option, painting the fill or stroke with a plain solid color. Later in this chapter, we’ll look at the many ways to set and change fill and stroke colors.
Gradient or pattern
Both fill and stroke may have various types of smooth color gradients or repeating patterns made from any objects. These complex paint types are the subject of a separate chapter (Chapter 10).
Unset
This means that a fill or stroke is not specified, and therefore may be inherited from an object’s ancestors. This is not the same as
none, which simply forces invisibility. Since ancestors are normally layers or groups without their own stroke or fill, an object with unset fill or stroke will get the SVG defaults: an invisible stroke and a solid black fill. Unsetting is useful with clones (Chapter 16) because it allows creating clones painted differently from their originals.
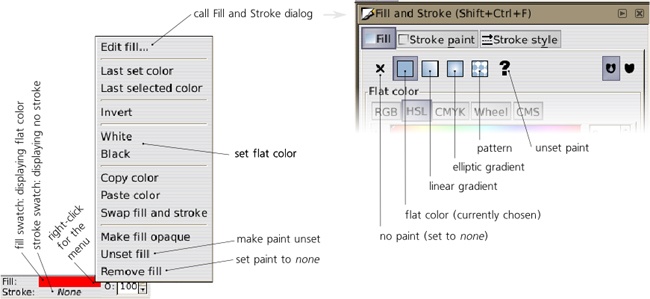
The main tool for editing an object’s style, the Fill and Stroke dialog ( ), has a number of buttons on its Fill and Stroke paint tabs that correspond to the different paint types. The pressed button indicates the current paint type of the selected object; if multiple objects with different paint types are selected, no button is pressed and the dialog says Multiple styles.
Also, learn to use the selected style indicator (2.8 Styling) in the status bar to quickly determine the paint type of the selected object, as well as change it via the right-click menu of this control (note that to access this menu you need to right-click the fill swatch at the top to change fill paint and the stroke swatch at the bottom to change stroke paint).
Figure 8-1. Paint types in the selected stroke indicator (left) and the Fill and Stroke dialog (right)
Note
A path need not be closed in order to be filled; unclosed paths (12.1.1 Subpaths) can still be filled, as if their ends were connected by an unstroked straight line segment.
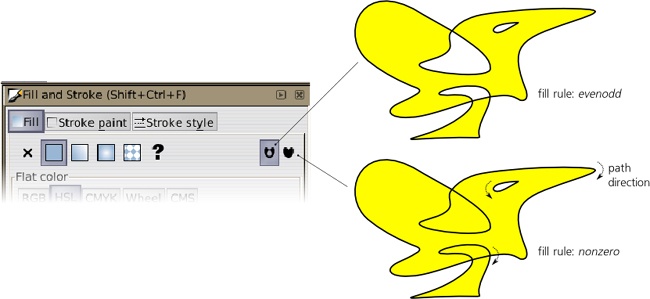
One important property which, unlike other paint properties, applies to fill but not stroke, is the fill rule. It may take one of the two values. The value of evenodd means that any self-intersections or inside subpaths (12.1.1 Subpaths) create holes in the fill of a path or stroke. The value of nonzero means that most holes are covered with fill (more precisely, if the inner subpath has the same direction as the outer one, the hole will be filled; otherwise it will still be a visible hole). To change this property, use the two toggle buttons in the Fill and Stroke dialog:
Note
Some of the inner subpaths can still produce holes even with nonzero fill rule. This depends on the direction of the subpath (12.1.1 Subpaths): If it is counterdirected relative to the outer path, the hole will remain unfilled.
Not all object types can or should have fill and stroke:
Bitmaps
Bitmap objects (Chapter 18) cannot have either fill or stroke. However, you can easily convert a bitmap into a rectangular path filled by that bitmap as a pattern (just press
 ), which can then have a stroke applied to it.
Groups
It makes little sense to assign fill or stroke to groups by themselves, because the objects inside a group usually have their own paint and ignore what is set on their parent group. In fact, if you attempt to set a fill or stroke on a group in Inkscape, in addition to setting it on the group, it will assume you mean to assign fill or stroke recursively on all the group’s members. Only explicitly unset fills or strokes of members are then left alone; however, they will inherit the new fill or stroke from their ancestor anyway.
Clones
If you try to set fill or stroke on a clone (Chapter 16), it won’t have a visible effect unless the original of that clone has fill or stroke unset.
On top of paint, objects may have opacity, editable by adjusting the O field in the status bar or the Opacity slider in the Fill and Stroke dialog. Just like filters (Chapter 17), opacity applies to the entire object without any distinction between fill and stroke.
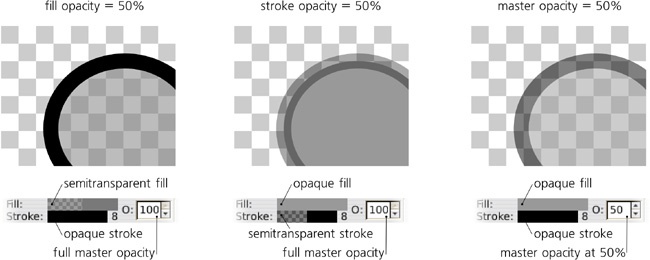
Strictly speaking, the above is only true for the master opacity of an object. In SVG objects can have three kinds of opacity: master opacity (which is called simply opacity in most places in the UI as well as in this book), fill opacity, and stroke opacity (see Figure 8-3). The two latter kinds apply only to fill or stroke, respectively, and while Inkscape allows you to view and change them, it generally discourages them in favor of master opacity. Situations where you might need your stroke opaque but fill transparent or vice versa are not too frequent in practice, and in all other cases master opacity is a lot more natural and easier to use.
One consequence of using stroke opacity is that you can see the fringe of the object’s fill, normally obscured by its own stroke. Per SVG rules, stroke is always drawn on top of fill in the object’s own internal z-order, and fill is bounded by the midline of the stroke, so with a semitransparent stroke you will see three distinct boundaries: the outer boundary of the stroke, the stroke’s midline where its fill starts, and the inner boundary of the stroke where it overlaps the fill.
Master opacity, unlike stroke opacity, has no such problems—it applies to the object as a whole, without revealing any untidy fringe. In the same way, when applied to a group, it makes the group transparent as a whole, which is often different from the same level of opacity assigned to individual objects in the group (see Figure 4-6).
Also, unlike fill or stroke opacity, master opacity is applicable to objects that cannot have fill or stroke of their own, such as bitmaps and most clones.
Note
What is the difference between opacity and transparency? They simply look at the same thing from opposite angles: When an object’s opacity is zero, it is fully transparent; conversely, when its transparency is zero, it is fully opaque. Yet another synonym for opacity that you may encounter is alpha.


