TANDOORI BAKED FLAT BREADS | PAGE 131
It was bound to happen. After decades of firing up such predictable fare as meat, seafood, and vegetables, grill jockeys finally discovered bread. Of course, grilling may have been the original method used to make bread. The first breads made by our Neolithic ancestors were likely grain pastes cooked crisp on heated stones next to a camp-fire. Today, villagers in Lebanon still use this technique for cooking pita bread. And in India, the flat breads called naan are baked on the sides of charcoal-fired clay barbecue pits called tandoors, while in Mexico commercially prepared tortillas are cooked on a metal conveyer belt that passes over open flames.
The easiest way to grill bread is to use the glowing coals as a toaster. But you can also use the flames to cook raw dough. In the following pages you’ll find recipes for grilled focaccia and flat bread cooked directly over the embers, as well as a direct-grilled version of Indian naan. Grilling also makes wonderfully crisp papadoms (Indian lentil crisps) that are completely free of the oil normally associated with them.
Whether you start with ready-made bread or homemade dough, you’ll find it tastes better cooked on the grill.
Grilling is a great way to crisp wedges of pita bread for dipping. (It’s also a great way to add fresh life to stale pita bread.) For extra color and flavor, sprinkle the chips with white or black sesame seeds before putting them on the grill.
3 large or 4 small pita breads
3 tablespoons extra-virgin olive oil
1 tablespoon regular or black sesame seeds (optional)
1. Cut larger pitas into 8 wedges, smaller pitas into 6 wedges (see Note). Generously brush both sides of each wedge with olive oil. Sprinkle one side of each wedge with sesame seeds (if using).
2. Set up the grill for direct griling and preheat to medium-high.
3. When ready to cook, arrange the pita wedges on the hot grate and grill, turning with tongs, until they are nicely browned, 1 to 2 minutes per side. Don’t take your eyes off the grill for a second; grilled pita burns very easily.
4. Place the grilled pita wedges in a single layer on a tray, platter, or cake rack and let cool. The wedges will crisp as they cool.
NOTE: For extra crisp chips, separate each pita into two rounds by cutting it in half horizontally. Cut each round into wedges, brush these on both sides with olive oil (you’ll need more oil), and grill them. This gives you a thinner and therefore crisper pita chip.
Grilling produces a garlic bread that is crunchy on the outside and softly chewy on the inside, with a smoky charcoaled flavor. The cilantro lends a Latin touch.
1 loaf bakery-style French bread (about 20 inches long)
8 tablespoons (1 stick) unsalted butter, at room temperature
4 cloves garlic, minced
½ cup minced fresh cilantro
Salt and freshly ground black pepper
1. Slice the bread sharply on the diagonal ¾ inch thick.
2. Using a whisk, cream the butter in a mixing bowl. Add the garlic and cilantro and season with salt and pepper to taste.
3. Set up the grill for direct griling and preheat to medium-high.
4. When ready to cook, generously brush or spread the bread slices on both sides with the cilantro butter. Arrange the bread slices on the hot grate and grill, turning with tongs as needed, until nicely browned, 2 to 4 minutes per side. Don’t take your eyes off the grill for a second; grilled bread burns very easily. Transfer the grilled bread to a bread basket and serve at once.
Barbecue, by its very nature, requires a lot of standing around the grill waiting for foods to cook. But idle time shouldn’t be hungry time. These slender bread strips—nice and garlicky—make a perfect munchie while you’re waiting for more substantial fare to cook. Cutting the bread into fingers maximizes the surface area, ensuring even crusting and browning on all sides. The lemon zest adds a dimension you won’t find in most garlic breads. And because you maximize the surface area, this recipe works well even on supermarket French bread. In the interest of health, I like to brush the bread with olive oil, but you could certainly use melted butter.
1 loaf French bread (about 20 to 24 inches long; see Note)
½ cup extra-virgin olive oil or melted unsalted butter
4 cloves garlic, minced
1 teaspoon grated lemon zest
¼ cup minced fresh flat-leaf parsley
Salt and freshly ground black pepper
1. Cut the loaf crosswise into 4 equal pieces. Then cut each piece lengthwise into 4 equal pieces to make 16 “fingers,” each 5 to 6 inches long.
2. Heat the olive oil in a small saucepan over medium-low heat. Add the garlic, lemon zest, and parsley and simmer until the garlic just begins to brown, 3 to 5 minutes. Remove the garlic oil from the heat and season with salt and pepper to taste.
3. Set up the grill for direct griling and preheat to medium-high.
4. When ready to cook, generously brush the bread fingers all over with the garlic oil. Starting crust side down, arrange the fingers on the hot grate and grill, turning with tongs, until nicely browned, 2 to 4 minutes per side. Don’t take your eyes off the grill for a second; grilled bread burns very easily.
5. Transfer the grilled bread to a bread basket and serve at once.
NOTE: My favorite bread for this recipe is the soft, puffy “French” or “Italian” loaves sold in the supermarket bread aisle. You can also use a long, crusty bakery-style baguette, but the result will be very crusty.
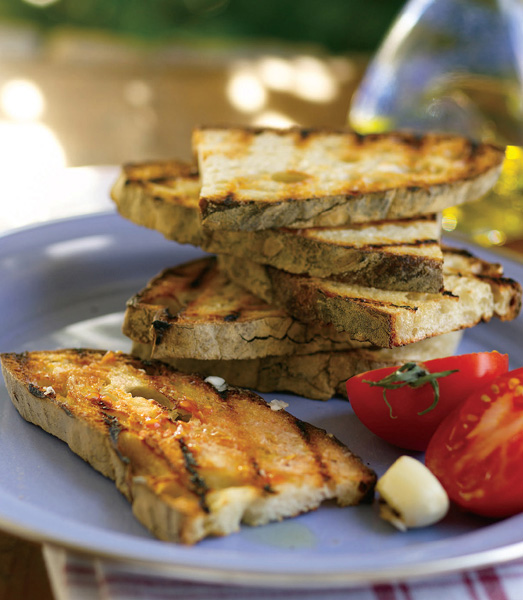
A slice of grilled bread rubbed with garlic and drizzled with olive oil—bruschetta (pronounced broo-SKEH-ta)—is the ancestor of American garlic bread. Most of us have grown up with baked or toasted versions, but real bruschetta, cooked over coals, comes as a revelation. To be strictly authentic, you’d use Tuscan bread, which is remarkable for its dense, slightly crumbly texture and its curious lack of salt. This makes the bread taste rather insipid—until you pair it with fruity Tuscan olive oil and a generous sprinkling of sea salt.
Bruschetta offers a remarkable contrast of flavors: the intense, granular saltiness of the topping, the fruiti-ness of the olive oil, the fragrance of the garlic (which is mellowed by warming), and the scent of smoke. Oh, sure, there are fancier versions of bruschetta, but none can rival the elemental flavor of this one. Note that there is no need to soak the wood chips. Unsoaked, the chips will give the bruschetta more of a wood flavor than a smoky flavor. Use them with a charcoal grill only.
SPECIAL EQUIPMENT
1 cup unsoaked wood chips, preferably oak (charcoal grill only; optional)
INGREDIENTS
8 slices of Italian bread (preferably unsalted Tuscan bread), cut ½ inch thick
1 to 2 cloves garlic, cut in half
2 to 3 tablespoons of the best cold-pressed extra-virgin olive oil you can find, preferably Tuscan
Coarse salt (kosher or sea) and freshly ground black pepper
1. Set up the grill for direct griling and preheat to medium-high.
2. When ready to cook, throw a cupful of unsoaked wood chips on the coals (if using). Arrange the bread slices on the hot grate and grill until nicely browned on both sides, 2 to 4 minutes per side, rotating the slices 60 degrees after 30 seconds or so to create an attractive crosshatch of grill marks. Don’t take your eyes off the grill for a second; grilled bread burns very easily.
3. Transfer the bread slices to the cool edge of the grill or to a platter. Rub the top of each bread slice generously with cut garlic. Drizzle olive oil over the bread and generously sprinkle salt and pepper on top. Serve at once.
My first meal in Barcelona—at the venerable Los Caracoles restaurant in the medieval quarter—began with this simple bread appetizer, and scarcely a day went by when I wasn’t served some variation of it. Catalan Tomato Bread belongs to an ancient family of grilled breads that includes Italian bruschetta and Indian naan. It offers irrefutable proof that the best dishes are often the easiest.
At its most rudimentary, pa amb tomàquet consists simply of a slice of grilled bread rubbed with ripe tomatoes and drizzled with olive oil. Like all simple dishes, it requires the best raw materials: crusty country-style bread; squish-ily ripe tomatoes; fragrant, cold-pressed olive oil. When prepared properly, the bread will be crisp from grilling, but the surface will be just beginning to soften thanks to the juices from the tomatoes. Not everyone in Catalonia uses garlic, so I’ve made it optional.
There are two ways to serve tomato bread. The first is for the cook to do the rubbing and drizzling. The second is to set out a cruet of olive oil and a bowl of salt, provide each person with a clove of garlic and half a tomato, and let him or her do the work. The second way is more fun.
4 very ripe tomatoes, cut in half
4 cloves garlic (optional), cut in half
8 slices country-style bread, cut ½ inch thick
Cruet of extra-virgin olive oil
Small bowl of coarse (kosher or sea) salt
Freshly ground black pepper (optional)
1. Place a half tomato and half garlic clove (if using) on each serving plate.
2. Set up the grill for direct griling and preheat to medium-high.
3. When ready to cook, arrange the bread slices on the hot grate and grill until nicely browned, 2 to 4 minutes per side.
Don’t take your eyes off the grill for a second; grilled bread burns very easily.
4. Place a piece of grilled bread on each plate. Serve immediately. To eat, rub a bread slice with the cut side of the garlic (if using), then with the cut side of the tomato. Drizzle olive oil over each slice and sprinkle salt and pepper, if desired, on top.
It’s hard to imagine a time when we didn’t eat focaccia. In the last decade this puffy Italian flat bread has jumped from the ethnic fringe to the culinary mainstream. Focaccia is a very ancient bread; its name comes from the Latin word focus, meaning hearth. There is archeological evidence that the first focacce were baked right in or on the embers on hearthstones heated by coals. That set me thinking about cooking the dough directly on the grill. This will make a thinner focaccia than the deep-dish pizza thickness you may be accustomed to—it’s almost like a cracker.
ADVANCE PREPARATION
1 to 2 hours for the dough to rise
FOR THE DOUGH
1 envelope active dry yeast
1 cup warm water
1½ teaspoons sugar
3 tablespoons extra-virgin olive oil
1½ teaspoons table salt
3¼ cups unbleached all-purpose flour, plus more for dusting
¼ cup fine cornmeal, for dusting
TO FINISH THE FOCACCIA
3 tablespoons sesame seeds
1 tablespoon coarse salt (kosher or sea)
3 to 4 tablespoons extra-virgin olive oil, for brushing
CATALAN TOMATO BREAD | PREVIOUS
1. Combine the yeast with the warm water and sugar in a large bowl and let stand until foamy, about 10 minutes. Stir in 2 tablespoons of olive oil, the table salt, and 3 cups of flour. You want a dough that comes away from the side of the bowl; add more flour if necessary.
2. Knead the dough until smooth and elastic either by hand on a floured work surface, in a food processor, or in a mixer fitted with the dough hook. The dough should be soft and pliable, but not sticky; add more flour, if necessary. It should take 6 to 8 minutes to knead.
3. Use some of the remaining tablespoon of olive oil to oil a large bowl. Place the dough in the bowl, brush the top with the remaining olive oil, cover it loosely with plastic wrap, and let rise in a warm, draft-free spot until doubled in bulk, 1 to 2 hours.
4. Punch down the dough and roll it into a cylinder about 2 inches in diameter. Cut the cylinder into 8 equal pieces. Roll each piece of dough into a ball and keep covered with a damp kitchen towel.
5. When you are ready to roll out the focacce, set up the grill for direct grilling and preheat to high.
6. Lightly dust the work surface and rolling pin with flour. Roll out the balls one at a time (keeping the others covered) to form circles 6 inches in diameter and ¼ inch thick. Lightly dust the circles with cornmeal and stack them on a plate with a piece of plastic wrap or waxed paper in between. For the best results, finish rolling out the breads not more than 15 minutes before you plan to cook them.
7. When ready to cook, combine the sesame seeds and coarse salt in a small bowl. Lightly brush the top of each focaccia with some olive oil and sprinkle some of the sesame mixture on top.
8. Place the focacce a few at a time, oiled side down, on the hot grate. Brush the tops with more olive oil and sprinkle more of the sesame mixture over them. Cook the focacce until nicely browned and blistered, 2 to 4 minutes per side, turning with tongs. Don’t take your eyes off the grill for a second; grilled bread burns very easily. Repeat with the remaining focacce and serve.
This recipe takes me down memory lane, specifically to a restaurant that helped launch the dining revolution in Boston, a romantic, innovative restaurant run by a visionary chef named Bruce Frankel. Although Panache in Central Square, Cambridge, Massachusetts, closed its doors more than a decade ago, and although Frankel has turned his talents to the Internet, my generation of Boston foodies will forever remember Panache with fondness. Bruce used to serve this wonderful grilled bread with goat cheese as an appetizer.
ADVANCE PREPARATION
1½ to 2½ hours for the dough to rise
INGREDIENTS
½ envelope active dry yeast (1¼ teaspoons)
1 tablespoon molasses
⅔ cup warm water
1½ cups unbleached all-purpose flour, plus more for dusting
¾ cup whole-wheat flour
3 tablespoons cornmeal, plus more for dusting
½ teaspoon coarse salt (kosher or sea), plus more for sprinkling
3 tablespoons extra-virgin olive oil
1 tablespoon fresh thyme leaves
Coarsely ground black pepper
1. Combine the yeast with the molasses and 2 tablespoons of the warm water in a large bowl and let stand until foamy, 5 to 10 minutes. Stir in the remaining warm water, 1½ cups of all-purpose flour, the whole-wheat flour, 3 tablespoons of cornmeal, and ½ teaspoon of salt to form a dough that is soft and pliable, but not sticky. Knead the dough until smooth and elastic either by hand on a floured work surface, in a food processor, or a mixer fitted with a dough hook; add more all-purpose flour, if the dough is too sticky to work with. It should take 6 to 8 minutes.
2. Use about 1½ teaspoons of the olive oil to lightly oil a large bowl. Place the dough in the bowl, brush the top with another 1½ teaspoons of olive oil, cover it with a dampened kitchen towel, and let rise in a warm, draft-free spot until doubled in bulk, 1 to 2 hours. Punch the dough down, cover it again, and let rise until doubled in bulk again, about 30 minutes.
3. Punch the dough down and divide it into 6 equal pieces. Roll each piece into a ball and keep covered with a damp kitchen towel.
4. When you are ready to roll out the bread, set up the grill for direct grilling and preheat to high.
5. Lightly dust the work surface and rolling pin with flour. Roll out the balls one at a time (keeping the others covered) to form circles 5 inches in diameter and ⅛ inch thick. Lightly dust the circles with cornmeal and stack them on a plate with a piece of plastic wrap or waxed paper in between.
6. When ready to cook, brush the breads with the remaining 2 tablespoons of olive oil and place them, a few at a time, on the hot grate. Grill, turning once with tongs, until puffed and golden brown, 2 to 4 minutes per side. Don’t take your eyes off the grill. Sprinkle the breads with the thyme leaves and pepper to taste. Serve at once.
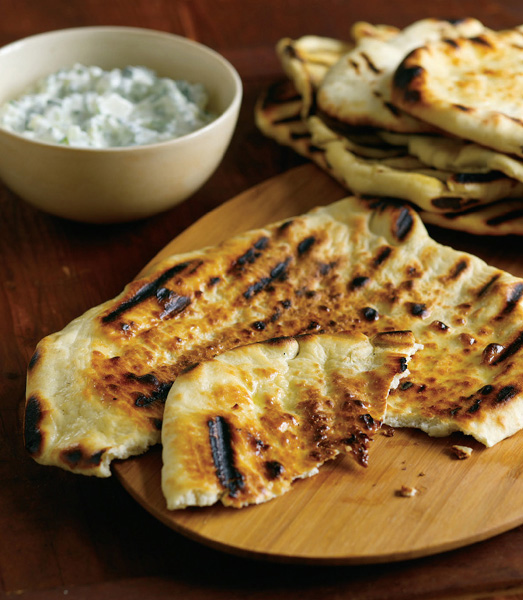
Flat breads were the first food cooked in a tandoor (Indian oven) and for me they remain the best—especially, the light, buttery, yeasted bread known as naan. The traditional way to cook naan is on the walls of the tandoor. Virtually every residential neighborhood in northern India has a bakery (more like an open-air stall), where barefoot bakers roll and bake naan to order.
The procedure is simple enough. When you order naan, the baker takes a soft white ball of dough and rolls it into a flat bread. A few slaps from hand to hand stretch the bread into its traditional teardrop shape. The baker presses the bread onto the wall of a hot tandoor using a pillowlike holder called a gaddi (literally throne). The gaddi protects the baker’s hand—a must when you consider that the temperature of the tandoor can reach 700°F. The bread emerges from the oven puffed and blistered on top and crisp and brown on the bottom. It’s sweet and smoky, pliable and moist, and about as delicious as bread gets.
Most of us don’t have tandoors, but good results can be obtained with an American-style barbecue grill. Over the years I’ve experimented with various techniques, including placing a baking stone in the grill. The best results come with cooking the naan directly on the grate over the flames.
ADVANCE PREPARATION
1½ to 2 hours for the dough to rise
INGREDIENTS
1 envelope active dry yeast
5 tablespoons sugar
1 cup warm water
1 large egg, beaten
3 tablespoons milk
2 teaspoons salt
4½ to 5 cups unbleached all-purpose flour, plus additional for dusting and rolling
1 tablespoon vegetable oil
4 tablespoons (½ stick) unsalted butter, melted
1. Combine the yeast, 1 tablespoon of the sugar, and ¼ cup of the warm water in a large bowl and let stand until foamy, 5 to 10 minutes. Stir in the remaining 4 tablespoons of sugar, ¾ cup of warm water, and the egg, milk, and salt. Add 4 cups of the flour and stir to form a dough that is soft and pliable, but not sticky. Knead the dough until smooth and elastic either by hand on a floured work surface, in a food processor, or in a mixer fitted with a dough hook; add more flour, if the dough is too sticky to work with. It should take 6 to 8 minutes.
2. Use 1½ teaspoons of the oil to lightly oil a large bowl. Place the dough in the bowl, brush the top with the remaining 1½ teaspoons of oil, cover it with a clean kitchen towel, and let rise in a warm, draft-free spot until doubled in bulk, 1 to 1½ hours. Punch down the dough and pinch off 2-inch pieces. Roll them between your palms into smooth balls. You should have 14 to 16 balls. Place the balls on a lightly floured baking sheet and cover with a lightly dampened clean kitchen towel. Let rise again until puffy, about 30 minutes.
3. Set up the grill for direct grilling and preheat to high.
4. When ready to cook, place a rolling pin, cutting board, bowl of flour, and the melted butter near the grill. (This is incredibly theatrical; your guests will be amazed.) Lightly flour the cutting board, then roll out a dough ball on it to form a disk about 5 inches in diameter. Gently slap the disk from one hand to the other to stretch it into an elongated 7- to 8-inch circle. (The motion is rather like the “patty cake, patty cake” motion in the nursery rhyme.) Stretch the circle into a traditional teardrop shape and immediately place it on the hot grate.
5. Cook the naan until the bottom is crusty and browned and the top is puffed and blistered, 2 to 4 minutes. Brush the naan with butter, turn it over, and grill the other side until lightly browned, 2 to 4 minutes. Don’t take your eyes off the grill; naan burns quickly. Prepare the remaining naan the same way. Brush each naan with more butter as it comes off the grill and serve while piping hot. Serve whole, or cut each naan into 3 wedges to serve the traditional way.
Crisp, spicy, and wafer-thin, papadoms are Indian flat breads made from lentil flour and spices. You’ve probably had them if you’ve eaten at an Indian restaurant, for papadoms are served as both an hors d’oeuvre and with the main course. They usually come deep-fried at Indian restaurants in North America, an admittedly tasty but greasy preparation, but in India papadoms are often cooked on the lid of a tandoor oven or over direct flames to produce audibly crisp wafers without a drop of added fat.
Papadoms are commonly sold in boxes, canned, or frozen at Indian markets and specialty food shops. (They’re one of the few commercially prepared foods consumed widely in India.) Here’s how papadoms are served on Bombay’s Khau Galli, a kaleidoscopically colorful street of food stalls near the Zaveri market.
8 papadoms
1. Set up the grill for direct grilling and preheat to high.
2. When ready to cook, place a few papadoms on the hot grill grate. Cook until the bottoms begin to brown and blister, 20 to 40 seconds. Turn the papadoms with tongs and cook the other side the same way. Don’t take your eyes off the grill; papadoms burn quickly. Repeat with the remaining papadoms. Serve at once.
Festivals—deep-fried breads—are the traditional accompaniment to Jamaican jerk chicken or pork. The following were inspired by a jerk joint in Boston Beach called Sufferer’s. (The name is certainly appropriate when you stop to consider how many Scotch bonnet chiles go into a single batch of jerk!) For a more dramatic presentation, I like to braid the dough into twists, but you can roll it out and fry it in the traditional cigar shapes.
2 cups unbleached all-purpose flour
¼ cup cornmeal
3 tablespoons sugar
1 teaspoon salt
5 tablespoons unsalted butter, chilled
¾ cup evaporated milk, or more as needed
2 cups peanut oil for frying, or more as needed
1. Combine the flour, cornmeal, sugar, baking powder, and salt in a large mixing bowl. Using two knives, cut in the butter. Alternatively, mix the ingredients in a food processor fitted with a chopping blade. The mixture should feel crumbly, like sand. Add enough evaporated milk to obtain a stiff but pliable dough. Stir just to mix.
2. Pinch off walnut-size pieces of dough and roll them between your palms to make long thin ropes. You should have about 24, each one about 10 inches long and ¼ inch thick. Fold the ropes in half and twist them together.
3. Place the peanut oil in a deep-fat fryer or large, deep skillet. Heat over medium-high heat until it reaches 350°F on a deep-frying thermometer.
4. Gently and carefully lower the festivals into the hot oil and fry, turning with a slotted spoon, until golden brown, 2 to 4 minutes in all. Transfer the festivals to paper towels to drain and serve while still hot.