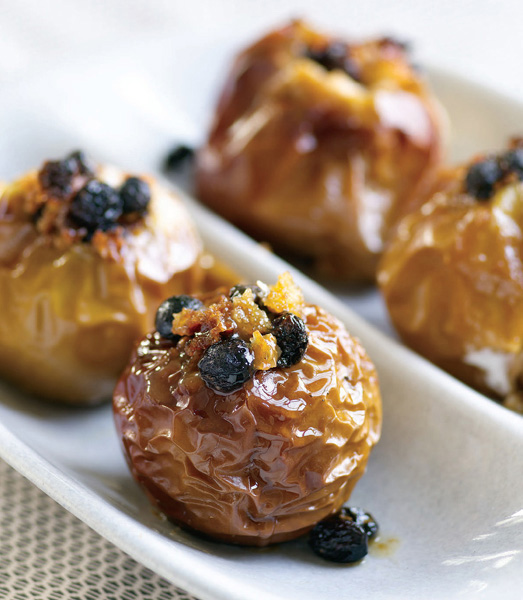
FIRE-ROASTED APPLES | FOLLOWING
Some say the world will end in fire, some say in ice,” wrote the poet Robert Frost. I hold that a barbecue should end with both.
Just because you’ve finished the main course doesn’t mean you should turn off your grill. This truth is not lost on the Bangkok banana vendor, who bastes his fruit with coconut milk and chars it over coconut charcoal. Nor is it lost on the French pâtissier, who uses a blowtorch to caramelize the top of his crème brûlée. The high heat of a fire does wonders for caramelizing sugar, helping it acquire an extraordinary depth of flavor. Here you’ll find recipes for crema catalana, grilled pineapples, grilled bananas, an updated version of s’mores, and other fire-charred desserts.
As for ice, well, many people (myself included) would argue that no barbecue is complete without ice cream. Next to beer, there’s nothing like it for refreshing a grill jockey who has been tending a blazing fire. The iced desserts in this chapter range from kulfi (Indian ice milk) to faluda (a Persian rose water and noodle sherbet) to a freshly made coconut ice cream that comes from Guadeloupe.
Once you master the concept of indirect grilling, you can grill pretty much anything you once baked in the oven. Even baked apples. But why would you bother? Well, smoke has a natural tie to sugar, a fact that is apparent in such classic sugar-cured foods as smoked salmon, turkey, and ham. It also seems to bring out the autumnal sweetness of apples, which here are stuffed with a luscious filling of brown sugar and graham cracker crumbs before hitting the grill.
SPECIAL EQUIPMENT
1 cup wood chips, preferably apple or maple, soaked for 1 hour in apple cider or cold water to cover and drained
8 firm, sweet apples, such as Cortlands or Galas
6 tablespoons (¾ stick) unsalted butter, at room temperature
¼ cup firmly packed dark brown sugar
¼ cup dried currants
¼ cup graham cracker crumbs, toasted bread crumbs, or ground almonds
½ teaspoon ground cinnamon
¼ teaspoon freshly grated nutmeg
1 teaspoon vanilla extract
4 marshmallows, cut in half (optional)
1. Lightly grease an aluminum-foil roasting pan. Core the apples, using an apple corer or melon baller, but don’t cut all the way through the bottom; the idea is to create a cavity for stuffing.
2. Cream the butter and brown sugar in a medium-size bowl until light and fluffy. Beat in the currants, graham cracker crumbs, cinnamon, nutmeg, and vanilla. Spoon the brown sugar mixture into the apples, dividing it evenly among them. Place a marshmallow half (if using) on top of each apple. Place the apples in the prepared roasting pan.
3. Set up the grill for indirect grilling. No drip pan is necessary for this recipe.
If using a gas grill, place all of the wood chips in the smoker box and preheat the grill to high; when smoke appears, reduce the heat to medium.
If using a charcoal grill, preheat it to medium.
4. When ready to cook, if using a charcoal grill, toss all of the wood chips on the coals. Place the pan of apples in the center of the hot grate, away from the heat, and cover the grill. Cook the apples until soft, 40 minutes to 1 hour. Check the apples after 40 minutes and, if the marshmallows start to brown too much, cover the apples with a piece of aluminum foil. Serve the apples at once.
I like to think of this recipe as a Balinese banana split. Imagine a sugar-crusted, smokily grilled banana served with a silken caramel sauce flavored with coconut milk, lemongrass, and palm sugar (palm sugar is a malty sweetener made from palm sap; it’s similar in flavor to light brown sugar). You can serve the grilled bananas in a bowl simply topped with this luscious, offbeat sauce or, if you prefer, with the ice cream I’ve made optional in this recipe.
The Balinese prepare this dish with finger bananas, sweet fruit about the size of your forefinger. I’ve called for regular bananas, but if you can find finger bananas or apple bananas (which have a tart, apple-y flavor), by all means use them instead. Choose bananas that are ripe, but not too soft.
FOR THE CARAMEL SAUCE
⅔ cup palm sugar or firmly packed light brown sugar
2 cups coconut milk, canned or homemade (page 522)
1 cinnamon stick (3 inches)
1 stalk lemongrass, trimmed and lightly flattened with the side of a cleaver
2 teaspoons cornstarch
FOR THE BANANAS
6 firm, ripe bananas (each about 6 inches long)
1 cup coconut milk, canned or homemade (page 522)
1 cup granulated sugar
1 quart vanilla ice cream (optional), for serving
1. Make the caramel sauce: Place the palm sugar in a large, deep, heavy saucepan (preferably nonstick) and melt it over medium heat, stirring constantly with a wooden spoon, 2 to 3 minutes. Continue cooking the sugar until it begins to caramelize (turn brown), 3 to 5 minutes longer. You’re looking for a rich brown color, but not the dark brown of chocolate. Do not overcook the sugar or it will burn and the sauce will be bitter.
2. Immediately remove the pan from the heat and stir in the 2 cups of coconut milk (be careful, it will sputter and hiss). Return the pan to the heat and bring the coconut milk to a boil, stirring until the sugar dissolves. Stir in the cinnamon stick and lemongrass. Reduce the heat and let the caramel sauce simmer, uncovered, until thick and richly flavored, about 10 minutes, stirring from time to time to prevent scorching.
3. Dissolve the cornstarch in 1 tablespoon of water, then stir it into the caramel sauce. Let simmer for 1 minute; the caramel sauce will thicken even more. Transfer the caramel sauce to a bowl and let cool to room temperature. Using tongs, remove and discard the cinnamon stick and lemongrass. Refrigerate the caramel sauce, covered, until cold.
4. Prepare the bananas: Peel the bananas and cut them into quarters on the diagonal. Place the 1 cup of coconut milk and the granulated sugar in separate shallow bowls at grillside.
5. Set up the grill for direct grilling and preheat to high.
6. When ready to cook, brush and oil the grill grate. Dip the pieces of banana first in the coconut milk, then in the sugar, and place them on the hot grate. Grill the bananas, turning with tongs, until they are nicely browned all over, 6 to 8 minutes in all.
7. To serve, arrange the grilled banana pieces on plates or in bowls. If serving the bananas with ice cream, place scoops of it in bowls and arrange the bananas on top. Spoon the caramel sauce over the bananas and serve at once.
Americans don’t customarily grill fruit, but elsewhere in the world—especially in Southeast Asia—bananas and other fruits are often charred over glowing coals for dessert. Pineapples taste particularly good grilled; the charred flavor meshes nicely with the caramelized sweetness of the fruit. When buying pineapple, go for the gold: Look for fruit with a golden rind. It will be juicier and sweeter than the usual green-rind pineapples.
1 ripe pineapple
¾ cup sugar
1 teaspoon grated lime zest
1 teaspoon ground cinnamon
⅛ teaspoon ground cloves
6 tablespoons (¾ stick) unsalted butter, melted
½ cup dark rum (optional), for flambéing
1. Cut the leafy top off the pineapple, then cut off the rind. Slice the fruit into 8 or 10 even rounds. Using a pineapple corer or paring knife, remove the core from each round.
2. Place the sugar in a shallow bowl and stir in the lime zest, cinnamon, and cloves.
3. Set up the grill for direct grilling and preheat to high.
4. When ready to cook, brush and oil the grill grate. Brush each slice of pineapple on both sides with the melted butter. Dip the pineapple in the sugar mixture, shaking off the excess. Arrange the pineapple slices on the hot grate and grill, turning with tongs, until browned and sizzling, 4 to 6 minutes per side.
5. Transfer the pineapple to plates or platter, arranging the slices in an overlapping fashion. If using the rum, warm it in a small flameproof saucepan on one side of the grill; do not let it boil. Remove the rum from the heat and then, working very carefully, light a long match and use it to ignite the rum. Carefully pour the flaming rum over the pineapple and serve at once.
One of Raichlen’s rules of the grill states that if something tastes good raw, baked, fried, or sautéed, it probably tastes even better grilled—for example, that classic American dessert the banana split. Grilling caramelizes the sugars in the bananas, imparting a smoky, candylike flavor, which is reinforced by a maple syrup basting sauce.
There are two ways to approach this dessert. You can grill and marinate the bananas ahead and serve the banana splits “ice cream parlor style” (cold). This allows you to make the dessert in advance. Or, you can grill the bananas just before serving, in which case you get a hot-cold dessert with a double dose of drama. Either version will give you a banana split that’s unlike any you’ve likely ever tasted.
1 cup maple syrup
½ cup dark rum
¼ cup sugar
½ teaspoon ground cinnamon
¼ teaspoon freshly grated nutmeg
4 bananas (see Notes), peeled
Coconut Ice Cream (page 522), or 1 quart good store-bought coconut ice cream, mounded in 4 shallow dessert bowls
Sweetened Whipped Cream (recipe follows)
¼ cup shredded coconut, toasted (see below)
2 tablespoons chopped macadamia nuts, toasted (see box, page 113)
1. Combine the maple syrup, rum, sugar, cinnamon, and nutmeg in a large bowl and whisk until the sugar dissolves.
2. Set up the grill for direct grilling and preheat to high.
3. When ready to cook, brush and oil the grill grate. Brush the bananas all over with some of the maple syrup mixture. Arrange the bananas on the hot grate and grill, turning with tongs, until nicely browned all over, 6 to 8 minutes in all, basting them with more of the maple syrup mixture (save about half of the maple syrup mixture for serving).
4. Transfer the grilled bananas to a cutting board and slice each in half sharply on the diagonal. Arrange 2 banana halves on top of each bowl of ice cream and spoon the remaining maple syrup mixture over them. Spoon the whipped cream over the bananas and sprinkle the toasted coconut and macadamia nuts on top. Serve the banana splits at once (see Notes).
NOTES: Select bananas that are ripe, or almost ripe, but still a little firm.
To serve the banana splits cold, stir the hot bananas into the remaining maple syrup mixture and let the bananas cool to room temperature. Then, cover the bananas and let marinate in the refrigerator for 3 hours before assembling the banana splits.
Are you willing to go the extra mile? Made from scratch whipped cream is much superior to the stuff in an aerosol can and it’s easy to whip up, too. The trick is to chill the bowl and beaters first—place them in the freezer for thirty minutes. This reduces the risk of the whipped cream separating.
1 cup heavy (whipping) cream
3 tablespoons confectioners’ sugar
½ teaspoon vanilla extract
1. Place the cream in a chilled large bowl and beat it with an electric mixer, first on slow speed, then medium speed, then high, until soft peaks form, about 5 minutes.
2. Add the confectioners’ sugar and vanilla and continue beating until the cream is thick and stiff, about 2 minutes longer. Do not overbeat the cream or it will separate. The cream is best used within 30 minutes of whipping.
Anyone who ever attended camp or a Boy or Girl Scout cookout will remember s’mores. To make them you sandwiched freshly roasted marshmallows between graham crackers and chocolate candy bars. The marshmallows melted the chocolate, which got all over your face and fingers. The overall effect was so tasty, you cried out for “s’more” (some more). Here’s a s’more for grownups, made with chocolate chip cookies and superpremium chocolate.
SPECIAL EQUIPMENT
1 long metal skewer for each person
INGREDIENTS
8 large marshmallows
8 thin squares (each 2 inches) premium dark chocolate
16 chocolate chip cookies, preferably homemade
1. Skewer the marshmallows and set them aside, one per skewer.
2. Set up the grill for direct grilling and preheat to high.
3. When ready to cook, if you are using a charcoal grill carefully remove the grill grate. Roast the marshmallows over the glowing embers or as close to as possible, but not touching, the grate of a gas grill, until darkly browned, 2 to 4 minutes, turning the marshmallows so they roast evenly. Some people (myself included) like to set the marshmallows on fire, then blow them out.
4. Place a piece of chocolate on the bottom (the flat side) of a cookie. Ease a hot marshmallow off the skewer onto the chocolate. Place a second cookie (flat side down) on top of the marshmallow to make a sandwich. Wait a few seconds for the hot marshmallow to melt the chocolate, then eat the s’more like a sandwich. Nostalgia never tasted so good!
This is a book about live-fire cooking, so I thought it only natural to include a few variations on crème brûlée (literally burnt cream). Despite their current trendiness, these burnt sugar desserts have been around a long time. Originally, the sugar was caramelized with a fire-heated poker. Although you could caramelize the sugar by running the brûlées under the broiler, these days there’s a better method available—the kitchen blowtorch. This is my favorite way to do this—first, because it’s in keeping with the live-fire theme of this book; then, because it gives you a very hot, concentrated, and controlled flame that burns the sugar without warming the custard beneath it. On page 516 you’ll find a discussion of kitchen blowtorches.
As for the crème brûlée here, fresh ginger and lemon zest give it a haunting Asian accent that makes for a particularly refreshing summer dessert.
ADVANCE PREPARATION
At least 6 hours for chilling the custard
SPECIAL EQUIPMENT
Kitchen blowtorch (optional); 6 flameproof crème brûlée dishes or ramekins
INGREDIENTS
3 cups heavy (whipping) cream
6 slices (each ¼ inch thick) peeled fresh ginger, flattened with the side of a cleaver
6 strips lemon zest (each 2 by ½ inches), removed with a vegetable peeler
10 large egg yolks
⅓ cup granulated sugar
About ⅓ cup turbinado sugar, such as Sugar in the Raw, or additional granulated sugar
1. Combine the cream, ginger, and lemon zest in a heavy saucepan. Bring just to a boil over medium heat. Remove the cream from the heat and let cool to room temperature.
2. Preheat the oven to 300°F. Bring a large saucepan or kettle of water to a boil.
3. Combine the egg yolks and granulated sugar in a large bowl and whisk just to mix. Whisk the cooled cream into the yolk mixture. Strain this custard mixture into 6 crème brûlée dishes or ramekins. Pour boiling water to a depth of ½ inch into a roasting pan. Place the crème brûlée dishes or ramekins in the roasting pan.
4. Bake the custards until just set, 45 minutes to 1 hour. To test for doneness, gently shake a dish; the top should jiggle just a little. Remove the dishes from the roasting pan and let cool to room temperature. Cover the custards loosely with plastic wrap and refrigerate them for at least 6 hours, or overnight.
5. When ready to serve, sprinkle each of the custards with 2 to 3 teaspoons of the turbinado sugar in a thin layer. Light a kitchen blowtorch following the manufacturer’s directions. Or preheat the broiler and set the broiling rack 2 to 4 inches from the source of the heat.
6. Use the kitchen blowtorch to caramelize the tops of the custards, following the instructions below. Or arrange the crème brûlée dishes on the broiling rack and broil the custards until the tops have crusted to a rich, golden brown, about 3 minutes; watch carefully to prevent burning and shift the crème brûlées as needed to ensure even browning. Serve at once.
COOKING WITH A BLOWTORCH
OK, it may not be grilling. But it is live-fire cooking. Many chefs and pit masters use a tool that was once relegated to the workshop to lend a flame-charred taste to their food: a blowtorch. The blowtorch made its appearance in the kitchen in the 1970s when French pastry chefs began using it to brown meringues and caramelize sugar on custard desserts, like crème brûlée.
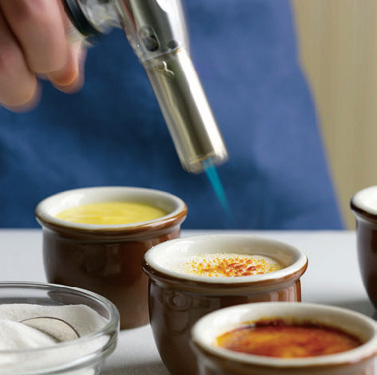
Using a blowtorch may seem a little daunting at first, but there’s nothing like it for creating a high, focused flame and sharp blast of heat. Nowadays there are blowtorches specially created for use in the kitchen. Cookware shops sell them. If you decide to use a blowtorch, keep these watchpoints in mind.
• Start with the food in a heatproof baking dish or plate. Never torch a pastry that is on a glass plate or platter.
• Place the baking dish or plate on top of a surface that is heatproof.
• Light the flame and adjust it to obtain a pointed, glowing, red-yellow cone of heat in the center of the lavender-blue flame. This cone is where the heat is concentrated. Hold the flame two to three inches above the surface of the food, moving it back and forth to ensure even browning.
• Remember that sugar and meringue will continue to cook for a few seconds after the flame has been removed. Stop torching just before you get the desired degree of doneness.
LEMON-GINGER CREME BRULEES | PAGE 515
Here’s a twist on classic crème brûlée, not to mention a “wow” dessert of the highest order—talk about drama! The custard is made with coconut milk and coconut cream and is served in a hollowed out coconut shell—an idea I got from chef Douglas Rodriguez of the restaurant Patria in New York City.
Coco Loco Brûlée isn’t really grilled, but it does involve the application of live fire in order to caramelize the sugar. I like to do it with a blowtorch, but you can use the broiler. Save the coconut water for making drinks, like Bahamian Sky Juice (see page 55).
ADVANCE PREPARATION
At least 4 hours for chilling the custard
SPECIAL EQUIPMENT
Kitchen blowtorch (optional)
INGREDIENTS
3 ripe (hard) coconuts
2 cups heavy (whipping) cream
¾ cup coconut milk, canned or homemade (page 522)
¾ cup canned sweetened coconut cream, such as Coco López
1 vanilla bean, split
2 strips lemon zest (each 2 by ½ inches), removed with a vegetable peeler
About ¾ cup sugar
8 large egg yolks
2½ tablespoons cornstarch
8 cups crushed ice
1. Cut the coconuts in half. The easiest way to do this is to hold each coconut so that the “eyes” are on top, then to tap the shell repeatedly with the back of a cleaver along an imaginary line going around the middle—its “equator.” After 10 to 20 taps, the shell will break neatly in two. Work over a bowl with a strainer to collect the coconut water, if desired, for making drinks. Blot the insides of the coconuts dry with paper towels. Place the coconut shell halves upside down on a baking dish and refrigerate them until you are ready to fill them.
2. Combine the heavy cream, coconut milk, coconut cream, vanilla bean, and lemon zest in a heavy saucepan and gradually bring to a boil over medium heat, 6 to 8 minutes. Remove the pan from the heat and let the cream mixture cool for 3 minutes.
3. Meanwhile, combine ½ cup of the sugar and the egg yolks in a medium-size heatproof bowl and whisk just to mix. Whisk in the cornstarch. Pour the cooled cream mixture into the yolk mixture in a thin stream and whisk to mix. Return this mixture to the saucepan and gradually bring to a gentle simmer over medium heat, whisking steadily. Once the custard thickens, let it simmer gently for 1 to 2 minutes. Do not let it boil rapidly or overcook or the custard will curdle. Remove the pan from the heat and let the custard cool to room temperature. Remove and discard the vanilla bean and lemon zest.
4. Make 6 doughnut-shaped rings of aluminum foil and place the coconut shell halves on top. Spoon the custard mixture into the coconut shells and smooth the tops with the back of a spoon. Refrigerate the custards for at least 4 hours, or even overnight.
5. When ready to serve, sprinkle each custard with 2 to 3 teaspoons of sugar in a thin layer. Light a kitchen blowtorch following the manufacturer’s directions. Or preheat the broiler and set the broiling rack so that the coconut shells will be 2 to 3 inches from the source of heat.
6. Arrange the custard-filled coconut shells on top of the aluminum foil rings in a roasting pan. Use the kitchen blowtorch to caramelize the tops of the custards, following the instructions on page 516. Or set the roasting pan on the broiling rack and broil the custards until the tops have crusted to a golden brown, about 3 minutes; watch carefully to prevent burning, shifting the pan as needed to ensure even browning.
7. Divide the crushed ice among 6 shallow bowls. Place a coconut shell half in each bowl and serve.
Crema catalana is Spain’s answer to crème brûlée, and a splendid answer it is. This recipe comes from the Restaurant de les 7 Portes in Barcelona, which opened its doors in 1836.
ADVANCE PREPARATION
6 hours for chilling the custards
SPECIAL EQUIPMENT
Kitchen blowtorch (optional); 6 flameproof ramekins or crème brûlée dishes
INGREDIENTS
2 cups milk
1 cup heavy (whipping) cream
6 strips fresh orange zest (each 2 by ½ inches), removed with a vegetable peeler
6 strips fresh lemon zest (each 2 by ½ inches), removed with a vegetable peeler
1 cinnamon stick (3 inches)
About 1 cup sugar
7 large egg yolks
2½ tablespoons unbleached all-purpose flour
1. Combine the milk, cream, orange and lemon zests, and cinnamon stick in a medium-size heavy saucepan and bring almost to a simmer over low heat. Let the milk mixture cook for about 10 minutes but do not allow it to boil. Let the milk mixture cool to room temperature.
2. Whisk together ¾ cup of the sugar and the egg yolks in a medium-size bowl. Whisk in the flour, then strain the cooked milk mixture into the yolk mixture in a thin stream and whisk to mix. Return this mixture to the saucepan and gradually bring to a gentle simmer over medium heat, whisking steadily. Once the mixture thickens, let it simmer gently for 1 to 2 minutes. Do not let it boil rapidly or overcook or the custard will curdle.
3. Immediately divide the custard among 6 ramekins or crème brûlée dishes. Let the custard cool to room temperature, then cover it loosely with plastic wrap and refrigerate for 6 hours.
4. When ready to serve, sprinkle each of the custards with 2 to 3 teaspoons of sugar in a thin layer. Light a kitchen blowtorch following the manufacturer’s directions. Or preheat the broiler and set the broiling rack 2 to 4 inches from the heat source.
5. Use the kitchen blowtorch to caramelize the tops of the custards, following the instructions on page 516. Or arrange the ramekins on the broiling rack and broil until the tops have crusted to a rich, golden brown, about 3 minutes; watch carefully to prevent burning, shifting the ramekins as needed to ensure even browning. Serve at once.
This thick, sweet, saucelike caramel is Argentina’s national dessert. It turns up at highfalutin restaurants and homey eateries, spooned over everything from fruit to cake to ice cream. It’s also good eaten right off the spoon. Dulce de leche (literally milk sweet) isn’t particularly difficult to make, but it does require conscientious stirring to keep the caramel from boiling over. Be comforted by the fact that it keeps for months and that a little can go a long way.
1 quart whole milk (see Note)
1⅓ cups sugar
1 vanilla bean
½ teaspoon baking soda
1. Combine the milk, sugar, vanilla bean, and baking soda in a large, heavy saucepan and bring to a boil over high heat, stirring to dissolve the sugar. Reduce the heat to medium and let the milk mixture simmer briskly, stirring often with a wooden spoon, until thick, caramel colored, and reduced by half, 30 to 40 minutes. You’ll need to adjust the heat, now up, now down, to keep the mixture at a brisk simmer without it boiling over. The traditional test for doneness is to pour a spoonful of caramel cream on a plate. When it gathers in a thick puddle and no longer runs to the edges, the caramel cream is ready. Remove the vanilla bean with tongs and discard it.
2. Transfer the caramel cream to a serving bowl and let it cool to room temperature. You can eat it now or refrigerate it, covered, if you prefer to serve it chilled.
NOTE: You must use whole milk for dulce de leche. Skim milk will burn during the reduction process.
It’s hard to imagine a meal of tandoori or kebabs without kheer, an exquisitely creamy rice pudding dessert popular in Central Asia and the Indian subcontinent. Kheer owes its exotic, perfumed fragrance to cardamom and rose water and its richness to the milk, which is boiled until reduced by almost half to concentrate its flavor.
2 quarts whole milk (see Note)
12 green cardamom pods, crushed and tied in a piece of cheesecloth
¼ cup basmati rice
½ cup sugar
¼ cup finely chopped unsalted pistachio nuts, plus 2 tablespoons for garnish
¼ cup slivered almonds
¼ cup golden raisins
Pinch of salt
1 tablespoon rose water
1. Combine the milk, cardamom, and rice in a large, heavy saucepan and bring gradually to a boil over medium high heat. Reduce the heat to medium and let simmer, stirring often with a wooden spoon, until the milk is reduced to 6 cups, about 30 minutes. Remove and discard the cardamom.
2. Stir the sugar, ¼ cup of pistachio nuts, the almonds, raisins, and salt into the reduced milk. Gently let the pudding mixture simmer, stirring often, until the rice is very soft and the pudding has thickened, about 20 minutes longer. You should have about 5½ cups in all. Stir the rose water into the rice pudding and let cook for 1 minute.
3. Remove the pan from the heat and let the pudding cool to room temperature, then spoon it into 6 bowls or wine glasses. The pudding tastes best served at room temperature or just slightly chilled. Just before serving, sprinkle the pudding with the remaining 2 tablespoons of chopped pistachio nuts.
NOTE: You must use whole milk for kheer. Skim milk will burn during the reduction process.
This lovely ice cream comes from Guadeloupe’s Pointe des Châteaux beach, where it’s churned by hand by women working under beach umbrellas or from the backs of their station wagons. For the best results, use made-from-scratch coconut milk. In a pinch you can make it with canned coconut milk (try Goya or A Taste of Thai); do not use coconut cream.
SPECIAL EQUIPMENT
Ice cream machine
INGREDIENTS
2 cups coconut milk, homemade (recipe follows) or canned
⅔ cup sugar, or more to taste
1 teaspoon vanilla extract
½ teaspoon almond extract
1 teaspoon grated lemon zest
½ teaspoon ground cinnamon
¼ teaspoon freshly grated nutmeg
1. Combine the coconut milk, sugar, vanilla extract, almond extract, lemon zest, cinnamon, and nutmeg in a medium-size bowl and whisk until the sugar dissolves. Taste for sweetness, adding more sugar if necessary.
2. Transfer the coconut mixture to an ice cream machine and freeze, following the manufacturer’s instructions.
Coconut milk is a staple on the world’s barbecue trail, used in marinades in Malaysia, sauces in Brazil, and in refreshing desserts all across the globe. You can buy reasonably good coconut milk in cans (two widely available brands are A Taste of Thai and Chaokoh), but it’s not difficult to make your own. Here’s how.
1 ripe (hard) coconut
2 cups boiling water
1. Prepare the coconut, through removing the brown skin, as directed in the box on page 114, setting aside the coconut water. Break the large pieces of coconut into 1 to 2-inch pieces.
2. Place the coconut, reserved coconut water, and boiling water in a blender and blend for 3 minutes. You may need to work in two or three batches to reduce the risk of overflow. Let the coconut mixture stand for 5 minutes, then pour it through a fine-mesh strainer or a strainer lined with several layers of dampened cheesecloth. Twist the cheesecloth tightly to extract as much milk as possible. The coconut milk can be refrigerated, covered, for up to 3 days. It can also be frozen for up to 1 month.
Grilled fare and ice cream are one of the constants of the world of barbecue. This one, kulfi, has a haunting flavor that lies midway between malt and caramel—the result of the long, slow simmering of the milk to reduce it by two thirds. To this add the exotic flavors of cardamom and pistachio nuts and you’ve got an ice cream quite unlike anything in the North American repertoire.
ADVANCE PREPARATION
2 hours for chilling the kulfi mixture
SPECIAL EQUIPMENT
Ice cream machine
INGREDIENTS
2 quarts whole milk (see Note)
6 green cardamom pods, crushed and tied in a piece of cheesecloth
½ cup sugar, or more to taste
3 tablespoons chopped pistachio nuts
3 tablespoons chopped blanched almonds
1. Combine the milk and cardamom in a large, heavy saucepan and gradually bring to a boil over medium-high heat. Reduce the heat to medium and let the milk simmer briskly, stirring it often with a wooden spoon, until reduced to 3 cups, about 1 hour. Remove and discard the cardamom.
2. Stir in the sugar, pistachio nuts, and almonds and let simmer for 3 minutes. Remove the kulfi mixture from the heat and taste for sweetening, adding more sugar if necessary. Let the kulfi mixture cool to room temperature, then transfer it to a bowl. Cover and refrigerate until cold, about 2 hours.
3. Transfer the kulfi mixture to an ice cream machine and freeze, following the manufacturer’s instructions.
NOTE: You must use whole milk for kulfi. Skim milk will burn during the reduction process.
One of the most refreshing desserts ever to grace a barbecue is faluda (aka faludeh). I first sampled it at a Persian restaurant in New York. Faluda also turns up in Afghanistan, where it is made with fresh mountain snow. It belongs to a large family of Asian frozen desserts that include Indian kulfi and Turkish sorpa (sorbet). The Persian version offers the haunting flavors of sour cherry syrup and rose water. But what really sets faluda apart is the addition of rice noodles, which creates a wonderfully exotic and unexpected texture.
Rose water and sour cherry syrup are available at Middle and Near Eastern markets. Use a thin rice noodle, like Thai rice sticks or Vietnamese rice vermicelli, for the noodles.
2 hours for chilling the rose water syrup
INGREDIENTS
⅔ cup fresh lemon juice
⅔ cup rose water
1½ cups sugar
1 skein (1 ounce) rice noodles
8 cups crushed ice
½ cup sour cherry syrup or grenadine
1. Combine the lemon juice, rose water, and sugar in a heavy saucepan and bring to a boil over medium-high heat. Let boil, stirring constantly, until the sugar dissolves and the mixture is syrupy, about 5 minutes. Remove the pan from the heat and let the syrup cool to room temperature, then cover and refrigerate it until cold, about 2 hours.
2. Meanwhile, soak the rice noodles in cold water to cover for 20 minutes.
3. Bring 4 cups of water to a boil in a large saucepan. Drain the noodles in a colander and cook them in the boiling water until soft, 3 to 5 minutes. Drain the noodles in a colander, rinse them under cold running water until cool, and drain again. Using kitchen shears, cut the noodles into 1-inch pieces.
4. Working in batches, combine the crushed ice and chilled rose water syrup in a blender and process to an icy puree. Transfer the rose water mixture to a bowl and stir in the rice noodles. Spoon the rose water and noodle mixture into 8 wine glasses. Drizzle a tablespoon of sour cherry syrup over each faluda and serve at once (see Note).
NOTE: You can make the faluda ahead and freeze it in paper cups. To serve, let the faluda warm for 5 to 10 minutes, then crush it by gently squeezing the side of the cups with your fingers to loosen up the ice crystals. Transfer the faluda to wine glasses and drizzle the cherry syrup on top.
Across between a milk shake and a dessert, this refreshing cooler is sold at street stalls and markets throughout Southeast Asia. Sweetened condensed milk is the dairy product of choice here because it will not spoil in the tropical heat. Feel free to vary the fruits.
3 cups seeded, diced watermelon
3 cups diced fresh strawberries, plus 6 small whole strawberries, for garnish
2 ripe bananas, peeled and diced
⅓ cup fresh lime juice, or more to taste
⅓ cup sugar, or more to taste
⅓ cup sweetened condensed milk
6 cups crushed ice
Working in batches, combine the watermelon, diced strawberries, bananas, lime juice, sugar, condensed milk, and ice in a blender and blend until smooth. Taste for flavoring, adding more lime juice and/or sugar as necessary. Serve the coolers at once in 6 tall glasses garnished with the whole strawberries and straws.
Part beverage and part fruit salad, this cool, syrupy dish is served as a refresher at the end of a Korean meal. I’ve had it made with everything from dried persimmons to jujubes (a type of date); the ingredients are really limited only by your imagination. I like a mixture of hard fruits, like Asian pears or apples; soft fruit, like bananas or melon; and berries, like strawberries or blueberries.
3 cups mixed diced or sliced fresh fruit
¾ cup sugar
4 slices peeled fresh ginger (each ¼ inch thick), flattened with a cleaver
3 strips lemon zest (each 2 by ½ inches), removed with a vegetable peeler
2 cinnamon sticks (each 3 inches)
2 tablespoons pine nuts, lightly toasted (see box, page 113)
1. Toss the fruit with ¼ cup of the sugar in a serving bowl and let stand for 15 minutes.
2. Meanwhile, combine the remaining ½ cup sugar, the ginger, lemon zest, cinnamon sticks, and 4 cups of water in a saucepan and bring to a boil over high heat. Reduce the heat and let simmer until well flavored and lightly syrupy, about 5 minutes. Remove the pan from the heat and let the syrup cool completely.
3. Strain the syrup over the fruit and stir gently to mix. Sprinkle the pine nuts on top and serve at once. I like to serve the punch in glass bowls or brandy snifters. It’s perfectly acceptable to raise the bowl to your lips to sip the syrup.
