AirDefense Mobile [23]
AirDefense Mobile is a commercial wireless network analysis and intrusion detection tool produced by AirDefense, Inc. that is designed to provide portable, powerful, and easy-to-understand network traffic analysis. Their mobile product provides most of the same strong intrusion detection and network management capabilities as their enterprise distributed products. AirDefense Mobile has a very powerful automated network analysis feature set, but it is often better suited to monitoring the network environment in one location as apposed to operations like wardriving. Even with this drawback, AirDefense Mobile can provide a level of automated analysis of wireless traffic that few tools can match.
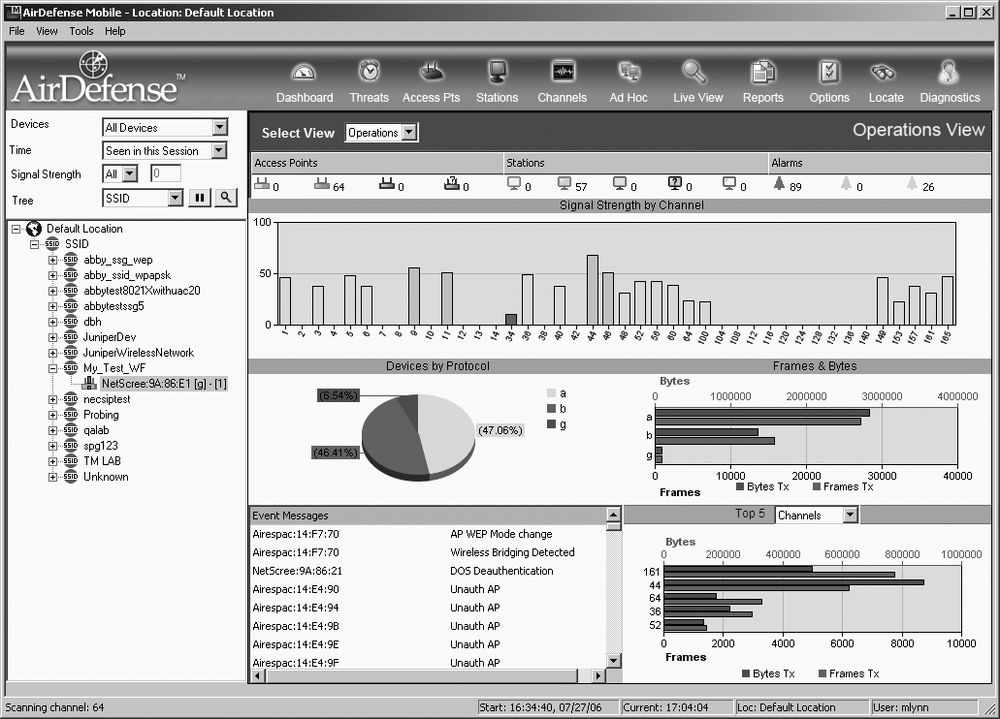
Figure 5-11 shows the basic dashboard interface. The dashboard interface of AirDefense Mobile is designed to give you a 5,000-foot view of the network, which can be invaluable for managing busy air space in an enterprise environment. For the purposes of wireless reconnaissance, the most useful aspect of the dashboard is the signal strength by channel graph. This can give a fast indication of which channels have traffic on them. Once you know which channels to look for traffic on, you can adjust the channel scanning options to get a faster overall scan.
On the lefthand side of the dashboard is a tree listing of the discovered networks. This listing defaults to be sorted by protocol. You can change the sorting options by selecting the desired sorting and filtering options from the menu directly above the network tree. For the purpose of wireless reconnaissance, you might want to start by sorting by SSID.
Warning
One thing you might find annoying while using this is that the channel scan options are set for a very slow scan. This is good when you can spend a lot of time in one place because you get a more detailed view of the network. However, this can get in the way if you are trying to quickly get a picture of the networks around you. To increase the scan rate, go to Options → Channel Settings and decrease the amount of time spent on each channel.
As you change the sorting mode, the dashboard automatically is replaced with the discovered access points' windows. This listing gives you a display similar to the one that Netstumbler or Kismet provides you with.
As you begin to discover networks, you'll want to find out more detailed info on them. The AirDefense Mobile engine gathers a good deal of information on each network it sees. To get detailed information for a given access point, click on it in the network tree window. To the right you will see a window called Access Point Detail View. In this window, you see a variety of graphs and statistics, mostly designed to help you manage a network, but some are useful for general network reconnaissance. At the top of the window is a list of configuration options discovered for the selected access point. At the bottom of this window is a list of associated clients on that network. You can get more detail on any associated station by right-clicking on it and choosing Details.
Warning
You cannot expand AirDefense Mobile to full screen on displays with better than 1024 × 768 resolution. This makes reading some things bothersome because you are constantly scrolling the window left and right.
Often a wireless network leaks network traffic intended only for the wire out onto the radio waves. This is usually broadcast traffic on the wired network, and it can give us an insight into the wired network that would not usually be accessible. Whenever AirDefense Mobile detects a wired device, it displays it with a grey icon. This can be interesting to know because it gives you a peek at the wired network, even if we cannot connect to it directly yet. This extra bit of information can sometimes be used to trick ARP poison wired hosts into thinking their default router is the access point. The end result of this would be that an attack could see some wired traffic over the air.
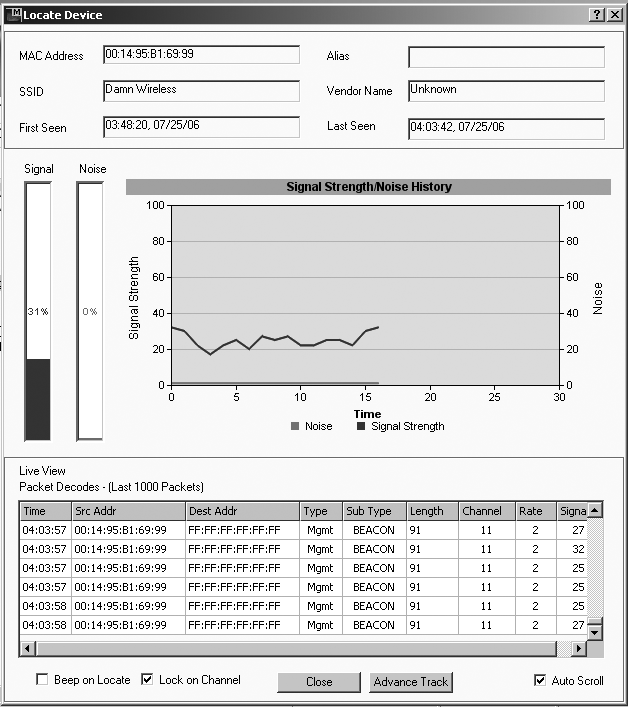
AirDefense Mobile supports two methods of tracking a device. The first uses a sophisticated triangulation algorithm that takes into account the dimensions of the walls in your building as well as signal strength readings from multiple locations to give you a real-time location of a given device. This system is clearly the more advanced of the two, but it is of little use to us while we are doing reconnaissance because it assumes we have a floor map of the building that the device is in. It is mostly used for network administrators to quickly track down a rogue device on their network. The second is similar to the ones used by programs such as Airmagnet, which use signal strength to give you an indication of whether you are getting warmer or colder in your search. This method is of interest to you because it requires no prior knowledge of the building layout where the target device is. To enable this mode, right-click on the target device anywhere it appears in the user interface and select Locate. Figure 5-12 shows the resulting interface.
Live view mode allows you to see what a particular network or even a single device is doing in real time. This lets you inspect the type of traffic that a device is sending at that moment. It is similar in use to the Kismet packet type window and can be useful for diagnosing problems with networks. To enable this mode, right-click on a device from the network tree on the left side of the screen and chose LiveView. Alternatively you can enter live view mode listening to all devices by selecting Tools → Live View from the drop-down menu.
Tip
A useful feature supported by AirDefense Mobile is the ability to beep whenever a new device is detected. This feature is similar to the ability supported by Kismet, and it lets you use this tool more safely while wardriving. To enable beeping on detection of a new device, select File → Beep on New Device from the drop-down menu.
AirDefense Mobile supports creating a configurable number of packet captures of configurable sizes based on the traffic it discovers. It even allows you to configure rolling capture files so you can better manage your disk usage. To enable packet capture, click on the options icon and chose Packet Capture in the lefthand window. This displays a window with a checkbox called Packet Capture; this is disabled by default, so you need to enable it the first time you want to use this option. Once this is enabled, you can choose Tools → Start Packet Capture To Disk from the drop-down menu. Table 5-7 contains a summary of the pros and cons of AirDefense Mobile.
Table 5-7. Pro and con analysis of AirDefense Mobile
Pros | Cons |
|---|---|
Excellent auto analysis | Not free |
Good deep inspection | Closed source |
Graphical interface | Not ideally suited to wardriving |
Windows support | No GPS support |
Packet logging | Limited wireless card support |
SSID decloaking | |
Excellent IDS features | |
Location tracking with triangulation | |
Excellent troubleshooting diagnostics | |
Active client termination |
[23] I was a founding employee of AirDefense, Inc. I wrote a considerable portion of AirDefense Mobile's core engine, and while I no longer work for AirDefense, Inc., I remain a shareholder.

