Internet Connection Sharing (ICS) debuted in Windows 98 and allows several machines on a LAN to share a single PC's dial-up-networking (DUN) connection through a simplistic NAT. It provides a rudimentary DHCP server and some access controls over which PCs can access the ICS; but otherwise, it is quite featureless.
Windows XP included the Internet Connection Firewall (ICF), which was disabled by default. When activated, ICF works by blocking all connections to the host, then allowing pinhole permits on inbound connections to specific services on specific hosts. With Windows XP Service Pack 2, ICF was turned on by default, given its own applet on the control panel, and renamed Windows Firewall.
Microsoft has (rightfully so) received a lot of guff over its lack of security. They are trying, however, and Windows Firewall shows these efforts. It does the right thing with being an implicit-deny/explicit-permit firewall. And it nags you with pop-ups from the system tray when an interface is not secured.
But it's clear it still could use some improvement. Windows Firewall supports blocking inbound connections, but does nothing for outbound connections such as rootkits, spyware, and phone-home backdoors. Microsoft recommends you do not activate Windows Firewall unless the interface is directly connected to the Internet—if you have some sort of other firewall, they suggest you disable Windows Firewall and rely on the external firewall for protection. They also say that Windows Firewall does not work with some ISP's Point-to-Point Protocol over Ethernet (PPPoE) drivers and suggest disabling it in those cases.
I personally keep Windows Firewall activated on all interfaces at all times unless I'm specifically doing something that requires it to be disabled—any protection, even as limited as Windows Firewall, is better than no protection at all.
Windows Firewall comes free with Windows XP, and if you have updated to Service Pack 2, it is probably already active. To verify your Windows Firewall status with Service Pack 2, open the Windows Firewall properties from the Control Panel. This controls the global settings. The General tab appears first and makes it visually very clear which setting you have the firewall set to. In order to make changes to the Windows Firewall configuration, you must be logged in with an account that has Administrator privileges on the box.
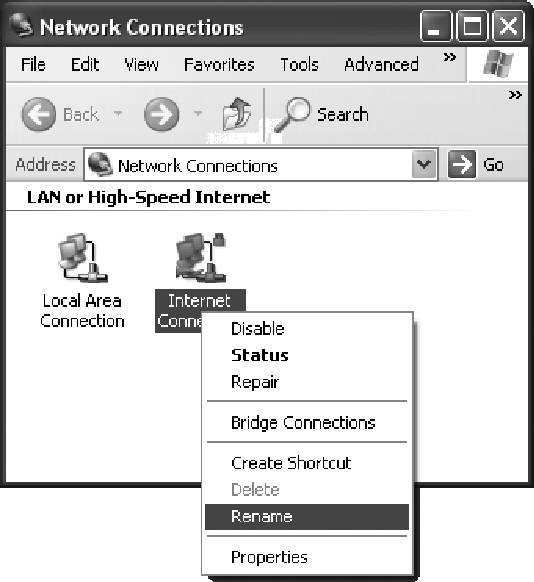
One handy thing you can do with Windows is name your interfaces. I have configured a Windows XP Service Pack 2 system with two interfaces: one connected to the Internet, and one connected to my local LAN. I renamed the Internet-facing interface Internet Connection to help me keep track of which interface is which. To name the interfaces, open the Network Connections, right-click the interface to change and select Rename, or slowly double-click on the interface name and it changes to edit mode and allows you to make changes. Check out Figure 13-2 for details.
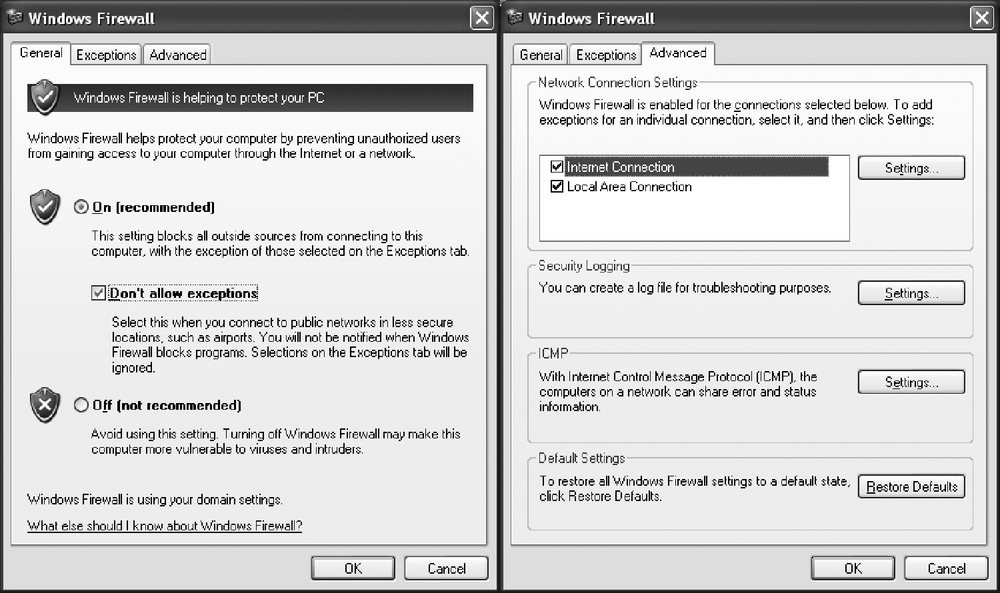
To activate Windows Firewall, use the Window Firewall Control Panel applet. Under the General tab, click the On radio button. For maximum security, also select the "Don't allow exceptions" option (exceptions are covered in the next section). Ensure your interfaces are also Windows Firewall-enabled by verifying they are checked in the Advanced tab. Once these settings are set, click OK to activate Windows Firewall—it's just that easy. A locked-down Windows XP SP2 system looks like Figure 13-3.
This section covers the "Don't allow exceptions" checkbox. Windows Firewall is an Implicit Deny/Explicit Permit firewall. That is, if it is active on an interface and you do not explicitly specify a permit, it is implicitly denied by default. This is actually a good security model. Let's permit Remote Desktop Protocol (RDP) so we can access this system remotely.
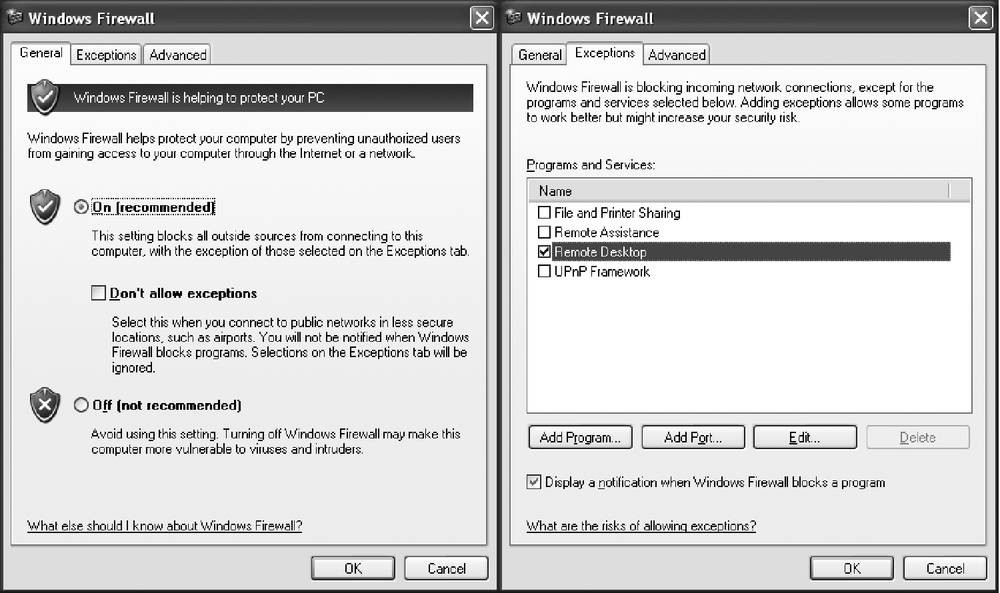
Start by following the instructions for locking down the box. Proceed to the General tab and uncheck the "Don't allow exceptions" option. Select the Exceptions tab and select which local services you wish to allow outside access to. The setup should look similar to Figure 13-4.
Windows supports port filtering by TCP/UDP port descriptions and by application. When an application attempts to open a port on an interface with Windows Firewall enabled, a pop-up informs you that Windows is blocking access to this listener unless you say otherwise. This can be turned off by unchecking the "Display a notification when Windows Firewall blocks a program" checkbox, but this is a pretty useful feature, so leave it on. Windows automatically makes a new entry for any program it detects creating a listener port. You can then go to the Exceptions tab and turn these ports on and off as you like. Note that you do not need to enable File and Printer Sharing in order to look at other systems' shares, only to share your own resources.
Windows Firewall does allow inbound connections to be filtered by host, but it is a bit of a kludge. The IP filtering is called a Scope in Windows Firewall, and it is configurable on a by-port or by-process basis.
To filter incoming connections, first follow the instructions for allowing inbound connections to specific services. Then go to the Exceptions tab and select the exception rule to which you would like to add host filtering and click Edit. Now change the scope of this permit.
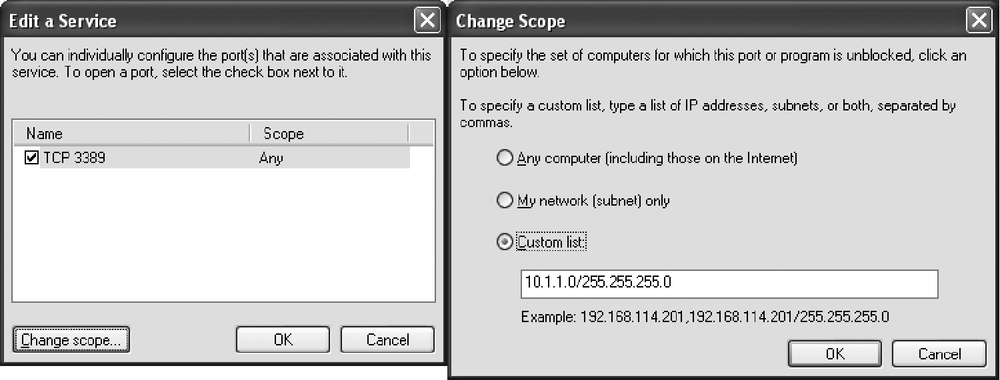
Assuming you have followed the previous instructions for allowing RDP, this now continues where those instructions left off. After clicking the checkbox next to Remote Desktop to enable RDP in the Exceptions tab, ensure Remote Desktop is highlighted, and click the Edit button to display the "Edit a Service" window. In that window, click the "Change scope" button to display the Change Scope window.
The Change Scope window has a radio button that allows you to select from three options: "Any," "My network," or a "Custom list." While you could select Any and be done, let's practice adding it manually. Type the subnet IP address (e.g., 10.1.1.0) followed by a forward slash and the subnet mask (e.g., a standard class C of 255.255.255.0, which selects all computers with a 10.1.1.x IP address). See Figure 13-5 for an example.
To finish, click OK to close the Change Scope window and then click OK in the "Edit a Service" window. RDP is now locked down to just those IP addresses.
Windows Firewall uses Internet Connection Sharing to provide NAT services to other hosts on the local subnet. Activate ICS by opening the properties windows of the Internet-facing connection and proceeding to the Advanced tab. In order for ICS to work, there must be two interfaces: the public Internet outside interface and the private network inside interface. The public interface can be a modem or an Ethernet interface connected to a broadband router.
First, follow the steps for locking down an interface for the outside interface. Then make sure that the inside interface is completely firewall-free—other Windows systems can use Universal Plug and Play (UPnP) to discover your gateway and need the UPnP port open.
To activate ICS on the gateway system, open the properties window for the Internet-facing interface from Network Connections and go to the Advanced tab again. Click "Allow other network users to connect through this computer's Internet connection." Also, uncheck "Allow other network users to control or disable the Internet connection." If this option is checked, anyone on the network that connects through you using Simple Service Discovery Protocol (SSDP, a UPnP protocol) can use Internet Gateway Device Discovery and Control Client (IGDCC) to shut down your Internet interface.
If the inside interface was set to DHCP, it is automatically changed to a static IP with an address of 192.168.0.1/24; otherwise, it is left as is. A simple DHCP server is started on the inside interface that provides IP addresses to other systems on the local subnet. At this point, the sharing system acts as a NAT router—packets sent to it destined for other IP addresses are NAT'd to the Internet interface and routed out.
Tip
Windows Internet Connection Sharing does not work with systems associated with an NT Domain. For domain-level connection sharing, Microsoft wants you to buy their ISA server for ˜$1,500 (Standard Edition) to ˜$5,500 (Enterprise Edition). If you need to use a domain, but do not want to buy an ISA server, just install Linux or BSD on an old clunker box and follow the steps in those sections for a cheaper NAT solution.
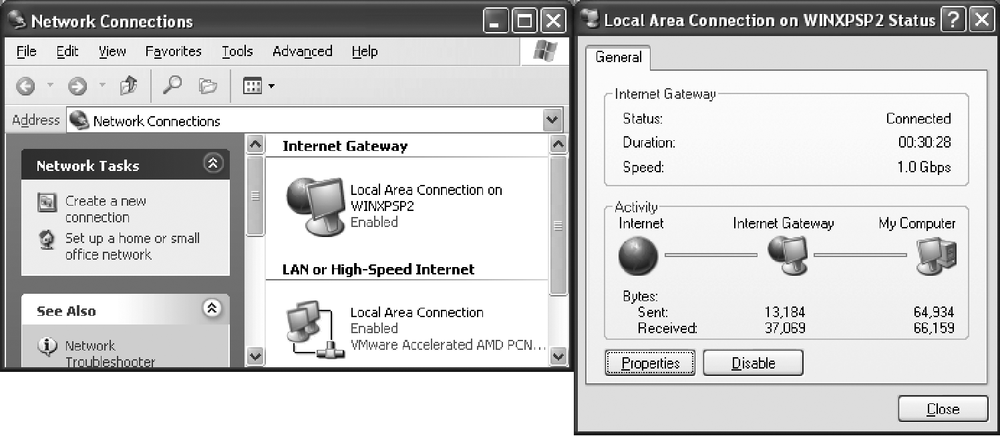
As mentioned earlier, other Windows XP systems can also use UPnP to discover the ICS gateway. If discovered, a new connection appears in Network Connections showing an Internet Gateway object. You can obtain status information on the sharing computer's Internet connection by right-clicking the gateway and selecting Status. See Figure 13-6 for details.
To add static inbound port mappings to a Windows system using ICS, first follow the steps to get it set up. Next, you are going to add a new service to your host, but with a twist. Open the Windows Firewall Control Panel and select the Advanced tab. Select your outside interface from the Network Connection Settings area and click the Settings button next to it. This displays all the configured services that are allowed to connect to this interface. If ICS is properly configured, you have firewalled this outside interface and all services should be unchecked.
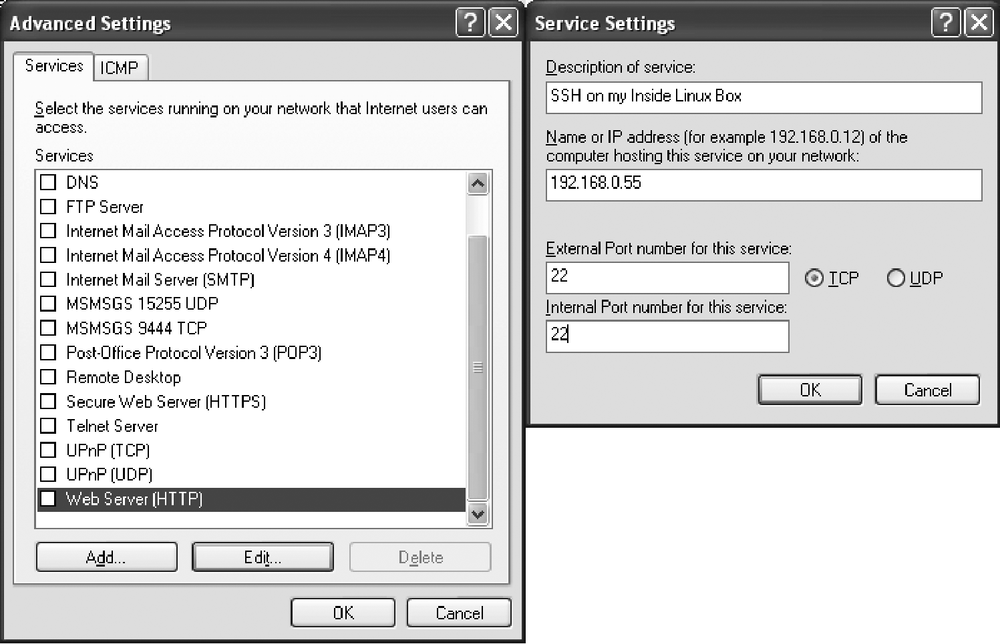
If you want to permit a service that is already listed in the display, select it and click the Edit button. This displays the Service Settings window. If you are using a predefined service, the only option that is editable is the name or IP address of the inside host serving this protocol. Simply type in the IP of the inside host and click OK. To enable access from the outside, click to place a checkmark next to this service.
If you are creating a new service, click the Add button. The Service Settings window appears as before, only all fields are unlocked for editing. Give the service a description, then fill out the details as appropriate: the Name or IP address is the IP address of the internal system hosting the service, the External Port is the port accessed by outsiders, and the Internal Port is the port on which the internal host is servicing this protocol. If you try to create a new service for the same External Port as an existing service, you are told you cannot create the new port. See Figure 13-7 for an illustration of these windows.
