Puppy Love Pillow
Place this pillow on the bed (where all puppies like to be anyway) for a little fun decor.

Skill Level
Confident Beginner
Specifications
Pillow Size: 12" × 12", excluding legs, head and tail
Materials
• Small piece pink tonal
• 1 fat quarter gray tonal
• ½ yard gray print
• 1 (12½") square cotton batting plus scraps
• 1 (12") pillow form
• 2 (⅝") black buttons
• 1 (⅝") pink button
• Fusible web with paper release
• Template material
• Thread
• Basic sewing tools and supplies
Here’s a Tip
To make your own pillow form, simply sew two 12½" squares of prewashed and pressed muslin or light-colored fabric together, leaving an opening for turning. Turn right side out and stuff with cotton or polyester fiberfill until the pillow is the firmness you prefer; stitch the opening closed.
Project Notes
Read all instructions before beginning this project.
Stitch right sides together using a ¼" seam allowance unless otherwise specified.
Refer to General Instructions for specific construction tips and techniques.
Materials and cutting lists assume 40" of usable fabric width for yardage and 20" for fat quarter.
Cutting
From gray tonal:
• Cut 2 (2" × 20") strips.
Subcut strips into 4 (2" × 7") C strips.
From gray print:
• Cut 1 (12½" by fabric width) strip.
Subcut strip into 1 (12½") A square and 2 (9" × 12½") B rectangles.
Assembling the Pillow
Refer to the Placement Diagram and project photo for positioning of pieces and stitching lines.
1. Prepare appliqué template using Heart pattern provided on the insert for this pillow.
2. Trace appliqué shape onto paper side of fusible web referring to information below for number to trace and cut out. Apply shapes to wrong side of fabric as stated below:
• Pink tonal: 5 hearts
3. Cut out appliqué shapes and remove paper backing. Referring to Figure 1, arrange the five hearts on A, no closer to the edge of A than 1¼". Fuse appliqués in place.

Figure 1
4. Baste the batting square to the wrong side of the fused A square.
5. Machine blanket-stitch around each heart using matching thread to complete the pillow front.
6. Prepare templates using patterns listed and provided on the insert for this pillow: Dog Head, Dog Ear, Dog Tail and Dog Paw.
• Gray tonal: 2 dog heads
7. Referring to Padded Appliqué, use gray tonal and batting scraps to make one tail and two ears. Topstitch ¼" from curved edges on each.
8. Referring to Figure 2, position an ear on right side of one head piece with raw edges at the upper edge of head where indicated on the pattern; baste in place.

Figure 2
9. Pin head with ears and remaining head piece right sides together with ears tucked inside. Sew around head with a ¼" seam allowance, leaving an opening at bottom edge where indicated on pattern. Clip curves and turn right side out. Turn opening edges in; slip-stitch closed. Press and topstitch all around ¼" from edge. Stitch a double line for the nose/mouth line referring to the Placement Diagram for positioning.
10. Referring to Padded Appliqué, use gray tonal and batting scraps to make two paws, cutting a slash in one layer of each for turning as indicated on the pattern.
11. To make legs, place two C strips right sides together and pin to a batting scrap. Sew the long edges and one short edge together, trim corners and turn right side out. Press and topstitch ¼" from long edges. Repeat to make the second leg.
12. Place a paw at the seamed end of each leg. Attach by double-stitching two lines on each paw as indicated on the pattern and as shown in Figure 3.
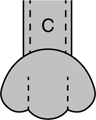
Figure 3
13. Referring to Figure 4, place tail on pillow front ¾" down from top right corner with raw edges matching. Place legs on pillow front with raw edges matching, 2" in from bottom corners. Baste tail and legs in place.
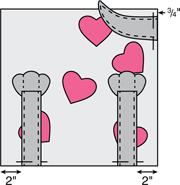
Figure 4
14. Press and stitch a ¼" double hem on one long side of each B rectangle as shown in Figure 5a. Place pillow front right side up and position one B rectangle at the top, right side down, matching top raw edges. Place second B rectangle at the bottom edge, right side down, matching raw edges and overlapping the first B rectangle. Stitch all around with a ¼" seam allowance (Figure 5b). Turn right side out through the overlapped opening and pull the tail and legs out.
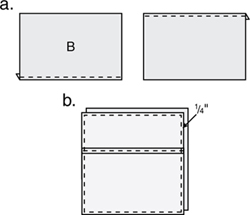
Figure 5
15. Position the head at the top left corner of the pillow so that the button eyes and nose that are to be added will overlap the pillow front. Sew the pink button to the face for a nose, going through the button and the pillow front only. Repeat with the black buttons for the eyes.
16. Insert the pillow form into the pillowcase to finish. ![]()
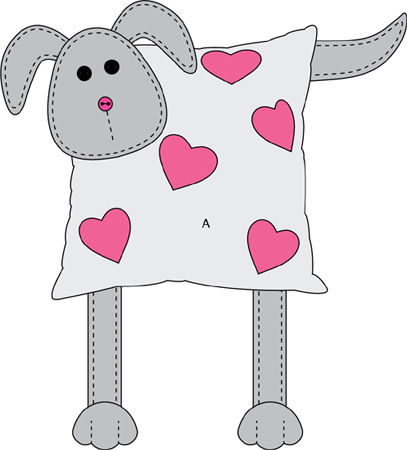
Puppy Love Pillow
Placement Diagram 12" × 12"
excluding legs, head & tail