Cat Chow Place Mat & Coaster Set
This place mat set will not only protect and decorate your dining table, it will also remind you to feed the cat. (As if the cat would let you forget!) The cat on the place mat is pieced and sports a big bow tie and a tail. The coaster has the same smiling face with pointy dimensional ears.

Skill Level
Confident Beginner
Specifications
Place Mat Size: 15" × 12"
Coaster Size: 4" × 4"
Materials
Materials listed make two sets.
• Small piece red-with-white dots
• ½ yard red tonal
• ⅞ yard newspaper print
• 1 yard cotton batting
• 12 (7/16") black buttons
• 2 (⅜") white buttons
• Thread
• Basic sewing tools and supplies
Project Notes
Read all instructions before beginning this project.
Stitch right sides together using a ¼" seam allowance unless otherwise specified.
Refer to General Instructions for specific construction tips and techniques.
Materials and cutting lists assume 40" of usable fabric width.
Cutting
From red-with-white dots:
• Cut 2 (4" × 5½") H rectangles.
From red tonal:
• Cut 1 (4½" by fabric width) strip.
Subcut strip into 1 (4½" × 12") cat tails rectangle, 4 (4½") G squares and 4 (1¾") D squares.
• Cut 1 (4" by fabric width) strip.
Subcut strip into 2 (4" × 10½") E rectangles and 2 (2" × 8") F strips.
• Cut 1 (5" by fabric width) strip.
Subcut strip into 1 (5" × 10") rectangle for cat ears.
From newspaper print:
• Cut 2 (12½" by fabric width) strips.
Subcut strips into 2 each 10½" × 12½" A rectangles, 2"-wide × 7"-tall B strips, 2½"-tall × 4"-wide C rectangles and 12½" × 15½" backing rectangles.
From batting:
• Cut 2 (12½" × 15½") rectangles for place mats.
• Cut 4 (4½") squares for coasters.
• Cut 1 (4½" × 6") rectangle for place mat cat tails.
• Cut 1 (5") square for coaster cat ears.
Assembling the Place Mats
Refer to the Placement Diagram and project photo for positioning of pieces and stitching lines.
1. Referring to Padded Appliqué and Figure 1, make two tails using the cat tail pattern provided on the insert for this project, the 4½" × 12" red tonal rectangle and the 4½" × 6" batting rectangle. After turning right side out and pressing, topstitch ¼" from curved edges.

Figure 1
2. Draw a diagonal line from corner to corner on the wrong side of the D squares.
3. Place a D square on the bottom corners of a C rectangle, right sides facing, and stitch on the drawn lines as shown in Figure 2a. Trim seams to ¼" (Figure 2b). Flip triangles and press to make a C-D unit.
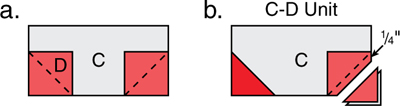
Figure 2
4. Referring to Figure 3, sew a C-D unit to one short end of an E rectangle to make a C-D-E unit; press.

Figure 3
5. Place a B strip right sides together on one end of an F strip and stitch from the corner of F to the corner of B as shown in Figure 4a. Trim seam to ¼" (Figure 4b). Flip open and press.

Figure 4
6. Referring to Figure 5, trim end of F so the total length of B-F strip is 12½".
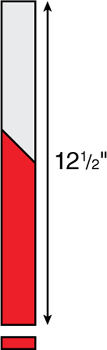
Figure 5
7. Stitch A rectangle to the left side and B-F strip to the right side of the C-D-E unit to complete the place mat top; press.
8. Position a tail on the right edge of the place mat top ⅜" above the bottom edge with the open end even with the edge of the place mat as shown in Figure 6. Baste in place.

Figure 6
9. Place a backing rectangle right sides together on the place mat top and pin to a batting rectangle. Sew all around, leaving a 4" opening in the bottom edge. Trim the corners and turn right side out through the opening, pulling the tail out to the side. Fold in the seam allowance of the opening and slip-stitch the opening closed.
10. Topstitch all around ¼" from the edge. Quilt by stitching in the ditch around the cat sections and 4½" up the center of the cat body to mark the legs. Double-stitch the whiskers and mouth using black thread and the cat face quilting pattern given on the insert. Quilt the remainder of the place mat as desired.
Here’s a Tip
One tool I have found useful when marking things like these cat faces for quilting is a centering ruler. It has a zero in the middle and numbers going out in both directions to make it easy to find the center of a space. You can usually find them where art or drafting supplies are sold.
11. Sew two black buttons on cat face for eyes and one for a nose.
12. To make the bow tie, fold the H rectangle in half to measure 4" × 2¾". Sew the raw edges together, leaving a 2" opening for turning as shown in Figure 7. Trim the corners and turn right side out. Fold in the seam allowance of the opening and slip-stitch closed. Press.
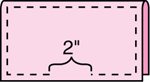
Figure 7
13. Referring to Figure 8 and using doubled thread, sew a gathering stitch up the center of the bow tie. Pull thread to gather the bow tie; knot thread and wrap it around the center a few times. Using the same thread, sew the white button to the front and then sew to the cat’s neck to complete the place mat.

Figure 8
14. Repeat steps 3–13 to make a second place mat.

Cat Chow Place Mat
Placement Diagram 15" × 12"
Assembling the Coasters
Refer to the Placement Diagram and project photo for positioning of pieces and stitching lines.

1. Referring to Padded Appliqué and Figure 9, make four ears using the cat ear pattern provided on the insert for this project, the 5" × 10" red tonal rectangle and the 5" batting square. After turning right side out and pressing, topstitch ¼" from angled edges.

Figure 9
2. Referring to Figure 10, pin two ears to one side of a G square, ⅝" from each corner with raw edges aligned, reversing one ear. Baste to hold.

Figure 10
3. Place a second G square over the one with ears attached, right sides facing and pin to two stacked 4½" batting squares. Sew all around, leaving a 2½" opening in the bottom edge. Trim corners and turn right side out through the opening, pulling the ears out at the top edge. Fold in the seam allowance of the opening and slip-stitch closed. Press.
4. Topstitch all around ¼" from edges.
5. Double-stitch the whiskers and mouth using black thread and the cat face quilting pattern given on the insert.
6. Sew two buttons to the face for eyes and one for a nose to complete one coaster.
7. Repeat steps 2–6 to complete a second coaster. ![]()

Cat Chow Coaster
Placement Diagram 4" × 4"
Padded Appliqué
Some of the projects are finished with a “padded” appliqué. In this technique, an appliqué piece is sewn with two layers of fabric and a layer of batting and then turned right side out through an opening. Padded appliqué gives dimensional interest to a project. Refer to Quilting Basics on for details about preparing templates from patterns.
1. Prepare template using pattern provided and trace the shape on the wrong side of the selected fabric. Fold the fabric in half with the right sides facing and the traced shape on top.
2. Pin this fabric to a scrap of batting that is slightly larger than traced shape and then sew on the traced lines as shown in Figure A.

Figure A
3. The instructions will tell you whether you should leave a side opening for turning in the seam allowance, or if you should sew all around and then make a slash in one layer of fabric only for turning.
4. Cut out the shape ⅛"–¼" from the seam line, clip curves generously (or use pinking shears to cut out).
5. To make a slash, pinch the top layer of fabric and pull away that layer from the other fabric layer; make a little snip in the pinched fabric. Insert scissor tips into the hole and cut the fabric just enough to turn the shape right side out (Figure B). If desired, add a little no-fray solution to the cut edges of the slash and let it dry.

Figure B
6. After turning the shape right side out through the slash or side opening, whipstitch the cut edges of slash back together as shown in Figure C or slip-stitch the side opening closed. Press the shape from the top side so it is flat and smooth at the edges.
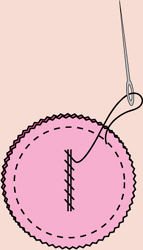
Figure C