Purrfect Day Wall Hanging
Cats don’t like to be ignored when their humans are busy at the sewing machine! This appliquéd wall hanging with a patchwork border reminds us that we need to stop and take time for our furry friends.

Skill Level
Confident Beginner
Specifications
Wall Hanging Size: 16" × 16"
Materials
• Small pieces yellow, orange, blue and green tonals
• Scraps of assorted colors and prints to coordinate with floral
• ¼ yard red floral
• ⅜ yard black-with-white dots
• ½ yard white-with-black text
• Backing to size
• Batting to size
• 2 (½") green buttons
• 1 ![]() black button
black button
• Thread
• Fusible web with paper release
• Template material
• Basic sewing tools and supplies
Project Notes
Read all instructions before beginning this project.
Stitch right sides together using a ¼" seam allowance unless otherwise specified.
Refer to General Instructions for specific construction and appliqué tips and techniques.
Materials and cutting lists assume 40" of usable fabric width.
Cutting
From assorted colors & prints:
• Cut 60 (1½") C squares.
From black-with-white dots:
• Cut 1 (3½" by fabric width) strip.
Subcut strip into 1 (3½" × 14½") B strip.
• Cut 2 (2¼" by fabric width) binding strips.
From white-with-black text:
• Cut 1 (11½" by fabric width) strip.
Subcut strip into 1 (11½" × 14½") A rectangle.
Here’s a Tip
When joining one piece that has many seams to a piece that has fewer seams, it is very important that the cutting and piecing are accurate or the pieces will not fit together. If your seam allowance is a tiny bit smaller or larger, that difference is multiplied with every seam.
Completing the Wall Hanging
1. Prepare templates using patterns listed and provided on the insert for this project: Sewing Machine, Spool, Wheel, Dial, Cat Head, Cat Ear, Cat Tail and Heart.
2. Trace appliqué shapes onto paper side of fusible web referring to list below for kind and number to trace; cut out shapes. Apply shapes to wrong side of fabrics as listed below.
• Red floral: 1 sewing machine, 5 hearts
• Green tonal: 1 spool
• Blue tonal: 1 dial
• Orange tonal: 1 wheel
• Yellow tonal: 1 cat head, 2 ears, 1 tail
3. Cut out appliqué shapes and remove paper backing.
4. Referring to Figure 1, arrange appliqués on the A rectangle with the bottom edge of the sewing machine at the bottom of the rectangle. The left edge of the machine should be about 3¼" from the left edge of A. Tuck the bottom edge of the spool under the top of the machine and slip the edge of the wheel under the edge of the machine on the right. Place the dial on the machine as shown. Position the cat head just to the left of the machine base and the tail about 2" from the head. Slip the ears under the top edge of the head. Fuse all shapes in place.
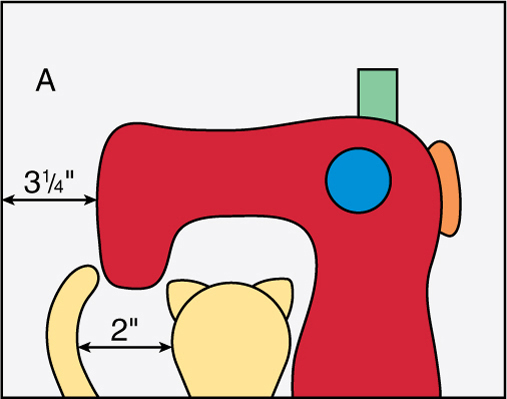
Figure 1
5. Machine blanket-stitch around each appliqué shape using matching thread.
6. Arrange the five hearts evenly spaced on B as shown in Figure 2 with a ⅝" space on each end and approximately ⅜" between hearts. Fuse in place.
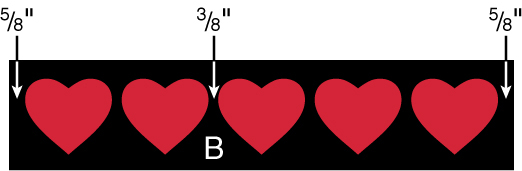
Figure 2
7. Machine blanket-stitch around each heart using matching thread.
8. Join appliquéd A and B pieces; press seam toward B.
9. Referring to Figure 3, arrange and join C squares into two rows each of 14 and 16 squares to make side and top/bottom borders; press.
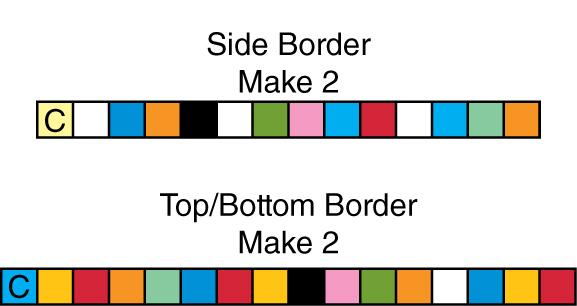
Figure 3
10. Sew borders to opposite sides and top and bottom of the appliquéd center to complete the wall hanging top.
11. Refer to instructions for Quilting Basics to layer and baste the quilt. Quilt around each appliqué. Double-stitch a black line for the needle in the sewing machine and for the cat’s whiskers and mouth. Double-stitch a green thread going from the spool, down the machine front and through the needle. Add other quilting as desired.
12. Prepare binding strips referring to instructions for Quilting Basics and bind the quilt.
13. Sew green buttons to the cat’s face for eyes and the black button for a nose. ![]()

Purrfect Day Wall Hanging
Assembly Diagram 16" × 16"